Mom’s City Chicken and Grandpa’s Water Works

Funny how this Summer has worked out. At its start, I’d planned to continue making cheese with you, sharing some seasonal recipes, posting more ice cream flavors, and sharing photos of “my girls” and their companions in the garden. Suddenly, Labor Day is here and I’ve run out of time. We’ve still not made Italian mozzarella, I’ve a couple of tomato recipes to share, and there’s still a custard-based peach ice cream to make. Oh! Mustn’t forget the cobbler. Fall will just start late this year. To further complicate my schedule, today’s post was reserved for a special pasta celebrating the US Open Tennis Championship. That was before I saw a package of veal at the market. That changed everything.

Last year, Linda posted a recipe for City Chicken on her wonderful blog, Savoring Every Bite.  At the time, I commented that I’d not thought about City Chicken in years. Mom prepared a version but it’s been some 35 years since I last tasted her City Chicken. Had Linda not shared her recipe, who knows when I would have remembered Mom’s? Anyway, after Linda’s reminder, I decided to put City Chicken on the schedule — last Summer! Well, as you know, it never made it but I had every intention of sharing Mom’s recipe this Summer — and then it again got lost. Last week, however, I saw veal cubes at the market and immediately thought of City Chicken. Since it would make a great dish for the coming holiday weekend, Mom’s City Chicken was suddenly on the schedule. Its addition pushed my special tennis pasta back a week and, well, Fall’s arrival, at least on this blog, has been delayed yet another week. By the way, don’t be surprised if Thanksgiving and Christmas are celebrated in one post this year. Hopefully, I’ll then be able to start the New Year sometime in January.

((cue the harp))

Throughout my childhood, Mom served us City Chicken almost exclusively on Wednesday or Sunday, when Dad was home to work the grill. Although I’ve already mentioned The Barbecue, I’ve not talked much of the rest of our yard. You see, the two-flat was built on a vast expanse of land, in the very center of which was the beautiful, privately owned, Lake Bartolini (pictured below, click to enlarge). While we kids frolicked, Dad was likely at The Barbecue, grilling that night’s meal, City Chicken being a family favorite. In the years following the barbecue’s construction in 1959, Grandpa would build a garage with an enclosed patio, attach a grape arbor, and plant his tomatoes on the lawn just beyond The Lake, after the first of what would become yearly land-grabs. (His tomatoes needed more land, always more land.) When The Lake was lost, the much larger and deeper Bartolini Sea, was erected and filled. As we would all come to learn, ripening beefsteak tomatoes can somehow attract errant pool toys, especially whenever Grandpa strolled through the yard. When the Sea gave way to what must have been near tectonic forces, it was replaced by the even larger and more formidable Bartolini Ocean, the last of the series.

OK, that is the official account of the Crystal Blue Waters of the Bartolini, the version you’ll see on the historical markers that dot the area. Here, for the first time anywhere, is the real story.

Grandpa wanted a garden, desperately, and even though Lake Bartolini stood in his way, he would never do anything to disappoint his adoring Grandchildren. No, not Grandpa. His was a problem that would have befuddled Solomon. You can well imagine, therefore, Grandpa’s relief the morning we kids awoke to find Lake Bartolini had been completely drained. Upon close examination, we saw that one side of  The Lake was inexplicably peppered with holes, while the most attentive among us claimed to have overheard our Parents whispering something about buckshot. Grandpa’s subsequent claim that one of us kids was to blame fell on deaf ears. Our Parents, calmly and coolly, bought and built the Bartolini Sea. With walls made of corrugated steel, the Sea glistened just to the West of the where the original Lake once stood. Grandpa got his garden and we kids had a new, buckshot-proof, Sea in which to swim. All went well until that thing about tomatoes attracting pool toys was discovered, much to Grandpa’s great displeasure.

Not but a couple of years after it’s installation, again we awoke to find that our gorgeous swimming hole, the Bartolini Sea, was but a mere puddle. On one side of the Sea, in the corrugated steel, was a gash of not quite a foot long. Bent inward, the steel pierced the Sea’s lining and flooded the yard. Depending upon which Parent asked, Grandpa said that my Youngest Cousin or I did it with the lawn mower. In our defense, I will merely point out that an old push mower was used to maintain the lawns. Even if we teamed up, together pushing that relic and with a 100 foot running start, never could we two young boys get up enough steam to create so much as a dent, let alone pierce, that steel siding. Our wise Parents, though they never determined “the how”, quickly surmised “the who” and soon thereafter we were erecting the bigger, better, and even sturdier Bartolini Ocean. It remained in our yard until it died of natural causes, some years later. Grandpa, too, remained in his garden, ensuring both he and his tomatoes never went thirsty, for years to come.  Though this marks the end of Grandpa’s Water Works, this is hardly the end of his story. Frankly, I’m just getting started.

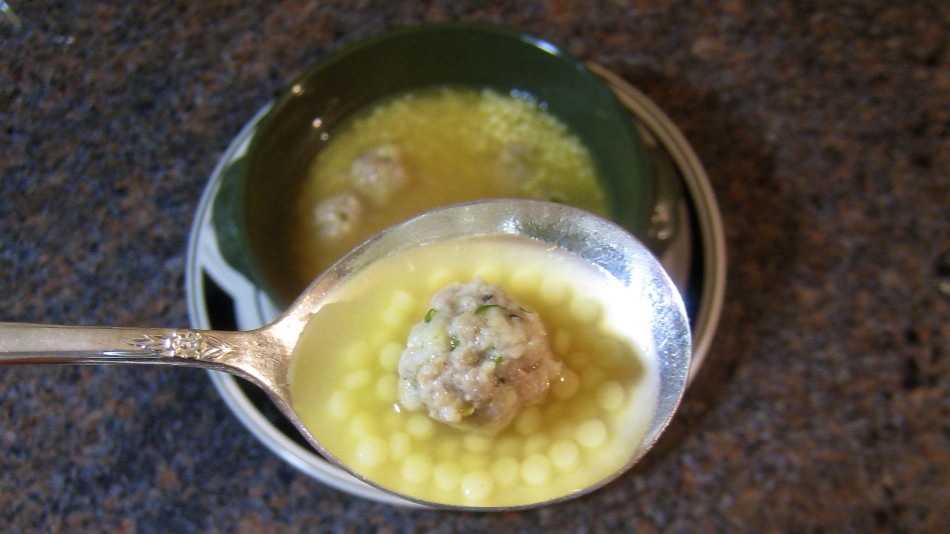
Now, back to the Present. Mom’s City Chicken couldn’t be any simpler to prepare. Equally sized cubes of veal, beef, and pork are marinated, skewered, wrapped with a rasher of bacon, and grilled. It really is that easy. I don’t give any amounts in the recipe to follow because so much will depend upon how many skewers are to be prepared. You can add, or subtract, spices to the marinade. Just be sure to make enough so that some can be reserved and later brushed on the skewers as they come off the grill. (Something I forgot to do for the photos.) Although the FDA no longer requires pork to be cooked well-done, many still prefer it cooked more than beef or veal. To accomplish this, I always place 3 pieces of meat on each skewer, pork always being the last/top one. As you’ll see in the recipe to follow, this will allow you to keep the pork closest to the fire, assuring it is cooked more than the other meats.

*     *     *

*     *     *

Mom’s City Chicken Recipe

Ingredients

  • Beef, cut into approx. 1½ inch cubes
  • Veal, cut into approx. 1½ inch cubes
  • Pork, cut into approx. 1½ inch cubes
  • Bacon, 1 rasher for every skewer
  • marinade

Marinade

  • juice and zest of one lemon
  • rosemary, chopped
  • garlic, minced or grated
  • Italian seasoning
  • olive oil
  • salt & pepper

Directions

  1. Add all the marinade ingredients to a bowl, whisk to combine, and set aside, reserving  a ¼ cup for later use. Place the meats into the bowl, mix until coated, and refrigerate for at least one hour or overnight
  2. Soak wooden skewers overnight. (This will prevent their burning during grilling.)
  3. When ready, light the grill.
  4. Using one thick skewer or 2 thin for each city chicken, pierce one end of a bacon rasher, followed by one piece of each type of meat. Be sure that the top piece of meat for each skewer is pork. After the pork is in place, wrap the meats with the bacon and secure its remaining end by piercing it with the skewer(s) tip(s).
  5. Once finished and the grill is hot, shut down part of the grill to facilitate  indirect grilling. Use a rag dipped in oil to grease the grill plate.
  6. Place the skewered meat on the grill with the pork closest to the fire/heat.
  7. Turn the meat after a few minutes, more or less depending upon the grill’s heat. The object is to cook the skewered meat without torching the bacon. The pork, being closest to the fire, will cook faster.
  8. With the meat still very rare, move the skewers directly over the fire/heat. Now the object is to crisp the bacon and to finish cooking the skewered meats. Turn the skewers occasionally to ensure even cooking.
  9. When grilled to your satisfaction, remove to a  platter, brush with reserved marinade, and serve.

*     *     *

Variations

Although Mom used all 3 meats, you needn’t if you prefer otherwise.  Use whatever meat(s) you like. The same is true for the bacon. I’m sure turkey bacon could be easily substituted.

Mom used 1 short, thick skewer for each of her City Chickens, skewers she got from her butcher. Try as I might, I’ve been unable to find them. Instead, I use 2 of the more readily available long, thin bamboo skewers. Before soaking, I trim off about 4 inches from each, making it much easier to grill them, especially if you’ve a small grill surface.

*     *     *

It’s déjà vu all over again …

Although some have already reached the end of tomato season, many of us are still harvesting the red beauties. One of my first posts featured Mom’s Tomato Antipasti that she made with Grandpa’s tomatoes. This time of year, his vines produced enough fruit to keep both families well-supplied and rarely was an evening meal prepared without tomatoes playing a role. Those who missed it the first time around  can find my post for Mom’s Tomato Antipasti by clicking HERE.

*     *     *

By any other name …

“Don Juan”

This tour of roses began on one side of my yard with “Opening Night”, a red hybrid tea rose, and ends on the opposite side of my yard with “Don Juan”, a red hybrid tea rose. (Who better to indulge my girls?)

*     *     *

It’s Mom’s Birthday and I’ve Got a Peach of an Idea!

As you may, or may not, recall, August is the birthday month for a number of people in my life, with today, August 15th, being Mom’s birthday as well as that of her Mother, Grandma Bartolini. Zia’s husband, “Uncle”, was born on the 11th  — and we’re just getting started. My Friend, one of the Kitchens’ tasters, had a birthday on the 7th, while another, my Friend the Entertainer, will be celebrating on the 20th.  And we mustn’t forget the kids. My Grand-Nephew’s birthday was the 1st, my not-quite-a-nephew Nephew will be blowing out candles on the 24th, and the Oldest of the Boys Upstairs has a birthday this Saturday, on the 18th. That’s a lot of birthdays!

So to celebrate, last August I posted 3 separate ice cream recipes that I combined for the finale. The first was taken from a recipe book that Mom gave me shortly after I moved to Chicago in 1980.

*     *     *

Pistachio Nut Ice Cream

*     *     *

Next on that month’s agenda was an ice cream based on Mom’s own chocolate recipe.

Chocolate-Chocolate Chip Hazelnut Ice Cream

*     *     *

Then came the third recipe. Again, using Mom’s recipe as a base, I created this “pretty in pink” ice cream.

Maraschino Cherry Ice Cream

*     *     *

Well, with those 3 recipes laying the ground work, I had little choice but to put them together.

Spumoni Ice Cream (It’s da Bomba!)

*     *     *

Now, having mentioned those 3 ice cream recipes and a Bombe, I might as well finish off this little round-up by sending you to the hands-down favorite ice cream recipe of all the Kitchens’ tasters, family, and friends. It may not be a frozen custard nor traditional ice cream but, I have to say, it’s damn good!  (Pssst! It’s the crumbled graham cracker crust.)

Blueberry Cheesecake Ice Cream

*     *     *

As great as that all sounds, this year I was in quite a pickle. What should I do for this year’s Birthday Month? How could I possibly top a Spumoni Bombe? Well, I can’t and won’t even try. What I will do, however, is share a recipe for an ice cream flavor that Mom loved. Yes, when it came to ice cream, Mom had a number of favorites. Frankly, I doubt that Mom ever tasted an ice cream that she didn’t like — and we haven’t even mentioned sherbet yet.

So, with that monkey off my back, I decided to take full advantage of the bounty in this area’s farmers markets. Today’s recipe will be for peach ice cream. It’s a simple recipe that results in a peachy frozen delight.  It’s Mom’s birthday, however, and “peachy” just won’t do. Directly following the recipe is a serving suggestion that Mom would have surely enjoyed. I hope you will, too.

Now, if you’ve no experience working with peaches, this paragraph is for you. In the first place, you may not be able to find fruit that are perfectly ripe, even in your farmers market. Just place the best you can find in a paper bag, place it on a counter, and check them every morning. In a couple of days, your peaches will be exactly how you like them. So, once your peaches are ripe, how do you peel them? Bring a large pot of water to boil. In the meantime, fill a large bowl with iced water. Take each peach and use a paring knife to cut a small “X” into the fruit’s bottom. Place the peaches into the rapidly boiling water and leave them there for about 30 seconds. Transfer them to the iced water bath to cool and to stop them from cooking. After a few minutes, simply peel off the skin beginning at the “X”. You may need a paring knife to trim a stubborn spot or two but, basically, that’s all there is to it.  And that’s the last of any possible problems you might run into.

*     *     *

*     *     *

Peach Ice Cream Recipe

Ingredients

  • 1½ pounds peaches — about 4 large fruit
  • ½ cup water
  • ⅔ cup sugar
  • ½ cup sour cream
  • 1 cup whipping cream
  • ¼ tsp vanilla extract
  • ⅛ tsp cinnamon
  • pinch salt

For Serving

  • 1 peach. peeled & sliced — more depending upon the number of servings
  • sugar
  • toasted chopped pecans

Directions

  1. Once the peaches are peeled, cut each into chunks, removing the pit in the process.
  2. Place the peaches and water into a non-reactive sauce pan and cook over a medium heat until the peaches are soft — about 10 minutes.
  3. Remove from heat, add the sugar, stir well, and set aside to cool.
  4. When the peach mixture has reached room temperature, place it in a food processor or blender, along with the sour cream. whipping cream, vanilla extract, cinnamon, and salt. Purée until blended but still a little chunky.
  5. Place the peaches & cream mixture into the fridge until thoroughly chilled — about 4 hours, more or less depending upon your fridge.
  6. Add the chilled peaches & cream to your ice cream machine and follow the manufacturer’s instructions to create your peach ice cream.

To Serve

Peaches are in season and we shouldn’t let this opportunity slip away. About 45 minutes before you serve your peach ice cream, peel and slice a ripe peach, more depending upon how many servings are to be prepared. Place the slices in a bowl, sprinkle with sugar, stir gently, and set aside. When ready to serve, divide the peach slices and juice among the servings of ice cream. Garnish with toasted chopped pecans.

Inspired by David Lebovitz, “The Perfect Scoop”

*     *     *

By any other name …

“Bella’Roma”

*     *     *

The Bartolini Girls’ Beet Salad

Everyone has one — or maybe two or three. A go-to recipe used when an occasion calls for you to “bring a dish.” Today’s recipe is one that Mom and my Zia often used to fulfill their potluck obligation. To be honest, I’ve no idea who first “discovered” this recipe. I remember Mom serving it for dinner during my childhood and Zia brings it to dinners to this very day. A colorful dish, this is much lighter than potato salad and is sure to be a hit among beet lovers. Even so, not all beet lovers are fans of mayonnaise. Should that be true for you, I hope you’ll find this classic video more to your liking.

*     *     *

*     *     *

When you look over the recipe, you’ll notice that the ingredients are listed without accompanying amounts. Much depends upon the number of servings required and the size of the serving dish. When all is said and done, you’ll need to create a layer of beets that is about one inch deep. Next, the amount of chopped onion depends upon how just how strong that onion is. Be sure to taste it before adding it to the salad. If it is too strong, rinse it briefly under cold running water and pat it dry using paper towels before proceeding. With that settled, you can add as much or as little mayonnaise as you prefer, and the same can be said for the chopped, hard-boiled eggs. Remember, the beets are the star of the dish; everything else is meant to compliment rather than overpower.

Oh! Before you toss those beet greens away, you may wish to checkout my blogging friend David’s recipe for creamed beet greens over on his blog, the Gastronomic Gardener.

*     *     *

*     *     *

The Bartolini Girls’ Beet Salad Recipe

Ingredients

  • Raw beets, washed with greens trimmed
  • Diced onion
  • Mayonnaise
  • Eggs, hard-boiled and chopped
  • Salt & pepper, to taste

Directions

  1. To Prepare the Beets
    1. Pre-heat oven to 400˚ F (205˚ C)
    2. Place the beets in a roasting pan or on a baking sheet. Drizzle with olive oil, season with salt, and place in the middle of the oven. Roast for 30 – 40 minutes, depending upon the size of the beets. The beets are fully roasted when a knife’s blade meets little resistance when the largest beet is pierced. Set aside to cool.
    3. Once cool enough to handle, use a paring knife to trim the beets’ tops and bottoms. Much of the skin of each bulb should slip off easily. Use a paring knife to remove the rest.
    4. Use a knife, food processor, or mandoline to dice, shred, or slice the beets. Set aside.
  2. To Assemble the Salad
    1. Place beets in a serving dish. You’ll want to create layer of about an inch deep. Season lightly with salt.
    2. Sprinkle a couple of tablespoons of diced onion on top of the beets. Use more or less depending upon the onion’s strength.
    3. Add enough mayonnaise to completely cover the ingredients.
    4. Use the chopped, hard-boiled eggs to top off the salad.
    5. Season with salt, pepper, and sweet paprika.
  3. Chill fully before serving.

*     *     *

*     *     *

Variations

Although I’ve not tried to prepare them this way, I imagine one could steam the beets instead of roasting them. And if you’re in a crunch for time, you can always substitute canned beets, although I prefer the additional flavor that roasted beets bring to the dish.

Notes

To beginner cooks: mayonnaise and hot temperatures do not mix. Serious illness can result if mayonnaise is not kept properly chilled. When serving this salad or any mayonnaise-based dish on a warm day, be sure to keep it covered and iced until the last minute before serving and then nestle the serving dish in another slightly larger one filled with ice. It must be kept chilled and when in doubt, throw it out.

*     *     *

One Long Overdue Acknowledgement

Way back in May, I was fortunate to win a give-away over at Zesty Bean Dog’s wonderful blog. My original plan was to feature my prize, an OXO salad dressing shaker, with my next post featuring a salad. Well, in retrospect and given how few salad recipes I post, I should have come up with a better plan. And even though a salad shaker isn’t used in the preparation of today’s recipe, I thought it was about the closest I’d come to posting a salad recipe for at least a few weeks. ZBD, I hope you do not feel that I don’t appreciate or do not use your gift. It has remained “in service” pretty much from Day One and is one of those few kitchen items that goes from fridge to dishwasher and back again, without ever seeing the inside of a cupboard. So, thanks again, ZBD, for a great kitchen accessory.

*     *     *

By any other name …

“Black Baccara”

*     *     *

Straw and Hay Pasta

Paglia e FienoToday’s recipe is another in a series celebrating the Spring harvest. Thus far, we’ve prepared dishes that included artichokes, asparagus, and ramps. Today, I’m going to share a recipe that comes from Lazio, Rome’s district, and that features freshly shelled peas and prosciutto in a cheese-flavored cream sauce. And if that hasn’t grabbed your attention, the pasta’s two colors surely will. This dish, you see, is named after the pasta used to make it, but calling it “Giallo e Verde”, “Yellow & Green”, would be so not Italian. As I’ve mentioned in the past, when it comes to naming pasta, the Italians have always let their imaginations run wild — and this pasta is no different. Here, it’s not yellow pasta but straw, paglia, while the green pasta is hay, fieno. Ready in minutes, Paglia e Fieno is another great tasting pasta to add to your arsenal, whether served as a primo piatto or main course.

This was a favorite of both families in the old two-flat every Spring. Unlike today, frozen foods were just beginning to appear in stores, so, making this dish meant shelling peas. I can remember helping Mom shell them —  until I grew up a little and the novelty wore off. After that, I made myself scarce when the metal colander and bag of peas appeared. Still, even once Bird’s Eye became a household name, fresh peas continued to be used to make this dish each Spring. As good as frozen peas may be, you just cannot beat the taste of fresh and if there’s one thing to be said about the best of Italian cooking, it’s that it relies upon the freshest of ingredients. To that end, my Zia and I continue to enjoy this dish every Spring and it wouldn’t be Easter at her youngest Son’s home if Paglia e Fieno isn’t served.

As mentioned earlier, this dish’s name comes from the coloring of the pasta. Green-colored noodles can be found in many groceries, some even packaged with yellow and bearing the name of  Straw & Hay. You certainly needn’t buy it if you don’t want to. Just using Mom’s pasta dough recipe as-is, or a fraction thereof, will give you the straw. To make hay — whether or not the Sun shines — add a couple of tablespoons of cooked, chopped spinach to the eggs before adding them to the flour when you make the dough. (Mom & Zia used spinach baby food to make pasta verde but spinach baby food is now only sold when combined with peas or beans. The color, as a result, isn’t as deep.) Moving away from the pasta, the thickness of the prosciutto to be used is totally up to you. For the dish pictured, I was lucky enough to be at my Greek market just as the deli was putting out a package of prosciutto end slices. At about ⅛ inch thick, these were easily chopped and, for my taste, stood up to the cream sauce very well. You can ask your deli to cut the prosciutto thicker or, if you prefer to use it thinly sliced, shred it before adding it to the pan.  Lastly, be sure to set aside some pasta water. The cream sauce can “seize up”, meaning get too dry, particularly if you’re timing is off and it is left waiting for the pasta to finish cooking. Adding a splash of pasta water can revive it, as well as later, should it seize up again once the cheese is added.

*     *     *

Paglia e Fieno

*     *     *

Paglia e Fieno Recipe

Ingredients

  • ½ lb (225g) yellow fettuccine (linguine, tagliatelle, or pappardelle may be substituted)
  • ½ lb (225g) green-colored pasta of the same type as the yellow pasta
  • 3 tbsp (45ml) butter
  • 1 tbsp (15ml) olive oil
  • 1 small onion, chopped fine
  • 3 cloves garlic, minced
  • 1 cup (236ml) heavy cream
  • 1 cup (140g) fresh peas
  • 4 to 6 oz (110 to 170g) prosciutto
  • ½ cup (60g) Pecorino Romano cheese, grated — more for serving
  • salt and pepper, to taste
  • fresh parsley, chopped — for garnish

Directions

  1. Bring a large pot of water to the boil for cooking the fettuccine. Time it so that the pasta is just shy of al dente about the time that the peas are cooked to your liking. Reserve 1 cup of the pasta water.
  2. Heat oil and butter in a large, deep frying pan over med-high heat. Add onion and sauté until translucent, about 5 to 8 minutes. Add garlic and continue to cook for another minute.
  3. Add heavy cream and simmer a few minutes until slightly reduced.
  4. Add the prosciutto and peas, stirring till well-combined.  If sauce becomes too thick, add a little pasta water to thin it.
  5. When pasta is just shy of al dente and peas are sufficiently cooked, taste to check seasoning and add the cooked pasta to the frying pan. Stir well. If necessary, add some pasta water to thin the sauce.
  6. Remove from heat, add grated cheese, mix thoroughly, and move to serving platter.
  7. Serve immediately, garnished with grated cheese, parsley, and cracked pepper.
*     *     *

Variations

This dish is just as good when prepared with pancetta, bacon, or ham in place of the prosciutto. Because they’re raw, though, be sure to saute the pancetta or bacon with the onions before adding the cream and peas. And if someone at your table doesn’t like peas, other vegetables can be substituted. Asparagus is commonly used, as are sliced crimini mushrooms. No matter what you choose to add, be sure it’s fresh and you cannot go wrong.

*     *     *

Fold, Cut, Unfurl Fettuccine Verde

*     *     *

Notes

You probably noticed that salt wasn’t added to the recipe until the end. That’s because some of the ingredients can be pretty salty in their own right. The salt content of the prosciutto — or it’s substitutes of pancetta, bacon, and ham — can vary greatly. The cheese and amount of pasta water you use can, also, add a fair amount of salt to the final dish. So, although I’ll season the dish liberally with pepper throughout its cooking, I’ll only use salt minimally, if at all, until I’ve tasted the dish at the very end. Even then, I may not add any. Again, let your own palate be your guide.

Spinach is not the only ingredient used to color pasta. I’ve used tomato paste to make pasta rosso (red), and I’m aware that beet juice can be used to make it purple, pasta viola, while squash is used to give pasta an orange hue, pasta arancione. And no discussion of pasta coloring would be complete without mentioning pasta nera which gets its black color from the ink of squid (calamari) or cuttlefish (seppia). If you find that a different color palette tickles your palate, you may wish to check out my recipe for Tricolor Risotto, which uses pesto and tomato paste to create a risotto platter that bears the colors of the Italian flag.

*     *     *

By any other name …

“Opening Night”

*     *     *

Artichokes Two Ways

Carciofi Due Modi

As I’ve mentioned to a few of you, I’ve had a devil of a time finding “baby” artichokes here in Chicago. Sure, I can get the goliaths year-round and, about this time of the year, the stores have some that are at about half that size. The truly small artichokes, however, the ones with no choke, have been impossible to find and it’s not for lack of trying. I routinely shop at 4 different groceries, 2 ethnic markets, and 2 additional fruit/vegetable markets. Whether I’m searching too late/early in the season or I’m living in a heretofore unknown baby artichoke-free zone, it’s been well over 10 years since the green beauties have graced my table — until now.

Recently, my vegetarian friend, Cynthia, and I decided to head West to the hinterlands. We’d both heard tales of an Italian market “out there” but never ventured to find out for ourselves. Not much more than a half-hour later, we were there and what a store! First off, the place was huge, easily the largest Italian market that I’ve ever seen. They had everything from antipasti to zuppe, and very often several choices for everything in between.  The best surprise, though, was found in the produce department.

There, at the end of one of the aisles, was not 1 but 2 displays of artichokes and, much to my delight, one of them was nothing but small artichokes. To say I was happy is a gross understatement.  So, with Cynthia perusing the rest of the fruits and vegetables, I got to work selecting only the smallest of the small artichokes. I didn’t care how long it took but I was going to find them. About 10 minutes later, I had amassed some 5 pounds of the edible thistles, all about the size of a goose egg. We soon finished our shopping and snacked on mini-conolli as we drove back to civilization. The next morning, I couldn’t wait to get started preparing my find.

*     *     *

Acid Washed

*     *     *

Preparing Baby Artichokes

Just like when preparing the goliaths, use a sharp knife to chop off the top of each artichoke. I usually chop just above the tips of the largest outer leaves. Next, peel off a couple of layers of the tough, outermost leaves, revealing the vegetable’s soft inner heart. Using a paring knife, peel the base and stalk of each artichoke and, depending on the size, cut it in half or quarters. Being so small, there is no choke to remove and be sure to save as much of the stem as possible. When finished with each, immediately rub the sections with a halved lemon and place in acidulated water. (Take a large bowl of cold water and add to it the juice of 2 lemons, as well as the lemons themselves.) This “bath” will prevent the vegetable from discoloring due to oxidation.  Continue until all the artichokes have been cleaned and trimmed.

Next bring a large pot of salted water to boil, add all the trimmed artichokes, and, when the water returns to the boil, leave them to blanch for about 3 minutes. Drain them and immediately place the blanched sections into a bowl of ice water to halt the cooking process. Once chilled, removed them from the water, pat them dry, and they are now ready for use. In my case, having bought 5 pounds of the green gems, that meant the freezer for most of them. Small amounts, destined for pasta or pizza, were individually bagged, as were larger quantities which would be prepared as side dishes in the near future. Once labelled, the bags were placed in the freezer.

So, with a treasure of cleaned and trimmed baby artichokes stashed away, what are you going to do with them? Well — and this is where the due modi come into play — I’ve got 2 of Mom’s recipes to share today.

*     *     *

Fry Babies

*     *     *

Mom’s Deep Fried Artichokes

Mom didn’t prepare baby artichokes like this very often but, when she did, they certainly didn’t linger long on the serving platter. I think you’ll find the same will hold true today, no matter how you serve them: as a side, an appetizer, or snack on game day. And if you’re working with previously trimmed and blanched artichokes, they’re a snap to prepare.

Whether using freshly blanched or just thawed, pat the artichokes dry as best you can. Use standard breading methods to coat the artichokes. Since I prefer a thin coating on these, I do not use bread crumbs. Instead, I’ll coat the artichoke pieces in seasoned flour (paprika & onion powder) first before dipping them in an egg wash that’s been seasoned with salt & pepper. Then it’s back into flour again before deep frying in vegetable oil that’s been heated from 350˚ to 360˚ F. Since the baby artichokes were previously blanched, they won’t need to cook for a long time. When the coating is golden brown, they’re done. Remove them to drain on paper towels, season with salt, and serve. Although fine just as they are, I’ll sometimes serve them with lemon wedges and/or a simple aioli of mayonnaise, lemon juice, and a little grated garlic. If possible, prepare the aioli a few hours before serving to give the flavors a chance to blend.

*     *     *

*     *     *

Mom’s Sautéed Artichokes

Mom most often prepared these artichokes as she did many vegetables. (See my Vegetables/Verdura posting.) If using fresh artichokes, trim and blanch as indicated above. If cleaned but frozen, allow to defrost before use. In a frying pan over medium heat, add a couple tbsp of olive oil. Once heated, add some chopped garlic, wait a minute, and then add the artichokes. Wait another 2 minutes and then add a little tomato paste or chopped tomato, “For color,” as Mom would say. Add a splash of dry white wine, season with salt & pepper, and continue to sauté until the wine is all but gone and the artichokes are cooked to your liking. Serve immediately, garnished with fresh parsley.

*     *     *

Notes

This is all well and good, so long as you can get baby artichokes. But what if you can’t? Both of these dishes can be prepared with artichokes of any size.  Just be aware that larger-sized artichokes have developed an inedible “choke.” It’s a fibrous mass found at the base of the bulb and it must be removed. Once you’ve trimmed and halved an artichoke, use a paring knife or teaspoon to scoop out the fibrous mass. Once the choke has been removed and depending upon how large the artichoke is, you may need to cut each half into halves or thirds before proceeding. As you may have guessed, because of their size, these artichoke pieces should be blanched a few minutes longer than the “babies” were and will require longer cooking times, too. Personally, I prefer to stuff and roast the larger artichokes, leaving the sautéing and deep frying for the more tender babies.

Coming Attractions

Today I shared Mom’s favorite recipes for preparing baby artichokes. Next week I’ll share my Pasta Primavera recipe that features baby artichokes, of course, as well as a couple of other Springtime treats.

*     *     *

Dad and his Dandelions

Today’s recipe was a recurring star of quite a few springtime dinners at the old two-flat. There’s nothing particularly special about the salad, once you get past the idea that you’re dining on dandelions. No, for my generation of Bartolini, it’s not so much the recipe as the circumstances surrounding it that we recall somewhat fondly. This is especially true for Sis and I. You see, whereas most people see crocus and daffodils in bloom and think “Spring!”, a Bartolini sees these very same things and thinks, “Cicoria!” Well, maybe not so much now anymore but certainly back in the day.

 *     *     *

Dad’s Dandelion Salad

*     *     *

When the lawns started to green each Spring, the adults in the old two-flat became wild chicory and dandelion pickers. We kids, depending upon our age, also took part.  When very young, Mom & Zia would take us to some parkland where we’d play as they “harvested” the tender,  young dandelions growing about. A couple of years would pass and we would be considered old enough to join in on the fun. We were each given our own butter knife, shown how to cut the greens out of the ground, and taught to leave the area if “traces” of dog were spotted.  So, off we proudly went, with knife in one hand and an Easter basket in the other. That’s right. Our Easter baskets were re-purposed each Spring and used to carry the harvest.

Now, Dad loved his cicoria & dandelions and Sis & I often went with him, spending Sunday mornings after Mass picking dandelions. We loved every minute of it — until we were around 8 or 9 years of age. It was about that age when we learned that not all kids spent Sunday mornings picking dandelions. In fact, we were the only ones to do so. Peer pressure being what it was, we began to balk at the idea of spending Sunday mornings picking weeds. Did that stop Dad? Not in the slightest, for Dad’s love of dandelions knew little of, nor cared about, peer pressure. If anything, Dad’s peers probably encouraged him to get out there and pick those greens. For Sis and I, it wasn’t so much that he picked the greens, it was when and where he chose to do it.

You see, the old two-flat was on the same block as the parish church and about a half mile from both was a freeway. Having attended an early morning Mass, Sis and I would jump into the back seat of the car and off we’d go with Dad as he ran errands and stopped for “un caffè” with friends or family. That first part of the ride was fraught with anxiety for Sis and I. If Dad turned left at the Church, we were fine. It’s when he turned right that we began to get nervous — and it grew worse as we approached the freeway. If he turned anywhere before the overpass, we breathed a sigh of relief and all was well.  The same held true if we drove over and beyond the bridge. It was only when we heard his turn indicator as we drove on the overpass that we knew we were heading for the freeway and trouble! “Please, Dad, NO!” As soon as he made the left turn, Dad pulled the car onto the entrance ramp’s shoulder, no more than 10 feet from the corner.  There, in full view of our fellow parishioners — and classmates — walking to-and-from Sunday Mass, Dad pulled out his penknife & paper bag and started picking weeds, while Sis and I, mortified, dove for cover in the back seat. How could he do this to us! Two forevers later, he’d return to the car and off we’d go to the park where the pickings would be better, or so Dad said. We didn’t care. We just wanted out of there!

 *     *     *

Dandelion Salad

 *     *     *

Looking back, and hindsight being what it is, I’m pretty sure that Dad stopped along that ramp for more than just some dandelion greens. To begin with, Dad was a practical joker and he probably stood outside of the car and laughed as Sis and I tried to hide ourselves in the back seat. And although at the time it seemed like an eternity, we were actually parked there for only a few minutes and Dad never returned with more than a few greens, if any. No, we always needed to go to the park afterward and, suddenly, Sis and I were more than happy to accompany and even help him, proving there’d be no need to ever stop on that ramp again. As a result, we had all the greens Dad needed in no time flat and soon we were on our way to our next stop.

See what I mean? In today’s vernacular, we got played!

 *     *     *

Preparing a Dandelion Salad

Although I’ve seen dandelion greens in produce markets, the leaves are very large and usually served cooked. We use are the tender new plants that begin to grow in early Spring. Look for dandelions in areas where there is little chance of fertilizer or weed killer having been used and as far away from dog “traffic” as possible. Open parkland is good, as are rural fields.  Look for young plants. If it has a bloom, it’s likely too old and too large. Once you’ve found one suitable for harvesting, use your knife to sever the plant from its roots below ground level. Continue harvesting until you’ve enough for your needs. I normally pick enough for a minimum of 2 salads.

Once home, soak the greens in cold water. One by one, rinse under running water and trim away any off-color leaves and all of the (brown) root stem.  There may be underdeveloped flower buds in the heart of the plant. I remove them; you may prefer otherwise. Depending on the size of each plant, you may wish to cut it in half or, by trimming off the very bottom of the plant, separate the individual leaves. Place trimmed greens in cold, fresh water and continue until all are cleaned and trimmed. Dry the greens and reserve enough for your salad. Wrap the rest in a paper towel, seal in a plastic bag, and refrigerate. The greens will stay fresh for a few days if stored properly.

The salad itself is really quite basic and you may wish to add more ingredients. Our insalata consists of dandelions, some sliced onion, chopped hard-boiled eggs, a dressing of oil & red wine vinegar, and seasoned with salt & pepper. That’s all there is to it and I believe that’s because the greens were special and only available for a few weeks every Spring. Keeping the salad simple ensured that the tender dandelions took center stage and their flavor wasn’t overpowered. Make yourself one of these insalate and you’ll find it a tasty little salad and, like asparagus, a great way to bring Spring to the dinner table.

And if you’ve children, you may wish to borrow a page from Dad’s parenting book. Keep an old butter knife and bag under the driver’s seat of your car. If the kids are “acting up” in the car, just drive by a favorite playground or practice field and announce that the dandelions look delicious and that “Everyone’s going pickin’!”  I’m willing to bet that you’ll only need to get out of the car one time, if at all, especially if you wave to their friends as your drive up to the curb. Best of all,  you’ll give them a great memory to recall when they reach — ahem — middle age.

 *     *     *

The Easter Bread of Le Marche

Crescia al Formaggio 

Let me say from the onset that this is not one of the Bartolini Clan’s recipes. Well, at least I didn’t think so. In any event, I think you’ll be surprised when you learn where it came from. I know I was …

*     *     *

Crescia al Formaggio

 *     *     *

You may recall last Christmas I posted a baccalà recipe called Baccalà alla Marchigiana, in honor of Zia and her Mother-in-Law, Nonna. Shortly after it was posted, I began getting referrals from a website called Scoop.It. I followed the links back and within that website is another that highlights Le Marche, the district of Italy that Mom’s family, the Bartolini, came from. I was very surprised to see that our baccalà recipe was listed in a collection of Le Marche’s Christmas Eve dishes. Well, of course I subscribed and now I receive an email every week and depending upon the content, I may check out that week’s posts. Nothing unusual here, eh?

Last week, I received one such email and it featured the traditional Easter bread of Le Marche, Crescia al Formaggio. I’d never heard of this bread and just had to check it out. Shaped somewhat like a traditional Italian Christmas panettone, this bread is an egg bread that is loaded with cheese. Since this wasn’t a recipe of the site’s owner, Mariano Pallotinni,  a link was provided to its origin. I took the link and, once there, I immediately checked out the recipe and liked what I saw. I was especially pleased to see that I already had all the ingredients needed, meaning there’d be no run to the store on a cold, rainy day. So, not wishing to lose the page, I went to the URL to bookmark it. That’s when I noticed the website responsible for this authentic Marchigiani Easter bread was none other than the King Arthur Flour Co. website!!!

Once I got over the shock, I remembered that I’ve relied on the KAF website for other breads and the results were always good and, most importantly, consistent. Why not give this one a go? Well, I did and it’s been a while since I’ve enjoyed a new bread recipe as much as I enjoyed this one. Although the dough bears the characteristic yellow of an egg bread, there’s no mistaking that there’s cheese in the loaf, as your kitchen soon fills with the aroma of cheese bread baking in the oven. Nor is there anything shy about the flavor of cheese in the finished loaf but, if that’s not enough, there’s also a healthy bit of pepper added to give one’s palate a bit of a bite. No doubt about it, this is a bread I’ll bake again and again, whether or not it’s Easter.

*     *     *

Just chillin’

*     *     *

Oh, yeah. There’s one more thing about this recipe that came as a surprise. Last Friday, I baked the loaf pictured within this post. On Sunday, I spoke with Zia and told her about the bread recipe I found via a Marchigiani website. As soon as I mentioned “Crescia al Formaggio,” Zia recalled the cheese bread that Grandma made at Easter when she and Mom were little girls. Of course, she couldn’t remember exact amounts but the 2 ingredient lists are pretty much the same, except that Grandma used Swiss cheese instead of the Asiago that I added. Considering she was baking this bread during the worst of the Great Depression, we both agreed that Grandma probably used whatever cheese she had on hand. So, for those keeping track, this KAF recipe has now been authenticated by 2 sources. although I honestly cannot believe the path it took to come back to my family’s kitchens.

Before I send you to the websites, I want to clarify a couple of things. The recipe calls for 1¼ cups of cheese and suggests using Parmesan, Pecorino Romano, and/or Asiago cheeses. I combined equal parts of Pecorino and Asiago. Luckily, someone in the KAF Comments section asked for the amount of cheese needed by weight rather than volume. They responded that the required 1¼ cups of cheese equals a weight of 6 oz. With that, I followed the recipe exactly and, as I said, was very happy with the results. Wish I could say the same for my braiding skills. Having neither a panettone nor brioche pan, I followed the suggestion of braiding the dough. As you’ll see, my braid leaves much to be desired. Next time, I’ll follow Grandma’s lead and just make a round loaf.

*     *     *

When Bad Braids Happen To Good Bread Dough

*     *     *

Recipe Links

Mariano Pallotinni’s site, Le Marche and Food

King Arthur Flour Co., Italian Easter Cheese Bread Recipe

*     *     *

But of course …

As I mentioned, I baked this bread on Friday and spoke with Zia about it on Sunday. Later that evening, as I was clearing out a spam folder, I came across a miss-sorted mailing from the King Arthur Flour Co. that highlighted 3 classic Easter breads. You guessed it. One of them was today’s Italian Easter cheese bread.

*     *     *

Mom’s Boiled Dinner

Though Italian, through and through, the Bartolini Sisters’ recipe repertoire was anything but restricted to Italian fare. Both Sisters cooked a range of dishes representing many cuisines, and as Mom loved to recall, I was about 6 when I told her that eating at our  house was “an adventure!” You see, it was about that time that Mom had gone to lunch with a few friends, I believe, at what was at the time Detroit’s premier Chinese restaurant. She ordered sweet & sour something-or-other (I don’t remember what), thoroughly enjoyed it, and asked the waiter if she could have the recipe. He agreed and returned a few minutes later with the recipe, which no doubt pleased Mom no end. Later, when the check arrived, Mom was surprised to see a $25.00 fee for the recipe included in the total! (Understand that this was a time when $25.00 was considered a nice sum to win on game shows like “What’s My Line?”. )  Mom, rightly, refused to pay the $25.00, indignantly gave them back the recipe, and vowed to duplicate that meal. And thus began our “adventure.” Starting with the Chun King section of the grocery store, Mom set out to make the ultimate sweet and sour dish. Time after time, she served us the latest version which, to be fair, we kids often thought was OK. Having tasted the original, however, Mom felt otherwise. I remember one specific dinner when her latest attempt fell short of expectations. After one bite, disgusted, she pushed her plate aside and watched as we kids gobbled it down.  The thing I most remember and, frankly, am most proud of, is she never gave up. Laughably, we did eat a couple pretty bad sweet & sour concoctions but she was determined to prove that the restaurant’s food wasn’t all that special and certainly not worth $25.00 per recipe. Truthfully, I don’t think she ever hit pay dirt, at least not while I was living at home, but she did teach me a valuable lesson by her example. So, when I describe the number of tests I’ve run to, say, come up with a cheddar cheese pie crust, or, to find the right level of “heat” in my giardiniera, don’t credit me. Credit Mom.

But I digress …

*     *     *

*     *     *

Among the many cuisines the Bartolini Girls drew upon, American was first and foremost. Meatloaf, stews, casseroles, and fried foods, among others, were very often served — with a platter of pasta on the side, of course. Mom, in particular, loved a New England boiled dinner and she was sure to serve it a couple of times each year. Today, although I may have added a couple of vegetables to the pot, I keep her tradition alive and prepare a boiled dinner at least twice every year, once in the Spring and again in the Fall.

The recipe that I’m about to share uses quite a few vegetables to form a bed for the corned beef. Even with my 6 quart crock pot, only a couple of cabbage wedges will fit into the cooker and, as a result, I have to make other arrangements for the rest of the cabbage. When there’s about an hour to go before dinner is ready, I place as much sliced cabbage as will fit comfortably into the slow cooker and replace the lid. The rest of the cabbage goes into a covered frying pan, a cup of broth from the slow cooker is added, and then everything is seasoned with salt & pepper, to be cooked over a medium heat. Cooking times will vary, depending upon the amount of cabbage and size of the pan. Try to time it so that this cabbage is finished when the slow cooker’s contests are ready. When ready, combine the two preparations for serving and storing. Of course, the alternative to doing this is to use fewer vegetables but, frankly, that just ain’t gonna happen around here.

*     *     *

Mom’s Boiled Dinner Recipe

total time: approx.  8.5 hours

Ingredients

  • 1 prepared corned beef, 4 lbs. Do not discard the packing liquid, unless directed to do so by the package directions.
    • enclosed spice packet
    •                     or
    • 12 green peppercorns and 1 tbsp pickling spice.
  • 1 small bag of baby Yukon gold potatoes
  • 1 large onion, cut into about 8 wedges
  • 1 rutabaga, cut into large chunks
  • 1 turnip, cut into large chunks
  • 4 carrots, cut into 2 inch chunks
  • 4 parsnips, cut into 2 inch chunks
  • 2 garlic cloves, diced
  • 1 cabbage, outer leaves discarded, cut into about 10 wedges
  • salt and pepper, to taste
  • water

Directions

  1. About an hour before you begin, remove the corned beef from the fridge and set it on a counter so that it warms slightly.
  2. Place the potatoes, onion, rutabaga, turnip, carrots, and parsnips into the slow cooker.
  3. Sprinkle the garlic over the vegetables and do the same with the spice packet, if any, that came with the corned beef. (If no spice packet, add the pickling spice and green peppercorns.) Season with salt and pepper.
  4. Place the corned beef atop the vegetables and empty the packing liquids over everything. Add water until the slow cooker is about 2/3 full.
  5. Set crock pot to “high” and cook for one hour, turn the meat over, set to “low” and cook for 6 more hours, turning the meat over every 2 hours. Periodically skim the surface to remove any off-color foam, as necessary.
  6. After 7 hours, turn over the corned beef one last time, place the cabbage wedges into the slow cooker, replace the cover, and cook for an additional hour. If you have too much cabbage for your slow cooker, place the surplus into a frying pan, season with salt & pepper, and baste with a cup of broth from the crock pot. Cover and cook over medium heat until ready to be served — 15 to 20 minutes.
  7. After a total of 8 hours, remove the corned beef to a cutting board, slice it thinly, and place it on a platter with the cooked vegetables and cabbage. Serve immediately. Alternately, some people, myself included, prefer that their vegetables be served in a bowl with some of the broth.
  8. When preparing the leftovers for storage, be sure to combine all the cabbage and its cooking liquid with the rest of the vegetables.

Variations

Aside from making one’s own corned beef from beef brisket — something beyond my scope — the only variations of which I’m aware involve the vegetables. Basically, this recipe was Mom’s but I’ve added the turnip, rutabaga, and parsnips. Make the recipe your own and drop or add any vegetables to suit your tastes

*     *     *

*     *     *

Note

The leftovers from this dinner store well and you can easily use them to repeat the meal, if that’s your wish. As I’ve mentioned, however, I prefer the vegetables served with the broth as a soup. That means that I can use the corned beef for panini, also personal favorites. Pictured above is one such sandwich made with corned beef, Swiss cheese, a little cabbage, and some mustard. It doesn’t get much better than this.

*     *     *

My Uncle’s Pasta (aka Cacio e Pepe … whatever!)

Being today is George Washington’s birthday, I’ve decided to come clean. Understand that there is no easy way for me to say this, so, I’m just going to blurt it out. I lied to you. Well-intentioned though I was, I nevertheless gave you false information. And, what’s worse, I did it not once but twice. Now, before you grab torches, gather en masse, and storm Chicago looking for me — by the way, if you do, be sure to take the Dan Ryan (hehehe) — let me explain …

*     *     *

  *     *     *

Back in October, 2010, my first real post was the recipe for Pasta in Bianco and, at the time, I said it was about the easiest pasta dish to make. And it is … sorta. Then, a year later, I shared the recipe for Spaghetti Aglio e Olio which I described as being “by far, the easiest (pasta dish) to prepare.” Well, it is … kinda. The truth is that there is a 3rd dish, an even easier dish to prepare, a dish that for decades I’ve prepared for myself and enjoyed as my own personal creation and that reminded me of Uncle. That is, until a few weeks ago when I found an authentic recipe that is identical to “my” recipe for Uncle’s Pasta. I could ignore it or, worse yet, try to convince everyone that my recipe is the original but, c’mon.  I’ve just confessed to 2 lies, committing a 3rd lie — especially one so obvious — would serve no purpose other than to further grease my path into Hades. So, I’ll take the high road and explain how I came upon this dish and, in an effort to make amends, I’ll throw in a little info on yet another obscure pasta, to boot.

Living in the old two-flat, there were many dinners where the families ate together and very often some form of pasta was served. My Uncle, like most, enjoyed grated cheese atop his pasta but, what set his plate apart from everyone else’s, was his love of black pepper. To my eye, he used more pepper than anyone seated at the table. Well, for this youngster, the aroma of grated Pecorino Romano mingling with the scent of freshly cracked pepper was intoxicating, made even more so because I was considered too young to have access to the pepper shaker. (As an unexpected benefit, however, when the nuns spoke of the Garden of Eden, I understood all too well Eve’s desire for the Forbidden Seasoning Fruit.) Well, I eventually grew up, as most young boys tend to do, and was finally able to add as much pepper to my pasta as I wanted — and I did. But wait, there’s more to this story because, up until now, I could have been talking about any pasta dish. I need to narrow the field a bit.

Once I moved away, I lived with a number of roommates until I could finally afford a place of my own. Back then, having a well-stocked pantry was not exactly high on my priority list. Let’s be honest, if not for “tissue”, coffee, and cat litter, I probably wouldn’t have seen the inside of a grocery for months at a time. Now, I’ve already blogged about my love for, and reliance upon, Spaghetti Aglio e Olio, pasta made with garlic and olive oil, but there were times when I didn’t have any olive oil. What to do? Well, I made my pasta without it, adding a bit more cheese, a couple more sprinkles of pepper, and some pasta water in its place. Moments later, I’d be seated at the dinner table where, with a single whiff, I was 6 years old again watching Uncle shower his pasta with pepper. So, for some 30 years, I’ve made this pasta, not just when out of olive oil but whenever I needed a pasta fix and the nostalgia bug hit me.  Over time, this pasta came to be called Uncle’s Pasta in my mind because its aroma reminded me of his plate during those family dinners of long ago.

*     *     *

I’ll re-visit this picture when WordPress becomes scratch & sniff-enabled.

*     *     *

With that in mind, you can well imagine my surprise when, a few short weeks ago whilst I was looking at pasta cutters, I learned that the people of Rome, and its district of Lazio, make a pasta called Cacio e Pepe, Cheese and Pepper, that is exactly like my Uncle’s Pasta! Now, rather than become bitter, I’ve decided to rise to the occasion and to turn this into a teaching opportunity. You see, the night that I became aware that the Romans had plundered my childhood memories and stolen my pasta recipe,  I was looking at a pasta maker called the chitarra. Italian for “guitar”, a chitarra is shirt box-sized with many wires or cords stretched, lengthwise, from one end to the other. A freshly made pasta sheet is laid on top of the “strings” and a rolling-pin is used to forcefully push the dough sheet through them to create pasta noodles. Although the width between the strings may vary from chitarra to chitarra, when they are set close enough together so that the distance is the same as the width of the pasta sheet, the result is a square-shaped pasta called tonnarelli. Often as thick as spaghetti, tonnarelli, not so coincidentally, are often used to make Cacio e Pepe. Never seen ’em? Guess again.  One very common “fresh” pasta’s cappellini is, in fact, tonnarelli. If you own a pasta machine, chances are it makes 2 types of pasta. The packaging will name the smaller of the 2 as being either cappellini or spaghetti. Um … no. One very popular stand mixer’s pasta cutter is advertised as making angel hair pasta. Again … no! These cutters are incapable of making a round pasta noodle and both cappellini and spaghetti are, in fact, round. If it’s a thin, square-shaped pasta, it’s tonnarelli. Now, if the pasta from your smallest cutter isn’t quite square, that’s probably because the pasta sheet wasn’t the same thickness as the cutter’s width. If you’re so inclined, vary the pasta sheet’s width and you’ll get your square tonnarelli.

My point isn’t to make sure everyone that sits at my dinner table, or that reads this, can identify the pasta set before them. No, not at all. It is to illustrate just how seriously the Italians take their pasta. For many, Emilia–Romagna is the home of Italy’s best pasta makers, with Bologna as its capital. True pasta aficionados from that region will claim that they can tell whether the pasta dough is rolled by hand or machine, with a wooden versus a steel rolling-pin, on a wooden board versus a stainless steel or marble counter top, etc., etc., etc. My father, when he saw Mom preparing to make pasta that day, would remind her to roll it out by hand as he left for work. Mom always assured him she would — and then got out the pasta machine before his car had made it to the end of the block. When dinner was served, could Dad tell the difference? Who knows but, like any loving husband, he knew when to keep quiet.

Wow! Such a long post for so simple a dish to prepare. I won’t be giving this recipe the full treatment because, frankly, it would be a waste of time. All you need is some pasta, freshly made is preferred but boxed spaghetti will do nicely; hot pasta water; some grated cheese, Pecorino Romano if possible; and freshly cracked/ground pepper.  I won’t be giving ingredient amounts because they will all depend upon the number of servings to be prepared and your own taste. You may not be as enamored with pepper as am I, after all.

While your pasta is cooking, warm the serving bowl. This can be done by pouring hot water from a tea kettle or via the tap. Once the pasta is cooked to your liking, reserve a  cup of the boiling pasta water before draining the pasta. No need to drain it fully. In fact, it’s better if you don’t. Work quickly now. Place the cooked pasta into the now-warmed serving bowl and season it very generously with the grated Pecorino Romano cheese. (Parmesan may be substituted.) Mix the pasta, adding more pasta water, a little at a time, so that it combines with the cheese to create a sauce-like dressing for the pasta. If it’s too dry, add more water; too wet, add more cheese. Once the pasta is evenly coated, add some pepper and stir. Remember, the dish is called Cacio e Pepe for a reason.

*     *     *

*     *     *

With your pasta now appropriately dressed, serve it on warmed dinnerware.  Garnish each serving with a generous sprinkling of grated Pecorino Romano and another dusting of pepper. Now, before you sample this testament to simplicity, take a moment to savor the fragrances of freshly grated cheese and newly cracked pepper wafting up from your plate. Nothing more need be said.

*     *     *

Pasta Cacio e Pepe

*     *     *

Sis’s Soup with Little Meatballs (Minestra con Polpettine)

You might recall that last December, I demonstrated how to make quadretti, a small, square-shaped pasta. At some point, I mentioned Mom using this pasta in soup to nurse me back to health but that my Sister remembered differently. She recalled Mom serving broth filled with Acini di Pepe, “sick soup”, whenever she was ill. Well, since Monday was Sis’s birthday, why not share the recipe for her sick soup?

Soup made with Acini di Pepe is not a Bartolini tradition. Oh, sure, it was served plenty of times at the old two-flat but it wasn’t made from a recipe that had been handed down from one generation to the next. It came to us, oddly enough, from the Mother of my 5th grade teacher. Mr. D was from Upstate New York and my class was his first in Detroit. In fact, he arrived in my hometown barely 1 week before school started that September. Mr. D wanted to introduce himself to the parish and to our parents so, once classes started, he visited the home of each of his students. He chose the families alphabetically, making mine the second home he entered. And as was so often the case with newcomers who entered the two-flat, he hung around for a number of years — make that decades — afterwards. (There was a similar phenomenon in our backyard that involved Grandpa, our neighbors, and the Parish priests but I’ll save that for another post.) Eventually, Mr. D migrated upstairs, becoming good friends of Zia and Uncle.  At some point, and I do not recall how much time had transpired, his Mother and Aunt came to Detroit for a visit. It wasn’t long before they, too, became ensnared in the two-flat’s web of conviviality. Well, as luck would have it, both women were good cooks and during subsequent visits, recipes were traded. One of the very few recipes to survive is today’s minestra, Acini di Pepe with meatballs. (It took a while but I got us here.)

Acini di Pepe is a small, bead-like pasta that expands during the cooking process, much like couscous. Mom served it to Sis when her tummy was upset, just as she served me quadretti. As was her way, Doctor Mom started with broth only and gradually added increasing amounts of Acini di Pepe to the broth as Sis’s condition improved. The meatballs, polpettine, were never used for medicinal purposes. No, they were served when everyone was well and seated at the dinner table. And did we ever enjoy them. The lemon zest in the polpettine, when mixed with a hint of nutmeg, take this simple soup to an entirely different level. Now, if Acini di Pepe isn’t “your thing,” I strongly suggest you make the polpettine and use them with whatever pastina you prefer. Trust me. You won’t be disappointed.

Oh, yeah. Happy Birthday, Sis!

*     *     *

Acini di Pepe with Meatballs Recipe

Ingredients

For the polpettine

  • 1/2 lb ground veal
  • 1/4 cup grated cheese, pecorino romano preferred
  • 1/2 cup plain bread crumbs
  • 1 large egg, slightly beaten
  • 1/8 tsp nutmeg
  • zest from 1/2 lemon
  • 2 tbsp fresh parsley, chopped
  • salt & pepper, to taste

For the minestra

  • 2 quarts homemade chicken stock (low-sodium store-bought may be substituted)
  • 1 cup Acini di Pepe, uncooked
  • additional grated pecorino romano

*     *     *

*     *     *

Directions

To make polpettine

yield : approx. 100 polpettine, divided, half to be frozen for later use

  1. Place all the ingredients into a bowl and mix until combined. Do not over-work.
  2. Use a melon baller or small scoop to fashion small meatballs. (See Notes below.)
  3. Divide all the polpettine into 2 halves and place each on separate baking sheets.
  4. Place one baking sheet into the freezer and, once frozen, place the polpettine in a container, return to the freezer for use on a later date.
  5. Use the other half as indicated below.

To make the minestra

  1. Bring the stock to a rapid boil.
  2. Add the Acini di Pepe, stir, and then add the remaining half of the polpettine.
  3. When stock returns to the boil, reduce to a medium simmer and cook for about 10 minutes. Stir often but gently so that the polpettine remain intact.
  4. At the end of 10 minutes, taste the minestra to see if the pasta is cooked to your liking and to adjust seasoning, if necessary.
  5. Serve immediately. Have plenty of grated pecorino romano cheese available at the table.

*     *     *

Notes

Polpettine are meant to be relatively small. One polpettino should easily fit upon a soup spoon with plenty of room left for pasta and broth. Although this recipe yields about 100 meatballs, I prefer to use only about half that amount in a 2 quart pot of soup. Of course, you may use more or less depending upon your own preference.

*     *     *

And Now for the Awards Portion of  Today’s Presentation

Over the past few weeks, I’ve been lucky enough to have received a few awards from members within our blogging community. And lest anyone think that I do not appreciate these wonderful gifts, I wanted to make sure that each was acknowledged.

*     *     *

So, to Marie, of My Little Corner of Rhode Island, I say thank you for generously nominating me for the Kreative Blogger Award.

*

*

*     *     *

To Kathryn, of kiwsparks, and Eva, of Kitchen Inspirations, I say thanks for your thoughtfulness in granting me The (Red) Educational Shoe Award. (And to Greg: You’ll just have to wait before you get to see me in stilettos, be they red or some other color.)

*

*     *     *

Finally, to Roger, of Food, Photography, & France, mere words cannot express the depth of emotion that I experienced upon learning you had nominated me for the Sunshine Award.

*

*

*

*     *     *

OK, I know that I’m supposed to answer a variety of questions or volunteer some facts about myself and I must admit to enjoying reading others’ replies. The truth of the matter is, however, that I’m not all that interesting. I am no onion with many layers to be pulled back revealing inner truths. There is no art in this choke. What you see is what you get — and what you get is pretty boring, at that. Besides, what little there is to tell is fodder for my future posts. If I tell you everything about myself now, whatever will I write about next time or the time after that?  And so, to those who truly wish to learn more about me, I say “Stay tuned … “

The next part of any award acceptance is to pass the award along to deserving individuals. Well, there are 3 awards to pass along and I don’t even know how many bloggers, in total, I am to name. I do know, however, that no matter how many good people I nominate, I will surely forget one person and, in all probability, quite a few more. I have been treated kindly by everyone I’ve met here and encouraged in more ways than I could ever enumerate.  I’d sooner quit blogging than hurt or offend any of those who have treated me so graciously. So, rather than nominate many, I shall only nominate one.

A relative newcomer, this blogging friend has taught me a great deal. By her example, I’ve learned that less is more. That silence is truly golden. That to just be yourself and the World will be yours to conquer. And so it is that I nominate, for the Kreative Blogger, The (Red) Educational Shoe, and Sunshine awards, none other than …

*

*

*

*

*

*

*

*

*

*

*

*

*

*

FLAT RUTHIE !!!!!

As soon as word of the awards became known, her friends carried her off to an impromptu party at Chicago’s Fondue Stube. Pictured above, Flat Ruthie is seen with one of her dearest of friends, Thing, as they await the arrival of the fondue pots. Oh, what a night!

So, congratulations Flat Ruthie! I for one, cannot wait to read your acceptance speech. (No fair helping her, 3D Ruth.)

And to Marie, Kathryn, Eva, and Roger, all joking aside, I am both honored and grateful for the awards you’ve sent my way. Mille grazie!

*     *     *