Shishito Peppers

A few years ago, I watched a cooking show featuring a number of chefs making pizza. One West Coast chef used chopped peppers for her signature pizza. Now, there’s nothing new about using peppers atop pizza. Many of us have done that for years. What set her apart was the peppers she used, shishito peppers. Right then and there I decided to find them.

*     *     *

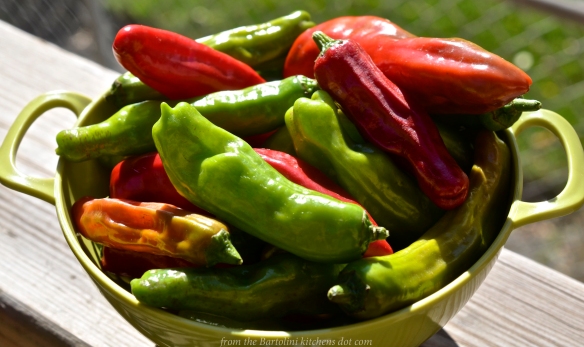
Raw Shishito Peppers

*     *     *

Shishito peppers are a sweet pepper that originated in Japan, like the name suggests. Very often you may see only green shishito peppers for sale, but as you can tell from the photo above, ripe shishito peppers can run from green to red, and all colors in-between. Some claim that the redder the pepper, the sweeter. Nothing unusual here. So, why did I go searching for them?

Think of eating one of these peppers as a game of non-lethal Russian roulette. Although technically a sweet pepper, about one in ten can be as hot as a jalapeño  — and you have no way of knowing which is which. As a result, a platter of shishitos can be more than just a tasty appetizer or game time snack. Although certainly not as hot as a Habanero, the “right” shishito pepper can bring even the most unconscious of snackers back to reality.

Now, it is possible that the peppers you buy will all be sweet. In fact, one of the vendors at this year’s farmers market told me that she hadn’t come across a single hot pepper in this year’s crop. Another vendor, the one from whom I buy Lucy’ jalapeños and my fresh peas and beans, said that his crop maintained the ten to one ratio of sweet to hot peppers. Some believe it is the environment — sun, water, temperature — that affect the peppers’ heat. Perhaps this Spring’s heavy rains and cooler temps affected her crop.

*     *     *

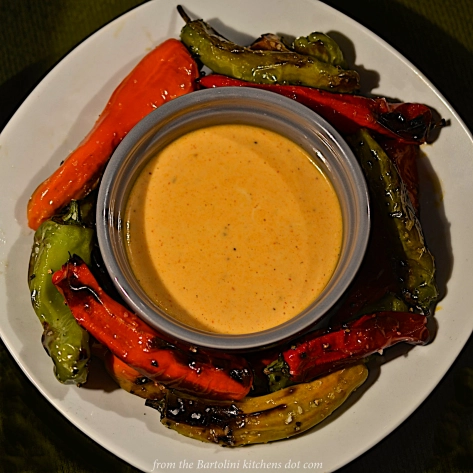
Roasted Shishito with Aioli

*     *     *

I’m sure there must be a number of ways to prepare and serve shishitos but I’m only aware of a few. Ofttimes in Japanese restaurants, you’ll find these peppers served as appetizers after they’ve been dipped in tempura batter and fried. As you’ll soon see, I chose to roast mine and served them with a spicy garlic aioli. I also pickled some, though I think it was a mistake to preserve them. More about that later.

None of the preparations are all that involved nor do any require the full recipe treatment. I’ll just describe what I did and leave it at that.

*     *     *

To Prepare the Garlic Aioli

Spicy Garlic AioliPlace one large egg, 2 grated garlic cloves, 1 tbsp Sriracha sauce, juice of 1/2 small lemon, 1/4 tsp dry mustard, 1/8 tsp salt, and a pinch of pepper into the bowl of a food processor or blender. Process to fully combine the ingredients. Continue to process while very slowly adding 1/2 cup of extra virgin olive oil. Process until the sauce emulsifies and thickens. Cover and refrigerate a couple of hours before use.

This will create about 2/3 cup of spicy aioli. If you prefer, substitute canola oil for the olive oil and adjust the remaining ingredients to suit your own tastes.

*     *     *

To Roast Shishito Peppers

Place a cast iron skillet under your oven’s broiler and pre-heat.

In a large mixing bowl, add the peppers, which have been washed with the stems trimmed leaving just a bit attached. Remember: piercing prevents peppers popping in your oven. Drizzle a bit of olive oil over the peppers and season with salt and pepper. Mix to evenly coat the shishitos.

Roasted Shishito Peppers

Once the pan is ridiculously hot, add the peppers and place the pan back under the broiler. Remove after the peppers begin to blister — from 3 to 6 minutes, Season with coarse salt and serve immediately with the garlic aioli dipping sauce on the side. ShIshito peppers that are allowed to sit after roasting tend to soften, becoming less palatable.

Shishitos can be prepared on the stove top, on a baking sheet in the oven, or on a barbecue grill. I prefer to place them under the broiler in a screaming hot cast iron pan thereby eliminating any need to toss/turn the peppers while roasting.

*     *     *

Pickling Shishito Peppers

Pickled Shishito PeppersNever having canned these peppers before, I thought I give it a try. After chopping them into rings, I placed them in sterile jars, and then filled the jars with Dave’s pickling liquid, along with some sliced onion, garlic, and green peppercorns. (Dave’s pickling method has become my “go-to” recipe for preserving pickled peppers. Quite simply, it’s the best.) The jars were then placed in a boiling water bath and processed. The result was a delicious batch of pickled peppers — but I doubt that I’ll do it again. Although tasty, these peppers are probably too delicate for boiling in the bath and their texture suffered. They were quite soft and that is not something I like. Next time, I’ll use them in a quick pickle and, although they cannot be stored nearly as long, the peppers should retain a bit of their crunch since they will not be boiled.

*     *     *

It’s déjà vu all over again …

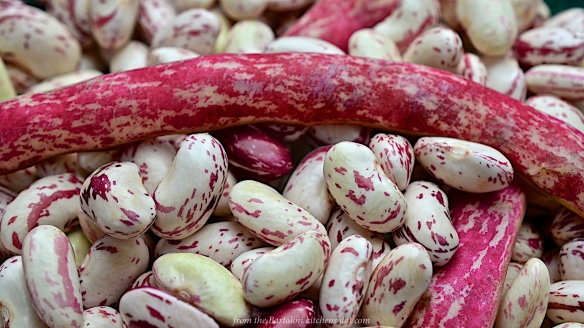
Borlotti/Cranberry Beans

With temperatures falling, it’s time to start cooking comfort foods. One of our favorites and one that I make for Zia every year is Pasta and Beans Soup, Pasta e Fagioli. Easy to make, this soup is the very definition of comfort. Best of all, if you’re as lucky as I was just last weekend, you can still find fresh Borlotti/cranberry beans at your local farmers market. The recipe for this traditional Italian dish can be found by clicking HERE.

*     *     *

Coming soon to a monitor near you …

Pickle Preview

A Summer Pickle (Served with Grilled Pork Chops)

*     *     *

*     *     *

There was Something in the Air … And Fried Chicken was on the Stove Top

Fall's First Colors - Mid-August!!!
Yes, there was something in the air, all right, and I’m not talking about leaves changing color in mid-August. Mid-August!!! You see, I had Max groomed the afternoon before we left for Michigan. Lucy would never forgive me if she had to share a car for seven hours with a dog that smelt. Early that evening, I picked up Max at the groomer’s, drove home, and parked my newly repaired car in the garage. Walking through my yard, I stopped to set the timer for the garden sprinkler, meeting Max on the porch no more than three minutes later. It’s amazing how much can happen in three teeny, tiny minutes, especially when skunks are involved.

Those whose dogs have encountered skunks will tell you that their attacks come in three forms. The first — and most foul — is the “direct hit”, where the dog gets sprayed with everything the skunk can throw at it. I had a Cairn Terrier that chased a skunk into a culvert, taking a direct hit to the mouth. His head was soaking wet, as were my shirt and arms after carrying him to a tub for the first of many baths. He was terribly ill for three days and reeked both inside and out, if you catch my drift. The second strike is the “glancing blow”, where just a little of the skunk’s spray hits the dog. Though the dog still smells awful, at least its coat isn’t sopping wet with the stuff, contaminating everything the dog rubs up against. The third — and preferred — encounter is best described as “collateral damage”. It’s when a dog comes in contact with an area that was very recently sprayed. Lucky for Lucy, Max was a victim of collateral damage, apparently having stuck his nose where it didn’t belong. His muzzle carried only faint traces of skunk and, from past experience, only if his snout were to get wet would the full effect of the skunking become noticeable. What, me worry? Like Max was somehow going to get his muzzle wet …

*     *     *

(Click to enlarge any/all photos)

*     *     *

Max’s muzzle finally dried out while in the car during our return to Chicago. Lucy was — and is — so not happy.

 My “fuming” dog and angry bird aside, I had a wonderful visit back home. Zia’s Eldest Son and my Nephew arrived on their Harleys and spent the weekend with us, making Max one very happy dog. He adores my Cousin and won’t leave his side whenever he comes to visit his Mom. He takes Max on “nature walks” that can last hours, covering terrain that I can no longer walk — at least that’s what I’ve always thought. Max is not one to talk but, this time, my Nephew, also, walked the walk and, when they returned, he talked about the walk. It’s safe to say that this is one walk unlike any I’ve experienced and if duty calls, Max is ready to serve in the Canine Corps of the Navy Seals.

With Max away for hours at a time, Zia and I had our own little vacation. I’d brought my chitarra and we made a few pounds of pasta together. In fact, I made sure that her pasta board was covered with pasta when I left for home. I, also, made gelato — over 2 gallons — for Zia and her friends. One night, I cooked us a Moroccan-inspired chicken dish and, on another, we conspired to roast a goat shoulder. That recipe will be featured in a future post, as well as on my own table. We really did enjoy it.

*     *     *

Rising Lake Levels

Adding another 6 inches of water since June, Lake Huron’s water level is about 14 inches higher than last year.

*     *     *

All facts considered, it was a great visit that ended too quickly. The weather was warm though not as warm as it should have been, a complaint heard throughout the Mid-West this year, I’m afraid. Heavy rains, too, caused flooding throughout much of South-Eastern Michigan and Lake Huron’s water level continued to rise. It hasn’t been this high in at least 15 years. For me, though, seeing leaves already turning color was a bit of a shock and I couldn’t help  but wonder what sort of Winter lies ahead. Best get the snowblower tuned up.

*     *     *

You might recall that I had scheduled our recipe for roast duck for today’s post. That was before I returned home to find that the WordPress gods were angry and once again had me in their cross-hairs. Just as was the case when I was in Italy, I no longer receive notifications of most of your posts and, again, they’re to be found in my SPAM folder — all 800+ of them. As a result, I’ve had no time to finish up the roast duck post but will have it done for next week. I guess the WP gods don’t like me being away which is most unfortunate, for I’ll be leaving again in a few weeks. The Honey Man will soon be open for business and Zia and I will be there to get our share.

As for today/s Fried Chicken recipe, I cannot think of a better recipe to post. This weekend, we in the States will be celebrating a three day weekend for the Labor Day Holiday and what picnic or yard party is complete without a platter of fried chicken? For me, the colder the chicken the better. Make it as much as a few days in advance and stick in the fridge until party time.

*     *     *

BACON!!!*     *     *

No, the above pic is correct. That’s a photo of bacon frying to start a post about fried chicken. There’s really nothing so shocking about that but my using lard with the bacon fat to fry chicken may raise a few eyebrows.

Mid-Winter, I learned of a CSA (Community Supported Agriculture) that serves my area of Chicago. Granted, much of their Winter offerings were “imports” — there’s nothing growing in these parts — but all were organic and the quality was very good. It was nice, too, not having to hunt for Meyer lemons, kumquats, Mandarin oranges, and, later, ramps. Then, one day while browsing the website, I saw that they had fresh, organic lard. My search had ended.

You see, I’ve been looking for fresh lard for some time now. Let’s be clear. I’m not talking about the stuff you might see on your grocer’s shelf. That stuff is hydrogenated so that it will “keep” and should be avoided. Fresh lard, though not perfect, is a far healthier choice. Speaking of healthier choices, the bacon used is low-sodium and uncured, with no nitrites and nitrates used in its processing. As is the case with any fried foods, though, moderation is the key. In the past three years, I’ve fried chicken twice. Now, I’d like for you to believe that it’s because I’m so health conscious but the reality is that I hate having to deal with a pot of used grease. Shallow frying, as I did here, minimizes the amount of grease used but its disposal is still a problem. So, when I do fry chicken, I fry quite a bit, freezing future dinners in the process. And a couple pieces of fried chicken is a nice treat to enjoy during a seven hour drive. Place the frozen pieces in the car when you leave home and, by the time you’re hungry, it will be thawed but still cold — just how I like it.

*     *     *

Fried Chicken 1

*     *     *

Fried Chicken Recipe

 Ingredients

  • chicken pieces with skin and bones — I used legs and thighs
  • 1 quart (950 ml) buttermilk
  • 2 tbsp Sriracha hot sauce – optional
  • 4 rashes/slices bacon
  • 1 lb (2 cups or 455 g) lard 
  • 1 cup all-purpose (AP) flour
  • 2 tsp kosher salt
  • 1 tsp black pepper
  • 1 tsp smoked paprika
  • 1 tsp onion powder
  • 1 tsp garlic powder
  • 1 tsp marjoram
  • 1/8 tsp cinnamon

Directions

  1. Place chicken pieces in a large bowl, non-reactive pot, or plastic bag. Combine buttermilk with Sriracha, if using, and pour over the chicken pieces. Cover/seal the chicken and refrigerate for 8 hours or overnight.
  2. In a large, seal-able plastic bag, combine flour, salt, pepper, paprika, onion powder, garlic powder, marjoram, and cinnamon. Mix until well blended.
  3. In a large (cast iron) frying pan over medium heat, cook the bacon until crisp. Remove bacon and reserve for another use.Fresh Lard
  4. Place the lard into the pan with bacon grease, raise the heat to medium, and melt the lard. Do not allow the pan to be filled more than halfway with grease. (See Notes)
  5. Meanwhile, drain the chicken, raise the heat to med-high, and when the grease reaches a temperature of 350˚ F (177˚ C) (see Notes), place 5 or 6 pieces into the bag with the flour. Seal the bag and shake to evenly coat the chicken pieces.
  6. Shake off the excess flour and place each piece individually into the hot grease, skin-side up. Watch out for splatters and do not over-crowd. Fry for 7 minutes.
  7. Turn each piece over, lower the heat to low, cover the pan, and fry for 12 minutes.
  8. Uncover, turn each piece over, raise heat to med, and fry for another 5 to 7 minutes. Chicken is fully cooked when it reaches a temperature of 165 F (75 C). (See Notes)
  9. Place cooked chicken on a rack over a baking sheet, season with salt, and place in a pre-heated, 200˚ F (95˚ C) to keep warm while the remaining chicken is fried.
  10. Serve immediately.

*     *     *

Fried Chicken 2*     *     *

Notes

No matter what type pan you use to fry, never fill it more than halfway with grease. Higher than halfway and you’ll run the risk of the grease bubbling over once the food has been added. Serious burns and/or fire may result.

I like to fry chicken in oil at a temperature between 350˚˚ to 355˚ F (177˚ to 180˚ C). If the oil’s temperature is a little higher at the start, that’s fine. Adding the chicken to the pan will drop the temperature down to what I consider to be acceptable levels.

A chicken’s dark meat takes more time to fry than does the white meat. Here I cooked only dark meat. When frying both white and dark meat, start the dark meat pieces a couple minutes before adding the white meat pieces. When frying a large amount of chicken, I’ll fry a batch of only dark meat and another of white.

*     *     *

Now, about that reserved bacon …

BLTA bacon, lettuce, & tomato sandwich for lunch the next day.

*     *     *

It’s déjà vu all over again …

Zia's Corn RelishIn this part of the country, it’s corn season and our groceries and farmers markets have bins of sweet corn for sale. Fresh corn is one of Summer’s great gifts and I take full advantage. Unfortunately, like all of Summer’s bounty, its season is far too short, leaving us corn lovers seeking the prized kernels in our grocer’s frozen foods aisle. Today’s look back is one way to enjoy Summer corn in mid-Winter without having to defrost it first. Zia has made this corn relish for years and it’s a family favorite. You can learn her recipe by clicking HERE.

*     *     *

Coming soon to a monitor near you …

Roast Duck Preview

The Once-Postponed Roast Duck

*     *     *

Egg-Filled Ravioli

Uova da Raviolo

Ravioli-7

Although my family made plenty of ravioli, only two filling recipes were prepared, one for ravioli served in tomato sauce and the other for cappelletti served in soup. I’ve been told that Mom and Zia experimented with cheese-filled ravioli but were never satisfied with them and gave up trying after a few attempts. Then, a few years ago, after having mastered the recipe for Bartolini sausage, I used it to fill ravioli and I was off and running. Since then, I’ve made a number different fillings, most dependent upon what was fresh and in-season at the time. Never, though, did I make today’s recipe, Egg-Filled Ravioli, Uova da Raviolo.

Last year, my blogging friend, Sarah, prepared these delectable ravioli using chicken eggs. Though she no longer maintains her blog, the memory of that dish stayed with me and I decided to surprise Zia with the dish. Since my family never made ravioli large enough to encompass the yolk of a chicken egg, I thought that if I used quail eggs, the ravioli would be much smaller and more in line with my family’s traditions. Well, when I went to buy the quail eggs in September before my trip home for honey, the vendor at the farmers market didn’t have any. My plans would have to wait until my next trip. In the meantime, my friend Celi posted her delicious recipe for these extraordinary ravioli and, not long after, my friend Eva posted her “delightful” recipe. Luckily, Zia saw neither post so my plans remained secret. Weeks later, before my last trip home, I went to the vendor to buy the quail eggs. Not only did the vendor remember me, she gave me 2 packs of eggs for the price of one. Already into November and with her birthday to come in a few weeks, my surprise dinner became Zia’s birthday dinner, with these ravioli as primo piatto.

 *     *     *

Uova da Raviolo, served

*     *     *

In the past, I’ve mentioned that Mom loved Swiss chard (silverbeet), even managing to secure a small piece of Grandpa’s prized garden to grow some. Although our ravioli recipes normally use spinach in the filling, I substituted chard as a means of bringing Mom to Zia’s birthday dinner. The substitution worked so well that Zia mentioned she may use chard the next time she makes ravioli.

Now, when you look at the recipe, you’ll undoubtedly notice that there are few, if any, ingredient amounts listed. The fact that I didn’t have a proper scale is part of the reason but certainly not the sole cause. The proportion of the ingredients will rely upon the amount of chard that you have and your own tastes. Once the chard is cooked and readied for use, add the Pecorino Romano cheese and then enough ricotta until it tastes and looks like you prefer. At this point, there are no raw eggs in the filling, so, you can taste it without fear of becoming ill. Just remember the filling should be stiff enough to support an egg’s yolk.

 *     *     *

ETA

Since this was published, my good blogging friend, Minnie of The Lady 8 Home, posted an entry using scissors to open quail eggs. If you’re interested in making these ravioli, be sure to check out Minnie’s post.

*     *     *

Ravioli Filling Ingredients*     *     *

Uova da Raviolo Recipe

Ingredients

  • 1/2 recipe of Mom’s Pasta Dough — recipe to be found HERE
  • 1 dozen quail eggs — you’d be wise to purchase a few extra (See Notes)
  • 1 bunch Swiss chard, leaves only, chopped
  • 2 tbsp butter
  • ricotta cheese — recipe to be found HERE
  • Pecorino Romano cheese, grated
  • ground nutmeg, to taste
  • Salt & pepper
  • butter

Directions

Prepare pasta dough, set aside to rest, and make the filling.

to make the filling

  1. Melt 2 tbsp of butter in a sauté pan over med-high heat. Add the Swiss chard, season with nutmeg, salt, pepper, and sauté until cooked. Allow to cool, place in a clean kitchen towel, and wring out as much liquid as possible. Set aside.
  2. To your food processor, add the cooked chard, ricotta cheese, and a handful of Pecorino Romano cheese. Process until smooth. Set aside.

to make the ravioli

  1. Place a strip of thinly rolled dough on a lightly floured work surface. (See Notes.)
  2. Most machines create strips that are 6 inches wide. Place a tbsp of filling, at about 3 inch intervals, in a straight line about 2 inches from the strip’s edge.
  3. Use a spoon to indent each tbsp of filling, creating a nest.
  4. Carefully break each quail egg, separate the yolk, and place one yolk in each filling nest.
  5. Use a pastry brush to lightly moisten the opposing side of the pasta strip.
  6. Carefully cover the nests with the moistened side of the pasta strip. Use a glass or biscuit cutter to seal and cut each raviolo.
  7. If air is trapped in a raviolo, use a toothpick to pierce the underside, being careful not to damage the enclosed yolk. Gently squeeze the trapped air out of the raviolo.
  8. Place ravioli on a lightly floured, wax paper covered baking sheet. Cover the ravioli with a clean kitchen towel. Ravioli should be cooked as soon as possible. Keep refrigerated until ready for use.

to cook and serve

  1. Bring a large pot of salted water to the boil over high heat.
  2. Add the ravioli and when the boil returns, lower the heat and gently cook the ravioli for about 2 minutes.
  3. Meanwhile, melt a few tbsp of butter in a sauté pan over medium heat.
  4. Use a spider strainer to remove the ravioli, placing them in the sauté pan with the melted butter.
  5. Gently toss the ravioli until all are well-coated with butter.
  6. Serve immediately, garnished with a sprinkling of Pecorino Romano cheese.

*     *     *

*     *     *

Variations

Although I served the ravioli dressed with melted butter, they may also be served with a sage-brown butter sauce or a fine extra virgin olive oil. Just be sure to garnish the dish with a sprinkling of grated Pecorino Romano cheese.

*     *     *

Notes

The pasta should be rolled very thin. The thicker the pasta, the longer it will take to cook the ravioli and you’ll run the risk of over-cooking the eggs. The yolks should be runny and not at all hard.

I had planned to serve these ravioli with a sage-brown butter sauce. When it came time to prepare the sauce, however, the sage went missing. With dinner already started and the nearest supply of fresh sage some 30 miles away, I decided it really wasn’t all that necessary and used butter and cheese to dress the pasta. As luck would have it, I was back here in Chicago when Zia came across the sage in her fridge, right where I’d left it.

These were served as a primo piatto. Frankly, there aren’t enough hours in a day to make enough of these ravioli for a main course. I had intended to make 6 per serving but, some time and a number of broken yolks later, I decided that 5 per serving would be plenty.

Quail eggshells are remarkably strong and the inner membrane is even more durable. Together, they make it difficult to break each egg and get to the yolk without it breaking. Buy more quail eggs than needed to allow for the inevitable loss of a yolk or two or three or …

Chances are, once you’ve made your ravioli, you’re going to have some pasta dough left over. Don’t throw it away but follow Mom’s example. She used the scraps to make quadretti pasta, which she kept sealed in an airtight container, adding to it every time she made pasta. These little pasta squares were added to broth and made a great meal. Click HERE to see step-by-step instructions for making quadretti pasta.

*     *     *

Tutto Fatto

*     *     *

It’s déjà vu all over again …

In the old two-flat, it wouldn’t be Christmas if there wasn’t a platter of ravioli on the table. WIth today’s post sharing a new ravioli recipe, I thought today we’d also look back to the original Bartolini Ravioli Filling recipe, as well as the instructional post demonstrating how to use a ravioli form to make the pasta pillows. You can see each post by clicking on the caption under each photo below.

*

Filling Recipe for Bartolini Ravioli

*

How to use a Dye/Mold to Make Ravioli

*     *     *

Coming soon to a monitor near you …

Turkey Risotto Preview

Turkey Risotto

*     *     *

Roast Loin of Pork with Fig Preserves

Fall is here and that can mean but one thing: break out the roasting pans! That’s right. No more excuses like, “It’s too hot!” or “The meal’s too heavy!” No sir-ee, Bob! It’s time to choose your weapon (beef, fowl, pork, or veal), set the oven temperature (low, medium, high, or roar), and prepare yourself for a feast. Lest anyone think that this party is reserved for carnivores alone, however, let me assure every vegetarian, vegan, and pescatarian that roasting does wonders for the foods in your diets, as well. In due time, we’ll get to a few of those recipes, too.

Some of you may recall a discussion in the comments section of the post detailing the making of strawberry jam with balsamic vinegar and black pepper. The consensus was that the jam would “work” with pork or veal roasts. A few weeks later, I made some fig preserves, also with balsamic and black pepper, and the idea of using it with pork was never far from my thoughts. In fact, the very next weekend, I purchased a pork loin and I was off and running.

That first roast was an end piece of the loin and, because of that, it was a little tapered. Once it was brined and coated with fig preserves, it had to be re-folded just as it had been butterflied. I used sliced pancetta on the top of the roast and placed it in a roasting pan with some potatoes. This did not work out so well. Once heated, the preserves leaked out of the roast and any potatoes that were near the preserves burned. The roast was very tasty but the potatoes a disappointment, to say the least. Enter roast no. 2

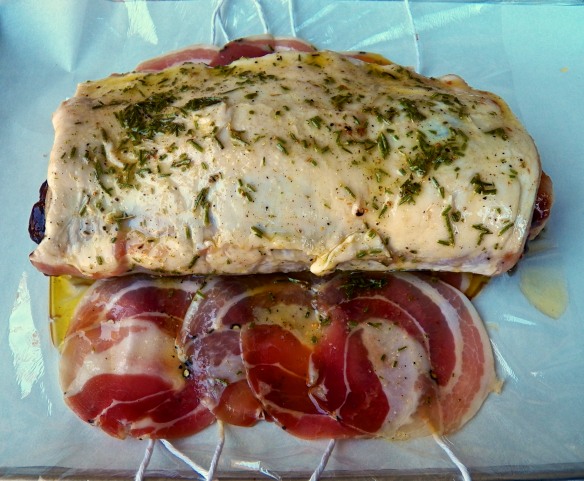
A couple of weeks later, as luck would have it, there was a sale on whole pork loins. Count me in! This time, I asked the my friend, the butcher, to do the butterflying for me, using the loin’s center cut. Once home, it was brined and slathered with fig preserves but this time, the roast was thick enough so that it could be rolled, as one would a jelly roll. After that, I covered it completely with sliced pancetta. The overall effect was to limit the amount of preserves that leaked into the roasting tray. Still, I didn’t want to take any chances. The potatoes were roasted separately and I added liquid to the roasting pan, eventually making a sauce out of the drippings and any “escaped” preserves. This is the method used in today’s post.

Before sharing the recipe, a few things need mentioning. The amount of salt and sugar used in this brine is exactly half what I would normally use, the reason being that the roast was already butterflied. Since it was going to be in the solution overnight, I didn’t want to risk it being over-brined. It is better to be under-brined, trust me. (See Notes.) When roasting, remember that brined meats cook more quickly. Other than that, roasting times will depend upon the size and cut of meat. I used the loin’s center cut. It weighed about 4 lbs. (1.8 kg) and was finished roasting in under an hour.  (An instant read thermometer is your friend.) The FDA’s guidelines no longer require pork to be cooked to 165˚ as it once did. Today, pork roasts are considered safe if cooked to a temperature of 145˚. No matter the temperature you prefer your roast, remember it will raise a few degrees while the roast rests after being pulled from the oven.

I’ve not listed the amounts of the spices required for they, too, will depend upon the roast’s size, as well as the amount of potatoes you’ll be preparing. Just make sure to make enough of the olive oil & herb marinade to cover the roast and the potatoes. You’ll note that I only added garlic to the reserved marinade that was used on the potatoes. I just didn’t feel that garlic would go well with the fig preserves in the roast or the sauce. And lastly, some pancetta is more salty than others. Take this into account when seasoning the pork roast.

 *     *     *

Roast Loin of Pork with Fig Preserves Recipe

Ingredients

for the brine

  • ½ tbsp table salt per cup of liquid used. If using kosher salt, ¾ tbsp per cup of liquid.
  • ¼ tbsp (brown) sugar per cup of liquid used.
  • 1 pint (16 0z, 473 ml) apple cider

for the roast

  • 1 pork loin, butterflied in thirds (see images below)
  • ½ to 1 cup fig preserves with balsamic vinegar
  • ¼ lb (112 g) pancetta, thinly sliced
  • rosemary, chopped
  • olive oil
  • salt & pepper
  • Yukon Gold potatoes, washed and cut into equally sized chunks
  • 2 garlic cloves, diced or grated
  • water, white wine, and stock (vegetable or chicken)

Directions

The Night Before 

Click to enlarge

  1. Carefully butterfly the pork loin 3 ways. Your butcher will do this for you.  Otherwise:
    1. Divide the roast’s thickness into thirds. The first cut will be ⅓ of the way down from the top. Be careful not to cut through the meat. The object is to create a flap not a separate piece
    2. Use your knife to cut the thicker portion in half, again creating a flap and not separate pieces. (Click image on left to see how it is done.)
  2. Following the guidelines, mix enough of a brining solution to ensure that the roast is completely immersed. Select a large enough non-reactive pot, bowl, or sealable bag to make this possible. If need be, place a plate on top of the roast to keep it submerged. Place everything in the refrigerator.
  3. Do not brine longer than 8 hours.

That Morning

  1. Combine enough olive oil, rosemary, salt & pepper to coat both the roast’s exterior  and the potatoes. Mix well and set aside.
  2. Remove the pork from the brine, rinse it under tap water, and pat dry.
  3. Open the roast and use the fig preserves to fully coat its inside.
  4. Close/roll the roast, cover with marinade, and set aside.
  5. On a clean work surface, spread a sheet of plastic wrap large enough to fully encase the rolled roast.
  6. On top of the plastic wrap, place 4 or 5 pieces of butcher’s twine that are long enough to tie the roast.
  7. Place the pancetta pieces atop the twine, making one large sheet. Use a pastry brush to coat the pancetta with the marinade.
  8. Place the roast onto the pancetta and roll it, as you would a jelly roll, to completely cover it in pancetta. Tie the twine to secure the roast.
  9. Coat the roast with olive oil before wrapping it in the plastic wrap. Place in the refrigerator until 30 minutes before the roasting is to begin. Refrigerate at least 1 hour, preferably several.

To Roast

  1. Pre-heat oven to 400˚ F (204˚ C)
  2. 30 minutes before you start to roast the pork loin, remove the meat from the fridge and set aside.
  3. Place potatoes in a large bowl, add reserved marinade, add garlic, and mix until well-coated. Place in a roasting dish/pan.
  4. Unwrap the pork loin and place it on a rack in the center of the roasting pan. Add 1 cup of water to the pan. (See Notes.)
  5. Place pork roast in the center of the oven.
  6. 15 minutes later place the potatoes on the same rack or above. Check the pork’s pan drippings and augment with stock and/or wine, if necessary. Repeat every 10 to 15 minutes, as needed. Do not allow to dry completely.
  7. After 20 minutes, use a large spoon to rearrange the potatoes.
  8. Roasting time will vary depending upon the size and cut of your roast. Begin checking the temperature of a 4 lb. roast after 45 minutes. For medium rare, a temperature of 145˚F (63˚ C) is required. Remember, the roast will continue to cook as it rests.
  9. When the desired temperature is achieved, remove the roast, tent with aluminum foil, and allow to rest for at least 10 minutes.
  10. If potatoes are roasted to you liking, remove and tent to keep warm.
  11. If desired, strain the pan’s juices, separate the grease, and
    1. serve as-is
    2. heat in a pan over med-high heat to reduce
    3. use a couple tbsp of the grease with an equal amount of flour to make a roux. To that roux, add the separated pan juices and additional wine or stock, as needed to make a gravy.
  12. Check for seasonings.
  13. After the roast has rested, remove the strings, slice, and serve immediately with the potatoes and sauce.

*     *     *

Notes

The brining ingredients as listed take into account that the roast was butterflied before it was brined. If you decide to butterfly it after brining you’ll need to double the amounts of sugar and salt used. That’s simply because a whole roast has less surface area than one that’s been butterflied.

No matter how you “wrap” the roast, a little — or a lot — of the fig preserves are going to spill into the roasting pan. Because of their high sugar content, the preserves will burn pretty quickly once they hit the hot pan. With a little care, however, they can help make a great sauce. The key is to make sure the roasting pan never dries completely. Here I started with a cup of water since its purpose was to keep any preserves from burning. As the roasting progressed, I switched to a combination of wine (California Riesling) and stock, ensuring a more flavorful sauce.

*     *     *

It’s déjà vu all over again …

According to one of our more celebrated Italian chefs, snails, lumache, are served traditionally on All Souls Day in Le Marche. Since Friday is All Souls Day, this is the perfect time to review my family’s recipe for preparing the little devils — and you’ll still have 2 days left to go out and buy/capture some for your dinner. You can see the recipe by clicking HERE. Happy hunting!

*     *     *

Coming soon to a monitor near you …

Pan-Seared Salmon with Dill Sauce

 *     *     *


The Kitchens are Powerless

Shortly after 8:00 am, the Kitchens lost their DSL service and it will not be restored until Wednesday, October 17th, at the earliest. In the interim, my access to WordPress, let alone the Internet, will be severely limited and painfully slow. This post  took 45 minutes to prepare.

Thank you for your understanding.

What I Did On My Summer Vacation

For homes not built on Lake Huron’s bluff, this is the path to the beach. In some places, it is at least a 45˚ incline, making it difficult, at best, and often treacherous when the least bit wet.                   (Click to enlarge)

Last Monday I returned from what has become an annual trip home to visit my Zia. She lives in a house she and Uncle built about 1970, retiring there a few years later, in a rural community along Michigan’s Lake Huron shore. I was about 15 when I first went “up North” with them. Back then, the property was used as a weekend get-away, with Zia & Uncle using a camper-trailer for their lodging and the rest of us in tents. Within a couple of years, Uncle began building their home, as did many of their current neighbors. (Because so many of them bought multiple lots, this will remain a sparsely populated area.) When my Parents were preparing for retirement, they bought the home “next door” to Zia’s. With only 2 lots separating the homes, Grandpa’s lifelong wish that his Girls remain together was once again fulfilled.

40 years ago, the water level of Lake Huron was high enough that this “pier” was almost submerged with sections made slippery with algae. We often fished off the end of the pier and what is now beach on the pier’s left was completely under water. Although smelt still “run” every Spring in the creek to the left of the pier, thanks to the efforts of the DNR, Coho salmon also used the creek to spawn during the 70’s and into the 80’s.

Searching for his ball.

In the years since, we’ve seen private phone lines come to the area, although modern services like call waiting and caller I.D. were made available only recently. About 10 years ago, running water was made available to the communities that wanted it.  Surprisingly, not everyone does and the water mains slowly continue to spread to those that do. Most importantly, however, was the community that the residents built together. As their homes went up, neighbors became friends and  the families mingled. Today, the kids have all grown and have families of their own, some even have their own grandkids. My Brother and his Wife raised their 2 Sons in a small community about 10 miles up the road. Two of Zia’s Sons remain in the Detroit Metropolitan area, less than a 2 hour drive away, as does my Sister and her 2 kids.

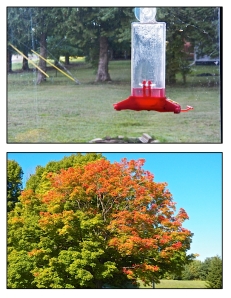
From abandoned hummingbird feeders to trees recently set ablaze, the signs of Autumn’s return were everywhere. Mom & Dad’s house was on the other side of the line of trees visible in the background of the photo of the hummingbird feeder.  (Click to enlarge)

All of this means that a visit with Zia is so much more than just that. My Brother and his Wife are sure to stop by for a visit. Most often, when he’s not playing with his grandkids here in suburban Chicago, Zia’s Eldest Son and the bane of my fantasy sports teams will visit for a few days. Don’t be fooled. He’s not there to visit with me. He’s come to play with Max. The two are inseparable as long as he’s there. And of course, her neighbors will be sure to stop by to visit and we’ll often have Sunday brunch together, meeting at one of the area’s restaurants after they’ve attended Mass. In between the visits, Zia and I will cook for each other. When she’s not teaching me a family recipe, I’m showing her one that I’ve found, often from my WP “family”.  This is the routine, for lack of a better word, followed during my visits home. Well, for all except my yearly visit in late Summer or early Fall.

This time of year my visit home is to help Zia fill her freezer. I bring my KitchenAid mixer, my pasta-making equipment, and, of course, my ice cream maker, although I very often forget some critical piece of equipment. (Once, I arrived without the door to Max’s crate; another time the paddle to my ice cream maker was left behind; and, most recently, I forgot my ravioli dies.) Still, we “make do” and spend a few afternoons working together.

*     *     *

This year, we spent 2 afternoons making ravioli. When all was said and done, we used 16 eggs worth of dough (you pasta makers will know how much that is) to make almost 900 of the pasta pillows. Not only that, but I used the leftover dough to make well over a pound of hand-cut fettuccine. All of this was accomplished under the watchful eye of Max who was able to snag 3 ravioli that fell off the table. This was a disappointing year for him. Last year he somehow stole 5 ravioli as we worked and literally vacuumed up another 30 as we sat a mere 10 feet away. Despite Max, these are some of my favorite times with Zia. We often reminisce, “filling in the blanks” to each other’s memories, and I’ve also learned a great deal of my family’s history during these work sessions. And, of course, sooner or later Grandpa’s name is sure to come up and we’ll laugh as we recall some incident involving the Bartolini Patriarch. Don’t worry. I’ll get to those tales eventually.

*     *     *

On another afternoon during this visit, the two of us turned our attention to sausage production. Although you sausage purists may object, a couple of years ago I convinced Zia to put away her casings and to make patties instead of links. Aside from being far easier and less time-consuming to make, sausage patties can be stacked for storage and are more easily used in sauces or whenever sausage meat is needed. To make things even easier, on yet another sleepless night a few years ago, I bought a patty press. Armed with a kitchen scale and my press, Zia and I whipped up a batch of 20 identical sausage patties in no time. And once again, Max was thwarted and unable to get to any of the ingredients. He did, however, try to pull off what has become his signature move when I’m working in the kitchen. As he has always done, he stayed close to where the action is, waiting for some morsel to hit the floor. This time, though, he waited for me to put my hand to my side and when I did, he gave it a good licking. Of course, that meant I had to stop and wash my hands — and herein lies the beauty of his plan. Up until I caught on, once I left the work area, he would “clean up”, gobbling as much as he could while my back was turned. This time, with Zia right there, his plan was foiled and, when we’re at home, he either accompanies me to the sink or I move the object(s) of his desire to higher ground while I wash.

*     *     *

September is Honey Time in her area of Michigan. A local man has 20 hives — that I saw — and on one or two weekends in September, he sells his honey to the locals for $2.25/lb. His honey is also available year-round at a couple of the local stores. I bought some for people back here in Chi-town and Zia bought more for her family. All told, we bought 3 gallons of honey from the man — and Zia said she was going back for more. Unfortunately, while I was taking pictures of the hives, a number of customers arrived and I never did get permission to publish photos of anything else. Next year!

*     *     *

As dedicated foodies, no narrative of a vacation would be complete without at least a mention of the meals served. When I visit Zia, there are 2 things that I know will be waiting for me: a Manhattan and a risotto dinner. I’ve yet to see anyone prepare risotto the Bartolini way, so, I’ll be posting that recipe later in the year. When Mom was still with us, upon my arrival, she’d serve me a Manhattan while she prepared soup for our dinner. I don’t know why I drink Manhattans back home for I rarely, if ever, drink them anywhere else. Nevertheless, for decades, Manhattans are the house cocktail when I visit. In fact, one afternoon, about 20 years ago, I’d gone down to the beach to get some sun.  I was there about 30 minutes when Zia appeared, carrying a pitcher of Manhattans with 2 glasses.  After about 15 minutes, as we sat, sipping our cocktails, Mom appeared carrying another pitcher of Manhattans with 2 glasses. After a good laugh, the 3 of us spent the afternoon together, sitting on the beach, sipping Manhattans. Thank heavens this took place before smartphones and the Video Age for there is no footage of the 3 of us struggling to get up that hill, empty pitchers in hand.

Now, back to the food …

With homes atop the bluff, this shoreline is repeated throughout much of this part of Michigan … well, not including Max, of course.

My 2nd night there, I took over the kitchen, preparing Mom’s Chicken Cacciatore and serving it over a bed of polenta. Zia fired back on the 3rd night, fixing broiled pork chops and serving them with a side of spaghetti dressed with her meat sauce. Peace reigned on the 4th night, a Friday, and we went to a local restaurant’s fish fry. I was back at the stove top the next night and I prepared Pappa al Pomodoro, a kind of tomato soup, the recipe for which I’ll be sharing next week. My final night, Zia prepared my farewell dinner, baked shells stuffed with homemade ricotta & spinach. Once the dust had settled, the judges rendered their verdict. Zia had won September’s Battle in the Kitchen. Though they appreciated my efforts, including the 6 quarts of blueberry cheesecake ice cream I’d prepared and the frozen cobbler I’d brought from home, I’d not done enough to overcome Zia’s home court advantage. You see, she’d kept the Manhattans flowing at the judges’ table.  I never did stand a chance.

*     *     *

So ends my essay on what I did on my Summer vacation. As you can see, not only did I have a wonderful time but Zia’s freezer is well-stocked for the cold months ahead. And, rest assured, the next time I visit, I’m going to insist on judges who are teetotalers.

*     *     *

It’s déjà vu all over again …

Since I mentioned it in the post above, I thought this post’s blast from the past would be the recipe for Mom’s Chicken (that’s not really) Cacciatore. I really enjoy this dish. It can be served as-is or atop a bed of polenta or buttered noodles. Best of all, no matter how it’s served, your kitchen will be filled with the irresistible aroma of the rosemary & garlic used in this dish’s preparation. Mom hit this one out of the park and you can view the recipe by clicking HERE.

*     *     *

Flat Ruthie: Miracle Worker (Part 2)

Welcome back. To recap Part 1, friends and I have, at this point, attended 3 Cubs games, with Flat Ruthie joining us for 2 of them. The Cubs won the games when Flat Ruthie was in attendance and lost the game she missed.

The next game that we attended was against the New York Mets on June 26th. With temperatures soaring well into the 90’s at game time, surprisingly, we spoke little of the weather. Our focus was on Flat Ruthie. Would she bring another victory to this most beleaguered of all ball clubs?

Well, the most amazing thing happened.  Here’s Flat Ruthie posing for me. Please take note of the Man in the bottom left corner.

  *     *     *

Remember that Man!

  *     *     *

Yes, the Cubs won that game, 3 – 1, but for once that wasn’t the amazing thing.

  *     *     *

  *     *     *

As I was attempting, unsuccessfully, to get a photo of both Flat Ruthie and the Cubs score board, the Man in the photo revealed himself. With devoted fans singing the last of “Go, Cubs, Go!”, this Man reached deep, deep into his pant pocket to retrieve his very large … Flat! You see, this Man seated before us was the Keeper of the New York Mets’ Gnome of Defeat — and that’s not even the miracle! Agog, I watched as he photographed The Gnome, trying to capture both Gnome and some significant sight within Wrigley Field. When he was finished, I asked if The Gnome wouldn’t mind posing with Flat Ruthie. Demonstrating that unique camaraderie that exists between all Flats, The Gnome graciously agreed. I took the picture, bid Gnome and Keeper farewell, and we headed for the exit. Flat Ruthie had just witnessed a 3rd victory. Someone pinch me. I must be dreaming!

It wasn’t until later that night, after I uploaded the photos, that I first caught glimpse of it — or did I? There, in the photo with The Gnome of Defeat, Flat Ruthie was sporting a … a … well, look for yourself. Do you see it?

*     *     *

 *     *     *

Skeptic that I am, I thought this some sort of fluke. Perhaps I’d inadvertently captured a ring toss game in progress or some such thing. Needless to say, I put the photo aside, vowing never to mention its existence to anyone. Tell me you wouldn’t have done the same.

It wasn’t long before we found ourselves once again passing through the turnstiles of Wrigley Field to witness a game against the Arizona Diamondbacks. On this day, July 15th, not only did Flat Ruthie join us but so did another Friend, one who would never be considered a fan of America’s Pastime.

*     *     *

*     *     *

Although you cannot see it in the above picture, the Cubs jumped to an early lead and fought hard to maintain it. Sometime during the 6th inning, my-less-than-fanatical fan Friend left to stretch his legs. As he walked around the park, the rest of us wondered if Flat Ruthie was behind these Cubs victories. You see, we’ve been to plenty of games, mostly losses, and it would be absurd to think that skill or even blind luck was behind this recent string of wins. Something else was at work here. I said nothing of the photo.

We were now into the top of 7th inning. Suddenly, the batter knocked a foul ball high into the Upper Deck on the other side of the stadium. I watched in amazement as it bounced directly in front of our Friend and landed right into the palm of his outstretched hand!!!! Unwilling to believe my own eyes, I turned to the others and asked if that was, indeed, our-less-than-fanatical fan Friend. Once Cynthia, who only moments before had fainted dead away, was revived, all agreed that it was, in fact, our Friend.

Try to understand the enormity of this. The rest of us have been going to Wrigley for decades. We’ve sat in virtually every section of that ballpark, and that includes a few of the rooftops across Sheffield Ave. We’ve gotten sunburned, drenched, and, on one memorable Opening Day, snowed upon. We’ve attended many a season’s first game, as well as its last, and far too many games in-between to count. We’ve sat stunned as we watched opportunity slip away and partied with the throngs on Clark St when the Cubs clinched a Playoff berth. We’ve done all that, and more, but never has a ball come within 50 feet of any one of us. Never!

So, my-less-than-fanatical fan Friend returned to us, souvenir ball in hand. Of course, Flat Ruthie insisted upon having her picture taken with them both. All the while, the rest of us groped for answers. How could this be? Are we on the verge of the Apocalypse? Do we walk into the Light or run from it? Was it too late to buy another round of beer? (One can question and still be thirsty.) Despite so many questions demanding answer, I shot my photograph.  Seconds later, when I checked the photo, there it was for all to see.

*     *     *

*     *     *

Flat Ruthie’s Halo had re-appeared — and this time for good. There was no ring toss game in the background. (No beer vendor either.) This was Flat Ruthie, Miracle Worker, pure and simple. She delivered unto my-less-than-fanatical fan Friend a foul ball, thus revealing her powers for all to see. I never should have doubted the first Halo sighting.

*     *     *

*     *     *

Yes, the Cubs won that game but, given the circumstances, the win did seem a bit anti-climactic. Still, a win is a win and, lest you’ve forgotten, the Cubs have won each game with Flat Ruthie in attendance. That’s 4 out of 4 victories thus far this season.

Now that her true self has been revealed, will Flat Ruthie continue to help the Cubs or will she see fit to punish me for doubting her after the Mets game? There’s only 1 way to find out. We’ve tickets for more games this season. I will let you know.

In the meantime, to learn more of Flat Ruthie, the indefatigable World Traveller, Bonne Vivante, and now Miracle Worker, please click HERE to go to her website.

*     *     *

Flat Ruthie: Miracle Worker (Part 1)

Let me begin by stating that this post is not for everyone. You see, as a Cubs fan, I’m used to being treated with everything from derision to sympathy, and all points in-between. For some, the Cubs and their fans are nothing more than a losing bunch with no redeemable qualities whatsoever. Well, to those people we say, “So, what! We’ve got Flat Ruthie on our side.”

“What’s that?” you say.  Permit me to explain.

Friends and I attend a number of Cubs games every year, win, lose or draw — with heavy emphasis on the first of the 3 choices. Thus far this year, we have seen 5 games but I’m getting ahead of myself.

We brought Flat Ruthie with us for our first game of the season on April 8th against the Washington Nationals. Of course, like every newcomer to Wrigley Field, Flat Ruthie went souvenir shopping.

*     *     *

Fetching!

 *     *     *

Pin Stripes are so slimming.

  *     *     *

Just her size.

  *     *     *


 *     *     *

And yes, you read that correctly. The Cubs won.

On April 23rd, we returned to the Friendly Confines for a game against our rivals, the St. Louis Cardinals. Having all the souvenirs a Flat could possibly want, Flat Ruthie decided to just relax and take in the excitement of a Spring Day at the ball park, beginning with a beer at the Captain Morgan Club.

 *     *     *

Flat Ruthie ordering a round from Paige.

 *     *     *

Moments later, Flat Ruthie introduces herself to Captain Morgan, himself!

 *     *     *

Later, during the game, Flat Ruthie and our beer vendor “ignore” each other. Their chemistry was palpable.

 *     *     *

And, yes, the Cubs won that game, too. As of that evening, the Cubs had won only 5 of 17 games and we were present for 2 of them.

We returned to the ballpark on June 12th, for an inter-league game against my old hometown’s team, the Detroit Tigers. Flat Ruthie couldn’t join us. She was touring Ashby de la Zouch, in North West Leicestershire, England, with her friend, Eldritch the Dragon. The Cubs lost by a score of 8 – 4. At this point, the Cubs had won 21 games out of 62.

“That’s all well and good,” you must be thinking. “But what’s this about Flat Ruthie being a Miracle Worker?”

Well, you’ll just have to wait until tomorrow, when Part II is published. Just remember that, thus far, with Flat Ruthie in attendance, the Cubs have won.

 *     *     *