Slow-Cooker Pork Belly Ramen

Urban Belly would be jealous

OK. By now you may have noticed that this blog has taken a turn into decidedly comfort food territory. I could give a number of reasons for this change of course but one rises above all others. Baby, it’s cold outside!!! Even worse, we’ve just endured a 9 day period where it snowed each and every one of those day! Is there any wonder why there’s Pork Belly Ramen slowly simmering in my slow cooker as this post is being written?

I was first served this wonderful ramen on my way home after a visit to the Garfield Park Conservatory late last winter. I stopped at a restaurant, Urban Belly, and ordered the Pork Belly Ramen based upon recommendations of previous diners. Bless them!

Once home, I immediately googled “pork belly ramen” and started comparing recipes. Off the top, I wanted to use my slow-cooker, rejecting the recipes that didn’t. Hopefully, slow-cooking  would not only result in tender pork but the broth should benefit, as well. With luck, the finished dish would include a soft-boiled egg. No matter. That egg was such a nice addition to the Urban Belly ramen that I was going to add it to whatever recipe I eventually chose.  Within minutes, I found the recipe that’s shared here. Of course, being the conscientious blogger that I am, I would never post a recipe without rigorous testing. So, I prepared the recipe again and again… and again … and again … and, well, you get the idea. Needless to say, the recipe not only passed the tests but has become a regular guest at my winter-time dinner table. I buy the pork belly, divvy it up into 1 pound pieces, use one for that night’s dinner, and freeze the rest. In fact, right now I’ve 2 pieces of pork belly resting comfortably in the freezer. Let it snow, let it snow, let it snow.

Aside from adding a couple garnishes, the only change I made to the recipe is in the handling of the pork belly.The recipe indicated that the belly should be cooked with the skin attached, to be removed just prior to slicing. The meat isn’t seared. When I tried it that way, I had a devil of a time removing the skin without (badly) butchering the belly. I even tried slicing the belly first before removing the skin. And the fat? Without any type of sear, it was a bit of a disappointment. For me, one of the most appealing things about well-cooked pork belly is the crispy fat. Believe me, it’s well worth the time (5 minutes) time and effort (minimal) to place that belly into a hot frypan and sear its fat side. Just be sure the pan is hot. You want to sear the fat quickly without further cooking the meat. Once sliced, place the slices on top of the ramen, keeping the seared side above the broth to maintain its crispness.

*     *     *

Note: Because this recipe endured such thorough testing, the link was never saved (to be later lost) but printed instead to allow easy access. So, unlike recent posts, it gives me great pleasure to give credit where due. This recipe can be found on the Australian Good Food website.

*     *     *

This just about says it all

*     *     *

Pork Belly Ramen Recipe

Ingredients

  • 1 lb  (approx 500 g) boneless, skinless pork belly (see Notes)
  • 1 quart (1 liter) chicken stock
  • 2 tbsp tamari
  • 2 tbsp sake  (don’t forget to toast the chef)
  • 2 tbsp mirin
  • 2 tsp sugar
  • 2 garlic gloves, chopped
  • 3½ oz (100 g) white (Shiro) miso paste
  • 1½ inches (4 cm) grated fresh ginger
  • 1 leek, white part only, thinly sliced
  • 1 carrot, chopped
  • i piece kombu (see Notes)
  • 1 lb  (approx 500 g) cooked ramen noodles (see Notes)
  • One 3 to 5 minute egg per serving, peeled & sliced in half
  • for garnish (optional)
    • sliced scallions, nori sheet, cilantro leaves, sesame seeds, a splash of ponzu, a sprinkle of sesame oil (see Notes)

Directions

  1. Add the chicken stock, tamari, sake, mirin, sugar, and miso to the slow-cooler and stir thoroughly.
  2. To the pot, add the leek, ginger, garlic, and carrot. Stir.
  3. Place the kombu into the pot before adding the pork belly.
  4. Cover and set the cooker to “LOW” and the timer to 7 hours.
  5. When finished, remove the pork belly. (If using a belly with skin, remove the skin before proceeding.)  Place fat-side down on to a hot frypan over med-high heat. The object here is to crisp the fat without burning or over-cooking the meat. Reserve, slice, and keep warm. (see Notes)
  6. Cook the noodles per package directions.
  7. Meanwhile, pour the broth through a fine-mesh strainer. Return to the slow cooker and keep warm.
  8. To serve:
    • Divide the cooked noodles evenly among the serving bowls.
    • Add equal amounts of the strained broth to each bowl.
    • Slice the egg, if using, and add to each bowl.
    • Place the sliced pork belly into each bowl. To maintain its crispness, try to keep the seared edge above the broth.
    • The remaining garnish may be added now or brought to the table to be added by your dinner mates.
  9. Serve immediately.

*     *     *

Not quite crispy enough.

*     *     *

Notes

Don’t be overly concerned when chopping the vegetables. Once the pork is cooked, the broth will be strained and the vegetables discarded.

I’ve a smaller-sized slow cooker and, therefore, use a small piece of pork belly. This recipe results in 4 bowls of ramen, each with 2 slices of pork belly.

Kombu is dried kelp and can be found in the Japanese section of many Asian markets. It is purchased in sheets and should be lightly wiped with a damp cloth before use. Store in an airtight container.

Similarly, nori — used here as a garnish — is dried seaweed also purchased in sheets. It’s very often used to wrap sushi rolls, maki. You, or your guests, may wish to place a small sheet into each bowl to add some texture and crunch to your ramen.

Although “ramen” noodles can be purchased at many groceries, feel free to use whatever noodle — rice, bean, egg — you prefer. Just keep an eye on the clock to insure that they are ready when you’re filling the bowls. Badly cooked noodles will spoil any dish, no matter the country of origin.

You needn’t sear the pork belly, if that’s your preference. Whether you do, be sure to slice the meat so that it can be evenly divided among the serving bowls. Remember: always slice the meat against the grain.

You may have noticed the small bowl to the right of the ramen in the opening photo. It contains sriracha and hoisin sauces. I got the idea of combining both by observing patrons at a number of pho restaurants. Additionally, one of this area’s food critics — more about him in a future pho post —  mentioned that some chefs are insulted when a patron adds sauce(s) to their pho. Placing the sauces in a small bowl allows one to dip the cooked meat(s) into the sauces, leaving the pho/ramen just as the chef intended, thereby averting an International incident.

*     *     *

It’s déjà vu all over again …

Stormy Lentils 3

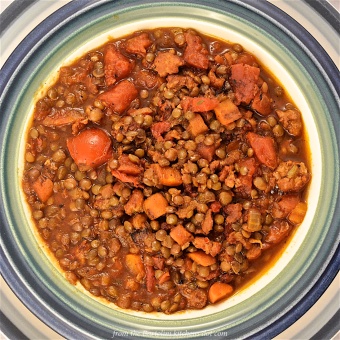
Here we stand, feet firmly planted in comfort food country, and here we shall stay. Today’s look back was — and still is — a great recipe for these wintry days. Easy to prepare and oh, so very hearty, you won’t care what’s happening outside your door with a bowl of this lentil soup before you. The recipe for this lentil dish can be found HERE.

*     *     *

Coming soon to a monitor near you …

Marinella’s Meatballs

*     *     *

Advertisements

Advertisement

Gettin’ Cheeky with Beef – And in a Slow Cooker, No Less

Guance di Manzo Brasato

Let me say from the onset that this is not a Bartolini family recipe. In fact, I can say with some certainty — feel free to back me up, Zia — that beef cheeks never graced a Bartolini dinner table. This all changed the last weekend of last October. That was the weekend the vendor with certified organic meats returned to the farmers market.

*     *     *

Beef Cheeks 1*     *     *

You may recall that I had been waiting for him to return because he sold goat and, even though I’d found some at a nearby market, I prefer to buy organic when its available. As it is, I buy chickens from him all Summer long. It had been weeks since he last set up his stall and I was, frankly, surprised to see him. The following weekend was to be the market’s last for the year and I thought him gone until 2014.

His stall, for lack of a better word, is a set of folding tables arranged in a “U” shape. On them he’s places about 6 ice chests in which he keeps the week’s frozen inventory. That week there wasn’t any goat meat but I was surprised to find a package labeled “beef cheeks.” I bought it, along with a chicken, and placed both in the freezer when I returned home.

Well, as this Winter unfolded, I exhausted my repertoire of comfort foods. Last week’s tuna noodle casserole was proof that I’d run out of options. It was about that time that I remembered that there were beef cheeks in the freezer, though they had somehow managed to work their way to a back corner. Another Sunday braise was suddenly in the offing.

Although still below freezing, that Sunday turned out to be the warmest day of the month to date. Since there was no real need to heat the kitchen, I switched gears a bit and opted for using the slow cooker rather than the Dutch oven. Best of all, with a fridge well-stocked with braising vegetables, there would be no last-minute trip to the grocery that morning — until I realized that I’d need side dishes. Curses!

*     *     *

This braise is like most, with one minor exception. I started by making a form of battuto, an Italian soffrito. In our part of Italy, a battuto consists of finely diced onion, parsley, garlic, and salt pork. Battuto is the first thing into the pan, after the olive oil is heated, and will flavor the dish as its aroma fills your kitchen. Here, I made my battuto with guanciale, parsley, and garlic. (Yes, this recipe mixes the cheeks of both pork and beef. Shocking!) The onions were added with the other braising vegetables, once the battuto was cooked. The rest of the recipe is easy enough to follow and you should have no problems.

*     *     *

Beef Cheeks Braising*     *     *

Braised Beef Cheeks Recipe

Ingredients

  • 2 beef cheeks, approximately 1.2 lbs (540 g)
  • 2 tbsp olive oil
  • 4 oz guanciale, chopped – pancetta or bacon may be substituted
  • 3 cloves garlic, chopped
  • 1/4 c parsley, chopped
  • 1 medium onion, chopped
  • 2 stalks celery, leaves included, roughly chopped
  • 2 carrots, roughly chopped
  • 3 sprigs fresh thyme
  • 2 sprigs fresh rosemary
  • 3 tbsp tomato paste
  • 3/4 c red wine
  • 3/4 c Madeira
  • 1.5 c beef stock
  • salt and pepper
  • lemon zest

*     *     *

Battuto*     *     *

Directions

  1. Combine chopped guanciale, parsley, and garlic on your cutting board and chop them together until uniform. This is the battuto.
  2. Warm oil in a sauté pan over med-high heat. Add the battuto and sauté until the guanciale’s fat is rendered, about 5 – 7 minutes. Do not allow to burn.
  3. Add onion, carrots, and celery to the pan and sauté until the onion is translucent.
  4. Add the rosemary and thyme to the pan. Continue sautéing until both begin to wilt.
  5. Use a slotted spoon to remove the pan’s contents and place all into the slow cooker. Do not drain the oil.
  6. Season beef cheeks with salt and pepper before placing into the hot pan. Turn when brown, about 5 minutes. Remove when both sides have been browned. Place into the slow cooker atop the other ingredients.
  7. Add the tomato paste to the pan and sauté until fragrant, about 1 minute.
  8. Use wine to deglaze the pan.
  9. Add the Madeira and beef stock and bring to a boil to burn off the alcohol.
  10. Add the liquid to the slow cooker. (See Notes)
  11. Cook on high for one hour before reducing to low for another 6 hours. Turn over the meat occasionally, about once every 90 minutes, or so. (See Notes)
  12. Remove meat and cover while the liquids are strained and the sauce prepared. (See Notes)
  13. Just before serving, garnish with a bit of lemon zest.

*     *     *

Beef Cheeks 2*     *     *

Sides

As pictured, there were 2 sides served, neither of which is complicated nor difficult to prepare.

  • Mashed Potatoes and Parsnips with Roasted Garlic:Parsnip-Potato Mash
      Prepare mashed potatoes as you would normally, substituting 1/3 of the potatoes with peeled, chopped parsnips. Once boiled and drained, mash before adding warmed heavy cream into which butter and roasted garlic cloves have been added. Serve.
  • Sautéed Broccoli Rab (Rapini) with Pancetta and Garlic:Rapini with Pancetta
      Sauté chopped pancetta in a bit of olive oil to render its fat and until it’s not quite fully cooked. Add garlic and, after about a minute, add the broccoli rab, season with salt & pepper, and sauté until cooked to your satisfaction. Serve.

*     *     *

Notes

The braising liquid should not be so deep that the meat is totally submerged like you would do for a stew or soup. When using a slow cooker. the liquid should come about half-way up the side of the beef cheeks. When using a Dutch oven, I use enough liquid so that it comes up 2/3 of the side of the protein to allow for evaporation. Use more or less liquid to arrive at the recommended level. Just maintain the same ratio of the braising liquid’s ingredients: 2 parts beef stock to 1 part each of Madeira and red wine.

A slow cooker works by applying a low, even temperature over a long period of time. Do not uncover the cooker unless necessary or you’ll run the risk of extending the cooking time.

Parsnips are a bit more firm than potatoes. When preparing them, chop the parsnips in pieces that are slightly smaller than the potatoes to insure that all will finish cooking at the same time.

Once you’ve strained the liquids and removed the fat, you can:

  • serve the sauce as-is;
  • reduce it and serve; or,
  • use a thickening agent — flour, corn starch, or arrowroot — to make gravy.

No matter how you finish the sauce, be sure to taste and adjust the seasoning as needed.

*     *     *

When blogs collide

On the very day that I was cooking my beef cheeks, Phil, of “Food, Frankly“, posted his recipes for preparing an ox cheeks dinner. Do yourself a favor and take a few minutes to check out the delicious meal that he prepared.

*     *     *

And finally

In the Comments for last week’s post, my Cousin mentioned that there’s a recall of beef that was processed by a California company and sold across the US. Though the beef I purchased was locally grown and processed, that is hardly the case everywhere. You can read about the recall and the reasons behind it in this USDA News Release, dated February 18th, 2014.

*     *     *

It’s déjà vu all over again …

Tricolor Risotto 4It won’t be long now before we are once again celebrating St. Joseph’s Feast Day. Today’s look back will show you how to prepare a risotto of 3 colors, each of which, not so coincidentally, corresponds to one of the colors of the Italian flag. You needn’t be Italian to make this expression of Italian pride and you can learn how to do it by clicking HERE.

*     *     *

Coming soon to a monitor near you …

Chocolate Torte Preview 2 Gluten-Free Chocolate Torte

*     *     *

Braised Goat in the Moorish Style

Capra Basata nello Stile di Moresco

Braised Goat with Harissa

I’m back and the Kitchens are once again open. Zia and I thank you all for your kind words and well wishes. She sends her warm regards. She, also, sent me home with a few new recipes — octopus and quail are at the top of that list — and I’ll be sharing them in the weeks to come.

Of course, we did buy our share of honey, over 4 gallons between the two of us. Although I brought home 2.25 gallons (8.5 l), almost all went to my neighbors for distribution among their family members. The “Honey Man”, Mr. Falkenberg, has about 100 hives and they produce enough honey for him to sell it in some of that area’s markets, as well as during not one but two weekends this year. He also sold apples, grapes, and black walnuts.  I bought a 5 pound bucket of grapes for $2.00 and used them to make grape jelly yesterday. The apples were used to make apple sauce and my Zia Mariolla’s apple cake. That recipe will be shared in the near future.

*     *     *

(Click to enlarge any photo)

*     *     *

I’ve mentioned in the past that my family prepared goat, very often at Easter. As the years past, we relied more upon lamb for that holiday meal and I cannot tell you the last time I enjoyed goat in any form. Worse yet, I had no idea where I might purchase some. Well, that all changed a few weeks ago. I didn’t realize it but the vendor at the farmers market from whom I buy organic chicken also sells a variety of meats, goat being among them. Although I couldn’t buy any at the time, I knew I’d be back to purchase some. And that’s the last I’ve seen of that vendor. For whatever reason, they are no longer at the farmers market. Not only did I lose my long sought-after source for fresh goat meat but I lost my organic chicken vendor, too.

Well, returning home after the third week of the vendor’s absence, I decided to take matters into my own hands. I pulled the car to the curb and googled, “Where to buy goat in Chicago?” Lo and behold! Just about a half-mile from my home, there’s a Middle Eastern grocery and butcher. It’s one block West of the Indian market where I buy spices and I’ve walked past it any number of times. Within minutes, I was on my way with a goat shoulder wrapped in brown paper.

Once home and after a quick web search, I settled upon a great recipe. Unfortunately, it required harissa and I didn’t have a recipe for the sauce nor did I feel like experimenting. So, I did what I often do. I went to the Middle East Bakery & Grocery, a little gem of a store located in my old neighborhood. As luck would have it, they make their own harissa on-site and it’s good enough to be used in a number of the restaurants in town.

So, with a goat shouder on the counter, harissa in-hand, and a jar of preserved lemons hiding out in the back of my fridge, I set about making braised goat — but with one major difference. The original recipe uses a dutch oven to braise the roast, slowly, in the oven. When I finally bought the meat, Summer had returned to this area with a vengeance, I wasn’t about to turn on my oven for anything, let alone a long and slow braise. Instead, I pulled out the slow cooker and my kitchen kept its cool. This is the version described in the recipe below.

Oh! One more thing. I will be bringing some goat with me to Michigan next time so that I can learn and share my family’s recipe for roasting it. Get ready, Zia!

*     *     *

Raw Goat Shoulder

*     *     *

Goat in the Moorish Style Recipe

Ingredients

  • 1 cup harissa for marinade
  • 2 – 3 tbsp extra virgin olive oil
  • 2 carrots, chopped
  • 1 large onion, sliced
  • 6 cloves garlic, smashed
  • 2 bay leaves
  • 1 cinnamon stick
  • 3 cilantro stems – that’s right, I’m using cilantro
  • 2 cups low/no sodium chicken stock
  • 1/2 cup dry white wine
  • 1 tbsp honey
  • the rind from half of a preserved lemon, finely chopped
  • salt and pepper
  • harissa for serving
  • Greek yogurt for serving

*     *     *

Goat ready to be cooked

*     *     *

Directions

  1. With a very sharp knife, remove gray skin from the meat. Season with salt & pepper.
  2. Place meat in a large, seal-able plastic bag, add the harissa and completely coat the meat. Place the bag and contents in the fridge overnight. Turn bag over every couple of hours. Remove from fridge 1 hour before cooking is to begin.
  3. Heat oil over med-high heat in a medium sauté pan. Add onions, carrot, garlic, bay leaves, and cinnamon stick, sautéing until soft and fragrant. Season with salt and pepper.
  4. Meanwhile, place stock, white wine, and honey in a small sauce pan, bring to a boil, and then keep warm over a very low flame.
  5. Once the vegetables have been sautéed, dump that pan’s contents into the slow cooker. Add the cilantro and stir.
  6. Place the goat meat atop the vegetables, Be sure to include any remaining harissa left in the bag.
  7. Pour the wine mixture around the roast in the slow cooker. Cover and set to “Low”.
  8. Turn the roast after 1 hour, and then again every 2 hours after. Roast will be cooked in 8 hours.
  9. After 8 hours, remove roast to a dish and cover. Strain the pan juices, discarding the braising vegetables. Set aside to allow the fat to separate and then remove.
  10. See Serving Suggestions below

Inspired by a recipe in the NY Times.

*     *     *

Goat Plated

*     *     *

Serving Suggestions

1) Once cooked, the roast can be carved and served as-is. Sprinkle with the preserved lemon. Suggested accompaniments would be rice, yogurt, and a bit of harissa on the side. The sauce can be reduced to the thickness of your choice. Check for seasoning before serving on the side.

2) Debone the cooked roast and treat it as you would pulled pork. Return in to the slow cooker. Add the preserved lemon and mix thoroughly. Reduce the sauce to the desired thickness and either add it to the pulled goat or serve on the side.

*     *     *

Goat Sandwich on Baby Arugula with Greek Yogurt and Harissa

Pulled Goat Sandwich on Baby Arugula with Greek Yogurt and Harissa

*     *     *

It’s déjà vu all over again …

About a year ago, I posted a recipe for plum cobbler that I jokingly called “magical.” What I didn’t know, but learned while I was visiting Zia, was that the recipe contained a typo. Instead of listing “1 TBSP baking powder”, I had written “1 TSP baking powder.” Big difference, no? I’ve since corrected the recipe  and please make sure you do the same if you’ve made a copy for yourself.

*     *     *

Coming soon to a monitor near you …

_DSC0001 2

Blueberry-Lemon Slice

*     *     *

Mom’s Boiled Dinner

Though Italian, through and through, the Bartolini Sisters’ recipe repertoire was anything but restricted to Italian fare. Both Sisters cooked a range of dishes representing many cuisines, and as Mom loved to recall, I was about 6 when I told her that eating at our  house was “an adventure!” You see, it was about that time that Mom had gone to lunch with a few friends, I believe, at what was at the time Detroit’s premier Chinese restaurant. She ordered sweet & sour something-or-other (I don’t remember what), thoroughly enjoyed it, and asked the waiter if she could have the recipe. He agreed and returned a few minutes later with the recipe, which no doubt pleased Mom no end. Later, when the check arrived, Mom was surprised to see a $25.00 fee for the recipe included in the total! (Understand that this was a time when $25.00 was considered a nice sum to win on game shows like “What’s My Line?”. )  Mom, rightly, refused to pay the $25.00, indignantly gave them back the recipe, and vowed to duplicate that meal. And thus began our “adventure.” Starting with the Chun King section of the grocery store, Mom set out to make the ultimate sweet and sour dish. Time after time, she served us the latest version which, to be fair, we kids often thought was OK. Having tasted the original, however, Mom felt otherwise. I remember one specific dinner when her latest attempt fell short of expectations. After one bite, disgusted, she pushed her plate aside and watched as we kids gobbled it down.  The thing I most remember and, frankly, am most proud of, is she never gave up. Laughably, we did eat a couple pretty bad sweet & sour concoctions but she was determined to prove that the restaurant’s food wasn’t all that special and certainly not worth $25.00 per recipe. Truthfully, I don’t think she ever hit pay dirt, at least not while I was living at home, but she did teach me a valuable lesson by her example. So, when I describe the number of tests I’ve run to, say, come up with a cheddar cheese pie crust, or, to find the right level of “heat” in my giardiniera, don’t credit me. Credit Mom.

But I digress …

*     *     *

*     *     *

Among the many cuisines the Bartolini Girls drew upon, American was first and foremost. Meatloaf, stews, casseroles, and fried foods, among others, were very often served — with a platter of pasta on the side, of course. Mom, in particular, loved a New England boiled dinner and she was sure to serve it a couple of times each year. Today, although I may have added a couple of vegetables to the pot, I keep her tradition alive and prepare a boiled dinner at least twice every year, once in the Spring and again in the Fall.

The recipe that I’m about to share uses quite a few vegetables to form a bed for the corned beef. Even with my 6 quart crock pot, only a couple of cabbage wedges will fit into the cooker and, as a result, I have to make other arrangements for the rest of the cabbage. When there’s about an hour to go before dinner is ready, I place as much sliced cabbage as will fit comfortably into the slow cooker and replace the lid. The rest of the cabbage goes into a covered frying pan, a cup of broth from the slow cooker is added, and then everything is seasoned with salt & pepper, to be cooked over a medium heat. Cooking times will vary, depending upon the amount of cabbage and size of the pan. Try to time it so that this cabbage is finished when the slow cooker’s contests are ready. When ready, combine the two preparations for serving and storing. Of course, the alternative to doing this is to use fewer vegetables but, frankly, that just ain’t gonna happen around here.

*     *     *

Mom’s Boiled Dinner Recipe

total time: approx.  8.5 hours

Ingredients

  • 1 prepared corned beef, 4 lbs. Do not discard the packing liquid, unless directed to do so by the package directions.
    • enclosed spice packet
    •                     or
    • 12 green peppercorns and 1 tbsp pickling spice.
  • 1 small bag of baby Yukon gold potatoes
  • 1 large onion, cut into about 8 wedges
  • 1 rutabaga, cut into large chunks
  • 1 turnip, cut into large chunks
  • 4 carrots, cut into 2 inch chunks
  • 4 parsnips, cut into 2 inch chunks
  • 2 garlic cloves, diced
  • 1 cabbage, outer leaves discarded, cut into about 10 wedges
  • salt and pepper, to taste
  • water

Directions

  1. About an hour before you begin, remove the corned beef from the fridge and set it on a counter so that it warms slightly.
  2. Place the potatoes, onion, rutabaga, turnip, carrots, and parsnips into the slow cooker.
  3. Sprinkle the garlic over the vegetables and do the same with the spice packet, if any, that came with the corned beef. (If no spice packet, add the pickling spice and green peppercorns.) Season with salt and pepper.
  4. Place the corned beef atop the vegetables and empty the packing liquids over everything. Add water until the slow cooker is about 2/3 full.
  5. Set crock pot to “high” and cook for one hour, turn the meat over, set to “low” and cook for 6 more hours, turning the meat over every 2 hours. Periodically skim the surface to remove any off-color foam, as necessary.
  6. After 7 hours, turn over the corned beef one last time, place the cabbage wedges into the slow cooker, replace the cover, and cook for an additional hour. If you have too much cabbage for your slow cooker, place the surplus into a frying pan, season with salt & pepper, and baste with a cup of broth from the crock pot. Cover and cook over medium heat until ready to be served — 15 to 20 minutes.
  7. After a total of 8 hours, remove the corned beef to a cutting board, slice it thinly, and place it on a platter with the cooked vegetables and cabbage. Serve immediately. Alternately, some people, myself included, prefer that their vegetables be served in a bowl with some of the broth.
  8. When preparing the leftovers for storage, be sure to combine all the cabbage and its cooking liquid with the rest of the vegetables.

Variations

Aside from making one’s own corned beef from beef brisket — something beyond my scope — the only variations of which I’m aware involve the vegetables. Basically, this recipe was Mom’s but I’ve added the turnip, rutabaga, and parsnips. Make the recipe your own and drop or add any vegetables to suit your tastes

*     *     *

*     *     *

Note

The leftovers from this dinner store well and you can easily use them to repeat the meal, if that’s your wish. As I’ve mentioned, however, I prefer the vegetables served with the broth as a soup. That means that I can use the corned beef for panini, also personal favorites. Pictured above is one such sandwich made with corned beef, Swiss cheese, a little cabbage, and some mustard. It doesn’t get much better than this.

*     *     *

Slow Cooker Beef Stew

Yes, you read that correctly: beef stew is next on the agenda. We’ll get to that but first I’ve got some ‘splaining to do. One of Chicago’s grocery chains has closed selected stores around town, renovated them, and is now re-opening each in grand style. One such re-opening occurred recently in my neighborhood and, of course, I attended and brought a friend. While there, he took advantage of one of the sales, buying a 4 lb bottom round beef roast. As you may already know, this cut of beef is not particularly well-marbled and isn’t the most tender of cuts. As such, it responds well to stewing or braising and is perfect for slow cooker stew. My friend asked if I had a recipe and I sent him this one in an email. Since I have the recipe handy, I might as well include it here now rather than later.

Before I share the recipe, however, we should probably look at a few of the ingredients. First off, I tend to avoid the grocery’s beef that’s pre-cut into chunks and labeled “beef for stew”. When I make stew, I prefer pieces that are 2 – 3 inches in size and those that are pre-cut are usually about half that size. So, I buy a 2 – 3 lb chuck, top round, or, as already mentioned, a bottom round roast. Once I get home, I cut the roast into chunks the size of my choosing. Of course, if you prefer smaller pieces, by all means go for it.

Zia and six-month-old Max.

Next, let’s look at the vegetables. If you’re considering making stew in a slow cooker, chances are you’ll be setting it up before leaving for work. Unless you have a sous chef, the last thing you’ll want to do is spend time chopping and cleaning your veggies. That’s why I recommend a small bag of new red or Yukon gold potatoes,  frozen pearl onions, and organic baby carrots. Only the potatoes need washing and everything can be thrown into the slow cooker as-is. If you prefer, feel free to use any type of carrot, potato, and onion that’s available. Just be sure to cut them into approximately equal-sized pieces so that they cook evenly.

Last to be mentioned is the wine. Although I use a few ounces of wine in this recipe, it’s not necessary and can be skipped, if you like. This isn’t boeuf bourguignon, after all. If you live alone, like I do, opening a bottle of wine just to use a few ounces in a recipe isn’t practical. I certainly don’t want to drink the rest with my dinner and watching it degrade on a counter or in the fridge is not the answer. I’ve found that the mini bottles of wine — about 5.5 ounces each — are the perfect solution. Our supermarkets sell them in sets of four and offer a variety of grapes. I buy one set of red and another of white. If a recipe calls for wine, I can use one of these bottles and have little, if anything, left over. Granted, these wines aren’t going to be of the same quality as those found in my wine rack but, then again, I’m not about to open an expensive bottle of wine just so that I can pour a few ounces into a stew. I’ll leave it for you to decide whether to use wine and, if you do, which one to choose. A general rule of thumb, however, states that if a wine isn’t good enough to drink, one shouldn’t cook with it. So, avoid the “cooking wines” at your grocery.

*     *     *

Slow Cooker Beef Stew Recipe

yield: 6 – 8 servings

prep time: approx.  30 minutes

cook time: 8 – 9 hours

Ingredients

  • One  2 – 3 lb beef roast, cut into 2 – 3 inch chunks (less expensive cuts of meat are fine for this recipe)
  • 3 tbsp all-purpose flour
  • 3 tbsp olive oil
  • 1 small package of new red or Yukon gold potatoes.
  • 1/2 small bag of organic baby carrots
  • 1 package frozen pearl onions
  • 1/2 package (about 4 oz) button or crimini mushrooms, quartered (more/less may be used according to your preference)
  • 1 small bottle (5..5 oz) red wine
  • 2 bay leaves
  • 3 – 4 sprigs of thyme
  • One 32 oz. box low-salt, fat-free beef stock
  • salt & pepper, to taste

Directions

  1. Spray the inside of the slow cooker with your favorite cooking spray.
  2. Place olive oil in a frying pan and heat over medium-high heat.
  3. Meanwhile, use paper towels to pat dry the beef chunks, season them with salt & pepper, and place them into the now hot frying pan. DO NOT CROWD. The pieces should not touch each other or they will steam and not brown. You may need to do this in batches. Do not disturb the meat. After 3 minutes, gently lift one piece to see if it has browned. If not, return the piece as it was and wait another few minutes before checking again. Once it is browned, turn it over, as well as all the other chunks in the pan, Repeat this process until all the meat is browned on all sides. Remove the meat and place in the slow cooker. If needed, add a little more olive oil to the frying pan before browning the 2nd, or 3rd, batch of meat.
  4. Remove the frying pan from the heat, add the wine, and return to medium heat. Use a wooden spoon to scrape off any residue from the pan’s bottom. Once the pan is “clean,” reduce heat to low.
  5. Sprinkle the flour on top of the meat in the slow cooker. Add the bay leaves and thyme sprigs.
  6. Add potatoes, carrots, onions, and mushrooms, in that order, to the slow cooker.
  7. Season with 1/2 tsp salt & 1/8 tsp pepper (more/less if you prefer).
  8. Pour the now-heated wine over the slow cooker’s contents.
  9. Add enough beef stock to cover the beef chunks. It’s OK if some of the mushrooms or carrots are above the liquid.
  10. Set slow cooker on “high” for one hour and then “low” for another 7 hours. Alternately, you can set your cooker on “low” and cook for 9 hours.
  11. Remove bay leaves & thyme sprigs before serving.

Variations

Although not really a variation, I have made this recipe but without the potatoes. I then serve it over a bed of plain rice or one of buttered, wide egg noodles. Before doing so, I check to see if the gravy is thick enough for serving this way. If not, I use a slotted spoon to remove most of the cooker’s content’s to a platter, leaving the liquid behind. Turn the cooker to “high” and while the gravy heats, mix a couple tbsp of corn starch into about a 1/4 cup water. Add to the slow cooker, stir thoroughly, and heat on “high” for 10  minutes before returning the stew meat & veggies to the cooker. By the time everything is heated through, another 5 – 10 minutes, the gravy should be thick and ready to serve.

*     *     *