Slow-Cooker Mole Pork

Pork Mole over Rice - 1

Pork Mole over Rice

*     *     *

Written almost 1 year ago, this is another “source-less” recipe, for I’ve long since lost those links. I do recall that the original protein was chicken but, to my way of thinking, things go better with pork. (See Notes)

Much like last week’s goat, this dish is all about comfort from the first whiff of its aroma, and perfect for these dreadfully cold winter days. Cooked long and slow, the pork grows more tender with each passing hour. When time to serve, you can serve it as-is over rice, or shred it. If you choose the latter, tacos or tasty sandwiches result. Versatility is its best feature and I take full advantage of all 3 options before the pot is empty.

I have prepared this dish several times with no 2 meals alike. I’ve little experience preparing mole, so, I’ve played with the amounts of Mexican chocolate, peanut butter, and chili pepper. This recipe represents my last — and best, for me — attempt. Feel free to adjust them to suit your own tastes. In fact, please come back and share your changes. With so little experience with Mexican cuisine beyond tacos and chili, I am open to any suggestions.
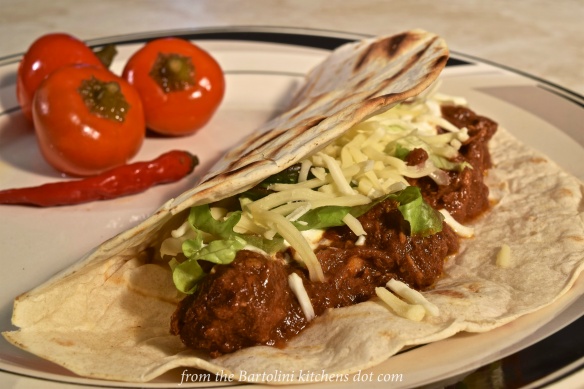
*     *     *

Pork Mole Taco 2

Pork Mole Taco

*     *     *

Slow-Cooker Mole Pork Recipe

Ingredients

  • 4 to 5 lb (1800 to 2300 g) pork shoulder (see Notes)
  • 1 large onion, sliced
  • 3 garlic gloves, smashed
  • 1 c chicken stock
  • 2 tbsp smoked paprika
  • 1½ tbsp ground cumin
  • 1 tsp Arbol chile powder
  • 2 tsp salt
  • 2 tbsp cinnamon
  • ½ tsp ground cloves
  • ⅓ c light brown sugar
  • 1 small can (7 oz, 196 g) chipotle peppers in adobo sauce
  • ¼ tablet (23 g) Mexican chocolate
  • ¼ c peanut butter
  • ½ c raisins

Directions

  1. Coat the slow-cooker container with cooking spray.
  2. Place the onions and garlic in an even layer on the bottom of the slow-cooker,
  3. Cut the pork into large chunks (see Notes) before placing in slow-cooker.
  4. In a bowl, combine the chicken stock, spices, light brown sugar, chipotle peppers, chocolate, peanut butter and raisins. Stir before emptying bowl into the slow-cooker, fully covering the pork.
  5. Set slow-cooker to LOW and timer to 8 hours (see Notes).
  6. When finished, remove pork and reserve.
  7. Using a stick blender, food processor, or blender, purée the sauce until as smooth as you prefer.
  8. Serving options:
    1. Return pork to slow-cooker before serving over rice, garnished with sour cream and cilantro leaves.
    2. Shred the pork before returning to the slow-cooker.
      • Prepare tacos with shredded lettuce/cabbage, onion, sour cream, cilantro, and/or whatever toppings you prefer.
      • Use to make pulled pork sandwiches with lettuce, onion, and whatever condiments you prefer

*     *     *

Mole Pulled Pork Sammich - 1

Pulled Pork Mole Sammich

*     *     *

Notes

This will produce a fair amount of sauce, particularly if you use a pork shoulder roast smaller than 4 lbs. (Been there.)  In fact, too much sauce may be produced for tacos or sandwiches. Then again. some may love a good, messy taco or sandwich. If so, have extra napkins on-hand and go for it!

While cutting the pork roast, remove any bone(s) and trim away as much fat as possible. Reserve the bone(s) for use in your next pot of tomato sauce.

If you prefer to use chicken, substitute 4 to 5 lbs of skinless, boneless chicken thighs for the pork. (This is not a recipe for chicken breasts.) Cut the thigh meat into chunks, flour, and lightly sear before proceeding with the recipe.

If you haven’t 8 hours to wait for your dinner, you can set the slow-cooker to HIGH and cook for 4 hours. In short, 1 hour on HIGH equals 2 hours on LOW.

*     *     *

Mex Choc

*     *     *

About that Mexican Chocolate (ETA)

When writing this, I didn’t consider that not everyone has access to Mexican chocolate. I hope the following helps.

I use the brand pictured above principally because it is the most readily available. There is another popular brand, Ibarra, that I have yet to find in the groceries that I frequent. If all else fails, you can make your own, the recipe being found on The Balance website. In it, use semi-sweet or milk chocolate equal in amount to the Mexican chocolate indicated in the recipe. To that, add 1/2 teaspoon ground cinnamon and a drop of almond extract (optional). If nothing else, it makes a great cup of hot chocolate!


*     *     *

It’s déjà vu all over again …

I’ve made no secret of my love for tart cherries, buying bags of them every summer. In fact, for a number of years, I drove 100 miles to a Michigan farm to get the little red beauties directly from the farmer.  Although I’ve plenty of uses for them, I always save some for this time fo year. A cherry muffin in February tastes almost as good as a piece of cherry pie in January. Both serve to remind me that the falling snowflakes will soon give way to cherry blossom petals.

My recipe for cherry pie can be found HERE and the cherry muffin recipe HERE.

*     *     *

Coming soon to a monitor near you …

Pork Belly Ramen

*     *     *

Meat Loaf – Finalmente!

Meatloaf sliced

Here it is, the very much delayed meatloaf recipe. Taa-daa!

My love affair with meatloaf goes back more decades than I care to say. I was a boy and didn’t think much about this dish, wondering why we weren’t having hamburgers instead. Then I tasted Zia’s meatloaf. She and Mom were great cooks but Zia’s meatloaf was heaven-sent. I was perennially trying to steal away from our dinner table so that I could have a taste of her meatloaf when she was serving it. Mom caught on quickly enough but rather than get annoyed, she tried to make a better meatloaf. Although hers did, in fact, improve, Zia’s remained the best in my book.

Now move ahead many years. Zia and I have decided to create this blog and we’re making a preliminary list of recipes to include for our family. Well, very early in the process, I added her meatloaf to the list. You can imagine my horror when she confessed that she no longer had the recipe nor could she remember it. All she knew was that she added oats (see above) and nothing else. At that point, I resigned myself to eating mediocre meatloaf for the rest of my days. And let me tell you. I was responsible for many a mediocre meatloaf in those days. (It also drove home the point that these recipes needed to be put to paper and preserved.)

*     *     *

meatloaf-4

*     *     *

About 2 years later, I came upon a post by my now good blogging friend, Tanya. (You may know her as Chica Andaluza. If you don’t, get over to her site for some tasty dishes and to learn of life on her beautiful Mountain in Spain.) She’d shared a recipe for ketchup, and, once I made it, I was instantly converted. I no longer buy ketchup and use this homemade version exclusively. It’s also a permanent member of my Christmas gift baskets, the recipients of which — friends and family —  cannot get enough.

At some point — I don’t remember exactly when — I was preparing what would become another mediocre meatloaf when I experienced a true epiphany. Why not use the homemade ketchup? It was a life changing moment … well, meatloaf changing. My meatloaf reached a new level of excellence and, best of all, consistency. No need to worry about which and how much spice to use. The ketchup had everything I would have added. Best of all, during her last visit here, I prepared a meatloaf dinner for Zia and she declared that mine reminded her of her long forgotten recipe. She could not have pleased me more. That’s the day I decided to share the recipe — it’s also the last time I served sliced meatloaf for dinner.

You see, I’m a mid-western boy and we love our meat and gravy sandwiches. It was a special treat on a cold winter’s evening when Mom placed before me a plate containing a meat sandwich and mashed potatoes smothered in gravy. Oh, boy! Over the years, even when serving a mediocre loaf, I dreamt of the next day’s smothered sandwich. Once that craving was satisfied, there would be meatloaf sammiches. These would be gravy-free but would instead contain lettuce, a slice of tomato, and a bit of horseradish sauce. I mentioned it to Zia and learnt that she, too, loved both sandwich and sammich. I’ve not served sliced meatloaf since. Make note of this post’s opening photo. It is the last of its kind in my home.

*     *     *

This is a very easy recipe to follow but it does result in plenty of meatloaf. I usually fill 2 small foil loaf pans first, and then use the rest of the meat mixture to create a larger loaf. I rarely place this loaf in a pan, preferring to create a free-form loaf by hand. The smaller loaves will eventually find a home in the freezer and, I must say, I get a certain amount of satisfaction knowing that I’ve got a meatloaf in the freezer. I feel the same about its neighbor in there, the tray of lasagna. This brings up another issue …and an invite. If ever you hear of a major power outage lasting for days/weeks in Chicago, rent a car, catch a train, hop a bus, take a flight, pirate a ship, or do whatever you need to get here. My guests and I will be eating mighty fine for the duration — or at least until everything melts.

*     *     *

meatloaf-duo

*     *     *

Meatloaf Recipe

Ingredients

  • 2 – 3 tbsp olive oil
  • 1.5 lb (680 g) ground beef (See Notes)
  • 1.5 lb (680 g) ground pork
  • 1 medium onion
  • 1 carrot
  • 1 celery stalk, leaves included
  • 2 cloves garlic, grated
  • 1 cup oats (I use good old Quaker Oats for “Nothing is better for thee…”)
  • 2 eggs, slightly beaten
  • 1 cup homemade ketchup, divided (See déjà vu)
  • salt and pepper to taste

Directions

  1. Pre-heat oven to 350˚ F (175˚ C)
  2. Chop the carrot, celery, and onion to equal size.
  3. Heat the olive oil in a frying pan over med-high heat. Add the chopped vegetables and cook until soft – about 8 to 10 minutes. Add the garlic midway through.
  4. Set aside to cool until safe to handle.
  5. In a large mixing bowl, add the meats, eggs, oats, sautéed vegetables, and 2/3 of the ketchup. Mix to combine but do not over-mix.  (See Notes)
  6. Use part of the meat mixture to fill 1 or 2 small loaf pan(s). The rest will be used to fill a large loaf pan or to create a free-form loaf on a foil-covered baking pan.
  7. Use the remaining 1/3 of the ketchup to lightly coat the tops of the loaves.
  8. Place the loaves in the pre-heated oven.
  9. Bake for 60 to 75 minutes. Each loaf is cooked when its internal temperature reaches 160˚ F (70˚ C).
  10. Once cooked:
    • For the larger loaf:
      • If using a loaf pan, allow to rest 10 minutes, drain the liquids from the pan, removing the meatloaf and placing on a serving platter.
      • If not using a loaf pan, allow to rest 10 minutes and place on a serving platter.
      • Serve immediately.
    • For the smaller loaves:
      • Set aside to fully cool. Completely cover with plastic wrap before tightly wrapping in aluminum foil. It can now be frozen for up to 6 months. When ready to serve, unwrap the plastic wrap, replace the foil, and thaw in the fridge overnight. Once thawed, place in a pre-heated 300˚ F (150˚ C) and cook until heated through. (See Notes)
  11. If you’re like me, forego the platter and use the liquids to prepare a gravy with cornstarch, a cup of beef stock or low sodium bouillon, and a little milk  (optional). Meanwhile, create a sandwich using 2 slices of bread  and a generous slice of meatloaf. On the same dish, serve some mashed potatoes with a well in the center. Use the hot gravy to smother the sandwich and fill the mashed potato well. Buon appetito!

 *     *     *

meatloaf-3

*     *     *

Notes

At one time, I used equal amounts of ground veal, beef, and pork to make meatloaf. I prefer not to use veal these days unless I can be sure it’s been humanely raised.

If you do not have — or do not want to use — oats, an equal amount of bread crumbs may be substituted.

Overworking the meat mixture will result in a meatloaf that’s too dense. Mix until al of the ingredients are combined but no more than that.

You needn’t thaw the meatloaf before re-heating but I find the results much more reliable. I never seem to get the timing right and dinner is just about always delayed when I stick a frozen meatloaf into the oven. Remember: it’s already been fully cooked so there’s no worry of serving raw meat — just really cold.

*     *     *

It’s déjà vu all over again …

ketchup-throwback-photo

As I mentioned, the secret to this meatloaf is the ketchup, although the recipe I shared is about as close to the ketchup we all knew as kids as is salsa. Thanks to a recipe derived from one posted by the Kitchens’ good friend, Tanya, the one and only Chica Andaluza, the flavor of my meatloaf has improved greatly. The fact is that I always have a few jars in reserve and am lost without it. (Sorry, Heinz.) You can see my recipe HERE.

*     *     *

Coming soon to a monitor near you …

Soft Shell Crab Curry Preview

Curried Soft Shell Crab

*     *     *

Smothered Pork Chops

Smothered Pork Chops 2

Those of you who have been with me for the past few weeks are aware that my eating habits are in a state of flux. Once it entered my life, the spiralizer set about changing me, as new loves often attempt. It was successful to an extent. Though I’ve not increased the number of my meatless days, I have enjoyed a greater number of meatless suppers. Even so, there are limits to my meat-free ways. When the temperature gets and stays well below freezing, I crave comfort food which, for this carnivore, means a meat dish of some sort. Enter today’s recipe, smothered pork chops.

I’ve watched countless chefs prepare this dish, each adding their own special touch. I shied away from preparing it because I have a history of being gravy-challenged, unless you prefer a gloppy, lump-filled mess. Lucky for me, and anyone seated around my table, that’s no longer the case. Who says you can’t reach an old dog new tricks? So, with my new-found gravy-making skills, it was time to smother some pork chops — and I haven’t looked back.

The recipe itself is surprisingly simple and there are plenty of opportunities to make it your own. For this recipe, I make a gravy using mushrooms, onions, and garlic with chicken stock and a little milk. You may wish to add jalapeños or perhaps make more of a milk gravy. Buttermilk is a good substitution, as well. Don’t have milk? Don’t worry about it. Replace it with some white wine and you’ll still have a tasty gravy. In short, so long as you’ve got the chops, you can make this for dinner tonight.

One word of caution. Although the chops will be pulled off the heat when not quite finished cooking, the time needed to get to that point will vary greatly depending on the thickness of the chops. Steer clear of really thick chops. They’ll require a longer cooking time, at lower heat, or they’ll brown but remain raw on the inside. That could be a problem later in the process, when you return the chops to the pan with the gravy.  Rather than cook them together for 10 minutes or so, they’ll need to stay in the pan for quite a bit longer. For me, that causes the gravy to thicken far too much. (Gravy-challenged, remember?)

*     *     *

Smothered Pork Chops 3

*     *     *

Smothered Pork Chops Recipe 

Ingredients

  • 2 tbsp olive oil to start, possibly more later in the process
  • pork chops, medium thickness, 1 per serving
  • 1 small to medium onion, sliced
  • 6 mushrooms sliced
  • 2 garlic cloves, finely diced or grated
  • ¼ cup flour
  • 1½ cups chicken stock – vegetable or pork stock may be substituted
  • ¼ cup milk – buttermilk or cream may be substituted
  • salt and pepper, to taste

Directions

  1. Heat olive oil in a large fry pan over medium heat.
  2. Once oil is hot, place pork chop(s) into the pan and cook until browned on each side — about 5 minutes per side. Remove to a plate.
  3. Place onion into the pan and sauté for a couple of minutes before adding the mushrooms. Continue to sauté until onions are translucent and mushroom cooked to your liking.
  4. Add garlic and continue to sauté for about a minute.
  5. Remove all but 4 tbsp of oil from the pan. If need be, add enough oil to the pan so that the amount of fat/oil in the pan equals the amount of flour added in the next step.
  6. Add the flour to the pan, stir, and make a roux. No need to make a dark roux but it should be cooked for a couple of minutes.
  7. Add the chicken stock to the pan in thirds, mixing well between additions to eliminate lumps.
  8. Reduce heat to med-low, add the milk, and stir to combine.
  9. Season with salt and pepper to taste.
  10. Return the pork chops to the pan, spoon gravy over them, and heat until cooked to your satisfaction, usually 5 to 10 minutes, Turn the chops mid-way through.
  11. Serve immediately with plenty of gravy for smothering.

*     *     *

Smothered Pork Chops 1

*     *     *

Notes

You may need to adjust the gravy ingredient amounts to suit the number of chops to be served. In the photos, that is one big chop and there’s more than enough gravy to smother it.

Milk gravy is a southern tradition. If that’s your preference, you can easily make it here. Just reverse the quantities of the chicken stock and the milk. Be sure to test for seasoning before serving.

*     *     *

It’s déjà vu all over again …

Strawberry-Balsamic-Mascarpone Parfait

I recently prepared a pasta with mascarpone  for dinner and thought it was about time we revisited making the creamy cheese. (Hard to believe it’s been 4 years since I first shared that recipe.) Mascarpone is far easier to make than you might think and certainly cheaper than any that you can buy. Once made, why not use some in a strawberry-balsamic parfait just like the one pictured? You can learn all about it when you click HERE.

*     *     *

Coming soon to a monitor near you …

Baked Calamari Preview

Zia’s Baked Calamari

*     *     *

This Pork Tenderloin is Plum Tasty

Pork Tenderloin - Plums  5Long-time subscribers to this blog know that I didn’t exactly jump at the chance to start canning. The word “reluctant” comes to mind, though “stubborn” might be more appropriate. Well, in August, 2011, I did start preserving foods, with most of my attention focused upon jams and jellies. It wasn’t long before I was awash in jams and jellies of every kind, as were many of my tasters, located both near and far alike.

At the time, I didn’t realize that there’s much more to jelly besides toast or peanut butter. The day I used fig preserves to stuff a pork loin changed the way I viewed my jams. So, when I made Damson plum jam last year, I was already thinking of pork roasts. I knew I was on the right track when my friend, Betsy, author of the wonderful Bits and Breadcrumbs blog, mentioned the very same thing in that post’s comments. Betsy, it took me a while to get here but I finally made it!

There is nothing complicated about this recipe. I’d guess that the toughest part of it will be finding plum jam, depending upon where you live. You could aways make some yourself but, if you live in the Chicago area, you’re likely to have a harder time finding Damson plums this Summer. You see, I plan on buying as many as I can find, all the while dreaming of future pork roasts. Speaking of which, there’s a pork roast with cherries in the works, as well.

*     *     *

Some have noticed and mentioned that I’ve not been around the blogosphere as much as I once was. The fact is that I now have over 1100 followers, far more than I ever dreamt possible, yet I’ve continued to administer the blog as I did when you numbered only 100. As you can well imagine, this cannot continue and I’m imposing a limit on the amount of time I commit to blogging every day. I certainly hope that no one takes offense if I miss a post or fail to reply to a comment, for that’s the very last thing intended. I simply need to devote time to other matters. Thank you for your understanding. I’m very grateful for your ongoing support and encouragement.

*     *     *

Pork Tenderloin - Plums 2

*     *     *

Pork Tenderloin with Plum Sauce

Ingredients

  • 1.5 lb. (680 g) pork tenderloin
  • 2 tbsp butter
  • 1 tbsp olive oil
  • 4 oz (120 ml) white wine — I used a Riesling
  • 1 tsp grated ginger — a little less than 1/2 inch piece
  • 2 tbsp balsamic vinegar
  • 4 oz (115 g) plum jam  — Damson plum jam recipe
  • 2 sprigs fresh rosemary
  • salt and pepper, to taste

*     *     *

Pork Tenderloin - Plums 4*     *     *

Directions

  1. Heat butter and olive oil in a large frying pan, with cover, over med-high heat.
  2. Season pork tenderloin with salt and pepper before browning it on all sides in the pan — about 8 minutes. Remove the tenderloin from the pan.
  3. Use the white wine to deglaze the pan.
  4. Reduce the heat to medium before adding the ginger, balsamic vinegar, and plum jam, stirring until the jam melts and all are well-combined.
  5. Add the rosemary and return the tenderloin to the pan. Use a spoon to coat the pork with the plum sauce. Cover the pan.
  6. Continue to cook the pork, periodically basting it with the sauce, until it reaches your preferred temperature. Remove from pan and tent with foil while it rests for at least 10 minutes. (I removed mine from the heat when it reached 150˚ F (65˚ C).)
  7. Remove the rosemary sprigs and reserve the sauce. (See Notes.)
  8. Slice the roast and serve with the reserved plum sauce.

*     *     *

Pork Tenderloin - Plums X*     *     *

Sides

This tenderloin is really so quick and easy to prepare that I didn’t want to spend time with complicated side dishes.

Shredded Brussels Sprouts with Pancetta:Shredded Brussels Sprouts

  • This inspired recipe combines shredded Brussels sprouts, pancetta, garlic, stock, and white balsamic to create a truly special dish. To see the full recipe, be sure to check out my friend Eva’s sumptuous blog, Kitchen Inspirations.

Roasted Fingerling Potatoes with Rosemary and Pecorino Romano Cheese:

  • Roasted FingerlingsPre-heat oven and baking sheet to 425˚ F (220˚ C). Wash then cut fingerling potatoes to equal size. Season with crushed dried rosemary, salt, pepper, and coat with olive oil. Carefully oil baking sheet, add potatoes in a single layer, and roast until potatoes can be pierced easily, 20 to 30 minutes depending on size and quantity. Remove to serving platter, garnish with grated Pecorino Romano cheese, and serve immediately.

*     *     *

Leftovers?

Pork and Plum Sammich

No problem

*     *     *

Notes

I used plum jam, not jelly. As a result, the sauce may not be as smooth as some may prefer. If that’s you, while the tenderloin rests, I would suggest deglazing the pan with a bit of stock, wine, or water before straining the sauce through a fine mesh sieve. Once strained, place the sauce in a small pan and reduce it over med-high heat until it reaches the desired thickness. Taste for seasoning before serving.

Not all fingerling potatoes are created equal and they’re likely to require varying times to roast. Cut the potatoes into even-sized pieces and all should cook evenly without any problems.

If plums are in season, you could add a few plum halves to the pan and sauté them for as long, or short, as you like. Serve them alongside the roast.

*     *     *

It’s déjà vu all over again …

Pappardelle 5Hard to believe that it was two years ago when I was in the middle of my series on making cheese at home. When I demonstrated how easy it was to make mascarpone, I promised that I’d publish some recipes that would use your freshly made cheese. Today’s blast from the past is one of those recipes, combining pappardelle, spinach, Pecorino Romano, and, of course, mascarpone. It’s a delicious recipe and one you won’t want to miss. You can learn all about it by clicking HERE.

*     *     *

Coming soon to a monitor near you …

Sicilian Strata 3A Sicilian Strata

*     *     *

Mom’s City Chicken and Grandpa’s Water Works

Funny how this Summer has worked out. At its start, I’d planned to continue making cheese with you, sharing some seasonal recipes, posting more ice cream flavors, and sharing photos of “my girls” and their companions in the garden. Suddenly, Labor Day is here and I’ve run out of time. We’ve still not made Italian mozzarella, I’ve a couple of tomato recipes to share, and there’s still a custard-based peach ice cream to make. Oh! Mustn’t forget the cobbler. Fall will just start late this year. To further complicate my schedule, today’s post was reserved for a special pasta celebrating the US Open Tennis Championship. That was before I saw a package of veal at the market. That changed everything.

Last year, Linda posted a recipe for City Chicken on her wonderful blog, Savoring Every Bite.  At the time, I commented that I’d not thought about City Chicken in years. Mom prepared a version but it’s been some 35 years since I last tasted her City Chicken. Had Linda not shared her recipe, who knows when I would have remembered Mom’s? Anyway, after Linda’s reminder, I decided to put City Chicken on the schedule — last Summer! Well, as you know, it never made it but I had every intention of sharing Mom’s recipe this Summer — and then it again got lost. Last week, however, I saw veal cubes at the market and immediately thought of City Chicken. Since it would make a great dish for the coming holiday weekend, Mom’s City Chicken was suddenly on the schedule. Its addition pushed my special tennis pasta back a week and, well, Fall’s arrival, at least on this blog, has been delayed yet another week. By the way, don’t be surprised if Thanksgiving and Christmas are celebrated in one post this year. Hopefully, I’ll then be able to start the New Year sometime in January.

((cue the harp))

Throughout my childhood, Mom served us City Chicken almost exclusively on Wednesday or Sunday, when Dad was home to work the grill. Although I’ve already mentioned The Barbecue, I’ve not talked much of the rest of our yard. You see, the two-flat was built on a vast expanse of land, in the very center of which was the beautiful, privately owned, Lake Bartolini (pictured below, click to enlarge). While we kids frolicked, Dad was likely at The Barbecue, grilling that night’s meal, City Chicken being a family favorite. In the years following the barbecue’s construction in 1959, Grandpa would build a garage with an enclosed patio, attach a grape arbor, and plant his tomatoes on the lawn just beyond The Lake, after the first of what would become yearly land-grabs. (His tomatoes needed more land, always more land.) When The Lake was lost, the much larger and deeper Bartolini Sea, was erected and filled. As we would all come to learn, ripening beefsteak tomatoes can somehow attract errant pool toys, especially whenever Grandpa strolled through the yard. When the Sea gave way to what must have been near tectonic forces, it was replaced by the even larger and more formidable Bartolini Ocean, the last of the series.

OK, that is the official account of the Crystal Blue Waters of the Bartolini, the version you’ll see on the historical markers that dot the area. Here, for the first time anywhere, is the real story.

Grandpa wanted a garden, desperately, and even though Lake Bartolini stood in his way, he would never do anything to disappoint his adoring Grandchildren. No, not Grandpa. His was a problem that would have befuddled Solomon. You can well imagine, therefore, Grandpa’s relief the morning we kids awoke to find Lake Bartolini had been completely drained. Upon close examination, we saw that one side of  The Lake was inexplicably peppered with holes, while the most attentive among us claimed to have overheard our Parents whispering something about buckshot. Grandpa’s subsequent claim that one of us kids was to blame fell on deaf ears. Our Parents, calmly and coolly, bought and built the Bartolini Sea. With walls made of corrugated steel, the Sea glistened just to the West of the where the original Lake once stood. Grandpa got his garden and we kids had a new, buckshot-proof, Sea in which to swim. All went well until that thing about tomatoes attracting pool toys was discovered, much to Grandpa’s great displeasure.

Not but a couple of years after it’s installation, again we awoke to find that our gorgeous swimming hole, the Bartolini Sea, was but a mere puddle. On one side of the Sea, in the corrugated steel, was a gash of not quite a foot long. Bent inward, the steel pierced the Sea’s lining and flooded the yard. Depending upon which Parent asked, Grandpa said that my Youngest Cousin or I did it with the lawn mower. In our defense, I will merely point out that an old push mower was used to maintain the lawns. Even if we teamed up, together pushing that relic and with a 100 foot running start, never could we two young boys get up enough steam to create so much as a dent, let alone pierce, that steel siding. Our wise Parents, though they never determined “the how”, quickly surmised “the who” and soon thereafter we were erecting the bigger, better, and even sturdier Bartolini Ocean. It remained in our yard until it died of natural causes, some years later. Grandpa, too, remained in his garden, ensuring both he and his tomatoes never went thirsty, for years to come.  Though this marks the end of Grandpa’s Water Works, this is hardly the end of his story. Frankly, I’m just getting started.

Now, back to the Present. Mom’s City Chicken couldn’t be any simpler to prepare. Equally sized cubes of veal, beef, and pork are marinated, skewered, wrapped with a rasher of bacon, and grilled. It really is that easy. I don’t give any amounts in the recipe to follow because so much will depend upon how many skewers are to be prepared. You can add, or subtract, spices to the marinade. Just be sure to make enough so that some can be reserved and later brushed on the skewers as they come off the grill. (Something I forgot to do for the photos.) Although the FDA no longer requires pork to be cooked well-done, many still prefer it cooked more than beef or veal. To accomplish this, I always place 3 pieces of meat on each skewer, pork always being the last/top one. As you’ll see in the recipe to follow, this will allow you to keep the pork closest to the fire, assuring it is cooked more than the other meats.

*     *     *

*     *     *

Mom’s City Chicken Recipe

Ingredients

  • Beef, cut into approx. 1½ inch cubes
  • Veal, cut into approx. 1½ inch cubes
  • Pork, cut into approx. 1½ inch cubes
  • Bacon, 1 rasher for every skewer
  • marinade

Marinade

  • juice and zest of one lemon
  • rosemary, chopped
  • garlic, minced or grated
  • Italian seasoning
  • olive oil
  • salt & pepper

Directions

  1. Add all the marinade ingredients to a bowl, whisk to combine, and set aside, reserving  a ¼ cup for later use. Place the meats into the bowl, mix until coated, and refrigerate for at least one hour or overnight
  2. Soak wooden skewers overnight. (This will prevent their burning during grilling.)
  3. When ready, light the grill.
  4. Using one thick skewer or 2 thin for each city chicken, pierce one end of a bacon rasher, followed by one piece of each type of meat. Be sure that the top piece of meat for each skewer is pork. After the pork is in place, wrap the meats with the bacon and secure its remaining end by piercing it with the skewer(s) tip(s).
  5. Once finished and the grill is hot, shut down part of the grill to facilitate  indirect grilling. Use a rag dipped in oil to grease the grill plate.
  6. Place the skewered meat on the grill with the pork closest to the fire/heat.
  7. Turn the meat after a few minutes, more or less depending upon the grill’s heat. The object is to cook the skewered meat without torching the bacon. The pork, being closest to the fire, will cook faster.
  8. With the meat still very rare, move the skewers directly over the fire/heat. Now the object is to crisp the bacon and to finish cooking the skewered meats. Turn the skewers occasionally to ensure even cooking.
  9. When grilled to your satisfaction, remove to a  platter, brush with reserved marinade, and serve.

*     *     *

Variations

Although Mom used all 3 meats, you needn’t if you prefer otherwise.  Use whatever meat(s) you like. The same is true for the bacon. I’m sure turkey bacon could be easily substituted.

Mom used 1 short, thick skewer for each of her City Chickens, skewers she got from her butcher. Try as I might, I’ve been unable to find them. Instead, I use 2 of the more readily available long, thin bamboo skewers. Before soaking, I trim off about 4 inches from each, making it much easier to grill them, especially if you’ve a small grill surface.

*     *     *

It’s déjà vu all over again …

Although some have already reached the end of tomato season, many of us are still harvesting the red beauties. One of my first posts featured Mom’s Tomato Antipasti that she made with Grandpa’s tomatoes. This time of year, his vines produced enough fruit to keep both families well-supplied and rarely was an evening meal prepared without tomatoes playing a role. Those who missed it the first time around  can find my post for Mom’s Tomato Antipasti by clicking HERE.

*     *     *

By any other name …

“Don Juan”

This tour of roses began on one side of my yard with “Opening Night”, a red hybrid tea rose, and ends on the opposite side of my yard with “Don Juan”, a red hybrid tea rose. (Who better to indulge my girls?)

*     *     *

Roast Pork with Fennel

Porchetta

My last few posts have been pretty much dedicated to dishes served over the Holidays. Today’s recipe, Porchetta con Finnocchio, is yet another of those dishes and was served not just around Christmas but whenever there was reason to celebrate. Similar in preparation to most pork roasts, this roast differs because of the cut of meat used and for the use of fennel, finnocchio, as seasoning.

Traditionally, porchetta meant the roasting of an entire pig. In fact, one such pig was roasted at a neighborhood bakery and served at the wedding reception of Zia & Uncle. (Imagine a time when “A”, there were neighborhood bakeries and, “B”, you could use their oven to roast a pig!) Now, that may be fine when feeding large groups but, for most families, a pig roast is out of the question. My family, like many, used the pig’s foreleg, the picnic ham, for the roast.  The meat was butterflied, removing the bone in the process, and then heavily seasoned with, among other things, fennel fronds which are similar to dill in both appearance and taste. The result was a juicy roast, with herbal flavoring throughout. Times have changed and picnic hams aren’t as readily available as they once were. My family switched to roasting bone-in pork loins initially but, as time passed, they, too, became less available and we began roasting boneless pork loins. Although still very good, the loin is a lean cut of meat and some will forever favor a porchetta made using  picnic ham over one made with pork loin.  In a future post, I’ll share a recipe for porchetta using a pork loin but, for today, we’re once again turning back the clock to roast a leg of pork.

This recipe differs from that used by my family in a couple of ways. First off, I wanted to make sure that I had a sauce to serve with my porchetta. To that end, I include roasting vegetables in the pan, adding stock & wine as a basting liquid. I, also, love roasted vegetables and add potatoes and carrots to the roasting pan about an hour after the roasting has begun. In contrast, the most my family put in the roasting pan was a few potatoes, and even that was a rarity. As a result, I don’t remember Mom ever serving a sauce with her porchetta. Lastly, and this is a big one, relatively speaking, I include sliced finnocchio as a roasting vegetable. This would never have been done back home, for fennel was always served raw, the fronds and smaller stems being frozen for later use in a porchetta. Whether served alone or among crudités, fennel was either served plain or with a small, ramekin-sized dish containing a simple dipping sauce of extra virgin olive oil, salt, pepper, and maybe a little red wine vinegar. (There is a name for this sauce but neither Zia nor I can remember it.) I broke with tradition when, about 15 years ago while they were visiting Chicago, I served Mom & Zia a whole sea bass that had been stuffed with, and roasted upon a bed of, fennel. That was the first time either had been served cooked fennel. So, for me to add fennel to the roasting pan is somewhat of a big deal. The flavor it brings to the sauce, however, is well worth the change. Still, should you wish to roast your porchetta in true Bartolini fashion, prepare the roast as indicated below, omitting all the roasting vegetables, and place the porchetta on a roasting rack centered in a roasting pan. No matter how you roast your porchetta, bear in mind you may need to adjust the amount of herbs needed depending upon the size of your roast.

*     *     *

Porchetta Recipe

Ingredients

    • 1 raw picnic shoulder ham, skin on, bone removed, butterflied
    • 4 tbsp fennel fronds, chopped
    • 4 tbsp fresh parsley, chopped
    • 8 – 10 garlic cloves, diced
    • 3 – 4 tbsp fresh rosemary, chopped
    • olive oil
    • 1 tbsp marjoram
    • 12 whole garlic cloves
    • 1 fennel bulb, thinly sliced
    • 1 onion, thinly sliced
    • 3 celery stalks, chopped
    • 3 carrots, cut into large pieces
    • fingerlings or new potatoes
    • 3 rosemary sprigs
    • 6 cups chicken stock, divided
    • 3 cups dry white wine, divided
    • 3 tbsp AP flour
    • butter
    • water

Directions

    1. About an hour before the porchetta is to go into the oven, combine the fennel fronds, parsley, chopped garlic, and rosemary. Add enough olive oil to make a paste, stir,  and set aside.
    2. Use a sharp knife to score the pork skin, making a checkerboard or diamond pattern. Try to avoid cutting deeply into the pork meat, if at all.
    3. Place the roast, skin-side down, and “open it,” revealing as much surface area inside the roast as possible.
    4. Evenly coat the exposed flesh with the herbal paste created in Step 1. Season with marjoram before liberally seasoning with salt & pepper.
    5. Use twine to tie the roast securely. Set roast aside while it loses its chill.
    6. In a roasting pan, add the sliced onions, fennel, celery, and whole garlic cloves. Season liberally with salt & pepper.
    7. Place the roast atop the bed of roasting vegetables. Pre-heat oven to 450˚.
    8. Coat the roast with olive oil, add 2 cups stock plus 1 cup wine to the roasting pan.
    9. Place roasting pan in pre-heated oven. Every 20 minutes, baste the roast with the pan juices, add more stock and wine to the pan, if needed.  (Be sure to reserve 2 cups of stock and 1/2 cup of wine for use later.)
    10. Meanwhile, place potatoes and carrots into a large bowl, season with salt and pepper, some rosemary, and enough olive oil to coat. Mix well.
    11. After 60 minutes total time, reduce oven temperature to 325˚, baste the roast adding more liquid to the pan if needed, and place the seasoned carrots and potatoes into the roasting pan.
    12. From this point forward, continue to baste the roast every 30 minutes or so, replenishing the pan juices when necessary.
    13. If outer skin grows too brown, use aluminum foil to tent the porchetta.
    14. Roast will be finished when the internal temperature reaches 165˚. When ready, remove roast to a cutting board and tent with aluminum foil to rest for at least 15 minutes. Remove the carrots and potatoes to a covered bowl. Strain the pan juices from remaining stewing vegetables.
    15. Use the reserved 1/2 cup of wine to deglaze the roasting pan over high heat.
    16. Use a grease separator to remove all but 3 tbsp of grease from the strained liquid.
    17. Reduce heat to medium, add the 3 tbsp of grease to the roasting pan, and add 3 tbsp AP flour. Mix thoroughly and cook for a minute or so to create a roux.
    18. Add the remaining pan juice liquids and stir until the sauce begins to thicken.
    19. Begin adding the reserved of stock to the pan, stirring constantly, over medium heat.
    20. Once all the stock has been added and the sauce thickened, taste for seasoning, remove from heat, and add a tab of butter to finish the sauce.
    21. Before carving the roast, use a small knife to remove the skin (crackling), which may be served with the roast or left in the kitchen as the Cook’s reward.
    22. Slice and serve the roast, accompanied by the sauce and reserved roasted vegetables.

*     *     *

Notes

You’ll note the recipe calls for fennel fronds when, in reality, Mom also used the small, thin stems along with the fronds. I believe these stems bring  much flavor to the roast but no one wants to find a stem in their food. To get around this, I make sure any stems used are chopped as finely as possible.

*     *     *

Bartolini Sausage

Laws are like sausages,” wrote Bismarck. “It’s better not to see them being made.” Well, I know little of the backroom dealings that are integral to our legislative process but today I intend to pull back the veil on sausage making, at least my family’s sausage making, that is. And why today? Because Zia taught me how to make sausage and today is her 89th birthday!!!

Allora, buon compleanno, Cara Zia! Cent’ anni e tanti baci!

*     *     *

You'll have no beef with this burger!

*     *     *

For as long as I can remember, the Bartolini Girls made sausage and served them at any meal. They’d cut up a few, add some beaten eggs, and we had a frittata for breakfast. As kids, many is the time we had sausages instead of hot dogs for lunch while, for supper, the sausages were either served alone, roasted with veggies & potatoes, or cooked in a tomato sauce and served with pasta instead of meatballs. Truth be told, we were much more likely to have sausage than we were to have meat balls.  Even after I moved away, Mom always made sure I had at least one container of frozen sausage patties to enjoy once I got home. And to this very day, whenever I make sausage, that first whiff of the seasoned ground pork is a trip on the Wayback Machine to my youth, watching Mom at work. Sure, there are many kinds of sausage available at the local groceries and butchers, not to mention the ethnic markets, but not a one reminds me of home. That’s reason enough for me to keep making these.

Now, for you sausage novices, there is at least 1 reason for Bismarck’s comment. You see, pork sausage requires a certain amount of fat, with some recipes calling for as much as 25% fat content. This recipe doesn’t come near that percentage but fat content is an issue. If you buy a cut of meat that’s too lean, like the pork loin I purchased early in my sausage making career, you will be very disappointed with the result. Look for a good, not too lean, pork butt roast when you make sausage. Even then, you may find that you need to add pork fat to the ground meat, although it wasn’t always this way. Years ago, pork  products had a much higher fat content and one rarely, if ever, needed to add more fat to the mix. Then, without warning to our fellow sausage makers, hog breeders began to develop a leaner, healthier product and the “Other White Meat” campaign was born. Unfortunately, getting rid of the fat got rid of a good deal of flavor, so much so that Mom and Zia quit making sausage altogether! I eventually convinced Zia to try making it again so that I could learn the recipe and, at first, I bought some extra pork belly fat to compensate for today’s leaner pork. It worked, I learned the recipe, and all was well — or should have been. One fateful day, I attempted to make sausage on my own and over-compensated with the fat. What a greasy mess! After that, I quit using additional fat and switched to pancetta. For a 4 lb. pork butt, I use about a half-pound of pancetta. Not only does it add some much-needed fat without going overboard, it brings a nice flavor to our sausage, as well. Most importantly, Zia approved the addition. In fact, the picture to the left was taken at her home and that’s pancetta on top of the pork. (See Notes below for a tip on grinding the meat.)

When you look over our recipe, you’ll quickly notice that there is a surprising lack of spices used but, because it’s so simple, it can easily be modified to suit your tastes. Mom didn’t like fennel seed in her sausage but I don’t think she’d mind if you added some to yours. She, also, didn’t like her sausage spicy but I’m sure she’d look the other way if you wanted to add some red pepper flakes or a couple shakes of cayenne pepper. And I bet Zia would find it interesting if you were to, say, add a little ground sage or marjoram to the ground meat. As for me, I’m a garlic lover and have been known to add a couple of cloves of minced garlic, in addition to the garlic-flavored wine. And if none of those suggestions hit their mark, check out Greg’s recipe at the Rufus Guide. Just remember that no matter what spices you use and how much, be sure to start with less than you think necessary and cook a small amount of pork for a taste test. You can always add more if need be.

Now, one more thing probably should be mentioned. Some may be wondering where the sausages are, being this is a posting about sausage making. Well, you can blame me for that.  As I mentioned, Mom always sent me home with a container of sausage patties after I visited and I grew to prefer them. Cooked on the grill, they are a great alternative to hamburgers. Not only that, but a patty or 2 can be easily crumbled for addition to a tomato sauce, meatloaf, pizza, or some other dish. Well, during one of our Sausage Days, I convinced Zia to just make patties that afternoon and we haven’t made a sausage since. If you’re a sausage person, however, feel free to stuff those casings!

*     *     *

Bartolini Sausage Recipe

Ingredients

  • 4 lbs pork butt, coarsely ground
  • 1/2 lbs. pancetta, coarsely ground
  • 6 oz dry white wine
  • 3 cloves garlic, smashed
  • 1 1/2 tbsp salt, more or less to taste
  • 2 tsp ground black pepper, more or less to taste

Directions

  1. At least 2 hours before beginning, place garlic and wine into a glass and set aside.
  2. Once garlic and wine have “married,” combine ground meats and spread in an even layer, about 2 inches thick, on a work surface.
  3. Season the meat with salt and pepper. Use your fingertips to create dimples in the meat’s surface.
  4. Strain the garlic from the wine and discard. Sprinkle the now flavored wine evenly across the meat. Begin mixing the meat until the seasoning and wine are evenly distributed. Recreate the meat layer and let rest for at least 30 minutes so that the flavors meld. (Caution should be taken if you are doing this on a hot Summer’s day or in a very warm room.)
  5. Once rested, make a mini-patty and cook it in a small frying pan. After tasting, you may need to adjust your seasoning. If you do add seasoning, let it rest 15 minutes before tasting again.
  6. Once the sausage meat has passed your taste tests, begin making patties. Place them in single layers on baking sheets and into the freezer. Once frozen, you can bag them or place them into containers until needed.

*     *     *

Notes

Our preference is to grind the pork using the plate with the largest holes. This will create a coarse grind. When grinding meat for ravioli or cappelletti, use a smaller holed plate for a finer grind. No matter what size the end-result, you’ll find that your grinder, whether machine run or hand-cranked, will perform better and produce a more consistent result if the meat is cut into strips and partly frozen before you begin. Cut the pork butt into strips, layer them on baking sheets, and place them into the freezer for 30 to 45 minutes. Do not let them freeze solid or you will have to thaw them somewhat before grinding.

In a way, this recipe represents a milestone in the long and storied history of Bartolini sausage making. Never before were the wine, salt, and pepper measured so that they could be recorded in a recipe. It was always, “Grab some salt. Grab a little pepper. Put some wine in a glass. No, that’s too much. … ” To write this recipe, Zia worked her magic using wine and seasoning that I had pre-measured and placed in containers on her counter. When a mini-sausage patty passed her palate’s inspection, I simply measured the salt, pepper, and wine that remained. Still, as I cautioned earlier, start out with less spice than you think you’ll need. Be especially careful with the salt if you add pancetta to the ground pork, for its salt content can vary.

Just One Thing More

You didn’t think I would end this post without at least 1 picture of sausages, did you? This one is from the Bartolini Sausage Archives.

*     *     *

*     *     *