My Cousin Marinella’s Meatballs

Palle di Marinella

This recipe has been a long time coming. In fact, this is actually the 4th rewrite. Each of the prior versions included time-sensitive references that no longer apply. (Let that be a lesson for us all.) Even this post is time-dependent, making me all the more determined to publish it post-haste — but more about that later.

My wonderful cousin, Marinella, graciously shared her meatball recipe with me the last time I was in San Marino — two years ago! While sitting around Zia Pina’s kitchen table one evening, I recorded a number of recipes in a small notebook and stored it safely away — never to be seen again. Well, I did find a meatball ingredient list on a piece of paper in my luggage but nothing more. Why did I write this list and how did it, alone, get into a pocket of my luggage are 2 questions that will probably never be answered.

“Wait a minute. ‘Luggage”? What was he doing with his luggage?” you might be asking.

Well, I’ll be heading back to Italy in but a few days and San Marino will be among the places we’ll visit. There’s no way I’d go to Italy without paying my Zia and cousins a visit. This time my niece, “G”, will be joining me for her first trip abroad, as will her brother, “M”, who accompanied me 2 years ago. We’ve planned our stops so that they can spend their days touring while I relax on a terrace and watch the watery horizon, if I so choose. A good time is sure to be had by all.

So, with our trip pending, I contacted Marinella and she guided me through this recipe. Perhaps its posting will soften the blow of my being so incredibly absent-minded. I can only hope …

*     *     *

*     *     *

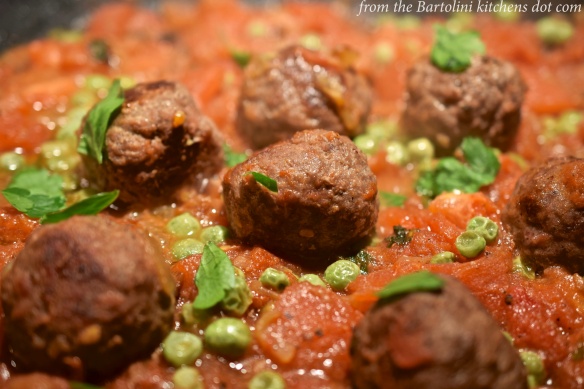
You may have looked upon the opening photo and wondered, “Where’s the spaghetti?” The fact is that the quintessential dish, spaghetti with meatballs, is not Italian in origin. The dish was actually created here in the States by Italian immigrants some time around 1900. Needless to say, the dish “caught on” and has become a staple of Italian restaurants — on this side of the Atlantic. Oh, sure, you may see “polpette” (Italian for meatballs) on menus in Italy but they will not be served with spaghetti. In fact, if you do see “spaghetti e polpette” on a menu, you’re probably in a place that is trying to attract American tourists.

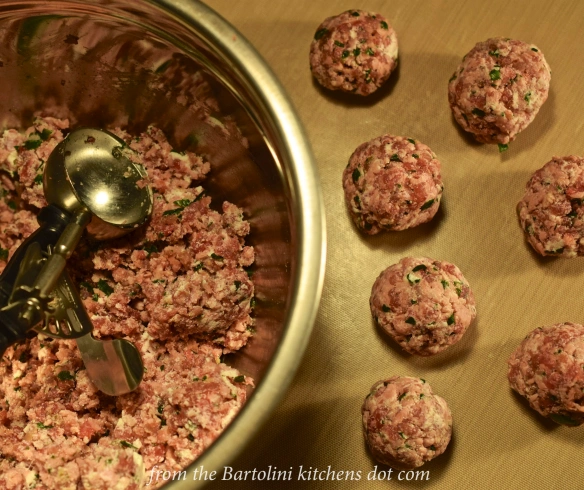
Another difference you may notice is their size. In Italy, polpette are about golf ball-sized. Here, meatballs can be over twice that size or, when served as appetizers, quite small  No matter what size you choose to prepare, an ice cream scoop makes the process much easier.

That being said, let’s get to the recipe …

*     *     *

*     *     *

Finding that ingredient list resulted in the first of many contacts with my cousin, all of which were necessary. You see, left to my own devices, I ended up with a number of tasty meat sauces with nary a meatball between them. In each case, the meatballs disintegrated in the sauce. Once I learned the correct amounts for the ingredients, our discussions turned to her method of preparation. Below, I’ve detailed her methods, as well as my recipes for meatball appetizers and meatballs simmered in marinara sauce.

The meatball recipe is actually quite simple. Grind/mince equal parts beef, veal, and mortadella (an Italian bologna-like product). Add a few tablespoons of chopped parsley, and season with salt & pepper to taste. Now add the ricotta. When I made today’s meatballs, I used 450 g (16 oz) of each meat. I used 150 g (5 oz) of freshly made and drained ricotta. (See Notes) To the mixture, add a splash of red wine and a slightly beaten egg. (See Notes.) Be careful when combining ingredients. Do not overwork the meat or the meatballs will be too dense. Pan fry a little of the meat mixture and taste for seasoning. Cover and refrigerate for a short while to allow the meat to set-up before proceeding. See Notes for tips on storage.

Once rested, form the balls in whatever size you prefer. To prepare, Marinella will sauté onion in a little olive oil until translucent. Add the meatballs and continue to sauté, moving the balls across the pan to ensure even browning. After 5 to 10 minutes, depending upon the balls’ size, add some chopped parsley and several plum tomatoes that have been peeled, seeded, and chopped. (See Notes) Continue to simmer for about 20 to 25 minutes. If you like, add a handful of peas — fresh or frozen — and continue cooking until peas are cooked to your preference. Serve. (See Notes)

*     *     *

Mini-meatballs, “polpettini“, in red wine reduction, garnished with crumbled fried sage leaves.

*     *     *

These meatballs are not heavily spiced, relying upon mortadella to deliver fantastic flavors. As such, care should be taken lest their flavor be lost in the preparation. This is especially true if serving them as appetizers with a wine reduction. After some experimentation, I found it best to bake the meatballs separately — (350˚ F, 175˚ C, for 20 minutes) — before adding them to the sauce just prior to serving. That will ensure that you taste both the meatballs and the sauce, with neither hogging the spotlight.

The wine reduction is easy, too. Sauté some shallots in a little olive oil until transparent. Add equal amounts of beef stock and red wine. (I used 1/2 cup of each, the wine being Pinot Noir.) Continue to simmer until the sauce is reduced by half. Pour the sauce through a fine mesh strainer and return to the pan. Whisk while adding a teaspoon of butter. Add the sauce to the bottom of a serving plate. Place the meatballs on to the sauce in the dish and serve. (Optional: garnish with crumbled fried sage.)

*     *     *

A delight on both sides of the Atlantic

*     *     *

Whether you call it a meatball sammich or uno panino con le polpette, something magical happens when meatballs meet marinara sauce and bread. If you ask me this sammich is the main reason for making meatballs but, as you know, I’ve a soft spot for sammiches.

First, start by creating a marinara sauce, Here I make a sauce that’s even less complicated than the one I shared HERE. Chop an onion and sauté in olive oil, over medium heat, until soft. Add sliced mushrooms, if using. Once the mushrooms have softened, add 2 cloves of minced or grated garlic. When you can smell the garlic (about 90 seconds), add 2 tbsp tomato paste. Cook for about 3 minute before adding about 4 ounces of red wine or 3 ounces of balsamic vinegar. Your choice. Continue to simmer until most of the liquid — and all the alcohol — has evaporated. Add 2 large (28 oz) cans of diced tomatoes. Season with salt, pepper, and marjoram, to taste. Stir thoroughly. Bring to a boil before lowering to a soft simmer.

After 30 minutes, give the sauce a good stir before carefully adding the meatballs. Do not stir the pot again for at least 20 minutes more. Stirring before the meatballs have a chance to set-up a bit may cause them to break apart. Continue simmering the sauce, carefully stirring occasionally, for another 45 minutes. Taste and season with salt and pepper, as required.

Now, turn your attention to the bread. I prefer a roll with a not-too-hard crust but the choice is all yours. Slice each roll lengthwise and remove some of the bread from both top and bottom. This will help keep the meatballs from falling and rolling “off of the table and on to the floor …” Spoon a bit of sauce into the trough you’ve just created and, with a slotted spoon, add as many meatballs to the bun as will comfortably fit. Place a slice or two of cheese — provolone, mozzarella, asiago, etc., — atop the meatballs before adding a garnish of fresh basil leaves. Buon appetito!

*     *     *

*     *     *

You really didn’t think I could look upon a pot of sauce with meatballs in my fridge and not whip up a dish of spaghetti with meatballs, did you? In fact, I found the sight so moving that I pulled out the pasta machine and made the spaghetti, too.

*     *     *

Notes

I prepare my own ricotta for use in this recipe. You can see how easy it is to prepare HERE.

Use caution when using smaller amounts of meat for the meatballs. I learned, the hard way, that too much liquid will cause the meatballs to crumble during cooking. A delicious tomato sauce resulted but that’s not quite what I had in mind.

You can use white or red wine for your wine reduction sauce. You can also add whatever herbs you prefer. If added early on you’ll derive more flavor from them, especially given that the sauce is being reduced. It’s for that reason, I prefer to add them at the end, to be briefly simmered before the sauce is strained.

The meatballs can be refrigerated, covered, for a short period, although it’s never safe to keep ground/minced meat in the fridge for long. Frozen, they will keep for weeks. Whether I cook them before freezing depends upon how I intend to use them. If making appetizers, I’ll bake the meatballs before freezing. If using them in tomato sauce, I’ll freeze the meatballs raw, to be thawed before being placed into the sauce. Both the sauce and meatballs will benefit being simmered together.

How you serve the meatballs will determine how much tomato will be needed. Less will be needed for sandwiches, for example, than is required for to create a marinara sauce.

*     *     *

It’s déjà vu all over again …

As of this rewrite, we are coming out of what is hopefully winter’s last stand. So, before saying farewell to comfort food for the season, let’s take a look at the short rib recipe I posted way back in March, 2012.  The recipe was very well-received and it remains a personal favorite. I’m currently looking into modifying the recipe to utilize a pressure cooker. If all goes well, I’ll either write a new post or update the old. In the meantime, you can check out the original recipe HERE.

*     *     *

Coming soon to a monitor near you …

*     *     *

Arrivederci! A presto …

*     *     *


Grilled Octopus Salad

Buon Natale a Tutti!

No matter what you may do during the holidays, if you don’t embarrass the little ones, you ain’t doing it right!

*     *     *

Well, it’s that time again. Time for the Feast of the 7 Fishes. Yes, I know I’ve been away for a while but I couldn’t let Christmas Eve pass without offering at least one suggestion for your Feast of the 7 Fishes.  Can  your guess what it is?

*     *     *

*     *     *

That’s right, we’re grilling octopus. Now, there’s nothing particularly special about this dish. Once grilled, I prepared it in a salad much like Mom’s Calamari Salad. The reason for posting the recipe has little to do with the salad but everything to do with the preparation of the octopus.

To start, put away the copper pot; no need to boil water for dipping; find another use for those wine corks; bash something else against that rock in the garden; keep your cephalopod out of the freezer; and, save the salt rub for something with fewer legs. Instead, grab a pressure cooker and kiss those rubbery octopi good-bye.

In the past, I had my feet firmly planted in the “Cook ’em slow, cook ’em long” camp. Even then I was never sure if my octopus was going to be tender or chewing gum. And grilling? I gave up on that idea years ago. Well, not anymore! Cooking octopus now takes minutes, not hours, and the result is as close to perfection as I dared hope. Give it a try. You will not be disappointed.

*     *     *

Grilled Octopus Salad Recipe

Ingredients

  • 2 lb (900 g) octopus, rinsed and cleaned (See Notes)
  • 1 lemon, divided
  • red bell pepper, diced
  • jalapeño pepper, diced
  • red onion, diced
  • extra virgin olive oil
  • lemon juice
  • fresh parsley, chopped
  • salt & pepper, to taste
  • Belgian endive (optional)

Directions

  1. Place the cleaned octopus and half the lemon into the pressure cooker and cover with water. Do not exceed the pot’s maximum content limit. Secure lid and heat over a med-high flame.
  2. Follow the manufacturer’s directions for use, maintaining high pressure for 15 minutes. (See Notes)
  3. Release the pot’s pressure completely, remove the lid, and allow the octopus to cool in the liquid. (See Notes)
  4. Meanwhile, gather the remaining ingredients and prepare.
  5. Once cooled, remove the octopus, drain, pat dry, and sever each tentacle at its base.
  6. If using the head, remove both eyes before chopping.
  7. If using the body, remove and discard the beak located at the very center where the 8 tentacles join before chopping the remainder.
  8. Lightly coat the pieces with olive oil.
  9. Heat the grill (pan) over high heat.
  10. Once hot, clean the grill grates before using an oil-soaked cloth to coat them.
  11. Place the octopus on to the grill (pan) and cook until the pieces begin to lightly char. Turn the pieces and continue cooking until evenly colored, Depending upon the grill’s heat and size of the octopus, this could take as few as 5 minutes total.
  12. Allow to cool before chopping into bite-sized pieces.
  13. Add all the ingredients into a bowl and gently toss.
  14. Either serve as-is or cover and refrigerate until dinnertime. Slice remaining half-lemon for garnish.

*     *     *

*     *     *

Serving Suggestion

Although this can easily be served as one would any salad, serving it atop individual leaves of Belgian endive adds a bit of flair to the dish, perfect for the Feast.

*     *     *

Notes

Safety features should prevent its opening but do not attempt to remove the lid of a pressure cooker until the pressure has been released fully.

Ask your fishmonger to clean the octopus. If you’re willing to tackle the job yourself, carefully remove the contents within the head. You can remove the beak now, or later as indicated in the recipe. Give it a good rinse and you’re set to go.

Cooking times may vary depending upon the size of the octopus. For example, I cook a 1 lb. octopus on high for 10 minutes, not 15 as indicated in the recipe.

Use as much or as little of the salad ingredients listed above according to your preferences.

*     *     *

It’s déjà vu all over again …

If you’re planning to serve the Feast of Seven Fishes, you may be looking for suggestions to complete your menu. Click HERE to see earlier seafood posts that I’ve shared.

*     *     *

Coming soon to a monitor near you …

Harissa-Braised Goat with Borlotti Beans

*     *     *

One more thing …

Yes, I’m back. See you in the New Year!!!!!

*     *     *

The Incredible Edible Eggplant

Eggplant Blossom

Such Promise

*     *     *

It all started innocently enough, with a blossom identical to the one pictured above. I had learned my lesson well, or so I thought. See, last year’s 2 eggplants were just about smothered by my tomato plants. The tomatoes quite literally took over my then-new raised garden bed as if the soil had been smuggled out of Chernobyl. I picked only 1 eggplant and it was a Japanese variety, not at all what I had expected. This type of thing has happened enough times to convince me that there are people who delight in swapping name tags between differing varieties of the same vegetable. This spring’s cuckoo was a jalapeño masquerading as a cayenne pepper.

*     *     *

Growing Up Eggplant

Growing Up Eggplant

*     *     *

This year, I planted 3 eggplants with the conviction that I would keep my eye — and pruning shears — on the neighboring tomato plants. I won’t bore you with the details but I was partly successful, with two plants growing nicely. The 3rd, well, is now engulfed. All facts considered, I really cannot complain. The 2 remaining plants have managed to produce more of the bulb-shaped vegetables than I thought botanically possible. (I really must get that soil tested.) As a result, I’ve pulled out every eggplant recipe at my disposal in trying to stay ahead of these 2 overly productive plants.

*     *     *

The Day's Eggplant Harvest

The 1st Eggplant Harvest 

*     *     *

Here are the dishes that I’ve prepared thus far. I’ve supplied the recipe for the first dish and links for the rest, the exceptions being the eggplant lasagna and a pickled eggplant. Both of those recipes are in the works.

*     *     *

Grilled Eggplant & Tomato

Grilled Eggplant & Tomato

Pre-heat the barbecue or grill pan. Slice the eggplant into approximately 3/4 inch (2 cm) rings. Cut the plum tomatoes in half, removing the seeds if you like. Use a pastry brush to sparingly coat the eggplant with olive oil. Lightly drizzle the tomato halves with olive oil and then season everything with salt and pepper. Giving the eggplant slices a head start, grill both vegetables until cooked to your satisfaction. Remove to a platter. Garnish the vegetables with a mixture of chopped fresh rosemary, thyme, basil, and parsley. Season with salt & pepper before adding a drizzle of extra virgin olive oil or Olio Santo (See Coming soon … ).

This vegetarian dish may be served hot, warm, or at room temperature, and will make a great light lunch or tasty side for any meal.

*     *     *

Pasta alla Norma

Pasta alla Norma

A favorite of Sicily, this eggplant & tomato sauce was created in honor of the Bellini opera of the same name. You needn’t travel to Sicily nor the nearest opera house to enjoy this dish, however. Just take this LINK to see the recipe that I posted.

The recipe calls for a garnish of ricotta salata. If you cannot find this cheese, crumbled feta is a great substitute and more readily available.

*     *     *

Caponata

Eggplant Caponata

Also originating in Sicily, caponata is another dish that celebrates the eggplant. Today, it is found throughout Italy with ingredients that often vary from region to region. I’ve shared Mom’s recipe, which you can find HERE.

Don’t forget to make more than needed. Add a few beaten eggs to the leftovers to make a tasty frittata the next day.

*     *     *

Stuffed Eggplant

Stuffed Eggplant

Grandma served this dish to her girls, Mom & Zia, when they were young. You can well-imagine my surprise when my Zia in San Marino also served stuffed eggplant during my recent visit. The recipe for this tasty contorno — and popular in both sides of my family —  can be found HERE.

Any of the stuffed vegetables in the linked recipe can be used to make a great tasting sandwich for your lunch the following day.

*     *     *

Eggplant Lasagna

Eggplant Lasagna

A layered dish, eggplant lasagna features pasta sheets, baked eggplant slices, and a tomato sauce, with or without meat. Oh! I almost forgot the cheeses. Asiago, mozzarella, and Pecorino Romano combine to make this one flavorful main course.

True confession time: I had thought that I’d already published this recipe and was surprised to learn that I had yet to share it. Not to worry. That oversight will be corrected in the weeks to come.

*     *     *

Jamie Oliver’s Pickled & Marinated Eggplant

Marinated Eggplant

Jamie has done it again. In his recipe, eggplant is chopped, bathed in a pickling liquid, and then marinated in herbed olive oil. Best of all, this same technique may be used with mushrooms, onions, small peppers, zucchini, and fennel, with each vegetable having its own suggested herb to include. You can check them all out by taking this LINK.

I did make one substitution to his recipe. In place of oregano, I used marjoram. For those unfamiliar, marjoram is related to oregano but is a bit more mild and is favored in Le Marche, the ancestral home of the Bartolini.

*     *     *

Indian-Style Pickled Eggplant

Indian Pickled Eggplant - Preview

Looking for something with a bit more heat? Well, with my cayenne pepper plants competing with my eggplants for top honors, I went web surfing for recipes. With many to choose from, the final recipe is an amalgam, using ingredients that I had on-hand or that could be easily sourced. The result was a spicy dish that I really enjoy. Best of all, it’s reduced my eggplant AND cayenne pepper inventories. A bit too involved to be shared here — this post is long enough already — I’ll publish the final recipe in the weeks ahead.

This eggplant dish supplies the heat that Jamie’s pickle was missing.

*     *     *

Baba Ganouj

Baba Ganouj 1

Can you detect which has been garnished with a drizzle of Olio Santo?

Although I’ve enjoyed baba ganouj far too many times to count, I’ve never actually prepared it, relying instead on one that I purchase from my favorite Middle Eastern grocery. Well, with a glut of eggplant filling my vegetable crisper, baba ganouj seemed like yet another great use of the melanzane and I sought help from the blog of our resident Middle Eastern food expert Sawsan, The Chef in Disguise. Her blog is brimming with delicious recipes and you can view her baba ganouj recipe HERE.

*     *     *

And there you have it. This is my way of handling 2 incredibly productive eggplants. If you think I’ve eaten plenty of eggplant lately, well, you’d be correct — and you haven’t even seen the inside of my freezers. I’ll be enjoying(?) eggplant dishes for months to come.

If I’ve missed an eggplant dish that you’re particularly fond of, or, you prepare a tasty variation of one of the recipes that I’ve just highlighted, don’t be shy. Please share the recipe or link in the Comments section below. These plants just won’t quit!

*     *     *

*     *     *

You may have noticed …

… My recent absence from the blogging world. This is Honey Time in Michigan’s Thumb and my Cousin and his Wife graciously offered to open Zia’s home so that I could get honey for my friends and neighbors. That’s the official explanation. In reality, my Cousin – aka “The Max Whisperer” – hadn’t seen Max in about a year and missed their “nature hikes”. In the photo above, the 2 BFFs are returning from their last hike of the visit. Also above is a photo of 2 of the 3 cases of the honey that I brought back. All told, our little group of honeycombers purchased about 6 cases of honey that day.

As luck would have it, my Cousin found a baseball-sized puffball growing in the yard. When picked 3 days later, it had grown to the size of a cantaloupe. As of this writing, I’ve yet to prepare it — but I will!

*     *     *

It’s déjà vu all over again …

Eggplant Parmesan

Eggplant parmesan is the one dish in my repertoire that I’ve yet to prepare using the current harvest. Having made 2 trays of eggplant lasagna – one of which is still in my freezer – I took a pass on eggplant parmesan. Who knows? If we don’t have a killing frost soon, I just may turn to eggplant parmesan to help me deal with this surplus. Worse things could happen. You can see the recipe that I’ll be following simply by clicking HERE.

*     *     *

Coming soon to a monitor near you …

Olio Santo - Preview

Olio Santo

*     *     *

If it’s Mid-Summer, it’s Time for Pinzimonio!

Pinzimonio 2

I remember this dish every year — but around Thanksgiving, long after the gardens have withered and the farmers markets have closed for the season. Sure, you can make this dish anytime but it’s best when the vegetables are freshly picked. So, what is pinzimonio?

It’s a variety of fresh vegetables served raw with a side dressing of olive oil and vinegar that’s seasoned simply with salt and pepper. (Yes, that’s crudités but I hesitate to bring a third language into the discussion.)  It’s easy enough to prepare and a great way to take advantage of summer’s bounty.

*     *     *

Pinzimonio 1

*     *     *

When I was a boy, Mom would serve pinzimonio just about every Sunday starting in July, when the first of our garden’s crop ripened. As we gathered for dinner, there would be a platter of cut, raw vegetables in the center of the table waiting for us. You might find bell peppers, fennel, celery, carrots, radishes, cucumbers, and scallions, along with whatever caught Dad’s eye when he took Sis & I to the grocery that morning. Rounding out the antipasti/insalati, she’d also serve a platter of freshly picked, sliced tomatoes (See Déjà Vu).  But wait! There’s more.

At each of our places at the table, Mom would have a ramekin with our own dipping sauce which she would cater to our age and preference. All contained oil and red wine vinegar but those for Sis and I, being the youngest, contained just a touch of salt & pepper. My brother, being so very much older (this is one way to see if my siblings read the blog), was allowed more salt and pepper in his dipping sauce. Mom, having a life-long aversion to pepper, gave herself barely a few pepper flakes with the salt in her ramekin. Dad had no such issues and you could see a thick layer of salt with another of pepper covering the bottom of his little dish. Each of us helped ourselves to whatever we wanted on the platter and dipped it into our own ramekins. No need to pass this or that and, best of all, we could double, triple, or even quadruple dip without so much as a raised eyebrow from Mom.

*     *     *

Pinzimonio 3

*     *     *

Now, as for a recipe, well, I’ve pretty much explained the dish already. Gather together any fresh vegetable that you would serve dressed with an oil and vinegar dressing. Clean and trim each in such a way to accommodate their serving and arrange them on a platter. Next, place oil, vinegar, salt and pepper in ramekins or small dishes, one per place setting. Although Mom always used red wine vinegar, I’ve used balsamic and loved it.

No matter the vinegar used, you’ll find that pinzimonio is a great way to take advantage of the bounty of summer, while adding more vegetables to your diet. Not only that but if, like me, you have meatless days, pinzimonio makes a great lunch or dinner, especially when summer’s heat renders the stove off-limits.

*     *     *

It’s déjà vu all over again …

Tomato Antipasti - Deja Vu

I could hardly write about pinzimonio without offering you the link to Mom’s Tomato Antipasti. This time of year, both dishes were usually served side-by-side, much to the delight of all seated at that table. Best of all, it’s an easy dish to prepare and, like pinzimonio, no stove is required. Here’s the LINK to one of my family’s favorite summertime antipasti.

*     *     *

Coming soon to a monitor near you …

Squash with Seafood Preview

Butternut Squash “Noodles” with Seafood

*     *     *

Our Italian Holiday

This being such a short post, I thought I’d take advantage of the opportunity and share a bit of our holiday last spring.

Bologna

My trip began in Bologna, a wonderful town with an incredible history. It is home to the world’s oldest continuously operating university and the center of what many believe to be the heart of Italian cuisine. With my nephew arriving the next day, I had barely enough time to check into my room, take a walk, break my camera, have a great dinner, and get lost on my way back to the hotel. Yes, you read that correctly. My camera was out of commission for the entire trip. Let me apologize now for the quality of the pics to follow. Truth be told, I hadn’t planned on posting many because most would be very similar to those posted 2 years ago. Even so, it would have been nice to have had a good camera with me.

Many of Bologna’s walks are covered and the “pavement” is marble. The city is meant for the casual promenade. Besides several churches and the university, there are a number of sites to see: the Two Towers, the Piazza Maggiore (site of my camera’s untimely demise), the statue of Neptune, and of course, my prosciutto store, La Prosciutteria. How I love that place!!!  Here are a few photos. Click on any one to see a full description.

*     *     *

*     *     *

That day ended with one of the best restaurant meals that I was served.

*     *     *

*     *     *

The Republic of San Marino

My nephew’s plane arrived on time and soon we were on our way to San Marino, where Zia Pina greeted us with open arms, Waiting with her was her grand-daughter & husband, and the newest member of our the family, the soon to be one-year-old Viola. Zia is a wonderful cook and the highlight was when she served cappelletti for the entire family. This just so happens to by my nephew’s favorite dish and one he hasn’t enjoyed since his Grandma, my Mom, passed away 14 years ago. The following day, she took us both for a tour of the city of San Marino, and the seat of the republic’s government atop Mt. Titano. The next day, Sunday, we attended a mass that Zia had arranged to honor our family’s departed. Afterward, we re-assembled at a restaurant In Riccione, on the Adriatic shore, for a fantastic seafood feast. I would go back there in a heartbeat! Here are just a few of those photos.

*     *     *

*     *     *

Venice

Before leaving San Marino, my nephew and I “kidnapped” a young cousin for a day trip to Venice and Murano Island. It was a chilly day with showers, so, we timed our lunch and a caffè for the worst spells — or so we tried. Although we knew it was the Italian Liberation Day holiday, we didn’t know that it was also St. Mark’s feast day, he being the Patron Saint of Venice. We learned of our oversight upon setting foot upon St. Mark’s Square. Even so, we had to keep moving and, after a water taxi ride to Murano Island for a bit of souvenir shopping, we ended our day with a fine supper. Then it was a dash across Venice for a train ride back to Rimini where a cousin would take us to Zia’s. (I won’t mention that our arrival was delayed because we missed our train and, consequently, were stowaways on the next.) Thankfully, our “chauffeur” was very kind and waited patiently for our eventual arrival. These next photos are by committee. Oddly enough, each of our phones, ran out of power as we traversed Venice. Mine was the first to go, only to miraculously revive — its vibrating giving me quite a start — on the train as we approached the station in Rimini.

*     *     *

Don’t let the blue skies fool you. We were drenched by the time we reached the piazza and there wasn’t a soul seated in any of the cafés that encircle it.

*     *     *

Rome

The next morning, my nephew and I boarded a train bound for Rome, with Zia and 2 cousins accompanying us. What fun! Our flat was about 100 yards from the Pantheon and once we settled in, we were off for a little sightseeing around the Piazza Navona. That night, we enjoyed a fine dinner in celebration of my nephew’s graduation and, as we soon learned, my cousin’s wedding anniversary. The next morning, we walked to the Vatican to meet another cousin and her husband. Unable to get into the Vatican because the Pope was awaiting a diplomat, we took taxis to the Colosseum, stopping along the way for lunch. Well, by the time we made it to the Colosseum, it was far too crowded with tourists to enter. We headed back to the flat, said our goodbyes, and our cousins headed to the train station for their ride back to San Marino. Alone now, with only 2 days left, we planned the rest of our stay. We would spend one morning revisiting the Colosseum, with the Vatican occupying the second. The afternoons would be spent seeing everything on his “must see” list, as well as a couple of sites that I tossed into the mix. Of course, a fantastic meal would end each day.

*     *     *

*     *     *

Corinaldo

In what seemed like the blink of an eye, it was time for us to part company. My nephew returned home but a few weeks earlier I had decided to extend my holiday. I wanted to take a few days to visit Corinaldo, the Bartolini ancestral home. So, as my nephew boarded a plane, I caught a train to Ancona, where I rented a car for the drive to Corinaldo. It’s a quaint little village nestled in rolling hills. The very center of the town is totally encircled by walls that were built during the 1300s. Unlike similar towns in Italy, these walls have been maintained and are in excellent condition. There is but one entrance and one exit, the knowledge of which might have saved me the hour I spent circling the area, not to mention one ill-fated attempt of entering through the exit. (Ah! The joys of travel.) Once situated, my flat was quite nice with a terrace facing west and I was anxious to watch the sun set over the Italian countryside. Well, that was the plan but the clouds had made previous reservations, apparently, and I never did see a sunset. No worries. I still enjoyed my time there, walking from one end of the village to the other — make that “carefully walking”. It rained intermittently and the cobblestone streets are quite narrow. I rushed for a doorway or hugged a wall whenever I heard a car approach. Luckily, that didn’t happen very often. There is no rush hour in downtown Corinaldo. There is, however, a great little restaurant on The Stairs and they served me my final meal in my Grandparents’ hometown.

*     *     *

Terrace view

The terrace view

*     *     *

*     *     *

Fiumicino

I left the next morning taking a route to Ancona that would allow me to travel along the Adriatic coast for a spell. To get to the coast, I travelled along narrow roads that carried me over the hills, through the beautiful Marche countryside. I dropped off the car and made my way to the train station. With an early morning flight, my destination would be Fiumicino, a small town about 30 km outside of Rome and home to the city’s international airport. Lucky for me, there was a wonderful restaurant just down the street from my hotel. My holiday ended with one last fantastic meal, albeit a filling one.

*     *     *

Along the way to Fiumincino during the last train ride.

Along the way to Fiumincino during the last train ride.

*     *     *

*     *     *

One thing more

Unbeknownst to me, I spent my holiday walking with a stress fracture of my left ankle. It had bothered me before I left but I made a variety of excuses about it. In fact, even upon coming home, the excuses continued. Finally, about a week later, I decided to have it checked and I was given this fancy boot to wear for the next 4 weeks. WIth the boot now gone, I am happy to say that things are back to normal, whatever that means.

*     *     *

Stress Fracture

You won’t find this at Ferragamo’s.

*     *     *

Our holiday was memorable in so many ways, and during the course of which, my now-adult nephew and I became re-acquainted. We were treated royally, with our family members freeing up their schedules so that they could spend as much time with us as possible. I’ve read that when we put to paper an objective, the odds of accomplishing it increase by 40%. With that in mind, I do not know how or when but I will be returning to San Marino. I must. I’ve promised to kidnap another cousin for a day trip somewhere.

*     *     *

A Tale of Two Pizzas

Un Racconto di Due Pizze

Due PizzeFunny the convoluted paths that some of my posts take before being published. Today’s is a case in point. Originally this was to be a post about Naan pizzas. Originally.

For almost as long as I’ve lived in Chicago, Friday night has been “little or no cook” night. When I worked in The Loop, I often went out with my workmates for a “quick one” after work, which then led to several more before food somehow made its way to the table. On other Fridays, I met friends at a nearby watering hole and we often ended up at a restaurant or in one of our apartments ordering dinner before heading out for the night. Pizza was often a part of the remaining Fridays — but they were delivered.

Much has changed in my life since then but the 2 things that have remained constant are that I don’t do a lot of cooking on Friday nights and I still love pizza. Enter Naan pizza. With Naan as my pizza crust, I can easily prepare pizza with whatever toppings I want or that I have on-hand — just like my “clean out the fridge frittata”, another Friday night favorite. And that was to be the post: making Naan pizza. Then I went to the wrong grocery store.

Naan is available at all the grocery stores where I shop — save one and, of course, that’s where I found myself on a recent Friday afternoon. I’d been running errands all morning and, once I discovered my mistake, I didn’t feel much like heading to another grocery, That’s when inspiration struck. Realizing that I had some very active sourdough starter on my counter, I decided to go traditional and make my own pizza crust. My “Naan Pizza” post suddenly became “A Tale of Two Pizzas”, one old-style and one Naan.

*     *     *

Prosciutto Pizza 1*     *     *

Prosciutto Pizza Recipe

Ingredients

  • Pizza dough (Recipe follows)
  • a few tablespoons of Pistachio Pesto
  • marinated artichoke hearts, well-drained
  • several asparagus spears, chopped and briefly sautéed in butter or olive oil, drained
  • diced prosciutto
  • mozzarella (See Notes)
  • Fontina cheese, grated
  • diced prosciutto, garnish

*     *     *

*     *     *

Directions

  1. Pre-heat oven to 425˚ F (220˚ C). Lightly coat a 9 X 13″ (23 X 33 cm) baking sheet with olive oil.
  2. Use a rolling-pin to create a rectangle with the dough. Do not try to make it as large as needed. Place the dough in the center of the baking sheet and, with your fingertips, gently move/stretch the dough until it covers the entire sheet. If the dough recoils, let it rest for 5 or 10 minutes before resuming.
  3. For a slightly thicker crust, pre-cook the crust for 10 minutes in a pre-heated oven before proceeding.
  4. Apply a light coating of pesto to the top of the crust. The less oil used, the better.
  5. Place the artichokes, asparagus, and prosciutto on the crust.
  6. Evenly arrange the mozzarella cheese before covering the entire pizza with freshly grated Fontina cheese.
  7. Bake in pre-heated oven for about 15 minutes, more or less depending upon your preference.
  8. Garnish with more diced prosciutto and let rest 5 minutes before serving.

*     *     *

Pizza Crust 1*     *     *

Pizza Dough Recipe

This dough recipe is based on the Celia’s Bread #101 — A Basic Tutorial recipe in her encyclopedic blog, Fig and Lime Cordial. (Seriously, if you’re looking for a bread recipe, forget Google and head over to Celia’s.) Her recipe makes 4 crusts which is too much for me. So, I reduced the amounts but not by half. I added 50g more flour to accommodate my addition of sourdough starter, which by the way, also, came from Celia. She’s named her sourdough starter “Priscilla”, while mine has been christened “Bart, son of Priscilla”.

Ingredients

  • 300 g bread flour
  • 5 g yeast (See Notes)
  • 1/4 cup sourdough starter
  • 5 g kosher salt
  • 160 ml water
  • 25 ml olive oil

Directions

  1. Combine all ingredients and, using a stand mixer’s dough hook, knead until a nice dough forms.
  2. Separate into 2 equal parts. (Mine were 280 grams apiece.)
  3. Place each in lightly oiled, container with lid, cover, and place in a warm place for an hour or until doubled in size.
  4. Punch down dough, re-cover, and let rise again till doubled — about 1 hour more.
  5. Take one ball of dough, wrap it tightly in plastic/cling wrap, and freeze. The night before it’s needed, place in the fridge to defrost.
  6. Prepare the remaining dough ball as you would normally when making pizza.

*     *     *

Now that the traditional pizza is out-of-the-way, we can turn to the “I want pizza now!” pizza recipe. These pizzas shouldn’t take more than a half hour to prepare — and that’s from start to burning the roof of your mouth. Use whatever toppings and as much of each as you like. Following the prosciutto pizza, I’ve listed 3 more, 2 of which are meatless.

*     *     *

Spinach~Prosciutto Naan Pizza

Prosciutto Pizza Topped 1*     *     *

Ingredients

  • Naan
  • Pesto Genovese – get recipe HERE.
  • mozzarella (See Notes)
  • crumbled goat cheese
  • hand-torn pickled cherry bomb peppers ( See Notes)
  • fresh baby spinach, very lightly dressed with olive oil, red wine vinegar, salt & pepper (See Notes)
  • thinly sliced prosciutto

*     *     *

*     *     *

Directions

  1. Pre-heat oven to 425˚ F (220 ˚C).
  2. Lightly coat top of the Naan with pesto.
  3. Place the mozzarella and then sprinkle with the grated goat cheese.
  4. Add the cherry bomb peppers.
  5. Bake in a pre-heated oven for 12 to 15 minutes, depending upon your preference.
  6. Remove from oven and immediately top with the dressed spinach leaves. Place torn slices of prosciutto on the top of the pizza and serve.

*     *     *

Variations

Originally, the above 3 pizzas were to be part of a Naan Pizza post. Once I made a pizza using my own crust, however, these 3 took a back seat to the prosciutto pizzas. Still, they do prove my point that the topping possibilities are endless and oftentimes my Friday night pizza, much like my Friday night frittata, helps me clear out my fridge. On the left is a pizza topped with sardines and kale, the top right is an anchovy and caper pizza, while the bottom pie is made with spicy salami and kalamata olives. Click on an image to reveal that pizza’s remaining ingredients.

*     *     *

Notes

When making these pizzas, I often use small mozzarella balls called ciliegine, so named because they are cherry-sized and ciliege is the Italian word for cherries. Other times, I use “mozzarella pearls” which are about half the size of ciliegine.

When using Naan for my crust, I use a baking sheet and wouldn’t suggest baking your pizza on a pizza stone. Naan is already fully cooked and it will likely burn on a pizza stone while your pizza’s toppings are being heated.

I used yeast this time around because I wasn’t sure that I’d have enough time to allow the sourdough to rise, having spent the day running errands. Normally, I start the dough in the morning and, when it’s ready, pre-bake the crust, then hold it until I’m ready to fix dinner.

Use as much or as little of any ingredient listed, according to your own preferences.

The pickled cherry bomb peppers I used here came from my garden and added a bit of heat to the pizza. Use whatever pepper/chile you prefer.

Dress the spinach leaves sparingly with oil and vinegar. Remember that any excess will drain on to your pizza.

I prefer to place the spinach on the pizza first so that the pizza’s heat will lightly wilt the leaves. You may prefer to place the prosciutto on first.

*     *     *

It’s déjà vu all over again …

Pasta al SalmoneToday’s look back features Pasta al Salmone, Pasta with Salmon. I first tasted this delicious pasta while in Italy for the first time. It was love at first bite. It took me a number of years to replicate that dish but I finally did and now I can enjoy Pasta al Salmone without having to deal with airports and surly flight attendants. You can see the recipe by clicking HERE.

*     *     *

Coming soon to a monitor near you …

Homemade GarganelliHomemade Garganelli Pasta

*     *     *

Fried Zucchini Blossoms

Fiori Fritti dello Zucchini

*     *     *

For a number of years now, it seems that every cook and chef on television has demonstrated the fine art of stuffing zucchini/squash blossoms before being fried. This was not something we ever tried at the two-flat. First of all, Grandpa would never plant something in his garden that would take up so much space. Tomatoes were his main interest and a plant that sprawled, no matter what kind, just wasn’t welcome. More importantly, even if he found a suitable spot for, say, zucchini, picking the blossoms would not have been acceptable to him in the slightest. He planted zucchini and anything that would lessen the crop would not have been allowed. So, without the crutch of a family recipe, I headed into new territory when I bought my first bunch of zucchini blossoms late last Summer.

Those first blossoms proved to be a disaster. They were an impulse buy and I’d no idea how to store them, so, I treated them like I would cut flowers. I awoke the next morning to find a wilted mess in a glass of water. That was the last I saw of blossoms until a few weeks ago, when I came across some at the farmers market. With my car in the shop, they survived the trip home in surprisingly good shape. Problems arose, however, when it came to creating a stuffing. Not wishing to test the CTA’s reliability a 2nd time that day, I raided the fridge, finding fresh mozzarella and fontinella cheeses. A quick trip to the corner store and I returned with a 1/2 gallon of whole milk that was used to make ricotta. These three cheeses were used to prepare the stuffing used in today’s recipe.

With the stuffing decided, I set about creating a batter to coat them. I tried a number of versions, over the course of 3 Saturdays, finally settling on a batter of flour, corn starch, cornmeal, and club soda. This batter was, by far, the best, resulting in blossoms that were crispy without being buried in batter.

I also continued to experiment with fillings. My favorite consisted of mozzarella and anchovies. Unfortunately, my photos from that batch were a mess, though I did post the “best” one later in this post.

There is one more thing worth mentioning. Be sure to open each blossom and check to see if there are any stow-aways. Although any one of a number of insects might be found lurking in there, I’m more concerned with creatures of the eight-legged variety. Although I’ve yet to come across one, I check the blossoms over the sink with the garbage disposal running. Just sayin’ …

*     *     *

I’ll be leaving for Michigan and the Kitchens will be closed as a result. It’s time for a little R&R on the beach with Max. See you in 2 weeks.

*     *     *

Che Bei Fiori!

*     *     *

Fried Zucchini Blossoms Recipe

Ingredients

  • 12 fresh zucchini/squash blossoms
  • 2 oz (56 g) mozzarella, grated
  • 2 oz (56 g) fontinella, grated
  • 4 oz (113 g) whole milk ricotta, well-drained
  • 1/2 cup AP flour
  • 1/4 cup corn starch/flour
  • 1/4 cup cornmeal
  • club soda
  • salt & pepper
  • oil for frying

*     *     *

Fontinella, Ricotta, & Mozzarella Cheeses

*     *     *

Directions

  1. Using tweezers, remove stamen and gently wash each blossom. Carefully blot each one dry. Remove the stems just beneath the blossom.
  2. Place a coffee filter into a strainer and add ricotta. Allow to drain a couple of hours. Discard the liquid (whey) and reserve the ricotta.
  3. Coarsely grate mozzarella and fontinella cheeses. (See Notes)
  4. Combine ricotta, mozzarella, and fontinella cheeses. Mix well.
  5. Add flour, corn starch, salt & pepper into a bowl and whisk to combine.
  6. Add enough club soda to make a batter.
  7. Place the cheese mixture  into a pastry bag or plastic storage bag. If using the latter, cut off one of the bag’s bottom corners and force the cheese into that part of the bag.
  8. Grab hold of a blossom in one hand and gently separate the petals to reveal a “pocket”. Gently blowing into the blossom may help open it up.
  9. Place the tip of the cheese-filled pasty/plastic bag into the pocket and squeeze some of the cheese into the blossom. Do not overfill nor allow the blossom to split. Continue until all are stuffed.
  10. Fill a medium-sized sauce pan with about 2 inches (5 cm) of oil. Heat to about 350˚. You’ll know it is hot enough if a bit of batter instantly begins to fry when dropped into the hot oil.
  11. Take one blossom and twist the petal ends to seal the cheese inside. Grabbing hold of the twisted petal ends, dip the blossom into the batter to cover. Drain excess batter and then place in the hot oil. Continue with more blossoms. Work in batches to avoid overcrowding the pan.
  12. When golden brown (2 to 4 minutes), flip each blossom. Fry for another 2 minutes
  13. Remove to a paper towel lined dish and season with salt.
  14. Serve immediately

*     *     *

*     *     *

Variations

Though stuffed blossoms are wonderful when fried, you really don’t need to stuff them with anything before frying. Just dip them in the batter and fry them. You’ll get a light, crispy treat without the hassle of trying to fill blossoms with cheese.

Mozzarella & Anchovy  Zucchini Blossom

You can stuff the blossoms with whatever you like. Any cheese or mixture of cheeses will work. I chose a combination of 3 cheese for this post. My favorites, though were blossoms stuffed with mozzarella and an anchovy. Simply prepare the blossom as indicated above, cut a stick of mozzarella, wrap it with an anchovy, insert both into the blossom before dredging and frying. Unfortunately, the photo on the right is the best of those I took that afternoon.

There are several ways to coat your blossoms. Some prefer to use eggs in their batter while others “go it alone” with just a coating of flour. Some use breadcrumbs to form a coating and others like only flour. I like a thinner batter, so, I use a little club soda poured into a mixture of 1 part each of corn meal and corn starch/flour for every 2 parts AP flour. When mixed, I prefer a batter that’s a little thicker than buttermilk but not quite as thick as pancake batter.

*     *     *

Notes

I’ve yet to discover a good way to store blossoms. I was told to treat them like freshly cut flowers and that didn’t work. I’ve since searched the web and it’s suggested that the blossoms be tightly sealed and refrigerated. (One of the vendors expressly stated not to refrigerate them.) I’ve yet to try this for when I returned last weekend for more blossoms, none were to be found — hence the blurry photo above.

By far, the easiest way to stuff a blossom is to use a pastry or plastic bag, tip inserted into the blossom. If and when I find more blossoms, I think I’ll try the 3 cheeses again, only doubling the amount of mozzarella and fontinella before adding chopped anchovies to the mixture. Yes, I do love my anchovies!

Whenever soft cheeses like mozzarella need to be grated, it’s easiest if your place the cheese in the freezer for about 30 minutes beforehand. This should harden the cheese a bit, making grating a snap.

Initially, I tried a shallow fry, using about a half-inch of oil in the pan. I did not like the results at all. The lack of oil meant the blossoms had to be “handled” more so that they could be flipped and evenly fried. This raised the risk of damaged blossoms and leaking cheese. Using about 2 inches (5 cm) of oil made frying so much easier and consequently no blossoms were harmed in the making of this tasty treat.

*     *     *

It’s déjà vu all over again …

For many, a meal isn’t complete until coffee and an after-dinner liqueur are served. If that meal is served during the Summer, a dish of ice cream is very often part of the equation. With an eye towards reducing the average dishwasher’s workload, the Italians took these 3 traditions and united them in one simple dessert, affogato al caffè. Often served in a cup, affogato is a combination of ice cream and espresso, with an optional shot of your favorite liqueur. I think you’ll agree that an affogato is a wonderful way to end a meal — without having to loosen your belt afterward. You can see directions for creating a variety of affogati by clicking HERE.

*     *     *

Coming soon to a monitor near you …

Baccalà Salad

Baccalà Salad

*     *     *

Crostini e Bruschette

A few weeks ago I posted my last recipe in the series of making cheese at home, Italian Mozzarella. Within that post were photos of crostini & bruschette and, with the holidays quickly approaching, I thought this the perfect time to share both recipes. Besides, if you were successful and made a couple of pounds of mozzarella, eventually you’re going to tire of eating it “by the chunk” — and that’s when these recipes will come into play.

First a definition of terms. The word crostini means little toasts, whereas bruschetta has as its origin bruscare, to char or roast. They sound pretty similar to me. I’ve always thought the difference to be in the bread used. When I make crostini, I use a baguette, thinly sliced on the diagonal. For bruschette, I use a thicker slice taken from a loaf of Italian bread. I toast both before piling on the fixin’s and sometimes pop them back into the oven afterward. It really does depend on what’s being used to top each off. And speaking of the fixin’s, you can use pretty much anything you like.  Just stick with fresh ingredients and you won’t go wrong.

About a year ago, I posted a recipe for Gorgonzola and Honey Bruschette. At the time, I mentioned that I often use my toaster to toast the bread beforehand and store it in airtight containers until needed later that day. This is particularly helpful when entertaining. It’s just one less thing to worry about.  No matter when you toast the bread, though, try to serve these bruschette directly after preparation or they may become sodden.

 *     *     *

 *     *     *

Mozzarella and Tomato Bruschette Recipe

Ingredients

  • ⅔ inch (1.7 cm) slices of Italian bread
  • plum tomatoes, seeded and chopped
  • garlic, minced
  • a few tbsp of sweet onion, diced
  • fresh mozzarella, cut in 1/2 inch cubes
  • fresh basil leaves, hand torn
  • Italian seasoning
  • olive oil
  • Balsamic vinegar
  • dried oregano
  • salt & pepper

Directions

  1. Slice bread, brush with olive oil, and toast lightly
  2. Add a couple of tablespoons of olive oil to a frying pan over medium heat. Add the onion and garlic, sautéing for about a minute. Do not let the garlic burn.
  3. Add the tomatoes, season with salt and pepper, and cook until heated through.
  4. Remove from heat, add the basil, Italian seasoning, balsamic, and olive oil. Mix well and taste before seasoning with salt and pepper. Set aside.
  5. Add the cubed mozzarella once the tomato mixture has cooled to room temperature.
  6. When ready to serve, spoon some of the tomato-mozzarella mixture on top of each toasted bread slice, season lightly with salt and cracked black pepper, and garnish with a light sprinkling of dried oregano.

 *     *     *

 *     *     *

Crostini alla Caprese Recipe

Ingredients

  • ½ inch (1.2 cm) thick slices of baguette, cut on the diagonal
  • cherry tomatoes, sliced in half
  • fresh mozzarella, cut in ¼ inch (.6 cm) slices
  • fresh basil leaves
  • olive oil
  • red wine vinegar
  • salt & pepper

Directions

  1. Slice bread, brush with olive oil, and toast lightly.
  2. Pre-heat oven to 400˚F (204˚ C).
  3. Place tomatoes in a bowl, season with salt & pepper, and drizzle with olive oil.
  4. Place tomatoes on a baking sheet and then into the oven to roast for about 15 to 20 minutes. Do not allow to roast so long that the tomatoes completely collapse.
  5. Meanwhile, place a slice of fresh mozzarella and then a few small basil leaves atop each piece of toast.
  6. Remove tomatoes from the oven and when cool enough to handle, place one tomato half, cut-side down, on each piece of the toast with mozzarella and basil. If you prefer, add a light drizzle of olive oil and a few drops of red wine vinegar.  Serve immediately.

*     *     *

Notes

These antipasti should be made using fresh mozzarella. No, you needn’t make it yourself and you can find it now in most large grocery stores. Just to be clear, I’m not talking about the pre-shredded stuff used when making pizza. Fresh mozzarella is usually ball-shaped and is often packaged in water/whey. If you’re unsure, ask a person working at your store’s deli counter for assistance.

*     *     *

It’s déjà vu all over again …

Since this post is somewhat party themed, I thought it best to resurrect a recipe that’s perfect when entertaining a large group. Cut into 3 inch squares, your guests will have no trouble munching on this bit of cheesecake while sipping on their cocktails, You can find the recipe for this Cherry Cheesecake Pizza by clicking HERE. If you need help deciding which cocktail(s) to serve, do what I do. Click HERE or HERE. While you’re there, be sure to take some time to check out both Greg’s and John’s blogs. You won’t be disappointed.

*     *     *

Coming soon to a monitor near you …

The Ketchup That Came Down The Mountain

*     *     *

The Proverbial Last Rose of Summer

“Sunset Celebration”

*     *     *

Spanakópita + Tyropitákia = Spanakotyropitákia

Oh, don’t worry. I’ll explain the title in a minute.

Spanakotyropitákia

The 1990s was my decade for travel. Accompanied with my best friend, aka my Traveling Companion, we toured places that I had previously dreamt of visiting but never thought that I’d actually see in person. One such place was Greece. We arrived in Athens, spent the night, and then headed out into the Aegean for some island hopping. This trip had a little something for everyone: a modern-day metropolis; ruins of ancient civilizations; beautiful beaches; thriving nightlife; far too many picturesque settings to mention here; and the food. Oh, the glorious food!

As you know, my love of pasta knows no bounds, so, you can rest assured I had my fair share of pastitsio, with a little moussaka thrown in for good measure. Surely, my holiday in Greece would not have been complete unless I had my fill of lamb nor, for that matter, could I be expected to go from island to island without at least sampling the seafood — repeatedly. And I can assure you that any gyros bought from any street vendor anywhere on those islands will put to shame any gyros you can buy on this side of the Atlantic, hands down. Even so, Man does not munch on gyros alone and, since each island has its own wine, cheeses, olives, & olive oil, it would have been an insult had we not tasted them all, usually with a chunk of crusty bread.  Similarly, it was a surprise to learn that each island also prepared its own version of spanakópita, the Greek spinach pie. Now, I truly enjoy spinach pies and my family makes the Italian version of these tasty treats. (Called cacioni, you can see our recipe here and a recipe link supplied by my blogging friend from Le Marche, Mariano Pallottini, can be found here.) So, I needed no further encouragement to taste each island’s unique take on spanakópita. I soon learned that although the basics to each were the same (a spinach filling covered with phyllo dough) there was a surprising variety.

*     *     *

The center of attention

*     *     *

First off, some spanakópita were actually pies and each serving is a wedge just as if it were some fruit-filled dessert. Others were prepared on baking sheets and you’re served a rectangular piece like you would if it were baklava, only larger. Still others were prepared with individual servings in mind and could be self-contained, triangular or burrito-shaped pies. Beyond their form, the stuffing mixtures contained primarily the same ingredients but in differing proportions. Virtually all contained spinach, a little onion, lemon (either zest, juice, or both), dill, and a binding agent, eggs I presume. As you can well imagine, changing the amount of lemon zest or dill to be used can greatly affect the overall taste of the pie. In some cases, a little mint or parsley was also added to the filling, each adding their own distinct flavor to the mix. So, with so many variables at play, I never knew what I would be served when I choose spanakópita from a menu — and I enjoyed the surprise almost as much as the pie.

Normally, this is where I’d dive into the recipe but one more thing needs mentioning. One night, while on Mykonos, we asked our hotel proprietor for a local restaurant, a taberna, far from the tourist crowds. He obliged, sending us to a great little spot where, coincidentally, a family group was holding some sort of celebration, as I recall. It’s been some time since that evening and I’ve grown unsure of many of the specifics but I do remember 3 things: 1) we were sent ouzo shots from the management and the celebrants; 2) we ordered the house specialty, gardoubes, lamb offal that’s wrapped in caul fat and grilled; and, 3) we were sent ouzo shots from the management and celebrants. What does any of this have to do with spanakópita?

Beware of books bearing Greek’s …       recipes

Well, I was so impressed with the dish — or, in retrospect, was it the ouzo? — that I was determined to find out how to prepare it. To that end, I eventually located a cookbook that contained a recipe for a version of gardoubes and I immediately ordered it, sight unseen. Sadly, it was a bit of a disappointment. Originally written in Greek, the translation was apparently word-for-word, without considering context, rendering parts of some recipes nonsensical. Gardoubes was one of them. I decided that I wasn’t meant to make gardoubes and moved onto other things — but I kept the cookbook. Move ahead now, to a couple of weeks ago. I had just posted my instructions for making feta cheese and I had a fridge full of jars containing feta in brine. Growing tired of Greek salads, I decided to make spanakópita with feta added to the filling.

Thus began the Great Search of 2012. I’d not seen, let alone used, that recipe in years. More notes than formal recipe, I had scribbled them on a piece of paper as I watched a Greek woman prepare spanakópita on a cooking show, most probably broadcast on PBS. Well, midway into my search, I located the long-forgotten cookbook. I thought I had hit pay dirt. Why look any further when I had the “real deal” right here? Guess again. Its version of spanakópita was of the pie variety and didn’t contain any cheese. It did include a recipe for triangular-shaped pies but these were filled with cheese and called tyropitákia. They even had a lovely photo of the little triangles, so golden-brown and enticing. Also pictured with the tyropitákia was a platter of “cigars” that were phyllo dough wrapped around a filling of what looked to be spinach and cheese. In the caption, they were identified as spanakotyropitákia. What luck! I found exactly what I needed — except that I didn’t. Yes, the cookbook included a picture of spanakotyropitákia but not the recipe. I went through the book page-by-page, twice, to make sure. (And of course, there is no index nor glossary for the book either.) So, although I received a great title for today’s post, I was back to looking for my recipe.

It wasn’t very long after that I found my old recipe. It was pretty straight-forward  — just how complex can a few notes scribbled on a piece of paper be? — and easily adapted to include feta cheese.  The result was just what I had in mind. You’ll find these spanakotyropitákia have a pronounced lemon flavor, which I prefer. In fact, I’ve often been served spanakópita with a lemon slice/wedge as garnish. If, however, you’re unsure about the lemon flavoring, begin by adding the zest of a half-lemon to the spinach mixture. Taste it and let that determine whether to add the rest of the lemon’s zest. Use that tasting to also decide whether more dill is needed and if you want to add more feta. In short, taste the filling and let your palate be your guide as you make this recipe your own.

This all sounds well and good but what if you want more? You know. You can’t put your finger on it but you just crave more. Well, my advice is to check out Tanya’s recipe for Salmon Spanakópita. The name says it all.

*     *     *

Spanakotyropitákia Recipe 

Ingredients

  • 1 tbsp olive oil
  • 1 small onion, chopped fine
  • 20 oz (2 bags, 566g) leaf spinach
  • 3 tbsp fresh dill, chopped (1 tbsp dried dill weed may be substituted),  more to taste
  • 8 oz (225g) feta, crumbled
  • zest of  ½ to 1 whole lemon
  • 1 stick butter, melted
  • phyllo (fillo) dough sheets

Directions

  1. Remove any large, thick stems from the spinach and coarsely chop the leaves.
  2. Over med-high heat in a large, non-stick frying pan, heat the olive oil and sauté the onion until translucent, about 5 to 8 minutes.
  3. Add the spinach, season with salt & pepper, and sauté, turning the leaves frequently, until cooked. Remove from heat.
  4. Once cooled, place the pan’s contents in a clean kitchen towel and wring out as much liquid as possible.
  5. Place semi-dried spinach into a large bowl, add feta, zest, and dill. Mix thoroughly. Taste and adjust seasoning, if necessary. Cover and refrigerate until ready for use. This may be done a day or two in advance.
  6. When ready to proceed, add an egg to the spinach and mix until well combined.
  7. Open and unfold a package of phyllo dough, remove one sheet, and cover the remaining sheets with a damp kitchen towel.
  8. Lay the sheet of dough on a clean work surface. Fold it, lengthwise, so that 1/3 or the sheet remains uncovered. Use a sharp knife to cut off that section and place it with the rest of the unused phyllo sheets.  (A & B, click on image to enlarge)
  9. Unfold the remaining 2/3 sheet and brush half of it with butter (C) before re-folding it lengthwise. Brush the entire length with butter. (D)
  10. Place 2 – 3 tbsp of spinach filling in the bottom corner of  the strip. (E) Fold the dough up and over to the side, creating a small triangle in the process. (F)
  11. Fold the triangle up and over to the side again, and do this repeatedly, as if folding a flag. (G) When you’ve reached the end, place the pie, seam-side down on a baking sheet (H), and repeat the process with a new phyllo sheet.
  12. After you’ve finished your 2nd pie, you will have two strips that resulted from trimming the previous two dough sheets. Lay one flat, brush it with butter, and then lay the 2nd on top of it. (I) Repeat steps 10 & 11 above.
  13. Once all of your triangles are filled and folded, you can either bake or freeze them.
    1. To bake: pre-heat oven to 375˚F (190˚C) . Brush each triangle with melted butter, place seam-side down on a baking sheet, and bake until golden brown, about 15 minutes.
    2. To freeze: brush both sides of each triangle with butter, place them in a single layer on a baking sheet, place the sheet in the freezer overnight, and then store for later use. To cook, follow baking instructions but allow an additional 10 minutes to bake.

*     *     *

Notes

Work as quickly as possible when using phyllo dough. If the sheet dries. it will become unusable. Be sure to keep the rest covered with a damp kitchen towel until needed.

As I learned during my recent trip, phyllo comes in different sized sheets. As a result, you may not need to trim off a third of each sheet as shown above. Just folding it in half may suffice.

By varying the width of the dough strips, you can change the size of the pies and, therefore, their intended use. Larger pies could be considered part of a light lunch, the perfect starter,  or an unusual side. Smaller pies make great appetizers and could even be served as one of many snacks on game-day.

Although I’m aware that these pies can be fried, I’ve never done it and I’m hesitant to advise doing so. As it is, I’m quite satisfied with the results when the pies are baked. If it ain’t broke …

*     *     *

Home Again

I returned home this afternoon bearing Zia’s greetings to you all. Normally, when I’m with her, I show her a number of your blogs — but not this time. For some unknown reason, internet service in her area was even more abysmal than usual. Pictures wouldn’t download and even the simplest of tasks — hitting the “like” button — weren’t possible. This just means that there’ll be more for me to show her next time — and I’ve got dozens of your posts from the past week to read in the meantime.

*     *     *

Artichokes Two Ways

Carciofi Due Modi

As I’ve mentioned to a few of you, I’ve had a devil of a time finding “baby” artichokes here in Chicago. Sure, I can get the goliaths year-round and, about this time of the year, the stores have some that are at about half that size. The truly small artichokes, however, the ones with no choke, have been impossible to find and it’s not for lack of trying. I routinely shop at 4 different groceries, 2 ethnic markets, and 2 additional fruit/vegetable markets. Whether I’m searching too late/early in the season or I’m living in a heretofore unknown baby artichoke-free zone, it’s been well over 10 years since the green beauties have graced my table — until now.

Recently, my vegetarian friend, Cynthia, and I decided to head West to the hinterlands. We’d both heard tales of an Italian market “out there” but never ventured to find out for ourselves. Not much more than a half-hour later, we were there and what a store! First off, the place was huge, easily the largest Italian market that I’ve ever seen. They had everything from antipasti to zuppe, and very often several choices for everything in between.  The best surprise, though, was found in the produce department.

There, at the end of one of the aisles, was not 1 but 2 displays of artichokes and, much to my delight, one of them was nothing but small artichokes. To say I was happy is a gross understatement.  So, with Cynthia perusing the rest of the fruits and vegetables, I got to work selecting only the smallest of the small artichokes. I didn’t care how long it took but I was going to find them. About 10 minutes later, I had amassed some 5 pounds of the edible thistles, all about the size of a goose egg. We soon finished our shopping and snacked on mini-conolli as we drove back to civilization. The next morning, I couldn’t wait to get started preparing my find.

*     *     *

Acid Washed

*     *     *

Preparing Baby Artichokes

Just like when preparing the goliaths, use a sharp knife to chop off the top of each artichoke. I usually chop just above the tips of the largest outer leaves. Next, peel off a couple of layers of the tough, outermost leaves, revealing the vegetable’s soft inner heart. Using a paring knife, peel the base and stalk of each artichoke and, depending on the size, cut it in half or quarters. Being so small, there is no choke to remove and be sure to save as much of the stem as possible. When finished with each, immediately rub the sections with a halved lemon and place in acidulated water. (Take a large bowl of cold water and add to it the juice of 2 lemons, as well as the lemons themselves.) This “bath” will prevent the vegetable from discoloring due to oxidation.  Continue until all the artichokes have been cleaned and trimmed.

Next bring a large pot of salted water to boil, add all the trimmed artichokes, and, when the water returns to the boil, leave them to blanch for about 3 minutes. Drain them and immediately place the blanched sections into a bowl of ice water to halt the cooking process. Once chilled, removed them from the water, pat them dry, and they are now ready for use. In my case, having bought 5 pounds of the green gems, that meant the freezer for most of them. Small amounts, destined for pasta or pizza, were individually bagged, as were larger quantities which would be prepared as side dishes in the near future. Once labelled, the bags were placed in the freezer.

So, with a treasure of cleaned and trimmed baby artichokes stashed away, what are you going to do with them? Well — and this is where the due modi come into play — I’ve got 2 of Mom’s recipes to share today.

*     *     *

Fry Babies

*     *     *

Mom’s Deep Fried Artichokes

Mom didn’t prepare baby artichokes like this very often but, when she did, they certainly didn’t linger long on the serving platter. I think you’ll find the same will hold true today, no matter how you serve them: as a side, an appetizer, or snack on game day. And if you’re working with previously trimmed and blanched artichokes, they’re a snap to prepare.

Whether using freshly blanched or just thawed, pat the artichokes dry as best you can. Use standard breading methods to coat the artichokes. Since I prefer a thin coating on these, I do not use bread crumbs. Instead, I’ll coat the artichoke pieces in seasoned flour (paprika & onion powder) first before dipping them in an egg wash that’s been seasoned with salt & pepper. Then it’s back into flour again before deep frying in vegetable oil that’s been heated from 350˚ to 360˚ F. Since the baby artichokes were previously blanched, they won’t need to cook for a long time. When the coating is golden brown, they’re done. Remove them to drain on paper towels, season with salt, and serve. Although fine just as they are, I’ll sometimes serve them with lemon wedges and/or a simple aioli of mayonnaise, lemon juice, and a little grated garlic. If possible, prepare the aioli a few hours before serving to give the flavors a chance to blend.

*     *     *

*     *     *

Mom’s Sautéed Artichokes

Mom most often prepared these artichokes as she did many vegetables. (See my Vegetables/Verdura posting.) If using fresh artichokes, trim and blanch as indicated above. If cleaned but frozen, allow to defrost before use. In a frying pan over medium heat, add a couple tbsp of olive oil. Once heated, add some chopped garlic, wait a minute, and then add the artichokes. Wait another 2 minutes and then add a little tomato paste or chopped tomato, “For color,” as Mom would say. Add a splash of dry white wine, season with salt & pepper, and continue to sauté until the wine is all but gone and the artichokes are cooked to your liking. Serve immediately, garnished with fresh parsley.

*     *     *

Notes

This is all well and good, so long as you can get baby artichokes. But what if you can’t? Both of these dishes can be prepared with artichokes of any size.  Just be aware that larger-sized artichokes have developed an inedible “choke.” It’s a fibrous mass found at the base of the bulb and it must be removed. Once you’ve trimmed and halved an artichoke, use a paring knife or teaspoon to scoop out the fibrous mass. Once the choke has been removed and depending upon how large the artichoke is, you may need to cut each half into halves or thirds before proceeding. As you may have guessed, because of their size, these artichoke pieces should be blanched a few minutes longer than the “babies” were and will require longer cooking times, too. Personally, I prefer to stuff and roast the larger artichokes, leaving the sautéing and deep frying for the more tender babies.

Coming Attractions

Today I shared Mom’s favorite recipes for preparing baby artichokes. Next week I’ll share my Pasta Primavera recipe that features baby artichokes, of course, as well as a couple of other Springtime treats.

*     *     *

Gorgonzola and Honey Bruschette

This is probably my all-time favorite bruschetta recipe. Not only does it blend salty with sweet, it couldn’t be easier to prepare, a big plus when you’re trying to get a large holiday dinner on the table. Being so simple, I see no need to give it the “full treatment” normally accorded recipes on this blog. You’ll see what I mean soon enough.

I came across this recipe some 13 years ago, just about the time I moved into my current home. That year I prepared my first Thanksgiving dinner here for some friends and these bruschette were to be the sole appetizer. Unfortunately, and in full view of my guests who refused to leave the kitchen, I not only burned them but set them on fire under the broiler. Luckily, I’d bought 2 baguettes and, after a quick but oh, so memorable trip to the trash, I was able to make another batch with nothing harmed but my pride. After what was literally a baptism of fire, I’ve served these many times since, always to rave reviews. Just to be on the safe side, however, I make sure to clear the kitchen of guests when I remove them from the heat.

*     *     *

*     *     *

Not counting flambé, there are 2 ways to prepare these bruschette and first I’ll describe the method least likely to set off a smoke alarm or result in the fire department joining you for dinner.

Take a fresh baguette and slice it, on the diagonal, into 1/2 to 3/4 inch thick slices. Place the slices in a single layer on a baking sheet. Lightly brush each with extra virgin olive oil. and bake in a pre-heated 400˚ oven for 10 to 15 minutes or until golden brown. Remove from the oven and cover each piece with crumbled gorgonzola. Return to the oven and bake for a few minutes more until the cheese melts. Remove from oven, drizzle with honey, and serve.

As simple as that is to do, you may wish to try a different approach. When I first moved here, my stove had a separate broiler area, unlike the one I now own. Prior to my guests’ arrival, I would toast the baguette slices in my toaster, place them on a baking sheet, and cover with plastic wrap. Once my guests began to arrive, I would brush the slices with olive oil, cover with crumbled gorgonzola, and place under the broiler for 2 minutes or until the cheese melted. A drizzle of honey later and these bruschette were ready to be served.

*     *     *

*     *     *

See? Didn’t I tell you? These couldn’t be easier to make and, if you’re at all like me, the combination of salty and sweet flavors can’t be beat. And if you don’t care for gorgonzola, feel free to substitute blue cheese. You may even find that it melts better. No matter which cheese you choose, you can take the safe route and bake them in the oven or throw caution to the wind and pop these babies under the broiler. If you choose the latter, however, just make sure you’re alone in the kitchen with a clear path to a fire pail — and having a spare baguette handy may not be such a bad idea.

*     *     *