The Easter Bread of Le Marche

Crescia al Formaggio 

Let me say from the onset that this is not one of the Bartolini Clan’s recipes. Well, at least I didn’t think so. In any event, I think you’ll be surprised when you learn where it came from. I know I was …

*     *     *

Crescia al Formaggio

 *     *     *

You may recall last Christmas I posted a baccalà recipe called Baccalà alla Marchigiana, in honor of Zia and her Mother-in-Law, Nonna. Shortly after it was posted, I began getting referrals from a website called Scoop.It. I followed the links back and within that website is another that highlights Le Marche, the district of Italy that Mom’s family, the Bartolini, came from. I was very surprised to see that our baccalà recipe was listed in a collection of Le Marche’s Christmas Eve dishes. Well, of course I subscribed and now I receive an email every week and depending upon the content, I may check out that week’s posts. Nothing unusual here, eh?

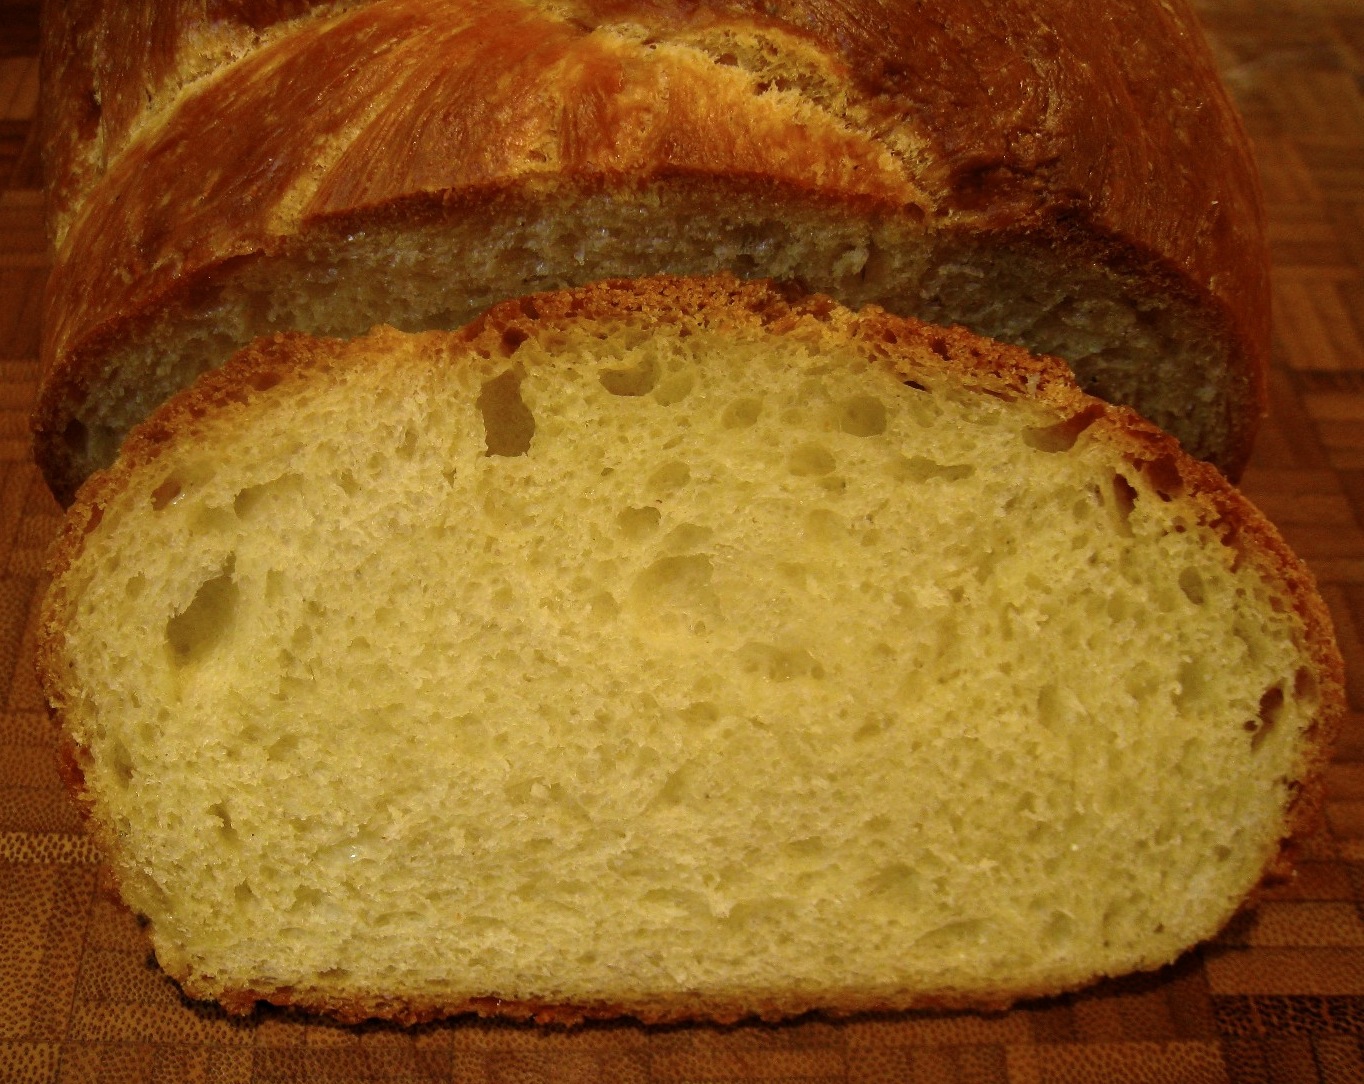
Last week, I received one such email and it featured the traditional Easter bread of Le Marche, Crescia al Formaggio. I’d never heard of this bread and just had to check it out. Shaped somewhat like a traditional Italian Christmas panettone, this bread is an egg bread that is loaded with cheese. Since this wasn’t a recipe of the site’s owner, Mariano Pallotinni,  a link was provided to its origin. I took the link and, once there, I immediately checked out the recipe and liked what I saw. I was especially pleased to see that I already had all the ingredients needed, meaning there’d be no run to the store on a cold, rainy day. So, not wishing to lose the page, I went to the URL to bookmark it. That’s when I noticed the website responsible for this authentic Marchigiani Easter bread was none other than the King Arthur Flour Co. website!!!

Once I got over the shock, I remembered that I’ve relied on the KAF website for other breads and the results were always good and, most importantly, consistent. Why not give this one a go? Well, I did and it’s been a while since I’ve enjoyed a new bread recipe as much as I enjoyed this one. Although the dough bears the characteristic yellow of an egg bread, there’s no mistaking that there’s cheese in the loaf, as your kitchen soon fills with the aroma of cheese bread baking in the oven. Nor is there anything shy about the flavor of cheese in the finished loaf but, if that’s not enough, there’s also a healthy bit of pepper added to give one’s palate a bit of a bite. No doubt about it, this is a bread I’ll bake again and again, whether or not it’s Easter.

*     *     *

Just chillin’

*     *     *

Oh, yeah. There’s one more thing about this recipe that came as a surprise. Last Friday, I baked the loaf pictured within this post. On Sunday, I spoke with Zia and told her about the bread recipe I found via a Marchigiani website. As soon as I mentioned “Crescia al Formaggio,” Zia recalled the cheese bread that Grandma made at Easter when she and Mom were little girls. Of course, she couldn’t remember exact amounts but the 2 ingredient lists are pretty much the same, except that Grandma used Swiss cheese instead of the Asiago that I added. Considering she was baking this bread during the worst of the Great Depression, we both agreed that Grandma probably used whatever cheese she had on hand. So, for those keeping track, this KAF recipe has now been authenticated by 2 sources. although I honestly cannot believe the path it took to come back to my family’s kitchens.

Before I send you to the websites, I want to clarify a couple of things. The recipe calls for 1¼ cups of cheese and suggests using Parmesan, Pecorino Romano, and/or Asiago cheeses. I combined equal parts of Pecorino and Asiago. Luckily, someone in the KAF Comments section asked for the amount of cheese needed by weight rather than volume. They responded that the required 1¼ cups of cheese equals a weight of 6 oz. With that, I followed the recipe exactly and, as I said, was very happy with the results. Wish I could say the same for my braiding skills. Having neither a panettone nor brioche pan, I followed the suggestion of braiding the dough. As you’ll see, my braid leaves much to be desired. Next time, I’ll follow Grandma’s lead and just make a round loaf.

*     *     *

When Bad Braids Happen To Good Bread Dough

*     *     *

Recipe Links

Mariano Pallotinni’s site, Le Marche and Food

King Arthur Flour Co., Italian Easter Cheese Bread Recipe

*     *     *

But of course …

As I mentioned, I baked this bread on Friday and spoke with Zia about it on Sunday. Later that evening, as I was clearing out a spam folder, I came across a miss-sorted mailing from the King Arthur Flour Co. that highlighted 3 classic Easter breads. You guessed it. One of them was today’s Italian Easter cheese bread.

*     *     *

Advertisement

No-Knead Bread and Buns

This being the 4th of July weekend, I’m sure that there’ll be barbecues blazing from sea to shining sea. I’m equally sure that more than a few of them will be grilling up burgers and dogs for at least one meal during the long weekend. I know mine will. To that end, I’ve got a “no-knead” recipe that may come in handy, courtesy of the King Arthur Flour Co. website. Originally intended to make hamburger buns, I’ve found that it can be used for hot dog buns just as easily and with equally good results. Mix up a double batch of dough and make both kinds of buns; they’re well worth the effort.

Since we’re on the subject of bread, I thought I’d share a second recipe similar to one that I found last year. It’s another recipe for no-knead bread, only this dough is used to make loaves and not buns. More importantly, you make enough dough for 3 to 4 loaves, baking one loaf at a time, as needed. The remaining dough is kept in the refrigerator where the longer it sits, the better it tastes. Unfortunately, I copied the recipe, pictures and all, but not the name of the website that supplied it. Within the portion I copied, however, the website’s author did make mention of his/her source, the book “Artisan Bread in Five Minutes” by Jeff Hertzberg and Zoë François. As luck would have it, there’s a recipe for no-knead bread on the King Arthur website and it, too, credits the Hertzberg/François book. So, since I cannot properly credit my source, I’ll send you to King Arthur for their version. I’ve used both recipes with equally good results.

*     *     *

No Knead Hamburger Buns Recipe

Coming soon: the giardiniera pictured above!

This recipe will yield 6 hamburger buns or, with a little shaping, you can get 6 brat or 8 hot dog buns. Although they’ll keep for a couple of days in a sealed bag, they are best when used the day they’re baked.

King Arthur’s No-Knead Cheese Burger Buns


*     *     *

No-Knead Bread Loaves Recipe

This recipe will yield 3 – 4 loaves, depending upon their size. You mix up a batch of dough and, after its first rise, store it in the fridge. Later, when you want to bake some bread, you literally grab a handful of dough, shape it, let it rise for an hour, and bake it. Make a batch of dough on the weekend and you can have freshly baked bread throughout the following week. It really is that simple.

King Arthur’s No-Knead Crispy White Bread

*     *     *

Notes

  • Before anyone questions my sanity for baking bread in the middle of Summer, I sometimes have sleepless nights due to insomnia. If that’s the case, like now, I take some of the refrigerated dough out, let it rise for an hour, and bake it. I’ll have a fresh loaf of bread cooling and it won’t even be 7:00 am.
  • If you’re interested, the Hertzberg/François book may be purchased here. If you wish to visit its companion blog, click here.

*     *     *

Spianata

When I was a boy, Mom occasionally treated us all to home-made pizza. She’d make standard pepperoni or sausage pizzas for us kids but Dad’s was a special order. His pizza was called spianata and, unlike our kiddie versions, his was topped with only garlic, onion, rosemary, salt and pepper, resembling a rather plain focaccia. Yet, for so few ingredients, it made a very tasty pizza back then, while Zia and I use it today as a perfect accompaniment for any number of dishes.

*     *     *

*     *     *

The recipe I’m about to share starts with what is called a “sponge.” Fairly common to many Italian/European breads, it’s a mixture of water, yeast, and flour that’s allowed to rise overnight. The mixture, in a sense, ferments and the resultant bread is more flavorful, almost sourdough-like. (In fact, I often add some of my sourdough starter to the sponge instead of yeast.) Of course, you needn’t start with a sponge but the spianata is so much more flavorful if you do. Once the sponge has “spent the night,” the rest of the recipe is pretty straight-forward and you should have no trouble following it.

*     *     *

Spianata Recipe

Ingredients

For the sponge

A Sponge Worthy of Spianata

  • 1 cup flour
  • 1 cup warm water
  • 1 tsp active yeast

For the spianata

  • 1/2 cup olive oil, divided
  • 1 tsp salt
  • 2 cups flour

For the topping

  • 1/2 of a small onion, sliced thin
  • 1 clove garlic, sliced thin or grated
  • 3 tbsp fresh rosemary, coarsely chopped
  • olive oil
  • coarse salt & pepper

Directions

  1. Proof the yeast in warm water, add to the flour to make the sponge, mix well, cover, and set aside. The sponge should be allowed to rise for at least 8 hours but no more than 20. 12 to 16 hours is usually best, in my experience. When you are ready to proceed, the sponge’s surface should be mottled with bubbles and it should have a strong yeast scent.
  2. To the sponge, add the flour, 1/4 cup olive oil, and salt. Knead dough for 5 minutes. Dough should not be sticky. If it is, sprinkle with flour and continue kneading until absorbed.
  3. Place dough in an oiled bowl, cover, and let rise until doubled — from 1 to 2 hours. (If using only sourdough starter, it could take longer.)
  4. Punch the dough down, turn it onto a floured work surface, cover with a towel, and let rest for 15 minutes. Meanwhile, coat a 9″ x 12″ sheet pan with the remaining 1/4 cup of olive oil.
  5. After resting 15 minutes, place dough onto the pan and use your fingers to begin stretching it to fit the pan. When it covers about 2/3 of the pan, flip the dough over and continue stretching the dough until the entire pan is covered and there’s enough dough to create a ridge around the pan’s edge. Cover with a towel and let rise until doubled again, about 1 hour.
  6. Pre-heat oven to 425*. Place garlic and onion into a small bowl and moisten lightly with olive oil.
  7. Once doubled, remove towel and, with your fingers, poke the surface of the dough repeatedly. Sprinkle surface with garlic, onion, rosemary, coarse salt & pepper.
  8. Bake on oven’s center rack for about 25 minutes. The spianata should be lightly browned.
  9. Allow to cool slightly before cutting and serving.

Notes

Like most breads, spianata can be frozen easily. Once it is fully cooled, wrap it tightly in aluminum foil and place in your freezer. When you are ready to serve it, place it, still wrapped in foil, in a pre-heated 350* oven for about 25 minutes. Enjoy!

*     *     *

Pieda

Located in the north of Italy, Emilia-Romagna is a collection of provinces, the southern border of which is shared with San Marino and Le Marche. Dad emigrated from San New Pieda 300Marino, Mom’s family from Le Marche. Pieda, today’s recipe, originated in Romagna but it came to our dinner table via San Marino.  It is a simple flatbread, similar to pita or tortillas, and, when folded in half, can be filled with lunch meat, cheese, or a variety of greens.  My family’s favorite was Swiss chard that had been blanched before being sautéed with a little sliced onion in garlic-flavored extra virgin olive oil . (See Mom’s way of cooking Vegetables.) No matter how you choose to fill them, pieda are best when served immediately after cooking.

*     *     *

Pieda Recipe

makes 6 – 8 pieces

total time: approx.  50 minutes (includes 30 minutes rest)

Ingredients

  • 3 cup flour
  • 1/3 cup Crisco (vegetable shortening)
  • 1 tsp baking powder
  • 1 cup milk

Directions

  1. Place all ingredients in food processor and mix until a ball of dough forms. Cover with plastic wrap and refrigerate for 30 minutes.
  2. Remove a small amount of dough and, using a rolling-pin, roll it out until it is about 6 inches in diameter and no less than 1/8 inch thick.
  3. Cook in a hot, non-stick frying pan over medium-high heat. It should only take a few minutes per side. Use a fork to prick any bubbles that may form during cooking. A side is done when it is mottled with brown spots of varying sizes.
  4. Place cooked pieda on a warmed dish in a warm oven until all are finished. Serve immediately.

*     *     *