Oatmeal Cookies with Two Chocolates, Dried Cherries, and Almonds

Cherry Choc Chip 1

Despite today’s post and a few more on the schedule, I am no baker. I do not bake. It is a classic catch-22. I don’t bake because I make mistakes and I make mistakes because I don’t bake. My experience with today’s recipe is a perfect example.

Although I’ve prepared these cookies a number of times, I’ve made more than my fair share of mistakes. Some weren’t so bad, like grabbing dark brown sugar instead of light or forgetting to add the salt. I wasn’t always so lucky, however, like the time I forgot the baking soda. Those little nuggets were tasty but hardly the cookies I had envisioned. Perhaps the worst, though, was the time I forgot to add the flour. Who forgets flour? You wouldn’t but I sure did. You can rest assured, knowing that I’ll never do that again. Even so, there has to be a better way to learn something without nearly ruining 2 baking sheets.

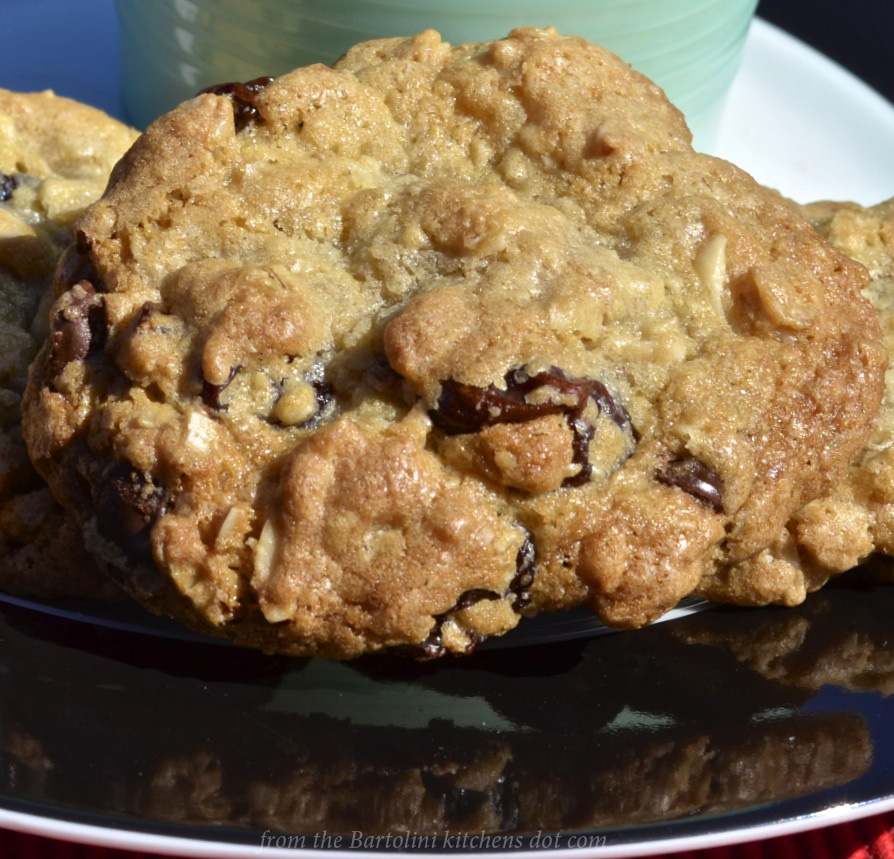
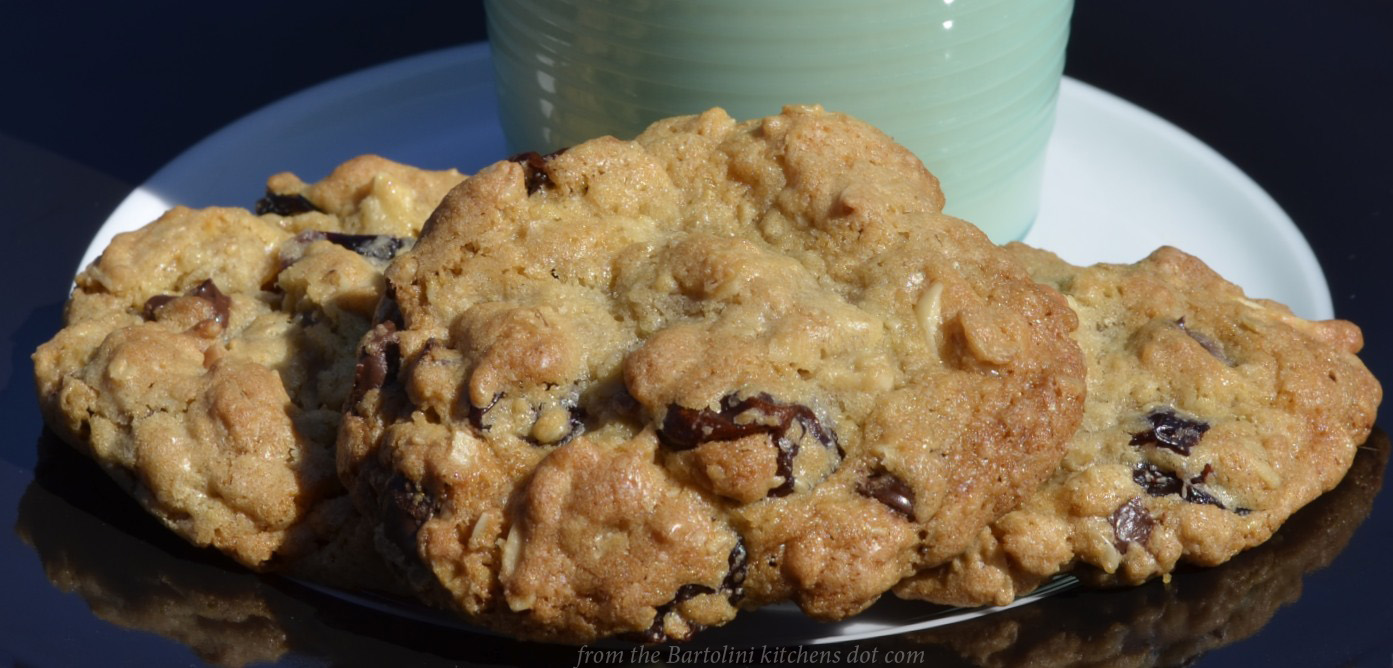
My lack of baking prowess — a.k.a common sense — aside, these are great cookies that freeze well. That’s important for me because if I don’t stash cookies in my basement freezer as soon as they’ve cooled, they’ll be gone within a day. I’ve absolutely no will power when it comes to freshly baked anything. (Yet another reason I so rarely bake.)

This recipe can easily be modified to suit your own kitchen and preferences. I’ve made these cookies using my food processor, as the original recipe directs, but I’ve also prepared them with my stand mixer. I’ve used dried cranberries instead of the cherries, and omitted the white chocolate altogether, doubling the amount of dark chocolate in its place. And if you like almond flavoring, try using almond extract instead of vanilla. In short, feel free to make whatever substitutions you like, just don’t forget the flour!

*     *     *

Announcing …

It’s time once again for the Honey Man to open shop in Michigan’s Thumb. This means I’ll be closing the Kitchens so that I can make the yearly honey run. Normally, I’d reopen the Kitchens in 2 weeks but not this year. You see, honey won’t be the only precious cargo that I’ll be bringing back to Chicago. I’m very happy to say that I’ll be playing host to a most special Guest and the Kitchens will be closed for the entire visit, known affectionately in these parts as “The Visitation.” Rest assured, the Kitchens will reopen once I’ve returned my Guest to her Michigan home.

*     *     *

Cherry Choc Chip 3*     *     *

Oatmeal Cookies with Two Chocolates and Dried Cherries Recipe

Ingredients

  • 1/2 cup unsalted butter at room temperature
  • 1/2 cup light brown sugar, packed
  • 1/4 cup sugar
  • 1/2 tsp vanilla extract
  • 1 large egg
  • 1/2 tsp baking soda
  • 1/2 tsp salt
  • 3/4 cup AP flour
  • 1 cup old-fashioned oats
  • 2/3 cup dried cherries
  • 1/3 cup semi-sweet chocolate chips
  • 1/3 cup white chocolate chips
  • 1/4 cup slivered almonds, toasted

Directions

  1. Pre-heat oven to 375˚ F (190˚ C). Place 2 oven racks on the top and bottom thirds of the oven.
  2. Cream together the butter, 2 sugars, and vanilla in a food processor
  3. To the processor bowl, add the egg, baking soda, and salt. Process until combined.
  4. Add the flour and again process till combined.
  5. Add the oats and pulse a few times. The object is to mix without pulverizing the oats. Empty the contents of the processor bowl into a large mixing bowl.
  6. Add the almonds, cherries, and both chocolates to the mixing bowl and use a spoon to mix the contents.
  7. Use a large ice cream scoop or tablespoon to create evenly sized cookies. Place scoops of dough on 2 large, parchment-covered baking sheets, about 2 inches apart.
  8. Bake for 6 minutes before turning and switching racks. Bake for another 6 or 7 minutes. Cookies should be lightly browned.
  9. Remove from oven and place cookies on a rack to cool.
  10. Store in an airtight container.

Adapted from a recipe on Epicurious

*     *     *

Cherry Choc Chip 2*     *     *

Notes

Like the fried chicken of 2 weeks ago, these cookies are good for long car rides. Very good.

*     *     *

The Colosseum and Forum of Rome

Just down the street from our flat was the Colosseum, one of the World’s few arena’s older than Wrigley Field. It is usually one of the first and last sights I see when I’m in Rome. As I’ve told my friends — ad nauseam, I’m sure — I’m a tactile person and only when I touch the Colosseum do I truly feel that I am in Rome.

(Click to enlarge any/all photos)

*     *     *

*     *     *

Right outside of the stadium lie the ruins of Ludus Magnus, the best of the gladiator schools. Tunnels once connected it to the “basement” of the Colosseum, which housed everything from wild animals and gladiators to their unfortunate victims. The amphitheater itself is huge with seating estimates that surpass 45,000 people. Yet, it could be vacated in as few as 5 minutes in an emergency. Located around the arena are thick cement posts, of a sort. These were used to support a retractable roof that provided shade from the hot Roman sun, while the arena floor could be flooded to permit mock naval battles to be performed. When not flooded, the stadium floor featured numerous trap doors, allowing for the “introduction” of fierce animals into the arena. Like so much of Rome, history comes alive as you walk around the Colosseum.

*     *     *

Inside the Colosseum    *     *     *

The heart of the ancient city, the Forum, was where Romans came to conduct business, shop, talk politics, and worship. On one side lay the Colosseum, easily the largest amphitheater of its time. On another, atop Palatine Hill, is where the emperors lived, as well as the Republic’s wealthiest citizens. Being slightly elevated, it was believed to be a bit cooler than the surrounding area and it gave the inhabitants the opportunity to literally look down upon the masses milling about the Forum. Following the main path through the Forum, the Via Sacra, you’ll pass the ruins of numerous temples, basilicas, and the Curia, where the Roman Senate met and where Julius Cæsar was assassinated. Speaking of which, you’ll also come across the altar used for Cæsar’s cremation. (The first time I visited the Forum was on March 17th quite a few years ago and red roses were strewn about the altar.)

*     *     *

*     *     *

If you are at all interested in the Roman Empire and find yourself in Rome, you really must see the Colosseum and Forum. Words and photos cannot describe the sensation of walking along the Via Sacra, tracing the steps of people like Julius Cæsar, Tiberius, Augustus, and every Emperor that was to follow them, not to mention countless notables of the ancient civilization. It was, for me, the perfect way to end my holiday and this series.

*     *     *

It’s déjà vu all over again …

Aglio e OlioToday’s blast form the past isn’t at all a seasonal dish, at its core, but you could make it one, if you wanted.  Aglio e Olio is so simple to prepare that it is a “late home from work” dish; a “we spent the night out with friends and need something quick to eat” dish; and/or a “my cupboard is bare and I’m hungry” dish. Aglio e Oilo can be all these things and so much more. You can learn all about it by clicking HERE.

*     *     *

Coming soon to a monitor near you …

Roast Duck Ravioli PreviewRoast Duck Ravioli

*     *     *

Gluten-Free Chocolate Torte

Flourless Chocolate Torte 3I’ve made no secret of my inability to bake. I have burned sheet after sheet of misshapen cookies and pulled countless cakes from the oven that failed to rise. A few years ago, after yet another bundt cake that had somehow been Super Glued to the pan, I threw both pan and cake into the trash — a very liberating experience.

Then there was the Fall that I was going to teach myself to bake my favorite cake, the Black Forest Cake. Yum, right? The first attempt quite literally made me sick. I couldn’t get that thing to the trash quick enough. The next week brought another attempt. That “cake” was better — it wasn’t life-threatening — but was certainly nothing to be proud of. The third cake proved I was on the right track, though it was in no way good enough to share with anyone. I hit pay-dirt with my 4th and, what would prove to be, my last attempt. That cake was a delight. Good thing, too, because that was 6 years ago and it was the last Black Forest Cake that I’ve tasted. Oh, I’ve been tempted to have a piece but, when I am, there’s a rumble down under that convinces me that now is not the time.

*     *     *

Perhaps it was my success with this torte that gave me the mistaken opinion that I could bake, leading me to the Black Forest Cake debacle. I first saw Jamie Oliver prepare the torte when he was known as The Naked Chef, so, this recipe has been around for some time. I’ve made it a number of times since without any problems whatsoever — not counting a misguided attempt to make it as a bundt cake with that accursed pan. Never mind that. Believe me. If I can bake this torte anyone can.

Now, a word about the recipe before proceeding. If you go searching for it on the web, you’ll find it titled a number of ways. Jamie Oliver’s: “Chocolate Torte”; “Flour-less Chocolate Torte”; and, “Two Nut Chocolate Torte”, are the most popular. Bear in mind that this recipe was demonstrated in an episode that aired in 2000, some time before most of us were aware of gluten-related issues. In fact, I’ve even see the recipe called “Flour-less” yet you’re instructed to grease and flour the pan before filling it with cake batter. Not to worry. This torte is gluten-free, hence the name change, and I coat the pan with powdered cocoa, not flour.

*     *     *

Chocolate Torte X

As Jamie intended

*     *     *

Gluten-Free Chocolate Torte Recipe

Ingredients

  • 5 1/2 oz (155 g) shelled and peeled almonds
  • 5 1/2 oz (155 g) shelled walnuts, finely ground
  • 11 oz (310 g) semi-sweet chocolate (separated – 2/3 & 1/3)
  • 1 heaped teaspoon unsweetened cocoa powder
  • 9 oz (255 g) butter
  • 3 1/2 oz (100 g) sugar
  • 6 large free-range eggs, separated
  • butter
  • cocoa powder
  • salt
  • powdered sugar

Directions

  1. Pre-heat the oven to 375˚ F (190˚ C). Use butter to grease the bottom of an 8 to 10 inch spring-form pan before lining the bottom with a piece of parchment paper. Butter the paper and sides of the pan. Use cocoa powder to coat the greased pan.
  2. Place the almonds into a food processor and grind them until finely ground.
  3. Add the walnuts and continue processing until all are finely ground. (See Notes)
  4. Add a pinch of salt and 2/3 of the chocolate and process for 30 seconds. Remove the nut-chocolate mixture to a large mixing bowl.
  5. Add the butter and sugar to the food processor and run until the mixture is a pale yellow and fluffy.
  6. Add the egg yolks, one by one, and process until well-blended.
  7. Add the egg mixture to the bowl with the chocolate mixture and stir until well-combined.
  8. Add the egg whites to a mixing bowl with a pinch of salt.  Using a whisk, hand mixer, or stand mixer, beat the eggs until stiff peaks form. (See Notes)
  9. Take 1/3 of the beaten egg whites and fold them into the bowl with the eggs and chocolate. Once blended, add the remaining 2/3 of the egg whites and fold into the batter. Do not over mix. (See Notes)
  10. Pour the batter into the prepared pan.
  11. Place the remaining chocolate chunks into the top of the torte’s batter. Press them slightly into the batter, though no need to cover them with batter.
  12. Bake on the center rack of a pre-heated oven for about an hour. After 55 minutes, use a knife to check to see if the torte is finished. Place the knife into the center, wait a few seconds, and remove. The blade should be relatively clean.
  13. Once cooled, remove from pan, invert to remove the paper, and place on a cake platter. Dust with powdered sugar.
  14. Serve as-is or with a dollop of whipped cream or crème fraîche.

This is a recipe from Jamie Oliver, The Naked Chef

*     *     *

Oven Ready

Ready for the oven

*     *     *

Notes

Be sure to keep an eye on your nuts when using the food processor or you may end up with almond-walnut butter.

To remove the almond skins: Add raw, shelled almonds to a small sauce pan filled with boiling water. Remove from the water after 3 minutes, placing the blanched nuts into an ice water bath. Strain and wipe dry. Squeeze each almond between your thumb and index finger to easily remove the skin.

This is how I beat egg whites:

  • Bring eggs to room temperature before separating. Be sure no yolk remains in the whites.
  • Place the whites in a mixing bowl. Whether whisking by hand or using a mixer, begin slowly at first. After about 30 seconds, continue beating at medium speed.
  • Once the eggs begin to color, beat at a higher rate until beaten to the recipe’s needs.

The beaten egg whites provide lift for this torte. If they aren’t folded into the batter correctly, the torte will not rise. Here’s a quick video demonstrating the proper technique for folding egg whites into batter.

*     *     *

*     *     *

For the chocoholics among us

Make a simple ganache.

  1. Place 8 oz (225 g) of chocolate pieces in a heat-resistant bowl – use whatever type of chocolate you prefer
  2. Heat 10 oz (300 ml) of heavy cream to the point of boiling.
  3. Pour the heated cream over the chocolate and let sit for a couple of minutes before stirring until smooth. As it cools, the ganache will thicken.
  4. If you prefer your ganache to be flavored, once the ganache is fully mixed, add 2 or more tbsp of:
      * Framboise for raspberry flavoring;
      * Grand Marnier or Cointreau for orange;
      * Amaretto for almond; or
      * Kahlúa for coffee.
  5. Either pour the ganache over the entire cake or each piece as it is served.

I usually make half the amount listed here and store the remainder in a sealed container in the fridge. I’ve no idea how long it will last because kitchen elves snack on it until it’s gone, usually within 48 hours — within 72 hours when Girl Scout cookies are atop the counter.

*     *     *

Chocolate Chocolate Torte

As John wanted

*     *     *

It’s déjà vu all over again …

Carnivale ends today in Italy, as it does round the World. In the days leading up to Ash fiocchetti1Wednesday, the beginning of Lent, celebrations of all kinds take place, each with its own particular sweets and confections. In New Orleans, it’s King Cake. In Chicago, it’s fried donuts called Paczkis. In the Bartolini kitchens, it was fiocchetti, which we called angel wings. These fried dough crisps, in one form or another, are made throughout Italy this time of year and go by a number of names. You can learn how to make them just by clicking HERE.

*     *     *

Coming soon to a monitor near you …

Pork Tenderloin - Plums 1

Pork Tenderloin with Plum Sauce

*     *     *

Aunt Mary’s Apple Cake

Torta di Mele di Zia Mariolla

Apple Cake

This is one of the recipes I brought home with me following my last visit with Zia but its path to this blog is nowhere near as direct as that statement makes it sound.

While having coffee with Zia, I mentioned that I baked a wonderful apple cake two years ago but have since lost the recipe. Try as I might, I can neither find nor duplicate that cake. My story reminded Zia of a slice of cake she was once served at her Daughter-in-Law’s home. She complimented my Cousin and asked for the recipe. Surprisingly, the recipe came from the other side of my family, my beautiful Zia Mariolla, who’s married to my Dad’s youngest Brother, Zio Leo. I’ve no idea how the recipe got to my Cousin’s cookbook but, lucky for us, it found its way into mine.

Perhaps what I like most about this cake is that it isn’t overly sweet and, in that regard, its lack of icing is a big plus. If you or your guests prefer a dessert that’s not too sweet, than serve them a piece of Zia’s cake just as she intended, with a dusting of powdered sugar on top. If, however, someone at the table would prefer something a bit more sweet, then have I got the thing for you, a salted caramel sauce. Within this post, I’ve included the recipe for the sauce  and you’ll find it the perfect accompaniment for Zia’s cake. See? With or without the sauce, you really can have your cake and eat it, too.

Now, as for the recipe itself, the original doesn’t specify the kind of apples, raisins, nor nuts to be used. Having just visited the Honey Man in Michigan, I had fresh Cortland apples and black walnuts at my disposal. I used golden raisins simply because I had them on-hand. That’s it. The rest of the ingredients are quite common and you should have little trouble preparing this cake.

*     *     *

On the road again …

I’m leaving for this year’s last visit with Zia. The Kitchens will be closed while I’m gone and will be re-opened on Wednesday, November 20th.

*     *     *

Apple Cake -2

*     *     *

Aunt Mary’s Apple Cake Recipe

Ingredients

Apple Cake

  • 1-3/4 c sugar
  • 3/4 c oil
  • 3 eggs
  • 1/2 tsp salt
  • 2 cup AP flour
  • 1 tsp baking soda
  • 1 tsp cinnamon
  • 1 tsp vanilla
  • 4 or 5 Cortland apples, peeled, cored, sliced thin
  • 1 cup chopped black walnuts, divided — any nuts may be substituted
  • 1 cup golden raisins (pre-soak in warm water for 30 minutes)
  • confectioners sugar (optional)
  • salted caramel sauce for serving (optional)

Salted Caramel Sauce

  • 1 cup sugar
  • 6 tbsp butter, cubed
  • 1/2 cup heavy cream, room temperature
  • 2 tsp kosher salt (see Notes)

Directions

To prepare the cake

  1. Pre-heat oven to 350˚ F (175˚ C).
  2. Place all ingredients — except apples, raisins, and nuts — in a large mixing bowl. Beat with a spoon until well-blended. Batter will be stiff.
  3. Add apples, raisins, and half the nuts to the bowl and stir till evenly distributed.
  4. Pour batter into a well-greased 9 X 13″ baking dish. Sprinkle the top with the remaining nuts.
  5. Bake in pre-heated 350˚ oven for 45 minutes. A toothpick inserted into center should be clean upon removal.
  6. Allow to cool before dusting with confectioners (powdered) sugar and serving.

To prepare the salted caramel sauce

  1. Pour the sugar into a medium sauce pan (see Notes) over med-high heat.
  2. Stir the sugar as it begins to melt and continue to do so until it begins to boil. Stop stirring the moment it begins to boil. (see Notes)
  3. Once boiling, look for it to change to an amber color. If necessary, swirl liquid in the pan but do not stir.
  4. Once the sugar has turned amber in color, reduce heat to medium, add the butter and whisk vigorously until melted and fully blended.
  5. Remove from heat, gradually add the cream, whisking all the while. Once blended, add the salt and continue to whisk until fully mixed.
  6. Set aside to cool for a few minutes before pouring into a sealable container for storage in the fridge, where it will keep for a couple of weeks.
  7. Warm before serving with your favorite dessert.

*     *     *

Apple Cake Preview

*     *     *

Notes

The recipe will prepare salted caramel sauce. If you’re not a fan of salted caramel, reduce the amount of salt used, but do not eliminate all of it. A bit of salt is usually recommended with sweet preparations. I’d suggest using 1/8 or 1/4 tsp instead of the amount listed in the recipe.

Be sure to use a large enough saucepan. The sugar will boil and could boil over if your pan is too small.

You may stir the sugar as it melts but must stop stirring the moment it begins to boil. Failure to do so may result in sugar crystals ruining the texture of the finished sauce. Once almost all the sugar is melted, it’s best to put away the spoon and swirl the pan’s contents until all is melted, boiling, and begins to turn amber-colored.

Do not, I repeat DO NOT catch a dropped spoon that was used to stir the melting sugar. I can tell you from personal experience that the momentary joy you may feel for actually catching something with your left hand will be obliterated by the searing pain that only sugar burns can deliver.

*     *     *

It’s déjà vu all over again …

Lumache ShellsLast Saturday, All Souls’ Day was observed in a number of Christian churches. In Marche, where the Bartolini are from, it’s traditional to serve snails, lumache, on that day. Although my family never observed that custom, we did, on very rare occasions, prepare and serve lumache. If you’re interested in learning how it’s done, just click HERE

*     *     *

Coming soon to a monitor near you …

Green Tomato Relish 3

Green Tomato Relish

*     *     *

Blueberry-Lemon Slice

Blueberry-Lemon Slice

As many of you know, I spend some of my spare time watching a variety of cooking shows. (Note that I didn’t say the Food Network. Since they’ve gone to the dark side of broadcasting — a.k.a. “reality” TV — I watch that network far less.) Since I can not always watch them when broadcast, many of these programs end up recorded on my DVR. Then, on some rainy day or sleepless night, I’ll clear my DVR of these recordings, zipping through the programs hoping that something will catch my eye. That’s how I found today’s recipe and it was quite a catch, even if I do say so myself.

If you’re at all like me, you enjoy the combination of blueberry and lemon flavors. After all, a blueberry muffin without a hint of lemon is just a muffin. These slices have an abundance of both ingredients and the result is one delicious treat. It’s ridiculously easy to prepare and there are no exotic nor hard-to-find ingredients. If you don’t have fresh blueberries, go ahead and use frozen. In fact, I always buy and freeze blueberries at the peak of their season, so, that I can enjoy blueberry pie when the cold weather hits. This Winter I’ll have a slice, too. If you try this recipe, I bet I won’t be the only one.

*     *     *

Blueberry-Lemon Slice Recipe

Ingredients

  • 2 cups all-purpose (AP) flour
  • 1 cup sugar, divided
  • 1 tbsp baking powder
  • 2 tsp salt
  • 1 egg yolk mixed with 1 tbsp water
  • zest & juice of 1 lemon
  • 10 tbsp butter, cubed and placed in freezer for about 30 minutes
  • 3 cups blueberries, fresh or frozen may be used
  • 1 tbsp cornstarch
  • pinch of salt

 *     *     *

This slideshow requires JavaScript.

*     *     *

Directions

  1. Pre-heat oven to 350˚ F (177˚ C)
  2. Place flour, sugar, baking powder, salt and lemon zest in a food processor. Process the ingredients till thoroughly mixed. Add the egg mixture and continue to whirl until combined.
  3. Place the very chilled butter cubes into the food processor. Pulse the ingredients, repeatedly, until the mixture looks like little pearls,
  4. Reserve 2 cups of the crumble mixture and use the rest to cover a greased 9 X 9″ baking dish. Press it down to form a crust.
  5. Meanwhile, place the blueberries, remaining sugar, lemon juice, corn starch, and a pinch of salt into a large bowl. Gently stir until everything is evenly coated.
  6. Once the bottom crust has been formed in the baking dish, pour the blueberries into the baking dish, covering the crust.
  7. Use the reserved crumble to cover the blueberries.
  8. Bake in a pre-heated oven for 35 to 45 minutes. Blueberries should be soft and the crumble browned to your satisfaction.
  9. Allow to cool and set before cutting into squares.
  10. Serve as-is or with optional Lemon Cream & Limoncello Syrup. (See Notes)

Inspired by Clinton Kelly’s Blueberry Pucker Bars, on The Chew

*     *     *

Blueberry-Lemon Slice

*     *     *

Notes …

The sharp-eyed among you may notice that I used an 8 X 8″ baking dish and not the 9 X 9″ dish indicated in the recipe. My 9 X 9″ dish met an untimely end when it crashed into the floor. It was empty, thankfully.

Although I’ve never done so, it’s suggested these slices be served with a Lemon Cream & Limoncello Syrup. Here’s that recipe, also from The Chew:

Ingredients

1 cup limoncello
1/2 cup heavy cream
1 tablespoon granulated sugar
1/4 cup lemon curd

Directions

  1. In a small sauce pan over medium heat, reduce limoncello by half. Refrigerate until well-chilled.
  2. Meanwhile, whip together heavy cream with sugar until stiff peaks form. Fold in lemon curd.
  3. When ready to serve, place a dollop of the lemon cream mixture atop each slice, accompanied by a drizzle of the limoncello reduction.

*     *     *

It’s déjà vu all over again …

PuffballBack in our part of Michigan, it’s puffball season. Well, it’s supposed to be but you never really know until your find them. Sometime during October, these large, oblong-shaped funghi appear in areas that are mostly shaded from the sun. Up until a few years ago, 1 to 3 of them could be found behind Zia’s garage. Now, for reasons known only to Mother Nature, they’ve moved to its side. You needn’t worry about that, though, for you can find some, as well as learn how to prepare them,  by clicking HERE.

*     *     *

Coming soon to a monitor near you …

Preview

Something Special to Commemorate Columbus Day

Octopus

*     *     *

This Plum Cobbler is Magical!

You may recall that I shared a peach cobbler recipe a few weeks ago. Somewhere along the line, I mentioned having another recipe for cobbler, one where the topping starts in the bottom of the baking dish but rises to the occasion during baking, giving you a perfectly formed topping to the rich fruit/berry filling. How can this be?

**********

Do you believe in magic?

**********

I’ve made this cobbler more than a few times over the years. Peaches, plums, strawberries you name it, I’ve used them all. It’s an easy recipe, a fast recipe, and one that is sure to please everyone at your table. Just bear in mind that the topping of this cobbler, unlike the peach cobbler recipe I shared HERE, is more cake-like than biscuit. I happen to like them both and now you’ll have a choice.

The recipe is as easy as 1, 2, 3 …

*********

Melt Butter in Baking Dish

*********

Add Batter – Do Not Mix

*********

Add Par-Cooked Filling – Do Not Mix

**********

Bake while singing “Abracadabra!” and … Ecco!

*********

Plum Cobbler Recipe

Ingredients

  • 1/2 cup unsalted butter, melted
  • 1 cup all-purpose (AP) flour
  • 2 cups sugar – divided
  • 1 tbsp baking powder
  • pinch salt
  • 1 cup milk
  • 4 cups plums, pitted and chopped
  • 1 tbsp fresh lemon juice
  • ground cinnamon and/or nutmeg, to taste (optional)

Directions

  1. Pre-heat oven to 375 F (190 C).
  2. Pour melted butter into a 9 x 13 x 3″ baking dish.
  3. In a medium bowl, combine the flour, 1 cup sugar, baking powder, with salt and mix well.
  4. Add the milk, mixing until just combined. Pour this batter into the baking dish containing the melted butter. Do NOT mix.
  5. In a medium saucepan, combine the plums, lemon juice, with  remaining cup of sugar and bring to a boil over med-high heat. Stir constantly. Remove from heat and add optional cinnamon and/or nutmeg.
  6. Carefully pour the plum mixture into the baking dish. Do NOT mix.
  7. Bake on a baking sheet in the center of a pre-heated oven for 40 to 45 minutes or until the top is golden brown. Alternately, you can forget to set a timer and eventually find a cobbler in your oven resembling the one in the final picture above
  8. May be served warm or cold, garnished with ice cream or whipping cream.

**********

Variations

As mentioned, you can use whatever fruit or berry that you like for the filling. I’ve never used a thickening agent, like flour or cornstarch, for fear of it affecting the cake’s formation magic.

Although the recipe lists cinnamon and nutmeg as optional, I rarely use them. I find that they can easily overpower a dessert, so, I use them sparingly in my cobblers, if at all.

**********

It’s déjà vu all over again …

Today’s Blast from the Pasta, Spaghetti Aglio e Olio, is probably the most versatile of all pasta recipes. Prepared as written and you’ll be enjoying a delicious pasta dinner within minutes but that’s only part of the story. Saute some vegetables and you’ll have a great pasta primavera. Add some clams with a touch of white wine and you’ve got the classic pasta con vongole. The choices are endless and I prepare this dish, in one form or another, just about once a week. You can see the recipe by clicking HERE.

**********

Coming soon to a monitor near you …

Branzino al Cartoccio

**********

An Update

Although I’m the proud owner of some new, fancy schmancy equipment, I am still without a DSL. I have been promised, however, that service will be restored, better than ever, sometime this evening — and companies, especially very big companies, never ever lie.

Thanks for your comments and well-wishes.

*********

A Tale of Two Recipes

During the recent heat wave, I really didn’t leave the house very much. Sure, I had errands to run and a dog to walk but that was pretty much all I did outdoors for much of 2 weeks. Well, except for watching fireworks on the 4th. Yay! It was a golden opportunity to watch some cooking shows as they were broadcast, as well as a number that I’d recorded but never watched.

*     *     *

*     *     *

One show, Lidia’s Italy, has been a long time favorite and I must have at least a dozen of her episodes recorded and saved. So, you can well imagine my astonishment when one afternoon, while watching a recorded episode of her newest show, Lidia’s Italy in America (episode 16, original airdate 12/24/11), there she was, standing in the produce department of my Italian market. Lidia Bastianich. In my market! Later she was in front of the very deli counter where I buy my prosciutto, my sopressata, and my mortadella. Do you realize what this means? I have walked on the very floor tiles upon which Lidia has walked. We’ve spoken to the same people, breathed the same air. I know. It kinda makes you weak-kneed just thinking about it. All I can say is that if you live in the Greater ChicagoLand area, you should head over to Caputo’s in Elmwood Park now, before word gets out and people begin making pilgrimages. It won’t be long before “La Via Lidia” is roped off and you’ll no longer be able to literally follow in her footsteps, as I have done. But I digress …

One show that I watched live was The Chew and on that particular day, Carla Hall made a cherry, blueberry, and sour cream pie. A pie with 2 of my favorite things? I vowed to bake one as soon as normalcy returned to our daily weather. A few days later, a Saturday, Max & I were on our way to the farmers market, where I bought sweet cherries, blueberries, and assorted other fruits & vegetables. On the way home, I stopped at a grocery and bought the sour cream needed for my pie. It wasn’t even 9:00 am and things were going very well. This all changed by 10:00 am, for that was the time I looked up the recipe on The Chew’s website.

The problem was that the printed recipe was not the recipe I recalled Carla preparing. I soon found the video of her making her pie on their website — and I was right. On the video, she uses 4 eggs, while the printed version used 3. Neither version indicates where the egg white is to come from nor the type of cherry to be used. Lastly, the video shows Michael Symon adding 2 tbsp of honey to the filling while the printed version states ⅓ cup is to be used. I was on my own.

My first attempt recreated the pie I watched Carla prepare. I used 4 eggs, the white of one being used to prepare the pie shell. The cherry question had been answered earlier that morning when I found sweet cherries at a good price at the market and bought a quart. And when it came to the honey, I followed Michael’s lead and used 2 tbsp. From that point forward, I followed the directions exactly and the pie was pretty good. For me, though, pretty good wasn’t what I wanted. With blueberries and cherries in season, I want my pie to scream “SUMMER!” This pie said “Eggs.” Yes, eggs. It certainly wasn’t a bad pie and I’m sure that it would be enjoyed by many. It just wasn’t what I’d expected. A week passed during which I ate all that pie, sometimes with home-made vanilla ice cream, sometimes with whipping cream, sometimes plain. But I ate it all because of all the sins one can commit, the gods most frown upon those who waste pie.

Another Saturday came and with it a return of the heat wave in the forecasts. Again Max and I headed to the farmers market. Again I bought blueberries and cherries, although this time I went for the tart. And again, on the way home, we stopped at a grocery to pick up sour cream. This time around, I didn’t just exchange cherries. I, also, cut the eggs in half, using only 2, and I increased the honey to ⅓ cup as the written version had indicated. Because I wanted my new pie to take full advantage of its seasonal ingredients, I increased the amount of both tart cherries and blueberries to 2 full cups apiece. This pie was not going to even whisper “eggs”. Once the filling was made, I prepared the pie as I did the first. And the verdict? I liked this rendition so very much more than the first. As I had hoped, this one was more custard and less egg-y. Adding more cherries & berries paid off, while using tart cherries worked better with the blueberries.

But you needn’t take my word for it.

Below I’ve listed the ingredient lists for both pies. The first uses a filling with sweet cherries and most closely resembles the televised recipe. The second uses tart cherries and fewer eggs in its filling and is more closely aligned with the printed version. The directions for preparing the pie are listed once because they are the same, no matter which filling you wish to use. Make one or make them both. All I ask is that you come back here and tell us what you think or any improvements you might suggest.

*     *     *

Sweet Cherry, Blueberry, and Sour Cream Pie Recipe

Ingredients 

  • A single pie crust large enough for a 9 inch deep dish pie.
  • 4 eggs, 1 divided
  • ½ cup superfine sugar, divided (see Notes below)
  • 1½ cups sweet cherries, pitted
  • 1½ cups blueberries
  • ½ tsp cinnamon
  • ¼ tsp salt
  • pinch of Nutmeg
  • 1 cup sour cream
  • 2 tbsp honey

*     *     *

Tart Cherry, Blueberry, and Sour Cream Pie Recipe

Ingredients

  • A single pie crust large enough for a 9 inch deep dish pie.
  • 2 eggs, 1 divided
  • ½ cup superfine sugar, divided
  • 2 cups tart cherries, pitted
  • 2 cups blueberries
  • ½ tsp cinnamon
  • ¼ tsp salt
  • pinch of Nutmeg
  • 1 cup sour cream
  • ⅓ cup honey

*     *     *

Directions

  1. For the pie crust. 
    1. Pre-heat oven to 400˚F.
    2. Roll out pastry dough into a 12 inch circle and place it in a pie dish, crimp edges, and blind bake, filling the pie with pie weights or beans beforehand. After 10 minutes, remove pie crust from oven. Set aside. Lower oven temp to 350˚F.
    3. When crust is cool enough to handle, remove the pie weights/beans. Whisk together 1 egg white with 2 tablespoons of the fine sugar. Using a pastry brush, coat the pie crust before returning it to the oven. Bake for another 15 minutes or until the crust is golden. Remove from oven and cool.
  2. For the pie filling. 
    1. In a bowl, combine 2 tbsp of the fine sugar, salt, cinnamon, and nutmeg.
    2. In a larger bowl, combine the blueberries and cherries.
    3. Add the sugar combination to the berries and gently mix.
    4. In a 2nd larger bowl, combine the remaining fine sugar & eggs, sour cream, and honey. Whisk until fully blended before adding to the berry mixture.  Stir to combine.
  3. Pour the filling into the pre-cooked pie shell and bake for 1 hour at 350˚F.
  4. Pie may be served warm.

*     *     *

Notes

There’s no need to buy the superfine sugar called for in the recipe, for you can make it yourself. Just place ½  cup of regular sugar into a food processor or spice grinder and give it a go. In a minute or two you’ll have superfine sugar.

Inspired by Carla Hall’s Blueberry Cherry Pie With Sour Cream

*     *     *

By any other name …

“Stainless Steel”

*     *     *

The Easter Bread of Le Marche

Crescia al Formaggio 

Let me say from the onset that this is not one of the Bartolini Clan’s recipes. Well, at least I didn’t think so. In any event, I think you’ll be surprised when you learn where it came from. I know I was …

*     *     *

Crescia al Formaggio

 *     *     *

You may recall last Christmas I posted a baccalà recipe called Baccalà alla Marchigiana, in honor of Zia and her Mother-in-Law, Nonna. Shortly after it was posted, I began getting referrals from a website called Scoop.It. I followed the links back and within that website is another that highlights Le Marche, the district of Italy that Mom’s family, the Bartolini, came from. I was very surprised to see that our baccalà recipe was listed in a collection of Le Marche’s Christmas Eve dishes. Well, of course I subscribed and now I receive an email every week and depending upon the content, I may check out that week’s posts. Nothing unusual here, eh?

Last week, I received one such email and it featured the traditional Easter bread of Le Marche, Crescia al Formaggio. I’d never heard of this bread and just had to check it out. Shaped somewhat like a traditional Italian Christmas panettone, this bread is an egg bread that is loaded with cheese. Since this wasn’t a recipe of the site’s owner, Mariano Pallotinni,  a link was provided to its origin. I took the link and, once there, I immediately checked out the recipe and liked what I saw. I was especially pleased to see that I already had all the ingredients needed, meaning there’d be no run to the store on a cold, rainy day. So, not wishing to lose the page, I went to the URL to bookmark it. That’s when I noticed the website responsible for this authentic Marchigiani Easter bread was none other than the King Arthur Flour Co. website!!!

Once I got over the shock, I remembered that I’ve relied on the KAF website for other breads and the results were always good and, most importantly, consistent. Why not give this one a go? Well, I did and it’s been a while since I’ve enjoyed a new bread recipe as much as I enjoyed this one. Although the dough bears the characteristic yellow of an egg bread, there’s no mistaking that there’s cheese in the loaf, as your kitchen soon fills with the aroma of cheese bread baking in the oven. Nor is there anything shy about the flavor of cheese in the finished loaf but, if that’s not enough, there’s also a healthy bit of pepper added to give one’s palate a bit of a bite. No doubt about it, this is a bread I’ll bake again and again, whether or not it’s Easter.

*     *     *

Just chillin’

*     *     *

Oh, yeah. There’s one more thing about this recipe that came as a surprise. Last Friday, I baked the loaf pictured within this post. On Sunday, I spoke with Zia and told her about the bread recipe I found via a Marchigiani website. As soon as I mentioned “Crescia al Formaggio,” Zia recalled the cheese bread that Grandma made at Easter when she and Mom were little girls. Of course, she couldn’t remember exact amounts but the 2 ingredient lists are pretty much the same, except that Grandma used Swiss cheese instead of the Asiago that I added. Considering she was baking this bread during the worst of the Great Depression, we both agreed that Grandma probably used whatever cheese she had on hand. So, for those keeping track, this KAF recipe has now been authenticated by 2 sources. although I honestly cannot believe the path it took to come back to my family’s kitchens.

Before I send you to the websites, I want to clarify a couple of things. The recipe calls for 1¼ cups of cheese and suggests using Parmesan, Pecorino Romano, and/or Asiago cheeses. I combined equal parts of Pecorino and Asiago. Luckily, someone in the KAF Comments section asked for the amount of cheese needed by weight rather than volume. They responded that the required 1¼ cups of cheese equals a weight of 6 oz. With that, I followed the recipe exactly and, as I said, was very happy with the results. Wish I could say the same for my braiding skills. Having neither a panettone nor brioche pan, I followed the suggestion of braiding the dough. As you’ll see, my braid leaves much to be desired. Next time, I’ll follow Grandma’s lead and just make a round loaf.

*     *     *

When Bad Braids Happen To Good Bread Dough

*     *     *

Recipe Links

Mariano Pallotinni’s site, Le Marche and Food

King Arthur Flour Co., Italian Easter Cheese Bread Recipe

*     *     *

But of course …

As I mentioned, I baked this bread on Friday and spoke with Zia about it on Sunday. Later that evening, as I was clearing out a spam folder, I came across a miss-sorted mailing from the King Arthur Flour Co. that highlighted 3 classic Easter breads. You guessed it. One of them was today’s Italian Easter cheese bread.

*     *     *

Apple Pie with a Cheddar Cheese Crust

I’ll be the first to admit that serving apple pie with a slice of cheddar cheese is not necessarily a common thing to do and it certainly wasn’t a family tradition. In fact, I was a young adult when Uncle first told me about it. Since then, I’ve enjoyed apple pie with cheddar cheese several times although, to be honest, I’ll take vanilla ice cream before cheddar cheese any day. (I am my Mother’s son, after all.) Still, I was happy with my apple pie adorned with the occasional slice of cheddar until one day a few months ago. I was busy doing whatever and, in the background, there was a Food Network program on the TV. It was one of those shows I’ve grown to dislike, with people talking about how great some dish is at this diner or that restaurant without ever telling how it’s made. Well, I watch these programs to learn new techniques, to get recipes, to see a dish prepared. If I want to hear people talk about how good a dish is, I’ll go to a diner and survey the people eating at the counter. Anyway, a restaurant was mentioned that was known for its pie and which featured an apple pie with cheddar cheese in the crust. Aside from that comment and seeing some grated cheddar dumped into a commercial mixer, the actual recipe was left a mystery. Did I mention how much I dislike these shows? Anyway, my quest began that very day …

In the weeks that followed, I baked a number of test pies. I varied the amount of grated cheddar cheese in the crust from 2 to 6 ounces per crust. I adjusted the amount of fat in the crusts and even swapped spices in the filling. And left in my wake was a trail of apple pies that stretched from the shores of Lake Michigan to those of Lake Huron, not to mention devoted taste testers in both locales. In the end, I settled on using 4 ounces of grated, sharp cheddar cheese and 7 tbsp of fat per crust while, in the pie filling, I replaced nutmeg with cardamom. The result was a pie with a crust that was manageable when raw and, when baked, was relatively light with the distinctive — but not overpowering — taste of cheddar. Success!

With the cheddar question out of the way, let’s talk filling. Just like with our Thingamajig, I use both tart and sweet apples. For the sweet, I find that Fuji work best because they, like Granny Smiths, hold up well during baking. I prefer the apples in my pie filling to be in chunks rather than thinly sliced and that way they remain somewhat firm when baked. Once the apples are peeled, cored, and chopped, I heat them in a saucepan with some butter. All I’m doing is heating them through; I take them off the heat when their juices first begin to appear in the pan. I’ve found that this helps to prevent a finished pie that has a gap of over an inch between the apple pie filling and the crust “dome” above it. It’s important, though, to pull the apples off of the heat as soon as they start to render their juices and to cool them completely before assembling the pie. Cook them too long or fill the pie while they’re still hot and your apples will not be at all crisp when the pie has finished baking.

*     *     *

No pie dome here!

*     *     *

The Apple with a Cheddar Cheese Crust Recipe

Ingredients

  • For Apple Pie Filling
    • 6 Granny Smiths (or similar, tart apples) peeled, cored, and sliced evenly
    • 2 Fuji (or similar, sweet apple) peeled, cored, and sliced evenly
    • 3 tbsp lemon juice
    • 2 tbsp butter
    • 1/4 cup raisins, soaked in hot water and drained (optional)
    • 1/2 cup sugar
    • 1/4 cup dark brown sugar
    • 1/4 cup AP flour
    • 3/4 tsp cinnamon
    • 1/4 tsp cardamom (or nutmeg)
    • 1/2 tsp salt
    • 1 egg, beaten
    • sugar
  • For Each of 2 Pie Crusts
    • 1 1/2 cups AP flour
    • 1/4 tsp salt
    • 3 tbsp vegetable shortening, cut into cubes and well-chilled
    • 4 tbsp unsalted butter, cut into cubes and well-chilled
    • 4 oz. sharp cheddar cheese, grated
    • 3 tbsp ice water, plus 1 tbsp, if needed
    • 1 tbsp cider vinegar

Directions

  • For apple pie filling
    1. In a large mixing bowl, combine the apple slices and lemon juice. Stir to coat the apples.
    2. In a sauce pan large enough to hold the apples, melt the butter over medium heat.
    3. Add the apples and sauté just until the apples begin to give up their liquid. Do not cook until the apples grow soft.
    4. Meanwhile, in a small bowl, mix together the sugar, brown sugar, flour, cinnamon, cardamom, and salt.
    5. Return heated apple pieces to large mixing bowl.
    6. Add the raisins, if using, and spice mixture to the apples and gently stir until the apples are coated evenly.
    7. Set aside to cool completely and until the pie crusts are ready.

  • For Pie Crust – Best if each crust is made individually in the food processor.
    1. Add flour, cheddar cheese, and salt to the processor. Pulse it a few times to combine the 3 ingredients.
    2. Add the very cold butter & shortening cubes.
    3. Pulse the machine 3 times, with each pulse lasting a 3-count. Your ingredients will now be lightly mixed. If need be, pulse again.
    4. With the machine running, add the vinegar and then slowly add the ice water. Do not add so much that a ball of dough forms. Remove the lid and, with your hands, test the dough to see if a ball of dough can be formed.
      1. If so, turn the dough until a very lightly floured service, form a ball, wrap it in plastic wrap, and refrigerate for 30 minutes.
      2. If a dough ball will not form, add a little more water, pulse the machine a couple of times, and test it again. When you can form a ball of dough, follow step A above.
    5. While the dough rests in the fridge, prepare the 2nd crust.
  • Assembly, to occur only after filling is cooled completely and pie crusts rested
    1. Pre-heat oven to 400.
    2. After 30 minutes, remove the dough from the fridge and roll it until large enough to completely cover the bottom of a 9 inch pie pan. Place the dough into the pan, trim any access, and return the crust and pan to the fridge until needed further.
    3. Roll out the 2nd crust, though slightly smaller, it must be large enough to cover the pie with a little excess.
    4. Retrieve the pie’s bottom crust from the fridge, fill it with the apple pie mixture, and cover it with the 2nd pie crust.
    5. Seal the pie by gently lifting the bottom crust’s edge while placing the top crust’s edge behind it. Work you way around the entire pie.
    6. Again, working your way around the pie, crimp the edge to further seal the pie.
    7. Use the egg to coat the top crust. Sprinkle with sugar. Use a sharp knife to create steam vents in the pie’s upper crust.
    8. Bake in a pre-heated 400* oven for 15 minutes. Without opening the door, lower the heat to 375* and continue baking for 40 – 45 minutes.
    9. After a total time of 30 minutes, and 15 minutes thereafter, check to see if the crust’s edge is too dark. If so, cover with aluminum foil and continue baking.
    10. When top is golden brown, remove pie from oven and place on a cooling rack. I always allow my apple pie to cool at least 2 hours before serving.

*     *     *

Fresh from the oven

*     *     *

Variations

This recipe is more concerned about the crust than it is the pie filling. So, if you prefer sweet apples, walnuts, or currants, use them. If you hate raisins, ditch them. If you don’t like or haven’t any cardamom, use nutmeg. In short, change the filling to suit your tastes. The same goes with the crust. If you find that adding cheddar to your favorite pie crust recipe makes a better pie, then please come back here and tell us about it.

*     *     *

Notes

One last thing about the crust. Add too little cheddar and you won’t taste it; too much and the pastry dough is rendered unmanageable. And even under the best of circumstances, the cheddar cheese will affect the crust’s flakiness. So, it’s basically a trade-off. The trick is to add as much cheddar cheese flavor as you can without sacrificing too many of the crust’s better qualities. My taste testers and I agree that this recipe “works.” If you try it, I hope you feel the same way.

*     *     *

The Apple Thingamajig

I’d planned to start this post by extolling the apple and its many uses but it’s hard to sing a fruit’s praises when there’s a thingamajig dangling atop your blog, metaphorically speaking, of course.  So, I might as well explain the name of this dish and get it over with — in a minute or two.

I’ve been busy elsewhere the past few days, so, these acknowledgements are a tad late. Last Friday, Kristy, of Eat, Play, Love was kind enough to pass me the Versatile Blogger Award, as did Eva of Kitchen Inspirations the very next day. Kristy’s blog is a family affair, featuring 2 gourmands-in-the-making, Mr. N and Miss A. Her recipes come from around the World and the blog’s stars are adorable. 4 spoons all the way! Eva’s blog is a treat, as well. Visit her blog and you may find yourself having brunch in a Montreal café or sharing a Moroccan feast that she researched and prepared herself. And every post is beautifully photographed. If you haven’t already done so, do yourself a favor and visit these 2 wonderful blogs. And as for the award itself, I am very thankful for the honor but, having just received this award a week ago, I won’t be passing it along. (As I mentioned to Kristy, I fear putting us all into some sort of infinite loop.) I will, however, refer you to my post of a week ago. Now, about that thingamajig …

Several years ago, at about this time of the year, my cooking shows were all featuring apple pies. Now, I love apple pie but had shied away from making them because my pie crusts were terrible and the poor apples turned to mush. That Fall, I decided to teach myself how to bake a pie and, every week to 10 days, I baked an apple pie. Well, with parents who were children of the Great Depression, we learned very early on that one  never wastes food. Period. So, if I made a pie, I ate a pie. True, eventually my pies got better and I was confident enough to share them with friends — but I ate a whole lotta pie before then. Still, even though I eventually settled on recipes for both crust and filling, one pie is a lot if you live alone, as Zia and I often commiserated. As a result, neither of us baked apple pie because we didn’t want to be greeted by the same pie every time we entered our kitchens for the next week or so. That was until 2 years ago. It was about that time that we both saw cooks on television prepare apples in a form that was part pie and part tart. They called them “open-faced” pies or tarts but, to our minds, they’re neither. So, we started calling them apple “thingamajigs” and the confusion ended, at least between the two of us. Best of all, an apple thingamajig is half the size of a pie and, therefore, better suited to our swinging single lifestyles.

Now, there are plenty of recipes around for thingamajigs and mine is based upon my apple pie recipe, with one notable exception. I include cheddar cheese in my apple pie crust but not here. Being a thingamajig has only one crust, the cheddar cheese flavor is too mild to be noticed and adding more cheese to the recipe only serves to make the crust unmanageable. So, the cheddar is reserved for double-crusted pies and it’s probably just as well. (My apple pie recipe with a cheddar crust is forthcoming.) A thingamajig, being open-faced, is less “runny” than a normal pie due to evaporation during baking. (See Notes.) As you’ll see and much to my liking, the apple slices remain firm and more apple flavor retained. As for the apples themselves, I always use tart apples, preferably Granny Smith, but I also add a sweet one — Fuji or Honeycrisp — to the filling, usually in a 3 tart to 1 sweet apple ratio. That way, you get an occasional taste of sweet among the sour. Raisins or currants will do the same. To that end, I don’t use a lot of sugar nor a number of spices in my apple filling. Why use tart apples if you’re going to add a ton of sugar and spice to the filling? For me, when it comes to apple filling, less is more.

*     *     *

The Apple Thingamajig Recipe

Ingredients

  • For Pie Crust
    • 1 1/2 cups AP flour
    • 1/4 tsp salt
    • 5 tbsp vegetable shortening, cut into cubes and well-chilled
    • 4 tbsp unsalted butter, cut into cubes and well-chilled
    • 3 tbsp ice water
    • 1 tbsp cider vinegar

  • For Apple Filling
    • 3 Granny Smiths (or similar, tart apples) peeled, cored, and sliced evenly
    • 1 Fuji (or similar, sweet apple) peeled, cored, and sliced evenly
    • 2 tbsp lemon juice
    • 1/4 cup sugar
    • 2 tbsp dark brown sugar
    • 2 tbsp AP flour
    • 1/2 tsp cinnamon
    • 1/8 tsp nutmeg
    • 1/4 tsp salt
    • 1 egg, beaten
    • sugar
    • butter

Directions

  • For Pie Crust
    1. Add flour and salt to the processor. Pulse it a few times to mix the 2 ingredients.
    2. Add the very cold butter & shortening cubes.
    3. Pulse the machine 3 times, with each pulse lasting a 3-count. Your ingredients will now be lightly mixed. If need be, pulse again.
    4. With the machine running, add the vinegar and then slowly add the ice water. Do not add so much that a ball of dough forms. Remove the lid and, with your hands, test the dough to see if a ball of dough can be formed.
      1. If so, turn the dough until a very lightly floured service, form a ball, wrap it in plastic wrap, and refrigerate for 30 minutes.
      2. If a dough ball will not form, add a little more water, pulse the machine a couple of times, and test it again. When you can form a ball of dough, follow step A above.
    5. While the dough rests in the fridge, prepare the filling.

  • For Apple Filling
    1. In a large mixing bowl, combine the apple slices and lemon juice. Stir to coat the apples.
    2. In a small bowl, mix together the sugar, brown sugar, flour, cinnamon, nutmeg, and salt.
    3. Add the spice mixture to the apples and gently stir until the apples are coated evenly.
    4. Set aside until the pie crust is ready.


  • Assembly
    1. Roll the dough as if making a bottom crust for a 9 inch pie.
    2. Place the apples in the center of the dough circle, leaving a 2 inch border around the filling. Creative types may wish to carefully place the apples in a circular design. (That is soo not me.)
    3. Carefully lift the border, working your way around the filling, crimping as needed. You are creating the crust for your open-faced thingamajig.
    4. Dot the top of the apple filling with small bits of butter.
    5. With a pastry brush, lightly coat the exposed crust with the beaten egg. Sprinkle the sugar.
    6. Place in a pre-heated 375* oven and bake for 40 to 45 minutes or until golden brown.
    7. Should not be served piping hot but may be served warm.

*     *     *

Variations

Just like its cousins the tart and pie, you can add ingredients to the filling to suit your own tastes. In the past, I’ve added raisins, currants, and chopped walnuts to the filling and enjoyed each. And, of course, you can change this dessert completely by selecting different apples. I like tart; you may prefer sweet. Lucky for us, there are plenty of apples to choose from.

*     *     *

Notes

Because there are fewer pie juices to contain, this pie crust can be rolled thinner than you would for a pie and, as a result, you can easily make 2 thingamajigs — as I often do and did today. I keep one for myself and give the other to a friend.  I believe it was Confucius who said, “It is easier to give someone a thingamajig than it is to give half a pie.”

*     *     *

My Cherry Amour, Reprise (Bigger, better, badder!)

Having professed my love of tart cherries last week, I’m sure you can understand my remorse now that cherry season has come to an end. Rather than mourn their passing, however, I’ve decided to celebrate their sour little lives by baking one last cherry pie. (Put another way, I’ve got a freezer full of cherry muffins and there’s still another quart of pitted cherries in the fridge.)

I’ve used both of these recipes for several years now. The first, for pastry dough, uses a food processor to mix the dough. That alone makes it a winner in my book. The recipe, however, makes only enough pastry dough for one 9 inch pie crust. I’ve found that I get better results if I make 2 batches of dough, rather than doubling the recipe for a double-crusted pie. Don’t ask me why but that’s just the way it works. The recipe for the pie filling is about as simple as can be. Flour, not cornstarch or tapioca, is the thickening agent and there’s no need to pre-cook the fruit filling mixture before placing it into the pie shell. So, if you’re good working with pastry dough, you can have a pie in the oven pretty quickly. Me? It’s an afternoon project, often including wailing, the gnashing of teeth, and the rending of garments.

There is one last thing to consider, especially if you, like me, tend to throw common sense out the window when you see all the pretty quarts of tart cherries lined up in the market or at some farmer’s stand. I mean, how can you not buy a few quarts? It all makes perfect sense until you arrive home and realize that you have to pit them all before you can do anything else with them. Well, there is hope for us. I’ve found a website that should be called “How to deal with the fruit and stuff that result from ChgoJohn going to a farmers’ market.com?” It has been called, instead, Kraft Foods something or other and it explains how to freeze a variety of baked goods. You can reach it by clicking here and I recommend that you bookmark the site. It’s one of those web pages that you probably won’t need today, you may not need tomorrow, but you are going to need it some day.

*     *     *

Food Processor Pie Crust Recipe

Yield: One 9 inch pie crust

For best results:

  • Do not over-process the dough.
  • Use only enough water to create a crumbly texture.
  • Do not run the processor long enough to form a dough ball. Use your hands to do that.

Ingredients

  • 1 1/2 cups flour
  • 4 tbsp unsalted butter, chilled/frozen, cubed
  • 5 tbsp shortening, chilled/frozen, cubed
  • 1/2 tsp salt
  • 3 tbsp ice water

Directions

  1. Add flour and salt to the processor. Pulse it a few times to mix the 2 ingredients.
  2. Add the very cold butter and shortening cubes.
  3. Pulse the machine 3 times, with each pulse lasting a 3-count. Your ingredients will now be lightly mixed.
  4. With the machine running, slowly add the ice water. Do not add so much that a ball of dough forms. Remove the lid and, with your hands, test the dough to see if a ball of dough can be formed.
    1. If so, turn the dough until a very lightly floured service, form a ball, wrap it in plastic wrap, and refrigerate for 30 minutes.
    2. If a dough ball will not form, add a little more water, pulse the machine a couple of times, and test it again. When you can form a ball of dough, follow step A above.
  5. After 30 minutes, remove the dough from the fridge and roll it until large enough to completely cover the bottom of a 9 inch pie pan. Place the dough into the pan, trim any access, and return the crust and pan to the fridge until needed further.
  6. I usually postpone handling the 2nd pie crust, the “top,” until just before it is needed. The colder the dough going into the oven, the flakier the crust coming out.

*     *     *

Pie Eyed

*     *     *

Cherry Pie Recipe 

Ingredients

  • Pastry for 1 double-crust 9 inch pie.
  • 4 cups fresh, tart cherries, pitted
  • 1 1/3 cups sugar
  • 1/3 cup ap flour
  • 1/4 tsp salt
  • 1/4 tsp almond extract
  • 2 tbsp butter, cut into small cubes
  • 3 tbsp milk
  • sugar

Directions

  1. Pre-heat oven to 425*.
  2. Use half of the pastry dough to line the pie plate. Place it in the refrigerator to chill until needed.
  3. Gently combine the cherries, sugar, flour, salt, and almond extract.
  4. Roll out the other half of the pastry and prepare for use. If covering the entire pie, leave as is. If creating a lattice, cut the strips. If, as I did, you’re creating leaves, use a stamp to form them all, place on a baking sheet lined with parchment paper, and refrigerate until needed.
  5. Pour the cherry mixture into the chilled pie shell and dot the pie with the cubes of butter.
    1. If covering the entire pie, spread the top portion of the pastry dough, seal its edge with the bottom’s dough, crimp the edge, and create slits in the top to allow steam to vent.
    2. For a lattice cover, retrieve the strips and, starting at one end of the pie, weave a lattice across the pie’s top. (See Notes below.)
    3. For a leaf top, place the dough leaves across the top,  being careful to leave enough openings for steam to vent.
  6. Use a pastry brush to coat the upper crust with milk. Sprinkle the top with a light dusting of sugar.
  7. Bake on a baking sheet — in case of overflow — in a pre-heated 425* oven for 35 to 40 minutes until golden.
  8. Allow to cool before serving so that the filling sets properly.

*     *     *

"... And let's have another piece of pie."

*     *     *

Notes

The reason one sees so many lattice-topped cherry pies is because a woven top allows the pie’s juices to evaporate somewhat during the baking process, making for a better pie. Cook’s Illustrated Magazine’s book, Baking Illustrated (p. 148), suggests creating the lattice on parchment paper and not atop the pie. Once woven, place both the lattice and parchment paper in the freezer. When the lattice is firm, gently transfer it from the paper to the pie’s top and carefully connect it to the bottom crust. Brush it with milk, sprinkle with sugar, and bake as directed above.

And so ends this year’s journey down Cherry Lane, where pitting is such tart sorrow.

*     *     *