A Pasta for the Open

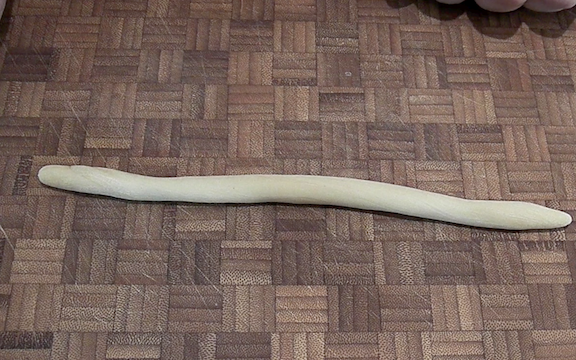
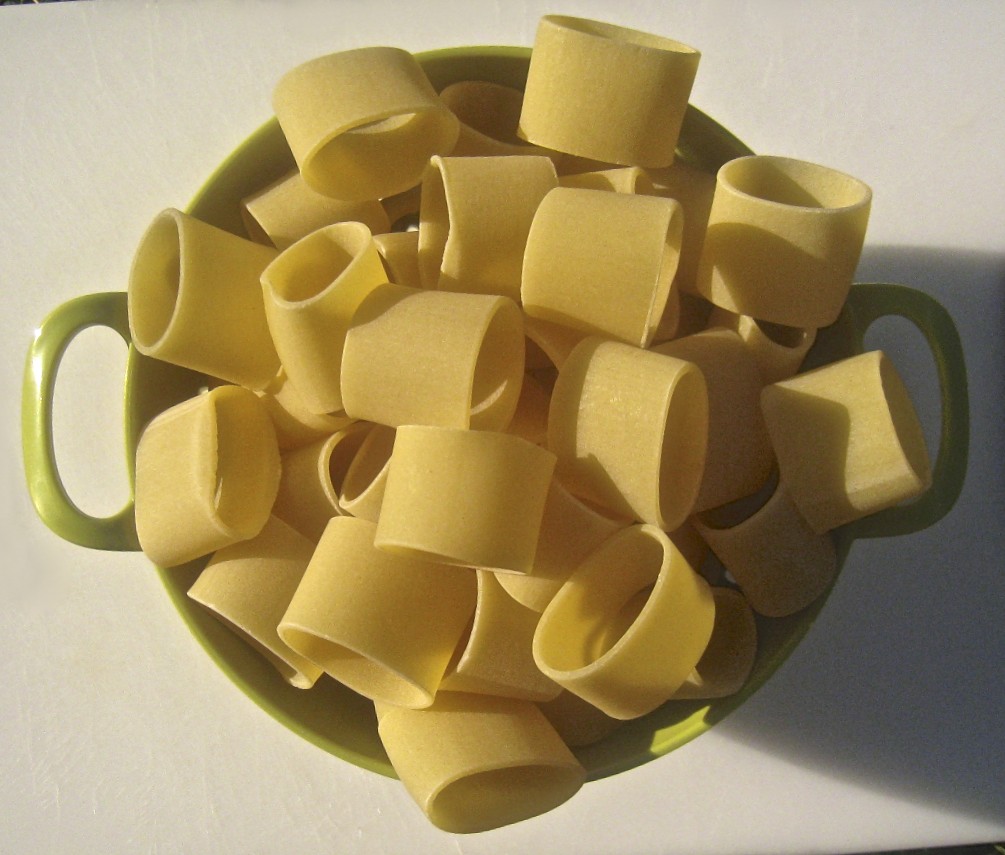
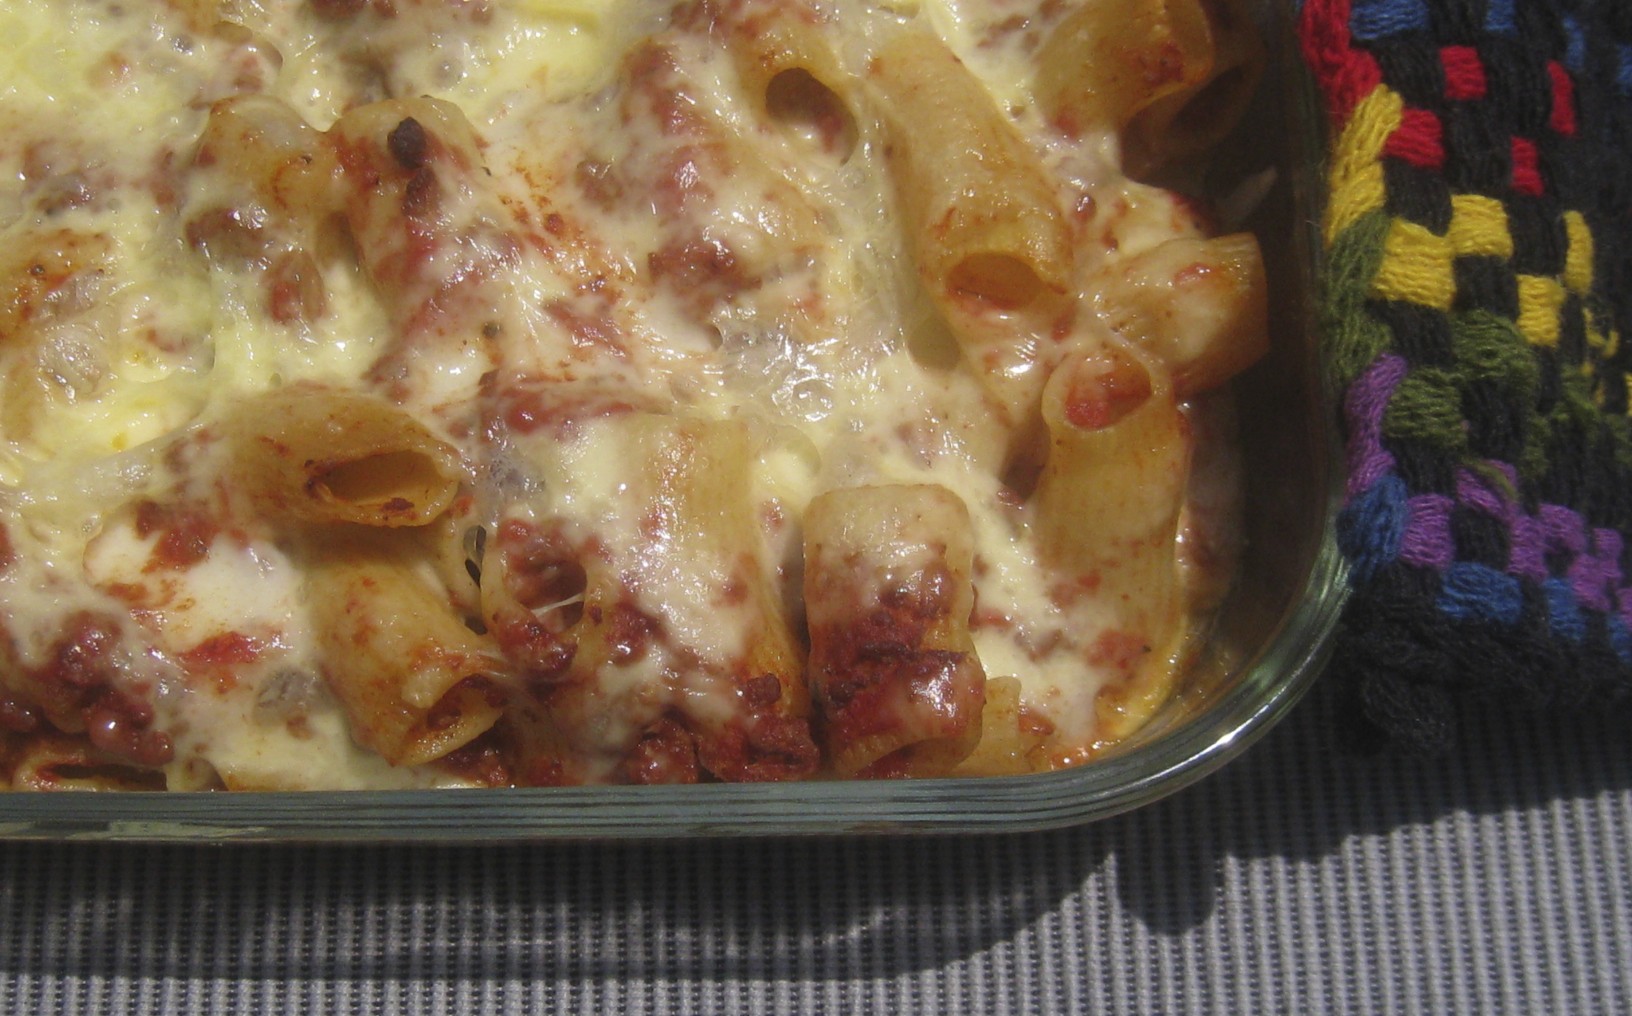
I don’t know about you but when I hear that the US Open Tennis Championships are about to begin, I immediately think of pasta. I mean, how could I not? So, when the Open starts, I naturally prepare some form of pasta to mark the occasion, just as so many of you do, I’m sure. In the past, it didn’t really matter what pasta was selected for that meal, and my choices have ranged from Bucatini to Ziti, and several pastas in-between. This all changed, however, one day when I toured the newly discovered Italian market’s pasta aisles. That’s where I discovered Racchette, a racket-shaped pasta.

*     *     *

*     *     *

Although I’m certainly no expert, I think it safe to say that Racchette are a relatively new pasta and virtually all are manufactured by machines. I mean, I just cannot imagine Nonnas — be they from Today or the 19th Century — rolling out dough sheets and making these little rackets. I know my Nonnas certainly didn’t — but if yours did, please leave a comment and I’ll be more than happy to amend this paragraph. Moving beyond Racchette’s manufacture, I can say, in all honesty, that the first any of the Bartolini women heard of Racchette was when I mentioned the pasta to my Zia a couple of weeks ago during a conversation. It should come as no surprise to anyone, therefore, that there is no Bartolini family recipe for Racchette.

Without a family recipe to use, I did what most do in this situation:  I googled it. That search returned thousands of results but most were very similar. That base recipe is one that I will make but I’ll do it in Spring, when the ingredients are fresh and readily available. Onward I went, wading through more of the search results until I came upon a recipe that was presented by the company that made the pasta. I went into kitchen, grabbed the box, and, sure enough, the recipe was on the back of the box of Racchette. (Isn’t it always the last place you look?) That recipe, Racchette California Style, is the one I’ll share today.

The recipe, as written, calls for red, white, and Marsala wines. When I prepared it, I used what I had on-hand, Pinot Grigio, Merlot, and a sweet Marsala. You may have better wine selections in mind (Jed) and, if you do, I hope you’ll use the Comments section to make your suggestions — and that includes ideas beyond wine selection. I think you’ll find this to be a simple, easy to prepare recipe. All you need to do now is to find the Racchette.

*     *     *

*     *     *

Racchette “California Style” Recipe

Ingredients

  • 1 lb Racchette
  • 1 handful fresh basil
  • 2 tbsp pine nuts
  • 1 clove garlic, smashed
  • 1 tsp grated Parmesan cheese
  • 1 tsp grated Pecorino Romano cheese
  • ½ cup white wine (I used Pinot Grigio)
  • ½ cup red wine (I used Merlot)
  • ½ cup Marsala wine (I used a sweet variety)
  • 2 tbsp butter, softened

Directions

  1. Bring a large pot of salted water to boil and cook Racchette per package directions or to taste.
  2. Meanwhile, add the basil, pine nuts, garlic, and cheese to a food processor until blended.
  3. Add the wines and process until well-mixed.
  4. When cooked to you liking drain the pasta. Add the softened butter to the sauce, giving it a creamier texture.
  5. Add the sauce to the pasta, toss, garnish with additional grated cheese & cracked pepper (optional), and serve.

Inspired by the De Cecco company’s Racchette California Style recipe

*     *     *

Notes

I must admit to having been surprised by this pasta. Neither Zia nor myself have ever used wine in pasta without cooking it, even if only for a few minutes. Using a total of 1½ cups of “raw” wine to dress a pound of pasta is completely new and something I never would have considered doing on my own. And the verdict? I enjoyed it. I make simple pastas with garlic, mushrooms, lemon, basil, or cheese as the predominant flavor within the “sauce”. Why not wine? Of course, if you’re not a wine lover, this dish isn’t for you. On the other hand, if you do enjoy a glass of wine every now and again, you just might want to give this dish a try.

*     *     *

It’s déjà vu all over again …

Just as was done in the last 2 posts, today’s look back will take advantage of the season’s harvest. Illinois is a leading producer of corn in this country and, even though the state is suffering the effects of a severe drought, there’s still plenty of corn in the farmers markets — at least in this area. This recipe for Corn Relish comes from Zia’s kitchen and is one that she prepared and canned every year. You can make it as spicy as you like and it is a terrific way to add a little Summer to your meal in the dead of Winter. Just be sure to make a double batch. It’s the only way to ensure you’ll have a few jars when Winter comes. Click HERE to see the full recipe.

*     *     *

By any other name …

In morning light …

*     *     *

Later that day

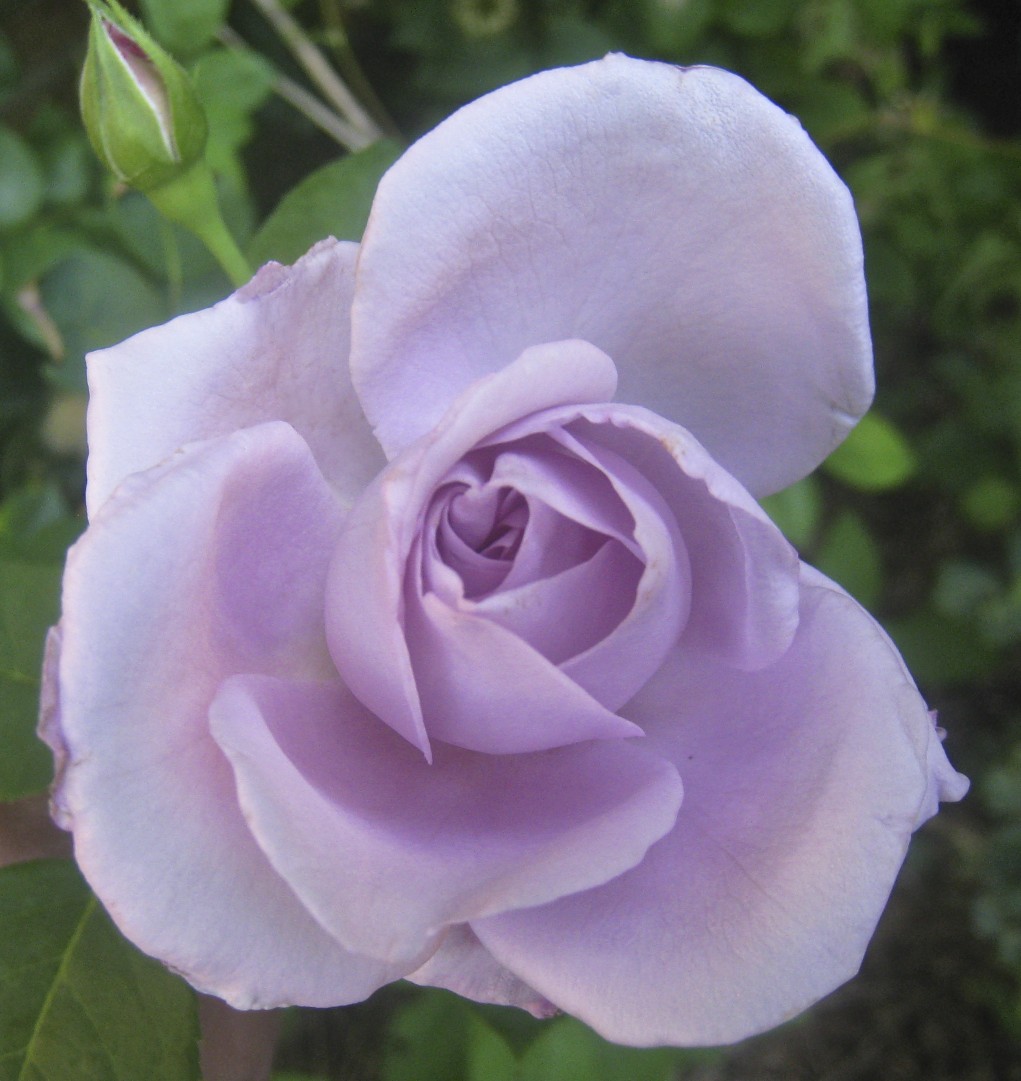
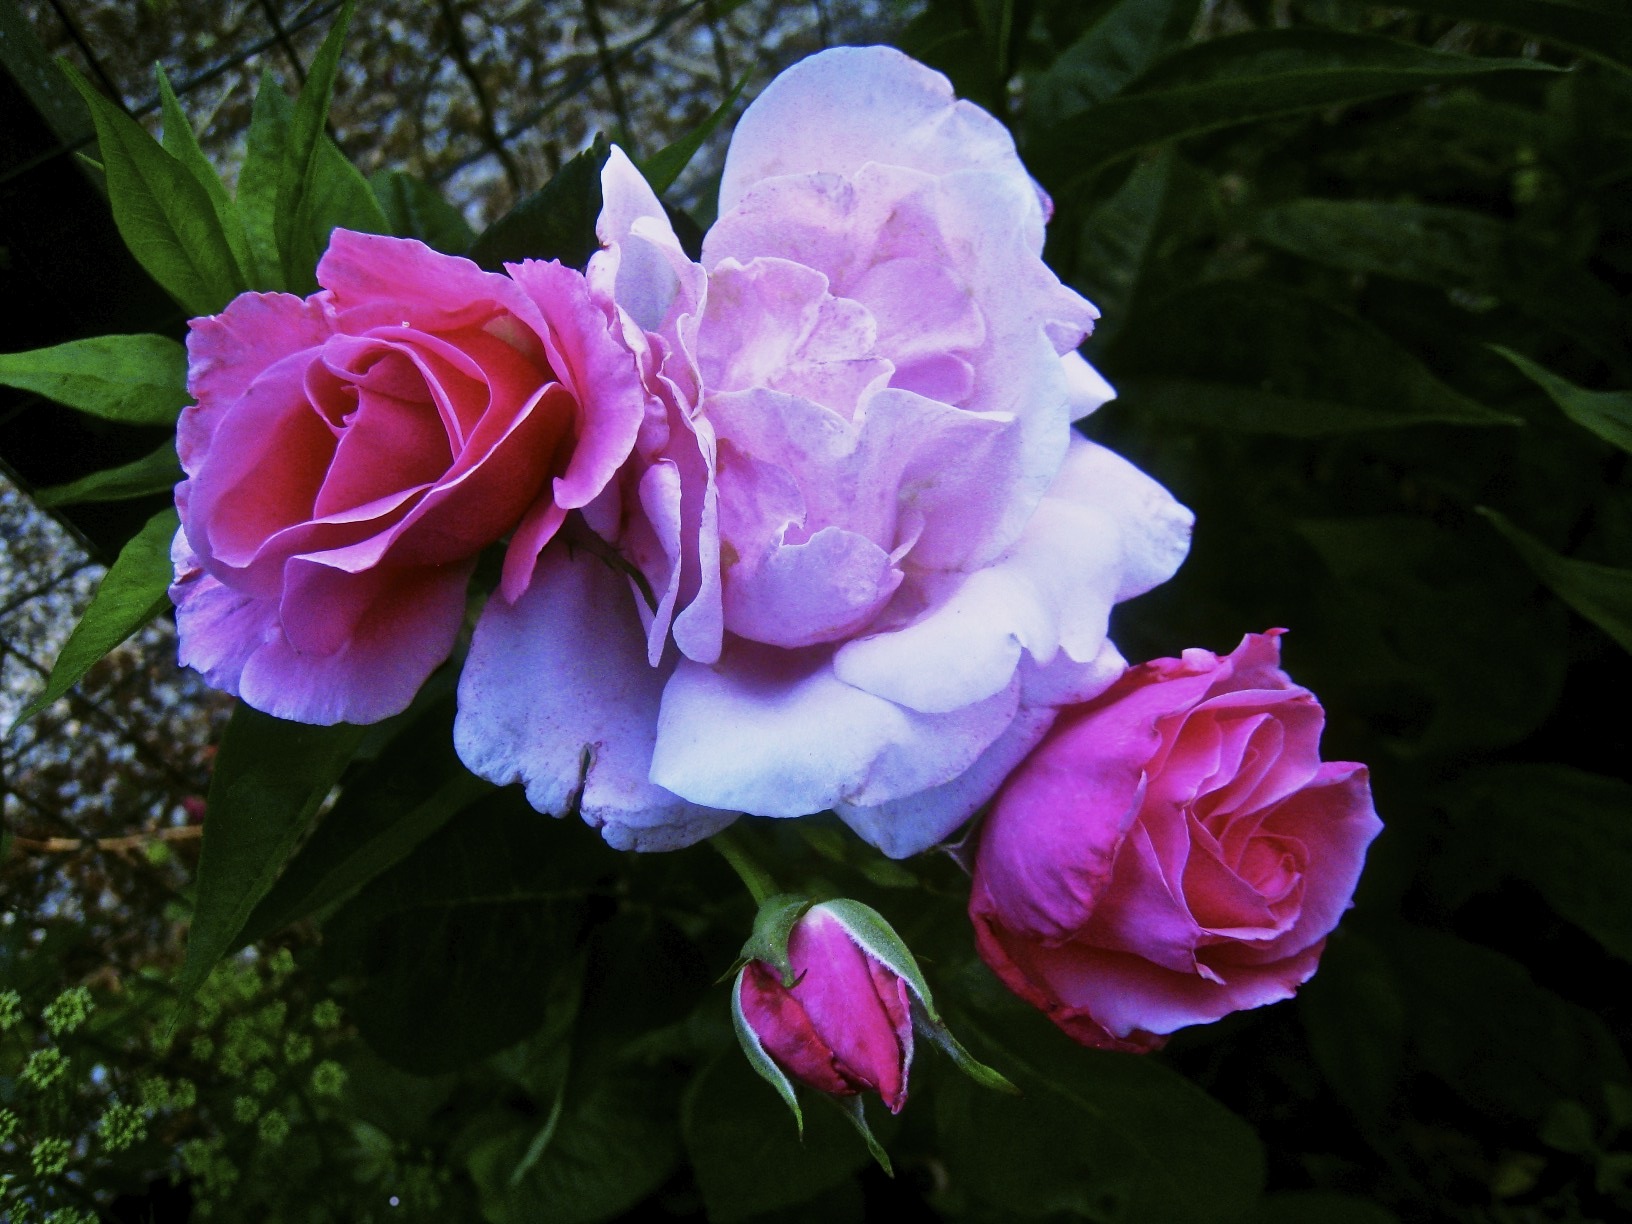
Never one to show up on time, she’s finally bloomed. Meet the last of my girls and last of my roses, “Marilyn Monroe”. Officially said to be apricot-colored, some say that the blooms are flesh-toned and mirror the complexion of its namesake.

*     *     *

Mom’s City Chicken and Grandpa’s Water Works

Funny how this Summer has worked out. At its start, I’d planned to continue making cheese with you, sharing some seasonal recipes, posting more ice cream flavors, and sharing photos of “my girls” and their companions in the garden. Suddenly, Labor Day is here and I’ve run out of time. We’ve still not made Italian mozzarella, I’ve a couple of tomato recipes to share, and there’s still a custard-based peach ice cream to make. Oh! Mustn’t forget the cobbler. Fall will just start late this year. To further complicate my schedule, today’s post was reserved for a special pasta celebrating the US Open Tennis Championship. That was before I saw a package of veal at the market. That changed everything.

Last year, Linda posted a recipe for City Chicken on her wonderful blog, Savoring Every Bite.  At the time, I commented that I’d not thought about City Chicken in years. Mom prepared a version but it’s been some 35 years since I last tasted her City Chicken. Had Linda not shared her recipe, who knows when I would have remembered Mom’s? Anyway, after Linda’s reminder, I decided to put City Chicken on the schedule — last Summer! Well, as you know, it never made it but I had every intention of sharing Mom’s recipe this Summer — and then it again got lost. Last week, however, I saw veal cubes at the market and immediately thought of City Chicken. Since it would make a great dish for the coming holiday weekend, Mom’s City Chicken was suddenly on the schedule. Its addition pushed my special tennis pasta back a week and, well, Fall’s arrival, at least on this blog, has been delayed yet another week. By the way, don’t be surprised if Thanksgiving and Christmas are celebrated in one post this year. Hopefully, I’ll then be able to start the New Year sometime in January.

((cue the harp))

Throughout my childhood, Mom served us City Chicken almost exclusively on Wednesday or Sunday, when Dad was home to work the grill. Although I’ve already mentioned The Barbecue, I’ve not talked much of the rest of our yard. You see, the two-flat was built on a vast expanse of land, in the very center of which was the beautiful, privately owned, Lake Bartolini (pictured below, click to enlarge). While we kids frolicked, Dad was likely at The Barbecue, grilling that night’s meal, City Chicken being a family favorite. In the years following the barbecue’s construction in 1959, Grandpa would build a garage with an enclosed patio, attach a grape arbor, and plant his tomatoes on the lawn just beyond The Lake, after the first of what would become yearly land-grabs. (His tomatoes needed more land, always more land.) When The Lake was lost, the much larger and deeper Bartolini Sea, was erected and filled. As we would all come to learn, ripening beefsteak tomatoes can somehow attract errant pool toys, especially whenever Grandpa strolled through the yard. When the Sea gave way to what must have been near tectonic forces, it was replaced by the even larger and more formidable Bartolini Ocean, the last of the series.

OK, that is the official account of the Crystal Blue Waters of the Bartolini, the version you’ll see on the historical markers that dot the area. Here, for the first time anywhere, is the real story.

Grandpa wanted a garden, desperately, and even though Lake Bartolini stood in his way, he would never do anything to disappoint his adoring Grandchildren. No, not Grandpa. His was a problem that would have befuddled Solomon. You can well imagine, therefore, Grandpa’s relief the morning we kids awoke to find Lake Bartolini had been completely drained. Upon close examination, we saw that one side of  The Lake was inexplicably peppered with holes, while the most attentive among us claimed to have overheard our Parents whispering something about buckshot. Grandpa’s subsequent claim that one of us kids was to blame fell on deaf ears. Our Parents, calmly and coolly, bought and built the Bartolini Sea. With walls made of corrugated steel, the Sea glistened just to the West of the where the original Lake once stood. Grandpa got his garden and we kids had a new, buckshot-proof, Sea in which to swim. All went well until that thing about tomatoes attracting pool toys was discovered, much to Grandpa’s great displeasure.

Not but a couple of years after it’s installation, again we awoke to find that our gorgeous swimming hole, the Bartolini Sea, was but a mere puddle. On one side of the Sea, in the corrugated steel, was a gash of not quite a foot long. Bent inward, the steel pierced the Sea’s lining and flooded the yard. Depending upon which Parent asked, Grandpa said that my Youngest Cousin or I did it with the lawn mower. In our defense, I will merely point out that an old push mower was used to maintain the lawns. Even if we teamed up, together pushing that relic and with a 100 foot running start, never could we two young boys get up enough steam to create so much as a dent, let alone pierce, that steel siding. Our wise Parents, though they never determined “the how”, quickly surmised “the who” and soon thereafter we were erecting the bigger, better, and even sturdier Bartolini Ocean. It remained in our yard until it died of natural causes, some years later. Grandpa, too, remained in his garden, ensuring both he and his tomatoes never went thirsty, for years to come.  Though this marks the end of Grandpa’s Water Works, this is hardly the end of his story. Frankly, I’m just getting started.

Now, back to the Present. Mom’s City Chicken couldn’t be any simpler to prepare. Equally sized cubes of veal, beef, and pork are marinated, skewered, wrapped with a rasher of bacon, and grilled. It really is that easy. I don’t give any amounts in the recipe to follow because so much will depend upon how many skewers are to be prepared. You can add, or subtract, spices to the marinade. Just be sure to make enough so that some can be reserved and later brushed on the skewers as they come off the grill. (Something I forgot to do for the photos.) Although the FDA no longer requires pork to be cooked well-done, many still prefer it cooked more than beef or veal. To accomplish this, I always place 3 pieces of meat on each skewer, pork always being the last/top one. As you’ll see in the recipe to follow, this will allow you to keep the pork closest to the fire, assuring it is cooked more than the other meats.

*     *     *

*     *     *

Mom’s City Chicken Recipe

Ingredients

  • Beef, cut into approx. 1½ inch cubes
  • Veal, cut into approx. 1½ inch cubes
  • Pork, cut into approx. 1½ inch cubes
  • Bacon, 1 rasher for every skewer
  • marinade

Marinade

  • juice and zest of one lemon
  • rosemary, chopped
  • garlic, minced or grated
  • Italian seasoning
  • olive oil
  • salt & pepper

Directions

  1. Add all the marinade ingredients to a bowl, whisk to combine, and set aside, reserving  a ¼ cup for later use. Place the meats into the bowl, mix until coated, and refrigerate for at least one hour or overnight
  2. Soak wooden skewers overnight. (This will prevent their burning during grilling.)
  3. When ready, light the grill.
  4. Using one thick skewer or 2 thin for each city chicken, pierce one end of a bacon rasher, followed by one piece of each type of meat. Be sure that the top piece of meat for each skewer is pork. After the pork is in place, wrap the meats with the bacon and secure its remaining end by piercing it with the skewer(s) tip(s).
  5. Once finished and the grill is hot, shut down part of the grill to facilitate  indirect grilling. Use a rag dipped in oil to grease the grill plate.
  6. Place the skewered meat on the grill with the pork closest to the fire/heat.
  7. Turn the meat after a few minutes, more or less depending upon the grill’s heat. The object is to cook the skewered meat without torching the bacon. The pork, being closest to the fire, will cook faster.
  8. With the meat still very rare, move the skewers directly over the fire/heat. Now the object is to crisp the bacon and to finish cooking the skewered meats. Turn the skewers occasionally to ensure even cooking.
  9. When grilled to your satisfaction, remove to a  platter, brush with reserved marinade, and serve.

*     *     *

Variations

Although Mom used all 3 meats, you needn’t if you prefer otherwise.  Use whatever meat(s) you like. The same is true for the bacon. I’m sure turkey bacon could be easily substituted.

Mom used 1 short, thick skewer for each of her City Chickens, skewers she got from her butcher. Try as I might, I’ve been unable to find them. Instead, I use 2 of the more readily available long, thin bamboo skewers. Before soaking, I trim off about 4 inches from each, making it much easier to grill them, especially if you’ve a small grill surface.

*     *     *

It’s déjà vu all over again …

Although some have already reached the end of tomato season, many of us are still harvesting the red beauties. One of my first posts featured Mom’s Tomato Antipasti that she made with Grandpa’s tomatoes. This time of year, his vines produced enough fruit to keep both families well-supplied and rarely was an evening meal prepared without tomatoes playing a role. Those who missed it the first time around  can find my post for Mom’s Tomato Antipasti by clicking HERE.

*     *     *

By any other name …

“Don Juan”

This tour of roses began on one side of my yard with “Opening Night”, a red hybrid tea rose, and ends on the opposite side of my yard with “Don Juan”, a red hybrid tea rose. (Who better to indulge my girls?)

*     *     *

The Kitchens have a Peach of a Jam

*     *     *

Peaches in this area are just passing their peak season and the farmers markets are filled with them. Over the next few weeks, peaches will disappear and the pears and apples will supplant them. For now, though, they seem to be calling to me, just as the tart cherries, blueberries, and strawberries did before them. So, I’ve answered their call and bought some each time I’ve gone to the market. Admittedly, the first purchases were eaten as-is. How could I not?  After that, I made ice cream and posted a recipe in honor of Mom’s birthday last week. Having made a few quarts of peach ice cream, it was time to move on.

Several weeks ago, when strawberries were at their peak for this area, I posted a strawberry jam recipe made with Balsamic vinegar and black pepper. In the Comments section of that post, Betsy, of Bits and Bread Crumbs, and Elaine, of Le Petit Potager, discussed making peach jam.  Betsy wondered about using balsamic and black pepper. Hmm …

After my last trip to the farmers market, I had what I thought was enough peaches to make a small-ish batch of peach jam — with a little balsamic vinegar. The recipe enclosed within the pectin packaging called for 4 cups of cleaned fruit. Incredibly, I somehow ended up with 7½ cups. I decided to use 6 cups here and to save the rest for a custard-based ice cream. (Recipe to come.) This recipe is very similar to the one used to make the strawberry jam, except I used white balsamic so that the peaches wouldn’t discolor; I used both lemon juice and zest; and, I didn’t add any pepper — maybe next time. Because I used so many more peaches than I had intended, I followed a tip from the Pick Your Own website. The author always adds an additional 20% of pectin than what the recipe calls for, just to ensure a good set. So, rather than add 49 g (1 envelope) I added 60 g to the peach mixture. My jam set perfectly although, next time, if I use 6 cups of peaches, I’ll increase the amount of white balsamic by another tablespoonful or two.

What if you’re not a balsamic lover? What if you just want to make some really good peach jam? Well, then, waste no time and click this link to go to Barb’s Just a Smidgen blog, where you’ll be treated to a fantastic recipe for making peach jam, not to mention a thorough, step by step, description of the canning process.

*     *     *

*     *     *

Peach with Balsamic Vinegar Jam Recipe 

yield: 7 – 8 cups

Ingredients

  • 6 cups fresh peaches, cleaned, peeled, sliced or chopped
  • 4 cups sugar – separated
  • 1 envelope + 20% more low-sugar pectin (60 g  total pectin)
  • 1 tsp butter (optional)
  • pinch of salt
  • juice & zest of one medium-sized lemon
  • ½ cup white balsamic vinegar

Directions

To Prepare

  1. Sterilize the jars and wash the jar lids and bands in hot, soapy water. Place lids and bands in a deep bowl and pour near-boiling water over them.
  2. Start bringing to boil a large, deep canning kettle of water to be used for the canning process and a second, smaller pot of water to be used to replenish water that may boil away during the canning process.
  3. Mix the pectin with ¼ cup of the sugar. Set aside.
  4. Working in batches, add sliced/chopped peaches into a large bowl and use a potato masher to smash them as much as you like. I skipped this step; my slices were thin and needed no further handling.

To Make the Jam

  1. Place the peaches and the pectin-sugar mixture into a heavy-bottomed pot over a med-high heat. A Dutch oven works nicely. Add butter, if desired, to limit foam.
  2. Stirring frequently, you are heating the peaches until a rolling boil is achieved at about 220˚F. A rolling boil is one that will not dissipate when the pot’s contents are stirred.
  3. Add the remaining sugar and stir well. Stir frequently while you wait for the pot to return to a rolling boil.
  4. Once a rolling boil has returned, keep stirring for exactly one minute before removing the pot from the heat.
  5. With a large spoon, carefully skim the surface to remove any foam.
  6. Add balsamic vinegar, lemon juice, and zest. Stir well to thoroughly combine.

To Preserve

  1. Using a funnel and large ladle, fill each jar to ¼ inch from the rim. Wipe the rim to make sure no jam has spilt, place a lid on each jar, and then the band, tightening until “finger tight” but not as tight as you can make it. Act quickly, filling and capping all the jars.
  2. Jars placed directly on the kettle’s bottom might burst, so, a rack of some sort must be put into the canning kettle to cover the bottom. Many large pots have one, as do many pressure cookers. (I use a rack from an old pot that has long since been discarded.)
  3. Keep each jar level as you place them, one by one, into the canning kettle filled with now boiling water. The jars should not touch each other, nor should they be allowed to tip over. Depending upon the size of the kettle and number of jars, you may need to work in batches.
  4. Once the jars are in the kettle, make sure that there is at least one inch of water over the top of the tallest jar(s). If not, add boiling water from the smaller pot mentioned in Step 2 of  To Prepare.
  5. Cover the pot and begin timing when the water returns to the boil. The jars must be boiled, “processed”, for 10 minutes.
  6. Meanwhile, place a baking sheet on a level surface and line it with a clean kitchen towel.
  7. Once 10 minutes have passed, carefully remove each jar and place it on to the towel-lined baking sheet. Leave about an inch separating the jars.
  8. Once all the jars have been processed and placed on the baking sheet, remove the baking sheet & jars to a place that is draft-free and where they will remain undisturbed for 24 hours.
  9. After 24 hours have passed, check each jar to insure it’s sealed and then store on a shelf in a cool, dark place, where it will stay fresh for months.

*     *     *

It’s déjà vu all over again …

This time of year, our farmers markets are filled with fresh fruits and vegetables, and with Labor Day barbecues quickly approaching, there’s no better time to make a batch of Chicago-style giardiniera. This colorful condiment is a great way to add some crunch, and a little heat, to your burgers, dogs, wurst, and sandwiches. The recipe was shared last August and you can find it by clicking  HERE.

*     *     *

By any other name …

“Sunset Celebration”

 *     *     *

It’s Mom’s Birthday and I’ve Got a Peach of an Idea!

As you may, or may not, recall, August is the birthday month for a number of people in my life, with today, August 15th, being Mom’s birthday as well as that of her Mother, Grandma Bartolini. Zia’s husband, “Uncle”, was born on the 11th  — and we’re just getting started. My Friend, one of the Kitchens’ tasters, had a birthday on the 7th, while another, my Friend the Entertainer, will be celebrating on the 20th.  And we mustn’t forget the kids. My Grand-Nephew’s birthday was the 1st, my not-quite-a-nephew Nephew will be blowing out candles on the 24th, and the Oldest of the Boys Upstairs has a birthday this Saturday, on the 18th. That’s a lot of birthdays!

So to celebrate, last August I posted 3 separate ice cream recipes that I combined for the finale. The first was taken from a recipe book that Mom gave me shortly after I moved to Chicago in 1980.

*     *     *

Pistachio Nut Ice Cream

*     *     *

Next on that month’s agenda was an ice cream based on Mom’s own chocolate recipe.

Chocolate-Chocolate Chip Hazelnut Ice Cream

*     *     *

Then came the third recipe. Again, using Mom’s recipe as a base, I created this “pretty in pink” ice cream.

Maraschino Cherry Ice Cream

*     *     *

Well, with those 3 recipes laying the ground work, I had little choice but to put them together.

Spumoni Ice Cream (It’s da Bomba!)

*     *     *

Now, having mentioned those 3 ice cream recipes and a Bombe, I might as well finish off this little round-up by sending you to the hands-down favorite ice cream recipe of all the Kitchens’ tasters, family, and friends. It may not be a frozen custard nor traditional ice cream but, I have to say, it’s damn good!  (Pssst! It’s the crumbled graham cracker crust.)

Blueberry Cheesecake Ice Cream

*     *     *

As great as that all sounds, this year I was in quite a pickle. What should I do for this year’s Birthday Month? How could I possibly top a Spumoni Bombe? Well, I can’t and won’t even try. What I will do, however, is share a recipe for an ice cream flavor that Mom loved. Yes, when it came to ice cream, Mom had a number of favorites. Frankly, I doubt that Mom ever tasted an ice cream that she didn’t like — and we haven’t even mentioned sherbet yet.

So, with that monkey off my back, I decided to take full advantage of the bounty in this area’s farmers markets. Today’s recipe will be for peach ice cream. It’s a simple recipe that results in a peachy frozen delight.  It’s Mom’s birthday, however, and “peachy” just won’t do. Directly following the recipe is a serving suggestion that Mom would have surely enjoyed. I hope you will, too.

Now, if you’ve no experience working with peaches, this paragraph is for you. In the first place, you may not be able to find fruit that are perfectly ripe, even in your farmers market. Just place the best you can find in a paper bag, place it on a counter, and check them every morning. In a couple of days, your peaches will be exactly how you like them. So, once your peaches are ripe, how do you peel them? Bring a large pot of water to boil. In the meantime, fill a large bowl with iced water. Take each peach and use a paring knife to cut a small “X” into the fruit’s bottom. Place the peaches into the rapidly boiling water and leave them there for about 30 seconds. Transfer them to the iced water bath to cool and to stop them from cooking. After a few minutes, simply peel off the skin beginning at the “X”. You may need a paring knife to trim a stubborn spot or two but, basically, that’s all there is to it.  And that’s the last of any possible problems you might run into.

*     *     *

*     *     *

Peach Ice Cream Recipe

Ingredients

  • 1½ pounds peaches — about 4 large fruit
  • ½ cup water
  • ⅔ cup sugar
  • ½ cup sour cream
  • 1 cup whipping cream
  • ¼ tsp vanilla extract
  • ⅛ tsp cinnamon
  • pinch salt

For Serving

  • 1 peach. peeled & sliced — more depending upon the number of servings
  • sugar
  • toasted chopped pecans

Directions

  1. Once the peaches are peeled, cut each into chunks, removing the pit in the process.
  2. Place the peaches and water into a non-reactive sauce pan and cook over a medium heat until the peaches are soft — about 10 minutes.
  3. Remove from heat, add the sugar, stir well, and set aside to cool.
  4. When the peach mixture has reached room temperature, place it in a food processor or blender, along with the sour cream. whipping cream, vanilla extract, cinnamon, and salt. Purée until blended but still a little chunky.
  5. Place the peaches & cream mixture into the fridge until thoroughly chilled — about 4 hours, more or less depending upon your fridge.
  6. Add the chilled peaches & cream to your ice cream machine and follow the manufacturer’s instructions to create your peach ice cream.

To Serve

Peaches are in season and we shouldn’t let this opportunity slip away. About 45 minutes before you serve your peach ice cream, peel and slice a ripe peach, more depending upon how many servings are to be prepared. Place the slices in a bowl, sprinkle with sugar, stir gently, and set aside. When ready to serve, divide the peach slices and juice among the servings of ice cream. Garnish with toasted chopped pecans.

Inspired by David Lebovitz, “The Perfect Scoop”

*     *     *

By any other name …

“Bella’Roma”

*     *     *

A Tale of Two Recipes

During the recent heat wave, I really didn’t leave the house very much. Sure, I had errands to run and a dog to walk but that was pretty much all I did outdoors for much of 2 weeks. Well, except for watching fireworks on the 4th. Yay! It was a golden opportunity to watch some cooking shows as they were broadcast, as well as a number that I’d recorded but never watched.

*     *     *

*     *     *

One show, Lidia’s Italy, has been a long time favorite and I must have at least a dozen of her episodes recorded and saved. So, you can well imagine my astonishment when one afternoon, while watching a recorded episode of her newest show, Lidia’s Italy in America (episode 16, original airdate 12/24/11), there she was, standing in the produce department of my Italian market. Lidia Bastianich. In my market! Later she was in front of the very deli counter where I buy my prosciutto, my sopressata, and my mortadella. Do you realize what this means? I have walked on the very floor tiles upon which Lidia has walked. We’ve spoken to the same people, breathed the same air. I know. It kinda makes you weak-kneed just thinking about it. All I can say is that if you live in the Greater ChicagoLand area, you should head over to Caputo’s in Elmwood Park now, before word gets out and people begin making pilgrimages. It won’t be long before “La Via Lidia” is roped off and you’ll no longer be able to literally follow in her footsteps, as I have done. But I digress …

One show that I watched live was The Chew and on that particular day, Carla Hall made a cherry, blueberry, and sour cream pie. A pie with 2 of my favorite things? I vowed to bake one as soon as normalcy returned to our daily weather. A few days later, a Saturday, Max & I were on our way to the farmers market, where I bought sweet cherries, blueberries, and assorted other fruits & vegetables. On the way home, I stopped at a grocery and bought the sour cream needed for my pie. It wasn’t even 9:00 am and things were going very well. This all changed by 10:00 am, for that was the time I looked up the recipe on The Chew’s website.

The problem was that the printed recipe was not the recipe I recalled Carla preparing. I soon found the video of her making her pie on their website — and I was right. On the video, she uses 4 eggs, while the printed version used 3. Neither version indicates where the egg white is to come from nor the type of cherry to be used. Lastly, the video shows Michael Symon adding 2 tbsp of honey to the filling while the printed version states ⅓ cup is to be used. I was on my own.

My first attempt recreated the pie I watched Carla prepare. I used 4 eggs, the white of one being used to prepare the pie shell. The cherry question had been answered earlier that morning when I found sweet cherries at a good price at the market and bought a quart. And when it came to the honey, I followed Michael’s lead and used 2 tbsp. From that point forward, I followed the directions exactly and the pie was pretty good. For me, though, pretty good wasn’t what I wanted. With blueberries and cherries in season, I want my pie to scream “SUMMER!” This pie said “Eggs.” Yes, eggs. It certainly wasn’t a bad pie and I’m sure that it would be enjoyed by many. It just wasn’t what I’d expected. A week passed during which I ate all that pie, sometimes with home-made vanilla ice cream, sometimes with whipping cream, sometimes plain. But I ate it all because of all the sins one can commit, the gods most frown upon those who waste pie.

Another Saturday came and with it a return of the heat wave in the forecasts. Again Max and I headed to the farmers market. Again I bought blueberries and cherries, although this time I went for the tart. And again, on the way home, we stopped at a grocery to pick up sour cream. This time around, I didn’t just exchange cherries. I, also, cut the eggs in half, using only 2, and I increased the honey to ⅓ cup as the written version had indicated. Because I wanted my new pie to take full advantage of its seasonal ingredients, I increased the amount of both tart cherries and blueberries to 2 full cups apiece. This pie was not going to even whisper “eggs”. Once the filling was made, I prepared the pie as I did the first. And the verdict? I liked this rendition so very much more than the first. As I had hoped, this one was more custard and less egg-y. Adding more cherries & berries paid off, while using tart cherries worked better with the blueberries.

But you needn’t take my word for it.

Below I’ve listed the ingredient lists for both pies. The first uses a filling with sweet cherries and most closely resembles the televised recipe. The second uses tart cherries and fewer eggs in its filling and is more closely aligned with the printed version. The directions for preparing the pie are listed once because they are the same, no matter which filling you wish to use. Make one or make them both. All I ask is that you come back here and tell us what you think or any improvements you might suggest.

*     *     *

Sweet Cherry, Blueberry, and Sour Cream Pie Recipe

Ingredients 

  • A single pie crust large enough for a 9 inch deep dish pie.
  • 4 eggs, 1 divided
  • ½ cup superfine sugar, divided (see Notes below)
  • 1½ cups sweet cherries, pitted
  • 1½ cups blueberries
  • ½ tsp cinnamon
  • ¼ tsp salt
  • pinch of Nutmeg
  • 1 cup sour cream
  • 2 tbsp honey

*     *     *

Tart Cherry, Blueberry, and Sour Cream Pie Recipe

Ingredients

  • A single pie crust large enough for a 9 inch deep dish pie.
  • 2 eggs, 1 divided
  • ½ cup superfine sugar, divided
  • 2 cups tart cherries, pitted
  • 2 cups blueberries
  • ½ tsp cinnamon
  • ¼ tsp salt
  • pinch of Nutmeg
  • 1 cup sour cream
  • ⅓ cup honey

*     *     *

Directions

  1. For the pie crust. 
    1. Pre-heat oven to 400˚F.
    2. Roll out pastry dough into a 12 inch circle and place it in a pie dish, crimp edges, and blind bake, filling the pie with pie weights or beans beforehand. After 10 minutes, remove pie crust from oven. Set aside. Lower oven temp to 350˚F.
    3. When crust is cool enough to handle, remove the pie weights/beans. Whisk together 1 egg white with 2 tablespoons of the fine sugar. Using a pastry brush, coat the pie crust before returning it to the oven. Bake for another 15 minutes or until the crust is golden. Remove from oven and cool.
  2. For the pie filling. 
    1. In a bowl, combine 2 tbsp of the fine sugar, salt, cinnamon, and nutmeg.
    2. In a larger bowl, combine the blueberries and cherries.
    3. Add the sugar combination to the berries and gently mix.
    4. In a 2nd larger bowl, combine the remaining fine sugar & eggs, sour cream, and honey. Whisk until fully blended before adding to the berry mixture.  Stir to combine.
  3. Pour the filling into the pre-cooked pie shell and bake for 1 hour at 350˚F.
  4. Pie may be served warm.

*     *     *

Notes

There’s no need to buy the superfine sugar called for in the recipe, for you can make it yourself. Just place ½  cup of regular sugar into a food processor or spice grinder and give it a go. In a minute or two you’ll have superfine sugar.

Inspired by Carla Hall’s Blueberry Cherry Pie With Sour Cream

*     *     *

By any other name …

“Stainless Steel”

*     *     *

Friends, Bloggers, and Bartolini! Lend Me Your Orecchiette!

I don’t know about you but when I “finish” writing an entry, I will return to it, editing and re-editing, right up until the minute it’s posted. Even then, I often make changes to it once it’s been published. A few months ago, in an effort to curtail my madness, I started posting my entries at the same time every Wednesday just to give myself a deadline for these corrections. Why do I mention this?

Well, I’ll be writing this entry before I leave for my visit with Zia and family and it will be posted about the time I’m heading back to Chicago. That means I’ll have a week to look at it with little chance to make corrections because of the sorry state of that area’s internet coverage. (If Dante’s Inferno had included a Tenth Circle in Hell, surely this would have been it.) So, I’m going to keep this post relatively short, hopefully keeping my errors to a minimum and, therefore, saving myself much wailing and gnashing of teeth when I should be spending that time visiting with my Zia.

Last week I showed you how to make orecchiette, an ear-shaped pasta that comes to us from the Puglia (Apulia) region of Italy. At the time, I said I would share today’s recipe, a traditional pugliese dish featuring orecchiette, sausage, and broccoli rabe (rapini). This is another simple dish with the flavors of its 3 main ingredients in perfect balance. Although you can certainly alter the quantities to suit your own tastes, try to keep that balance in mind. The dish also offers a little heat because of the red pepper flakes. If you use a spicy sausage here, you may wish to reduce the amount of these flakes or eliminate them altogether. On the other hand, I use my family’s sausage recipe, which is quite mild, so I add a healthy amount of red pepper flakes to the dish. The rest of the recipe is easy enough to follow but be sure to check out the Variations below if, perish the thought, you don’t care for broccoli rabe.

 *     *     *

Orecchiette with Sausage and Broccoli Rabe

Ingredients

  • 1/2 lb orecchiette pasta
  • 3 tbsp olive oil
  • 6 oz Italian sausage
  • red pepper flakes, to taste
  • 1 medium onion, chopped
  • 2 garlic cloves, minced or grated
  • 10 oz broccoli rabe, trimmed and coarsely chopped
  • grated Pecorino Romano cheese
  • salt & pepper, to taste
  • 1 cup + a couple tbsp of pasta water

*     *     *

*     *     *

Directions

  1. Bring a large pot of salted water to the boil, to be used to cook the orecchiette. Time the pasta so that it is cooked about a minute shy of al dente, per package instructions, at about the same time that the rest of the ingredients are finished sautéing.
  2. Meanwhile, in a large deep frying pan, heat the olive oil over med-high heat. Add the sausage meat and use a wooden spoon to break the meat into smaller pieces as it sautés.
  3. Once the meat has browned, about 5 minutes, add the onion & pepper flakes and continue sautéing until the onion is translucent, about 5 minutes more.
  4. Add the garlic and cook another minute.
  5. Add the broccoli rabe to the pan with a little pasta water and continue sautéing until rabe is done to your liking.
  6. Drain the orecchiette and add it to the frying pan along with the cup of pasta water, using it to deglaze the pan. Finish cooking the orecchiette in the pan as the “sauce” reduces to the consistency you prefer.
  7. Remove to a serving platter, garnished with grated Pecorino Romano cheese and freshly cracked black pepper. Serve immediately.

Variations

For many, broccoli rabe is just a bit too bitter to be enjoyed as-is. If you find it that way, there are alternatives. In the first place, you might try blanching the vegetable in boiling water for a minute before plunging it into an ice bath. To prevent the oil from splattering, pat the rabe with paper towels before adding it to the frying pan in Step 5 above. If you like, you can save the blanching water, salt it, and use it to cook the orecchiette.

Broccoli, Broccolini, Broccoli Rabe

What if you just don’t like broccoli rabe and no amount of blanching is going to make it palatable for you? Well then, you might try substituting one of its relatives. Pictured above are broccoli on the left, broccoli rabe on the right, and the newest member of the family, broccolini, in the center. Although often called “baby broccoli”or “asparation”, broccolini is actually a cross between broccoli and a Chinese broccoli called kai-lan. Like broccoli, broccolini has no leaves and is not as bitter as rabe. Either cousin would make a great substitute for broccoli rabe in this dish.

*     *     *

By any other name …

“Midas Touch”

 *     *     *

Listen up! We’re making Orecchiette!

It’s been quite some time since we made pasta from scratch, so, I thought today would be a good day to make another. Today’s pasta comes to us from Puglia (Apulia), a District along Italy’s Southeast coast, including the “heel of the boot.” Meaning little ears, orecchiette is another pasta named for that which it resembles. And if you’re willing to accept that tortellini were modeled after the navel of Venus, you should have no problem accepting that orecchiette look like little ears.

Coming from Puglia, it’s a safe bet to say that the dough should be made with durum flour and water. And if you want to make authentic orecchiette, that’s what you should do. The fact is that Mom’s family, the Bartolini, came from Marche where eggs are used to make pasta. That’s how I learned to make pasta dough and that’s the recipe I shared here. Now, I’ve tried to make pasta using semolina but certainly not enough times to get a “feel” for the dough like I have with Mom’s pasta dough. So, I now have a container of semolina flour in my kitchen, along with containers for whole wheat,  spelt, bread, cake, and all-purpose flours. Given my poor track record with semolina, I just didn’t feel like buying a bag of durum to add to my flour collection. (FYI, semolina and durum are not the same flour, although both are made from durum wheat.) So, though this pasta shape is pugliese, from Puglia, the pasta dough is marchigiani, from Le Marche.

Now that’s settled, let’s get on with the show. You’ll find that orecchiette are really quite simple to make, albeit repetitive. There are no shortcuts and it is just complicated enough to require your attention throughout. In short, you can watch television or make orecchiette — but you cannot do both at the same time. The process involves taking a golf ball-sized piece of dough and rolling it into a long thin rope. The pasta is then cut, molded using your thumb, and set aside. Easy peasy! Now form another 350 or so “ears” and you’ll have a pound of pasta.

*     *     *

Take a piece of dough and roll it into a ball about the size of a golf ball. Be sure to cover the remaining dough to prevent its drying out.

*     *     *

Remember Play-Doh? Roll out a snake.

*     *     *

My snakes were about 1/3 to 1/2 inch wide. (See Notes below.)

*     *     *

Cut the dough into equally sized segments of about 1/2 inch in length.

*     *     *

Using the tip of a blunt knife, smash the dough segment and draw it towards you. This will flatten the segment and cause it to curl over the knife. Keep a supply of flour nearby to occasionally coat the tip of the knife, as well as for your thumb in the next step.

*     *     *

Invert the curled segment, pulling it over your thumb in the process.

*     *     *

Remove it from you thumb to reveal a perfectly formed orecchietta.

*     *     *

A look at the flip side. I found it best to store them cup-side down until dried otherwise the pasta’s “walls” tended to collapse, leaving a flat disk instead of a concave ear.

*     *     *

Notes

You must take into account the size of your thumb when rolling the dough and cutting it into segments. Although I prefer my orecchiette small, my thumbs are too large to accomplish that and attempts to use another finger tip didn’t work out. As a result, I needed to make my dough roll a little on the thick side. I’m sure that if I made orecchiette more often, I’d eventually learn to make smaller ones. Even so, freshly made “large” orecchiette are still better than those in a box.

Being homemade, part of this pasta’s charm is its lack of uniformity. Don’t obsess and try to get all of the “little ears” to be the same shape and size. You’ll find that those created near the end of your dough supply are far more alike than the ones you made at the start — and that’s just fine. I prefer to think of my orecchiette as being rustic. You should, too.

*     *     *

Coming next week …

Next week I’ll post the pugliese recipe for orecchiette with sausage and broccoli rabe, pictured above.

By the time many of you read this post, I’ll be well on my way to Michigan. Please understand that while there, I can read your posts and comments but making my own comment or reply is unbelievably slow.  Most may have to wait until I return home.

*     *     *

By any other name …

“Honor”

*     *     *

The Bartolini Girls’ Beet Salad

Everyone has one — or maybe two or three. A go-to recipe used when an occasion calls for you to “bring a dish.” Today’s recipe is one that Mom and my Zia often used to fulfill their potluck obligation. To be honest, I’ve no idea who first “discovered” this recipe. I remember Mom serving it for dinner during my childhood and Zia brings it to dinners to this very day. A colorful dish, this is much lighter than potato salad and is sure to be a hit among beet lovers. Even so, not all beet lovers are fans of mayonnaise. Should that be true for you, I hope you’ll find this classic video more to your liking.

*     *     *

*     *     *

When you look over the recipe, you’ll notice that the ingredients are listed without accompanying amounts. Much depends upon the number of servings required and the size of the serving dish. When all is said and done, you’ll need to create a layer of beets that is about one inch deep. Next, the amount of chopped onion depends upon how just how strong that onion is. Be sure to taste it before adding it to the salad. If it is too strong, rinse it briefly under cold running water and pat it dry using paper towels before proceeding. With that settled, you can add as much or as little mayonnaise as you prefer, and the same can be said for the chopped, hard-boiled eggs. Remember, the beets are the star of the dish; everything else is meant to compliment rather than overpower.

Oh! Before you toss those beet greens away, you may wish to checkout my blogging friend David’s recipe for creamed beet greens over on his blog, the Gastronomic Gardener.

*     *     *

*     *     *

The Bartolini Girls’ Beet Salad Recipe

Ingredients

  • Raw beets, washed with greens trimmed
  • Diced onion
  • Mayonnaise
  • Eggs, hard-boiled and chopped
  • Salt & pepper, to taste

Directions

  1. To Prepare the Beets
    1. Pre-heat oven to 400˚ F (205˚ C)
    2. Place the beets in a roasting pan or on a baking sheet. Drizzle with olive oil, season with salt, and place in the middle of the oven. Roast for 30 – 40 minutes, depending upon the size of the beets. The beets are fully roasted when a knife’s blade meets little resistance when the largest beet is pierced. Set aside to cool.
    3. Once cool enough to handle, use a paring knife to trim the beets’ tops and bottoms. Much of the skin of each bulb should slip off easily. Use a paring knife to remove the rest.
    4. Use a knife, food processor, or mandoline to dice, shred, or slice the beets. Set aside.
  2. To Assemble the Salad
    1. Place beets in a serving dish. You’ll want to create layer of about an inch deep. Season lightly with salt.
    2. Sprinkle a couple of tablespoons of diced onion on top of the beets. Use more or less depending upon the onion’s strength.
    3. Add enough mayonnaise to completely cover the ingredients.
    4. Use the chopped, hard-boiled eggs to top off the salad.
    5. Season with salt, pepper, and sweet paprika.
  3. Chill fully before serving.

*     *     *

*     *     *

Variations

Although I’ve not tried to prepare them this way, I imagine one could steam the beets instead of roasting them. And if you’re in a crunch for time, you can always substitute canned beets, although I prefer the additional flavor that roasted beets bring to the dish.

Notes

To beginner cooks: mayonnaise and hot temperatures do not mix. Serious illness can result if mayonnaise is not kept properly chilled. When serving this salad or any mayonnaise-based dish on a warm day, be sure to keep it covered and iced until the last minute before serving and then nestle the serving dish in another slightly larger one filled with ice. It must be kept chilled and when in doubt, throw it out.

*     *     *

One Long Overdue Acknowledgement

Way back in May, I was fortunate to win a give-away over at Zesty Bean Dog’s wonderful blog. My original plan was to feature my prize, an OXO salad dressing shaker, with my next post featuring a salad. Well, in retrospect and given how few salad recipes I post, I should have come up with a better plan. And even though a salad shaker isn’t used in the preparation of today’s recipe, I thought it was about the closest I’d come to posting a salad recipe for at least a few weeks. ZBD, I hope you do not feel that I don’t appreciate or do not use your gift. It has remained “in service” pretty much from Day One and is one of those few kitchen items that goes from fridge to dishwasher and back again, without ever seeing the inside of a cupboard. So, thanks again, ZBD, for a great kitchen accessory.

*     *     *

By any other name …

“Black Baccara”

*     *     *

Calamarata with Shrimp and Mussels

It’s getting to be routine. I go to “my” Italian market with a list of items to buy. Once I’ve finished the vegetable portion of my romp, I take a casual stroll toward the fish monger. I just cannot pass that display case without stopping to check out the day’s catch. And that’s when it happens.

No matter who is behind that counter, I’m greeted with a friendly, “Hello. Are you looking for anything in particular?” or something to that effect. I explain that I’m just looking and, to be polite, I ask about an item on display. “You’ve got branzini (Mediterranean sea bass)?” “Where do you get your vongole (clams)?” “Are these cozze (mussels) Mediterranean?” “Do you have anguille (eels) at Christmas?” You know. Just being polite. Maybe it’s the way I pronounce “vongole” or something but once my question’s been answered, the conversation turns to shell-fish. A few weeks ago, it was the vongole, the “freshest in town.” And I bought some. The following week it was vongole again and I would have left with another bag of the little darlings had it not been well over 90˚. With a few more stops to make, I wasn’t sure if I’d make it home without melting; those clams didn’t stand a chance. The Friday before last, as I approached the counter, I noticed I was alone. The fish mongers were nowhere to be seen. Great! I could ogle the octopi, peruse the perch, savor the salmon, and scan the squid, all at my leisure and with no fear of leaving with a bag of seafood. Soon I spied a sign announcing a sale on mussels and I turned a bit to get a better view of the black beauties. That’s when he appeared, seemingly out of nowhere. “Those mussels are good, real good … but … these here are much better. They’re larger and-”  Resigned, I stopped him in mid-sentence and told him to just get me a pound. Why fight the inevitable?

While he bagged my mollusks, my mind raced. How would I prepare them and with what, if anything? Since mussels have such a strong flavor, I reasoned, they could easily stand up to a red sauce. Shrimp are, also, strong-tasting, I thought, and I bought a pound of them, too. Vongole, though, would never be able to compete in this mix, so, I bid “Ciao!” to the fish monger. I quickly decided to make a “fresh” sauce and by that I mean one that simmers only a brief amount of time. I want to taste fresh tomato and I headed back into the produce area to buy 9 large plum tomatoes. Now to find the dish’s most important component: the pasta. I headed over to the pasta aisle (actually, it’s a pasta aisle and a half!) and the choice was easy. Since the mussels and shrimp were large, I wanted my pasta to be, too. I selected calamarata, so named because they resembles large calamari (squid) rings.  It certainly didn’t hurt that they’d be used in a seafood dish. Leaving the pasta aisle, I mentally inventoried my fridge and knew I was set to go. I finished my shopping and headed home, munching on my reward, a cannoli.

*     *     *

Calamarata

 *     *     *

When preparing today’s dish, remember to “Think Big!” Calamarata are a large pasta and everything included with it needs to be large, as well. So, the onions aren’t diced but chopped and rather large, at that. Once peeled, divide the tomatoes into 2 groups. The larger group, about ⅔ of the total, are seeded and chopped into chunks. These will add texture. The remaining ⅓, once seeded, is puréed in a food processor. These will be the basis for the sauce. The only things diced are the parsley, basil, and garlic. Even so, when garnishing the dish before serving, sprinkle a few hand-torn basil and parsley leaves. Most importantly, if you, too, want that fresh tomato taste, do not let the sauce simmer for longer than 30 minutes. The “simmer clock” starts the minute the tomatoes hit the pan. Cheese, by the way, would not be used with this dish.

And if you do like that fresh tomato taste, check out this recipe for Pesto Trapanese. It will take you longer to cook the pasta than it will to make this pesto and the taste is incredible.

*     *     *

Calamarata with Shrimp and Mussels Recipe

(Calamarata con Gamberetto e Cozze)

Ingredients

  • 1 lb calamarata pasta
  • 1 lb fresh mussels, beards removed and scrubbed
  • 1 lb large  (21-25 count) shrimp, peeled and de-veined
  • 9 or 10 large plum tomatoes – divided
  • 3 tbsp olive oil
  • ½ tsp red pepper flakes, more of less to taste
  • 1 medium onion, roughly chopped
  • 2 cloves garlic, diced
  • splash of white wine
  • 3 tbsp fresh parsley, chopped, more for garnish
  • 1 tbsp fresh basil, chopped, more for garnish
  • ½ tbsp marjoram
  • 2 tbsp capers
*     *     *

*     *     *

Directions

  1. Bring a large pot of water to boil. While waiting, use a paring knife to cut a small “X” into the bottom of each tomato. Once the water boils, place the scored tomatoes into the water and blanch for 1 to 2 minutes. Remove the tomatoes and place in a bowl of ice water. Once cooled to touch, peel each, beginning at its “X”, before quartering and seeding it. Place aside.
  2. Take about ⅔ of the tomatoes and coarsely chop into chunks. Puree the rest of the tomatoes using a food processor, blender, or stick blender.
  3. Heat the olive oil in a large, deep frying pan over med-high heat. Add the pepper flakes and, after a minute, add the onions. Sauté until translucent.
  4. Add the garlic and continue sautéing for about a minute more. Add a splash of white wine and reduce for a minute or two.
  5. Add all the tomatoes, season with salt & pepper, and maintain a medium simmer.
  6. Begin heating the water for your pasta. The calamarata pasta that I prepared needed 16 minutes to cook. Check your package’s instructions.
  7. When there are 5 minutes to go, add the parsley, basil, & marjoram to the frying pan, stir, and then add the mussels to the sauce and place a cover on the pan.
  8. 3 minutes later, add the shrimp and replace the cover.
  9. If you prefer to serve the mussels shelled, see Notes below.
  10. At the 5 minute mark, reserve some pasta water, drain the pasta and add it to the sauce pan. Add the capers and mix to evenly coat the pasta.
  11. Pour the calamarata into a serving bowl, garnish with torn basil & parsley leaves, and serve.

Variations

This is really a basic tomato sauce with seafood added. As I mentioned early on, I wanted a fresh sauce so I didn’t let the tomatoes simmer for long. You certainly may allow your tomatoes to simmer longer, if that’s your preference. Just remember that there’s no turning back once you put the pasta into the boiling water, and that’s regardless of the pasta you’ve chosen to cook. And once the mussels are put into the sauce, you have about 5 minutes to go. The cooking instructions on the pasta’s package are your friends.

Notes

As always, be sure to reserve some pasta water in case your sauce needs it. Be aware, though, that the mussels will give off some flavorful liquid during the cooking process. You may not need as much pasta water as you think.

Once the shrimp have been in the sauce for about a minute, I remove the pan’s cover and begin removing the mussels from their shells. I usually leave a few in the shell just for presentation in the final dish. Once all are removed, it is far easier to stir the sauce to insure the shrimp are evenly cooked on both sides.

I usually drain and add the pasta to the sauce when the shrimp are just shy of being fully cooked. They will finish cooking when mixed with the hot pasta and this will insure that neither shrimp nor mussels are over-cooked and chewy when served.

*     *     *

By any other name …

There are two more of “my girls” but neither is doing well enough to make a public appearance. If they return from Betty Ford respond to treatment in time for Fall, I’ll be sure to share a photo or two. Before moving on to the rest of the roses, there are these, located at the foot of the bed, right next to Judy. Where else?

*     *     *

Lady’s Slipper Orchids

*     *     *

Baked Rigatoni

Rigatoni al Forno

Yes, I realize for many of us in the Northern Hemisphere, Summer is in full swing, with temps soaring well into the 90’s and, incredibly for some, beyond. I, also, know that for many, firing up the oven isn’t necessarily something we’re prone to do when our homes are already sizzling. So, why am I featuring a baked pasta dish today? The answer is simple. Mozzarella. I had plenty of mozzarella in my fridge, left over from the first round of mozzarella making and I needed to do something with it. And lest there be any doubt, when I have a surplus of something, anything, my go-to dish is pasta of some sort. So, considering that mozzarella “performs” so well when baked, I decided to make an “al Forno” recipe.

Growing up, rigatoni was a frequent “guest” at our dinner table, although we kids called them “flat tires.”  I don’t recall Mom ever baking rigatoni, though. It wasn’t until I was on my own that I started experimenting with baking penne and rigatoni. Generally, these dishes are easy to assemble, with left-overs that keep well and are easily re-heated. Perfect for my one person household. So, when presented with a bounty of mozzarella, I chose flat tires to help me out.

Normally, when I prepare a baked pasta, I coat the cooked pasta with sauce and cheese of some sort before topping it off with shredded mozzarella. With this dish, however, I reverse things a bit. Butter and Pecorino Romano cheese are used to coat the partially cooked rigatoni but, as you’ll soon see, the mozzarella is chopped into cubes and stirred into the pasta. Once mixed, Asiago cheese is used to top off the dish before baking. Doing so gives one both contrasting flavors and textures. The strong-tasting Asiago, melted until golden, hides not just the sharp Pecorino Romano but the gooey milder tasting mozzarella cubes spread throughout the pasta, as well. It’s a three cheese combination that I enjoy well enough that I don’t really mind turning on the oven in a heat wave.

*     *     *

*     *     *

Rigatoni al Forno Recipe

Ingredients

  • 1 lb rigatoni
  • 1 quart tomato sauce (vegetarians use marinara)
  • 8 oz Mozzarella
  • 8 oz Asiago cheese
  • 4 tbsp butter, cut into chunks + a little more to grease the baking dish (optional)
  • ¾ cup Pecorino Romano cheese, grated
  • fresh parsley, chopped, for garnish (optional)

Directions

  1. Pre-heat oven to 350˚F.
  2. Lightly grease a 9 X 13″ baking dish with cooking spray or butter.
  3. Add rigatoni to a large pot of heavily salted, boiling water. Cook the pasta for half of the time suggested on the package for al dente pasta. Drain and hold until needed.
  4. Warm sauce and maintain a low simmer.
  5. Slice and cut the mozzarella cheese into ½ inch cubes. Set aside.
  6. Use a box grater to shred the Asiago cheese. Set aside.
  7. Once the pasta has been semi-cooked and drained, return the rigatoni to the now empty pot.
  8. Add the butter and then the Pecorino Romano to the hot rigatoni, stirring after each until the pasta is well-coated.
  9. Add the tomato sauce to the pot and stir.
  10. Add the mozzarella to the pot and gently stir until evenly distributed.
  11. Place the pasta in a greased 9 x 13″ baking dish. Evenly sprinkle the shredded Asiago cheese on top.
  12. Bake in pre-heated 350˚F oven for 20 to 25 minutes or until the Asiago cheese is melted to your liking.
  13. Allow to rest 5 minutes before serving, garnished with parsley, if desired.

*     *     *

Someone forgot the parsley.

*     *     *

Variations

For whatever reason, some may find Asiago cheese unappealing. If that’s true for you, there are other cheeses that can be used to top off your dish. Fontina is a good alternative, as is ricotta salata. The choice is really yours, just try to find a cheese that offers a contrasting flavor to the mozzarella. You won’t be disappointed.

Although I used rigatoni for this dish, you can certainly use any of the tube-shaped pastas. Just avoid the ribbon-like pastas. They are not well suited to baked dishes of this type.

*     *     *

By any other name … 

“Queen Elizabeth”

(Because there is no King George III rose.)

Happy 4th of July!

*     *     *