The Kitchens are in a Pickle

This post is really little more than a comedy of errors. I had another recipe in mind for today but that was before forces beyond my control intervened. You see, I was at the farmers market, minding my own business when I came upon the radishes, French breakfast radishes, no less. So, I bought them. Never mind that I was already lugging around a full shopping bag. Exiting the vendor’s stall, I literally bumped into the beets display. WIth my shirt now sporting a mixture of mud and beet juice, I thought it a sign and bought a bunch of large red beets. On the way out of the market, I bought a few more things, filling a 2nd bag, and headed for home.

*     *     *

*     *     *

Once home, I unpacked my bounty, dreaming of following Roger’s suggestion for buttery radishes and re-creating Mom’s beet salad. And that’s when it hit me. I’d be leaving for Michigan in a few days. I should be subtracting from my refrigerator’s shelves, not adding to them. WIth no possible way to clear my fridge before I was to leave, Plan B was put into effect: food preservation. I’d freeze some and the rest? Well, that’s how today’s pickling post was born and first up were the radishes.

Googling pickled radish recipes, I came upon one from David Lebovitz and looked no further. I’ve had very good luck with his recipes. Unfortunately, I didn’t have any white vinegar — this was a spur of the moment pickle, after all — so I married what I had until I reached the required amount. The radishes turned out great and, subsequently having earned Zia’s seal of approval, I see no reason to change things. The “married” amounts are the ones listed in the recipe’s ingredients.

Next were the beets. I didn’t have my own recipe, so, I again I turned to google. After checking a number of them out, I decided to wing it. The recipe below is the result. There’s one critical error, however. I had intended to use these beets in a salad but I included whole cloves in jars of red shoestring beets. How could anyone find those cloves when it’s time to serve the beets? With 2 jars already filled, I had little choice but to continue with the recipe, adding whole cloves to the remaining jars, watching them disappear into the beets. Since I had promised beets to some friends, I knew I would have to make more. These wouldn’t do.

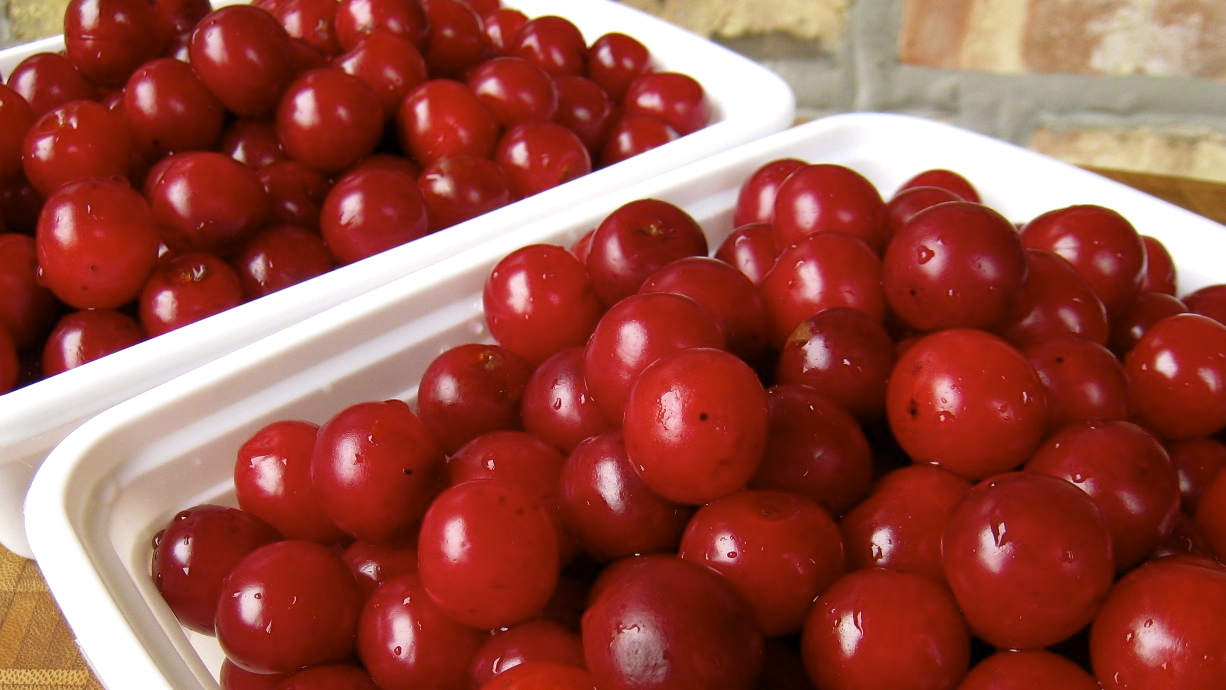
The Saturday following my return from Michigan, I once again returned to the farmers market and bought 2 bunches of beets. This time I bought Chioggia beets, an Italian variety of heirloom beets with alternating red & white rings when cut. There was no way any cloves could hide among these beauties. Still, I wasn’t going to take any chances. These beets would be sliced rather than shredded. While the beets were roasting, I surfed the web looking at pickling recipes. I stumbled upon a USDA site and their recipe for pickled beets. With some changes, that’s the recipe I used and have shared below.

*     *     *

Shoestring Beets

Pickled Red “Shoestring” Beets Recipe

Ingredients

  • 1 bunch (4 or 5) large red beets, washed and greens removed
  • olive oil
  • 1 cup (235 ml) cider vinegar
  • 1 cup water (237 ml)
  • 1/2 cup (100 g) sugar
  • 1 tsp kosher salt
  • 2 cinnamon sticks, halved
  • 3 whole cloves per jar

Directions

  1. Pre-heat oven to 400˚ (205˚ C).
  2. Place washed beets on a foil line baking sheet, cover lightly with olive oil, and use another sheet  of foil to enclose the baking sheet and beets.
  3. Place beets in oven and bake for 45 minutes or until a knife can be inserted into a beet with little resistance.
  4. Uncover the beets and set aside until cool enough to handle.
  5. Beet skins should peel off, though a paring knife may be needed for some spots.
  6. Using a food processor with blade inserted, shred the beets created “shoestrings.”
  7. Meanwhile, add vinegar, water, salt, and sugar in a small sauce pan and heat until both are dissolved. Keep hot though not boiling.
  8. Using 4, sanitized pint-sized jars, add 1 clove and 1/2 stick of cinnamon to each. Add some beets, another clove, enough beets to fill, and one more clove. Add enough of the hot pickling liquid to fill each jar to within 1/2 inch of the jar’s top.
  9. Seal each jar until “finger tight” and process in a boiling water bath for 30 minutes, Remove from water and set, undisturbed, on a kitchen towel covered baking sheet in a draft-free spot. Jars may be moved after 24 hours.

*     *     *

“Quick Pickle” Radishes Recipe

Ingredients

  • 9 oz (260 g) radishes, cleaned, trimmed, and sliced thin.  Peel where needed.
  • 2 oz (60 g) red onion, sliced thin
  • 1 1/3 cup (316 ml) red wine vinegar
  • 2/3 cup (157 ml) cider vinegar
  • 1 cup water (237 ml)
  • 1 tbsp sugar
  • 1 tbsp kosher salt
  • 2 garlic cloves, cut in half
  • 24 green peppercorns, divided
  • 24 red peppercorns, divided

Directions

  1. Add vinegar, water, salt, and sugar in a small sauce pan and heat until both are dissolved. Set aside to cool.
  2. Using 4, sanitized, pint-sized jars, add 1/2 garlic clove and 6 of each, red and green peppercorns.
  3. Divide the onion and radishes evenly among the jars.
  4. Once cooled, pour enough pickling liquid to fill each jar within 1/2 inch of the top. Seal each jar with a sterile lid and refrigerate.

Inspired by David Lebovitz

*     *     *

Chioggia Beets

Pickled Sliced Chioggia Beets Recipe


Ingredients

  • 2 bunches (9 or 10) medium Chioggia beets, washed and greens removed
  • olive oil
  • 1 medium onion, sliced thin
  • 4 cups (950 ml) cider vinegar
  • 2 cup water (475 ml)
  • 2 cups (400 g) sugar
  • 2 tsp kosher salt
  • 3 cinnamon sticks
  • 10 whole cloves

Directions

  1. Pre-heat oven to 400˚ (205˚ C).
  2. Place washed beets on a foil line baking sheet, cover lightly with olive oil, and use another sheet  of foil to enclose the baking sheet and beets.
  3. Place beets in oven and bake for 45 minutes or until a knife can be inserted into a beet with little resistance.
  4. Uncover the beets and set aside until cool enough to handle.
  5. Beet skins should peel off, though a paring knife may be needed for some spots.
  6. Slice the beets as thin as you prefer.
  7. Meanwhile, place cinnamon sticks and cloves into a small pouch or piece of cheese cloth and tie to secure.
  8. Place vinegar, water, salt, sugar, and spice bag into a sauce pan and bring to the boil.
  9. Add sliced beets and onion, simmering for 5 minutes.
  10. Remove the spice bag and fill each jar with enough beets, onion, and pickling liquid to within 1/2 inch of the top.
  11. Seal each jar until “finger tight” and process in a boiling water bath for 30 minutes, Remove from water and set, undisturbed, on a kitchen towel covered baking sheet in a draft-free spot. Jars may be moved after 24 hours.

Inspired by National Center for Home Food Preservation

*     *     *

Notes

The radishes should sit in the refrigerator for a few days before use and they will last about 3 to 4 weeks if kept in the fridge. Both beet pickles are processed and will last for months on a cool, dark shelf. If you like, you can skip the boiling water bath, put a sterile lid on each jar, and refrigerate them. They, too, will last about 3 to 4 weeks this way.

Although I used French breakfast radishes for this post, I’ll use the more common, globe-shaped radishes for future pickles. They’ll produce larger slices, which I prefer.

You needn’t roast the beets before pickling. Many recipes suggest boiling the beets for 20 to 30 minutes before peeling and continuing with the pickling.

*     *     *

It’s déjà vu all over again …

Giardiniera-topped Mount Burger

Giardiniera-topped Mount Burger

It’s Summer and people are googling season-appropriate recipes. Pesto was hot but now my giardiniera recipe has caught the internet’s eye. It’s probably because the ingredients are all readily available now, as are reasons for having a jar on-hand. It is barbecue & picnic season, after all, and neither can be a success without a jar of giardiniera handy. You can find out what so many others are googling by simply clicking HERE.

*     *     *

Coming soon to a monitor near you …

Risotto Preview

Risotto

Let’s try this again, shall we?

*     *     *

Grilled Rack of Spring Lamb

Carré di Abbacchio alla Griglia

As a boy, I was aware that Mom was a good cook. I’d been to enough of my friends’ homes for dinner to know that few shared Mom’s skill in the kitchen. Judging by their response, my friends came to the same conclusion when they stayed for dinner at our home. In fact, a Mom called mine one evening asking how she prepared spinach. To her surprise, upon returning home after dinner with us, my friend couldn’t stop raving about the spinach, something he refused to eat at his own home. Apparently, she had only served her family canned spinach. Over the phone, Mom gave her instructions for sautéing fresh spinach in garlic-flavored olive oil. Decades before Jamie Oliver, Mom was changing how America ate, one dinner table at a time. Incidentally, to this day, I’ve never eaten canned spinach, no matter what Popeye said or did.

*     *     *

*     *     *

Knowing that Mom was a good cook was one thing, realizing the authenticity of her cooking was something else. During my first trip to Florence, I followed a tour book’s suggestion and dined at a family owned restaurant. Just as the book described, we were greeted by the owner/chef, taken to our table, and then he disappeared, returning a few minutes later with menus and a list of the specials. In the kitchen, just as the book stated, Mamma could be seen helping to get the orders out to the diners. I followed our host’s suggestion and ordered lamb chops. A few minutes later, I glanced into the kitchen and there was Mamma, just beyond the restaurant’s back door, grilling my chops. When I was served, I was surprised to learn that they tasted exactly — not similarly but exactly — as if my own Mom had prepared them. That was the day I realized just how authentically Italian Mom and Zia cooked. That was quite a souvenir to bring back home.

Although a recipe is listed below, today’s post is more about the method used than anything else. This was how all of our chops and steaks were prepared, no matter who manned the barbecue. This is not an exact science nor will it ever be. The only difference in method when cooking the various meats is that a little lemon juice might be added when cooking lamb. Otherwise, a simple combination of olive oil, garlic, rosemary, salt, and pepper are used to marinate the meats. It really is that simple but don’t take my word for it. Karen has shared her own flavorful version of this simple recipe for grilled lamb in her wonderful blog, Back Road Journal.

As for today’s lamb, a couple of days after Easter, I was pleasantly surprised to see 2 small racks (a 3 rib & a 4 rib) of Spring lamb in the meat display. I asked the butcher about them and learned that they have been trimmed to  fulfill special orders for the holiday. I bought them — at half price! — and stored them in the freezer, bringing them with me when I last visited Michigan. Believe me, after every future holiday I will be sure to check every meat counter within reason, looking for a similar deal.

*     *     *

*     *     *

Grilled Rack of Spring Lamb Recipe

Ingredients

  • 2 portions of Spring rack of lamb, 7 ribs in total, french cut
  • 1 to 3 cloves garlic, chopped
  • rosemary, roughly chopped
  • olive oil
  • 1 to 2 tbsp fresh lemon juice (optional)
  • salt and pepper
  • parsley for garnish (optional)

Directions

  1.  A couple of hours before you are to roast the lamb, remove it from the refrigerator and place on a pie plate or similar dish.
  2. Season with garlic, rosemary, salt, and pepper before sprinkling with optional lemon juice and enough olive oil to lightly coat everything. The lamb is already dead. No need to drown it in oil.
  3. Set aside to marinate until you’re ready to cook. If your kitchen is warm, place the rack in the fridge until 30 minutes before you intend to cook it.
  4. Pre-heat your barbecue on high. Wrap the chop tips with aluminum foil, something I forgot to do.
  5. Place the rack directly over the heat and sear the meat for a couple of minutes before moving it to an area on the grill away from the heat.
  6. Using an instant read thermometer, we pulled the racks off of the grill when the temperature reached 120˚ F (49 C).
  7. While the racks rested, covered, I grilled the asparagus while Zia dressed the salad.
  8. The racks were served, garnished with a bit of parsley (optional).

*     *     *

Notes

The olive oil marinade is not one that is left on the meat overnight. At most, the meat was left to marinate for 3 hours, with 1 to 2 hours the norm.

As you can see in the photo, the rosemary wasn’t chopped before being used.  Most, if not all, will be lost during grilling. The same is true for the garlic, so, don’t be overly concerned with chopping/dicing everything evenly.

The racks could just as easily be broiled if a barbecue or grill pan is not available. As always, do not forget about them lest your return to find Spring rack of lamb flambé.

*     *     *

It’s déjà vu all over again …

Cherries JammedI mentioned last week that tart cherries are now in season. In my opinion, these cherries make the best pies, muffins, and jams. Yes, it can be a bit tedious pitting the little red devils but the end result certainly makes it all worthwhile. If you’re interested, you can see my recipe for making this delicious jam by clicking HERE.

*     *     *

Coming soon to a monitor near you …

Fried Zucchini Blossoms 

*     *     *

Grandpa’s Tuna Salad gets a Makeover

Due Insalate di Tonno 

Ah, Spring! Who can forget the sights and aromas of a glorious Spring morning? Well, try as we might, none of us who called the two-flat home will ever forget a few not so glorious Spring days — and I imagine our neighbors would say the same.

As I’ve mentioned in prior posts, Grandpa’s retirement years revolved around his garden, although he always had various maintenance jobs to perform around the building, too. As a young boy, and later teen, one learned to make oneself scarce early in the morning or become part of the work crew. This was especially true in early Spring.

Grandpa sowed his seeds after consulting the lunar calendar and the Old Farmers Almanac. He needed no help with this and the process remains shrouded in mystery to this very day. No, Grandpa only called upon one or more of us boys when he needed muscle. In the Fall, we helped him clear all the old tomato plants and their support stakes before we turned over the soil. The only parts of the garden to escape this tilling were the lettuce and parsley patches. Those he covered in straw and it wasn’t unusual for us to have a bit of both with our Thanksgiving dinner.

Come the following year and the Spring Thaw, Grandpa would find one of us and, again, we tilled the garden, though this time no patch was left unturned. That was the easy part. You see, Grandpa was a firm believer in the power of manure to grow gigantic tomato plants.  (To his credit, there may be some truth to this. How many gardeners do you know that use old hockey sticks to support their tomatoes?) About the time of the tilling, he would ask if you wanted to go out to the farm with him. Grandpa had a farmer friend and how we kids loved going there.  After all, this was the same farm that had adopted our dogs, though they were always out running in the fields when we came to visit. Well, by the time we were old enough to till the garden, the jig was up as far as the dog tales were concerned.  We were, also, fully aware of why we were roped into offered the chance to accompany Grandpa on this particular trip to the farm.

*     *     *

*     *     *

The fact was that the garden needed manure and not just any manure. Grandpa’s tomato crop depended upon this farm’s sheep manure. So, once each Spring, we drove out to the farm and, after a few pleasantries, we drove off with a large metallic tub of sheep manure in the trunk, making us very popular at traffic lights if the wind shifted just the right way. Once home, we hauled the tub to the yard but it didn’t end there. Oh, if only it ended there!

As it turns out, sheep manure, in its natural state, is too strong for young tomato plants and, even if it wasn’t, there was no way we could haul enough manure in a car’s trunk to cover Grandpa’s ever-expanding garden. Grandpa had a solution, all right, and it’s lucky that he was so loved by our neighbors.  Using a very large metallic bucket and a hose, Grandpa made “soup” — his label not mine — which was then spread over the tilled earth. A couple of days later, one of us would be called upon to till the garden again. Don’t think we didn’t try to avoid that call to action but we were on our own. Our parents had their eyes on the prize: a wealth of tomatoes come August. Any inkling that we didn’t want to help Grandpa was met with a  reminder that “work never hurt anyone” and suddenly we found ourselves asking Grandpa if he needed help.

All facts considered, it was one bad afternoon, leaving 364 pretty good ones. Thankfully, it was early enough in the year that the Spring rains helped to quite literally clear the air, much to everyone’s relief. Most fortunately, since the boys’ bedrooms were closest to the garden, rain and cold temperatures prevented anyone from even considering opening a window “to let in some fresh air.”  And the tomatoes? Grandpa’s plants were huge and the crop large enough for 2 families. Sheep manure soup. Who knew?

*     *     *

At noon on any given Friday, save those that fell in Winter or manure week, you could find Grandpa in his patio enjoying his lunch. It was usually a simple dish and, being Catholic, it was, also, meat-free. A favorite of Grandpa, and later my own, was this simple tuna salad. Believe me, it could not get any more simple and no further introduction is required. 

*     *     *

*     *     *

Grandpa’s Tuna Salad Recipe

Ingredients

  • 1 can (5 oz; 142 g) tuna, packed in olive oil, drained 
  • a bit of red onion, sliced or chopped
  • 2 whole anchovy fillets, more if desired
  • olive oil 
  • red wine vinegar
  • salt & pepper, to taste

Directions

  1. Place the tuna on a serving plate. it can be flaked or left in a ring shape.
  2. Top with onion and anchovies.
  3. Sprinkle with olive oil and red wine vinegar.
  4. Season with salt, & pepper, to taste
  5. Serve with crusty bread and a glass of homemade white wine.

*     *     *

That’s it. Quick and easy but surprisingly satisfying. I enjoyed this dish as a boy and continue to enjoy it today. Even so, nothing remains the same forever. As much as I enjoy Grandpa’s tuna salad, I wanted to try something a little different and, so, I gave Grandpa’s version a makeover. Enter tuna salad number 2.

Whereas Grandpa’s tuna rested on a plate, the foot of my salad rests on a bed of mixed salad greens. Rather plainly dressed, Grandpa’s tuna was clothed with just onion, salt, pepper, and oil & vinegar. My new tuna salad is adorned with capers, onion, salt, pepper, olive oil, and freshly squeezed lemon juice. Most importantly, Grandpa’s tuna came to him by way of a can. My tuna skipped the middleman, taking a more direct route to my plate via a grill pan.

Now, to many, it isn’t really a makeover if there is no reveal. Not wanting to disappoint, here’s mine. On the right, you’ll see Grandpa’s original tuna salad and, on the left, may I present the new and “refreshed” tuna salad.

*     *     *

*     *     *

It wouldn’t benefit anyone if I didn’t explain how this transformation took place. Here, then, is how the makeover specialists of the Bartolini Kitchens performed this miracle.

*     *     *

Grandpa’s New & Improved Tuna Salad Recipe

Ingredients

  • 1 tuna steak per serving
  • mixed salad greens
  • 1 tsp capers per serving, more if desired
  • red onion, thinly sliced
  • olive oil
  • lemon juice
  • salt & pepper, to taste
  • lemon wedges for serving
  • whole anchovy fillets (optional)

*     *     *

*     *     *

Directions

  1. Place salad greens in a large bowl. Add onion & capers, dress with olive oil and fresh lemon juice, season with salt & pepper, and toss to combine. Set aside.
  2. Heat the grill pan over med-high heat. Lightly coat the tuna steak with olive oil and season with salt and pepper on both sides.
  3. When the grill is hot, moisten a (paper) towel with vegetable oil and use it to lightly coat the grill surface.
  4. Add the tuna steak to the grill pan. After 90 seconds, use a fish turner to give the steak a quarter turn.
  5. Cook for 60 to 120 seconds and then flip the steak over.
  6. After cooking for 60 seconds, give the steak a quarter turn. Continue cooking the steak for 60 to 90 seconds and remove from heat.
  7. Move tuna steak to a cutting board. Cutting with the grain, carve slices no less than 1/4 inch (2/3 cm) thick.
  8. Place salad on the serving plate and arrange tuna slices atop the salad. Garnish plate with lemon wedges and optional anchovy fillets.
  9. Serve with crusty bread and a white wine of your choosing.

*     *     *

Variations

Although my tuna steak rested atop a bed of baby salad greens, you may choose whatever greens you prefer — baby spinach, baby kale, and rocket come to mind.

I chose to dress my tuna salad with a simple dressing of lemon juice and olive oil, reserving a little juice for the tuna, as well. You may wish to use another dressing, such as the lemon-caper sauce I shared within my grilled sturgeon recipe post.

*     *     *

Notes

I used a grill pan here but you could just as easily use your barbecue, broiler, or skillet to cook your tuna steak. Just resist the urge to move the steak until it’s time to turn it.

Cooking times, as you’ve probably noted, are anything but precise. The pan, the heat, and/or the tuna steak’s thickness all play a role. Remember, too, that the steak will continue to cook once it has been removed from the fire, as well as while you fiddle with a camera, trying to take photos for a blog entry. (#%*@^#&$!)

100_3954Whether you call it tinned or canned, whether it’s packed in oil or water, and whether it’s chunk or whole, please make sure that the tuna you’re about to purchase was harvested in ways that will not harm dolphin populations. The symbol located to the right, or something similar, should be found on the can. If it’s not there, please do not purchase that tuna.

*     *     *

It’s déjà vu all over again

freshly-made

Freshly made mascarpone

A little over a year ago, I was in the middle of my cheese-making series when I shared the recipe for making mascarpone. Though widely known as the star ingredient in tiramisu, mascarpone is so much more than that, Whipped and flavored, this creamy cheese makes a wonderful dessert topping, while adding it to pasta gives new meaning to the words “cream sauce.” Best of all, mascarpone is a snap to make with results far better than you can imagine. But don’t take my word for it. You can see how it’s done by clicking HERE.

*     *     *

 Coming soon to a monitor near you … 

Frittata

*     *     *

Engineering the Standing Rib Roast

In the past, I’ve mentioned how my family traditionally cooked porchetta, a fantastic pork roast, on New Year’s Day. To be sure, that is a remarkable main course for a New Year’s Day dinner — but it’s certainly not the only one. A number of years ago, I started serving standing rib roast for my dinner on New Year’s Day. At first, not knowing any better, I prepared it like I would any beef roast and, though the results were good, I was expecting fantastic. In the years to follow, I tried different roasting temperatures and even starting on a high temperature before shutting off my oven and letting the roast sit, undisturbed in the oven for 4 hours. Yes, that roast was cooked well but all the dinner’s side dishes had to be cooked on the stove top because the oven door was not to be opened under pain of poorly roasted meat. After I cooked a second standing rib following that method, I decided I wanted to try something else. Luckily, I stumbled upon a different approach. Analytical.

*     *     *

Engineers can cook. Who knew?

Engineers can cook. Who knew?

*     *     *

On another sleepless night — it’s 4:15 AM as I write this, by the way — I went surfing for a way to cook the perfect standing rib roast. I soon came upon a website, Cooking For Engineers, where an analytical approach is used for cooking — or so the site’s header claims. Well, I may not be aware of the analysis, if any, that lead them to this recipe but I do know a perfectly cooked roast when I see one. I have followed their instruction now 4 times and each roast has been roasted evenly throughout. There are no well-done slices at either end or gray area on the edges of each slice, with a medium-rare center.  As you can see in the photos, it is medium-rare throughout. And the best part of it all is that this is one easy roast to prepare. Incredibly so.

Day 1: Tsk. So young

Day 1: Tsk. So young.

One of the keys to this dish lies in the aging of the meat. As much as one week before the dinner, you’ll want to select your roast. Once you get it home, unwrap the roast and place it on a rack, bone-side down, over a baking sheet in your refrigerator, where it will age for at least a day and no more than 7. Don’t be surprised if the aging causes changes in the roast’s appearance. It’s normal for it to darken and to lose from 10 to 15% of its weight, depending upon how long it is aged. According to our Engineer friends, aging will lend a “buttery texture” to the already richly flavored meat. Believe me. You do not want to skip this step.

Day 5: Aged & ready to go.

Day 5: Aged and better than ever.

Once you’ve aged the meat, you’ll need to prepare it for roasting. Remove the roast from the refrigerator and let it sit on the counter top for a couple of hours. For an evenly cooked roast, it must be at room temperature throughout. You may notice some unusually dark spots on the roast. These should be trimmed away. Use butcher’s twine to tie the roast lengthwise, in-between each pair of bones. This will help to ensure that the roast’s shape is maintained during the cooking process. Once the roast has been brought to room temperature, place a roasting pan on to the stove top and begin heating it. When hot, add a little olive oil to the pan. Place the roast into the now hot oil and sear it on all sides, spending about 3 minutes on each side to do so. Pre-heat your oven to 200˚ F (93˚ C). That’s right: 200˚ F (93˚ C).

Remove the seared roast from the hot pan and place a wire rack into the roasting pan. Heavily season the roast with salt & pepper on all sides. Place the roast on to the rack, insert a meat thermometer into its center, away from any bone, and place the roast & roasting pan on to the lowest rack in the oven. Set the thermometer for 125˚F (52˚C) for rare; 130˚F (55˚C) for medium rare; 145˚F (63˚C) for medium. Sorry but you’re on your own if you want to cook a fine piece of beef like this beyond medium.

For roasts under 5 pounds, it should take about 45 minutes per pound to roast. For roasts greater than 5 pounds, it will take between 4 and 5 hours to cook properly. Once your target temperature has been reached, remove the roast from the oven, place it on a cutting board, tent it with aluminum foil, and let rest for 20 minutes. In the meantime, you can deglaze the roasting pan and use the drippings to create a sauce or add flour to make a roux before adding beef stock to make a gravy. Once rested, use your carving knife to first trim the entire roast off of the rib bones. If you prefer, you can also trim off the fatty end of the roast. Once trimmed, slice the roast in however many slices as are needed to serve everyone. Serve with a little horseradish sauce on the side. (Recipe to follow.)

Now, I ask you. Could it be any easier to cook standing rib than to age, season, sear, and roast at a low temperature? Once again, look at the photos. Each time I’ve listened to the Engineers, I served a roast that was evenly — dare I say perfectly? — cooked throughout.

Oh, one more thing. Leftovers. If you’re blessed with an extra slice, it will make a delicious sandwich the next day. Just sauté it in a little butter until heated through and serve on a favorite bun with a bit of horseradish or horseradish sauce.

To make horseradish sauce: combine equal amounts of plain yogurt (Greek pref.) and sour cream. Add horseradish to taste, some brown whole grain or Dijon mustard, a dash or two of Worcestershire Sauce, and salt & pepper to taste. Mix well and set aside. Serve at room temperature.

*     *     *

Notes

The original recipe specifically mentions to leave the roast uncovered as it ages. I’ve never aged it less than 3 days and certainly not more than 7, as the Engineer states. I’ll replace the fridge’s box of baking soda a day or two before I start the aging process and have never noticed any scent in my fridge. Of course, that just as well might have been the case had I not replaced the box. I guess I’ll never know.

Roasting a piece of meat at a low temperature means that its surface may not color as it would if roasted at a higher temperature. This is why the meat is seared before going into the oven. Just be careful to only sear the meat for 3 minutes per side. Searing it for longer periods will begin to cook the meat on the roast’s inside. Later, when the roast is carved, the end pieces will be cooked more than the rest of the roast, defeating the purpose for roasting the meat this way.

*     *     *

You can see the original recipe on the Cooking For Engineers website by clicking HERE.

*     *     *

It’s déjà vu all over again …

More gravy, please.

More gravy, please.

Since we’re starting the year off with a beef rib recipe, I’ll use another to end this post. With Winter here and snow having reached as far south as Texas, there are few better ways to heat up the kitchen than with a delicious braise in the oven. These beef short ribs will not only warm your kitchen, their aroma will fill your home like only good comfort food can. Be sure to serve them with mashed potatoes or polenta because you’ll want to take full advantage of that gravy. Click HERE to view the recipe.

*     *     *

The Kitchens Have Gone To The Dogs: Jerky Treats For Your Pupster

As many of you know, I share my home with Max, a boxer-mix that, despite being 4 years of age, remains more puppy than dog. I’m told it is the boxer in him and that they never grow up. What luck! Now, I’ve no intention of using today’s post to detail his many transgressions. Rather, since tomorrow is the 4th anniversary of his adoption, I thought I’d share the recipe for one of his favorite treats, jerky.

When Max was a puppy, I decided to switch him to a grain-free diet once he outgrew his puppy food.  I regulate his diet in other ways but I’m no expert and this is not the forum for that discussion. (If anyone is interested, drop me an email and I’ll be happy to explain what Max is fed and why.) The only grain Max eats now is the wheat flour in the peanut butter biscuits I bake for him (recipe courtesy of Linda at Savoring Every Bite).  He, and all of his mates, love those biscuits and I’m not about to deprive him of them. Much to his delight, he also gets one “all natural” Bully Stick per day and a couple of jerky-type treats. It’s the jerky treats that bothered me. Speaking with my Traveling Companion, we were both concerned about the meat and preservatives being used to make them. The brand that I had been purchasing, for example, was an American-owned company but the jerky was processed elsewhere. I didn’t like the sound of that and decided to see if I could make my own. As it turned out, making dog jerky at home is a surprisingly simple endeavor, although some web sources insist on complicating matters. Some, for example, soak the meats in marinades and almost all season them  before baking in a very low oven. Although I tried one such recipe for my first batch, I never did it again. My jerky treats are 100% meat that is intended for human consumption and absolutely nothing else. The next batch I made was beef, followed by one of chicken. Both were baked on cooling racks that were placed on baking sheets. I thought that this would help the meat strips to dehydrate more evenly — and it did. The problem came when I removed the second batch, the chicken, from the racks. Some of the racks’ non-stick coating stuck to the chicken strips. It may have happened with the first batch but, being beef and dark-colored, I hadn’t noticed. So, rather than risk my canine tasters’ health, both batches of jerky and the racks were taken to the garbage. I now have new racks but they aren’t necessary to get the job done, as you’ll soon see.

*     *     *

The Bartolini Kitchens’ Canine Tasters, Bea and Max

*     *     *

Home-Made Jerky For Dogs

No matter what type of jerky is to be made, I find it easier to partially freeze the meat before cutting it into strips. I buy chicken tenders when on-sale and use them for Max’s chicken jerky, but any skinless, boneless part of the bird will do. Try to slice equally sized pieces and always cut with the grain. When using tenders, I cut each in half, creating 2 long strips of about equal size. (Exceptionally large tenders can be cut into 3 strips.)  When making beef jerky, use the cheaper cuts of beef. No dog will mind if you use chuck instead of tenderloin. Cut the meat against the grain into thin strips, equally sized. No matter the kind of meat you’re using, once it’s cut and fully thawed, place some of the strips, evenly spaced, between sheets of plastic wrap or wax paper. Use a meat pounder, rolling-pin, or even a frying pan to flatten the strips until they are all of equal thickness. This will insure that they will cook evenly. Place the strips on baking sheets that have been lightly sprayed with cooking spray. If using racks, spray the racks with cooking spray, place on baking sheets, and place the meat strips onto the racks. In both cases, no strip should be touching another.  Place the baking sheets in a pre-heated 170˚F (my oven’s lowest temperature setting). Bake 6½ hours, turning over each strip every 2 hours while rotating the trays. When finished, remove, cool, and store.

*     *     *

*     *     *

Notes

Being I don’t use a dehydrator nor preservatives, I’m very careful to ensure the jerky doesn’t spoil. Using airtight containers, I store in my refrigerator only as much jerky as will be used in a 3 day period. All of the rest is kept in the freezer until needed. Do not make so many that they’ll be in the freezer for more than a month. Of course, if your dog is at all like Max, there’ll be no need to thaw the treats. Now he comes running every time he hears me open the freezer door.

Every dog owner learns that abrupt changes to the pet’s diet can result in digestive problems. That’s because it takes time for a dog’s digestive system to develop the necessary bacteria to properly process a new food. Depending upon your dog and its diet, you may need to introduce these treats to it slowly to give its digestive system time to adjust. This is especially necessary if you’ve chosen to season or marinate the meat before cooking. It shouldn’t take any more than a couple of days for the dog to get “acclimated” and then you’re free to give your pet as many as you like.

*     *     *

 The lion sleeps tonight.

*     *     *

Before You Buy Another Bag Of Jerky Treats For Your Pooch

Although I wrote this entry several weeks ago, I scheduled its posting to coincide with Max’s adoption date. Unfortunately in the interim, a friend sent me a link to this MSNBC article of March 13th, 2012, which seems to confirm our worst fears about some brands of store-bought jerky treats. Be aware: just because the packaging says it is an American-owned company does not mean that the meat or finished product originated in this hemisphere, let alone country. Google is your friend.

*     *     *