Fish Tacos with Roasted Tomatillo Salsa

Yes, you read the post’s title correctly. Today I’m sharing a recipe for fish tacos. As I’ve said on several of your blogs, I rarely make tacos. I don’t think it worth the effort just to make 2 or 3 tacos for my dinner. I still feel that way but at the time this post was written, my chile plants were producing at a rate that rivaled my eggplant crop.. If only my tomato plants had been so competitive.
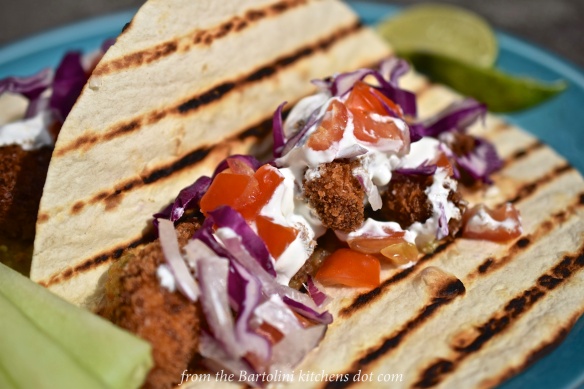
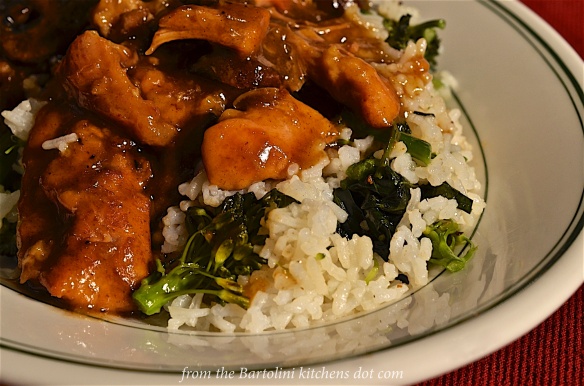
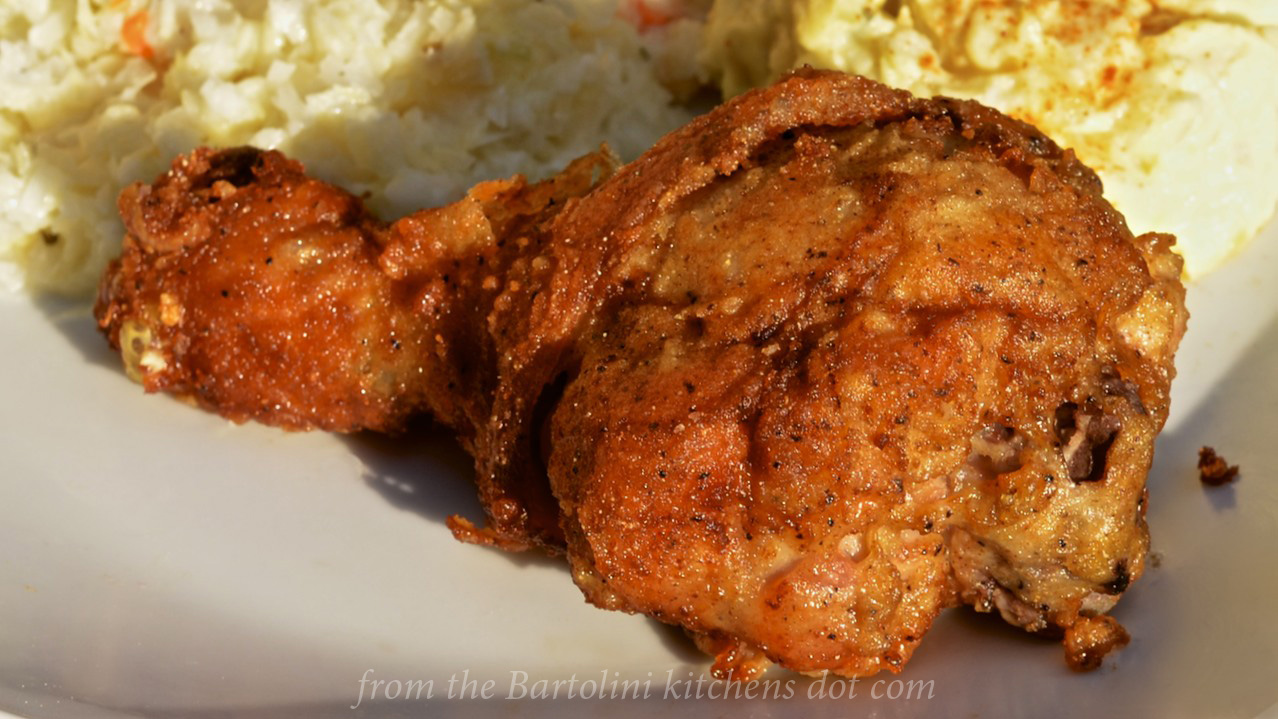
*     *     *

Fried Fish Tacos - 1

This Fish is Fried

*     *     *

Well, it was far too humid to try to dry the peppers and without a dehydrator, I was loath to turn on the oven, no matter how low the temperature would be set.. So, I cooked some, pickled others, and added a few to the cherry bomb peppers that I was preserving. But the chiles kept coming and Lucy can only eat so many. Thanks to a couple blogging friends, I decided to make tomatillo salsa. (That recipe follows this one.)

Well, the salsa did make a dent — albeit a small one — in the chile inventory but what to do with it? I was stumbling around the grocery, trying to figure out what to prepare when I saw that there was a sale on pollock. That’s all I needed to make up my mind. Fish tacos would be on the night’s menu.

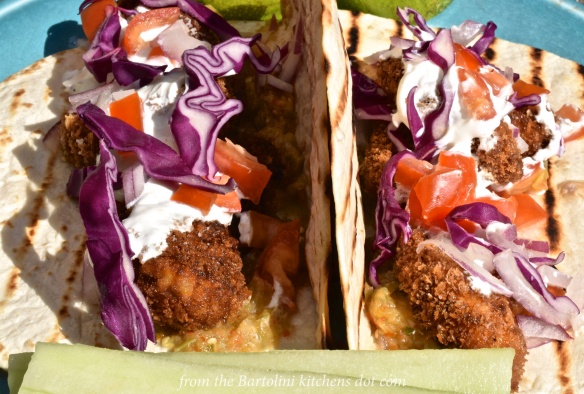
Since my tomatillo salsa was rather smooth, I felt that the taco needed something more crispy than shredded lettuce. That’s why the shredded cabbage was included but you should use whichever you prefer. The same is true for the tortillas. As much as I like corn tortillas, I bought flour because I felt that corn tortillas would just about disintegrate by the time I was done snapping photos. Oh, to be a better — read faster — photographer. And, by the way, hats off to those who would make their own tortillas for a dinner for one.

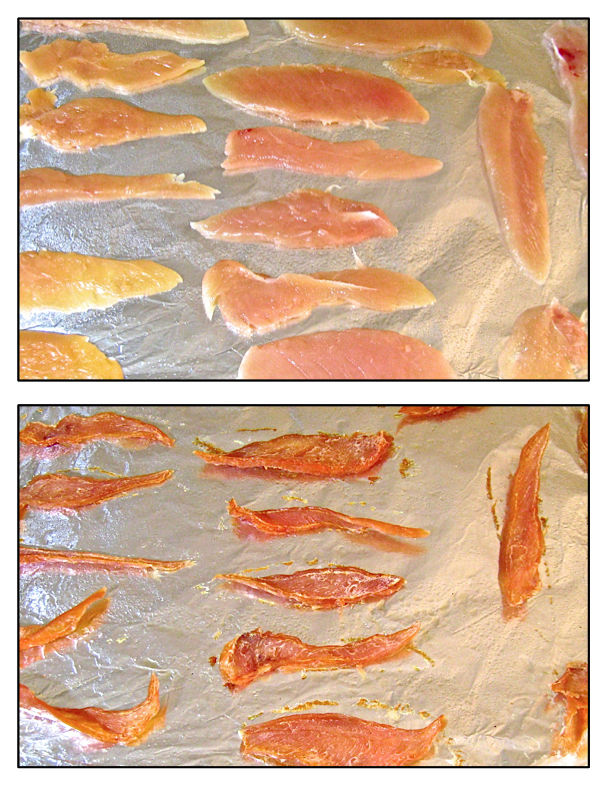
To prepare the fish for breading, the fillets were cut into strips about 3 inches (8 cm) long. Seasoned corn starch was used to coat the strips, just as was done when soft shell crabs were prepared several weeks ago. Once coated, the strips were dipped in a mixture of eggs, milk, and Sriracha. From there, they were coated in Panko bread crumbs and reserved. Easy peasy.

A note about the ingredients. Few amounts are listed because they will depend upon the number of tacos to be prepared and your own taste preferences. More cornstarch and breadcrumbs will be needed if you’re feeding 4, for example, than if you are preparing tacos for 1.

Lastly, for those avoiding fried foods, I’ve included instructions for baking the fish, as well as for frying.

*     *     *

Fish Tacos - Baked 1

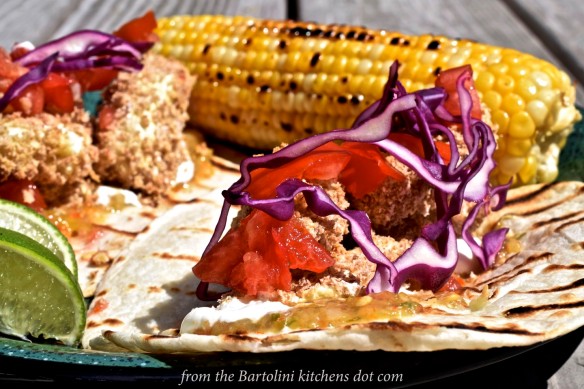
Tacos with Baked Fish

*     *     *

Fish Taco Recipe

Ingredients

  • Fish fillets cut into strips (see Notes)
  • corn starch seasoned with paprika, ground chipotle, cumin, salt, and pepper, to taste
  • 2 eggs, beaten
  • 2 tbsp milk
  • 2 tbsp Sriracha sauce, more or less to taste
  • Panko bread crumbs
  • tortillas
  • roasted tomatillo salsa – recipe follows
  • shredded cabbage
  • diced tomato (optional)
  • sour cream (optional)
  • diced red onion (optional)
  • limes, quartered

Directions

  1. Set up a breading station:
    • In the first dish, place corn starch seasoned with paprika, ground chipotle, cumin, salt & pepper to taste.
    • In the second, combine and beat the eggs, milk, and Sriracha.
    • In the 3rd dish, add enough Panko breadcrumbs to coat the pieces of fish.
  2. To fry:
    • Add enough oil to the pan for a depth of 1/2 inch (1.5 cm).
    • Heat over med-high heat to 360˚ (180˚C).
    • Place breaded strips into the hot oil and fry until golden brown, about 2 minutes per side.
    • Remove from oil, place on paper towels, season with salt immediately.
  3. To bake:
    • Pre-heat oven to 400˚ F (200˚ C)
    • Place breaded strips on to a rack placed atop a baking sheet.
    • Bake until golden brown, about 10 to 12 minutes, turning them over midway through the bake.
    • Remove to a platter and season with salt.
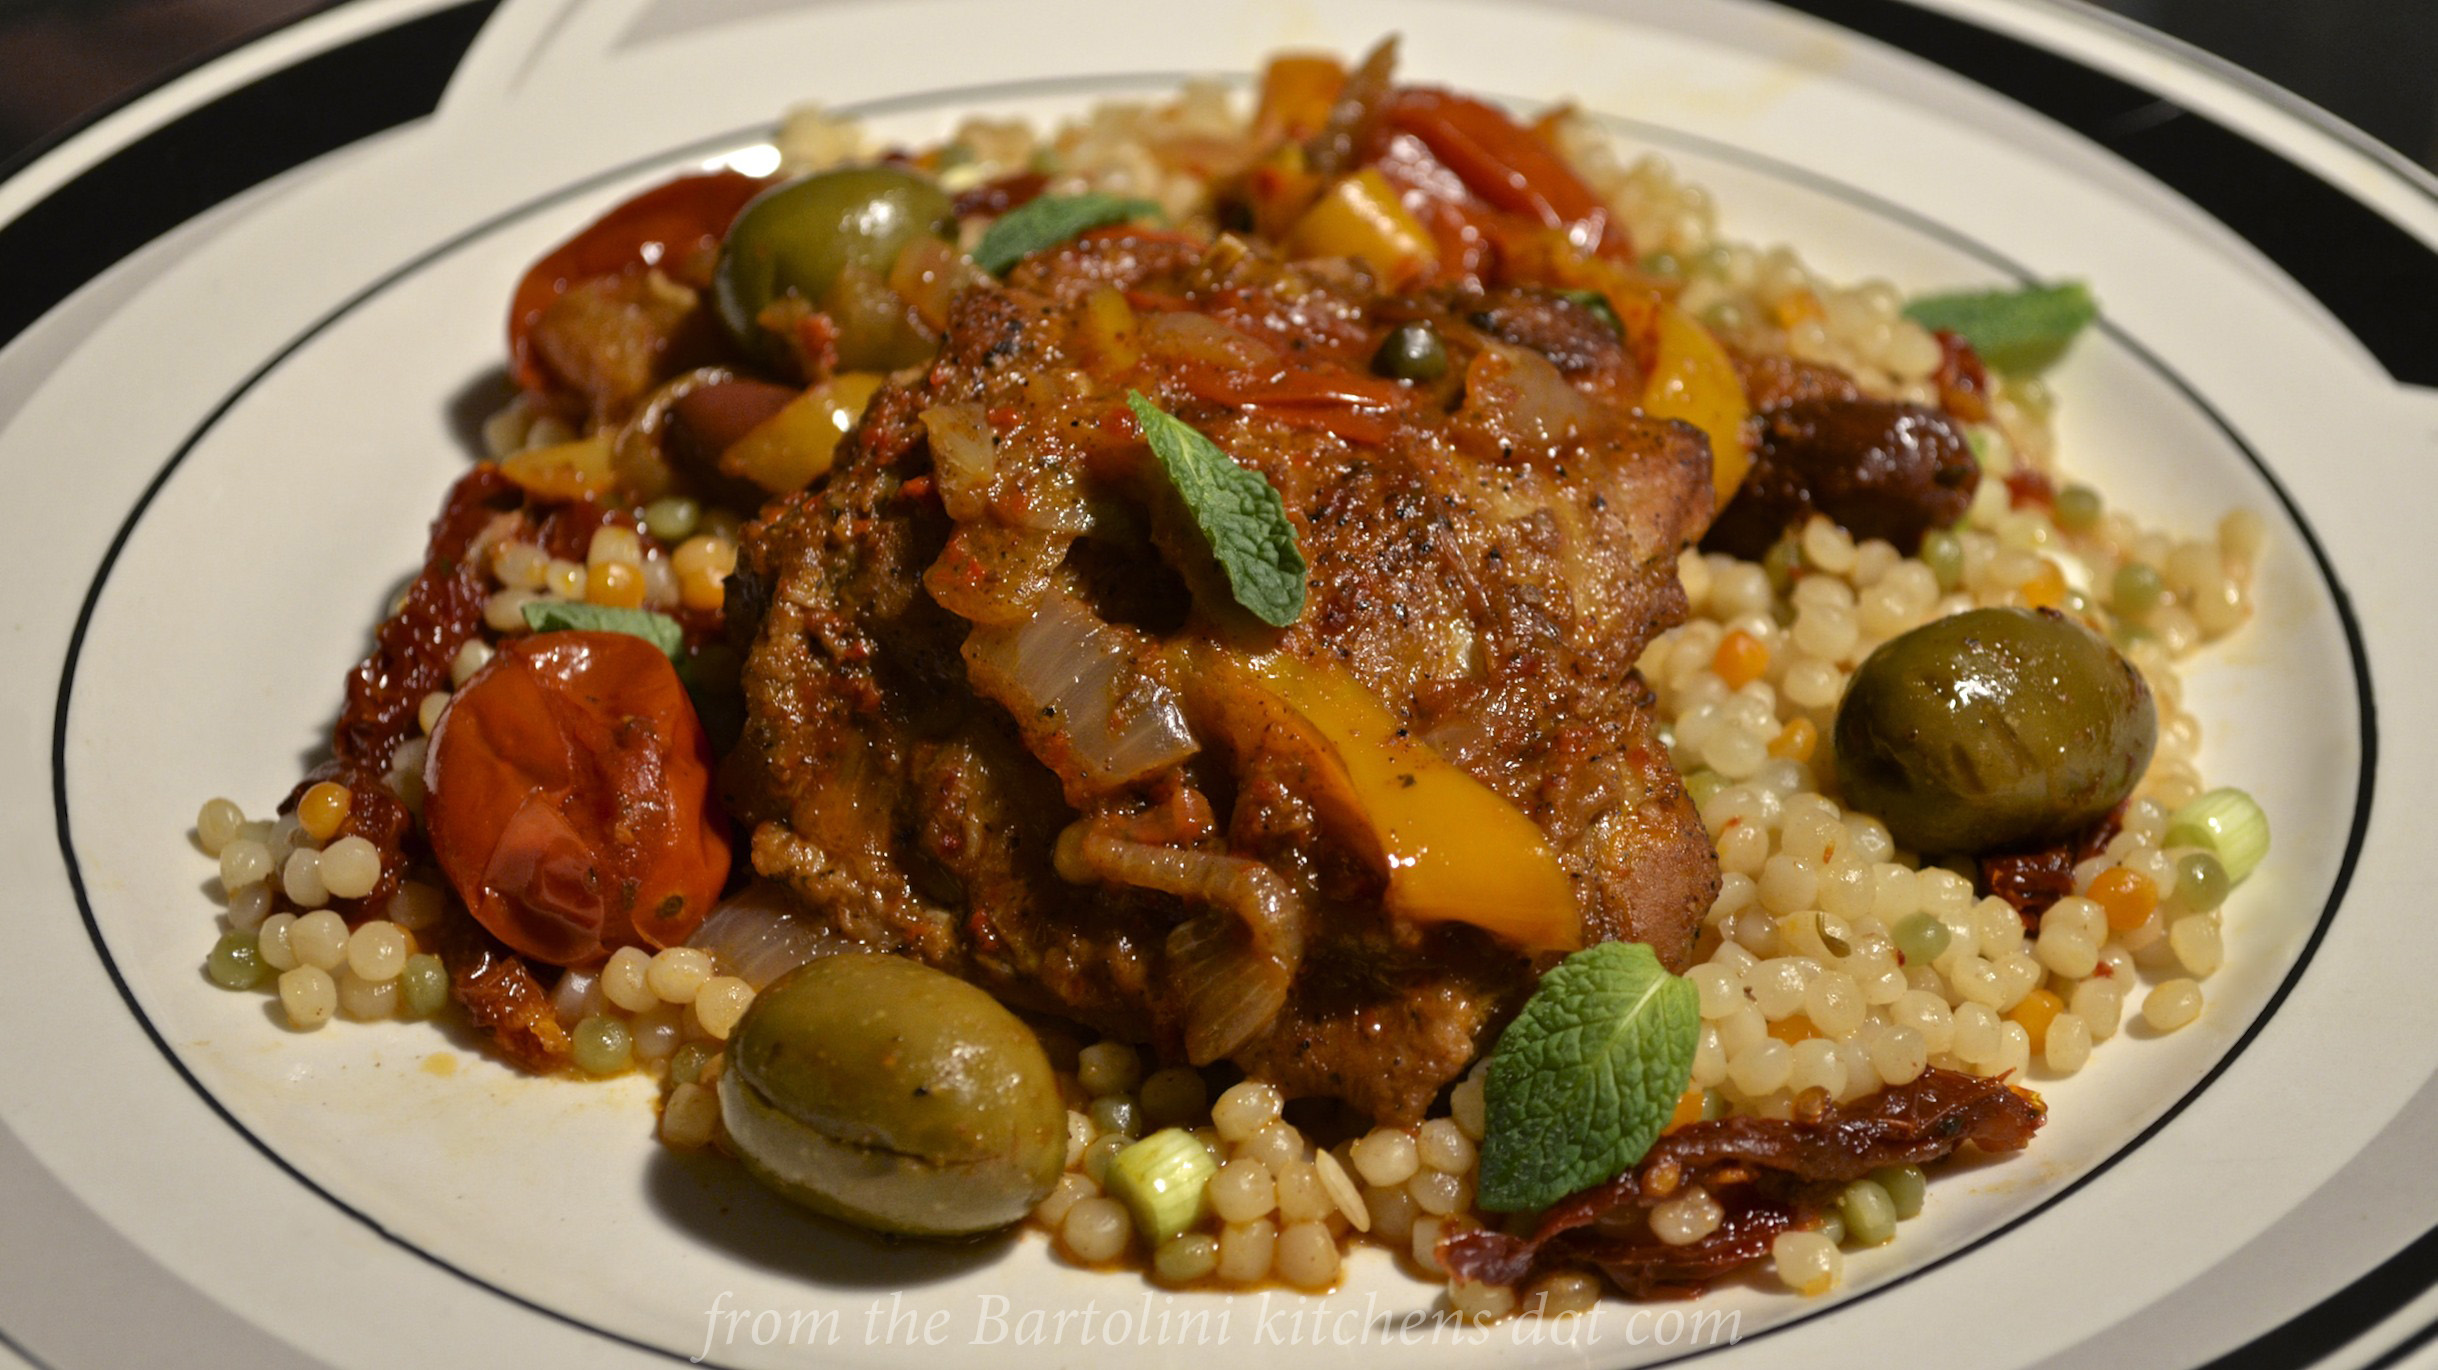
  4. To assemble the tacos:
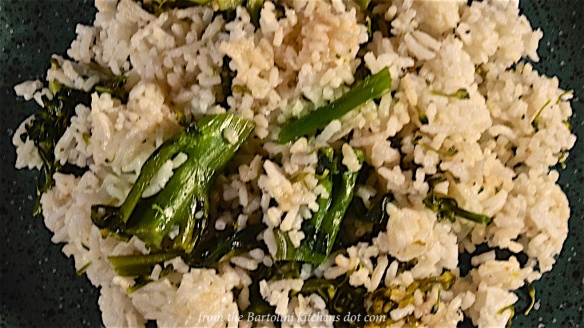
    • Over med-high heat, warm the tortillas on a grill pan, cast iron fry pan, skillet, or barbecue grill until heated through.
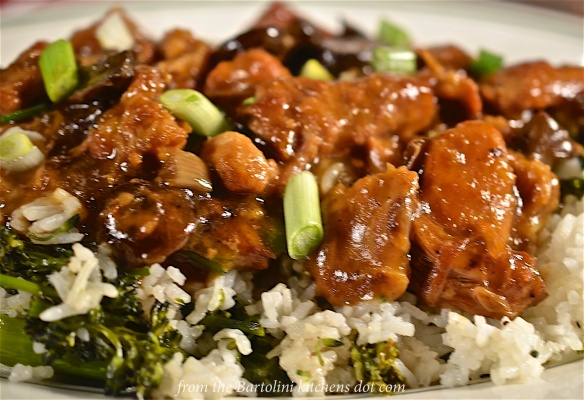
    • Create a taco using a tortilla, pieces of fish, a couple tbsp of salsa, some shredded cabbage, and a squeeze of lime.
      • Sour cream, onions, and tomatoes may be added, according to personal tastes.
  5. Garnish with lime quarters and serve.

*     *     *

Fried Fish Tacos - 2

More Fried Fish Tacos

*     *     *

Notes

Although I used pollock here, feel free to use any white fish. Cod, hake, or tilapia come to mind, although mahi mahi, halibut, or even tuna would be very good, too. You may want to adjust the seasoning depending upon the fish you’ve selected.

Roast Chicken Tacos 2Fish not your thing? Tacos are a great way to re-purpose leftover roast chicken. Use a fork to pull apart the chicken meat and warm it quickly in a frypan with a little butter. Once heated, use it to build your taco with a bit of tomatillo salsa and whatever other fixins you like: shredded cabbage/lettuce, sour cream, diced onion, diced tomato, fresh cilantro, and/or a bit of shredded cheese would work just fine.

Roast Chicken with Tomatillo SalsaDid I say roast chicken leftovers? Well, first you have to roast that bird. Do it however you wish. Mine was spatchcocked and seasoned with plenty of herbs, lemon juice, and olive oil before roasting. Be sure to have the salsa nearby so that you can generously spoon some atop the chicken once served.

*     *     *

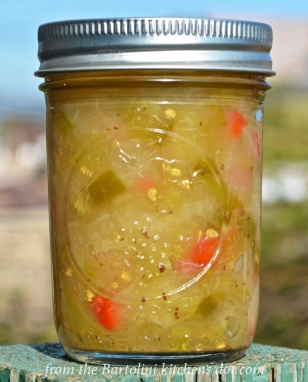
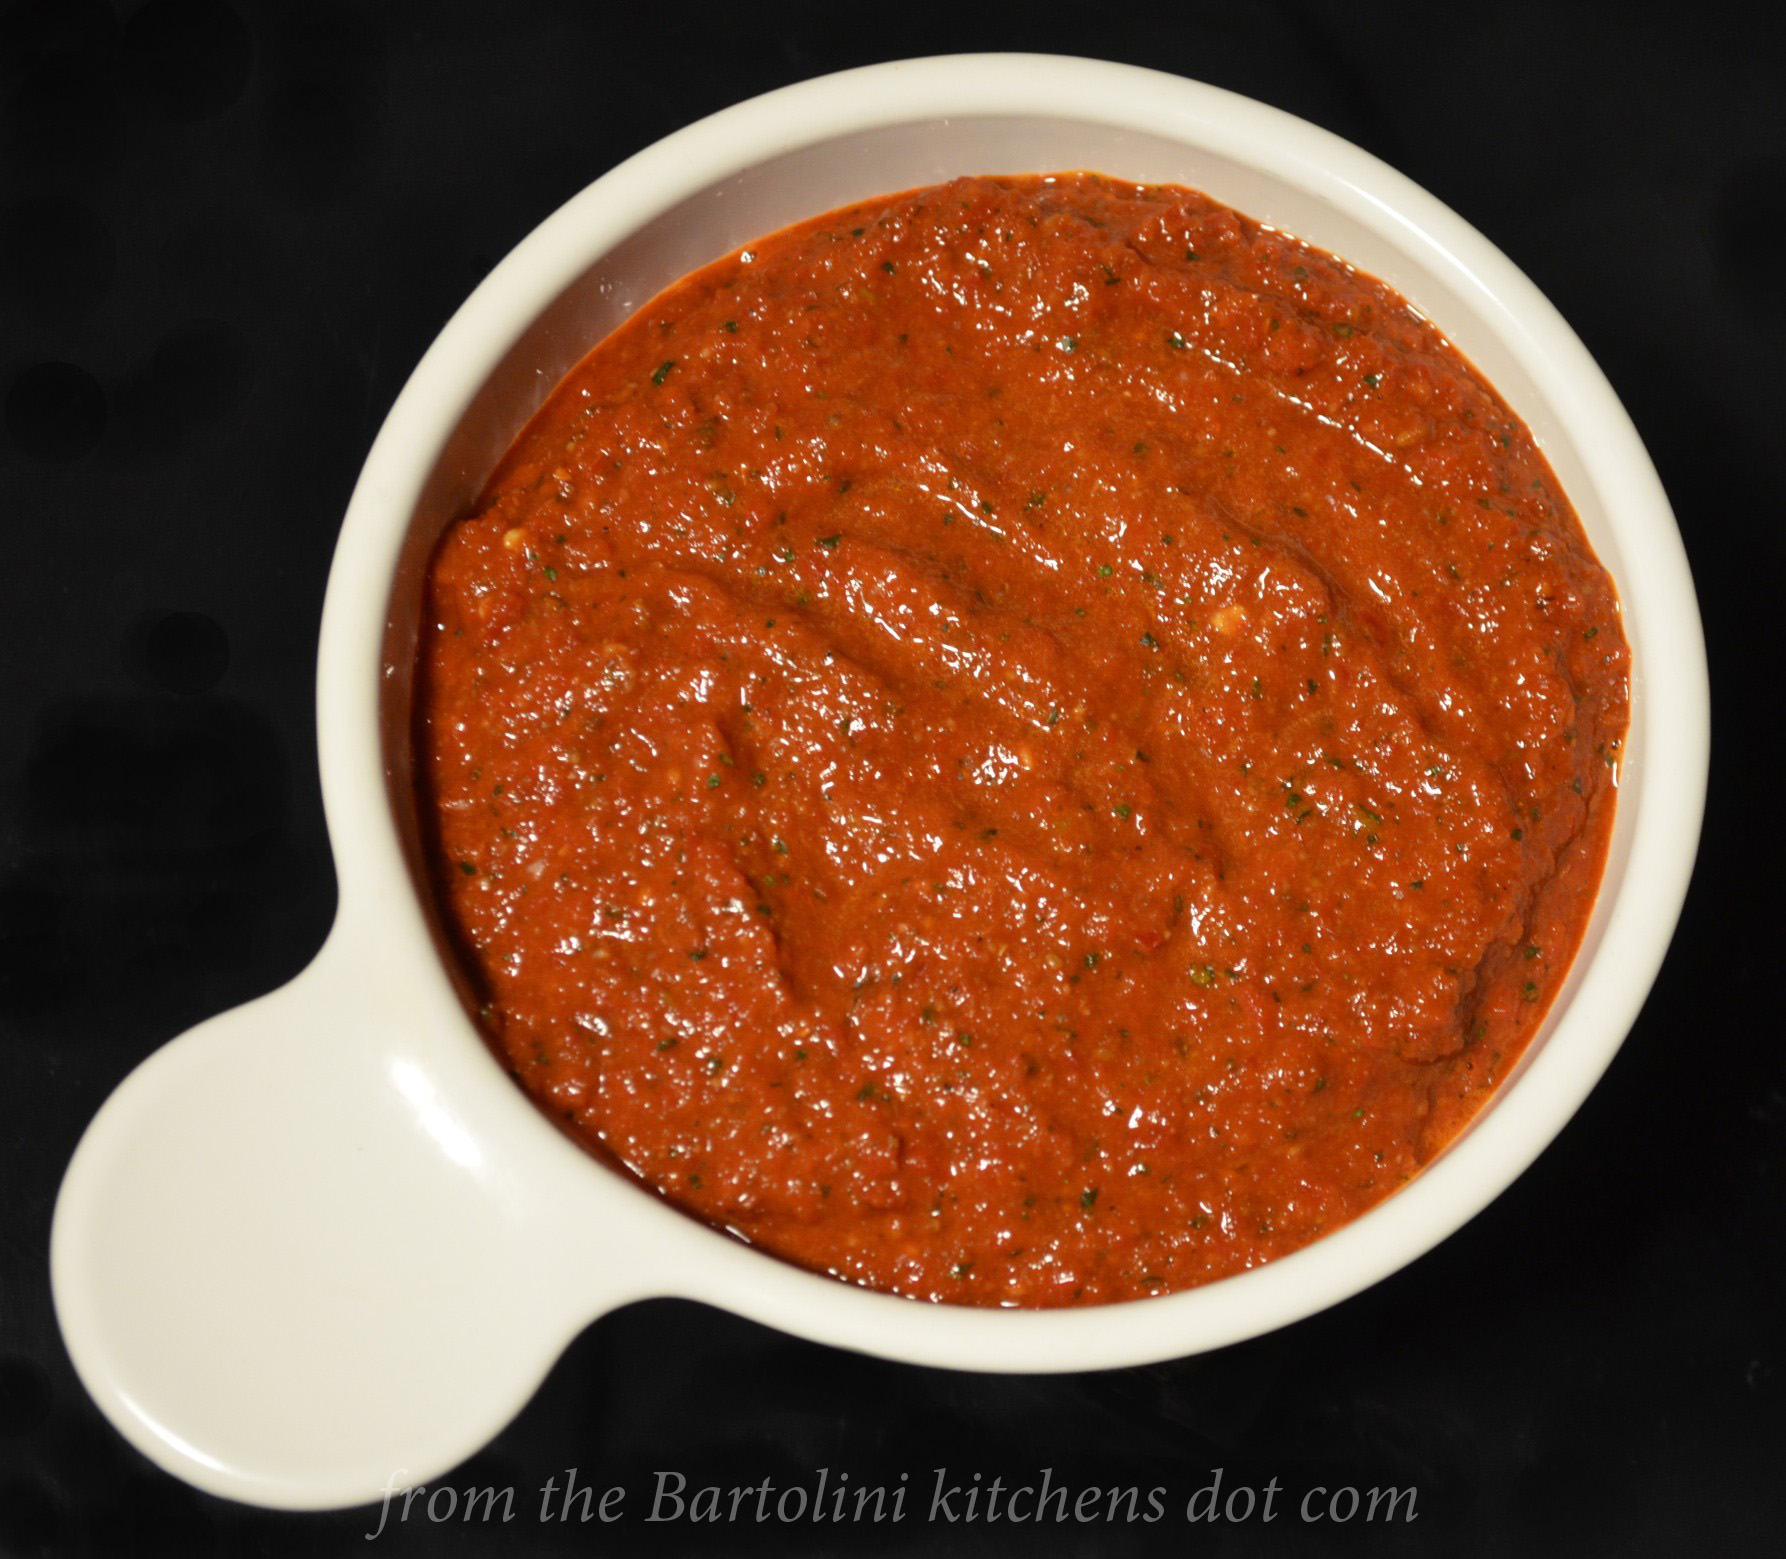
Roasted Tomatillo Salsa Recipe

I have 2 blogging buddies to thank for this post, Kathryn of Another Foodie Blogger and MJ of MJ’s Kitchen. Had it not been for Kathryn, I never would have bought tomatillos, and MJ is the Queen of Chiles. Now, this salsa and serving suggestions may not be exact duplicates of their recipes — shower them with all the praise and I’ll shoulder any blame — but I was certainly inspired by them. If you’re looking for some inspiration, by all means check out these 2 wonderful blogs.

Ingredients

  • 6 tomatillos, husked and washed (see Notes)
  • 4 cayenne chilies, tops trimmed (see Notes)
  • 1 chile de agua, top trimmed
  • 2 to 3 cloves garlic
  • small sweet onion or half of a large, cut in half
  • olive oil
  • cilantro, to taste
  • lime juice, to taste
  • salt & pepper, to taste

Directions

  1. Pre-heat oven to 400˚F (205˚C).
  2. Place tomatillos, all the chilies, garlic, and onion into a large bowl, drizzle with olive oil, and spread on a baking sheet in an even layer. Roast for 30 minutes.
  3. Once cooled, place all the roasted ingredients into a food processor, along with cilantro and the juice of 1 lime.
  4. Pulse the ingredients several times until the salsa is the consistency you prefer. Midway through, taste and season with salt and pepper. Add more cilantro or lime juice, if needed.
  5. Refrigerate until needed.

*     *     *

fried-fish-tacos-3

One More Fried

*     *     *

Notes

After removing their paper coverings, be sure to rinse the tomatillos very well to remove their somewhat sticky coating.

Until this point, I hadn’t tasted any of my home-grown chiles, all having been pickled and preserved. Now that I’ve tasted this salsa, I will only add 2 cayenne peppers in the future. For my tastes,  4 of these cayenne are a bit much. (Please pass the milk.)

*     *     *

It’s déjà vu all over again …

Crostini Look Back

With the holidays fast approaching, it’s never too early to start working on the menu for the holiday feast(s). It wouldn’t be much of a celebratory meal if there aren’t any appetizers, and crostini/bruschette are tasty ones to whip up. You can see a couple of suggestions by clicking HERE.

*     *     *

Coming soon to a monitor near you …

Sweet Potatoes au Gratin Preview

Sweet Potatoes au Gratin

*     *     *

Advertisement

Slow Cooker General Tso’s Chicken

Subscribers and frequent visitors to this site don’t come here for my take on Asian cuisine, No, as much as I love food from that part of the world, I must confess that up until recently, I very rarely prepared it, much to the joy of the local Thai, Japanese, Korean, and Indian restaurants. Now, however, there are four dishes that I prepare at home and enjoy very much. One, a chicken dish, is today’s recipe, General Tso’s Chicken.  The others can be found on blogs that I follow. The first of these, a delicious lamb dish called Karma Khorma, is from my blogging friend David’s decidedly delectable blog, Cocoa and Lavender. The second, a Korean pork dish, one of the first Asian dishes that I made with any frequency, is from Cam’s wonderful blog, Geukima, and is called Crispy Stir-Fried Pork Ribs With Caramelized Fish Sauce. The third is a very tasty Indian dish, Chicken Biryani, and can be found on The Insatiable Gourmet blog. You cannot go wrong preparing any of these and a visit to any of the 3 blogs is very rewarding. (Unfortunately, as of this writing, Geukima and The Insatiable Gourmet seem to be on hiatus. Cocoa and Lavender, thankfully, is still going strong.)  Not very long ago, the only Asian dishes I enjoyed were set before me at nearby restaurants. These days, hardly a week goes by that I do not prepare one of these four dishes. Who says you can’t teach an old dog new tricks?

*     *     *

General Tso 1

*     *     *

Now before going any further, it’s probably best to mention the origins of today’s dish. In my last post’s Comments section, I had mistakenly stated that the dish was created by Chinese immigrants in California. A comment from Eha got me googling its origins. Although I could not find the source stating its California origins (I should know better than to rely upon my memory for anything), I did find much to confirm Eha’s account. It is widely accepted that this dish was a creation of the Hunan chef, Peng Chang-kuei, in Taipei, Taiwan, after he had fled the Chinese mainland. Created in the ’50s, he once served it to Chiang Kai-shek. Chef Peng brought his recipe to America and introduced it in New York City in 1972 following Nixon’s trip to China. Since then, the dish has continued to evolve, in ways not necessarily pleasing to its creator. That is the simple version of the tale. You can find more information on Wikipedia or NPR or, for those who’d rather look at pictures, you can watch the movie, “The Search for General Tso“.

*     *     *

The Favorite Family Recipes website is the source for today’s recipe. I was attracted to it because I love both General Tso’s Chicken and my slow cooker. I can already sense some of you thinking how much easier it would be to stir-fry this dish. Well, I haven’t a wok and I am certifiably stir-fry challenged. For me, the slow cooker is the way to go. Even so, I did make a few changes. most notably replacing the original’s pineapple juice with orange juice and its cayenne pepper with ground chipotle. In both cases, I used what I had in supply. While searching for the cayenne pepper, I came upon a seldom used container of arrowroot and used it as a thickening agent instead of cornstarch,

I did make a couple of additions, as well. When I order General Tso’s Chicken from my neighborhood Chinese restaurant, broccoli is always included. Even though the original recipe makes no mention of it, I always include some form of the vegetable in my dish. Here, there was a package of broccolini in the vegetable crisper and it ended up being sautéed in garlic-flavored oil before being mixed with the cooked rice. About the same time the broccolini was grabbed, a few mushrooms were found. They had matured into the “use ’em or lose ’em” stage of crisper life and became the most unconventional addition to the dish.

Now that’s all settled, let’s take a look at the recipe.

*     *     *

General Tso 2

*     *     *

General Tso’s Chicken Recipe

Ingredients

Serves 4

  • 2 lbs boneless, skinless chicken thighs, chopped into 1 inch pieces
  • 1 cup flour
  • 1½ tsp kosher salt
  • ½ tsp pepper
  • 2 tbsp vegetable oil
  • ½ cup dark brown sugar
  • ½ cup lite soy sauce
  • ½ cup orange juice
  • ½ cup white distilled vinegar
  • 3 cloves garlic, crushed
  • 1 tbsp fresh ginger, grated
  • ½ tsp ground chipotle pepper
  • approx. 4 oz sliced “baby bella” mushrooms (forgive me, Chef Peng)
  • 2 tbsp arrowroot, mixed with 2 tbsp water – flour or cornstarch may be substituted
  • 4 scallions/green onions, sliced

original recipe from Favorite Family Recipes

*     *     *

General Tso Rice 2

*     *     *

for the rice and broccolini

  • 1 cup jasmine rice
  • 2 cups water
  • ¼ tsp kosher salt
  • 2 tsp butter
  • 2 tbs olive oil
  • 2 cloves garlic, smashed
  • 8 oz (225 g) broccolini, roughly chopped
  • salt & pepper to taste

Directions

  1. Place the flour, salt, and pepper into a sealable plastic bag. Working in batches, add the chicken pieces to the bag, shake to coat, and place the now-coated chicken on a plate. Continue until all the chicken is coated with the seasoned flour.
  2. Add 2 tbsp of oil to a hot, large frying pan over med-high heat.
  3. When oil is hot begin adding the chicken pieces. Do not overcrowd. It should take you 2 batches, at least. You may need to add a bit more oil between batches. Cook for 2 to 3 minutes per side. Chicken needn’t be cooked through, only browned.
  4. When the chicken is browned on all sides, remove to a plate and begin the next batch.
  5. Meanwhile, into the slow cooker, add the sugar, soy sauce, orange juice, vinegar, garlic, ginger, and cayenne pepper. Stir to completely combine.
  6. Add the mushrooms and stir.
  7. When all the chicken has been browned, add to the slow cooker and set it to low. Cook for 3 to 4 hours or until chicken is cooked thoroughly.
  8. About 30 minutes before completion, check to see if the sauce has thickened. If not, combine the arrowroot and water to make a slurry. Add to the pot and gently stir. Cover.
  9. Bring 2 cups of water to the boil in a medium sauce pan with a lid.
  10. Add salt and butter, stir, and then add the rice.
  11. When the water returns to the boil, reduce the heat to low and cover the pan.
  12. After 20 minutes, remove the pan from the heat. Rice will be ready in 5 more minutes.
  13. While the rice cooks, add 2 tbsp olive oil to a large frying pan and heat over med-high heat.
  14. Add the smashed garlic and cook until brown.
  15. Remove the garlic, add the broccolini, and reduce the heat to medium.
  16. Continue to sauté the broccolini in the garlic flavored oil until cooked to your satisfaction.
  17. Add the cooked rice to the frying pan and stir until fully combined. (See Notes)
  18. Serve the cooked chicken atop a bed of rice with broccolini. Garnish the dish with the chopped scallions/green onions.

*     *     *

General Tso 3

*     *     *

Notes

Although broccolini was used here, I have used broccoli and broccoli raab in the recipe. In all cases, I added the cooked rice to the pan in which the vegetable was sautéed so that the rice could absorb as much flavor from the pan as possible. Of course, you could steam the broccoli and add it to the dish however you wish.

The amount of arrowroot slurry needed will vary depending upon how much liquid is in the pot. No matter whether you use flour, cornstarch, or my oft-forgotten arrowroot, mix an equal amount of water with the thickening agent.

*     *     *

It’s déjà vu all over again …

Green Tomato Relish Look Back

Very soon we’ll be coming to an end of our tomato growing season. Each of us probably has a favorite method for dealing with the green tomatoes left on the vine with no hope of ripening. My Grandpa placed them in the drawer of an old dresser on the patio where they slowly ripened. Others wrap them in newspaper, while some place the green orbs in paper bags. That’s great if you want to ripen them but what if you don’t want to invest the time, paper, or drawer space? Today’s look back will give you a totally different option Take this LINK to learn how to make green tomato relish. Your hot dogs will thank you.

*     *     *

Coming soon to a monitor near you …

The Kitchens Salute Awburr-what? … Melanzane!

*     *     *

There was Something in the Air … And Fried Chicken was on the Stove Top

Fall's First Colors - Mid-August!!!
Yes, there was something in the air, all right, and I’m not talking about leaves changing color in mid-August. Mid-August!!! You see, I had Max groomed the afternoon before we left for Michigan. Lucy would never forgive me if she had to share a car for seven hours with a dog that smelt. Early that evening, I picked up Max at the groomer’s, drove home, and parked my newly repaired car in the garage. Walking through my yard, I stopped to set the timer for the garden sprinkler, meeting Max on the porch no more than three minutes later. It’s amazing how much can happen in three teeny, tiny minutes, especially when skunks are involved.

Those whose dogs have encountered skunks will tell you that their attacks come in three forms. The first — and most foul — is the “direct hit”, where the dog gets sprayed with everything the skunk can throw at it. I had a Cairn Terrier that chased a skunk into a culvert, taking a direct hit to the mouth. His head was soaking wet, as were my shirt and arms after carrying him to a tub for the first of many baths. He was terribly ill for three days and reeked both inside and out, if you catch my drift. The second strike is the “glancing blow”, where just a little of the skunk’s spray hits the dog. Though the dog still smells awful, at least its coat isn’t sopping wet with the stuff, contaminating everything the dog rubs up against. The third — and preferred — encounter is best described as “collateral damage”. It’s when a dog comes in contact with an area that was very recently sprayed. Lucky for Lucy, Max was a victim of collateral damage, apparently having stuck his nose where it didn’t belong. His muzzle carried only faint traces of skunk and, from past experience, only if his snout were to get wet would the full effect of the skunking become noticeable. What, me worry? Like Max was somehow going to get his muzzle wet …

*     *     *

(Click to enlarge any/all photos)

*     *     *

Max’s muzzle finally dried out while in the car during our return to Chicago. Lucy was — and is — so not happy.

 My “fuming” dog and angry bird aside, I had a wonderful visit back home. Zia’s Eldest Son and my Nephew arrived on their Harleys and spent the weekend with us, making Max one very happy dog. He adores my Cousin and won’t leave his side whenever he comes to visit his Mom. He takes Max on “nature walks” that can last hours, covering terrain that I can no longer walk — at least that’s what I’ve always thought. Max is not one to talk but, this time, my Nephew, also, walked the walk and, when they returned, he talked about the walk. It’s safe to say that this is one walk unlike any I’ve experienced and if duty calls, Max is ready to serve in the Canine Corps of the Navy Seals.

With Max away for hours at a time, Zia and I had our own little vacation. I’d brought my chitarra and we made a few pounds of pasta together. In fact, I made sure that her pasta board was covered with pasta when I left for home. I, also, made gelato — over 2 gallons — for Zia and her friends. One night, I cooked us a Moroccan-inspired chicken dish and, on another, we conspired to roast a goat shoulder. That recipe will be featured in a future post, as well as on my own table. We really did enjoy it.

*     *     *

Rising Lake Levels

Adding another 6 inches of water since June, Lake Huron’s water level is about 14 inches higher than last year.

*     *     *

All facts considered, it was a great visit that ended too quickly. The weather was warm though not as warm as it should have been, a complaint heard throughout the Mid-West this year, I’m afraid. Heavy rains, too, caused flooding throughout much of South-Eastern Michigan and Lake Huron’s water level continued to rise. It hasn’t been this high in at least 15 years. For me, though, seeing leaves already turning color was a bit of a shock and I couldn’t help  but wonder what sort of Winter lies ahead. Best get the snowblower tuned up.

*     *     *

You might recall that I had scheduled our recipe for roast duck for today’s post. That was before I returned home to find that the WordPress gods were angry and once again had me in their cross-hairs. Just as was the case when I was in Italy, I no longer receive notifications of most of your posts and, again, they’re to be found in my SPAM folder — all 800+ of them. As a result, I’ve had no time to finish up the roast duck post but will have it done for next week. I guess the WP gods don’t like me being away which is most unfortunate, for I’ll be leaving again in a few weeks. The Honey Man will soon be open for business and Zia and I will be there to get our share.

As for today/s Fried Chicken recipe, I cannot think of a better recipe to post. This weekend, we in the States will be celebrating a three day weekend for the Labor Day Holiday and what picnic or yard party is complete without a platter of fried chicken? For me, the colder the chicken the better. Make it as much as a few days in advance and stick in the fridge until party time.

*     *     *

BACON!!!*     *     *

No, the above pic is correct. That’s a photo of bacon frying to start a post about fried chicken. There’s really nothing so shocking about that but my using lard with the bacon fat to fry chicken may raise a few eyebrows.

Mid-Winter, I learned of a CSA (Community Supported Agriculture) that serves my area of Chicago. Granted, much of their Winter offerings were “imports” — there’s nothing growing in these parts — but all were organic and the quality was very good. It was nice, too, not having to hunt for Meyer lemons, kumquats, Mandarin oranges, and, later, ramps. Then, one day while browsing the website, I saw that they had fresh, organic lard. My search had ended.

You see, I’ve been looking for fresh lard for some time now. Let’s be clear. I’m not talking about the stuff you might see on your grocer’s shelf. That stuff is hydrogenated so that it will “keep” and should be avoided. Fresh lard, though not perfect, is a far healthier choice. Speaking of healthier choices, the bacon used is low-sodium and uncured, with no nitrites and nitrates used in its processing. As is the case with any fried foods, though, moderation is the key. In the past three years, I’ve fried chicken twice. Now, I’d like for you to believe that it’s because I’m so health conscious but the reality is that I hate having to deal with a pot of used grease. Shallow frying, as I did here, minimizes the amount of grease used but its disposal is still a problem. So, when I do fry chicken, I fry quite a bit, freezing future dinners in the process. And a couple pieces of fried chicken is a nice treat to enjoy during a seven hour drive. Place the frozen pieces in the car when you leave home and, by the time you’re hungry, it will be thawed but still cold — just how I like it.

*     *     *

Fried Chicken 1

*     *     *

Fried Chicken Recipe

 Ingredients

  • chicken pieces with skin and bones — I used legs and thighs
  • 1 quart (950 ml) buttermilk
  • 2 tbsp Sriracha hot sauce – optional
  • 4 rashes/slices bacon
  • 1 lb (2 cups or 455 g) lard 
  • 1 cup all-purpose (AP) flour
  • 2 tsp kosher salt
  • 1 tsp black pepper
  • 1 tsp smoked paprika
  • 1 tsp onion powder
  • 1 tsp garlic powder
  • 1 tsp marjoram
  • 1/8 tsp cinnamon

Directions

  1. Place chicken pieces in a large bowl, non-reactive pot, or plastic bag. Combine buttermilk with Sriracha, if using, and pour over the chicken pieces. Cover/seal the chicken and refrigerate for 8 hours or overnight.
  2. In a large, seal-able plastic bag, combine flour, salt, pepper, paprika, onion powder, garlic powder, marjoram, and cinnamon. Mix until well blended.
  3. In a large (cast iron) frying pan over medium heat, cook the bacon until crisp. Remove bacon and reserve for another use.Fresh Lard
  4. Place the lard into the pan with bacon grease, raise the heat to medium, and melt the lard. Do not allow the pan to be filled more than halfway with grease. (See Notes)
  5. Meanwhile, drain the chicken, raise the heat to med-high, and when the grease reaches a temperature of 350˚ F (177˚ C) (see Notes), place 5 or 6 pieces into the bag with the flour. Seal the bag and shake to evenly coat the chicken pieces.
  6. Shake off the excess flour and place each piece individually into the hot grease, skin-side up. Watch out for splatters and do not over-crowd. Fry for 7 minutes.
  7. Turn each piece over, lower the heat to low, cover the pan, and fry for 12 minutes.
  8. Uncover, turn each piece over, raise heat to med, and fry for another 5 to 7 minutes. Chicken is fully cooked when it reaches a temperature of 165 F (75 C). (See Notes)
  9. Place cooked chicken on a rack over a baking sheet, season with salt, and place in a pre-heated, 200˚ F (95˚ C) to keep warm while the remaining chicken is fried.
  10. Serve immediately.

*     *     *

Fried Chicken 2*     *     *

Notes

No matter what type pan you use to fry, never fill it more than halfway with grease. Higher than halfway and you’ll run the risk of the grease bubbling over once the food has been added. Serious burns and/or fire may result.

I like to fry chicken in oil at a temperature between 350˚˚ to 355˚ F (177˚ to 180˚ C). If the oil’s temperature is a little higher at the start, that’s fine. Adding the chicken to the pan will drop the temperature down to what I consider to be acceptable levels.

A chicken’s dark meat takes more time to fry than does the white meat. Here I cooked only dark meat. When frying both white and dark meat, start the dark meat pieces a couple minutes before adding the white meat pieces. When frying a large amount of chicken, I’ll fry a batch of only dark meat and another of white.

*     *     *

Now, about that reserved bacon …

BLTA bacon, lettuce, & tomato sandwich for lunch the next day.

*     *     *

It’s déjà vu all over again …

Zia's Corn RelishIn this part of the country, it’s corn season and our groceries and farmers markets have bins of sweet corn for sale. Fresh corn is one of Summer’s great gifts and I take full advantage. Unfortunately, like all of Summer’s bounty, its season is far too short, leaving us corn lovers seeking the prized kernels in our grocer’s frozen foods aisle. Today’s look back is one way to enjoy Summer corn in mid-Winter without having to defrost it first. Zia has made this corn relish for years and it’s a family favorite. You can learn her recipe by clicking HERE.

*     *     *

Coming soon to a monitor near you …

Roast Duck Preview

The Once-Postponed Roast Duck

*     *     *

Try This One For Thighs

Coscie di Pollo con Harissa

Harissa Thighs 1Little did I know when I used harissa to braise goat last October that I would become obsessed with the spicy sauce. Initially, I bought harissa from a Middle Eastern bakery that prepares the sauce on-site and provides it to a number of restaurants here in Chicago. Celia, though, suggested I make my own. Now, if you’ve been to her amazing blog, Fig Jam and Lime Cordial, you know that Celia makes just about everything and does so with a deft hand. Still, I was hesitant.

The truth is that many recipes say to use red or green chiles. Well, being a chile neophyte, I never know which ones to use and it’s not like there’s a big selection here. Then I came upon Mimi’s harissa recipe. (Take some time to get to know her blog, the Chef Mimi Blog, too, for some incredibly delicious recipes.) Her recipe took a different tack and I decided to give it a try.

Well, as luck would have it, when I went shopping for ingredients, there they were, a large display of red Fresno peppers. I bought a dozen, deciding I would take inspiration from both of their recipes, and since that afternoon, I’ve made several batches of harissa.

Over time, I’ve adjusted the spice mix to get to a flavor profile I prefer and now I’m working on the heat level. Right now, this sauce has a nice even heat when raw — there’s a roasted vegetable salad post in the works — but it dissipates a bit when cooked. Those with a higher tolerance for chiles may wish to include the peppers’ ribs and seeds, or, add another Habanero to the recipe below.

Like my harissa sauce, today’s chicken recipe is a work in progress, although I have prepared it in much the same manner 4 or 5 times now. In some ways, it reminds me of a cacciatore with a North African twist. I think you’ll find the recipe easy enough to follow without experiencing any problems.

*     *     *

*     *     *

Chicken Thighs with Harissa

Ingredients

  • 4 chicken thighs with skin and bones
  • 3 tbsp harissa sauce – recipe follows
  • 1/2 c chicken stock
  • 1/4 tsp cinnamon
  • 2 tbsp olive oil
  • 1 onion, sliced
  • 1 orange bell pepper/capsicum, sliced
  • 3 cloves garlic, sliced
  • 2 sprigs fresh rosemary
  • about 12 oz (340 g) olive salad (See Notes)
  • 12 cherry tomatoes
  • 1/2 preserved lemon, chopped
  • salt & pepper
  • lemon zest
  • mint leaves for garnish – optional

Directions

  1. Combine harissa, cinnamon, and chicken stock in a small bowl and set aside.
  2. Heat olive oil in a large frying pan with a cover over med-high heat.
  3. Season chicken thighs with salt and pepper and add to frying pan, skin-side down. Sauté until brown, 6 to 8 minutes, before turning over and browning the other side. Remove thighs from the pan.
  4. Remove all but 2 tbsp of fat from the pan. Add onions and peppers to the pan and sauté until onions are translucent, about 8 minutes. Add garlic for the final minute.
  5. Add olive salad and harissa sauce mix, stir, and heat through.
  6. Add thighs back to the pan, skin-side down, before adding the cherry tomatoes and preserved lemon. Cover the pan and reduce heat to medium.
  7. After 15 minutes, turn over the thighs so that they’re skin-side up. Do not cover the pan, giving the sauce a chance to thicken while the chicken finishes cooking.
  8. After the thighs have cooked for a total of 30 minutes, insert an instant read thermometer into the thickest part of the largest thigh. When the temperature reaches 165˚ F (75˚ C) the thighs are done.
  9. Remove to serving platter, sprinkle with lemon zest, and garnish with torn mint leaves, if desired.
  10. Serve immediately.

*     *     *

Harissa Thighs 7

Someone forgot the mint leaves.

*     *     *

Notes

I prefer to use a variety of olives here. Most of the groceries in this area offer olive salads, some even have more than 1 type. When they’re available, I’ll use the Mediterranean or Spanish olive salad. In today’s recipe, I combined both. Use whatever combination of olives you prefer and that are available. Use as little or as much as you like.

The chicken was served over tri-color “pearl” couscous that had been tossed with chopped scallions (spring onions) and sun-dried tomatoes.

*     *     *

Homemade Harissa*     *     *

Harissa Recipe

yield: 2 cups

Ingredients

  • 12 Fresno peppers, seeds removed
  • 3 whole roasted red peppers — well-drained if store-bought
  • 1 Habanero chile, seeds removed
  • 2 tsp caraway seeds
  • 1 tbsp whole cumin seed
  • 1 tbsp whole coriander seed
  • 2 tsp paprika
  • 1/2 tsp kosher salt
  • 1 tbsp tomato paste
  • 10 garlic cloves, smashed
  • 30 mint leaves, more or less to taste
  • 1/4 c extra virgin olive oil
  • water

Directions

  1. Place cumin seeds in a small frying pan over med-high heat. Keep the pan moving and toast the seeds until uniformly brown and fragrant — no more than 2 minutes. Immediately remove from pan and reserve.  Repeat with coriander seeds and then the caraway. Once all are cool, place in spice mill or mortar and grind. (See Notes)
  2. Place the ground spices. Habanero and Fresno chiles, paprika, and salt into the bowl of a food processor and run until a thick paste has formed.
  3. Add the mint leaves and pulse the contents until mixed.
  4. Add the oil and process. If you prefer your harissa sauce to be thinner, add water until it reaches the consistency you like.
  5. Harissa is ready to use as-is, though it will be better after a few days, once the flavors have a chance to blend a bit.

Refrigerate in an airtight container. Celia recommends adding a thin coat of olive oil before storing. Harissa should be used within a couple of weeks.

With special thanks to Celia, Fig Jam and Lime Cordial, and Mimi, Chef Mimi Blog

*     *     *

Notes

It is best to toast seeds of varying sizes separately. When toasted together, the smallest seeds will likely burn while you wait for the larger ones to toast.

*     *     *

It’s déjà vu all over again …

Swordfish 1Today’s blast from the past, swordfish served with salsa verde, carries with it a message. See those grill marks, Old Man Winter? We want to start grilling but can’t so long as you stick around. Take the hint, vacate the North, and head to the Southern Hemisphere, where they eagerly await your cooler temps and much-needed rain. The rest of you can click HERE to learn how to prepare this dish.

*     *     *

Coming soon to a monitor near you …

Pasta e Fagioli 2Pasta and Beans

*     *     *

The Bartolini Have Hit The Road!


Going for a Ride

If there’s one thing we Bartolini enjoy as much as a dish of pasta, it’s a good old-fashioned road trip. So, when one such opportunity presented itself, I shut down the Kitchens, packed up the car, and headed out — to Washington D.C.

Now, I just didn’t pick D.C. as a destination out of thin air. No, the Kitchens’ good buddy and fellow blogger, Jed, recently invited me to guest host at his blog, sports-glutton.com. There he leads a team of sportswriters that covers the world of sports, offering ego-free commentary and well-reasoned conclusions. With every post, each of these gentlemen offers true insight into his respective field of expertise. Sounds pretty good, huh? Yeah? Well, wait! There’s more.

Jed and his wife, Liz, share recipes that are sure to appeal to the latent glutton in each of us. From appetizers to desserts, and all dishes in-between, these two know their way around a stove — and campfire.  And just when you think sports-glutton.com couldn’t get any better, Thursday arrives. That’s the day that Jed reviews, one bottle at a time, a wide variety of beer and wine. Whether you’re in the mood for a Japanese ale or a Chilean Pinot Noir, not to mention a Wyoming micro brew or whiskey from Utah, this is the place to check before you go shopping for spirits.  Drat! I’ve gotten ahead of myself. You see, every Monday Jed starts off the week with a bit of humor. Think of it as you would a refreshing sorbet, preparing you for his posts to come.

How’s that for a blog? There’s quite literally something for everyone.

So, as you can well imagine, when asked to take part in his  MLB Recipe Series, I could hardly refuse the honor and jumped at the chance. Now, for the uninformed, every Wednesday of the Major League Baseball season, Jed celebrates a different team by offering a recipe that, in some way, is connected to that team. Being a Cubs fan, I contributed my recipe for Jack Brickhouse Chicken, for reasons that will become clear when you follow me to Jed’s place by clicking here to read my guest post. Once you’ve checked out my recipe, be sure to take a look around. You’re sure to find something of interest.

Thanks, Jed, for the honor of participating in your series, allowing me to share a recipe commemorating our Cubs. One of these years …

*     *     *

Regular programming will resume at the Bartolini Kitchens next week, once I figure out a way to explain to Max that we’re not really going anywhere.

Coming soon to a monitor near you …

Asparagus Ravioli made with Duck Egg Pasta

*     *     *

The Kitchens Have Gone To The Dogs: Jerky Treats For Your Pupster

As many of you know, I share my home with Max, a boxer-mix that, despite being 4 years of age, remains more puppy than dog. I’m told it is the boxer in him and that they never grow up. What luck! Now, I’ve no intention of using today’s post to detail his many transgressions. Rather, since tomorrow is the 4th anniversary of his adoption, I thought I’d share the recipe for one of his favorite treats, jerky.

When Max was a puppy, I decided to switch him to a grain-free diet once he outgrew his puppy food.  I regulate his diet in other ways but I’m no expert and this is not the forum for that discussion. (If anyone is interested, drop me an email and I’ll be happy to explain what Max is fed and why.) The only grain Max eats now is the wheat flour in the peanut butter biscuits I bake for him (recipe courtesy of Linda at Savoring Every Bite).  He, and all of his mates, love those biscuits and I’m not about to deprive him of them. Much to his delight, he also gets one “all natural” Bully Stick per day and a couple of jerky-type treats. It’s the jerky treats that bothered me. Speaking with my Traveling Companion, we were both concerned about the meat and preservatives being used to make them. The brand that I had been purchasing, for example, was an American-owned company but the jerky was processed elsewhere. I didn’t like the sound of that and decided to see if I could make my own. As it turned out, making dog jerky at home is a surprisingly simple endeavor, although some web sources insist on complicating matters. Some, for example, soak the meats in marinades and almost all season them  before baking in a very low oven. Although I tried one such recipe for my first batch, I never did it again. My jerky treats are 100% meat that is intended for human consumption and absolutely nothing else. The next batch I made was beef, followed by one of chicken. Both were baked on cooling racks that were placed on baking sheets. I thought that this would help the meat strips to dehydrate more evenly — and it did. The problem came when I removed the second batch, the chicken, from the racks. Some of the racks’ non-stick coating stuck to the chicken strips. It may have happened with the first batch but, being beef and dark-colored, I hadn’t noticed. So, rather than risk my canine tasters’ health, both batches of jerky and the racks were taken to the garbage. I now have new racks but they aren’t necessary to get the job done, as you’ll soon see.

*     *     *

The Bartolini Kitchens’ Canine Tasters, Bea and Max

*     *     *

Home-Made Jerky For Dogs

No matter what type of jerky is to be made, I find it easier to partially freeze the meat before cutting it into strips. I buy chicken tenders when on-sale and use them for Max’s chicken jerky, but any skinless, boneless part of the bird will do. Try to slice equally sized pieces and always cut with the grain. When using tenders, I cut each in half, creating 2 long strips of about equal size. (Exceptionally large tenders can be cut into 3 strips.)  When making beef jerky, use the cheaper cuts of beef. No dog will mind if you use chuck instead of tenderloin. Cut the meat against the grain into thin strips, equally sized. No matter the kind of meat you’re using, once it’s cut and fully thawed, place some of the strips, evenly spaced, between sheets of plastic wrap or wax paper. Use a meat pounder, rolling-pin, or even a frying pan to flatten the strips until they are all of equal thickness. This will insure that they will cook evenly. Place the strips on baking sheets that have been lightly sprayed with cooking spray. If using racks, spray the racks with cooking spray, place on baking sheets, and place the meat strips onto the racks. In both cases, no strip should be touching another.  Place the baking sheets in a pre-heated 170˚F (my oven’s lowest temperature setting). Bake 6½ hours, turning over each strip every 2 hours while rotating the trays. When finished, remove, cool, and store.

*     *     *

*     *     *

Notes

Being I don’t use a dehydrator nor preservatives, I’m very careful to ensure the jerky doesn’t spoil. Using airtight containers, I store in my refrigerator only as much jerky as will be used in a 3 day period. All of the rest is kept in the freezer until needed. Do not make so many that they’ll be in the freezer for more than a month. Of course, if your dog is at all like Max, there’ll be no need to thaw the treats. Now he comes running every time he hears me open the freezer door.

Every dog owner learns that abrupt changes to the pet’s diet can result in digestive problems. That’s because it takes time for a dog’s digestive system to develop the necessary bacteria to properly process a new food. Depending upon your dog and its diet, you may need to introduce these treats to it slowly to give its digestive system time to adjust. This is especially necessary if you’ve chosen to season or marinate the meat before cooking. It shouldn’t take any more than a couple of days for the dog to get “acclimated” and then you’re free to give your pet as many as you like.

*     *     *

 The lion sleeps tonight.

*     *     *

Before You Buy Another Bag Of Jerky Treats For Your Pooch

Although I wrote this entry several weeks ago, I scheduled its posting to coincide with Max’s adoption date. Unfortunately in the interim, a friend sent me a link to this MSNBC article of March 13th, 2012, which seems to confirm our worst fears about some brands of store-bought jerky treats. Be aware: just because the packaging says it is an American-owned company does not mean that the meat or finished product originated in this hemisphere, let alone country. Google is your friend.

*     *     *

Chicken gizzards? No way!

Admittedly, dishes featuring chicken gizzards are a hard sell and some of you will go no further than the picture above (Just click HERE, Cynthia.) and that’s fine.  Believe me, the majority of my family will be going with you. Since this blog was conceived as a means of recording and sharing my family’s recipes, however, I’d be remiss if I failed to mention these two. Who knows? Some future Bartolini Clan member may wish to know how to cook chicken gizzards and they won’t need to look any further than right here.

Mom and Zia were little girls when the Great Depression struck and our family, like so many others, was hit hard. By all accounts, these were lean times and our Grandparents struggled to put food on the table and keep a roof over their heads. Both Bartolini Girls marvel(ed) at how Grandma could make a single chicken last a full week, feeding a family of four in the process. Well, that’s when she could get a chicken. Both of today’s recipes come from that time. Mom often served us the first, a side dish of peas with gizzards, when I was growing up. No need to explain why it wasn’t an especially popular dish with my siblings. The second is a pasta dish that I “created” on my own. I remember telling Mom about it and, somewhat surprised, she recalled that Grandma used to make the same dish. Zia has mentioned that, as well. Since neither had ever mentioned or served me this pasta, I think it’s a sign that Grandma wants this dish prepared and, by sharing it here, I’m just doing my part to see that her wish is carried out.

I can’t speak of packaging during the Depression but, in today’s markets, one can usually find chicken gizzards and hearts sold together in 1 pound containers. Once cleaned and trimmed, I’ll divide them, with a quarter being reserved for the peas dish and the rest for pasta. One of the 2 portions will be set aside, even frozen, for later use. Cooking these meats can be a little tricky. To brown them like one would, say, beef chunks for stew, will render them nearly inedible. That shouldn’t be a problem if you follow the steps outlined in the recipes that follow.

*     *     *

Peas alla Nonna Recipe (aka Chicken Gizzards with Peas)

Ingredients

  • 5 or 6 oz chicken gizzards & hearts, cleaned and trimmed
  • 1/2 small onion, divided in halves
  • water
  • 1 tbsp olive oil
  • 2 tbsp butter
  • 1 plum tomato, chopped
  • 2 cups frozen or fresh peas
  • pinch of cloves
  • salt and pepper, to taste

Directions

  1. Place gizzards, half of the onion, and enough lightly salted water to cover into a medium saucepan, Cover, bring to a boil over med-high heat, and reduce to a soft simmer. Cook for 1 hour, checking periodically to ensure enough water remains. At the end of an hour, pour the pan’s contents through a strainer, discarding the onion and stewing liquid.
  2. Slice the remaining onion portion and roughly chop the stewed meat.
  3. In the same pan, heat oil and butter over medium high heat. Return gizzards to the pan, along with the sliced onion, and sauté until the onion is soft and translucent.
  4. Add tomato and sauté for a minute before adding peas, cloves, and a few tbsp of water to the pan. Season with salt and pepper, cover, and cook about 5 minutes or until peas are done to you liking.
  5. Serve immediately.

*     *     *

Pasta with Chicken Gizzards Recipe

Ingredients

  • 12 – 16 oz chicken gizzards & hearts, cleaned & trimmed
  • 2 tbsp extra virgin olive oil
  • 1/2 onion, chopped
  • 3 cloves garlic, minced
  • 1/2 cup dry white wine
  • 2 to 3 tbsp tomato paste
  • 1 large (28 oz) can tomatoes, whole or diced
  • 3 tbsp fresh parsley, chopped
  • 1 lb pasta, cooked to not quite al dente
  • grated parmesan cheese
  • salt and pepper, to taste

Directions

  1. Heat oil in a deep skillet over medium heat. Add gizzards and cook for 5 minutes. Do not allow to burn.
  2. Add onion, season with salt and pepper, and cook until translucent.
  3. Add garlic and sauté for 1 minute before adding the wine. Cook until almost all the wine has evaporated.
  4. Add the tomato paste and sauté for 1 to 2 minutes. Add parsley and tomatoes. If using whole tomatoes, tear them apart before adding to the pan. Season with salt and pepper.
  5. Bring to a boil, cover partially, and reduce to a soft simmer.
  6. The sauce should cook for 45 minutes. Check the pasta’s package directions and time its cooking so that the pasta is about 2 minutes shy of being al dente when the sauce is ready.
  7. Reserve some of the pasta water before adding the pasta to the frying pan. Mix well and continue cooking until the pasta is done to your liking. Add some of the reserved pasta water to the pan if the pasta becomes dry during this last step of the cooking process.
  8. Serve immediately, garnished with the grated parmesan cheese.

*     *     *

Notes

And so ends our treatment of chicken gizzards and hearts. Oh, don’t you worry. We’ll be coming back to these ingredients when the Bartolini Family Risotto recipe is shared. That won’t be for a while, however, so, all you chickens out there can rest easy. Your giblets are safe — for now.

*     *     *

Chicken Parmesan

As is the case within most families, birthdays were special events in our household and Mom would fix whatever dish the birthday child desired. For me, that choice was always veal parmesan. Mom served it with home-made pasta and I was one happy boy. Nowadays, I tend to avoid veal but I can’t avoid this dish nor the memories it evokes. So, instead of  veal, I use chicken. It may not be the same but it’s close enough — and certainly good enough — for me.

*     *     *

*     *     *

To begin, I start with boneless, skinless chicken thighs, which are fried after being floured and breaded. They are then placed into a baking dish, smothered in marinara sauce, and topped with sliced mozzarella & grated parmesan cheese before being baked in the oven. Yes, this recipe can make a mess of your kitchen but the pay-off is well worth the effort. The only advice in this area that I might offer is to clean as you go. When the marinara sauce is simmering, clean the work area and utensils. The same goes with the breading station as the chicken is being fried. When the final dish is in the oven, put the rest of the mess into the dishwasher (I hope you have a dishwasher) and start it running. Take it from one who’s been there, your kitchen will resemble a disaster area if you put off the cleaning until after you’ve eaten dinner.

*     *     *

Chicken Parmesan Recipe

Ingredients

  • 1 quart Marinara Sauce
  • 1 pkg boneless, skinless chicken thighs (5 or 6 thighs)
  • 1/2 cup all-purpose flour
  • 1 – 1 1/2 cups bread crumbs
  • 3 tbsp fresh parsley, chopped
  • 1/2 tsp garlic powder
  • 1/2 tsp onion powder
  • 2 eggs
  • 2 tbsp milk
  • 3 tbsp olive oil, more as needed for frying
  • 1 large ball of fresh mozzarella, sliced thinly to provide a slice for each thigh
  • 1/2 cup freshly grated parmesan cheese
  • salt & pepper

Directions

  1. Set up a breading station. Place the flour in one dish; combine the eggs & milk and place into the center dish; and in the third dish mix the bread crumbs, garlic powder, onion powder and parsley. Season each thigh with salt & pepper. Use the standard breading technique and begin by coating each thigh with the flour, one at a time. Shake off the excess flour before coating the thigh with the egg mixture. Allow the excess to drain a bit and dredge the thigh in the bread crumbs.  Set the breaded thigh aside and repeat with the remaining chicken pieces.
  2. Place oil in a large frying pan and heat over med-high heat. Working in batches, fry the breaded thighs until each side is golden brown, about 5 minutes per side. If necessary, replenish the oil between batches.
  3. Pre-heat oven to 375*.
  4. Liberally butter or use a cooking spray to coat a 9 x 13″ baking dish.
  5. Coat the bottom of the dish with a few ladles of the marinara sauce.
  6. Place the fried chicken pieces into the dish and use the rest of the tomato sauce to cover them all.
  7. Evenly sprinkle the dish with the parmesan cheese and then position one slice of mozzarella on top of each chicken piece.
  8. Cover with aluminum foil and bake in a pre-heated oven for 20 minutes. Remove the foil and continue baking for another 20 minutes.
  9. Remove from oven and allow to rest 10 minutes before serving.

Variations

Originally, Mom shallow-fried the veal in about 1/4 inch of vegetable oil. Initially, I did the same with the chicken pieces but, over the years, eventually cut out most of the oil in favor of a few tbsp of olive oil. Use whichever method you prefer, so long as the breaded pieces are golden brown when you’re done.

Mom never baked her veal parmesan and you needn’t bake this dish either. In a large, deep frying pan with a lid, add enough sauce to generously coat the pan’s surface, add the coated, fried chicken pieces, and cover with more sauce before sprinkling with grated parmesan cheese and topping with mozzarella slices. Cover the pan and cook over medium heat until the chicken is fully cooked, about 30 minutes. Use an instant read thermometer when in doubt.

I use chicken thighs but chicken breasts, tenders, or whatever chicken parts you prefer can be substituted. You may find, however, that boneless pieces work best. No matter what part(s) of the chicken you use, just be aware that the cooking times may vary, so, again, use an instant read thermometer to ensure the meat is thoroughly cooked.

Notes

The dish, as shown, was prepared “family style” and I wouldn’t necessarily serve it this way for guests.  Here, the chicken pieces are pretty much blanketed by a coating of cheese. If I were serving guests, I would be more careful with the cheese placement, using less cheese and restricting it to the individual chicken pieces. For “family,” however, I’ll go with the cheese blanket and I haven’t had any complaints yet.

*     *     *

Mom’s Chicken (that’s not really) Cacciatore

I Dig It Mom's Way

Traditionally, pollo alla cacciatore (hunter-style chicken) features chicken, pan-braised in a tomato sauce with mushrooms, served over pasta, very often spaghetti. I say “traditionally” because this is not the cacciatore Mom made. Her recipe did not result in a tomato sauce and Mom never served this dish over pasta. Although I will agree with the purists who’ll be quick to point out that this is not a true cacciatore, I very much prefer it Mom’s way if, for no other reason, than that I already make a number of tomato-based sauces. Making another one with chicken holds little interest for me. All of this doesn’t mean that tomatoes aren’t used in this recipe. I’ll add a diced tomato or about a tbsp of tomato paste “for color,” as Mom would say. Additionally, this recipe uses chicken thighs with the skin-on and bone-in because the combination adds so much flavor to the final dish. Of course, you may use whatever chicken parts you wish, with or without skin or bones, but your choices may affect cooking times. Use an instant read thermometer when in doubt. If you do not wish to use wine, one cup of chicken broth/stock may be substituted.

*     *     *

Mom’s Chicken (that’s not really) Cacciatore Recipe

total time: about 75 minutes.

yield: 5 or 6 servings

Ingredients

  • 1 pkg chicken thighs (5 or 6 thighs), with bone-in and skin-on
  • 2 tbsp extra virgin olive oil
  • 3 slices of bacon (or 1/4 lb. of pancetta),  chopped
  • 1/3 cup all-purpose flour
  • 1 large yellow or sweet onion, halved and sliced
  • 3 cloves garlic, sliced
  • 1 bell pepper, cut into strips
  • 8 oz. crimini or button mushrooms, sliced
  • 1 tomato, diced, or 1 tbsp tomato paste
  • 2 – 3 tbsp fresh rosemary, chopped
  • 1 cup white wine (or low-sodium chicken stock/broth)
  • 3 tbsp capers (optional)
  • 3 tbsp fresh parsley, chopped, for garnish
  • salt & pepper, to taste

Directions

  1. Heat olive oil in a large frying pan with lid over medium heat. Add bacon/pancetta and cook until crisp and the fat is rendered. Remove meat from pan and drain over paper towels.
  2. Meanwhile, season chicken with salt & pepper. Place flour in a plastic bag, place 2 chicken pieces in bag, and shake to coat. Remove chicken to a plate and repeat until all the chicken is coated with flour.
  3. Once the bacon/pancetta has been removed from the frying pan, increase the heat to medium-high and add the chicken pieces, skin-side down. Sauté until chicken is lightly browned, about 5 – 6 minutes, turn the chicken pieces over, and sauté until they, too, are lightly browned — another 5 minutes or so. Remove chicken to a plate.
  4. Remove all but about 3 tbsp of oil from the frying pan. Add the onion and begin sautéing. Lightly season with salt & pepper. Use a wooden spoon to clean the pan’s bottom of the brown bits. (These are where the flavor is.)
  5. After about 5 minutes, add the garlic & bell peppers and continue sautéing.
  6. After 5 minutes more, add the mushrooms.
  7. 5 minutes later, add the tomato/paste and sauté for 2 – 3 minutes. Season lightly with salt & pepper.
  8. Return the bacon/pancetta to the pan, season with the rosemary, return the chicken to the pan, and add the wine.
  9. Bring the pan to a boil before covering and reducing heat to medium-low.
  10. Continue cooking for 45 minutes or until chicken is fully cooked. (Use an instant read thermometer if in doubt.) Periodically, throughout the cooking, slightly shift the chicken pieces to prevent their sticking/burning. If the pan looks too dry, add a little water/chicken broth.  A few minutes before serving, sprinkle the capers over the pan’s contents. Taste the sauce to see if salt or pepper is needed.
  11. When finished cooking, remove to a serving platter and garnish with parsley.

Variations

Strictly speaking, I do not have any variations for this recipe. It’s pretty much the same recipe that Mom used. Where we part ways is in the serving. As was mentioned earlier, Mom never served her cacciatore over pasta.  On the other hand, I’m a pasta fanatic and I’m always on the look-out for ways to include pasta in a meal. For me, this recipe is delicious when served over wide noodles that have been buttered and lightly sprinkled with freshly chopped parsley. And on those extremely rare occasions when I’m not in a pasta mood, I’ll serve it atop polenta. Either way is aces in my book.

*     *     *