You, too, can make Pizzoccheri Pasta at home!

Today, I will once again stray from the Bartolini recipe file and show you how to make another pasta. This one, made with buckwheat, is called pizzoccheri, and originated in the most northern part of the Italian peninsula.  I first heard of this pasta, and its namesake dish, from a fellow blogger “MusingMar” when she shared the recipe for this unusual dish last February in her blog, Life Through the Kitchen Window. If you’ve not met Mar, I hope you take a few minutes to visit her WordPress “home”. Similar to my documenting my family’s recipes for future Bartolini, Mar is gathering her recipes as a gift for her children. And what a gift it will be! Her blog features  delicious recipes that are well-written, easy to follow, and beautifully photographed. One day, her kids will thank her but, in the meantime, we’re welcome to have a peak and even “borrow” a few.

When Mar posted her recipe for pizzoccheri, she called it “Italian Comfort” — and is it ever! This pasta dish features potatoes and cabbage, with some butter, garlic, and sage thrown in for good measure. Oh! Did I mention the Fontina and Parmesan cheeses? Yes, this is one hearty dish, made even more so by its buckwheat noodles. And this is where I got involved. When Mar posted her recipe, she mentioned that she makes it with regular fettuccine since she’s been unable to find buckwheat noodles. She asked if I could be of help. Well, I love a challenge, so, of course I agreed.
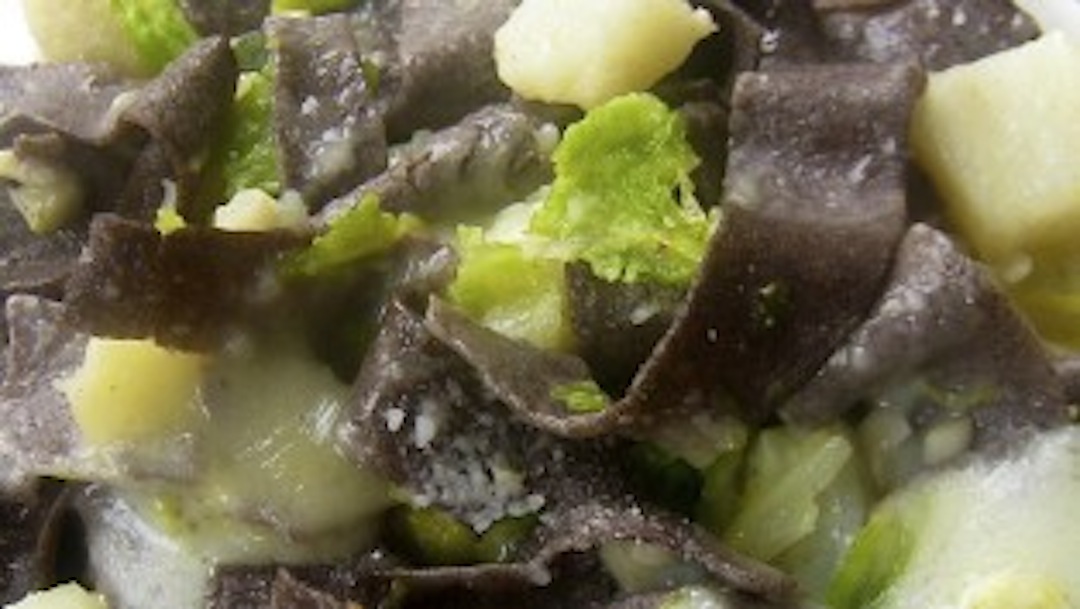
 *     *     *

"Italian Comfort"

 *     *     *

First, I searched the web and learned that the dish originated along Italy’s border with Switzerland. As Mario Batali is quick to point out, the northern districts of Italy use eggs and “double zero” flour  in their pasta dough and, as you travel south, the flour is mixed with semolina and water is used with the eggs. When you get to the very south, the dough can be all semolina with little or no egg used at all. Well, since this pasta came from the extreme north, chances are its dough was all double zero flour and eggs, without any semolina or water used. Knowing that, I began searching the web and weeded out recipes that didn’t seem to have originated in the north. One memorable recipe used Grappa and Vermouth!?!? Seeing that, I decided to go ahead and trust my own instincts.

Based roughly on Mom’s dough recipe, I used a 4 to 1 ratio, meaning 2 cups of buckwheat flour and ½ cup of  all-purpose (AP) flour. I also used 3 eggs but the dough was too dry and I had to add some liquid. An egg would have been too much so I added about 2 tbsp of water to the food processor. After it rested for 30 minutes, I treated it like I would any pasta dough and cut the pasta by hand. In all, I ended up with a little over a pound of pizzoccheri pasta. While they cooked up just fine, the pasta broke into small pieces when everything was assembled for the oven and, although the finished dish tasted great, it certainly wasn’t the most appealing thing I’ve ever served myself. Not only that, since I used the entire batch of pizzoccheri pasta in the dish, I had plenty — and I do mean plenty — of pizzoccheri to eat during the following week. As luck would have it, pizzoccheri week was followed by the boiled dinner days of March. One could say that I enjoyed more than my fair share of cabbage during that time period and pizzoccheri was off of the menu for a spell.

Finally, this past Friday I decided to try again. Having spoken with Zia, we agreed that my first attempt failed because it needed more gluten to hold the noodles together and that I rolled the dough too thin.  This time around, I used 2 parts buckwheat flour to 1 part AP flour. Again, I only used eggs and the dough handled much better, although still not as easy as regular pasta dough. Once the dough was made, I followed Mar’s recipe and this time the noodles “survived”. This pizzoccheri was not only delicious but it looked great, too. Success!

Today’s recipe is from that final, successful attempt. Although I only made 12 oz. of pasta, you can easily adjust the recipe to make more or less, depending upon your needs. As mentioned above, use a ratio of 2 parts buckwheat flour to one part AP flour and I estimate 1 egg is needed for every 75g of flour. Be aware that buckwheat flour is heavier than AP flour and that’s why I used weight, rather than volume, measurements the second time around. (Where volume measurements are given in the recipe that follows, they are my best guess approximation.) Your dough will be a little more moist than normal pasta dough but should not be sticky. This dough dries faster than most and the extra moisture will be needed as your roll it out and cut the pasta. Work quickly and do not roll it as thin as you normally would for fettuccine or pappardelle. Additionally, do not allow the sheets to dry as much as you would normal pasta before it’s cut into noodles. If it is too dry, the pizzoccheri dough sheets will become brittle and break as you prepare to cut them by hand or when passing them through your pasta cutters. As complicated as this all may seem, once you start working with the dough, especially if you’ve pasta-making experience, you’ll see what I mean. Really, it’s a little tricky but not nearly as impossible as this may sound.

 *     *     *

How To Make Home-Made Pizzoccheri Pasta

Ingredients

yield: approx 12 oz pasta dough

  • 150 g buckwheat flour (about 1¼ cups)
  • 75 g AP flour (about  ⅔ cup)
  • 3 large eggs
  • pinch of salt

Directions

  1. Place all ingredients in a food processor and process until a dough ball forms, usually within about 30 seconds.
  2. Remove dough and knead on a floured surface for a few minutes. Cover with an overturned bowl or plastic wrap and allow to rest at least 30 minutes and no more than 60. If you must rest dough longer than an hour, refrigerate it until you’re ready to roll it out.
  3. To roll the dough:
    1. If using a rolling pin, roll the dough until about twice as thick as you would when making fettuccine.
    2. If using a stand mixer rolling attachment or hand cranked pasta machine with “1” as the widest setting, pass the dough repeatedly through the rollers, increasing the number setting each time, up to and including the “4” setting.
    3. If your roller gizmo’s widest setting is “10”, pass the dough repeatedly through the rollers, decreasing the number setting each time, up to and including the “6” setting.
  4. Allow dough sheets to dry a bit but not as much as you would for normal pasta dough.
  5. Cut each sheet into 12 inch sections.
  6. If using stand mixer or hand cranked pasta cutters:
    1. Pass the sheets individually through the largest pasta cutters, usually fettuccine-sized.
    2. Place newly cut fettuccine aside on a floured surface and repeat the process for all the dough sheets.
  7. To cut by hand (see poorly focused pictures below):
    1. One by one, lightly flour each sheet, fold it in half, then in half again.
    2. Using a sharp knife or pastry cutter, trim off the  2 ends of the folded dough sheet (sfoglia).
    3. Cut your noodles. Tagliatelle are no less than ¼ inch (6.4 mm) wide. Fettuccine are no less than ⅓ inch wide (8.4 mm). Pappardelle are no less than ½ inch (12.7 mm) wide.
    4. Unroll the cut sections to produce the noodles, place the newly cut pasta aside, and repeat the process until all the dough sheets have been cut.
  8. When finished, cover the noodles with a clean kitchen towel and use ASAP in Mar’s pizzoccheri recipe.

 *     *     *

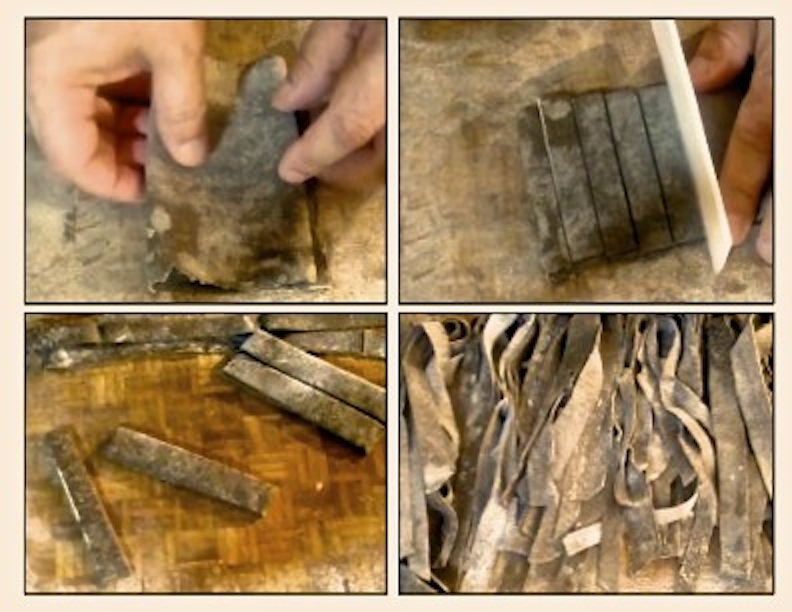
The dough sheets must be well-floured to prevent them from sticking when folded and cut.

 *     *     *

Now, I realize that  this may seem like a difficult process just to make some pasta, especially for the inexperienced pasta maker. As I’ve mentioned, if you’ve made pasta at home, my precautions will make sense and this will probably not seem so difficult. If you haven’t,  I’d suggest you start with a regular pasta dough recipe (see Mom’s Pasta Dough) before attempting this one. This dough is not nearly as “forgiving” as normal pasta dough and, as such, is not a good dough to use when learning the ropes of pasta making. Besides, you can always use regular fettuccine or tagliatelle noodles in your pizzoccheri or, if you must have buckwheat, try soba noodles. Don’t let your noodle prevent you from enjoying a great dish!

And thank you, Mar. When all is said and done, I learned both a new recipe and how to make buckwheat pasta. Not a bad outcome.

 *     *     *

Dad and his Dandelions

Today’s recipe was a recurring star of quite a few springtime dinners at the old two-flat. There’s nothing particularly special about the salad, once you get past the idea that you’re dining on dandelions. No, for my generation of Bartolini, it’s not so much the recipe as the circumstances surrounding it that we recall somewhat fondly. This is especially true for Sis and I. You see, whereas most people see crocus and daffodils in bloom and think “Spring!”, a Bartolini sees these very same things and thinks, “Cicoria!” Well, maybe not so much now anymore but certainly back in the day.

 *     *     *

Dad’s Dandelion Salad

*     *     *

When the lawns started to green each Spring, the adults in the old two-flat became wild chicory and dandelion pickers. We kids, depending upon our age, also took part.  When very young, Mom & Zia would take us to some parkland where we’d play as they “harvested” the tender,  young dandelions growing about. A couple of years would pass and we would be considered old enough to join in on the fun. We were each given our own butter knife, shown how to cut the greens out of the ground, and taught to leave the area if “traces” of dog were spotted.  So, off we proudly went, with knife in one hand and an Easter basket in the other. That’s right. Our Easter baskets were re-purposed each Spring and used to carry the harvest.

Now, Dad loved his cicoria & dandelions and Sis & I often went with him, spending Sunday mornings after Mass picking dandelions. We loved every minute of it — until we were around 8 or 9 years of age. It was about that age when we learned that not all kids spent Sunday mornings picking dandelions. In fact, we were the only ones to do so. Peer pressure being what it was, we began to balk at the idea of spending Sunday mornings picking weeds. Did that stop Dad? Not in the slightest, for Dad’s love of dandelions knew little of, nor cared about, peer pressure. If anything, Dad’s peers probably encouraged him to get out there and pick those greens. For Sis and I, it wasn’t so much that he picked the greens, it was when and where he chose to do it.

You see, the old two-flat was on the same block as the parish church and about a half mile from both was a freeway. Having attended an early morning Mass, Sis and I would jump into the back seat of the car and off we’d go with Dad as he ran errands and stopped for “un caffè” with friends or family. That first part of the ride was fraught with anxiety for Sis and I. If Dad turned left at the Church, we were fine. It’s when he turned right that we began to get nervous — and it grew worse as we approached the freeway. If he turned anywhere before the overpass, we breathed a sigh of relief and all was well.  The same held true if we drove over and beyond the bridge. It was only when we heard his turn indicator as we drove on the overpass that we knew we were heading for the freeway and trouble! “Please, Dad, NO!” As soon as he made the left turn, Dad pulled the car onto the entrance ramp’s shoulder, no more than 10 feet from the corner.  There, in full view of our fellow parishioners — and classmates — walking to-and-from Sunday Mass, Dad pulled out his penknife & paper bag and started picking weeds, while Sis and I, mortified, dove for cover in the back seat. How could he do this to us! Two forevers later, he’d return to the car and off we’d go to the park where the pickings would be better, or so Dad said. We didn’t care. We just wanted out of there!

 *     *     *

Dandelion Salad

 *     *     *

Looking back, and hindsight being what it is, I’m pretty sure that Dad stopped along that ramp for more than just some dandelion greens. To begin with, Dad was a practical joker and he probably stood outside of the car and laughed as Sis and I tried to hide ourselves in the back seat. And although at the time it seemed like an eternity, we were actually parked there for only a few minutes and Dad never returned with more than a few greens, if any. No, we always needed to go to the park afterward and, suddenly, Sis and I were more than happy to accompany and even help him, proving there’d be no need to ever stop on that ramp again. As a result, we had all the greens Dad needed in no time flat and soon we were on our way to our next stop.

See what I mean? In today’s vernacular, we got played!

 *     *     *

Preparing a Dandelion Salad

Although I’ve seen dandelion greens in produce markets, the leaves are very large and usually served cooked. We use are the tender new plants that begin to grow in early Spring. Look for dandelions in areas where there is little chance of fertilizer or weed killer having been used and as far away from dog “traffic” as possible. Open parkland is good, as are rural fields.  Look for young plants. If it has a bloom, it’s likely too old and too large. Once you’ve found one suitable for harvesting, use your knife to sever the plant from its roots below ground level. Continue harvesting until you’ve enough for your needs. I normally pick enough for a minimum of 2 salads.

Once home, soak the greens in cold water. One by one, rinse under running water and trim away any off-color leaves and all of the (brown) root stem.  There may be underdeveloped flower buds in the heart of the plant. I remove them; you may prefer otherwise. Depending on the size of each plant, you may wish to cut it in half or, by trimming off the very bottom of the plant, separate the individual leaves. Place trimmed greens in cold, fresh water and continue until all are cleaned and trimmed. Dry the greens and reserve enough for your salad. Wrap the rest in a paper towel, seal in a plastic bag, and refrigerate. The greens will stay fresh for a few days if stored properly.

The salad itself is really quite basic and you may wish to add more ingredients. Our insalata consists of dandelions, some sliced onion, chopped hard-boiled eggs, a dressing of oil & red wine vinegar, and seasoned with salt & pepper. That’s all there is to it and I believe that’s because the greens were special and only available for a few weeks every Spring. Keeping the salad simple ensured that the tender dandelions took center stage and their flavor wasn’t overpowered. Make yourself one of these insalate and you’ll find it a tasty little salad and, like asparagus, a great way to bring Spring to the dinner table.

And if you’ve children, you may wish to borrow a page from Dad’s parenting book. Keep an old butter knife and bag under the driver’s seat of your car. If the kids are “acting up” in the car, just drive by a favorite playground or practice field and announce that the dandelions look delicious and that “Everyone’s going pickin’!”  I’m willing to bet that you’ll only need to get out of the car one time, if at all, especially if you wave to their friends as your drive up to the curb. Best of all,  you’ll give them a great memory to recall when they reach — ahem — middle age.

 *     *     *

The Easter Bread of Le Marche

Crescia al Formaggio 

Let me say from the onset that this is not one of the Bartolini Clan’s recipes. Well, at least I didn’t think so. In any event, I think you’ll be surprised when you learn where it came from. I know I was …

*     *     *

Crescia al Formaggio

 *     *     *

You may recall last Christmas I posted a baccalà recipe called Baccalà alla Marchigiana, in honor of Zia and her Mother-in-Law, Nonna. Shortly after it was posted, I began getting referrals from a website called Scoop.It. I followed the links back and within that website is another that highlights Le Marche, the district of Italy that Mom’s family, the Bartolini, came from. I was very surprised to see that our baccalà recipe was listed in a collection of Le Marche’s Christmas Eve dishes. Well, of course I subscribed and now I receive an email every week and depending upon the content, I may check out that week’s posts. Nothing unusual here, eh?

Last week, I received one such email and it featured the traditional Easter bread of Le Marche, Crescia al Formaggio. I’d never heard of this bread and just had to check it out. Shaped somewhat like a traditional Italian Christmas panettone, this bread is an egg bread that is loaded with cheese. Since this wasn’t a recipe of the site’s owner, Mariano Pallotinni,  a link was provided to its origin. I took the link and, once there, I immediately checked out the recipe and liked what I saw. I was especially pleased to see that I already had all the ingredients needed, meaning there’d be no run to the store on a cold, rainy day. So, not wishing to lose the page, I went to the URL to bookmark it. That’s when I noticed the website responsible for this authentic Marchigiani Easter bread was none other than the King Arthur Flour Co. website!!!

Once I got over the shock, I remembered that I’ve relied on the KAF website for other breads and the results were always good and, most importantly, consistent. Why not give this one a go? Well, I did and it’s been a while since I’ve enjoyed a new bread recipe as much as I enjoyed this one. Although the dough bears the characteristic yellow of an egg bread, there’s no mistaking that there’s cheese in the loaf, as your kitchen soon fills with the aroma of cheese bread baking in the oven. Nor is there anything shy about the flavor of cheese in the finished loaf but, if that’s not enough, there’s also a healthy bit of pepper added to give one’s palate a bit of a bite. No doubt about it, this is a bread I’ll bake again and again, whether or not it’s Easter.

*     *     *

Just chillin’

*     *     *

Oh, yeah. There’s one more thing about this recipe that came as a surprise. Last Friday, I baked the loaf pictured within this post. On Sunday, I spoke with Zia and told her about the bread recipe I found via a Marchigiani website. As soon as I mentioned “Crescia al Formaggio,” Zia recalled the cheese bread that Grandma made at Easter when she and Mom were little girls. Of course, she couldn’t remember exact amounts but the 2 ingredient lists are pretty much the same, except that Grandma used Swiss cheese instead of the Asiago that I added. Considering she was baking this bread during the worst of the Great Depression, we both agreed that Grandma probably used whatever cheese she had on hand. So, for those keeping track, this KAF recipe has now been authenticated by 2 sources. although I honestly cannot believe the path it took to come back to my family’s kitchens.

Before I send you to the websites, I want to clarify a couple of things. The recipe calls for 1¼ cups of cheese and suggests using Parmesan, Pecorino Romano, and/or Asiago cheeses. I combined equal parts of Pecorino and Asiago. Luckily, someone in the KAF Comments section asked for the amount of cheese needed by weight rather than volume. They responded that the required 1¼ cups of cheese equals a weight of 6 oz. With that, I followed the recipe exactly and, as I said, was very happy with the results. Wish I could say the same for my braiding skills. Having neither a panettone nor brioche pan, I followed the suggestion of braiding the dough. As you’ll see, my braid leaves much to be desired. Next time, I’ll follow Grandma’s lead and just make a round loaf.

*     *     *

When Bad Braids Happen To Good Bread Dough

*     *     *

Recipe Links

Mariano Pallotinni’s site, Le Marche and Food

King Arthur Flour Co., Italian Easter Cheese Bread Recipe

*     *     *

But of course …

As I mentioned, I baked this bread on Friday and spoke with Zia about it on Sunday. Later that evening, as I was clearing out a spam folder, I came across a miss-sorted mailing from the King Arthur Flour Co. that highlighted 3 classic Easter breads. You guessed it. One of them was today’s Italian Easter cheese bread.

*     *     *

No baloney, it’s Mascarpone!

Hard to believe that this is already the 4th cheese of the series. We’re in the home stretch now but there’ll be no sprint to the finish line. No, I’ll continue to go slow so that any who want to jump on this cheesy bandwagon will have plenty of time to do so. If you’re thinking of giving it a go, I’ll repeat what I’ve said in the comments following each cheese post: start with the ricotta cheese recipe. It’s the easiest, there’s less chance for error, and the ricotta is the best you’ve ever tasted. Not only that, but working with ricotta gets you experience with handling curds, a must when making cheese. So, get yourself a couple quarts of whole milk, some white vinegar, and make a batch of ricotta. Once you do, you’ll realize that none of the cheeses I’ve covered thus far are at all difficult to prepare.

Those who have followed this series may notice the similarities between today’s recipe and that of my ricotta. The main difference between the 2 recipes is the amount of milk fat in the dairy products used. In the case of ricotta, warmed whole milk separates into ricotta & whey with the addition of white vinegar. To make mascarpone, combine equal amounts of heavy cream with half-and-half, warm, and use lemon juice to separate the mascarpone from the whey. In both instances, the curds are strained and the resulting cheeses are ready for use in your favorite recipes. Yes, it is that simple and those of you have made the ricotta know exactly what I mean. Best of all, it is far cheaper to make mascarpone at home than it is to purchase it from your grocer. For example, the dairy products I used cost about $4.50 and resulted in 16 oz. of cheese. An 8 oz. container of mascarpone costs about $7.00 at the same store. Needless to say, since coming across this recipe on the Fankenhauser Cheese Page, I’ve not bought a bit of mascarpone from any store.

So, what can you do with all of that homemade mascarpone in your refrigerator? Well, add a little confectioner’s sugar and heavy cream, whip it, and the result may be served with berries in a variety of ways or used as a luscious topping for your favorite dessert. Use mascarpone as the creamy base for a number of delicious pasta dishes, perfect as primi or secondi piatti. Combine it with your favorite cheeses (cheddar, Monterey Jack, Asiago, etc.) and use the mixture to stuff jalapeños to make poppers.  And of course, use it to prepare tiramisu, the quintessential Italian dessert. Given mascarpone’s creamy texture and relatively mild flavor, the only limit to its uses is your own imagination.

*     *     *

Hand-Cut Pappardelle with Spinach, Pecorino Romano, and Mascarpone

*     *     *

Before beginning, please refer to my Cheesy Stuff page. Chock full of cheesy details, it provides information about ingredients, cleaning/sterilizing equipment, spices & seasonings, a few tips, and sources for supplies and information.

*     *     *

Home-Made Mascarpone Cheese Recipe

yield: slightly more than 1 lb. (485g)

Ingredients

  • 1 pint heavy whipping cream
  • 1 pint half-and-half
  • 2 tbsp fresh lemon juice

Directions

  1. Place the cream and half-and-half into a clean, sterile pot with a lid and heat over low to med-low heat until it reaches 185˚. Stir frequently to prevent cream from scorching on the pot’s bottom. A double-boiler works fine, too.
  2. Add lemon juice and stir until thoroughly combined.
  3. Cover and maintain 185˚ temperature for 5 minutes, stirring occasionally. Mixture should show signs of thickening.
  4. Remove from heat and place covered pot into the refrigerator overnight.
  5. The next morning, the mixture should have thickened more and you should see traces of the whey beginning to separate from the curds. .
  6. Cover a large strainer with a clean, sterile handkerchief.
  7. Gently pour the curds into the handkerchief.
  8. Grab the handkerchief’s 4 corners, tie them, and use them to hang like a sack over the sink or a large pot. If your kitchen is exceptionally warm or if it has drained a few hours and still not to your liking, place everything into the fridge to drain.
  9. Drain until the mascarpone is the consistency you prefer. To hurry the process, carefully twist the “sack” to force the whey out of the cheese.
  10. Place cheese into container(s) and refrigerate. The mascarpone will remain fresh for about 1 week but is best when used immediately.

*     *     *

Notes

Unlike some of the other cheeses, you can use ultra-pasteurized dairy products to make mascarpone — but I would avoid them if possible. You’ll get the best tasting cheese if you use raw dairy but it is illegal to sell raw milk in many States, including Illinois. With raw dairy products off of the table, you’re left with pasteurized and ultra-pasteurized products. Although both processes negatively affect the mascarpone’s taste, it’s worse with ultra-pasteurization. So, I only use ultra-pasteurized products when I’ve no choice.

Some sites and cheese recipes call for using tartaric acid instead of lemon juice to separate the curds from the whey when making mascarpone. This additive can be bought online and is available at a couple of the resources I’ve listed on my Cheesy Stuff page. I have never used it and am perfectly happy with the mascarpone that results from using lemon juice.

Coming Attractions

Here is the recipe for the Pappardelle with Spinach, Mascarpone and Pecorino Romano Cheeses dish pictured above. Recipes for the remaining pictured dishes, as well as Aunt Lil’s tiramisu, are forthcoming.

Feta cheese is next in this cheesy series.

*     *     *

Inspired by the Fankhauser Making Mascarpone At Home webpage.

*     *     *

Beef Short Ribs

Short ribs weren’t on the menu when I was growing up. No, I had to wait until I was well past my youth, living here in Chicago, to discover them and even then it was purely coincidental. I had just moved into an apartment on The Lake and was checking out the neighborhood one Saturday when I “discovered” a Hungarian restaurant. Having looked at the menu, I was ready to order the paprikash when my waitress announced that the day’s luncheon special was short ribs. I opted for the special and that split-second decision became a life-altering event. For well over a year afterward, I dined there frequently and never sampled the paprikash, but I did order the short ribs every time. I introduced friends to my “discovery” and urged each to try the short ribs. You see, I was in heaven and was happy to share my good fortune with everyone — until  that  day.

*     *     *

Beef short ribs served over polenta, with grilled asparagus & horseradish sauce

*     *     *

I was having lunch with a good friend and we were marveling about — you guessed it — the short ribs when the check came. My friend was surprised to see how little our lunch cost and I mouthed the words that I would soon come to regret, “I don’t know how they do it?” During my very next visit to this little gem of a restaurant, we overheard a patron at a neighboring table question the waitress about the restaurant’s future. She replied, assuring them that the restaurant wasn’t going anywhere. At the end of our meal, one of my lunch party, a friend who had come to love the place as much as I, asked the waitress whether the place was closing. Again she said, “No way!”

The following Saturday the place was closed, never to re-open.

In the years since, more than a few of my favorite restaurants have closed, each after I uttered the fateful incantation. Once I realized the power of those words, I did my very best to avoid mouthing them but if you’re going to serve potent margaritas or top-shelf sake at below market prices, well, I can hardly be held responsible. Anyway, through the years, I’ve seen my favorite Chinese, Mexican, and Sushi restaurants all close, not to mention great little diners and hamburger joints. Perhaps the most painful closing of them all was my neighborhood Thai restaurant, which served the best Pad Thai on the planet. I was known as “Mr. John.” Since its closing 8 years ago, I’ve never repeated those powerful words in reference to any restaurant that I’ve liked. (Interesting to note that I have tried to use the magic on restaurants that should be closed as a service to my fellow diners. The fact that these businesses have continued, uninterrupted, mocks me to this very day.) So, aside from ruining the businesses —  and dreams — of a number of immigrant families, just what does any of this have to with short ribs?

Well, once my Hungarian restaurant closed, I took it upon myself to learn how to prepare beef short ribs. Mom, my first resource in such matters, suggested making them like a beef stew. So, my first attempts were cooked in a slow cooker and pretty much looked like a stew. Looking back, my experiences preparing short ribs pretty much mirrors my growth as a cook, such as it was. Over the years, I learned to brown the meat first, make a roux and a sauce, use the vegetables for the braise only, added wine, moved the braise from the slow cooker to a Dutch oven, and, finally, added some balsamic vinegar to the pot. The spices, also,  changed and, somewhere along the way, I began making horseradish sauce. The recipes I share today are the last of a long series.

*     *     *

Beef Short Ribs Recipe

Ingredients

  • 3 – 4 lbs (approx. 1.8kgs) beef short ribs — 6 to 8 rib pieces
  • 2 tbsp olive oil
  • 1 large onion, roughly chopped
  • 2 carrots, roughly chopped
  • 2 celery stalks, roughly chopped
  • 3 cloves garlic, smashed
  • 3 tbsp all-purpose flour
  • 1½ cups red wine
  • 1½ cups low-sodium beef broth
  • ¾ cup balsamic vinegar
  • 3 tbsp tomato paste
  • 3 or 4 fresh thyme stems
  • 2 fresh rosemary stems
  • 1 bay leaf
  • salt & pepper, to taste

Horseradish Sauce – recipe follows

Directions

  1. Pre-heat oven to 325˚F (160˚C).
  2. Heat oil in a Dutch oven or heavy-bottomed pot with a lid over med-high heat.
  3. Meanwhile, use paper towels to pat dry the short ribs, season liberally with salt & pepper, and place into the now hot oil. DO NOT CROWD. You will probably need to brown them in 2 batches. Once the meat has been placed into the pot, do not disturb for about 3 minutes. Check one to see if it has browned. If so, turn each piece to brown another side, If not, continue cooking for another 2 minutes before checking again.
  4. Brown all sides of each rib before removing them to a platter and repeating the process with the rest of the ribs.
  5. Pour off excess grease, leaving 3 tbsp in the pot. Add the celery, carrots, and onion to the pot and begin sautéing. Season with salt & pepper.
  6. When the onion is translucent and the vegetables have softened, add the garlic and continue sautéing for about a minute.
  7. Add the flour to the pot, stir, and cook for two minutes.
  8. Use the red wine to deglaze the pot. Once finished, add the balsamic, beef stock and tomato paste. Season with salt and pepper and stir well.
  9. Add the thyme, rosemary, and bay leaves. Return the ribs to the pot, bring to a boil, cover, and place in pre-heated oven.
  10. Continue to cook for 2½ to 3 hours or until meat is fork tender and falling off of the bones. Carefully remove the ribs to a platter and cover with foil to keep warm.
  11. Pour the braising liquid through a strainer and place resultant liquid into a grease separator.  Wait a few minutes to allow the grease to rise and then pour off the sauce.
  12. Depending upon your preference, you can
    1. Serve the sauce as is.
    2. Place the sauce into a small pan so that it can be further reduced and thickened.
    3. Add more wine or beef broth and then reduce.
  13. No matter the choice, be sure to taste the sauce to see if additional seasoning is needed.
  14. The sauce may be used to cover the ribs before serving or left on the side.
  15. Serve immediately with mashed potatoes, buttered broad noodles, or polenta, as pictured.

*      *     *

Horseradish Sauce

Combine equal amounts of plain yogurt (Greek pref.) and sour cream. Add horseradish to taste, some brown, whole grain or Dijon mustard, a dash or two of Worcestershire Sauce, and salt & pepper to taste. Mix well and refrigerate until needed. Be sure to make extra for the cole slaw.

*      *     *

Pulled rib sammich with horseradish slaw & corn relish

*     *     *

Notes

I always try to make extra ribs, gravy, and horseradish sauce. Not only are the ribs even tastier the next day, the meat can be pulled apart, similar to what is done with pork, and used with the extra gravy to make sandwiches. The extra horseradish sauce can be used as a dressing for cole slaw to top off the sandwich, as pictured, or as a condiment. If used to dress slaw, you may wish to add more yogurt, sour cream, or a little mayonnaise, to suit your tastes.

Be sure to come back next Wednesday when, as promised, I’ll show you how to make mascarpone.

*     *     *

There’s something about Mary …


Happy St. Joseph’s Feast Day!

Eggplant Parmesan

Order the cannoli! Put the biscotti in the oven! Chill the prosecco! St. Joseph’s Feast Day is just around the corner! Across Italy and certainly throughout Sicily, as well as in many Italian-American households and communities around our own country, next Monday, St. Joseph’s Feast Day, will be marked by special religious services, street fairs, parades, and celebratory dinners. There’s even a special pastry (zeppola) and dish (fava beans) to be served in this Saint’s honor. So, why all the hoopla?

To start, and to eliminate any possible confusion with the many other St. Josephs, I’m speaking about Joseph, the carpenter who, along with Mary, raised the Christ Child, according to Christian beliefs. Perhaps because of its close proximity and relationship with the Vatican for so many centuries, the Church has exercised considerable control over Italy. Each town, village, city, district, in fact every community of any size, has at least one patron saint. And Saint Joseph is one very popular patron saint. Today, he is the Patron Saint of Sicily and that is the reason for the celebrations on Monday — but it wasn’t always that way.

The Holy Family - Michelangelo

According to legend, sometime during the Middles Ages, Sicily was struck by drought. As the earth dried and crops withered, famine became a very real possibility. Fava beans alone are all that kept the people from starvation. They prayed to St. Joseph, beseeching him to intercede on their behalf and to ask his “Son” to end the drought. In return, the people promised to hold a feast every year in his honor. The rains came, the drought ended, and mass starvation was averted. The grateful Sicilians proclaimed Saint Joseph their Patron Saint and his Feast Day is marked by celebrations to this very day.

Now, lacking both fava beans and the skills of a pasty chef, I decided to take a different path to honor this Saint. Since eggplant is used so often in Sicilian cuisine, I thought an eggplant dish would be appropriate. So, today’s recipe is eggplant parmesan, parmigiana di melanzane.

In recent years, the 3 most common parmigiana dishes — veal, chicken, and eggplant — have come under fire somewhat. Let’s face it, they aren’t exactly low-cal, by any measure. And, to be honest, it is only in the past few years that I’ve attempted to make them a bit lighter. In this case, where I used to fry the breaded slices of eggplant, I now bake them. In place of a meat sauce, I now use a marinara. Granted, you still won’t see this dish listed on any menu as the “Dieter’s Special”, but you will enjoy a lighter dish that is every bit as enjoyable as the more traditional preparations.

One further note deserves mention. During a recent post in which I shared instructions for making goat cheese, I asked if anyone knew of a nearby buffalo herd, implying that I’d use their milk to make mozzarella. Bufala mozzarella, by the way, is the most prized of all mozzarella cheeses. Judy@Savoring Today left a comment stating that bufala mozzarella, made in Italy, was available at, get this, Costco, of all places! Within days, I was at Costco and the parmigiana di melanzane pictured in today’s post is the result. Thank you, Judy!

 *     *     *

Eggplant Parmesan Recipe

Ingredients

  • 6 – 8 cups marinara sauce (recipe below)
  • 2 eggplant, about 2 1/2 lbs. total
  • 3/4 cup all-purpose flour
  • 4 – 5 cups bread crumbs, more may be required
  • 3 tbsp fresh parsley, chopped
  • 1 tbsp Italian seasoning
  • 1 tsp garlic powder
  • 3 eggs
  • 2 tbsp milk
  • 1 lb. fresh mozzarella, thinly sliced or shredded
  • 1 cup freshly grated parmesan cheese, pecorino romano may be substituted
  • salt & pepper

Directions

To prepare the eggplant

  1. Create a breading station.  In a large dish or flat-bottomed container, add the flour. Add the eggs and mild to a second such container and mix until well-combined.  Add to the 3rd container the bread crumbs, parsley, Italian seasoning, and garlic powder. Mix to thoroughly combine.
  2. Pre-heat oven to 400˚.
  3. Slice the eggplant, lengthwise, into 1/2 inch slices.
  4. Coat each eggplant slice with flour, shake off excess, and dip into egg wash. Allow excess to drip off before dipping into the bread crumb mixture to completely coat each slice. Place on a cooking rack that has been sprayed with cooking spray. Continue until all slices are breaded. You will need to use 2 racks or to bake 2 batches.
  5. Place eggplant-filled cooling rack on top of a large baking sheet and bake in pre-heated, 400˚ oven for 15 minutes or until very lightly browned.

Assembly & cooking instructions – family style

  1. Use a few ladles of sauce to coat the bottom of a large baking dish.
  2. Add eggplant slices to form a layer in the baking dish. Place a few ladles of sauce evenly across the breaded slices. Apply 1/3 of the mozzarella in an even layer across the eggplant. Finish the layer by sprinkling 1/3 of the parmesan cheese on top.
  3. Repeat step 2 twice, creating 3 layers in all and alternating the direction of each layer’s slices.
  4. Bake in 400˚ oven for 30 to 40 minutes, until the dish is bubbly and the cheese has cooked/browned to your liking.

*     *     *

*     *     *

Variations

If prepared as indicated — and pictured — above, the result is more suitable for a “family style” dinner and resembles a tray of lasagna. If you like, you can easily “build” individual servings using 3 slices of eggplant and covering each layer with the sauce and cheese as above but keeping each serving separate from the others. Similarly, you can slice the eggplant into 1/2 inch disks, rather than lengthwise, and create smaller sized portions, perfect for use as primi piatti.

*     *     *

Marinara Sauce

This marinara isn’t meant to be simmered for hours. The resulting, fresh-tasting sauce adds another flavor element to this vegetarian dish.

  • 3 tbsp olive oil
  • 1/2 – 1 tsp red pepper flakes (optional)
  • 1 large onion, coarsely chopped
  • 2 carrots, coarsely chopped
  • 2 celery stalks, coarsely chopped
  • 6 garlic cloves, smashed
  • 2 – 3 tbsp tomato paste
  • 1 can (28 oz) diced tomatoes
  • 1 can (28 oz) crushed tomatoes
  • 1/2 cup dry red wine (optional)
  • 3 tbsp fresh parsley, chopped fine
  • 1 tbsp dried marjoram
  • salt & pepper

Directions

  1. Place onion, carrots, celery, and garlic into a food processor and process until finely chopped. Alternately, finely chop the vegetables and garlic by hand.
  2. Heat oil in a sauce pan over med-high heat. Add the optional red pepper flakes and sauté for about a minute.
  3. Add the finely chopped ingredients, season with salt & pepper, and cook until liquid has evaporated and they start to caramelize.
  4. Add the tomato paste and continue to cook for about 2 more minutes.
  5. Add the tomatoes, wine, parsley, marjoram, and stir to combine. Season with salt & pepper, bring to a boil, and reduce to a simmer.
  6. Continue to simmer until sauce has thickened and deepened in color,  about 60 minutes, on average. Check for seasoning and reserve for use in your recipe.

*     *     *

Mom’s Boiled Dinner

Though Italian, through and through, the Bartolini Sisters’ recipe repertoire was anything but restricted to Italian fare. Both Sisters cooked a range of dishes representing many cuisines, and as Mom loved to recall, I was about 6 when I told her that eating at our  house was “an adventure!” You see, it was about that time that Mom had gone to lunch with a few friends, I believe, at what was at the time Detroit’s premier Chinese restaurant. She ordered sweet & sour something-or-other (I don’t remember what), thoroughly enjoyed it, and asked the waiter if she could have the recipe. He agreed and returned a few minutes later with the recipe, which no doubt pleased Mom no end. Later, when the check arrived, Mom was surprised to see a $25.00 fee for the recipe included in the total! (Understand that this was a time when $25.00 was considered a nice sum to win on game shows like “What’s My Line?”. )  Mom, rightly, refused to pay the $25.00, indignantly gave them back the recipe, and vowed to duplicate that meal. And thus began our “adventure.” Starting with the Chun King section of the grocery store, Mom set out to make the ultimate sweet and sour dish. Time after time, she served us the latest version which, to be fair, we kids often thought was OK. Having tasted the original, however, Mom felt otherwise. I remember one specific dinner when her latest attempt fell short of expectations. After one bite, disgusted, she pushed her plate aside and watched as we kids gobbled it down.  The thing I most remember and, frankly, am most proud of, is she never gave up. Laughably, we did eat a couple pretty bad sweet & sour concoctions but she was determined to prove that the restaurant’s food wasn’t all that special and certainly not worth $25.00 per recipe. Truthfully, I don’t think she ever hit pay dirt, at least not while I was living at home, but she did teach me a valuable lesson by her example. So, when I describe the number of tests I’ve run to, say, come up with a cheddar cheese pie crust, or, to find the right level of “heat” in my giardiniera, don’t credit me. Credit Mom.

But I digress …

*     *     *

*     *     *

Among the many cuisines the Bartolini Girls drew upon, American was first and foremost. Meatloaf, stews, casseroles, and fried foods, among others, were very often served — with a platter of pasta on the side, of course. Mom, in particular, loved a New England boiled dinner and she was sure to serve it a couple of times each year. Today, although I may have added a couple of vegetables to the pot, I keep her tradition alive and prepare a boiled dinner at least twice every year, once in the Spring and again in the Fall.

The recipe that I’m about to share uses quite a few vegetables to form a bed for the corned beef. Even with my 6 quart crock pot, only a couple of cabbage wedges will fit into the cooker and, as a result, I have to make other arrangements for the rest of the cabbage. When there’s about an hour to go before dinner is ready, I place as much sliced cabbage as will fit comfortably into the slow cooker and replace the lid. The rest of the cabbage goes into a covered frying pan, a cup of broth from the slow cooker is added, and then everything is seasoned with salt & pepper, to be cooked over a medium heat. Cooking times will vary, depending upon the amount of cabbage and size of the pan. Try to time it so that this cabbage is finished when the slow cooker’s contests are ready. When ready, combine the two preparations for serving and storing. Of course, the alternative to doing this is to use fewer vegetables but, frankly, that just ain’t gonna happen around here.

*     *     *

Mom’s Boiled Dinner Recipe

total time: approx.  8.5 hours

Ingredients

  • 1 prepared corned beef, 4 lbs. Do not discard the packing liquid, unless directed to do so by the package directions.
    • enclosed spice packet
    •                     or
    • 12 green peppercorns and 1 tbsp pickling spice.
  • 1 small bag of baby Yukon gold potatoes
  • 1 large onion, cut into about 8 wedges
  • 1 rutabaga, cut into large chunks
  • 1 turnip, cut into large chunks
  • 4 carrots, cut into 2 inch chunks
  • 4 parsnips, cut into 2 inch chunks
  • 2 garlic cloves, diced
  • 1 cabbage, outer leaves discarded, cut into about 10 wedges
  • salt and pepper, to taste
  • water

Directions

  1. About an hour before you begin, remove the corned beef from the fridge and set it on a counter so that it warms slightly.
  2. Place the potatoes, onion, rutabaga, turnip, carrots, and parsnips into the slow cooker.
  3. Sprinkle the garlic over the vegetables and do the same with the spice packet, if any, that came with the corned beef. (If no spice packet, add the pickling spice and green peppercorns.) Season with salt and pepper.
  4. Place the corned beef atop the vegetables and empty the packing liquids over everything. Add water until the slow cooker is about 2/3 full.
  5. Set crock pot to “high” and cook for one hour, turn the meat over, set to “low” and cook for 6 more hours, turning the meat over every 2 hours. Periodically skim the surface to remove any off-color foam, as necessary.
  6. After 7 hours, turn over the corned beef one last time, place the cabbage wedges into the slow cooker, replace the cover, and cook for an additional hour. If you have too much cabbage for your slow cooker, place the surplus into a frying pan, season with salt & pepper, and baste with a cup of broth from the crock pot. Cover and cook over medium heat until ready to be served — 15 to 20 minutes.
  7. After a total of 8 hours, remove the corned beef to a cutting board, slice it thinly, and place it on a platter with the cooked vegetables and cabbage. Serve immediately. Alternately, some people, myself included, prefer that their vegetables be served in a bowl with some of the broth.
  8. When preparing the leftovers for storage, be sure to combine all the cabbage and its cooking liquid with the rest of the vegetables.

Variations

Aside from making one’s own corned beef from beef brisket — something beyond my scope — the only variations of which I’m aware involve the vegetables. Basically, this recipe was Mom’s but I’ve added the turnip, rutabaga, and parsnips. Make the recipe your own and drop or add any vegetables to suit your tastes

*     *     *

*     *     *

Note

The leftovers from this dinner store well and you can easily use them to repeat the meal, if that’s your wish. As I’ve mentioned, however, I prefer the vegetables served with the broth as a soup. That means that I can use the corned beef for panini, also personal favorites. Pictured above is one such sandwich made with corned beef, Swiss cheese, a little cabbage, and some mustard. It doesn’t get much better than this.

*     *     *

Don’t tell Philadelphia that we’re making Cream Cheese

This is my 3rd, cheese-related post of the series. Unlike its predecessors, unlike almost all of my prior blog entries, there is no side story, no anecdote, to tell. Yes, Mom sometimes served us cream cheese but don’t all Moms do the same? Although it’s true I’ve made this cream cheese for Zia, it’s hard to build a story around her saying, “I like it.” Looking beyond the 2 Bartolini Girls, there just aren’t any cream cheese yarns to report coming from the old two-flat. Moving more to the Present, in all of my sleepless nights, cream cheese never played even the smallest of bit parts. To be honest, I don’t even recall a single instance where I snacked on cream cheese in the wee hours of the morning. Most shockingly — and, for once, disappointingly — Max has never done anything to disrupt or despoil my cream cheese operation nor its end-product. And Lucy doesn’t speak cheese, so, she is of no help whatsoever. As a result, I’ve got nothing. Nada. Butkis. So, then, how did I come to make cream cheese? One day about 2 year ago, while looking at the Fankenhauser Cheese Page, I clicked on the words Cream Cheese. Within days, the Bartolini kitchens were making cream cheese. Hardly the quaint tale of a bygone time that you’ve come to expect, now is it?

So, with no story to tell, I’ll get right to the business at hand. The ingredient list mentions that salt is optional but strongly recommended. I would definitely add salt should you decide to make this cheese. Not only will it prolong the cheese’s shelf-life, but it tastes so much better. Believe me, a salt-free cream cheese is one, extremely bland cheese. Beyond the salt issue, there’s but one thing more worthy of mentioning. While I was away, guest hosting for Jed at sports-glutton.com, I happened upon his post dedicated to the fine art of making NYC-style bagels. Thanks to Jed and that post, the Bartolini kitchens actually baked all the bagels pictured within this post.

By the way, home-made mascarpone is next on the cheesy schedule and, like today, I’ve got nothing.

Before attempting to make this cheese or any within my recipe collection, please refer to my Cheesy Stuff page. Chock full of cheesy details, it provides information about ingredients, cleaning/sterilizing equipment, spices & seasonings, a few tips, and sources for supplies and information.

*     *     *

Home-Made Cream Cheese Recipe

yield: 2 pounds

Ingredients

  • 1 quart whole milk – never ultra-pasteurized
  • 1 quart whipping cream – never ultra-pasteurized
  • 1/4 cup cultured buttermilk – no substitutes
  • 1/2 tablet Rennet dissolved in 1/4 cup distilled water
  • 1 to 2 tsp table salt, more or less to taste – optional but strongly recommended

Directions

  1. Place the milk and cream into a clean, sterile pot with a lid and heat over low to med-low heat until it reaches 70˚ . Stir frequently.
  2. Add buttermilk, mix thoroughly, cover, and set aside for 15 minutes.
  3. Add rennet, stir, set aside for at least 8 hours, or overnight, at a room temperature from 70 to 75˚.
  4. If properly prepared, the mixture should have gelled after waiting the specified time. Sprinkle the salt over the top of the gelled mixture. Briefly use a whisk to gently stir the mixture, creating pea-sized curds.
  5. Cover a large strainer with a clean, sterile handkerchief.
  6. Gently pour the curds into the handkerchief and let drain for 30 minutes.
  7. Grab the handkerchief’s 4 corners, tie them, and use them to hang like a sack over the sink or a large pot. If your kitchen is exceptionally warm, place everything into the fridge to drain.
  8. Drain until the cream cheese is the consistency you prefer. To hurry the process, carefully twist the “sack” to force the whey out of the cheese.
  9. Place cheese into container(s) and refrigerate. The cream cheese will remain fresh for about 1 week, less if unsalted.

*     *     *

Notes

Because of its relatively short shelf-life, I rarely mix other ingredients into my cream cheese unless it will be used up entirely within a day. To do otherwise, I feel, opens the door to contaminating the cheese because of a slightly over-ripe berry or piece of fruit.

I’ve tried cooking with this cream cheese and it “broke,” liquified, both times. I have used it successfully, however, in a variety of refrigerated cheesecakes and spreads.

*     *     *

Adapted from Emeril’s Homemade Creole Cream Cheese

and

     the Fankhauser Making Cream Cheese webpage.

*     *     *

My Uncle’s Pasta (aka Cacio e Pepe … whatever!)

Being today is George Washington’s birthday, I’ve decided to come clean. Understand that there is no easy way for me to say this, so, I’m just going to blurt it out. I lied to you. Well-intentioned though I was, I nevertheless gave you false information. And, what’s worse, I did it not once but twice. Now, before you grab torches, gather en masse, and storm Chicago looking for me — by the way, if you do, be sure to take the Dan Ryan (hehehe) — let me explain …

*     *     *

  *     *     *

Back in October, 2010, my first real post was the recipe for Pasta in Bianco and, at the time, I said it was about the easiest pasta dish to make. And it is … sorta. Then, a year later, I shared the recipe for Spaghetti Aglio e Olio which I described as being “by far, the easiest (pasta dish) to prepare.” Well, it is … kinda. The truth is that there is a 3rd dish, an even easier dish to prepare, a dish that for decades I’ve prepared for myself and enjoyed as my own personal creation and that reminded me of Uncle. That is, until a few weeks ago when I found an authentic recipe that is identical to “my” recipe for Uncle’s Pasta. I could ignore it or, worse yet, try to convince everyone that my recipe is the original but, c’mon.  I’ve just confessed to 2 lies, committing a 3rd lie — especially one so obvious — would serve no purpose other than to further grease my path into Hades. So, I’ll take the high road and explain how I came upon this dish and, in an effort to make amends, I’ll throw in a little info on yet another obscure pasta, to boot.

Living in the old two-flat, there were many dinners where the families ate together and very often some form of pasta was served. My Uncle, like most, enjoyed grated cheese atop his pasta but, what set his plate apart from everyone else’s, was his love of black pepper. To my eye, he used more pepper than anyone seated at the table. Well, for this youngster, the aroma of grated Pecorino Romano mingling with the scent of freshly cracked pepper was intoxicating, made even more so because I was considered too young to have access to the pepper shaker. (As an unexpected benefit, however, when the nuns spoke of the Garden of Eden, I understood all too well Eve’s desire for the Forbidden Seasoning Fruit.) Well, I eventually grew up, as most young boys tend to do, and was finally able to add as much pepper to my pasta as I wanted — and I did. But wait, there’s more to this story because, up until now, I could have been talking about any pasta dish. I need to narrow the field a bit.

Once I moved away, I lived with a number of roommates until I could finally afford a place of my own. Back then, having a well-stocked pantry was not exactly high on my priority list. Let’s be honest, if not for “tissue”, coffee, and cat litter, I probably wouldn’t have seen the inside of a grocery for months at a time. Now, I’ve already blogged about my love for, and reliance upon, Spaghetti Aglio e Olio, pasta made with garlic and olive oil, but there were times when I didn’t have any olive oil. What to do? Well, I made my pasta without it, adding a bit more cheese, a couple more sprinkles of pepper, and some pasta water in its place. Moments later, I’d be seated at the dinner table where, with a single whiff, I was 6 years old again watching Uncle shower his pasta with pepper. So, for some 30 years, I’ve made this pasta, not just when out of olive oil but whenever I needed a pasta fix and the nostalgia bug hit me.  Over time, this pasta came to be called Uncle’s Pasta in my mind because its aroma reminded me of his plate during those family dinners of long ago.

*     *     *

I’ll re-visit this picture when WordPress becomes scratch & sniff-enabled.

*     *     *

With that in mind, you can well imagine my surprise when, a few short weeks ago whilst I was looking at pasta cutters, I learned that the people of Rome, and its district of Lazio, make a pasta called Cacio e Pepe, Cheese and Pepper, that is exactly like my Uncle’s Pasta! Now, rather than become bitter, I’ve decided to rise to the occasion and to turn this into a teaching opportunity. You see, the night that I became aware that the Romans had plundered my childhood memories and stolen my pasta recipe,  I was looking at a pasta maker called the chitarra. Italian for “guitar”, a chitarra is shirt box-sized with many wires or cords stretched, lengthwise, from one end to the other. A freshly made pasta sheet is laid on top of the “strings” and a rolling-pin is used to forcefully push the dough sheet through them to create pasta noodles. Although the width between the strings may vary from chitarra to chitarra, when they are set close enough together so that the distance is the same as the width of the pasta sheet, the result is a square-shaped pasta called tonnarelli. Often as thick as spaghetti, tonnarelli, not so coincidentally, are often used to make Cacio e Pepe. Never seen ’em? Guess again.  One very common “fresh” pasta’s cappellini is, in fact, tonnarelli. If you own a pasta machine, chances are it makes 2 types of pasta. The packaging will name the smaller of the 2 as being either cappellini or spaghetti. Um … no. One very popular stand mixer’s pasta cutter is advertised as making angel hair pasta. Again … no! These cutters are incapable of making a round pasta noodle and both cappellini and spaghetti are, in fact, round. If it’s a thin, square-shaped pasta, it’s tonnarelli. Now, if the pasta from your smallest cutter isn’t quite square, that’s probably because the pasta sheet wasn’t the same thickness as the cutter’s width. If you’re so inclined, vary the pasta sheet’s width and you’ll get your square tonnarelli.

My point isn’t to make sure everyone that sits at my dinner table, or that reads this, can identify the pasta set before them. No, not at all. It is to illustrate just how seriously the Italians take their pasta. For many, Emilia–Romagna is the home of Italy’s best pasta makers, with Bologna as its capital. True pasta aficionados from that region will claim that they can tell whether the pasta dough is rolled by hand or machine, with a wooden versus a steel rolling-pin, on a wooden board versus a stainless steel or marble counter top, etc., etc., etc. My father, when he saw Mom preparing to make pasta that day, would remind her to roll it out by hand as he left for work. Mom always assured him she would — and then got out the pasta machine before his car had made it to the end of the block. When dinner was served, could Dad tell the difference? Who knows but, like any loving husband, he knew when to keep quiet.

Wow! Such a long post for so simple a dish to prepare. I won’t be giving this recipe the full treatment because, frankly, it would be a waste of time. All you need is some pasta, freshly made is preferred but boxed spaghetti will do nicely; hot pasta water; some grated cheese, Pecorino Romano if possible; and freshly cracked/ground pepper.  I won’t be giving ingredient amounts because they will all depend upon the number of servings to be prepared and your own taste. You may not be as enamored with pepper as am I, after all.

While your pasta is cooking, warm the serving bowl. This can be done by pouring hot water from a tea kettle or via the tap. Once the pasta is cooked to your liking, reserve a  cup of the boiling pasta water before draining the pasta. No need to drain it fully. In fact, it’s better if you don’t. Work quickly now. Place the cooked pasta into the now-warmed serving bowl and season it very generously with the grated Pecorino Romano cheese. (Parmesan may be substituted.) Mix the pasta, adding more pasta water, a little at a time, so that it combines with the cheese to create a sauce-like dressing for the pasta. If it’s too dry, add more water; too wet, add more cheese. Once the pasta is evenly coated, add some pepper and stir. Remember, the dish is called Cacio e Pepe for a reason.

*     *     *

*     *     *

With your pasta now appropriately dressed, serve it on warmed dinnerware.  Garnish each serving with a generous sprinkling of grated Pecorino Romano and another dusting of pepper. Now, before you sample this testament to simplicity, take a moment to savor the fragrances of freshly grated cheese and newly cracked pepper wafting up from your plate. Nothing more need be said.

*     *     *

Pasta Cacio e Pepe

*     *     *