I’ve been fortunate to visit Italy several times and, in the past, my goal was to eat my way up, down, and across the peninsula, Sicily included. Safe to say: “Mission accomplished.” This last visit was different, though, and probably due to my joining WordPress. I wasn’t satisfied to just enjoy my meal, I wanted to know its ingredients and, if lucky enough to have an English-speaking wait person, its preparation. If you saw the FaceBook entries I published during that trip, most were photos of the meals we enjoyed. With a notoriously bad memory, this was the easiest way to record those dishes and, hopefully, jog my memory months, even years, later. Such is the case with today’s agnolotti … kinda.
* * *
 * * *
* * *
While in Bologna, one night I ate at a small restaurant that I chose because it was crowded with locals and had a nice outdoor seating area. Coming from Chicago, eating supper outdoors in mid-May is something you don’t pass up if the opportunity presents itself. I ordered the tortellini and asked my waiter how they were prepared. Looking puzzled, he disappeared and returned with a woman I was to learn was a sous chef. In broken English — that was still far better than my Italian — she answered my questions and before leaving, mentioned that she was from Piedmont, Piemonte, coincidentally the region of Italy that is home to agnolotti. I asked how she made her agnolotti, she smiled and said that the filling for the tortellini I had ordered was very similar to her own agnolotti filling recipe. Our entire conversation didn’t last 5 minutes — it was a busy night — but she did give me its list of ingredients before returning to the kitchen. When my dinner arrived, I took a photo and made a note of her ingredient list.
Jump ahead now to last month, November. Traditionally, it’s the time for my last visit to Michigan before Winter sets in. While there, I like to fix Zia a birthday dinner and maybe even a Christmas dinner, since I won’t be with her for either events. This year, I wanted to serve her agnolotti for her birthday dinner. The only problem with that plan was that I had never made agnolotti before.
The Saturday before I left for Michigan was the last day the Chicago area’s farmers markets were open. When I returned home, I realized that there wasn’t much time for me to make a test batch of agnolotti. I was to leave in a few days and had much to do beforehand. Not wishing to use premium ingredients for something that would be little more than a kitchen experiment, I dug around my fridge and freezers for ingredients and that’s how today’s filling came about. Well, having bought a bunch of lacinato kale, cavolo nero, at the market that morning certainly didn’t hurt matters any. Let’s be clear. I seriously doubt this is in any way a traditional Piemontese recipe. I will say, though, that it was surprisingly good, good enough to convince me to share the recipe along with this instructional post for making Agnolotti del Plin. When I make the filling again — and I will make it again — I won’t grind it so thoroughly and will use it to make ravioli.
* * *
As you know, stuffed pastas are popular in Italy, with ravioli, tortellini and cappelletti being the most common. Agnolotti are a stuffed pasta that, as I mentioned, originated in Piedmont and are almost always handmade. Their filling consists primarily of roasted meat, though exceptions abound. (This is consistent with the filling recipe that I was given at the restaurant.) I was surprised to learn that traditionally, freshly cooked agnolotti were eaten as-is, without any form of dressing/sauce at all. The family ate them, one at a time, from a large serving at the table’s center.
Agnolotti del Plin are formed by pinching the dough in-between the individual agnolotto, “plin” being the Piemontese word for “pinch”. As you’ll soon see, once pinched, the agnolotti are cut and ready to be cooked. There is another way to make agnolotti and you’ll see how that’s done in a future post. This one is already getting too long.
* * *
 * * *
* * *
How to make Agnolotti del Plin
with a Chicken Gizzard Filling
Agnolotti con i Ventrigli del Pollo
Ingredients
- 1 lb (450 g) chicken gizzards, trimmed and chopped
- 3.5 oz (100 g) Tuscan kale (cavolo nero), trimmed of thick ribs — any kale may be substituted
- 1 large (1.5 oz, 35 g) shallot, diced
- 1 cup ricotta cheese
- 1/2 cup grated Pecorino Romano cheese
- nutmeg
- 1 large egg
- butter
- olive oil
- salt and pepper
- Mom’s Pasta Dough — recipe HERE — rested 30 minutes before use
Directions
for the filling
- Heat equal parts butter and olive oil (no more than 3 tbsp total) in a deep frying pan over med-high heat. Once hot, add the shallot and sauté until translucent – about 3 minutes.
- Meanwhile, roughly chop the cleaned & trimmed kale leaves before placing them in the pan with the shallots. Season lightly with salt & pepper and sauté until wilted.
- Allow to cool and drain as much liquid as possible from the cooked kale before placing it in a clean kitchen towel. Wring out as much liquid as possible. Set aside.
- In the same frying pan, melt another 2 tbsp butter over medium heat. Add the chicken gizzards, season with salt and pepper, and sauté until fully cooked – about 20 to 25 minutes. Remove from heat and allow to cool.
- Once cooled, place the cooked gizzards into a food processor and process until well ground.
- To the chopped gizzards in the food processor, add the cooked kale, ricotta cheese, Pecorino Romano cheese, egg, nutmeg to taste, and season lightly with salt & pepper. Process until smooth. This is critical.
- Remove and refrigerate several hours or overnight so that the flavors will blend.
for the agnolotti del plin – also detailed in the slideshow that follows
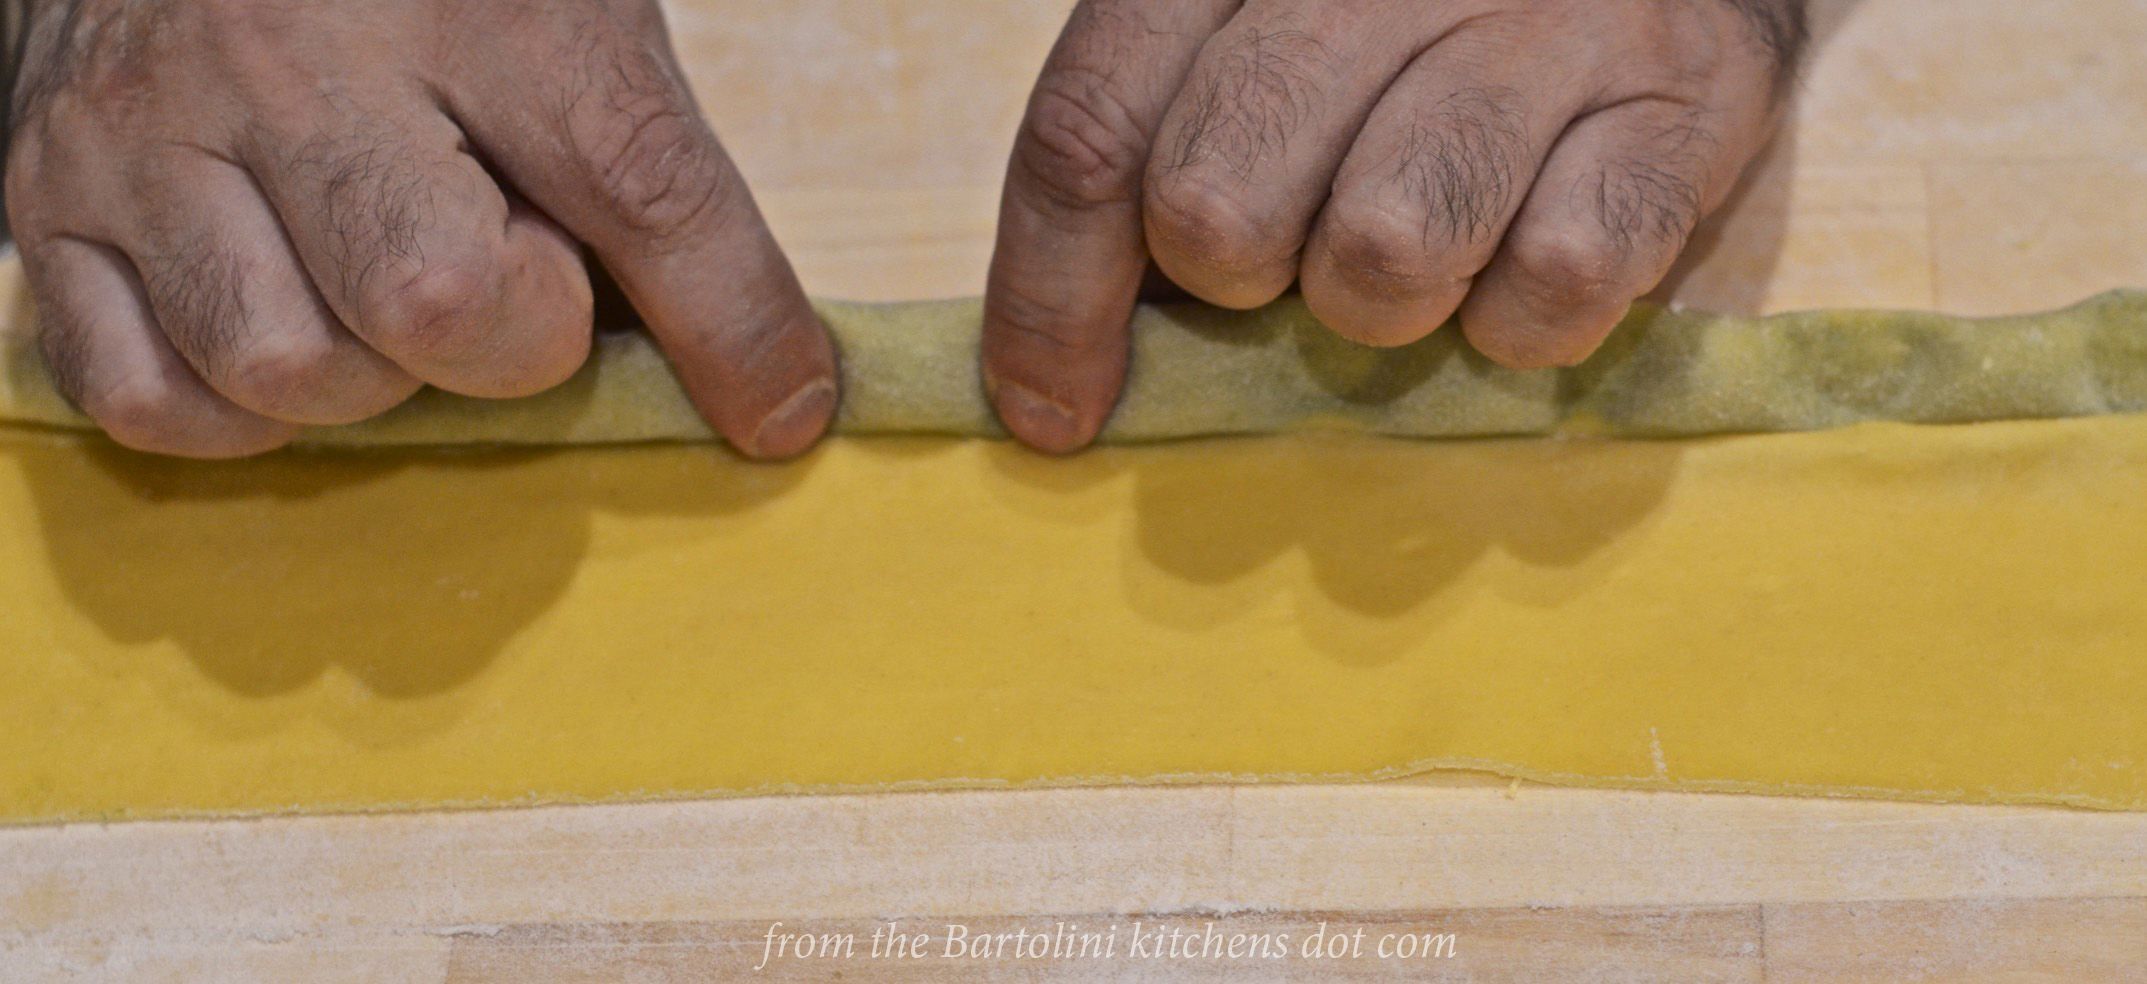
- Using a jumbo egg-sized piece of dough, pass it through pasta rollers until thin. My rollers are at the widest setting at “0” and I roll the dough up to and including the no. “7” setting.
- Place the dough strip on a lightly floured work service, trimming both ends to make an elongated rectangle.
- Fill a pastry bag with the filling and pipe a line of filling about an inch from the dough strip’s edge.
- Use a water bottle to mist — or a pastry brush to lightly moisten — the dough on the side of the filling farthest from you. Do not get it too wet or it may split during subsequent steps.
- Carefully take hold of the dough’s edge and pull it over the piped filling.
- Use your fingers to press/seal the flap to the moistened dough, eliminating as much air as possible as you work you way down the strip.
- Use a pastry brush to moisten the top of the seal. – optional (sea Notes)
- Gently fold the filling roll over the moistened flap – optional
- Use your index fingers and thumbs to pinch the filling roll at inch intervals.
- Use a pastry wheel or very sharp knife to first trim away the excess dough
- Use the same tool to cut the agnolotti at the center of each pinch.
- Place the agnolotti in a single layer on a baking sheet that has been dusted with corn meal. Cover with a clean kitchen towel. If they are to be cooked relatively quickly, nothing further needs to be done. If they are to be cooked in a couple of hours, they should be placed in the fridge until dinner time. If the are to be cooked later than that evening, place the baking sheet in the freezer and,once frozen, place the agnolotti in bags or some other container suitable for freezing.
* * *
* * *
Serving Suggestion
I really hadn’t thought this all the way through and was caught scrambling for a sauce once the agnolotti were made. I turned to an old favorite that, as luck would have it, helped me to continue to clean out my fridge before leaving for Michigan.
- Bring to a boil a large pot of salted water over high heat.
- Meanwhile, in a deep fry pan, melt a few tbsp of butter over medium heat. Add about twice as much heavy cream and heat until the butter is melted. Add enough Pecorino Romano cheese to thicken the cream mixture. Add an amount of plain, meatless tomato sauce equal to the amount of cream added earlier. Stir and keep hot until the agnolotti are cooked. If the sauce thickens too much, add a bit of the pasta water to thin it. Taste and adjust seasoning as required.
- Once the water is boiling rapidly, add the agnolotti and stir. When the water returns to the boil, lower the heat and gently cook the agnolotti.
- If the agnolotti are fresh or refrigerated, they are fully cooked when all of them float to the surface of the pot of water — just a few minutes.
- If the agnolotti are frozen, they will take a few minutes longer.
- If in doubt whether your pasta is fully cooked, sample one.
- Once cooked to your satisfaction, use a spider strainer to remove the agnolotti from the boiling water and add them to the simmering sauce.
- Gently stir to coat the pasta with the sauce and serve immediately, garnished with more grated Pecorino Romano cheese and, fresh parsley and/or basil, if desired.
* * *
 * * *
* * *
Notes
YouTube contains quite a few videos showing agnolotti del plin being made. Some folded the filling roll over a moistened flap, as I did in steps 6 and 7 above. I thought that would ensure the pasta was fully sealed. I also skipped those 2 steps with a subsequent dough strip. Later, I cooked them both, fresh and frozen, and neither opened up while being boiled. In short, it made no difference whether you folded the filling roll over the sealed flap. You can follow the method you feel most comfortable doing.
Make sure the gizzards are fully cooked. “Rare” gizzards are not a good thing.
Because the filling is to be piped, it must be ground in a food processor, or similar device, until very smooth. The filling may block the piping bag’s tip if not ground fully.
When making the tomato-cream sauce, if you haven’t any tomato sauce on hand, a couple tbsp of tomato paste may be substituted.
The tomato-cream sauce used to dress these agnolotti is simple to make and can be used for a number of stuffed pastas. I often season it with a bit of nutmeg but, this time, the agnolotti filling already was seasoned with the spice and I didn’t want to over do it. A little nutmeg goes a very long way.
* * *
It’s déjà vu all over again …
 Continuing with a review of seafood dishes suitable for A Christmas Eve feast, today’s I’m highlighting Mom’s Calamari Salad. It’s a snap to make and is a welcome addition to any celebratory meal, Christmas or otherwise. Another reason for selecting this dish is that its post contains links to a number of seafood dishes and recipes, in case your Feast of the Seven Fishes is minus a few fins. All of this may be yours simply by clicking HERE.
* * *
Coming soon to a monitor near you …
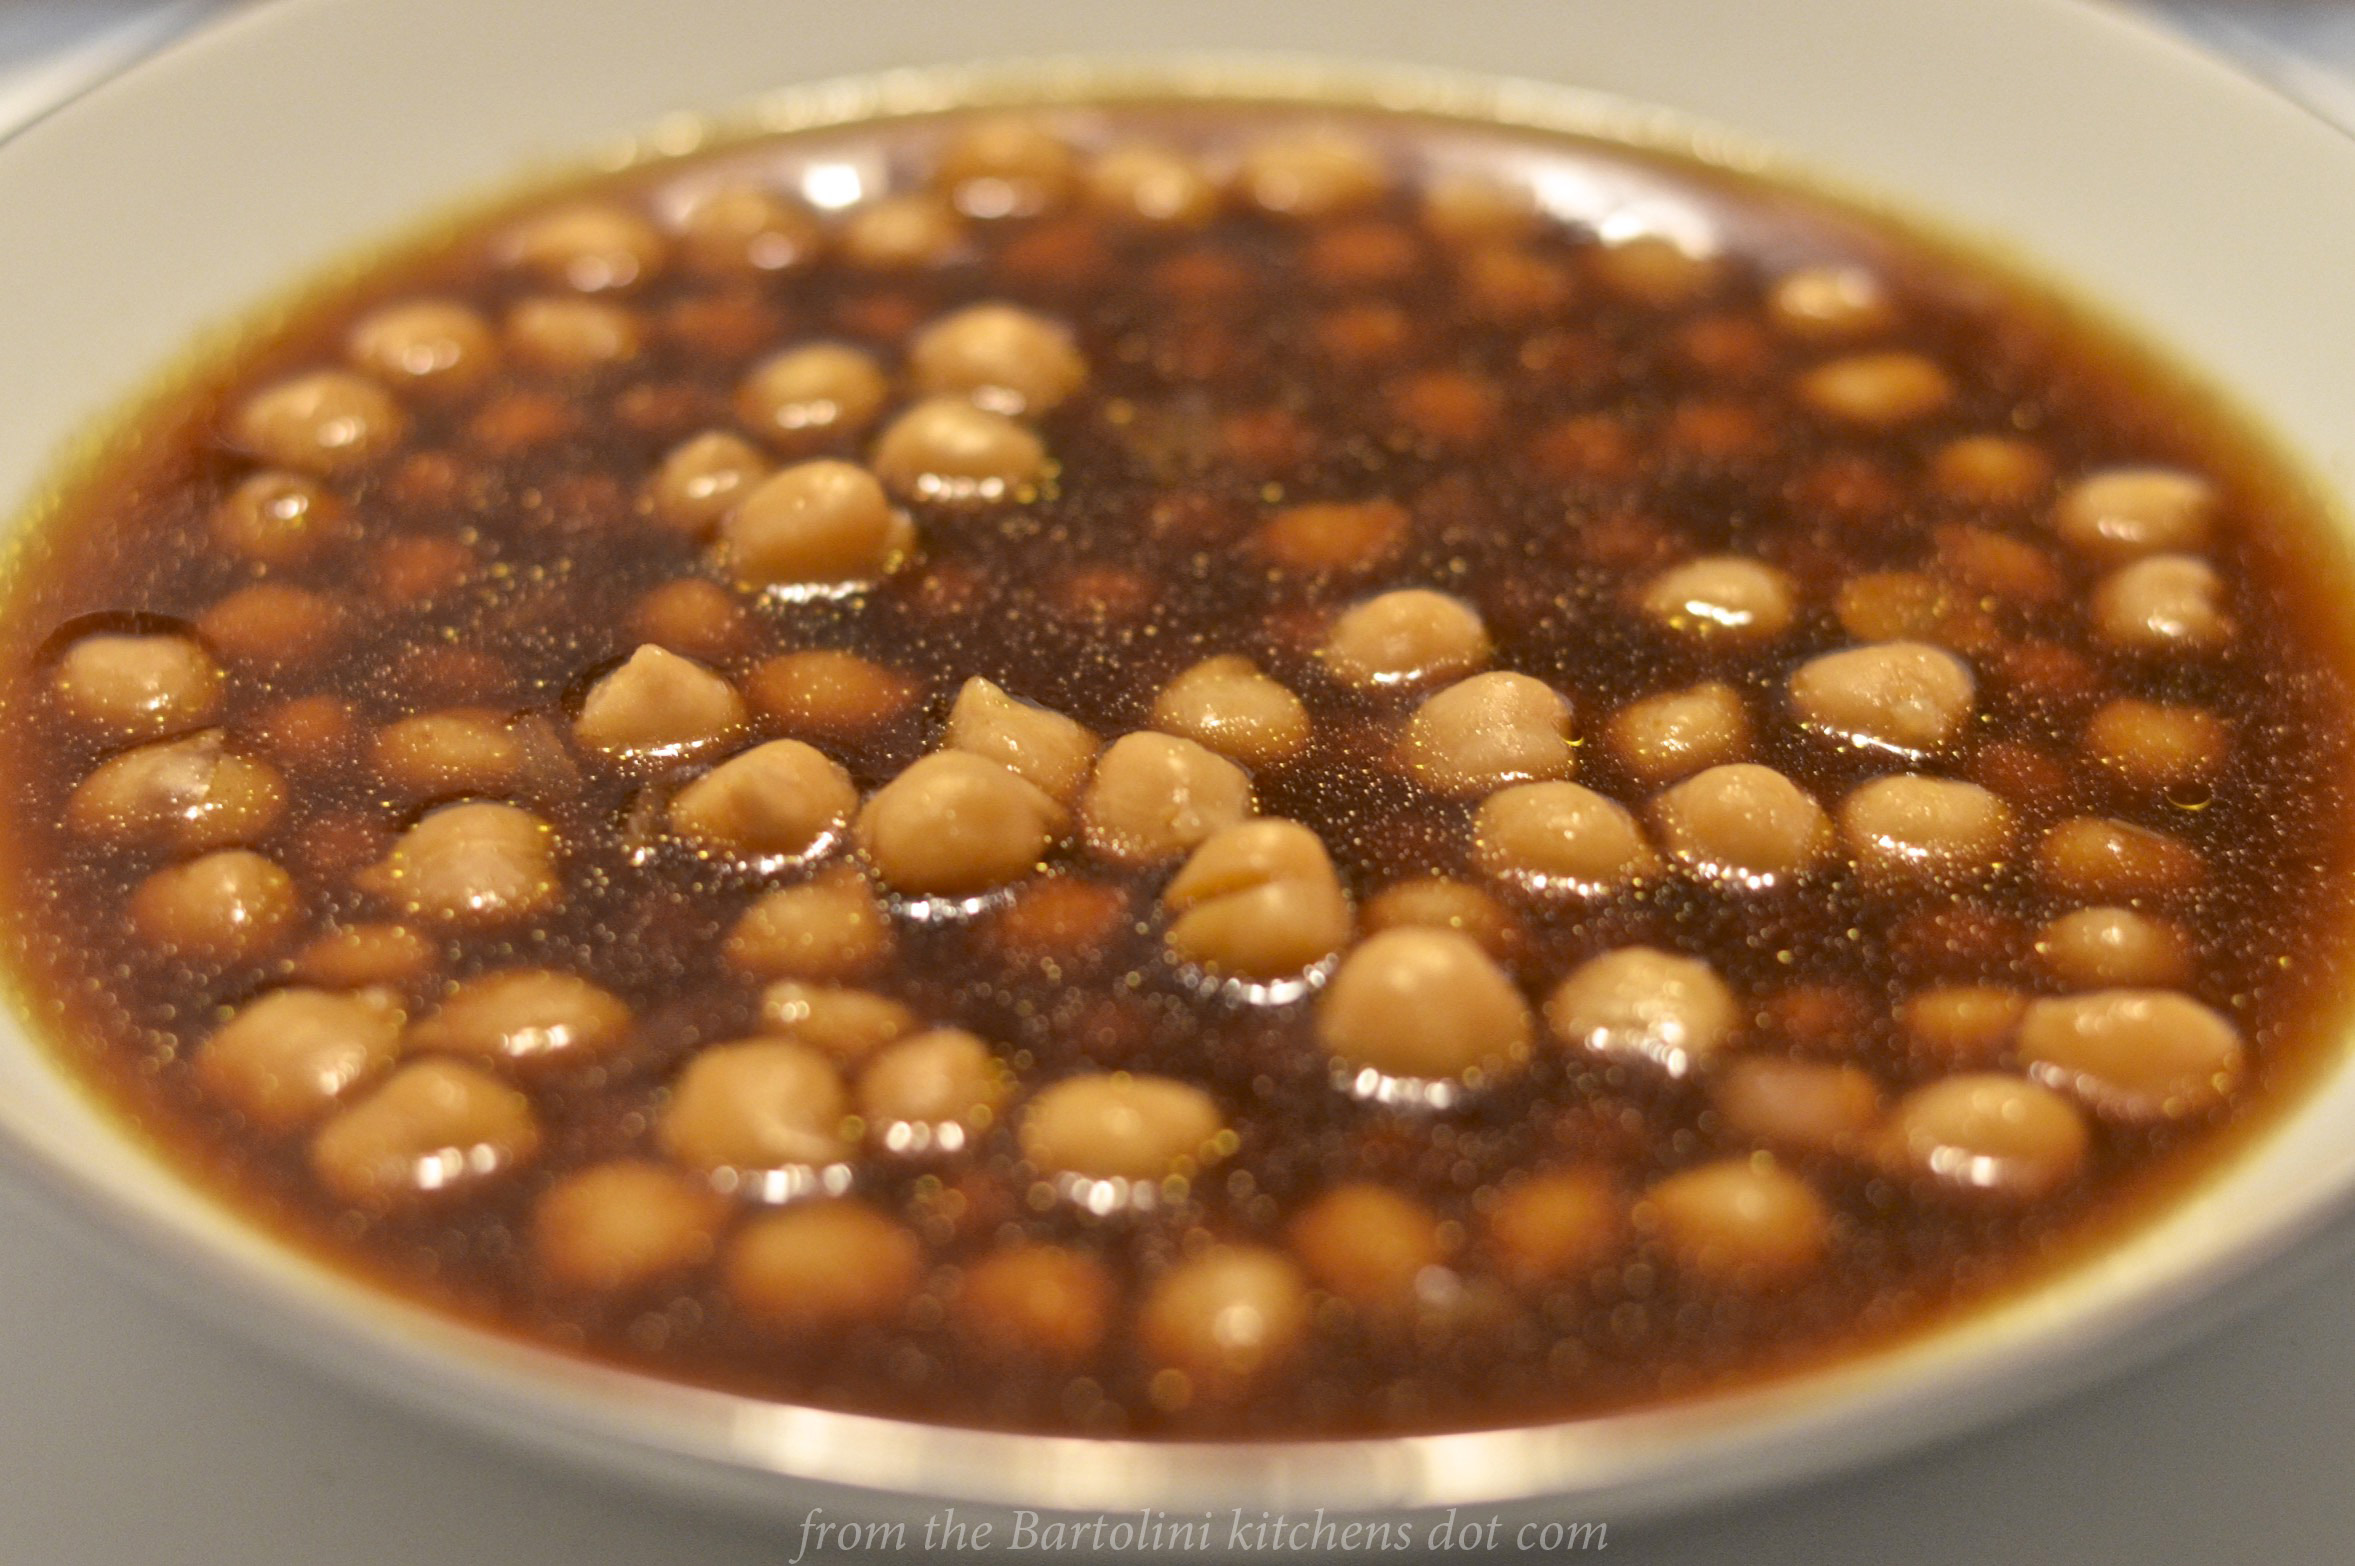 My Grandmas’ Garbanzo Bean Soup
* * *