What do a Zia, a Pope, and an Elf have to do with Today’s Pasta? (Part 2)

*     *     *

Ché bella Zia!

*     *     *

As was mentioned yesterday, today is the 90th anniversary of my Zia’s birth! Last Saturday, some 2 dozen Bartolini gathered at the home of one of her Grandsons for a surprise party in her honor. (Very heavy emphasis on the “surprise.”) The food was delish; the champagne chilled and plentiful (just how I like it); and the highlight of the evening was her Son’s slide show of family photographs. It was a wonderful night for this very special Lady and Matriarch of the Bartolini Clan. She deserves no less!

Now, back to our story …

*     *     *

2 Pieces of the Puzzle

*     *     *

Yesterday, I recounted my favorite story involving my Zia as a means of celebrating her birthday. What’s this? You missed it? Well, click HERE to view yesterday’s post. Once there, you’ll see how Zia and Pope John Paul II are connected. Don’t worry, we’ll wait for your return.

For the rest of you, I don’t expect you to sit idly by while the others catch up. Heavens no! Here’s a musical interlude to occupy your attention while we wait. (Thanks, Cris!)

*     *     *

(Remember this aria, Zia?)

*     *     *

Everybody here? Then let’s continue …

When we left our story, Zia and I had just experienced a close encounter of the Papal Kind and were in a taxi being ferried back to our hotel. When we arrived at the hotel, we skipped lunch, preferring to retire to our rooms. We had anticipated a memorable day and this was so much more than that, a truly once-in-a-lifetime experience. A rest was definitely in order — if for no other reason than to allow Zia to re-hydrate. Later that afternoon, as was our custom, room service delivered our caffè to Zia’s room. Normally, this is when we would have planned our dinner and evening. That night, however, we decided to “stay close to home” and made an early reservation at a restaurant just down the street from where we were staying.

Not that much later, we were seated at the restaurant, our appetites still nowhere to be found. Now, one thing you should know about my Cara Zia is that she loves pasta every bit as much as I do. When we dined, we always enjoyed a primo piatto of pasta of some sort before ordering our secondi and contorni. So, absent an appetite, we did what came naturally: we ordered pasta.  Not so coincidentally, that pasta just happens to be today’s recipe, Spaghetti alla Carbonara.

*     *     *

Spaghetti alla Carbonara

*     *     *

Mom first prepared this dish for me when I was in my teens. She told me a legend that its name was derived from the coal miners that worked in the mines that surround Rome. As they ate their lunch, which often consisted of a plate of pasta, coal dust fell from their clothes and on to their plates. The dish’s ample use of black pepper is an homage, of sorts, to those miners and their lunches.

The version Mom served me usually contained bacon, although prosciutto was sometimes substituted, albeit rarely. Pancetta just wasn’t something that Mom and Zia used in their cooking. Remember, many of the Bartolini dishes began with a battuto of onion, garlic, parsley, and salt pork. There was no need for pancetta, too. As my experience as a cook grew, however, I began to use pancetta more frequently when I prepared this pasta.

Back in Rome, Zia and I noticed that this pasta was made with guanciale, something that was an unknown to me. Our waiter explained that guanciale comes from the pig’s jowls and, like pancetta, it’s cured but not smoked. Although now used throughout Italy, our waiter went on to explain that it is still most commonly used in Rome and its surrounding district of Lazio. Well, we needed no further urging. Zia and I ordered the Spaghetti alla Carbonara and so began my love affair with this cured meat. Unfortunately, it would take me 10 years to find a source for guanciale in my hometown but that’s a story for another day. Even so, in my mind, Spaghetti alla Carbonara will be forever linked to Zia and Pope John-Paul II.

OK. So far I’ve explained the connection between Zia and the Pope and how, on the day of their meeting, we dined on today’s pasta, Spaghetti alla Carbonara. Get ready, kids. Here comes Santa Claus!

*     *     *

No, that reindog isn’t Max.

*     *     *

In the years following that momentous day in St Peter’s Square, I’ve prepared Spaghetti alla Carbonara countless times. It is one of the few dishes I prepare using spaghetti because it’s just not my favorite form of pasta. You see, lacking the means to create this thin, round-shaped pasta, I had to rely on manufactured spaghetti. As you know, I prefer homemade pasta over pretty much all manufactured types. Still, when it came to this tasty dish, I gladly bought spaghetti and never thought twice about it. This all changed 3 years ago, almost to the day.

One afternoon, Martha Stewart was promoting a new attachment for a well-known stand mixer. This piece of equipment worked much like an extruder, forcing dough through interchangeable plates, creating macaroni, fusilli, rigatoni, bucatini, and, you guessed it, spaghetti. Later that day, I spoke with a good Friend (aka my Traveling Companion) and mentioned this pasta-making wonder of modern technology. A year later he would become a member in high standing of my blog’s tasting crew and, at this time, he had already been the beneficiary of many of my dishes and, well, experiments. He understood full-well the ramifications of this piece of equipment. Our conversation ended and that was the end of that, as far as I was concerned — or so I thought. About a week later, much to my surprise, UPS delivered the pasta maker. In its packaging was a card from Santa, wishing me a Merry Christmas. I called to thank my Friend but he denied having anything to do with it — a denial he maintains to this very day. Now, I’ve no reason to doubt my Friend or his word. If he maintains that Santa did, indeed, send me a gift, who am I to disagree? I would just like to point out, however, that he is the Elf holding the reindog in the picture above. Just sayin’…

There you have it. This is how my Zia, a Pope, and an Elf all helped to bring you today’s Spaghetti alla Carbonara. All that’s left to do, aside from presenting the recipe, is to say,

“Buon Compleanno, Cara Zia!”

*     *     *

*     *     *

Spaghetti alla Carbonara Recipe 
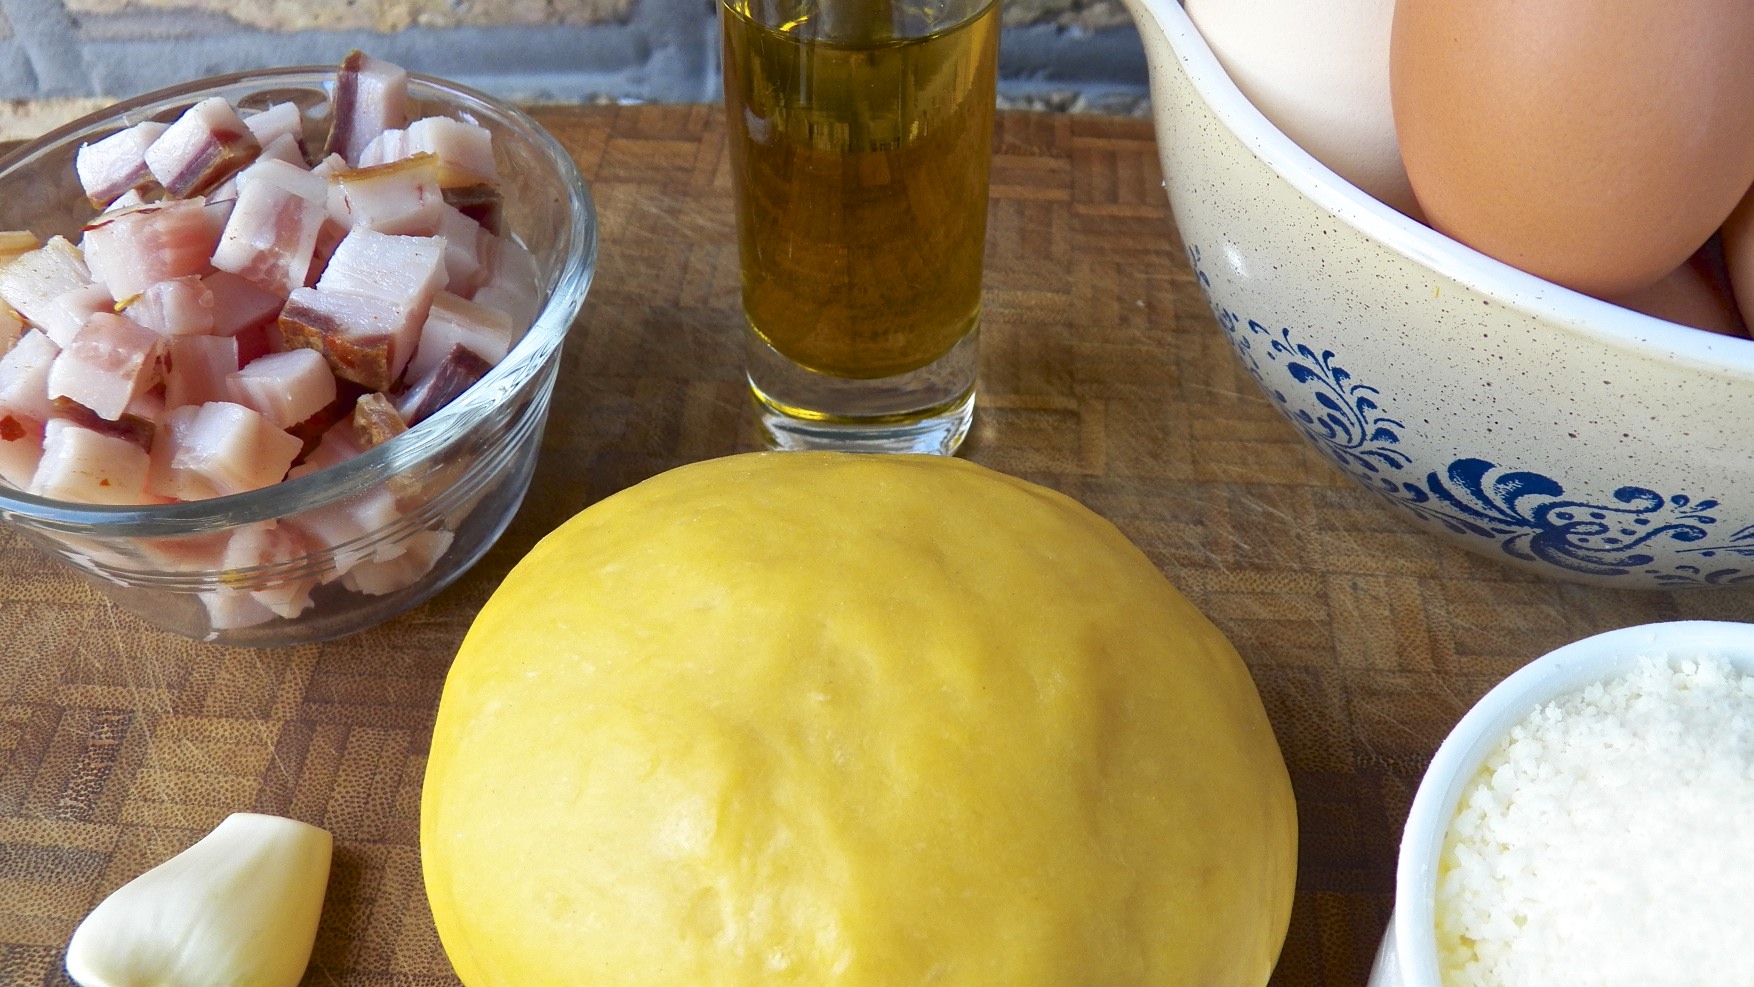
Ingredients

  • 1 lb spaghetti
  • 2 tbsp extra virgin olive oil
  • 4 oz. guanciale, ¼ inch dice (pancetta, prosciutto, bacon, or ham may be substituted)
  • 1 or 2 cloves of garlic, sliced
  • 3 eggs, beaten
  • 1 cup grated Pecorino Romano cheese – separated
  • ½ to 1 tsp freshly cracked black pepper
  • reserved pasta water
  • Parmesan or Romano cheese for garnish/serving

Directions

  1. Warm a large pasta serving bowl.
  2. Bring a large pot of heavily salted water to boil. Add the spaghetti and stir.
  3. Check the spaghetti package’s cooking instructions. You’ll want it to be 2 minutes shy of al dente when the rest of the ingredients are ready.
  4. Add half of the cheese to the 3 eggs and beat well to be rid of any lumps.
  5. In a large, deep frying pan, heat the oil over medium heat. Add the pancetta and brown, rendering all the fat. Do not over cook.
  6. Add the garlic and sauté for about a minute.
  7. While the garlic cooks, reserve a cup of pasta water, drain the pasta, and add the pasta to the frying pan.
  8. Continue cooking the pasta in the oil for 2 minutes, heating it thoroughly.
  9. Pour the frying pan’s contents into the warmed serving bowl. Add the egg and cheese mixture in a slow, steady stream, stirring constantly to prevent the eggs from scrambling. Once fully coated, add more cheese, the pepper, and as much pasta water as necessary to create a creamy sauce.
  10. Serve immediately with plenty of grated cheese and cracked black pepper available at the table.

*     *     *

Notes

For so few ingredients, this is a relative tricky dish to prepare. If not done properly, the pasta will not be hot enough to cook the eggs, raising the possibility of salmonella. To eliminate that risk, I only use pasteurized eggs when making this dish. On the other end of the spectrum, it is very easy to “scramble” the eggs rather than create a sauce. You can limit this risk by mixing the pasta and egg mixture off the heat, in a warmed bowl, and/or by adding a little of the hot pasta water to the egg mixture before it’s added to the pasta. This will, in effect, temper the eggs a bit. No matter how you do it, remember to keep the pasta hot and to work fast.

*     *     *

It’s déjà vu all over again …

It was just about a year ago when I shared the Bartolini recipe for making sausage. Mild compared to most spicy sausages, ours depend upon garlic, white wine, and salt & pepper for flavoring. Consider them a platform on which to build your own sausage. Paprika, red pepper flakes and fennel seeds will change them up a bit, as will marjoram, mint, and oregano. Though these days we tend to form patties more often than sausages, the post is nonetheless chock full of sausage making information. Feel free to ask any questions that may arise. You can view the post by clicking HERE.

*     *     *

Coming soon to a monitor near you … 

Merluzz’ al Forno

*     *     *

Crostini e Bruschette

A few weeks ago I posted my last recipe in the series of making cheese at home, Italian Mozzarella. Within that post were photos of crostini & bruschette and, with the holidays quickly approaching, I thought this the perfect time to share both recipes. Besides, if you were successful and made a couple of pounds of mozzarella, eventually you’re going to tire of eating it “by the chunk” — and that’s when these recipes will come into play.

First a definition of terms. The word crostini means little toasts, whereas bruschetta has as its origin bruscare, to char or roast. They sound pretty similar to me. I’ve always thought the difference to be in the bread used. When I make crostini, I use a baguette, thinly sliced on the diagonal. For bruschette, I use a thicker slice taken from a loaf of Italian bread. I toast both before piling on the fixin’s and sometimes pop them back into the oven afterward. It really does depend on what’s being used to top each off. And speaking of the fixin’s, you can use pretty much anything you like.  Just stick with fresh ingredients and you won’t go wrong.

About a year ago, I posted a recipe for Gorgonzola and Honey Bruschette. At the time, I mentioned that I often use my toaster to toast the bread beforehand and store it in airtight containers until needed later that day. This is particularly helpful when entertaining. It’s just one less thing to worry about.  No matter when you toast the bread, though, try to serve these bruschette directly after preparation or they may become sodden.

 *     *     *

 *     *     *

Mozzarella and Tomato Bruschette Recipe

Ingredients

  • ⅔ inch (1.7 cm) slices of Italian bread
  • plum tomatoes, seeded and chopped
  • garlic, minced
  • a few tbsp of sweet onion, diced
  • fresh mozzarella, cut in 1/2 inch cubes
  • fresh basil leaves, hand torn
  • Italian seasoning
  • olive oil
  • Balsamic vinegar
  • dried oregano
  • salt & pepper

Directions

  1. Slice bread, brush with olive oil, and toast lightly
  2. Add a couple of tablespoons of olive oil to a frying pan over medium heat. Add the onion and garlic, sautéing for about a minute. Do not let the garlic burn.
  3. Add the tomatoes, season with salt and pepper, and cook until heated through.
  4. Remove from heat, add the basil, Italian seasoning, balsamic, and olive oil. Mix well and taste before seasoning with salt and pepper. Set aside.
  5. Add the cubed mozzarella once the tomato mixture has cooled to room temperature.
  6. When ready to serve, spoon some of the tomato-mozzarella mixture on top of each toasted bread slice, season lightly with salt and cracked black pepper, and garnish with a light sprinkling of dried oregano.

 *     *     *

 *     *     *

Crostini alla Caprese Recipe

Ingredients

  • ½ inch (1.2 cm) thick slices of baguette, cut on the diagonal
  • cherry tomatoes, sliced in half
  • fresh mozzarella, cut in ¼ inch (.6 cm) slices
  • fresh basil leaves
  • olive oil
  • red wine vinegar
  • salt & pepper

Directions

  1. Slice bread, brush with olive oil, and toast lightly.
  2. Pre-heat oven to 400˚F (204˚ C).
  3. Place tomatoes in a bowl, season with salt & pepper, and drizzle with olive oil.
  4. Place tomatoes on a baking sheet and then into the oven to roast for about 15 to 20 minutes. Do not allow to roast so long that the tomatoes completely collapse.
  5. Meanwhile, place a slice of fresh mozzarella and then a few small basil leaves atop each piece of toast.
  6. Remove tomatoes from the oven and when cool enough to handle, place one tomato half, cut-side down, on each piece of the toast with mozzarella and basil. If you prefer, add a light drizzle of olive oil and a few drops of red wine vinegar.  Serve immediately.

*     *     *

Notes

These antipasti should be made using fresh mozzarella. No, you needn’t make it yourself and you can find it now in most large grocery stores. Just to be clear, I’m not talking about the pre-shredded stuff used when making pizza. Fresh mozzarella is usually ball-shaped and is often packaged in water/whey. If you’re unsure, ask a person working at your store’s deli counter for assistance.

*     *     *

It’s déjà vu all over again …

Since this post is somewhat party themed, I thought it best to resurrect a recipe that’s perfect when entertaining a large group. Cut into 3 inch squares, your guests will have no trouble munching on this bit of cheesecake while sipping on their cocktails, You can find the recipe for this Cherry Cheesecake Pizza by clicking HERE. If you need help deciding which cocktail(s) to serve, do what I do. Click HERE or HERE. While you’re there, be sure to take some time to check out both Greg’s and John’s blogs. You won’t be disappointed.

*     *     *

Coming soon to a monitor near you …

The Ketchup That Came Down The Mountain

*     *     *

The Proverbial Last Rose of Summer

“Sunset Celebration”

*     *     *

Mediterranean Sea Bass in Parchment

Branzino al Cartoccio

During the past 6 months, I’ve discovered not just an Italian market with an extensive fish counter but 2 fish mongers, as well. Their impact upon my diet has been incredible and I’ve enjoyed a far greater variety of seafood than ever before.  I’ve not seen some — whiting (merluzzo), eels (anguille), octopus (polipo) — since I was a boy. Others — clams (vongole), squid (calamari), red snapper, and the like — may have been more readily available but the fish and calamari were often frozen and finding clams was a hit-or-miss affair. So, suddenly having 3 sources for fresh (affordable) seafood is mind-boggling and I’ve taken full advantage of them. Mediterranean sea bass (branzino) is a case in point.

Up until I found the Italian market, branzino was something I only saw on the menus of restaurants. My usual sources for seafood certainly weren’t going to carry it, although I suppose I may have been able to order one. You can imagine my surprise when I looked at the market’s fish counter one day and saw no less than a dozen fresh branzini on display. I just could not pass them by — even though I was leaving for Michigan the next morning. I bought one, packed it in ice overnight, repacked it in ice in my cooler for the trip, and we arrived in Michigan, fresh as daisies, the next afternoon. After a quick run to a grocery, I fixed today’s recipe for Zia that night.  Unfortunately, the pictures from that dinner were too dark to be used in a post, so, I was forced to prepare the dish again here at home. I know. The sacrifices we bloggers must endure.

By now, you’ve probably surmised that al cartoccio is Italian for “in parchment.” For this dish, because of its length, I used 2 sheets of parchment paper to enclose the fish. With a smaller branzino, you may be able to use a single large sheet, folded in half.  Although this is a recreation of our meal that night, it’s not exactly what I had planned for us. True to form, I forgot to bring a few ingredients with me and her area’s markets did not have them in supply. The fish was nonetheless delicious but, if you’re interested, the “Mediterranean style” mentioned in Variations below is what I had originally intended for that evening.  No matter how you decide to prepare your fish, be sure to set aside a few of the diced vegetables and chopped herbs to be used as garnish before serving. They’ll add both texture and freshness to the dish.

*     *     *

Branzino al Cartoccio Recipe

Ingredients

  • 1 branzino, cleaned, scaled, fins trimmed and, if desired,  head and tail attached
  • 1 fennel bulb thinly sliced
  • thinly sliced lemon
  • diced yellow bell pepper
  • diced, cored, & seeded tomato
  • chopped scallions
  • a couple stems of fresh basil
  • 1 or 2 rosemary branches
  • a few parsley stems
  • white wine
  • olive oil
  • salt & pepper
  • 2 sheets of parchment paper
  • additional diced vegetables with hand-torn basil & parsley for garnish

*     *     *

Oven Ready

*     *     *

Directions

  1. Pre-heat oven to 400˚F (204˚C).
  2. Place a large sheet of parchment paper on a large baking sheet.
  3. Place the sliced fennel in a straight line, forming a bed for the fish.
  4. Use a sharp knife to score both sides of the fish. Do not cut through the backbone. Depending upon its length, 3 or 4 parallel cuts should be made into each side of the fish. Season the fish, inside and out, with salt & pepper.
  5. Lay the fish on top of the fennel bed. Stuff the cavity with a loose bundle made with all the herbs.
  6. Cover the top of the fish, from gill to tail, with lemon slices and cover them with the chopped vegetables.
  7. Sprinkle a little wine across the entire fish and then repeat with olive oil.
  8. Cover the baking sheet with another sheet of equally sized parchment paper.
  9. Beginning on one side, grab the edges of both sheets of paper, fold them twice together, and use a stapler to permanently attach them to each other.
  10. Repeat Step 9 on the remaining 3 sides, creating a sealed pouch for the fish.
  11. Lightly brush the pouch’s top with olive oil before placing the pouch and baking sheet in the pre-heated oven.
  12. Bake for 20 to 25 minutes, depending upon the thickness of the fish. See Notes below.
  13. Slide the pouch on to a serving platter and bring to the table. Pierce the top but be careful of the steam’s release. Peel back the paper to reveal your main course and serve, garnished with the reserved diced vegetables and chopped herbs.

*     *     *

Pronti!

*     *     *

Variations

If you prefer a more Mediterranean style, add some chopped olives to the vegetables, add some fresh oregano to the herbs within the cavity, and use a little dried oregano to season the chopped vegetables. Oregano is a strong-tasting herb. Be careful not to use too much. Feel like something from South of the  (US) Border? Swap cilantro for the parsley, add a little chopped jalapeño to the vegetables, and maybe a pinch or two of cumin. And no matter style you follow, you can’t go wrong with capers — unless you forget to add them like I did when I prepared this fish.

*     *     *

*     *     *

Notes

The cooking times may vary depending upon the size and thickness of the whole fish or even the fillets, if used. Though the pouch will protect your fish from drying out to a point, you don’t want to let it cook too long. A good rule of thumb for this or any fish roasted in parchment is to listen for the sizzle coming from inside the pouch. Most whole fish will be finished cooking from 7 to 9 minutes from that point; fillets will be finished in about 5 minutes.

You may have noticed that I used staples instead of a series of folds to seal the parchment ends. Once I saw Alton Brown do this, I abandoned the origami method of sealing the pouches. This is so much easier and reliable, especially when preparing a fish large enough to require 2 sheets of parchment paper.

*     *     *

It’s déjà vu all over again …

I’m just finishing up with this year’s canning, preserving, and pickling. One family favorite that I shared last year is the recipe for Zia’s Corn Relish. It’s a simple pickle, actually, and results in a great little condiment to serve with virtually any protein. It’s a little bit o’ sunshine on your dinner plate and who wouldn’t like that in the cold months ahead? Now, don’t worry if the “good” fresh corn is no longer available. Frozen corn can easily be used to make this relish and you can see the recipe by clicking HERE.

 *     *     *  

Coming soon to a monitor near you …

Crostini

 *     *     *

This Plum Cobbler is Magical!

You may recall that I shared a peach cobbler recipe a few weeks ago. Somewhere along the line, I mentioned having another recipe for cobbler, one where the topping starts in the bottom of the baking dish but rises to the occasion during baking, giving you a perfectly formed topping to the rich fruit/berry filling. How can this be?

**********

Do you believe in magic?

**********

I’ve made this cobbler more than a few times over the years. Peaches, plums, strawberries you name it, I’ve used them all. It’s an easy recipe, a fast recipe, and one that is sure to please everyone at your table. Just bear in mind that the topping of this cobbler, unlike the peach cobbler recipe I shared HERE, is more cake-like than biscuit. I happen to like them both and now you’ll have a choice.

The recipe is as easy as 1, 2, 3 …

*********

Melt Butter in Baking Dish

*********

Add Batter – Do Not Mix

*********

Add Par-Cooked Filling – Do Not Mix

**********

Bake while singing “Abracadabra!” and … Ecco!

*********

Plum Cobbler Recipe

Ingredients

  • 1/2 cup unsalted butter, melted
  • 1 cup all-purpose (AP) flour
  • 2 cups sugar – divided
  • 1 tbsp baking powder
  • pinch salt
  • 1 cup milk
  • 4 cups plums, pitted and chopped
  • 1 tbsp fresh lemon juice
  • ground cinnamon and/or nutmeg, to taste (optional)

Directions

  1. Pre-heat oven to 375 F (190 C).
  2. Pour melted butter into a 9 x 13 x 3″ baking dish.
  3. In a medium bowl, combine the flour, 1 cup sugar, baking powder, with salt and mix well.
  4. Add the milk, mixing until just combined. Pour this batter into the baking dish containing the melted butter. Do NOT mix.
  5. In a medium saucepan, combine the plums, lemon juice, with  remaining cup of sugar and bring to a boil over med-high heat. Stir constantly. Remove from heat and add optional cinnamon and/or nutmeg.
  6. Carefully pour the plum mixture into the baking dish. Do NOT mix.
  7. Bake on a baking sheet in the center of a pre-heated oven for 40 to 45 minutes or until the top is golden brown. Alternately, you can forget to set a timer and eventually find a cobbler in your oven resembling the one in the final picture above
  8. May be served warm or cold, garnished with ice cream or whipping cream.

**********

Variations

As mentioned, you can use whatever fruit or berry that you like for the filling. I’ve never used a thickening agent, like flour or cornstarch, for fear of it affecting the cake’s formation magic.

Although the recipe lists cinnamon and nutmeg as optional, I rarely use them. I find that they can easily overpower a dessert, so, I use them sparingly in my cobblers, if at all.

**********

It’s déjà vu all over again …

Today’s Blast from the Pasta, Spaghetti Aglio e Olio, is probably the most versatile of all pasta recipes. Prepared as written and you’ll be enjoying a delicious pasta dinner within minutes but that’s only part of the story. Saute some vegetables and you’ll have a great pasta primavera. Add some clams with a touch of white wine and you’ve got the classic pasta con vongole. The choices are endless and I prepare this dish, in one form or another, just about once a week. You can see the recipe by clicking HERE.

**********

Coming soon to a monitor near you …

Branzino al Cartoccio

**********

An Update

Although I’m the proud owner of some new, fancy schmancy equipment, I am still without a DSL. I have been promised, however, that service will be restored, better than ever, sometime this evening — and companies, especially very big companies, never ever lie.

Thanks for your comments and well-wishes.

*********

Tomato with Bread Soup

Pappa al Pomodoro

Columbus Day is right around the corner and I can think of no better way to commemorate the day than to share a recipe that typifies traditional Italian cooking. I’ve mentioned in the past that very little goes to waste in an Italian kitchen, bread being a perfect example. Like elsewhere in Europe, bread is baked or bought daily and seldom, if ever, is it discarded because it’s stale. Day old bread is used to make everything from bread crumbs to a delicious Tuscan salad known as Panzanella. {That recipe features Michigan heirloom tomatoes (What else?) and is from Bam’s Kitchen, a wonderful blog whose author currently lives in Hong Kong and offers recipes from around the world.}  Today’s recipe, Pappa al Pomodoro, is another that takes advantage of not just day old bread but, also, the glut of home-grown tomatoes that many experience during Summer. It is a simple dish to prepare but, oh, so very satisfying.

I cannot speak for everyone but I will say that the majority of us, growing up in Italian households, at one time or another experienced the simple pleasure of eating a piece of bread that had just been dipped in Mom’s or Nonna’s simmering pot of tomato sauce. As a boy, Mom would dunk a piece of crusty bread into the pot, blow on it a few times to cool the sauce, and then hand it to me with a warning to be careful because it was still hot. As I got older, I became an expert at sneaking a piece of bread into the pot and then my mouth in one fell swoop without her noticing. (Yeah, right!). Unfortunately, the sauce was every bit as hot as it was years before and a burned mouth was very often punishment for my devious ways. Even so, the reward of a piece of sauce-soaked bread made the risks worth while. And today, far too many years later to mention, my favorite way of checking the seasonings of my tomato sauce is with a chunk of bread, though I’ve grown a little more patient and a burned palate is rare.

Understanding that bit of my personal history may help you understand why I so enjoy Pappa al Pomodoro. Often described as having the consistency of baby food, one might wonder why ever would anyone like this soup. Well, one taste and you’re once again standing next to Mom or Nonna, eagerly waiting for her to blow on a sauce drenched tidbit. Here, though, instead of just having a crust of bread, you have an entire bowl to savor. Better still, the fresh basil and grated cheese gives this dish a wonderful aroma. I’m telling you, if you liked pieces of sauce-dipped bread as a child, you’re going to really enjoy this soup as an adult.

When making this soup, be sure to use the ripest tomatoes you can find. In fact, if they’re a little over-ripe, that’s just fine. As for the bread, it’s best to use day old bread with a good crust; fresh bread just won’t do. I use a small loaf of ciabatta and it works perfectly. If you’ve no day old bread, you can use fresh if you slice it and put it into a warm oven for a few minutes. You’re not trying to toast the bread, merely dry it somewhat, mimicking the feel of bread that’s just past being fresh. This is necessary because dried bread will receive the sauce much more readily than fresh. Think back to when you were a child. The best “samples” resulted from bread that had been fully drenched in the sauce. The same is true here. Lastly, be sure to garnish each serving with olive oil, freshly grated cheese, and a hand-torn leaf or two of fresh basil, the aromas of which will add so much to the dish.

*     *     *

Pappa al Pomodoro Recipe

Ingredients

  • 3 tbsp olive ol
  • 1 onion, chopped
  • 2 garlic cloves, minced or grated
  • 2½ lbs of tomatoes, preferably plums, peeled, cored, seeded, and chopped
  • 2 cups vegetable stock – water may be substituted
  • about 9 oz of day old, crusty Italian bread, cut into cubes (I use a small ciabatta loaf.)
  • 1 cup fresh basil leaves
  • salt & pepper, to taste
  • olive oil, grated Pecorino Romano cheese, and whole basil leaves for garnish

Directions

  1. Heat oil in a saucepan over medium heat. Add onions and sauté until translucent, about 5 – 8 minutes. Add garlic and continue cooking for another minute. Season lightly with salt and pepper.
  2. Add tomatoes, bring to a boil, and then reduce to a simmer. Cook until tomatoes begin to break down, about 5 minutes.
  3. Add the bread and stock to the pot, stirring until the bread is fully coated with the tomato mixture. Continue to simmer until the soup begins to have the consistency of  baby food.
  4. Hand tear the basil leaves, add to the pot, stir, and continue a low simmer for about 10 more minutes. Add more stock or water if it becomes too dry.
  5. Serve immediately, garnished with grated Pecorino Romano cheese, a drizzle of olive oil, and a leaf or two of fresh basil.

*     *     *

Notes

What if you live here, in Chi-town, and you want a bowl of Pappa al Pomodoro but it’s January. Fear not! Although fresh, vine ripened tomatoes are always preferable, you can make this soup with canned tomatoes just as easily. Instead of using the 2½ lbs. of tomatoes listed in the recipe’s ingredients, substitute one large can of San Marzano tomatoes, crushing them by hand before you add them to the pot.

Speaking of San Marzano tomatoes, shopping for a can of the real thing can be a daunting task. Many cans will claim to be filled with San Marzano tomatoes but, after close inspection of the labels, you’ll learn that they are mere plum tomatoes and not their more famous — and expensive — cousins. How do you tell the difference? Like authentic balsamic vinegar, San Marzano tomato sales and distribution are tightly controlled. Click HERE to learn what must be on a can’s label for all San Marzano tomatoes. By the way, if the canned tomatoes are crushed, chopped, or puréed, they are not true San Marzanos. See? Click on the link.

*     *     *

Coming soon to a monitor near you …

Italian Mozzarella!

*     *     *

It’s déjà vu all over again …

With Columbus Day fast approaching, I thought it appropriate to take a look at not one but two posts from the past. The first will share my family’s recipe for a ravioli filling that consists of veal, pork, spinach, cheeses, and seasonings. The second will show you how to use a ravioli die to make the pasta pillows. Click HERE to see the ravioli filling recipe and  HERE to learn how to make the ravioli.

*     *     *

Peach and Bing Cherry Cobbler

Well, it certainly took me a while to get here but this is it, the end of this year’s peach recipes. And, as far as this blogger is concerned, I saved the best for last. You see, I happen to really like peach cobbler. I make them with a batter that rises through the peaches, creating a cake-like top. I make them with a biscuit placed on top and baked.  I eat them as they are, still warm from the oven. I eat them with a scoop of vanilla ice cream or a large spoonful of whipped cream. And there lies the problem. I eat them. All of them. Every last morsel of every last one of them. There just aren’t many recipes for peach cobbler for one. So, I make a cobbler and for the next week, my snacks and desserts are all servings of peach cobbler.  I know, poor me! Well, this time around, I decided to try something different. I divided the cobbler among 6 smaller dishes and froze all but the one I tested for “quality control”. (Thank you, Tanya.)  See Variations below to see what I did.

Oh, yes. I almost forgot about the cherries. Most will recall that a few weeks ago I shared 2 recipes for a blueberry and cherry pie. The final pie was so good that I’ve been thinking of combining other fruit in other pies. Well, this being peach cobbler season, why not  experiment? Last week at the farmers market, I purchased what would turn out to be the last of the season’s Bing cherries and a plan was born. Upon my return home, Google gave me the recipe.

Today’s cobbler combines Bing cherries with fresh peaches and is crowned by a biscuit, of sorts. There’s nothing complicated about it, though pitting the cherries can be a bit tiresome. Even so, once the fruit is prepared, the rest of the recipe is a snap. And once you taste this cobbler, you won’t remember anything about pitting cherries — unless you wore a white t-shirt. When will I learn?

 *     *     *

 *     *     *

This post was written prior to my departure for Michigan and scheduled to post now. The trip went as planned, Zia’s freezer is filled, and we took turns cooking dinner. I hope to have a “vacation” post written by the weekend. Internet service was deplorable and, as a result, it will take me a while to get caught up with all of your posts and comments but I’ll get there. Thanks for your patience.

 *     *     *

Peach and Bing Cherry Cobbler Recipe

Ingredients

  • 3½ lbs peaches, peeled and sliced or chopped  (about 6 large peaches)
  • 2 lbs Bing cherries, pitted
  • ¾ cup sugar
  • ¼ cup cornstarch
  • 3 tbsp lemon juice

for the biscuit topping

  • 2 cups all-purpose (AP) flour
  • ⅓ cup plus 2 tbsp sugar, divided
  • 2½ tsp baking powder
  • ½ tsp salt
  • ½ cup unsalted butter, chilled and cubed
  • ¾ cup plus 2 tbsp whipping cream, divided
  • ¼ tsp ground cinnamon
  • ice cream for serving (optional)

Directions

  1. Liberally grease a 9 X 13″ baking dish. Pre-heat oven to 425˚ F (218˚ C)
  2. In a large saucepan over high heat, combine peaches, cherries, and sugar. Stir carefully, bring to a boil, and simmer for 1 minute.
  3. Remove filling from heat and pour into prepared baking dish.
  4. In a mixing bowl, whisk together the AP flour,  ⅓ cup of sugar, baking powder, and salt.
  5. Using knives or a pastry blender, cut the butter into the dry ingredients until a very coarse mixture results. Stir in ¾ cup whipping cream and knead only enough to create a dough. DO NOT OVER-WORK THE DOUGH.
  6. Place dough on a floured surface and roll to a ½ inch thickness. Use cookie or biscuit cutters to cut shapes in the dough. Place the shapes on the filling in any pattern you wish.
  7. Combine cinnamon with remaining sugar and whipping cream. Use a pastry brush to coat the tops of all the pasty cutouts.
  8. Bake in a 425˚ F (218˚ C) pre-heated oven for 20 to 25 minutes. Filling should be hot and bubbling.
  9. Serve warm with optional ice cream.

 *     *     * 

*     *     *

Variations

As I mentioned, I used 6 small baking dishes for this recipe rather than 1 large dish. 4 of these dishes each held 500 ml while the other 2 were a little smaller at about 400 ml. I greased and filled each one, using biscuit cutters for the topping. Once they were baked and cooled completely, I wrapped each in plastic wrap before sealing them again in aluminum foil. They were placed on a baking sheet and frozen. To serve, remove the plastic wrap and recover using the foil before placing it in an oven pre-heated to 350˚F (177˚C). After 30 minutes, remove foil and continue heating until filling is bubbly, about another 15 minutes. Cooking time will depend upon size/amount frozen.

I think next year I’m going to try this recipe using tart cherries instead of Bing and with a little almond extract in the biscuit instead of the cinnamon. It’s not that there is anything wrong with this cobbler, I just happen to prefer tart cherries and want to see if they’d be at least as good.

*     *     *

It’s déjà vu all over again …

Peaches are all but gone from our farmers markets and though a few berries, plums, and pears remain, apples have started to take over the vendors’ stalls. It’s the time of year for apple pies, muffins, crumbles, and sauce. If you choose your apples wisely, your pie will be as tart, and your apple sauce as sweet, as you like.  As proof of the latter, last year I shared a recipe for apple sauce that does not call for any sugar whatsoever. You can see the recipe by clicking HERE.

*     *     *

And another thing or three …

Aside from the recipes I’ve posted, the Kitchens have been busy trying out recipes from two great blogs. Thanks to David, The Gastronomic Gardener, I have jars of brandied figs and 2 kinds of pickled peppers on my shelf. And thanks to Richard, REMCooks, my tasters and I all have jars of  peach preserves with jalapeños and cardamom. Both guys have great blogs and I hope you take some time to check them out.

*     *     *

Peach Ice Cream – Revisited with Custard and Nectar


Yes, I know it’s getting a little late for ice cream recipes and peaches are all but gone from the farmers markets, but I just couldn’t let this one sit around until next year. My previous peach ice cream used sour cream for its base. Today’s recipe uses custard for a base but it, also, uses peach nectar for added flavor.  That peach nectar also affects the ice cream’s texture. One of my tasters said it was like a cross between sorbet and ice cream. Despite its great taste, though, you may prefer a more traditional, custard only, ice cream. Lucky for us all, Betsy has already shared her recipe for peach ice cream on her blog, Bits & Breadcrumbs. (Do take a few minutes to check out both her recipe and her blog. You won’t be disappointed.)  So, you now have 3 peach ice creams from which to choose but if you think I’m done with peaches, you’d be mistaken. Next week I’ll share a recipe for peach cobbler, with a twist.

This ice cream will have a better “mouth feel” if you fully purée the peaches.  Although you can process the peaches until merely chunky, I find it better if they are puréed until completely smooth. This recipe will make 3 quarts of ice cream. That’s quite a bit if you’ve a smaller machine like mine. The saving grace of my machine is that I purchased it on Amazon during a sale in which I received an additional freezing canister for free. That additional canister means that I can get all 3 quarts made and put away in one night. To see how it’s done, be sure to check out the Notes section below.

Now, I’m already in Michigan, where Zia and I have plans to stock her freezer with ravioli and sausage, that is if we can keep Max occupied elsewhere. So, I’ll keep the posts for today and next week on the short side. Given the sorry state of that area’s internet coverage, I hope you’ll understand if I’m not quick to respond to your comments or to leave a remark on your blogs.

 *     *     *

 *     *     *

Peach Ice Cream Recipe

Ingredients

  • 4 cups peeled and chopped peaches (about 3 lbs or 6 large peaches)
  • 1 cup nectar
  • ½ cup sugar
  • 4 egg yolks
  • 4 cups milk
  • 1 cup half-and-half
  • 1 tbsp lemon juice
  • ¼ tsp cinnamon
  • pinch of salt
  • sliced fresh peaches and toasted pecans for garnish (optional but strongly advised)

Directions

  1. In a large bowl, combine peaches, sugar, and nectar. Mix thoroughly.
  2. Working in batches, use a food processor or blender to fully purée the peach mixture until smooth. Refrigerate.
  3. In a mixing bowl, whisk together egg yolks and milk until fully blended. Add the egg mixture to a heavy-bottomed pan or double boiler (my favorite). Heat over a med-high heat, stirring constantly, until it thickens and a custard forms, about 20 to 25 minutes. DO NOT ALLOW TO BOIL.
  4. Once thick enough to coat the back of a wooden smooth, remove from heat and pour the custard through a fine mesh strainer into the reserved peach purée. Add the half-and-half, lemon juice, cinnamon, and salt, whisking until fully combined.
  5. Cover and place in the refrigerator for at least 4 hours.
  6. Make your ice cream using this peach custard and following your machine’s instructions. Place in freezer until frozen to your liking.
  7. When ready to serve, garnish with sliced peaches and toasted pecans. (See Variations)

 *     *     *

Variations

This is a good ice cream recipe but it is so much better when served with sliced fresh peaches and toasted pecans. To prepare the peaches, just peel and slice a ripe peach, putting the slices in a resealable container. Sprinkle a little sugar on top, seal the container, and place in the fridge for at least 30 minutes, giving the fruit a chance to macerate. In the meantime, toast the pecan chips in a small frying pan over medium heat. Be attentive or they’ll burn before you know it. Add a little of both to your ice cream cup for a dessert that is just about perfect.

Notes

As I’ve mentioned, this recipe will make enough peach custard to make 3 quarts of ice cream. That is 2 quarts too many for a single machine like mine and even though I’ve got a 2nd canister, that still leaves me with one quart of custard too many. Since it takes a full 24 hours to freeze my canister, this recipe could stretch out over 2 days, at least. Here’s what I do to get around the problem.

Once the custard is chilled and ready to be put into the machine, I put it into the canister and refrigerate the excess.  When it’s ready, after about 25 minutes, I quickly dump the newly formed ice cream into a container, place it in the freezer,  and quickly refill the canister with more custard. If there’s leftover ice cream in the canister, all the better. After 25 minutes, I will not have ice cream but I will have a thicker, chilled custard.  I then pour this custard into the unused frozen canister, which I’ve kept in the freezer until now. No need to let the machine process for all the 25 minutes, 15 minutes will do. Quickly remove the ice cream, use it to fill another quart container, and place it in the freezer. I then pour the remainder of the custard into the same canister and let her rip! Surprisingly, after about 30 minutes, I’ll have another quart of ice cream ready to be frozen. And what do I do with 3 quarts of ice cream? I give 2 quarts to my tasters and keep one for me.

Adapted from Southern Living, July 2005

*     *     *

It’s déjà vu all over again …

Well, with today’s recipe being an ice cream, what better recipe to pull from the past than the one for pickles, Bread & Butter Pickles? These are not preserved but are kept in the refrigerator, where they will keep for weeks. You needn’t worry about that, though. These pickles will disappear long before freshness is an issue. You can read the recipe by clicking HERE.

*     *     *

The parting shot …

For the past 13 weeks, I’ve ended each blog entry with a photo. Well, I’ve no more roses to share but I didn’t think it right to abruptly stop the practice. So, I give you this last photo and, although this may have nothing to do with roses, it is, in its own way, every bit as memorable. With thanks to Chris.

*     *     *

A Pasta for the Open

I don’t know about you but when I hear that the US Open Tennis Championships are about to begin, I immediately think of pasta. I mean, how could I not? So, when the Open starts, I naturally prepare some form of pasta to mark the occasion, just as so many of you do, I’m sure. In the past, it didn’t really matter what pasta was selected for that meal, and my choices have ranged from Bucatini to Ziti, and several pastas in-between. This all changed, however, one day when I toured the newly discovered Italian market’s pasta aisles. That’s where I discovered Racchette, a racket-shaped pasta.

*     *     *

*     *     *

Although I’m certainly no expert, I think it safe to say that Racchette are a relatively new pasta and virtually all are manufactured by machines. I mean, I just cannot imagine Nonnas — be they from Today or the 19th Century — rolling out dough sheets and making these little rackets. I know my Nonnas certainly didn’t — but if yours did, please leave a comment and I’ll be more than happy to amend this paragraph. Moving beyond Racchette’s manufacture, I can say, in all honesty, that the first any of the Bartolini women heard of Racchette was when I mentioned the pasta to my Zia a couple of weeks ago during a conversation. It should come as no surprise to anyone, therefore, that there is no Bartolini family recipe for Racchette.

Without a family recipe to use, I did what most do in this situation:  I googled it. That search returned thousands of results but most were very similar. That base recipe is one that I will make but I’ll do it in Spring, when the ingredients are fresh and readily available. Onward I went, wading through more of the search results until I came upon a recipe that was presented by the company that made the pasta. I went into kitchen, grabbed the box, and, sure enough, the recipe was on the back of the box of Racchette. (Isn’t it always the last place you look?) That recipe, Racchette California Style, is the one I’ll share today.

The recipe, as written, calls for red, white, and Marsala wines. When I prepared it, I used what I had on-hand, Pinot Grigio, Merlot, and a sweet Marsala. You may have better wine selections in mind (Jed) and, if you do, I hope you’ll use the Comments section to make your suggestions — and that includes ideas beyond wine selection. I think you’ll find this to be a simple, easy to prepare recipe. All you need to do now is to find the Racchette.

*     *     *

*     *     *

Racchette “California Style” Recipe

Ingredients

  • 1 lb Racchette
  • 1 handful fresh basil
  • 2 tbsp pine nuts
  • 1 clove garlic, smashed
  • 1 tsp grated Parmesan cheese
  • 1 tsp grated Pecorino Romano cheese
  • ½ cup white wine (I used Pinot Grigio)
  • ½ cup red wine (I used Merlot)
  • ½ cup Marsala wine (I used a sweet variety)
  • 2 tbsp butter, softened

Directions

  1. Bring a large pot of salted water to boil and cook Racchette per package directions or to taste.
  2. Meanwhile, add the basil, pine nuts, garlic, and cheese to a food processor until blended.
  3. Add the wines and process until well-mixed.
  4. When cooked to you liking drain the pasta. Add the softened butter to the sauce, giving it a creamier texture.
  5. Add the sauce to the pasta, toss, garnish with additional grated cheese & cracked pepper (optional), and serve.

Inspired by the De Cecco company’s Racchette California Style recipe

*     *     *

Notes

I must admit to having been surprised by this pasta. Neither Zia nor myself have ever used wine in pasta without cooking it, even if only for a few minutes. Using a total of 1½ cups of “raw” wine to dress a pound of pasta is completely new and something I never would have considered doing on my own. And the verdict? I enjoyed it. I make simple pastas with garlic, mushrooms, lemon, basil, or cheese as the predominant flavor within the “sauce”. Why not wine? Of course, if you’re not a wine lover, this dish isn’t for you. On the other hand, if you do enjoy a glass of wine every now and again, you just might want to give this dish a try.

*     *     *

It’s déjà vu all over again …

Just as was done in the last 2 posts, today’s look back will take advantage of the season’s harvest. Illinois is a leading producer of corn in this country and, even though the state is suffering the effects of a severe drought, there’s still plenty of corn in the farmers markets — at least in this area. This recipe for Corn Relish comes from Zia’s kitchen and is one that she prepared and canned every year. You can make it as spicy as you like and it is a terrific way to add a little Summer to your meal in the dead of Winter. Just be sure to make a double batch. It’s the only way to ensure you’ll have a few jars when Winter comes. Click HERE to see the full recipe.

*     *     *

By any other name …

In morning light …

*     *     *

Later that day

Never one to show up on time, she’s finally bloomed. Meet the last of my girls and last of my roses, “Marilyn Monroe”. Officially said to be apricot-colored, some say that the blooms are flesh-toned and mirror the complexion of its namesake.

*     *     *

Mom’s City Chicken and Grandpa’s Water Works

Funny how this Summer has worked out. At its start, I’d planned to continue making cheese with you, sharing some seasonal recipes, posting more ice cream flavors, and sharing photos of “my girls” and their companions in the garden. Suddenly, Labor Day is here and I’ve run out of time. We’ve still not made Italian mozzarella, I’ve a couple of tomato recipes to share, and there’s still a custard-based peach ice cream to make. Oh! Mustn’t forget the cobbler. Fall will just start late this year. To further complicate my schedule, today’s post was reserved for a special pasta celebrating the US Open Tennis Championship. That was before I saw a package of veal at the market. That changed everything.

Last year, Linda posted a recipe for City Chicken on her wonderful blog, Savoring Every Bite.  At the time, I commented that I’d not thought about City Chicken in years. Mom prepared a version but it’s been some 35 years since I last tasted her City Chicken. Had Linda not shared her recipe, who knows when I would have remembered Mom’s? Anyway, after Linda’s reminder, I decided to put City Chicken on the schedule — last Summer! Well, as you know, it never made it but I had every intention of sharing Mom’s recipe this Summer — and then it again got lost. Last week, however, I saw veal cubes at the market and immediately thought of City Chicken. Since it would make a great dish for the coming holiday weekend, Mom’s City Chicken was suddenly on the schedule. Its addition pushed my special tennis pasta back a week and, well, Fall’s arrival, at least on this blog, has been delayed yet another week. By the way, don’t be surprised if Thanksgiving and Christmas are celebrated in one post this year. Hopefully, I’ll then be able to start the New Year sometime in January.

((cue the harp))

Throughout my childhood, Mom served us City Chicken almost exclusively on Wednesday or Sunday, when Dad was home to work the grill. Although I’ve already mentioned The Barbecue, I’ve not talked much of the rest of our yard. You see, the two-flat was built on a vast expanse of land, in the very center of which was the beautiful, privately owned, Lake Bartolini (pictured below, click to enlarge). While we kids frolicked, Dad was likely at The Barbecue, grilling that night’s meal, City Chicken being a family favorite. In the years following the barbecue’s construction in 1959, Grandpa would build a garage with an enclosed patio, attach a grape arbor, and plant his tomatoes on the lawn just beyond The Lake, after the first of what would become yearly land-grabs. (His tomatoes needed more land, always more land.) When The Lake was lost, the much larger and deeper Bartolini Sea, was erected and filled. As we would all come to learn, ripening beefsteak tomatoes can somehow attract errant pool toys, especially whenever Grandpa strolled through the yard. When the Sea gave way to what must have been near tectonic forces, it was replaced by the even larger and more formidable Bartolini Ocean, the last of the series.

OK, that is the official account of the Crystal Blue Waters of the Bartolini, the version you’ll see on the historical markers that dot the area. Here, for the first time anywhere, is the real story.

Grandpa wanted a garden, desperately, and even though Lake Bartolini stood in his way, he would never do anything to disappoint his adoring Grandchildren. No, not Grandpa. His was a problem that would have befuddled Solomon. You can well imagine, therefore, Grandpa’s relief the morning we kids awoke to find Lake Bartolini had been completely drained. Upon close examination, we saw that one side of  The Lake was inexplicably peppered with holes, while the most attentive among us claimed to have overheard our Parents whispering something about buckshot. Grandpa’s subsequent claim that one of us kids was to blame fell on deaf ears. Our Parents, calmly and coolly, bought and built the Bartolini Sea. With walls made of corrugated steel, the Sea glistened just to the West of the where the original Lake once stood. Grandpa got his garden and we kids had a new, buckshot-proof, Sea in which to swim. All went well until that thing about tomatoes attracting pool toys was discovered, much to Grandpa’s great displeasure.

Not but a couple of years after it’s installation, again we awoke to find that our gorgeous swimming hole, the Bartolini Sea, was but a mere puddle. On one side of the Sea, in the corrugated steel, was a gash of not quite a foot long. Bent inward, the steel pierced the Sea’s lining and flooded the yard. Depending upon which Parent asked, Grandpa said that my Youngest Cousin or I did it with the lawn mower. In our defense, I will merely point out that an old push mower was used to maintain the lawns. Even if we teamed up, together pushing that relic and with a 100 foot running start, never could we two young boys get up enough steam to create so much as a dent, let alone pierce, that steel siding. Our wise Parents, though they never determined “the how”, quickly surmised “the who” and soon thereafter we were erecting the bigger, better, and even sturdier Bartolini Ocean. It remained in our yard until it died of natural causes, some years later. Grandpa, too, remained in his garden, ensuring both he and his tomatoes never went thirsty, for years to come.  Though this marks the end of Grandpa’s Water Works, this is hardly the end of his story. Frankly, I’m just getting started.

Now, back to the Present. Mom’s City Chicken couldn’t be any simpler to prepare. Equally sized cubes of veal, beef, and pork are marinated, skewered, wrapped with a rasher of bacon, and grilled. It really is that easy. I don’t give any amounts in the recipe to follow because so much will depend upon how many skewers are to be prepared. You can add, or subtract, spices to the marinade. Just be sure to make enough so that some can be reserved and later brushed on the skewers as they come off the grill. (Something I forgot to do for the photos.) Although the FDA no longer requires pork to be cooked well-done, many still prefer it cooked more than beef or veal. To accomplish this, I always place 3 pieces of meat on each skewer, pork always being the last/top one. As you’ll see in the recipe to follow, this will allow you to keep the pork closest to the fire, assuring it is cooked more than the other meats.

*     *     *

*     *     *

Mom’s City Chicken Recipe

Ingredients

  • Beef, cut into approx. 1½ inch cubes
  • Veal, cut into approx. 1½ inch cubes
  • Pork, cut into approx. 1½ inch cubes
  • Bacon, 1 rasher for every skewer
  • marinade

Marinade

  • juice and zest of one lemon
  • rosemary, chopped
  • garlic, minced or grated
  • Italian seasoning
  • olive oil
  • salt & pepper

Directions

  1. Add all the marinade ingredients to a bowl, whisk to combine, and set aside, reserving  a ¼ cup for later use. Place the meats into the bowl, mix until coated, and refrigerate for at least one hour or overnight
  2. Soak wooden skewers overnight. (This will prevent their burning during grilling.)
  3. When ready, light the grill.
  4. Using one thick skewer or 2 thin for each city chicken, pierce one end of a bacon rasher, followed by one piece of each type of meat. Be sure that the top piece of meat for each skewer is pork. After the pork is in place, wrap the meats with the bacon and secure its remaining end by piercing it with the skewer(s) tip(s).
  5. Once finished and the grill is hot, shut down part of the grill to facilitate  indirect grilling. Use a rag dipped in oil to grease the grill plate.
  6. Place the skewered meat on the grill with the pork closest to the fire/heat.
  7. Turn the meat after a few minutes, more or less depending upon the grill’s heat. The object is to cook the skewered meat without torching the bacon. The pork, being closest to the fire, will cook faster.
  8. With the meat still very rare, move the skewers directly over the fire/heat. Now the object is to crisp the bacon and to finish cooking the skewered meats. Turn the skewers occasionally to ensure even cooking.
  9. When grilled to your satisfaction, remove to a  platter, brush with reserved marinade, and serve.

*     *     *

Variations

Although Mom used all 3 meats, you needn’t if you prefer otherwise.  Use whatever meat(s) you like. The same is true for the bacon. I’m sure turkey bacon could be easily substituted.

Mom used 1 short, thick skewer for each of her City Chickens, skewers she got from her butcher. Try as I might, I’ve been unable to find them. Instead, I use 2 of the more readily available long, thin bamboo skewers. Before soaking, I trim off about 4 inches from each, making it much easier to grill them, especially if you’ve a small grill surface.

*     *     *

It’s déjà vu all over again …

Although some have already reached the end of tomato season, many of us are still harvesting the red beauties. One of my first posts featured Mom’s Tomato Antipasti that she made with Grandpa’s tomatoes. This time of year, his vines produced enough fruit to keep both families well-supplied and rarely was an evening meal prepared without tomatoes playing a role. Those who missed it the first time around  can find my post for Mom’s Tomato Antipasti by clicking HERE.

*     *     *

By any other name …

“Don Juan”

This tour of roses began on one side of my yard with “Opening Night”, a red hybrid tea rose, and ends on the opposite side of my yard with “Don Juan”, a red hybrid tea rose. (Who better to indulge my girls?)

*     *     *

It’s Mom’s Birthday and I’ve Got a Peach of an Idea!

As you may, or may not, recall, August is the birthday month for a number of people in my life, with today, August 15th, being Mom’s birthday as well as that of her Mother, Grandma Bartolini. Zia’s husband, “Uncle”, was born on the 11th  — and we’re just getting started. My Friend, one of the Kitchens’ tasters, had a birthday on the 7th, while another, my Friend the Entertainer, will be celebrating on the 20th.  And we mustn’t forget the kids. My Grand-Nephew’s birthday was the 1st, my not-quite-a-nephew Nephew will be blowing out candles on the 24th, and the Oldest of the Boys Upstairs has a birthday this Saturday, on the 18th. That’s a lot of birthdays!

So to celebrate, last August I posted 3 separate ice cream recipes that I combined for the finale. The first was taken from a recipe book that Mom gave me shortly after I moved to Chicago in 1980.

*     *     *

Pistachio Nut Ice Cream

*     *     *

Next on that month’s agenda was an ice cream based on Mom’s own chocolate recipe.

Chocolate-Chocolate Chip Hazelnut Ice Cream

*     *     *

Then came the third recipe. Again, using Mom’s recipe as a base, I created this “pretty in pink” ice cream.

Maraschino Cherry Ice Cream

*     *     *

Well, with those 3 recipes laying the ground work, I had little choice but to put them together.

Spumoni Ice Cream (It’s da Bomba!)

*     *     *

Now, having mentioned those 3 ice cream recipes and a Bombe, I might as well finish off this little round-up by sending you to the hands-down favorite ice cream recipe of all the Kitchens’ tasters, family, and friends. It may not be a frozen custard nor traditional ice cream but, I have to say, it’s damn good!  (Pssst! It’s the crumbled graham cracker crust.)

Blueberry Cheesecake Ice Cream

*     *     *

As great as that all sounds, this year I was in quite a pickle. What should I do for this year’s Birthday Month? How could I possibly top a Spumoni Bombe? Well, I can’t and won’t even try. What I will do, however, is share a recipe for an ice cream flavor that Mom loved. Yes, when it came to ice cream, Mom had a number of favorites. Frankly, I doubt that Mom ever tasted an ice cream that she didn’t like — and we haven’t even mentioned sherbet yet.

So, with that monkey off my back, I decided to take full advantage of the bounty in this area’s farmers markets. Today’s recipe will be for peach ice cream. It’s a simple recipe that results in a peachy frozen delight.  It’s Mom’s birthday, however, and “peachy” just won’t do. Directly following the recipe is a serving suggestion that Mom would have surely enjoyed. I hope you will, too.

Now, if you’ve no experience working with peaches, this paragraph is for you. In the first place, you may not be able to find fruit that are perfectly ripe, even in your farmers market. Just place the best you can find in a paper bag, place it on a counter, and check them every morning. In a couple of days, your peaches will be exactly how you like them. So, once your peaches are ripe, how do you peel them? Bring a large pot of water to boil. In the meantime, fill a large bowl with iced water. Take each peach and use a paring knife to cut a small “X” into the fruit’s bottom. Place the peaches into the rapidly boiling water and leave them there for about 30 seconds. Transfer them to the iced water bath to cool and to stop them from cooking. After a few minutes, simply peel off the skin beginning at the “X”. You may need a paring knife to trim a stubborn spot or two but, basically, that’s all there is to it.  And that’s the last of any possible problems you might run into.

*     *     *

*     *     *

Peach Ice Cream Recipe

Ingredients

  • 1½ pounds peaches — about 4 large fruit
  • ½ cup water
  • ⅔ cup sugar
  • ½ cup sour cream
  • 1 cup whipping cream
  • ¼ tsp vanilla extract
  • ⅛ tsp cinnamon
  • pinch salt

For Serving

  • 1 peach. peeled & sliced — more depending upon the number of servings
  • sugar
  • toasted chopped pecans

Directions

  1. Once the peaches are peeled, cut each into chunks, removing the pit in the process.
  2. Place the peaches and water into a non-reactive sauce pan and cook over a medium heat until the peaches are soft — about 10 minutes.
  3. Remove from heat, add the sugar, stir well, and set aside to cool.
  4. When the peach mixture has reached room temperature, place it in a food processor or blender, along with the sour cream. whipping cream, vanilla extract, cinnamon, and salt. Purée until blended but still a little chunky.
  5. Place the peaches & cream mixture into the fridge until thoroughly chilled — about 4 hours, more or less depending upon your fridge.
  6. Add the chilled peaches & cream to your ice cream machine and follow the manufacturer’s instructions to create your peach ice cream.

To Serve

Peaches are in season and we shouldn’t let this opportunity slip away. About 45 minutes before you serve your peach ice cream, peel and slice a ripe peach, more depending upon how many servings are to be prepared. Place the slices in a bowl, sprinkle with sugar, stir gently, and set aside. When ready to serve, divide the peach slices and juice among the servings of ice cream. Garnish with toasted chopped pecans.

Inspired by David Lebovitz, “The Perfect Scoop”

*     *     *

By any other name …

“Bella’Roma”

*     *     *