Where East Meets West: Wonton Wrapper Pastas

Today’s entry is the fulfillment of a promise that I made to Norma in the Comments section of the Bartolini Cannelloni recipe post of last March. (Norma, by the way, is a cookbook author whose wonderful blog, Garden to Wok, is filled with tasty recipes and gardening tips.) She asked if egg roll skins could be used in place of pasta dough to make cannelloni. Well, Norma, it took 2 months and I used wonton wrappers but here’s the promised post.

Back before I started buying ravioli molds but after I learned I was unable to use Mom’s tiny cappelletti mold, I saw someone on a cooking show use wonton wrappers to make ravioli. That’s all I needed to see. Before long I was making ravioli and tortelloni using the wrappers without any problems. In fact, I’d probably still be using wrappers if I hadn’t seen another TV cook use a large ravioli mold one day. Soon I was making ravioli and cappelletti of all sizes and I never bought another wonton wrapper.

When I’ve shared our ravioli recipes, some have mentioned that the process seemed difficult and time-consuming. Using wonton wrappers eliminates one of the more difficult elements, that of making and rolling out the pasta dough. With that out-of-the-way, the rest of the process is a snap and this post will show you just how easy it is to use wonton wrappers to make stuffed pasta. Along the way, we’ll make round ravioli, manicotti, square ravioli, and tortelloni, all of which are pictured in the unfortunate photo above. It’s a long post but the method for preparing each pasta will “stand on its own” so that you need only reference the section(s) that interest you.

*     *     *

How to make Jumbo Ravioli (Ravioloni)

  1. Place one wonton wrapper on a floured work surface.
  2. Place about a tbsp of filling in the center of the wrapper.
  3. Use your fingers or a brush to moisten the 4 edges on the wrapper.
  4. Place another wrapper on top.
  5. Use your fingers to remove as much air as possible while pressing to seal the edges.
  6. Use a pastry wheel or sharp knife to trim uneven edges.
  7. Use a fork’s tines to press and further seal the 2 wrappers.
  8. Reserve on a lined baking sheet for later cooking or freezing.

*     *     *

This slideshow requires JavaScript.

These ravioli are about 3.25 inches (8.9 cm) square, after trimming. Remember that when cooked, they will expand a bit more.

*     *     *

How to make Ravioli

  1. Place one wonton wrapper on a floured work surface.
  2. Use a pastry wheel or sharp knife to cut the wrapper in half.
  3. Place about a tsp of filling in the bottom half of each part.
  4. Use your fingers or a brush to moisten the top half of each part.
  5. Fold the top half and cover the bottom half of each.
  6. Use your fingers to remove as much air as possible while pressing to seal the edges.
  7. Use a fork’s tines to press and further seal the 2 ravioli.
  8. Reserve on a lined baking sheet for later cooking or freezing.

*     *     *

This slideshow requires JavaScript.

These ravioli are about 1.6 inches (4.0 cm) square.

*     *     *

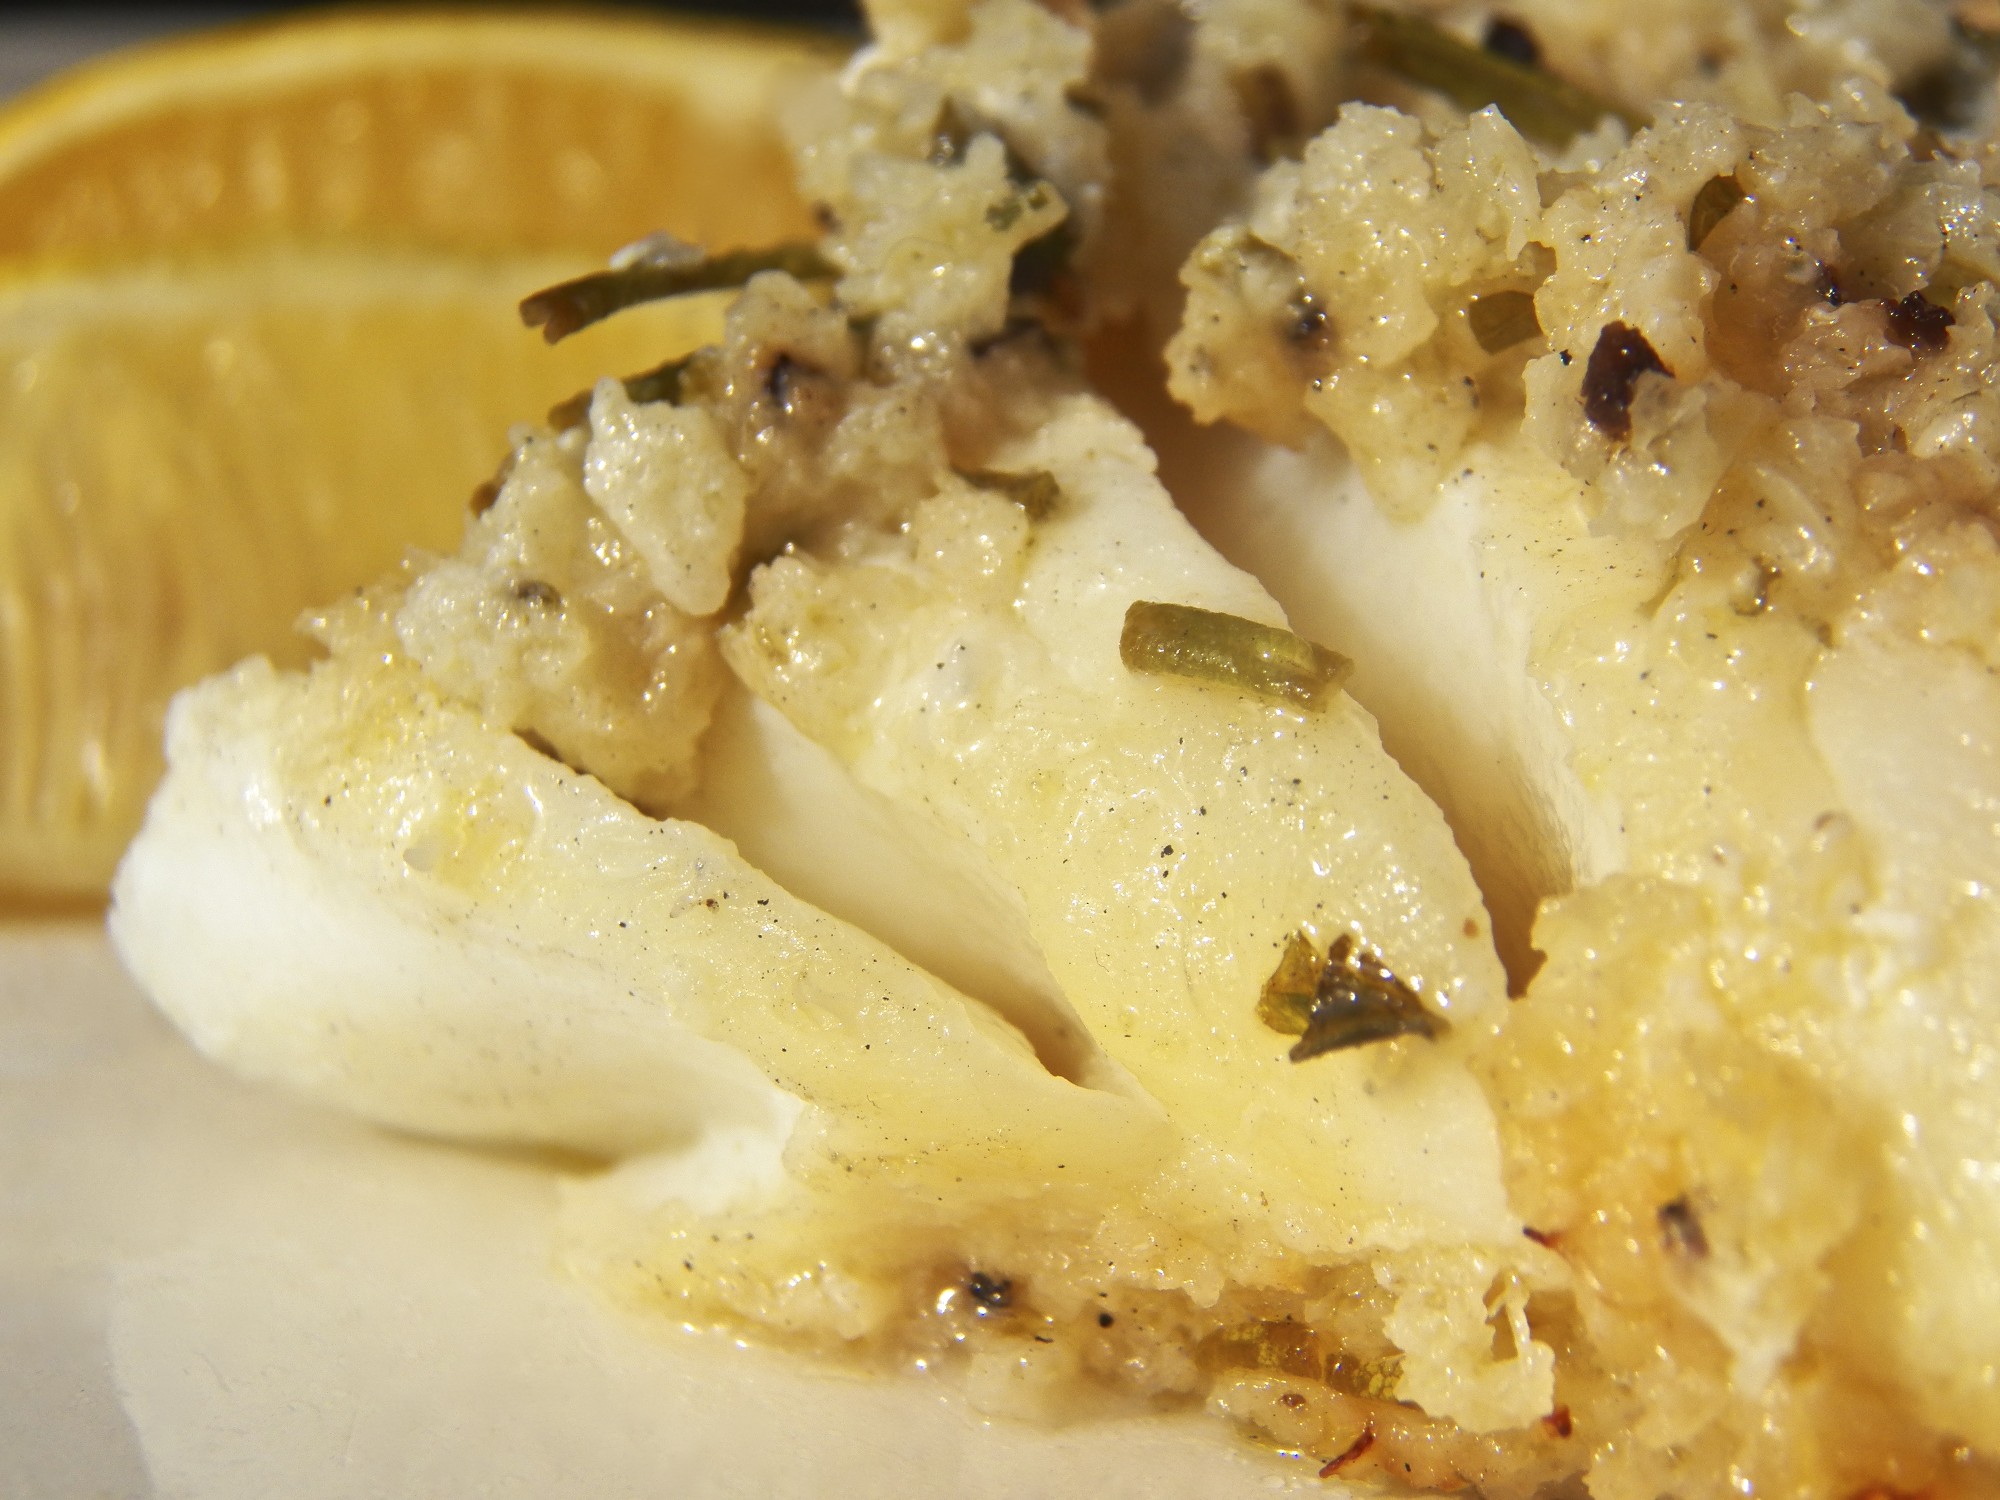
How to make Large Round Ravioli

  1. Place one wonton wrapper on a floured work surface.
  2. Place about 2 tsp of filling in the center of the wrapper.
  3. Use your fingers or a brush to moisten the wrapper area around the filling.
  4. Place another wrapper on top.
  5. Use your fingers to remove as much air as possible while pressing to seal the edges.
  6. Carefully place a large biscuit cutter over the covered filling. Make sure that the cutter surrounds the filling without touching it.
  7. Press down on the biscuit cutter hard enough to sever the wrappers.
  8. Remove excess wrapper from around the cutter.
  9. Remove the raviolo from the cutter and reserve on a lined baking sheet for later cooking or freezing.

*     *     *

This slideshow requires JavaScript.

These ravioli have a diameter of 2.5 inches (6.4 cm).

To make Small Round Ravioli use a smaller biscuit cutter. Mine was 2 inches (5 cm) in diameter.

*     *     *

How to make Tortelloni

  1. Place one wonton wrapper on a floured work surface.
  2. Use your fingers or a brush to moisten 2 adjoining sides of the wrapper.
  3. Place a little more than a tsp in the corner opposite the moistened sides.
  4. Fold the moistened half of the wrapper to cover the other.
  5. Use your fingers to remove as much air as possible while pressing to seal the edges.
  6. Use a fork’s tines to press and further seal the 2 sides.
    1. At this point, you’ve created a triangular-shaped raviolo. You can stop here or continue and make a tortelloni. 
  7. Use you finger to make an indentation in the center of the triangle’s hypotenuse. (And you once thought you’d never use geometry in real life, didn’t you?) 
  8. Bring the two opposing corners together, moisten one, and press together to seal.
  9. Bend backwards the remaining corner.
  10. Reserve on a lined baking sheet for later cooking or freezing.

*     *     *

This slideshow requires JavaScript.

Although it’s not possible to give the exact size of your tortelloni, it’s safe to assume that these would be too large to be used in soup. Any stuffed pasta used in soup should be bite-sized so that the diner needn’t cut them before eating.

*     *     *

How to make Manicotti/Cannelloni

  1. Place one wonton wrapper on a floured work surface.
  2. Place about 1.5 tbsp of filling along the bottom edge of the wrapper.
  3. Use your fingers or a brush to moisten the opposite or top edge of the wrapper.
  4. Carefully and tightly roll the wrapper and filling towards the moistened edge.
  5. Place the finished manicotto/cannellono, sealed-side down, on a lined baking sheet for later baking or freezing.

*     *     *

This slideshow requires JavaScript.

In my family, cannelloni are meat-filled and manicotti are cheese-filled. These manicotti/cannelloni are about 3.5 inches (8.9 cm) wide, perfect for creating a double row in many baking dishes.

*     *     *

Variations

The size and shape of your pasta is limited only by the size of the wonton wrapper. If you haven’t a biscuit cutter in the size you want, try using a glass or jar to cut your pasta. I’ve never used egg roll wrappers but imagine that the processes would be the same, only much larger. Frankly, I’d never use an entire egg roll wrapper to make a single stuffed pasta. Instead, I’d cut it into halves or quarters before using.

*     *     *

*     *     *

Notes

No matter what size or shape of ravioli that you make, be sure that there is no filling along the edge where the dough is to be sealed. It will only interfere with the seal and the pasta will probably open up during cooking. Equally important is to make sure that the pasta edges being sealed are moistened with water. Mom, Zia, Lidia Bastianich, and Mario Batali all agree: egg or egg wash is never used to seal pasta for it can harden during the cooking process, making the edges of your pasta pillows unpalatable.

As you may have noticed in the photos, I used a cheese-based filling when making each stuffed pasta. The recipe for that filling, porcini mushroom, leek, and goat cheese can be found HERE. If you don’t wish to use that filling, you may prefer to use either of these 2 fillings: the traditional Bartolini ravioli filling or the Bartolini sausage ravioli filling.

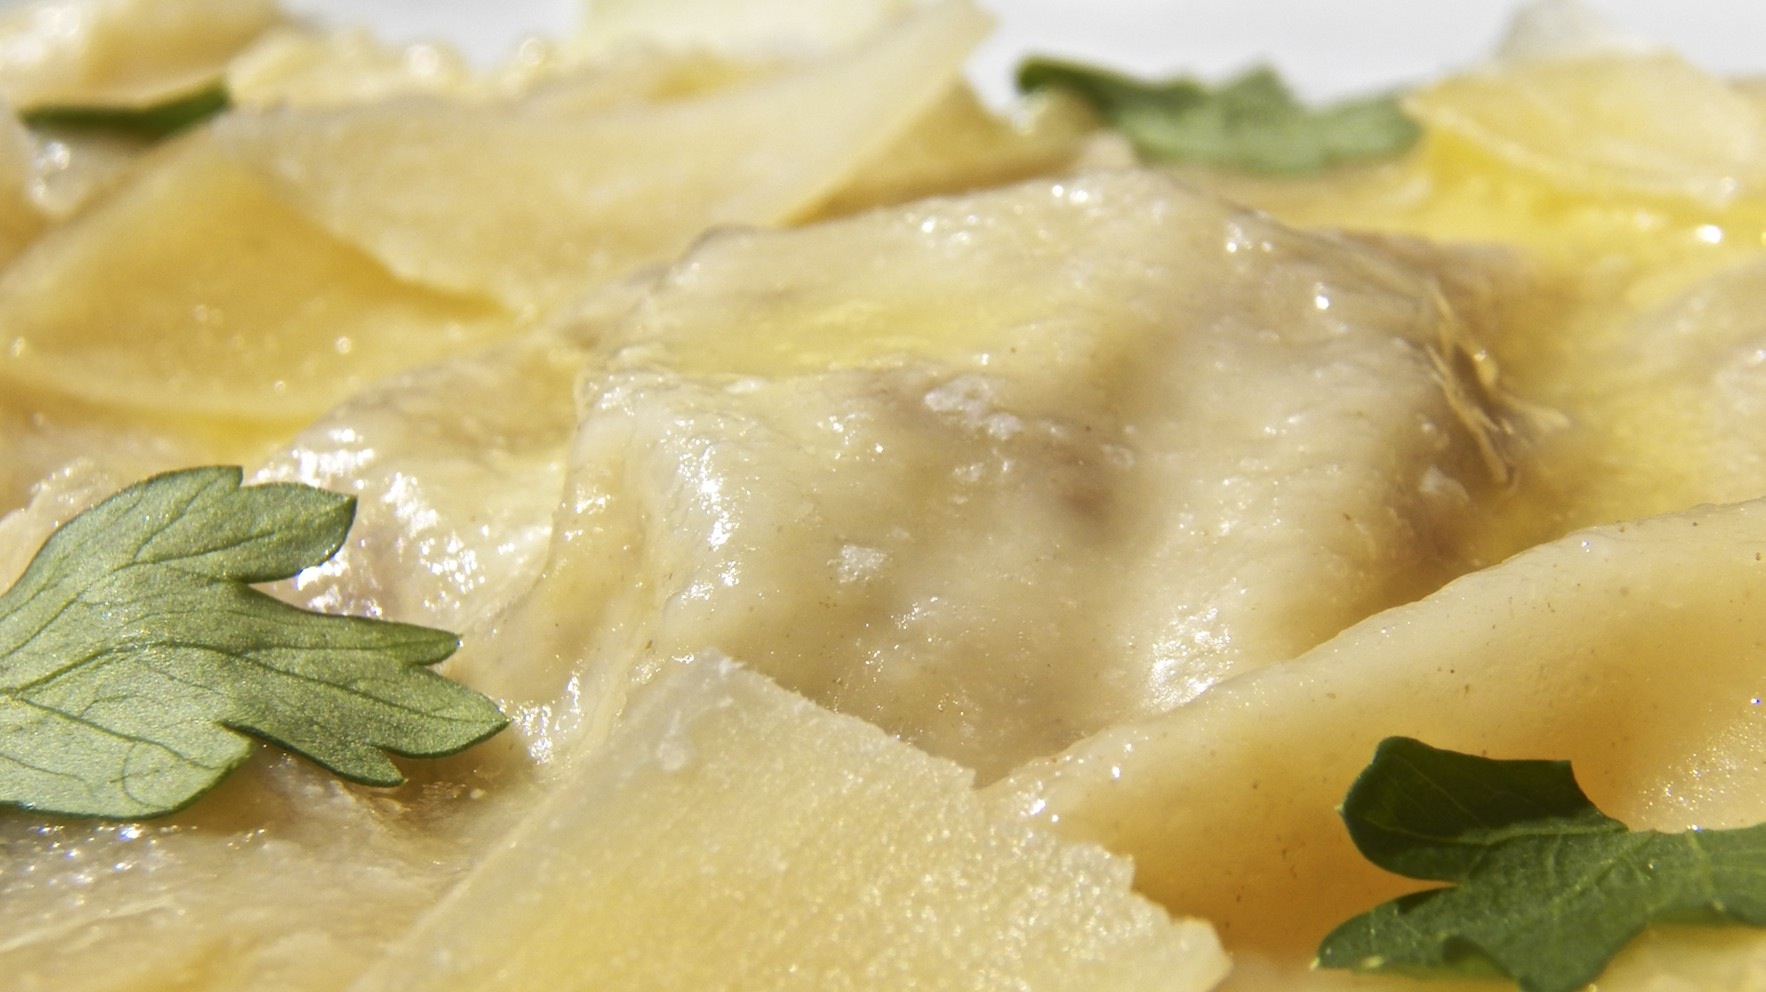
At the very beginning of this post I stated that my objective was to show how simple it is to make wonton wrapper pasta. As you’ll see next week, the filling I used here is flavorful yet, also, uncomplicated and easy to prepare. The same holds true for dressing the cooked pasta. Although you can certainly use any sauce you wish to dress your ravioli or tortelloni, you needn’t complicate matters. The large ravioli pictured above were dressed with melted butter and garnished with Parmesan flakes and fresh parsley. You could just as easily use olive oil in place of the butter, and, grated cheese in place of the Parmesan flakes. By keeping it simple I hoped I’ve demonstrated just how easy it is to prepare a homemade stuffed pasta dinner using wonton wrappers. In short, yes, you can do this!

*     *     *

 It’s déjà vu all over again … 

Fazzoletti PastaSince today’s post used square wonton wrappers, I thought I’d stick with the theme and send you back to the post where we made fazzoletti, little handkerchiefs, pasta. Nothing more than pasta squares, these are among the easiest of pastas to make at home. You can see how they’re made simply by clicking HERE.

*     *     *

Coming soon to a monitor near you …

Porcini mushroom, leek, and goat cheese ravioli filling.

*     *     *

Split Pea Soup

With Mother’s Day but a few days away, I’ve read a number of posts featuring recipes for a variety of dishes, running the full gamut from savory to sweet. Not to take anything away from these beautiful posts, but I’ve chosen a different path. You see, so far I’ve shared a number of soup-related posts. Each was often described in terms of its use for members of my family. This soup nursed me back to health, that one nursed Sis; this was our New Year’s Day lunch, these took turns as lunch on cold Winter’s days; and, always, Dad was there to enjoy the salad Mom prepared using the boiled meats, similar to a bollito misto. Notice that Mom was never mentioned, other than as cook for these fantastic dishes. Sure, she enjoyed each soup but none were her favorite. No, Mom’s favorite, not so coincidentally, is today’s featured soup, split pea.

*     *     *

*     *     *

As much as she enjoyed split pea soup, Mom rarely prepared it. If my memory is correct — something that becomes less likely with each passing day — Mom and I were the only ones to like this soup. The rest, at best, endured it. Not only that but we rarely had baked ham for dinner. As I’ve mentioned in previous posts, our holiday meals were pretty much decided and ham just didn’t make the cut. Besides, I don’t think that Dad was at all interested in baked ham, for I cannot remember it ever being served on a Sunday or any other night that Dad was home for dinner. So, with ham being served so rarely, there were no ham leftovers and, consequently, no split pea soup. I know my vegan and vegetarian friends will take issue with what I’m about to write but here it is. You must have ham to make good split pea soup. Mom said so.

Though it’s true that we might not have had it often, Mom and I still did enjoy our split pea soup. She usually served it when it was just the two of us for lunch and it became something of a special treat. Later, after I moved away, whenever I told her that I was going to roast a ham — or had just done so — she would ask if I was going to make split pea soup, asking for each and every detail of the recipe. And more than once I brought a frozen ham bone home to Michigan with me, made a pot of split pea soup, and left it for her, safely stored in her freezer. So, this Sunday, while many will honor their Mom with a homemade breakfast in bed or a fantastic brunch at a favorite restaurant, I’ll remember mine with a bowl of split pea soup for lunch.

*     *     *

Like so many of the recipes I post, today’s is a work in progress. Over the years it has evolved into a two-step process. In the first, a stock is prepared that becomes the base for the second step. It’s not at all complicated but it does take a bit more time than the standard way of preparing split pea soup. I think you’ll find, though, that the additional flavor in the soup is well worth the extra time required.

*     *     *

Split Pea Soup Recipe

Ingredients

For the ham stock

  • 1 ham bone, some meat left on
  • 2 partially cooked, smoked ham hocks
  • 2 onions, quartered
  • 4 carrots, quartered
  • 4 celery stalks leaves attached, quartered
  • parsley stems
  • 2 bay leaves
  • 4 quarts (3.8 l) water

For the split pea soup

  • 2 lb (908 g) dried split peas
  • 3 to 4 quarts (2.85 to 3.8 l) ham stock
  • 3 or 4 carrots, diced or sliced, as preferred
  • 8 oz (227 g) roasted ham, cubed — more or less, to taste
  • ham removed from bone, trimmed & chopped
  • meat from ham hocks, trimmed & chopped
  • salt & pepper, to taste
  • croutons for serving (see Notes)

Directions

  1. For the stock
    1. Put all the stock’s ingredients into a large, heavy bottomed pot, bring to a boil, and then reduce to a low simmer.
    2. Continue simmer for 2 hours, skimming surface foam occasionally, as needed.
    3. After 2 hours, remove meat from pot and reserve. Pour stock through a fine mesh sieve to remove remaining vegetables and other bits, resulting in a clean stock. Reserve.
    4. When cool enough to handle, trim the meat from the bones and chop into bite-sized pieces. Cover and reserve.
  2. For the soup:
    1. Add all the soup’s ingredients to a slow cooker. If you did not create enough stock in the previous step, add water to augment.
    2. Set on “low” and cook for 8 hours or set on “high” and cook for 4 hours.
    3. Check for seasoning and serve garnished with croutons. (See Notes.)

*     *     *

*     *     *

Variations

This can just as easily be made on the stove top as it can in a slow cooker. Create the stock as indicated and place all the ingredients into a stock pot rather than a slow cooker. Bring to a boil over a med-high heat and then reduce to a soft simmer. Soup will be ready once the peas are soft and the carrots cooked, about 30 to 45 minutes.

If you want the smokey flavor but not the pork, try using a bit of smoked turkey instead of the ham hocks.

 *     *     *

Notes

From what I’ve seen, split peas are sold in 1 lb. (454 g) packages. When I made today’s soup, I made a “double batch” that resulted in a little over 4 quarts (3.8l) of soup.  I wanted some for my dinner, to be sure, but also some for the freezer. As you may have already gathered, a bowl of split pea soup makes a fantastic lunch. Still, you can easily halve the recipe, if you like.

You’ll note that I do not use salt and pepper until the very end. There’s no way to estimate the amount of salt in the ham or hocks. Wait until the end of the cooking process, give a taste, and then add whatever you feel is needed.

To make croutons:

  • Heat equal amounts of olive oil and butter in a frying pan over medium heat.
  • Add 1 smashed clove of garlic and sauté.
  • Meanwhile, cube a few slices of thickly sliced bread.
  • When oil is hot and garlic fragrant, place bread cubes in the pan and toast, turning frequently.
  • When browned to your satisfaction, remove to paper towels, and reserve.

*     *     *

It’s déjà vu all over again … 

Pasta al Salmone

Pasta al Salmone

When I travel to Italy, there are 2 dishes that I request every time and very often more than once: pasta with clams and pasta with salmon. The first is a dish I’ve made for some time using a family recipe, while a recipe for the latter eluded me for years. You can well imagine my excitement when I finally stumbled upon the secret to this fantastic dish. Click HERE to see this secret revealed.

*     *     *

Coming soon to a monitor near you … 

Wonton wrapper pastas

*     *     *

Grandpa’s Tuna Salad gets a Makeover

Due Insalate di Tonno 

Ah, Spring! Who can forget the sights and aromas of a glorious Spring morning? Well, try as we might, none of us who called the two-flat home will ever forget a few not so glorious Spring days — and I imagine our neighbors would say the same.

As I’ve mentioned in prior posts, Grandpa’s retirement years revolved around his garden, although he always had various maintenance jobs to perform around the building, too. As a young boy, and later teen, one learned to make oneself scarce early in the morning or become part of the work crew. This was especially true in early Spring.

Grandpa sowed his seeds after consulting the lunar calendar and the Old Farmers Almanac. He needed no help with this and the process remains shrouded in mystery to this very day. No, Grandpa only called upon one or more of us boys when he needed muscle. In the Fall, we helped him clear all the old tomato plants and their support stakes before we turned over the soil. The only parts of the garden to escape this tilling were the lettuce and parsley patches. Those he covered in straw and it wasn’t unusual for us to have a bit of both with our Thanksgiving dinner.

Come the following year and the Spring Thaw, Grandpa would find one of us and, again, we tilled the garden, though this time no patch was left unturned. That was the easy part. You see, Grandpa was a firm believer in the power of manure to grow gigantic tomato plants.  (To his credit, there may be some truth to this. How many gardeners do you know that use old hockey sticks to support their tomatoes?) About the time of the tilling, he would ask if you wanted to go out to the farm with him. Grandpa had a farmer friend and how we kids loved going there.  After all, this was the same farm that had adopted our dogs, though they were always out running in the fields when we came to visit. Well, by the time we were old enough to till the garden, the jig was up as far as the dog tales were concerned.  We were, also, fully aware of why we were roped into offered the chance to accompany Grandpa on this particular trip to the farm.

*     *     *

*     *     *

The fact was that the garden needed manure and not just any manure. Grandpa’s tomato crop depended upon this farm’s sheep manure. So, once each Spring, we drove out to the farm and, after a few pleasantries, we drove off with a large metallic tub of sheep manure in the trunk, making us very popular at traffic lights if the wind shifted just the right way. Once home, we hauled the tub to the yard but it didn’t end there. Oh, if only it ended there!

As it turns out, sheep manure, in its natural state, is too strong for young tomato plants and, even if it wasn’t, there was no way we could haul enough manure in a car’s trunk to cover Grandpa’s ever-expanding garden. Grandpa had a solution, all right, and it’s lucky that he was so loved by our neighbors.  Using a very large metallic bucket and a hose, Grandpa made “soup” — his label not mine — which was then spread over the tilled earth. A couple of days later, one of us would be called upon to till the garden again. Don’t think we didn’t try to avoid that call to action but we were on our own. Our parents had their eyes on the prize: a wealth of tomatoes come August. Any inkling that we didn’t want to help Grandpa was met with a  reminder that “work never hurt anyone” and suddenly we found ourselves asking Grandpa if he needed help.

All facts considered, it was one bad afternoon, leaving 364 pretty good ones. Thankfully, it was early enough in the year that the Spring rains helped to quite literally clear the air, much to everyone’s relief. Most fortunately, since the boys’ bedrooms were closest to the garden, rain and cold temperatures prevented anyone from even considering opening a window “to let in some fresh air.”  And the tomatoes? Grandpa’s plants were huge and the crop large enough for 2 families. Sheep manure soup. Who knew?

*     *     *

At noon on any given Friday, save those that fell in Winter or manure week, you could find Grandpa in his patio enjoying his lunch. It was usually a simple dish and, being Catholic, it was, also, meat-free. A favorite of Grandpa, and later my own, was this simple tuna salad. Believe me, it could not get any more simple and no further introduction is required. 

*     *     *

*     *     *

Grandpa’s Tuna Salad Recipe

Ingredients

  • 1 can (5 oz; 142 g) tuna, packed in olive oil, drained 
  • a bit of red onion, sliced or chopped
  • 2 whole anchovy fillets, more if desired
  • olive oil 
  • red wine vinegar
  • salt & pepper, to taste

Directions

  1. Place the tuna on a serving plate. it can be flaked or left in a ring shape.
  2. Top with onion and anchovies.
  3. Sprinkle with olive oil and red wine vinegar.
  4. Season with salt, & pepper, to taste
  5. Serve with crusty bread and a glass of homemade white wine.

*     *     *

That’s it. Quick and easy but surprisingly satisfying. I enjoyed this dish as a boy and continue to enjoy it today. Even so, nothing remains the same forever. As much as I enjoy Grandpa’s tuna salad, I wanted to try something a little different and, so, I gave Grandpa’s version a makeover. Enter tuna salad number 2.

Whereas Grandpa’s tuna rested on a plate, the foot of my salad rests on a bed of mixed salad greens. Rather plainly dressed, Grandpa’s tuna was clothed with just onion, salt, pepper, and oil & vinegar. My new tuna salad is adorned with capers, onion, salt, pepper, olive oil, and freshly squeezed lemon juice. Most importantly, Grandpa’s tuna came to him by way of a can. My tuna skipped the middleman, taking a more direct route to my plate via a grill pan.

Now, to many, it isn’t really a makeover if there is no reveal. Not wanting to disappoint, here’s mine. On the right, you’ll see Grandpa’s original tuna salad and, on the left, may I present the new and “refreshed” tuna salad.

*     *     *

*     *     *

It wouldn’t benefit anyone if I didn’t explain how this transformation took place. Here, then, is how the makeover specialists of the Bartolini Kitchens performed this miracle.

*     *     *

Grandpa’s New & Improved Tuna Salad Recipe

Ingredients

  • 1 tuna steak per serving
  • mixed salad greens
  • 1 tsp capers per serving, more if desired
  • red onion, thinly sliced
  • olive oil
  • lemon juice
  • salt & pepper, to taste
  • lemon wedges for serving
  • whole anchovy fillets (optional)

*     *     *

*     *     *

Directions

  1. Place salad greens in a large bowl. Add onion & capers, dress with olive oil and fresh lemon juice, season with salt & pepper, and toss to combine. Set aside.
  2. Heat the grill pan over med-high heat. Lightly coat the tuna steak with olive oil and season with salt and pepper on both sides.
  3. When the grill is hot, moisten a (paper) towel with vegetable oil and use it to lightly coat the grill surface.
  4. Add the tuna steak to the grill pan. After 90 seconds, use a fish turner to give the steak a quarter turn.
  5. Cook for 60 to 120 seconds and then flip the steak over.
  6. After cooking for 60 seconds, give the steak a quarter turn. Continue cooking the steak for 60 to 90 seconds and remove from heat.
  7. Move tuna steak to a cutting board. Cutting with the grain, carve slices no less than 1/4 inch (2/3 cm) thick.
  8. Place salad on the serving plate and arrange tuna slices atop the salad. Garnish plate with lemon wedges and optional anchovy fillets.
  9. Serve with crusty bread and a white wine of your choosing.

*     *     *

Variations

Although my tuna steak rested atop a bed of baby salad greens, you may choose whatever greens you prefer — baby spinach, baby kale, and rocket come to mind.

I chose to dress my tuna salad with a simple dressing of lemon juice and olive oil, reserving a little juice for the tuna, as well. You may wish to use another dressing, such as the lemon-caper sauce I shared within my grilled sturgeon recipe post.

*     *     *

Notes

I used a grill pan here but you could just as easily use your barbecue, broiler, or skillet to cook your tuna steak. Just resist the urge to move the steak until it’s time to turn it.

Cooking times, as you’ve probably noted, are anything but precise. The pan, the heat, and/or the tuna steak’s thickness all play a role. Remember, too, that the steak will continue to cook once it has been removed from the fire, as well as while you fiddle with a camera, trying to take photos for a blog entry. (#%*@^#&$!)

100_3954Whether you call it tinned or canned, whether it’s packed in oil or water, and whether it’s chunk or whole, please make sure that the tuna you’re about to purchase was harvested in ways that will not harm dolphin populations. The symbol located to the right, or something similar, should be found on the can. If it’s not there, please do not purchase that tuna.

*     *     *

It’s déjà vu all over again

freshly-made

Freshly made mascarpone

A little over a year ago, I was in the middle of my cheese-making series when I shared the recipe for making mascarpone. Though widely known as the star ingredient in tiramisu, mascarpone is so much more than that, Whipped and flavored, this creamy cheese makes a wonderful dessert topping, while adding it to pasta gives new meaning to the words “cream sauce.” Best of all, mascarpone is a snap to make with results far better than you can imagine. But don’t take my word for it. You can see how it’s done by clicking HERE.

*     *     *

 Coming soon to a monitor near you … 

Frittata

*     *     *

Burrata Returns and This Time It’s Packin’ Fusilli

Fusilli Corti Bucati alla Bolognese con Burrata

These days, I never know from where my next recipe idea will come.  Beyond my family’s treasure trove, there’s the Cooking Channel & Food Network; Saturday afternoons on PBS are Must See TV; mustn’t forget Julia, Lidia, Mary Ann, Biba, and Mario, whether new episodes or rebroadcasts I’ve seen a dozen times; and most recently The Chew — and that’s only television sources. What about cookbooks, magazines, newspapers, and foodie websites? And where would we be without WordPress, Blogger, Pinterest, Facebook, Twitter, and, StumbleUpon? I must admit that some days — like when I’m on my 5th attempt at remembering a password — I wonder if all of this is really necessary. Yes, there are those days but there are, also, days when I’m rewarded with a gift like today’s recipe.

Back in January I posted a pasta recipe featuring spinach, lemon, and burrata cheese. The recipe was well-received and a number of you have since tried and liked it. In the Comments Section, Celia, whose wonderful blog Fig Jam and Lime Cordial is what I hope mine will become when it grows up, mentioned that Down Under burrata is served atop pasta, broken open to allow the cream and stracciatelle (torn curds) to soak into the pasta, and served. Well, that’s all I needed to hear. I got right on it!

My first attempt was just as Celia has said. I dressed the pasta with my tomato sauce with meat, placed the burrata on top, and served myself a portion. That plate was just incredible and I couldn’t wait to have a 2nd helping. And that’s when it happened. You see, leaving the burrata on top of the pasta, though great for the first servings, isn’t so great for a 2nd helping. WIth the cream now soaked into the pasta, the burrata sitting atop the cooling pasta also cools. Soon, instead of being a warm, gooey cheese, it’s more like a block of lumpy cheese –still very tasty but a hardened block nonetheless. Leftovers were no better because by then the cheese was more pasta death mask than gooey delight. How does one re-heat this?  I eventually did reheat it in a covered pan with a bit of water and butter over a low heat. This was not what I had expected. Undaunted, I bought more burrata,

Cheese issues aside, I realized that this is no normal pasta dish and I needed to step it up. That’s why last week my Sugo alla Bolognese was posted. I had planned to share the recipe this Fall but I wanted everyone to have the recipe should they decide to make today’s pasta. So, when I made this dish for the 2nd time, I used my Sugo all Bolognese and did everything the same, save one big exception. In the first test, I served the burrata right after I spread it atop the pasta. Not this time. Since I was again dining alone, once it was spread, I used two large spoons to stir the cheese and cream into the pasta, garnished it with grated cheese, and served. Though the presentation wasn’t as impressive as having a chunk of burrata on each plate being served, by mixing the bowl’s contents, each serving had an even amount of burrata within, and most importantly, the cheese and pasta left in the serving bowl remained warm and manageable. Second helpings were a delight as were leftovers.

So, my advice for preparing this dish depends upon the number of dinner mates being served. If dining alone or serving one other, you can break the burrata and spread it across the top of the pasta. Then you can either serve the pasta first and then mix the cheese into the remainder in the pasta bowl, or, just go ahead and mix the cheese before serving. If you’re serving a number of guests, then just spread the burrata across the top of the pasta and serve. Once everyone has been served, you may wish to mix the remaining burrata into the remaining pasta to avoid the hardened blob of cheese.

Since that first burrata post, I’ve been asked several times whether I plan to make burrata. The answer is an unequivocal no. Making mozzarella is difficult enough. Forming it into a pouch, stuffing it with shredded curds, and then filling it with cream is a bit much for me to handle. Still, some of you may wish to try making burrata at home. Here, then, is a video of burrata being made. Enjoy!

*     *     *

*     *     *

The last thing worth mentioning is the pasta I chose Fusilli Corti Bucati for the dish . The word fusilli means “little spindles” and it’s a twisted pasta. Corti in the name means small or short, as opposed to lunghi which means long. Bucati refers to the fact that each fusillo has a hollow center. I chose them because their shape would hold onto both the sauce and the cheese very well. Feel free to use whatever pasta you like.

*     *     *

*     *     *

Fusilli Corti Bucati with Burrata Cheese Recipe

Ingredients

  • 1 lb (453 g) fusilli corti bucati — maccheroni molle (pasta springs) may be substituted
  • 1 quart tomato sauce with meat — vegetarians may substitute meatless sauce
  • 1 lb (453 g) Burrata “pouch”
  • grated/shaved Pecorino Romano cheese — Parmigiano Reggiano may be substituted

Directions

  1. Cook pasta following package directions.
  2. Heat tomato sauce in a sauce pan.
  3. Drain pasta, return to pan, and mix with 2/3 of the heated tomato sauce.
  4. Place the dressed pasta in serving bowl.
  5. Place remaining 1/3 sauce on top of pasta.
  6. Place burrata pouch on top of pasta with sauce.
  7. Use 2 knives to slice through the pouch, releasing the curds & cream.
  8. Continue slicing until the burrata is evenly spread.
  9. At this point you can:
    1. Garnish with grated and/or shaved cheese
    2. Serve immediately.

                                      —  or  —

    1. Thoroughly combine the burrata & cream with the pasta & sauce.
    2. Garnish with grated/and or shaved cheese.
    3. Serve immediately

*     *     *

This slideshow requires JavaScript.

*     *     *

Notes … 

Whether the sauce you use is bought, homemade, and with or without meat, make sure it is your favorite. This is no ordinary pasta and deserves no less than your best.

*     *     *

It’s déjà vu all over again … 

I first shared the recipe for Cherry Cheesecake Pizza 2 years ago, in the days leading up to Easter. The recipe was given to Mom by the wonderful woman who lived across the street from us. A great little dessert, this “pie” has also been served, in some form, at countless parties and barbecues,  Easy to prepare, you’ll quickly see why this remains a family favorite. Click HERE to see the recipe.

*     *     *

Coming soon to a monitor near you …

Old Meets New

Old Meets New

Grandpa’s Tuna Salad Gets A Makeover

*     *     *


Bourbon & Cola Sauced Ham

Easter dinner back at the old two-flat was the 4th of the big holiday meals, with Thanksgiving, Christmas, and New Year’s Day being the other 3. Of course, there was a platter of freshly made ravioli on the table, as well as a beautiful roast. When I was very young, that roast was a baby goat. I don’t remember those meals but I do remember 2 of the goats. You see, the “kid” was brought home live and kept in the basement awaiting execution. After hearing its bleating that first year, I must have been 4 or 5 years of age,  I was warned to stay out of the basement. Warned to stay out of a basement that I was certain contained a gazillion boy-eating spiders? No problem! The following year, again I heard the bleating and again I was told to stay clear. Well, I was a precocious child and knew that I was safe from the spiders if I stayed in the center of the basement, avoiding all corners, walls, and anything hanging from the ceiling. So, when Mom told me to stay out of the basement, I headed down there as soon as she looked the other way. Now, I may have been a precocious boy but I wasn’t one much for clandestine operations. Yes, I went into the cellar. Yes, I saw the baby goat. Yes, I felt Mom standing behind me. Yes, it was a tearful return up the stairs and into my room. No, I  do not remember having goat for that Easter dinner.

*     *     *

*     *     *

I think it was the next year when our dinner switched from goat to lamb, but lamb’s reign as our Easter dinner’s centerpiece was short-lived. My siblings — one or both — did not care for the meat and Mom prepared something else. The thing is, I can’t remember what it was she served. I was a bit older and, as I’ve said in other posts, my attention was fixated on that platter of ravioli. Everything else on that table was put there to distract the weak-willed, their appetites to be sated by these “lesser” dishes. I, being of strong heart and mind, kept my eyes on the prize, eating serving after serving of the tasty pillows. So, today, when asked what Mom served, I can honestly say is that all I remember is the ravioli.

I started preparing a ham for Easter about 15 years ago. As much as I enjoy a baked ham dinner, I love a good ham sammich and spilt pea soup even more. And you can not have the latter if you don’t make the former. Early on, I baked my ham with pineapple rings and created a glaze with the juices and brown sugar. Then about 5 years ago, I saw ham prepared this way and decided to give it a try. I liked it so much that today it remains the only way that I prepare ham but you needn’t take my word for it.

Four years ago, Max was just about a year old and celebrating his first Easter at my house. With my lovely ham covered in foil and resting atop the stove, I was in the dining room preparing the table. I returned to find Max feasting on the back side of my lovely ham. The front of the ham was carved and Max spent the rest of Easter in his crate. Still not convinced? A year later and it’s now Max’s second Easter. This time, the ham was placed on a counter, back against the wall where Max surely could not reach it. Again, I left the kitchen to tend to the dinner table. When I returned, Max was in his crate — licking his chops. Sure enough, though he could barely reach it, he did manage to score a few bites off of the side of my lovely ham, though he was smart enough to go to his crate before I returned. Again, he spent the rest of Easter in his crate. So, even though he’s never been left alone again in the same room with one, this ham is so good that Max would risk spending Easter in a crate just to have another taste. The facts speak for themselves.

And as for the bourbon and Coke with the ham garnish? It was delicious!

*     *     *

Bourbon and Cola Sauced Ham Recipe

Ingredients

  • 8 lb (3.6 kg) fully cooked, smoked ham
  • 8 oz. (236 ml) cola
  • 10 oz. (296 ml) bourbon divided
  • 1/2 cup (100 g) light brown sugar – dark may be substituted
  • 1/4 cup (116 g) mustard (See Variations below)
  • 1/2 cup (170 g) honey
  • 1 tsp fresh thyme leaves
  • whole cloves

Directions

  1. Place ham on a counter one hour before you plan to start preparing it. This will remove the chill from the ham.
  2. Lightly score the fat side of the ham, cutting in one direction and then again at a  90˚ angle, creating a diamond pattern. Place a whole clove wherever the cuts intersect.
  3. Pre-heat oven to 325˚ F (163˚ C).
  4. Using a medium saucepan, add 1 cup (236 ml) of bourbon, the cola, brown sugar, mustard, and thyme — AWAY FROM HEAT. Once the ingredients are combined, then heat over a med-low heat, reducing it until it is thick enough to coat the back of a wooden spoon.
  5. Place oven rack just beneath the middle position. Add 1 cup (236 ml) of water and the rest of the bourbon to the roasting pan.
  6. Place the ham, cut side down, in the pan. Insert a thermometer into the ham’s thickest part without touching any bone and baste the ham with some sauce before placing the ham in the oven.
  7. Continue to baste ham every 15 minutes until the ham’s internal temperature reaches 140˚ F (60˚ C) — about 90 minutes.
  8. Remove from oven, place ham on cutting board, tent with foil, and rest for 15 minutes.
  9. Meanwhile, pour pan juices into a grease separator and, after a few minutes, pour off the juices, leaving the grease behind.
  10. Into a small saucepan, add the pan juices and the remaining sauce over a med-high heat. Once it starts to boil, reduce heat to a simmer and reduce the sauce to the thickness of your choosing. Keep an eye on the saucepan lest it boil over.
  11. Once fully rested, place ham on a serving platter, bring to table with bourbon~cola sauce, and serve

Inspired by Tyler Florence, “The Ultimate”, reprinted HERE.

*     *     *

*     *     *

Variations

The recipe calls for mustard and I’ve used yellow, Dijon, and whole grain mustard when preparing the sauce, all to good effect. My mustard of choice, however, is a Guinness-based, whole grain mustard that I make with a recipe I received from Mandy’s wonderful blog, and, she received it from Celia’s delightful blog. So, for those keeping track, this mustard uses Irish stout and came to my Chicago table from Australia, by way of South Africa. (What, no frequent flier miles?)

Today’s post featured a fully cooked, smoked ham (“City Ham”). I’ve also prepared smoked and partially cooked hams with this sauce, as well. Since both of these types of hams require being heated to 160˚ F ( 71˚C), it will take longer to roast them. So, I take a low and slow approach. I’ll pre-heat the oven to 300˚ F (149˚ C) and tightly tent the ham in its pan. I estimate it will take 15 to 20 minutes per pound to roast and at the 90 minute mark, I’ll start basting every 15 minutes. After 2 hours, having basted it twice, I’ll remove the foil for good and continue basting until the ham has reached the proper temperature.

*     *     *

Notes 

Though the ham will have a slight glaze by the time it has finished roasting, this is the bourbon, cola, & honey mixture is more sauce than glaze. Frankly, I don’t prepare a ham nearly often enough to experiment with glazes to accompany this sauce. If I were to test glazes, I’d probably start with a honey-whole grain mustard glaze since those flavors are present in the sauce.

No matter the ham or the roasting time required, I prefer putting it into the pan with the cut-side down. Though the first slice may not have the darkened color we’re all accustomed to seeing, I find that slice, as well as the rest of the ham, to be far more moist than a ham roasted on its side.

*     *     *

So, why bake a ham?

Roast ham, Swiss cheese, baby kale, and whole grain mustard on Ciabatta, with sides of potato salad and deep-fried pickle slices.

Roast ham, Swiss cheese, baby kale, and whole grain mustard on Ciabatta, with sides of potato salad and deep-fried pickle slices.

For the Sammiches and, later, Split Pea Soup (recipe coming)

*     *     *

It’s déjà vu all over again … 

When I wrote this post 2 years ago, I told of going to high-end groceries if I wanted to prepare the dish and, once there, the price was per clam!?!?! Well, not anymore. I now have a choice of places to buy my clams and all are priced per pound — and linguine with clams has graced my table more than ever. If you have access to fresh clams, you won’t want to miss our recipe. You can see it by clicking HERE.

*     *     *

Coming soon to a monitor near you …

Preview

Sugo alla Bolognese

 *     *     *

Broiled Halibut with Mushrooms

Halibut alla griglia con funghi

Broiled Halibut

With the arrival of Easter on Sunday, today’s post will mark the end of the series of seafood dishes. And what a good one to end with: Broiled Halibut!

Some may be surprised to learn that halibut is what’s called a “flatfish”, meaning that it has evolved into one that lives on the ocean floor. Think flounder or sole, only very much larger. Like most flatfish, at birth halibut fry appear and swim like the young of other fish. Around 6 months of age, however, one of its eyes begins to migrate to the other side of the fish. As it does, the fish goes from being left and right-sided to having a top and bottom-side. The top-side (the side with both eyes) develops a gray color while the bottom-side (the side that rests on the ocean floor) becomes white. As is so often the case with seafood today, halibut is in trouble in some areas. Look for Alaskan, wild caught, and do not buy Pacific halibut caught with gill nets nor Atlantic halibut caught through bottom trawling. If your fishmonger doesn’t know how or where his halibut is caught, it’s a sign to buy seafood that you know to be sustainable. My experience has been that fishmongers are proud to tell you when their stock is sustainable and harvested correctly.

Halibut flesh is not oily, as was the swordfish of a few weeks ago. The flesh is every bit as firm as was the swordfish and stands up to grilling very well. And if a fish fillet works well on the grill, it will do very well under the broiler, too. Halibut has a good, clean taste that I very much like. As such, I prefer not to do anything to prepare it — no marinades, for example — other than salt, pepper, and olive oil. When preparing the mushroom accompaniment, I chose 2 that were delicately flavored and shiitake, which has a bit of a smoky taste. The idea is for the flavors to co-exist and not for any one to obliterate the others.

Broiling is a wonderful way to prepare meats and seafood, though one should probably learn how to use one’s broiler with something other than an expensive halibut fillet. When I broil a fish fillet, I’ll use a baking sheet covered in aluminum foil that has been lightly coated with olive oil or butter, depending upon the recipe. My oven’s first rack’s setting is about 5 inches beneath the heat source, perfect for broiling fish. Remember that the distance away from the heating element and thickness of the fillet(s) will affect cooking times, so, be sure to keep an eye on any kind of fish you put under your broiler. I’ve included more guidelines for broiling within the recipe, as well as how to test your fillet(s) for doneness.

*     *     *

*     *     *

Broiled Halibut with Mushroom Recipe

Ingredients

  • Halibut steak(s)
  • Olive oil
  • salt & pepper

for the mushrooms

Maitake (t -l), Oyster ( t - r), Shiitake (bottom)

Maitake (t -l), Oyster ( t – r), Shiitake (bottom)

  • 12 oz assorted mushrooms, sliced (used here: Maitake (hen of the woods), Oyster, and Shiitake)
  • 2 – 3 tbsp olive oil
  • 2 shallots, chopped
  • 1/4 cup white wine
  • 1/2 tsp fresh rosemary, chopped
  • 1/2 tsp fresh thyme, chopped
  • 1/2 tsp dried marjoram
  • salt & pepper, to taste
  • 1/2 cup fresh parsley, chopped

Directions

for the mushrooms

  1. Clean and slice the mushrooms (see Notes), chop the herbs & shallots.
  2. Heat the oil in a large frying pan over med-high heat.
  3. Add the shallots and sauté until they soften, about a minute.
  4. Add the mushrooms, lower the heat to medium, and continue sautéing for another 7 or 8 minutes, stirring often. Mushrooms will be ready when they have given up their liquids and darkened in color.
  5. Add the wine, increase the heat to med-high, and sauté until wine has all but evaporated.
  6. Add the herbs and stir to combine.
  7. 1 minute later, remove from heat, add parsley, stir throughly, and serve.

*     *     *

*     *     *

for the halibut

  1. Lightly brush the fillet(s) with olive oil. Season with salt & pepper.
  2. Place fillet on a lightly greased baking sheet and set aside.
  3. Pre-heat broiler for 15 minutes. Place an oven rack about 5 inches from the heat source.
  4. Place fillet(s) directly under the heat source and broil from 7 to 9 minutes. If more than 1 fillet is being broiled, turn the baking sheet midway through the broiling.
    1. To test if this or any fish is cooked: use a metal skewer or sharp knife to pierce the fillet at its thickest point. Keep it there for several seconds. Remove it and use it to touch the inside of your wrist or the area beneath your lips. If cold, the fish isn’t cooked. If warm, the fish is cooked rare. If hot, the fish is done. If very hot, the fish is over-done.
  5. Serve immediately, using the mushrooms as an accompaniment.

*     *     *

Variations

These mushrooms  can be served with any number of dishes. I use white wine when serving mushrooms with seafood, pork, and poultry, but red wine for beef and then I’ll use crimini mushrooms rather than the more delicate tasting funghi. And though I don’t use garlic when serving this with seafood, I will add it for other dishes. You can easily alter this recipe to suit your own tastes.

*     *     *

Notes

Do not use water to clean these mushrooms. Use a damp paper or kitchen towel to gently wipe them.

The stems of Shiitake are tough and inedible. They should be cut off.  The same may be said of the base of Maitake mushrooms. Some believe the base of Oyster mushrooms to be edible. I find them to be a little tough and trim them away, as well. Earlier I mentioned that you should save the mushroom bits and pieces. Why toss them when you can easily use them to make stock? Once I trimmed and sliced the mushrooms used in today’s recipe, I was left with about 4 oz (114 g) of stems and woody parts. These were roughly chopped and placed into a medium saucepan, along with an onion, a celery stalk, a carrot, a couple of parsley stems, a sprig of thyme, and a bay leaf but no salt nor pepper. I added a quart of water, brought it to a boil, and then reduced it to a simmer. Since I had relatively few stems, I wanted to concentrate the flavors, so, I left the cover  off of the sauce pan while it simmered and reduced. Had there been more mushroom parts, I would have covered the pan for there would not have been as great a need to reduce the stock. In any event, after an hour, I had 12 oz (355 ml) of stock headed for the freezer. I’ll use it the next time I make risotto, soup, a gravy or sauce.  And there’ll be no need to worry about its salt content ruining my dish.

If leftover, mushrooms cooked like this are worth their weight in gold. Use them for an omelet the next morning or to top off your burger for lunch. Yes, you can always use them to accompany your next supper’s protein but — and perhaps best of all — you could reheat them with a little more oil and some red pepper flakes. Add your favorite pasta and you’ve got a fantastic dinner, ready in minutes.

*     *     *

It’s déjà vu all over again … 

Cavatappi with TunaEaster is right around the corner and today’s Blast from the Past features a dish that graced our table any number of Fridays, both in and out of Lent. Our Tomato Sauce with Tuna is a simple tomato sauce with tuna as its protein. It’s easy enough to prepare and doesn’t require a long simmer, unlike its meaty cousins. If you’re at all curious, you can see the recipe by clicking HERE.

*     *     *

Coming soon to a monitor near you …

This is the First Way

Bourbon & Coke Soused Ham, Two Ways

 *     *     *

Spaghetti with White Anchovies & Capers

Spaghetti con Acciughe Bianche e Capperi

Spaghetti with White Anchovies and Capers

We’re back to fish recipes this week and today I’ll share the long-anticipated spaghetti with white anchovies recipe. This is not a family recipe but, I have to admit, it should be. There’s no doubt in my mind that all the adults in my family would have really enjoyed this pasta. And like so many of the pastas they served, it’s easy to make, requires few ingredients, and is ready in minutes. What’s not to like?

This recipe came about clearly by chance. Last Fall, I happened to overhear a cooking program in which Michael Symon used white anchovies in a pasta dish. Never having seen white anchovies, I didn’t think much of it. Then, around Christmas, I found a two-pack of white anchovies at one of the big box  stores. I bought them, went home and started working with them, using my aglio e olio recipe as a base. It really was that simple. As you’ll see later when you read the recipe, this is another dish you can have on your dinner table in 30 minutes, tops. And if you’re at all like me, it will find its way to your table more often than you now think possible.

The anchovies I found that day — and continue to use — are not only white but are far less salty and “fishy” tasting than the anchovies one finds in the small tins. These differences make them perfect for this dish and, as you can see in the photo bellow, white anchovies actually look like fish. Imagine that! The recipe calls for 6 whole anchovies but, truth be told, I normally use 8 or 10 of the little fishies when I make this dish. Yes, I really do enjoy them. I suggest that you taste one upon opening the package to see how it tastes before you decide how many to use for a pound of pasta.

As is the case with any of these aglio e olio pastas, time is of the essence. You want to time it so that the anchovies, garlic, and oil “sauce” is ready when the pasta is 2 minutes shy of being al dente. Don’t worry. It’s easy enough to do. And remember: whenever you prepare a pasta, always reserve at least a cup of the water used to cook the pasta. It has saved many a dish for me.

*     *     *

That's a lot of achovies!

Packed in vegetable oil, wine, vinegar, & parsley.   7.1 oz (200 g)    (That’s a lot of anchovies!)

*     *     * 

Spaghetti with White Anchovies and Capers Recipe 

Ingredients

  • 1 lb spaghetti
  • 1/2 cup + 2 tbsp extra virgin olive oil, divided
  • 6 whole white anchovies, drained & roughly chopped – more to taste
  • 4 cloves of garlic, diced or grated – more to taste
  • 1/8 tsp red pepper flakes – more to taste
  • 2 tbsp nonpareil capers
  • 1/2 cup Panko bread crumbs
  • zest of 1 lemon
  • 3 tbsp fresh parsley, chopped
  • salt & pepper
  • reserved pasta water

*     *     *

Directions

  1. Make the bread crumb topping:
    1. In a small mixing bowl, combine bread crumbs, lemon zest, and 2 tbsp of olive oil. Season lightly with salt & pepper. Mix thoroughly.
    2. In a small frying pan over med-high heat, lightly toast the bread crumb mixture. Do not allow to get too dark or it will ruin the dish. Remove from heat and set aside.
  2. Bring a large pot of heavily salted water to boil. Add the pasta and stir.
  3. In a large frying pan over med heat, add the remaining olive oil. Once hot, add garlic and red pepper flakes. Sauté for 1 minute.
  4. Add the anchovies to the pan and continue sautéing until the pasta has cooked 2 minutes less than the package’s cooking instructions indicate for al dente. If you’ve timed everything correctly, the anchovies should be sautéed for just a few minutes before the pasta is ready.
  5. Drain the pasta, reserving 1 cup of the pasta water.
  6. Add capers and pasta to the pan containing the anchovies. Gently toss to evenly coat the pasta with the anchovy & oil mixture. If too dry, add enough pasta water to create a sauce. Continue to sauté until the pasta is al dente, 1 to 2 minutes more.
  7. Remove from heat, add 2/3 of the bread crumb mixture, and toss.
  8. Place on a serving platter and garnish with remaining 1/3 of the bread crumb mixture.
  9. Serve immediately.

*     *     *

*     *     *

Variations

This recipe is so basic and with so few ingredients that there’s little room for variations — or so I thought. In a comment written after last week’s cannelloni post, the Kitchens’ good friend and fellow ravioli maker, Spree, mentioned adding bits of preserved lemon to this dish. Though I’ve yet to try it — still working on corned beef sandwiches here —  I will soon, no doubt about it. What’s this? You don’t know how to preserve lemons? Well, neither did I until I saw Spree’s post of January, 2012. Now I use it exclusively to make preserved lemons and you can learn how to do it, too, by going to Spree’s wonderful blog, Cooking-Spree. While you’re there, be sure to look around. You’re in for a treat!

Notes

I have yet to find white anchovies in packaging smaller than shown in the image above. In fact, it was while trying to do so that I mistakenly bought the sardines that led to my sardine and pickled pepper recipe of a few weeks ago. I have seen an anchovy salad at one of the groceries but, now that I want to buy it, the salad has disappeared from their “fish/seafood bar.” If I do find some in more convenient packaging I’ll mention it in a post and come back here to announce it.

Be very careful when toasting the bread crumb mixture. If too well-browned, your pasta will have a burnt toast flavoring that isn’t at all desirable. Take the crumbs off of the heat as soon as they begin to have a golden glow.

I used homemade spaghetti with this dish but you can use any of the similar pastas — i.e., linguine, fettuccine, trenette, tagliatelle, etc.

*     *     *

It’s déjà vu all over again … Stracciatella

I’ve mentioned that we ate lunch at home throughout the school year, a consequence of living so close to the parish school. I also said that when the weather turned cold, we would often find a bowl of soup waiting for us to walk through the door. One of those soups Mom prepared and today’s Blast from the Past is Stracciatella. Requiring few ingredients and ready in minutes, this soup is just about as easy to prepare as that stuff in a can — but, oh, so much better. You can see the recipe by clicking HERE.

*     *     *

Coming soon to a monitor near you …

Broiled Halibut with Mushrooms 

*     *     *

Another of the Bartolini Crown Jewels: Cannelloni

Cannelloni dei Bartolini Serve Cannelloni

With St. Joseph’s Feast Day fast approaching, I’m going to take a break in our fish recipe series and share yet another of the Bartolini Crown Jewels, Cannelloni. St. Joe, after all, deserves no less.

Cannelloni are another of Italy’s stuffed pastas, though these are more in the style of manicotti (see Notes) rather than ravioli or agnolotti. As much as we all loved them — we kids called them “cigars” — cannelloni weren’t served for dinner very often. Unlike ravioli or cappelletti, which were “assigned” holidays, cannelloni were served when Mom or Zia found the time to make them. Remember. There were no freezers so a cannelloni dinner meant that they would have been up at dawn, rolling out pasta dough. As a result, though it wasn’t a holiday, a cannelloni dinner was a special occasion, to be sure.

Now, when you look at the recipe, something may seem a bit familiar. Déjà vu, perhaps? No, that’s not until the end of this post. It’s the filling. We use the same filling here that we used when we made cappelletti a few weeks ago. It is not unusual for Italian households to use the same fillings, condiments, marinades, etc., in a number of dishes. Our breading mixture is the perfect example of this. There are other examples but I’ll save those for another day. No sense spoiling the surprise.

Although the filling recipe is rather straight-forward, preparing the dough needs some explaining. As many of you know, I use either a hand-cranked pasta machine or a roller attachment for my stand mixer to roll my pasta dough. The result is a long sheets of pasta, about 2 to 3 feet long and about 6 inches wide Before doing anything else, you Cannelloni Sheetsneed to determine how wide each of the cannelloni will be. Ours are usually about 4 inches long, allowing 2 rows to be placed down the full length of the baking dish. Some prefer larger cannelloni. No matter which size you like, measure the inside width of your baking dish’s bottom. To allow the pasta to expand during cooking (see image for comparison), subtract at least half an inch from the measurement. If you want large cannelloni, this is the width of the dough sheet you’ll need. For smaller cannelloni, divide the measurement by 2. Keep this measurement in mind. (For example. My baking dish is 8 inches square, though, at the bottom, it is 7.5 inches. I wanted to place 2 rows of cannelloni into the dish so I cut my dough sheets at 3 inches.)

Once you’ve made the dough and allowed it to rest, roll it into long sheets. If your machine or rollers are at their widest when set to no. 1, roll and re-roll the dough up to and including no. 5. If your machine or rollers are at their widest at no. 10, then roll and re-roll the dough up to and including no. 6. Once the dough sheet is rolled to the specified thickness, lay it flat on a lightly floured surface. Using a straightedge, move down the full length of the dough sheet, marking it according to the measurement gained above. Use a pastry cutter or sharp knife to cut the sheet into smaller sections. (My sheets were all 3 X 6 inches.) Lay the newly cut sheets separately. Do not stack.

This is where things get interesting. It has been quite sometime since either Zia or I made cannelloni. So, when I asked if we par-boiled the pasta before filling it, she drew a blank. Obviously, so had I or I wouldn’t have asked the question. After some discussion, she leaned toward the side of no par-boiling was required, while I thought it was. I was left with little choice, so, off to the test kitchens I went. That afternoon I made side-by-side dishes of cannelloni, one with noodles that had been boiled and the other with noodles that were raw. Once finished baking, a taste test ensued. After all that, the difference was minimal. Yes, I could tell the difference, tasting them one right after the other. I’m not so sure, however, that I could identify one if eaten alone — although I’d have a 50-50 chance if I guessed. Even so, there was a difference,  no matter how slight, and I preferred the cannelloni prepared with par-boiled dough sheets. I guess I’ll be doing that from now on.

*     *     *

Cannelloni Bite

*     *     *

So, if you chose to par-boil your noodles, place them, in batches, into rapidly boiling salted water. Remove after 60 to 90 seconds, and place in an ice bath. Treat carefully because the noodles are delicate and may tear while being moved or handled. Continue with batch after batch until done. When you’re ready to fill them, you may find it easier if you pat dry each sheet before attempting to fill and roll them.

If you choose to use raw noodles, you must work quickly lest the dough sheets dry. This will cause them to crack when you attempt to roll them. To avoid this problem, once you’ve measured and cut the individual sheets, fill them all and put them aside before starting another piece of dough through the rollers. Follow this method and you’ll have no problems with cracking dough sheets.

Be sure to read the Notes section below for freezing suggestions.

*     *     *

Bartolini Cannelloni Recipe

Ingredients

for the filling

  • 1 1/2 lbs. ground pork
  • 1 1/2 lbs. ground veal (chicken or turkey may be substituted)
  • 2 – 3 tbsp butter
  • 1 pkg (10 oz, 283 g) frozen chopped spinach (cooked and well-drained)
  • 1 pkg (8 oz, 227 g) cream cheese
  • 1 cup grated Pecorino Romano — Parmigiano may be substituted
  • 2 or 3 eggs slightly beaten — depending on size
  • ¼ tsp ground nutmeg
  • zest of 1 lemon, more if you like

for the cheese sauce

  • 2 – 3 oz (57 to 85 g) cream cheese, softened 
  • 2 – 3 oz (59 to 89 ml) milk

for the cannelloni

  • Mom’s pasta dough
  • 1 quart tomato sauce, with meat or without (See Notes)
  • cheese sauce
  • an 8 oz ball of fresh mozzarella
  • 1/2 cup grated Pecorino Romano cheese

*     *     *

*     *     *

Directions

for the filling

  1. Sauté meat in butter. Season lightly with salt.
  2. Use meat grinder to process the meats. Add all the ingredients into a mixing bowl and mix until well-combined.
  3. Cover the filling and refrigerate for a few hours or overnight.
  4. Once the filling has rested, you can begin making your cannelloni.

for the cheese sauce

  1. Combine equal amounts of cream cheese with milk.
  2. Whisk and set aside. 

to make the cannelloni

  1. Shape 2 to 3 tbsp of filling into a small log, about as thick as your index finger. More or less filling may be required depending upon the size of your cannelloni. Do not over-stuff. Filling should leave a 1/4 inch (.6 cm) border on either side of the dough sheet.
  2. Place the filling on the edge of the dough sheet and roll as one would if making a cigar.
  3. Set aside, seam-side down.
  4. Repeat Steps 1 through 3 until all the filling or dough sheets have been used.

assemble the dish and bake

  1. Pre-heat oven to 350˚ F ( 177˚ C).
  2. Liberally butter a baking dish.
  3. Coat the bottom of the dish with 1 to 2 cups (237 to 473 ml) of tomato sauce
  4. Place cannelloni, seam side down, in 2 rows, until dish is filled. Do not over-crowd.
  5. Spoon cheese sauce over all the cannelloni.
  6. Add enough of the remaining tomato sauce to completely cover the dish’s contents.
  7. Sprinkle the top with the grated mozzarella and Pecorino Romano cheeses.
  8. Spray one side of a sheet of aluminum foil with cooking spray and use it to cover the baking dish, sprayed side down.
  9. Bake in pre-heated 350˚ oven for 20 minutes. Remove foil and continue baking until cheese topping is cooked to your satisfaction. Over-cooking may result in dry cannelloni.
  10. Allow to rest 10 minutes before serving.

*     *     *

Cannelloni 7

*     *     *

Variations

If you have a favorite ravioli filling, you can easily use it here. In fact, I’ve used our ravioli filling to make cannelloni several times. The truth is, you may find it easier to make cannelloni than it is to make ravioli, at least initially, so, why wait? Go ahead and use these instructions to make cannelloni with whatever filling you prefer. There’s sure to be a great dinner in store for you, if you do.

Although never served in my family, there is a version of cannelloni that uses crespelle (crêpes) rather than pasta dough sheets. One day I’ll give them a try — once I learn how to make crespelle, that is.

Notes

If you choose not to par-boil the dough sheets, add about a 1/3 cup (80 ml) of water to the tomato sauce before using and stir well. The extra water will be needed by the raw sheets as the cannelloni bake.

I recently made a half-batch of filling with a whole batch of Mom’s pasta dough. Combining the 2, I made 32 cannelloni, enough for several dinners. Your results may vary, however, depending upon how large you make your cannelloni. If you make an entire batch of filling, you could use half to make cannelloni on Day 1, as I did, and use the rest of the filling on Day 2 to make cappelletti. On Day 3, open your freezer and smile, secure in the knowledge that there are some very good dinners in your future.

Cannelloni can be frozen easily.  

  1. Once fully assembled, cover the baking dish with foil and freeze. To heat, leave covered with foil and bake in a pre-heated, 350˚ F (177˚C), oven for 45 minutes. Remove foil and continue baking until cheese is to your liking.
  2. I find it easier and more convenient to freeze the cannelloni individually on a baking Cannelloni for the Freezersheet covered with foil or parchment paper. Once frozen, place them into a hard-sided container and store in your freezer. When it’s time to serve them, you can use as many as needed to assemble your dish, rather than cook a dish you prepared the week before. Follow the same instructions for baking as in the preceding step.
  3. Even if you follow my cooking instructions for frozen cannelloni, you’ll need to test for doneness before removing them from the oven. To do this, place the tip of a metal skewer or sharp knife into one of the cannelloni in the center of the dish. Hold it there for 5 to 10 seconds. Remove and use it to touch the inside of your wrist or just beneath your lower lip. Continue baking until tip is hot to the touch.

If you can, try to use fresh mozzarella to top off this dish, for it tastes so much better. I prefer not to use slices here, though. Since the slices take longer to melt and brown, you run the risk of drying out the cannelloni while it bakes. Fresh mozzarella will melt faster but it can be a mess to grate at home. To make it a bit easier, open its packaging and place it all in your freezer for about 30 minutes before needed. You’ll find the cheese to be firmer and, therefore, easier to grate. If it is too firm, just leave on the counter for a few minutes.

I’m not certain if these definitions are “official”, but in our family, cannelloni were meat-filled and manicotti were filled with a ricotta cheese mixture. You now have our cannelloni recipe. Soon you’ll have our manicotti recipe, too.

It’s déjà vu all over again … 

tricolor-risottoFor today’s Blast from the Past, we’re going to continue to celebrate St. Joseph’s Feast Day with risotto, a dish that’s Italian, through and though.  This is no ordinary dish of risotto, however, as you can see on the right, for its colors are those of the Italian flag. You can learn how to prepare this dish by clicking HERE.

*     *     *

Coming soon to a monitor near you …

Spaghetti with White Anchovies and Capers

Spaghetti with White Anchovies and Capers

 *     *     *

Grilled Swordfish with Salsa Verde

Pesce Spada alla Griglia con Salsa Verde

Broiled Swordfish

As Lent continues, so does our fishing trip. Today’s catch is swordfish, a large fish that can be found primarily in the coastal waters of the Atlantic and Pacific oceans. A favorite of cooks everywhere, its firm, relatively oily flesh is most often cut into steaks and is considered perfect for grilling. Well, considering my recent (highly unusual) successes on the grill, I’d little choice but to put away the broiler pan and return to the barbecue one more time.

Now, though I may continue to grill throughout the Winter, there’s nothing complicated in what I do, for it’s too cold for fancy schmancy. Instead, it’s Grilling 101. Heat the grates. Go back in the house. Clean the grates. Go back in the house. Oil the grates. Put the fish on the grates. Go back in the house. Flip the fish after a specified amount of time. Go back in the house. Remove, rest, and serve – in the house.  The only prep work for the fish involves seasoning the fillets with salt and pepper and lightly brushing them with oil. No, it doesn’t get much easier than this. And, to be honest, preparing the salsa verde, green sauce, isn’t much more difficult, as you’ll soon see.

*     *     *

Raw Swordfish with Salsa Verde

*     *     *

Green sauce, in one form or another, is common to countries in Europe and the Americas. Easy to prepare, with ingredients common to each area, this sauce can be used as a dip, condiment, and/or accompaniment for meat and fish dishes. Even so, the green sauce you find in Frankfurt, Grüne Soße, is quite different from that which you’d be served in Mexico, salsa verde. In Italy, there is no one salsa verde recipe. It varies from district to district, town to town, and probably house to house. So, when you look at my salsa verde recipe, use it as a guide. If you don’t like anchovies, drop them but be sure to add a bit of salt to make up for the change. Want a little mint? Swap some of the parsley for it. Just keep in mind that Italian salsa verde is meant to be a relatively simple sauce. Try not to get too exotic with the ingredient list. And no matter what recipe you follow, be sure to let your salsa rest at least an hour — hopefully 2 — before serving, giving the flavors a chance to blend and mellow.

*     *     *

Grilled Swordfish with Salsa Verde Recipes

Ingredients

  • swordfish steaks
  • salt & pepper
  • extra virgin olive oil
  • lemon wedges

Salsa Verde

  • 2 cups fresh parsley, chopped fine
  • 1 tbsp capers, rinsed
  • 2 – 3 anchovy fillets, chopped
  • 1 shallot, chopped
  • 1/3 cup lemon juice
  • zest of 1/2 lemon, more or less to taste
  • 1/2 cup extra virgin olive oil
  • pepper, to taste

Directions

for the salsa verde

  1. Place parsley, capers, anchovies, shallot, and lemon juice (or vinegar) into a food processor and run, forming a paste.
  2. Scrape the bowl’s sides and resume processing for a couple more minutes.
  3. While the processor is running, pour the olive oil in a slow stream into the bowl. Continue until well-mixed.
  4. Taste before seasoning with pepper.
  5. Cover and set aside. Refrigerate if not needed for hours, though, best when served at room temperature.

for the swordfish

  1. Start grill. Will require a med-high heat.
  2. When grill is ready, thoroughly clean the grilling surface before using a towel soaked in vegetable oil to coat the grill plates.
  3. Lightly coat fish with vegetable oil, season with salt & pepper, and place on grilling surface. Do not move or disturb once placed on the grill.
  4. Grill for 3 to 4 minutes per side. Remove from heat, cover, and let rest for a few minutes.
  5. Place swordfish filets on a serving platter and serve with salsa verde accompaniment

*     *     *

Grilled Swordfish

*     *     *

Notes 

Please note that the recipe for salsa verde requires 2 cups of chopped parsley and not 2 cups of parsley that you chop. Make that mistake and you’ll have one runny batch of salsa. Now, should your salsa be too thin for your tastes, there’s no reason to panic. You can always add more chopped parsley to the food processor and try to correct the problem. In Italy, some recipes call for a slice or 2 of bread to thicken the salsa. Having tried both over the years, I’ve come up with Option 3. Pour the salsa through a fine-mesh sieve, draining as much liquid as you wish. Once the salsa has been allowed to rest, taste it and correct the seasoning as required.  Believe me, that’s the easiest way around the problem and doesn’t involve a run to the grocery to buy more parsley.

Variations

This salsa verde is the one that I use when serving fish. When seafood isn’t on the menu, I’ll make a few changes, resulting in a salsa that’s a better fit for the protein being served. Instead of the lemon juice and zest, I’ll add 1/2 cup of red wine vinegar. I’ll, also, chop 2 cloves of garlic in place of the shallot. Whether you follow my suggestions, with just a few substitutions you can create a salsa verde to go with any dish.

So, maybe you’re thinking that as much as you like swordfish, this salsa verde thing just isn’t for you. Not to worry. The Bartolini kitchens aim to please. Perhaps you’d be happier with a different cuisine. Might I suggest taking a trip to a kitchen located on the other side of the World? This Hong Kong kitchen is run by a blogging buddy, BAM, who recently shared a GF recipe for swordfish cooked in the Thai style. Believe me, this is one recipe and post you don’t want to miss.

*     *     *

It’s déjà vu all over again … 

Pasta alla Norma

Pasta alla Norma

A couple of weeks ago, I sent you to Naples for a peek at my Pasta Puttanesca recipe. This week, we’ll head to Sicily for a look at my recipe for Pasta alla Norma, another of Southern Italy’s great dishes. This meatless pasta features chopped eggplant and is garnished with ricotta salata, a firmer, saltier version of the creamy ricotta that we all know and love. If you’re interested, you can see the recipe by clicking HERE. 

*     *     *

Coming soon to a monitor near you …

Cannelloni

Bartolini Cannelloni

Your eyes aren’t deceiving you. Next week we’ll be taking a break from our fishing trip in honor of the pending St. Joseph’s Feast Day. 

*     *     *

Grilled Salted Cod

Baccalà alla Griglia

Grilled Salted Cod

Today’s post is the 3rd straight recipe involving seafood of some sort — and we’ve 4 more to go. For today’s dish, we return to the grill but this time, after some discussion, a grill basket is used.   You see, fresh from my success with the grilled sturgeon, I wanted to try grilling salted cod, baccalà, directly on the grill plates. What could go wrong? Well, when I spoke with Zia about my plan, not only did she mention what could go wrong but she also pointed out that we Bartolini always grilled baccalà lightly breaded and in a basket.  How could I fight that kind of logic? This is, after all, a place for documenting our family’s recipes. So, moments later, she was explaining how baccalà was grilled in the Old Days and I was wondering where I’d put my grill basket. You needn’t worry, however, if you’re a fan of grill marks on you fish. We’ll return to the grill next week, when swordfish is on the menu.

With the grilling method out-of-the-way, let’s briefly recap baccalà and its preparation. For centuries, cod was caught, cleaned, and dried primarily in Scandinavia before distribution across Europe. If the cod is salted and then air-dried, it’s called salted cod, baccalà in Italy. If the cod is hung and air-dried, it is called stock fish, stoccafisso in Italy. (In Italy, all stoccafisso is cod but that’s not necessarily the case elsewhere.) Before either form of cod can be prepared, each must be re-hydrated and, if necessary, rinsed free of salt. To do so, place the cod in a flat baking dish, deep enough to hold enough water to completely submerge the entire fish. Keep the cod in the water for at least 12 hours but no more than 2 days. Replace the water 3 times daily. You can speed up the process a bit by letting a slow, steady stream of water flow into the dish but not on to the cod or you might damage the fillet. You’ll know the fish is ready by the way it looks, feels, and smells.

Once the cod is ready, remove it from the water and place it on (paper) towels while you make the marinade. You do not want to allow the cod to completely dry out but do remove the surface moisture. In a small mixing bowl, add about 1/3 cup Panko bread crumbs; 3 tbsp chopped fresh parsley; 1 tbsp chopped fresh rosemary; 1 or 2 cloves of garlic (grated or diced); 1/2 cup extra virgin olive oil; and pepper to taste. (Salt should not be needed and ingredient amounts may vary depending upon the size of the fillet.) Return the cod to the now-dry baking dish and cover with the marinade, coating it evenly on all sides. This is not a “true” breading, so, there’s no need to completely cover the fish. Use plastic wrap to cover the dish and set aside for a couple of hours. It may be necessary to refrigerate the cod, depending upon your kitchen’s temperature.

Pre-heat the grill when you’re ready to cook your cod. Clean the grilling basket and oil it liberally just prior to placing the cod in its center. Once secured, lay the basket on the grill and sprinkle a bit of olive oil over the fillet’s top side and close the grill’s lid. Lower the heat to med-high. Depending upon your grill’s temperature, how the basket rests on the grill plates, and the thickness of the fillet(s), baccalà will take from 8 to 11 minutes per side. Be sure to check it midway through the cooking of each side and be prepared to adjust cooking times, as required. Once you’ve flipped the basket over, sprinkle the fish’s “new” top side with the juice of a half-lemon. Continue grilling until done.

When cooked properly, cod will easily flake. Keep this is mind as you carefully remove the cod from the grilling basket.  Place on a serving platter and serve immediately with lemon wedges.

*     *     *

*     *     *

Notes

As mentioned earlier, the marinade is not meant to be a breading that completely covers the fillet. Though it contains bread crumbs, there is no way that all of it will remain on the fish as it is grilled. Once the marinade has done its job, the bread crumbs will offer some protection for the fish, helping it to remain moist as it’s grilled.

Depending upon where you live, you may be able to purchase a piece of baccalà that is just about equal in size to the fillet I used in this recipe.  I have no such luck and must purchase a large piece of baccalà, probably around 18 inches (46 cm) long, that is the entire side of the fish, from the gill opening to its tail. On Christmas Eve, the entire piece can be cut up and cooked, as I showed you HERE. Any other time of the year, that piece of cod is far too big for me and I divvy it up for 3 different dishes. First of all, do not re-hydrate the cod until you’re ready to use that particular piece of fish. Even though dried, you’ll notice one side, the fillet section, that is thicker than any other part of the fish (shown in RED on the right). Use a sharp knife or kitchen shears to remove that piece. This is the piece I used in today’s recipe. On the other side of the fish, is another, equally sized portion, though not as thick (GREEN). Remove that section and return it to the packaging. This piece will be used to make a salad and I’ll show you how in a future post. The remaining section BLUE), about a 10 inch (25 cm) “tail”, should be returned to the packaging and, once re-hydrated, can be baked or broiled. I’ll be showing you how to do that, too, at a later date. Properly sealed and kept dry, these 2 remaining pieces will keep for months although, if you enjoy baccalà like we do, you needn’t worry about it being around for weeks, much less months.

And for those of you keeping track, this is pretty much the same bread crumb mixture that was used in last week’s recipe, as well as a number of other Bartolini recipes. Guaranteed, it will be making at least one more appearance in the weeks ahead.

*     *     *

In my rush to get last week’s entry posted, I failed to include anything about my visitors. For those not in the know, that previous Friday, Miss C and The Matriarch, of The Kitchen’s Garden fame, rode into town on a brisk, but sunny, Friday morning and left the very next morning, heavily laden with packages of every kind. It was a whirlwind tour of some of my favorite food haunts, topped off with a late lunch at a favorite Thai restaurant. They were, without a doubt, perfect guests, as we ran from store to store, aisle to aisle, letting me prattle on as if I was personally responsible for the contents of each. By any measure, it was a very good day, one that I hope we can repeat, weather and Farmy permitting.

*     *     *

It’s déjà vu all over again … 

Easter is still several weeks away but it’s never too late to plan. Besides, if you like this bread as much as all who’ve baked it, you’ll need time to bake another loaf for the Holiday. Crescia al Formaggio is baked in the Bartolini homeland, Le Marche, every year at Easter. With over a cup of grated cheese in its dough, this bread not only tastes good but it fills your kitchen with a fantastic aroma while it’s in the oven. Believe me. This is one bread that is sure to please everyone seated at your dinner table. You can read my post by clicking HERE.

*     *     *

Coming soon to a monitor near you …

Grilled Swordfish with Salsa Verde

 *     *     *