What I did on my Spring Vacation. (The short answer: I ate.)

Formal introductions are forthcoming

*     *     *

Home again! 

After an all-too-brief visit, Lucy, Max, and I returned home to find things not quite the way we left them. (More about that later.) My time spent with Zia was wonderful, though the weather, much like that area’s like the internet service, wasn’t at all cooperative. One had me wishing I’d brought my Winter coat and the other had me seriously considering driving the 30 miles to get access to free WiFi at the nearest McDonald’s. As a result, there were no walks on the beach with Max and I only showed Zia a couple of your blog posts. I couldn’t get them to load on my iPad and this was the first time I brought my iPhone to Michigan. My experience with WP on the device is really quite limited. Even so, I wouldn’t necessarily consider an iPhone’s displays “Zia friendly” and I did much of my reading alone. And before anyone thinks I’m picking on my Cara Zia, I wouldn’t call the displays “John friendly” either. You should have seen me trying to “Pin” or “Like” one of your posts. (I don’t know how you do it, Eva!)

You may be wondering, with it cold and damp when it wasn’t flat-out raining, what does one do in rural Michigan? Well, I can’t speak for others but we cooked … and we cooked … and we cooked again. True, I did take my daily walk looking for morel mushrooms and ramps but returned home empty-handed each time. (Not to worry, I came prepared.) So, with several great meals prepared and, as the title suggests, devoured, I thought I’d share a couple of the recipes today, with a promise to post the rest in the weeks to come.

*     *     *

I can count on two things whenever I arrive at Zia’s home. Once I’ve unpacked the car, there will be a Manhattan waiting for me. (Zia is the original “Hostess with the Mostest”.) With my thirst quaffed, Zia will then get to work on the traditional Bartolini risotto.

*     *     *

*     *     *

Made with fresh mushrooms and chicken gizzards, this dish has long been a family favorite. In fact, there were relatives that traveled hundreds of miles and, upon each and every arrival, asked for a risotto dinner. Of course, not everyone likes chicken gizzards, so, just tell them that the offending bits are nothing but a few dried mushrooms. More about that, and the risotto recipe, will be shared in a future post.

*     *     *

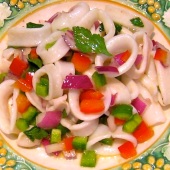
Although most lunches were simple sandwiches made with the Italian lunch meats and bread I brought with me, there were 2 notable exceptions. On Sunday, like always, we had brunch after Mass with a few of Zia’s neighbors and fellow choir members. (Yes, Zia is a member of her church’s choir.) The 2nd time was when I prepared Asparagus in the style of Milan, Asparagi alla Milanese.

*     *     *

*     *     *

There will be no future recipe for this dish because it is so very simple to prepare. Season fresh asparagus spears with salt, pepper, and a bit of olive oil. Place the spears on a heated barbecue, hot grill pan, or baking sheet that’s placed in a hot (425˚ F, 218˚ C) oven. Meanwhile, fry an egg or two per serving and season with salt & pepper. If, like us, you like your yolks runny, the eggs should be prepared sunny-side up or over easy. And that’s it. When both the asparagus and eggs are cooked to your liking, arrange a serving of asparagus spears on a dinner plate, place the eggs on top, and, if you like, garnish with a bit of grated Pecorino Romano or Parmigiano Reggiano cheese. It couldn’t be easier but it sure is a great tasting light lunch or fantastic primo piatto.

*     *     *

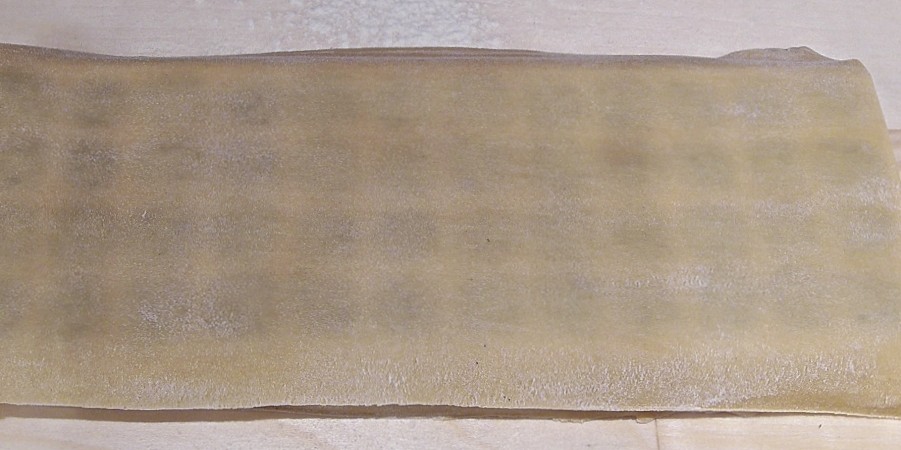
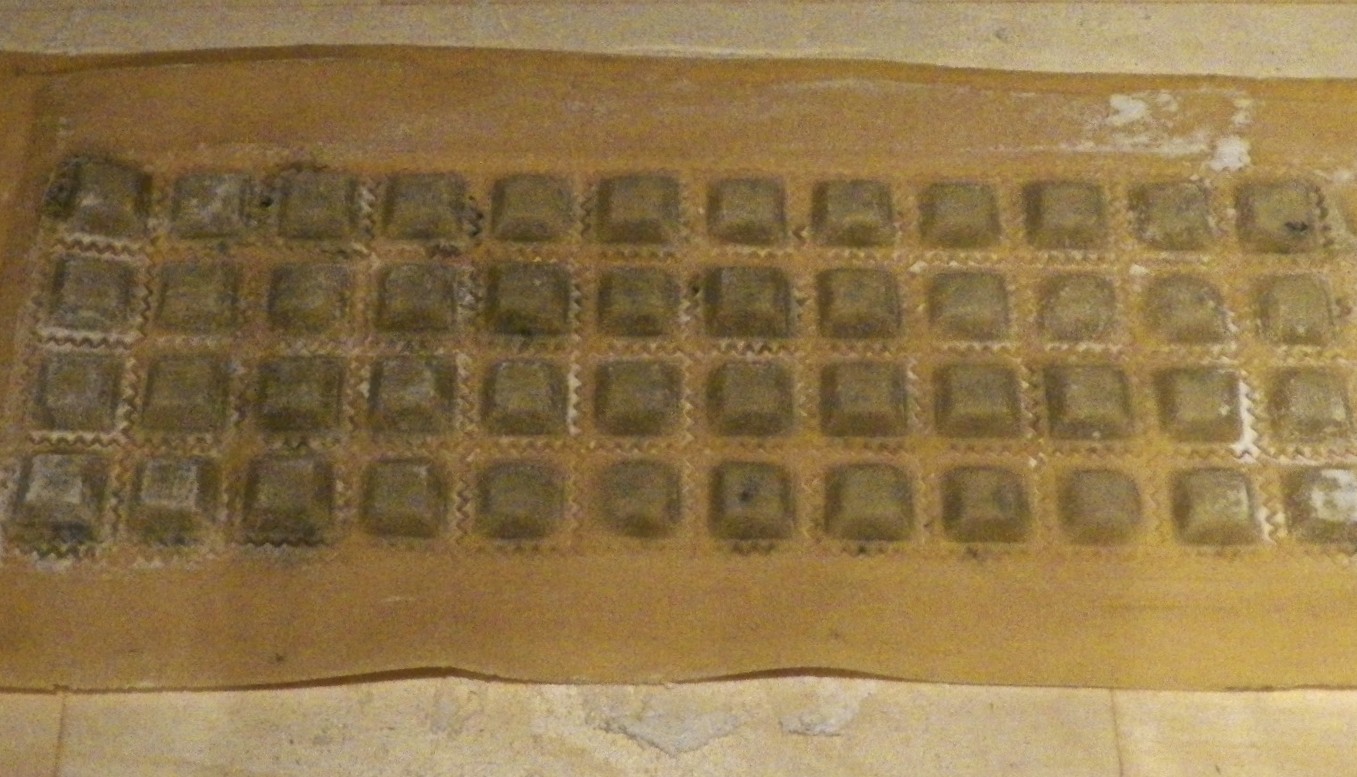
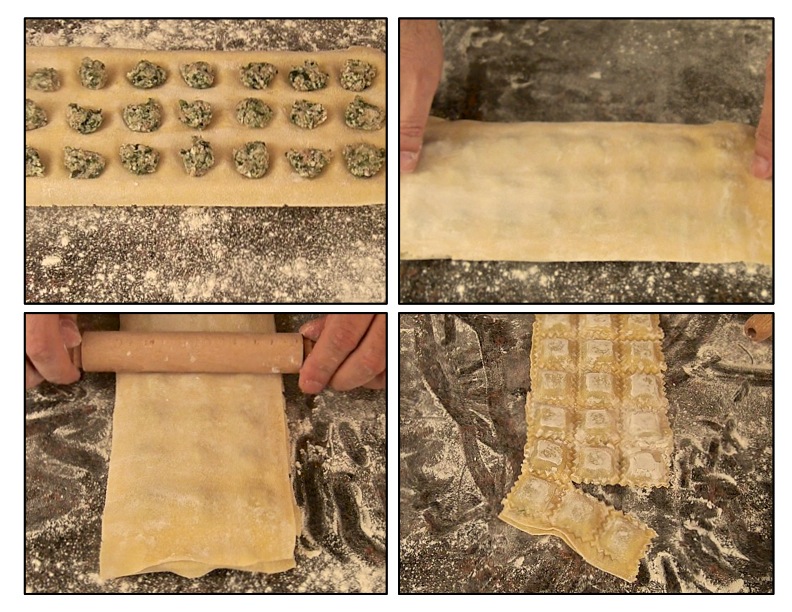
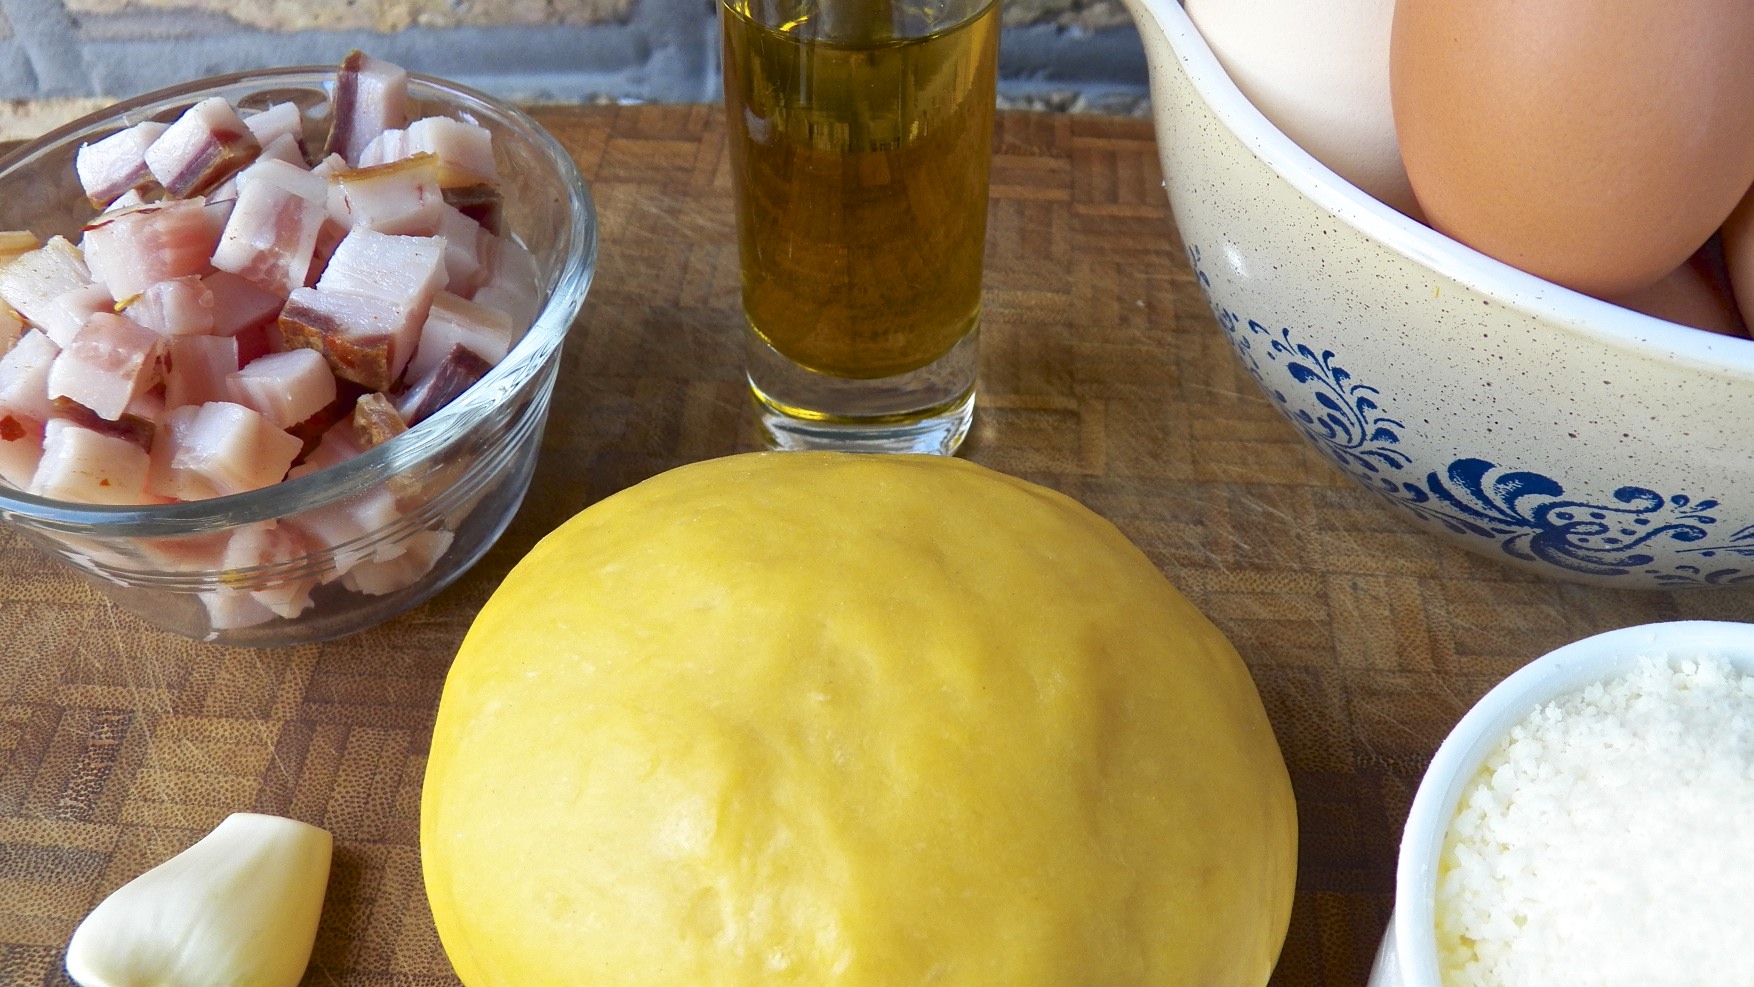
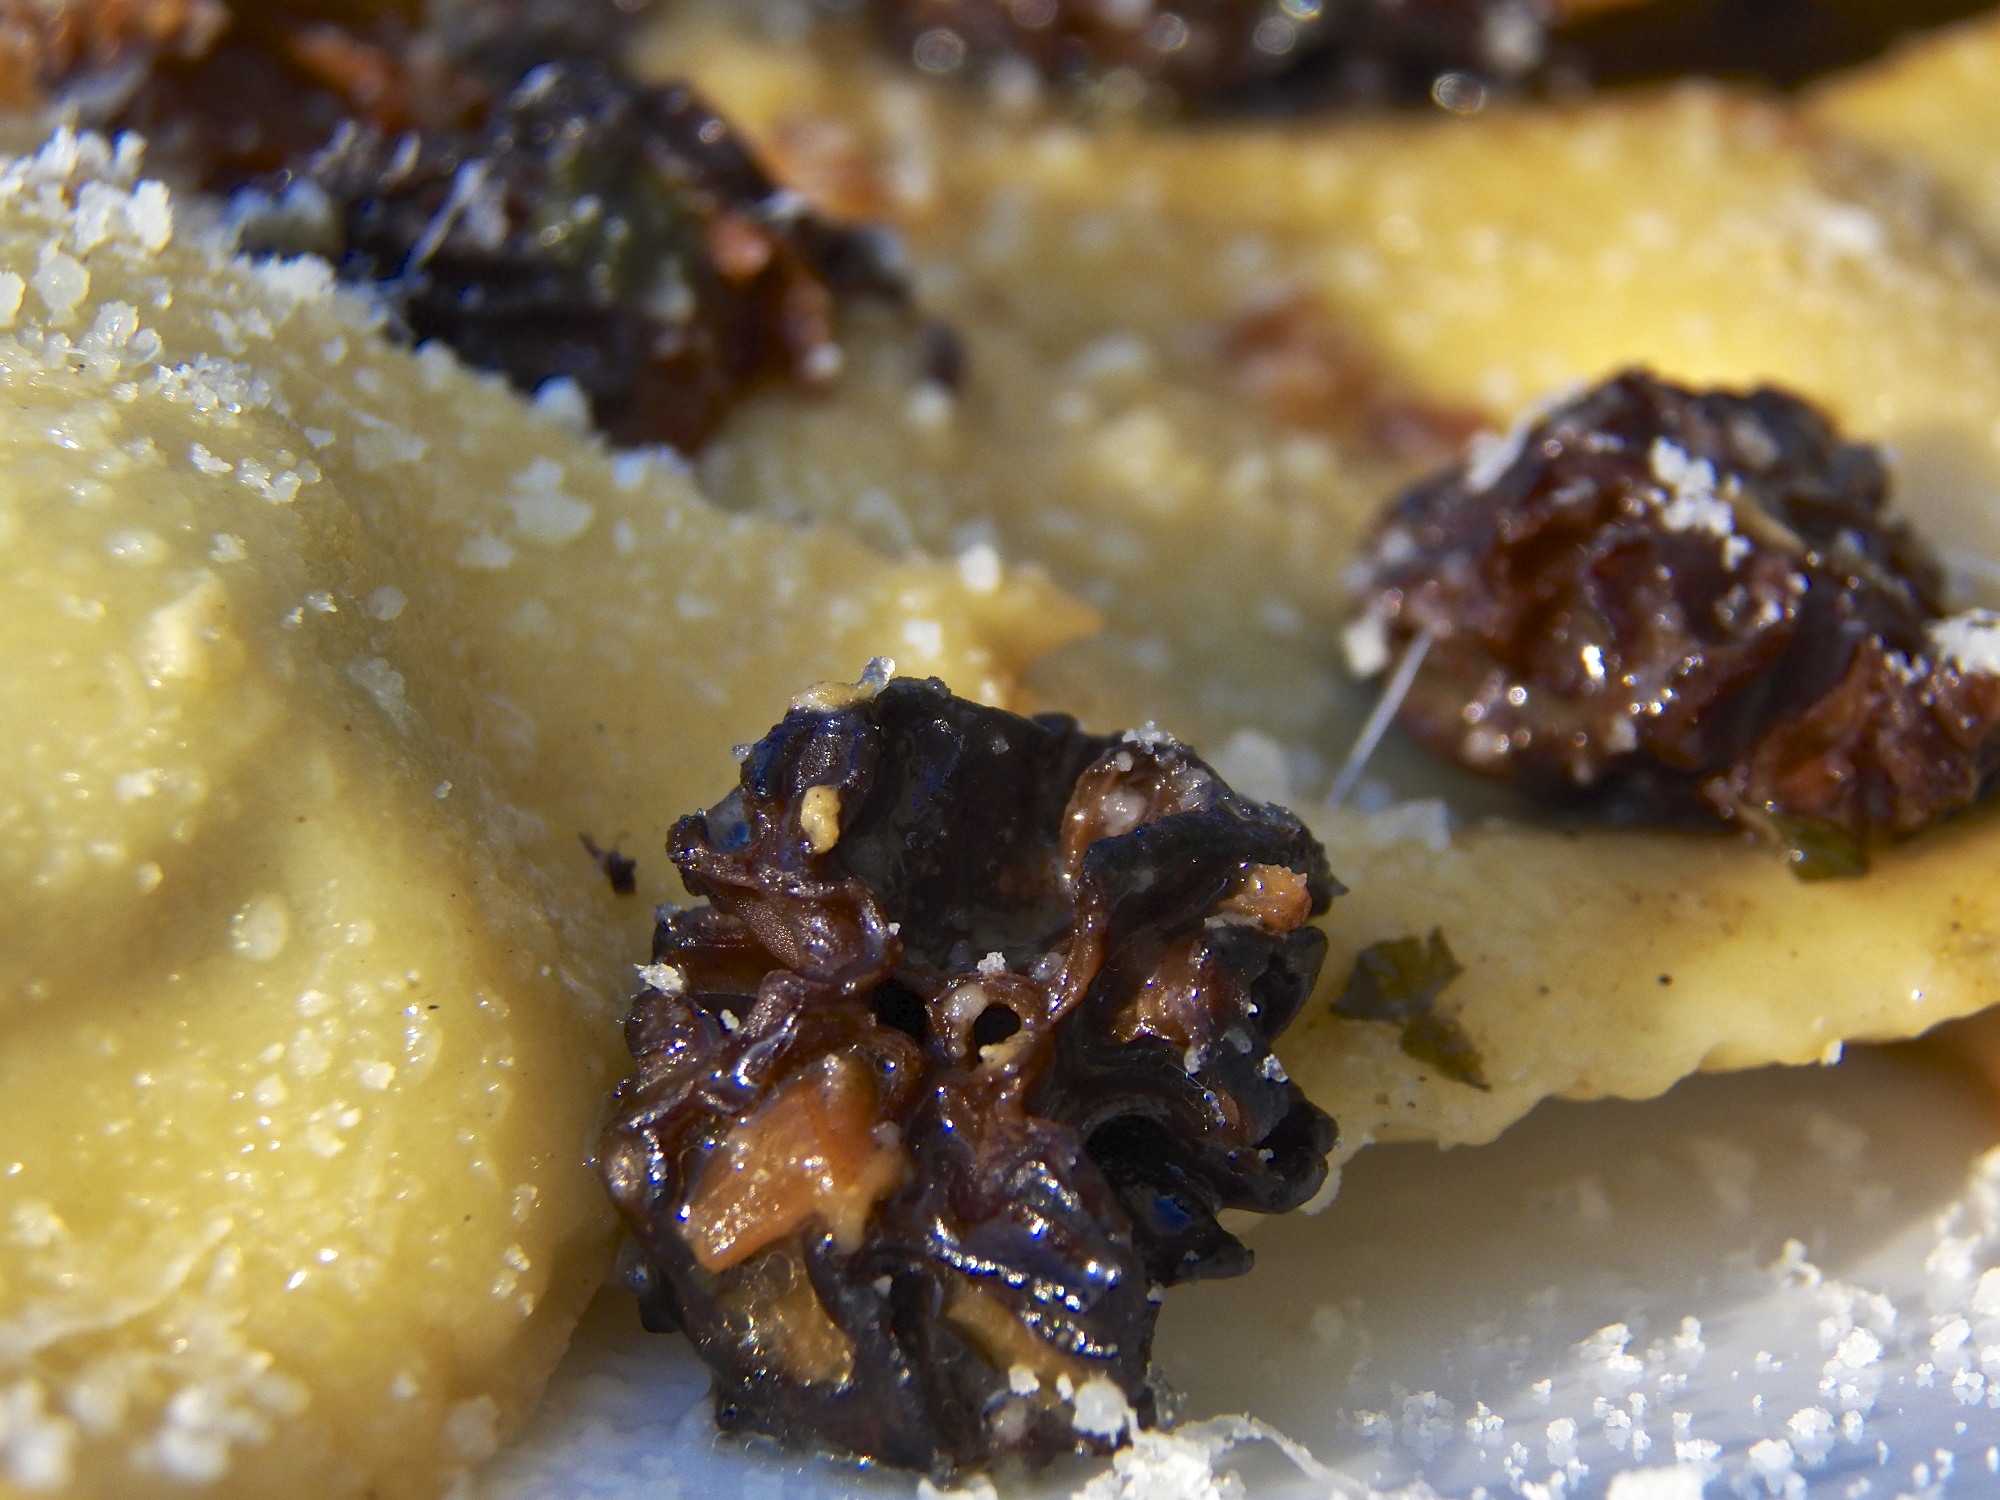
Now, we just didn’t spend all of our time eating lunch. We did work for our suppers, too. In fact, Zia’s pasta board got quite a bit of use over the course of my visit. One day, we made ravioli and linguine.

*     *     *

*     *     *

Using a filling of ramps, fresh spinach, and goat’s cheese, Zia and I spent the afternoon making pasta pillows. That night, we feasted on these very same ravioli, prepared with morel mushrooms in a white wine sauce.

*     *     *

*     *     *

Those recipes will be coming your way.

*     *     *

Another day brought out the pasta board again and we spent the afternoon making gnocchi.

*     *     *

*     *     *

That night’s dinner was probably the best of my entire visit. Our primo piatto was gnocchi dressed in a rich gorgonzola cream sauce.

*     *     *

*     *     *

That night’s secondo was grilled rack of Spring lamb, while contorni of grilled asparagus and a tossed salad rounded out the meal.

*     *     *

*     *     *

Later that night, I surprised Zia with cannoli that I’d brought from my Italian market. Recipes for the gnocchi, gorgonzola cream sauce, and lamb will soon be posted, too.

*     *     *

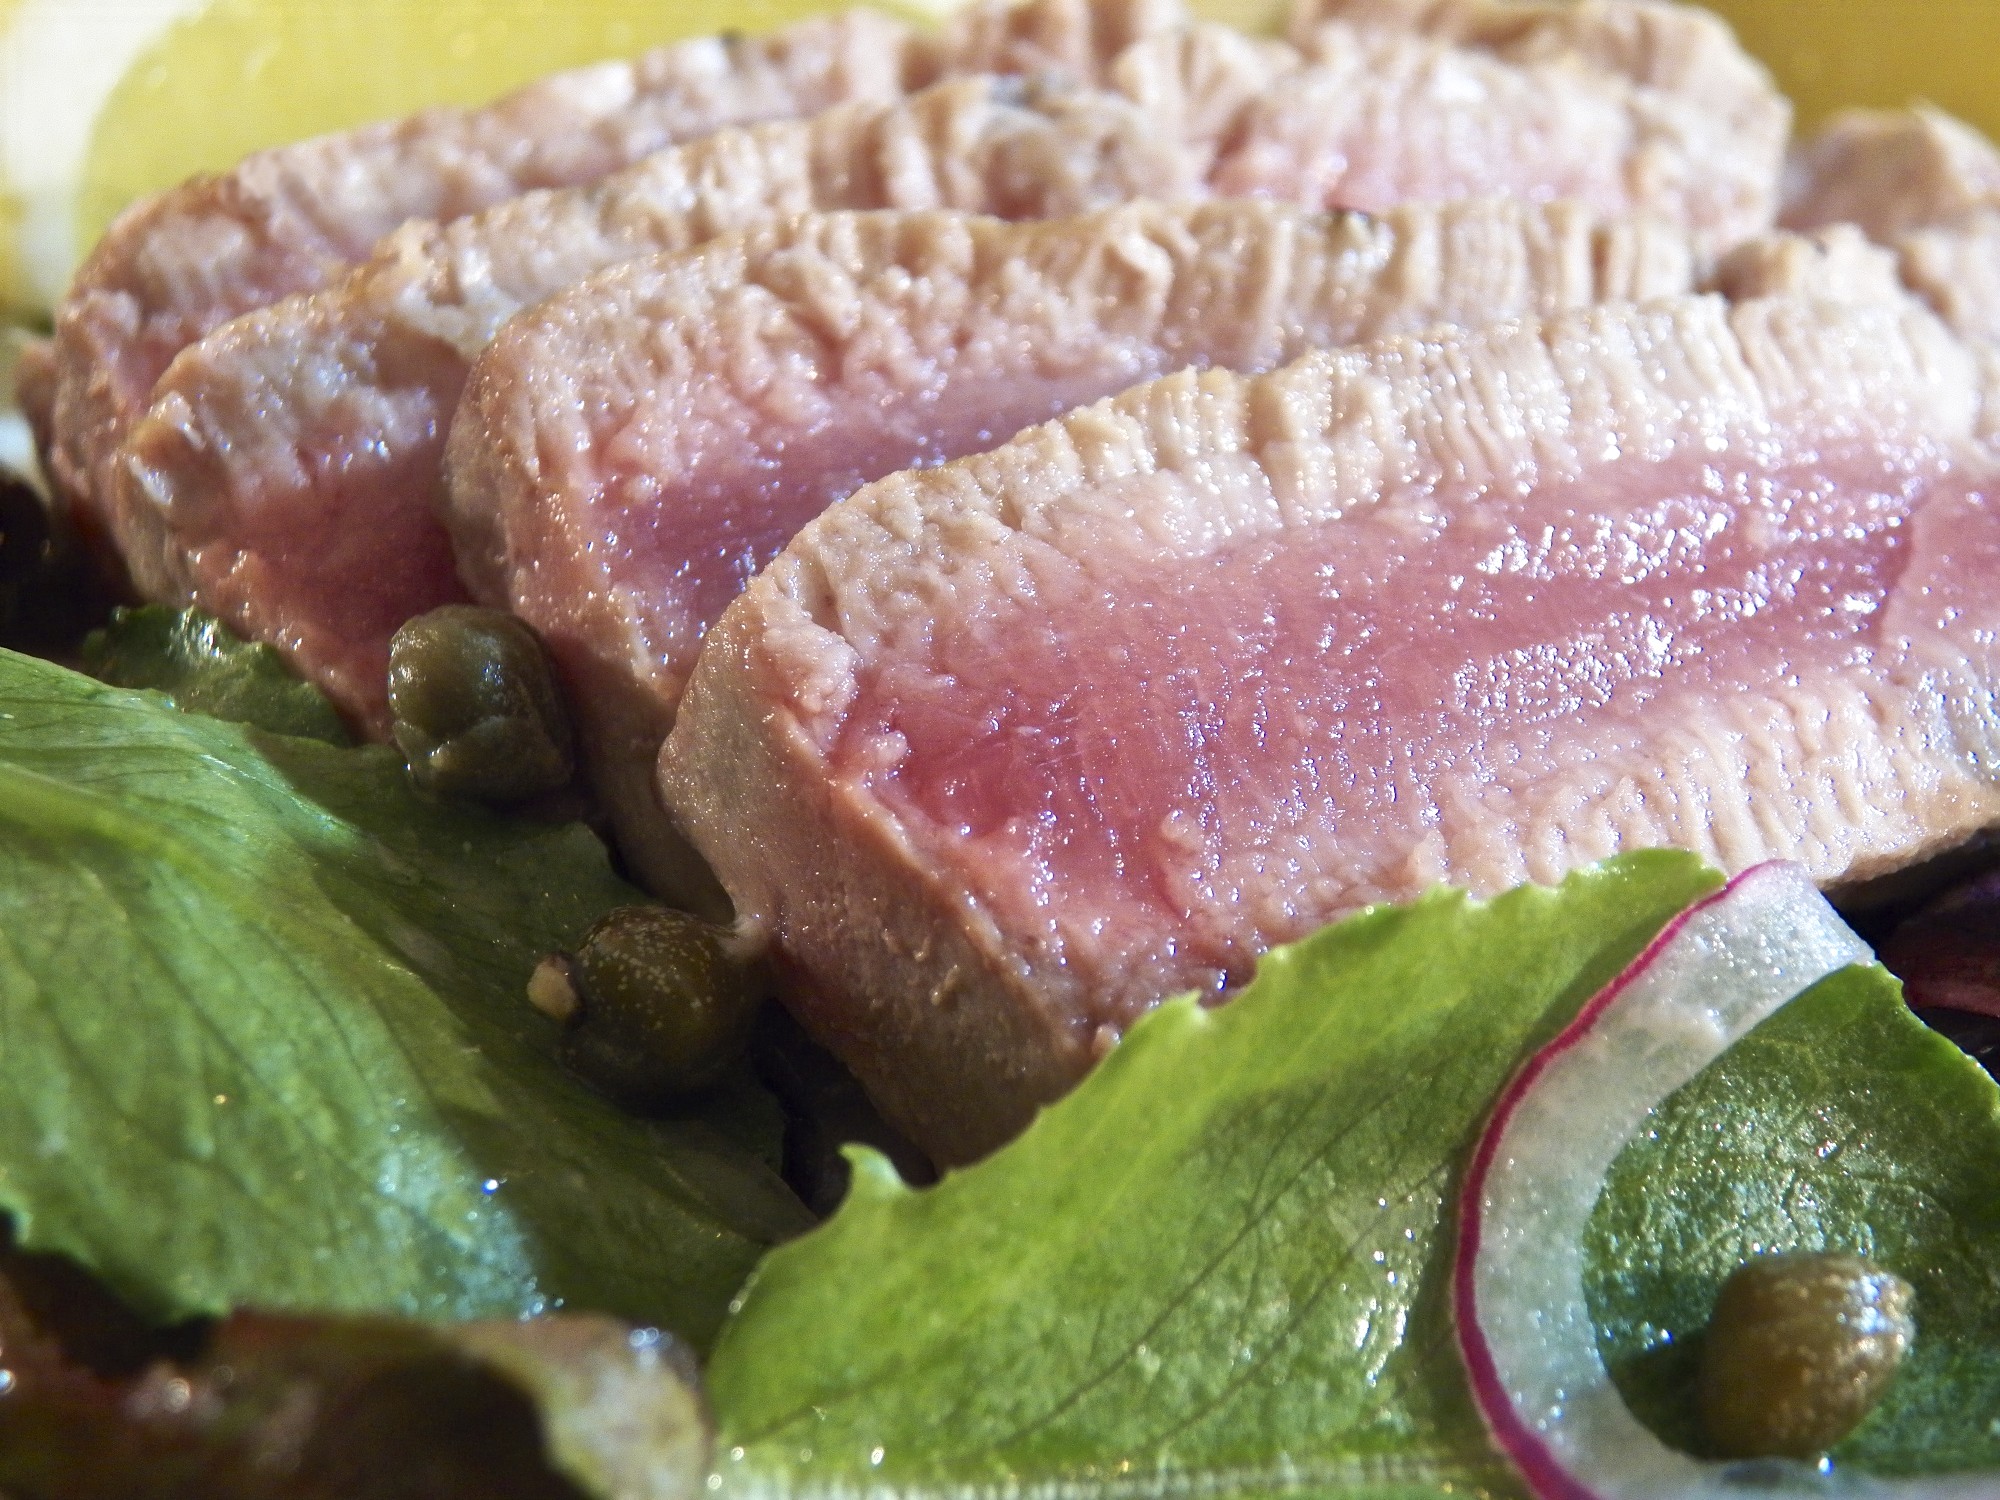
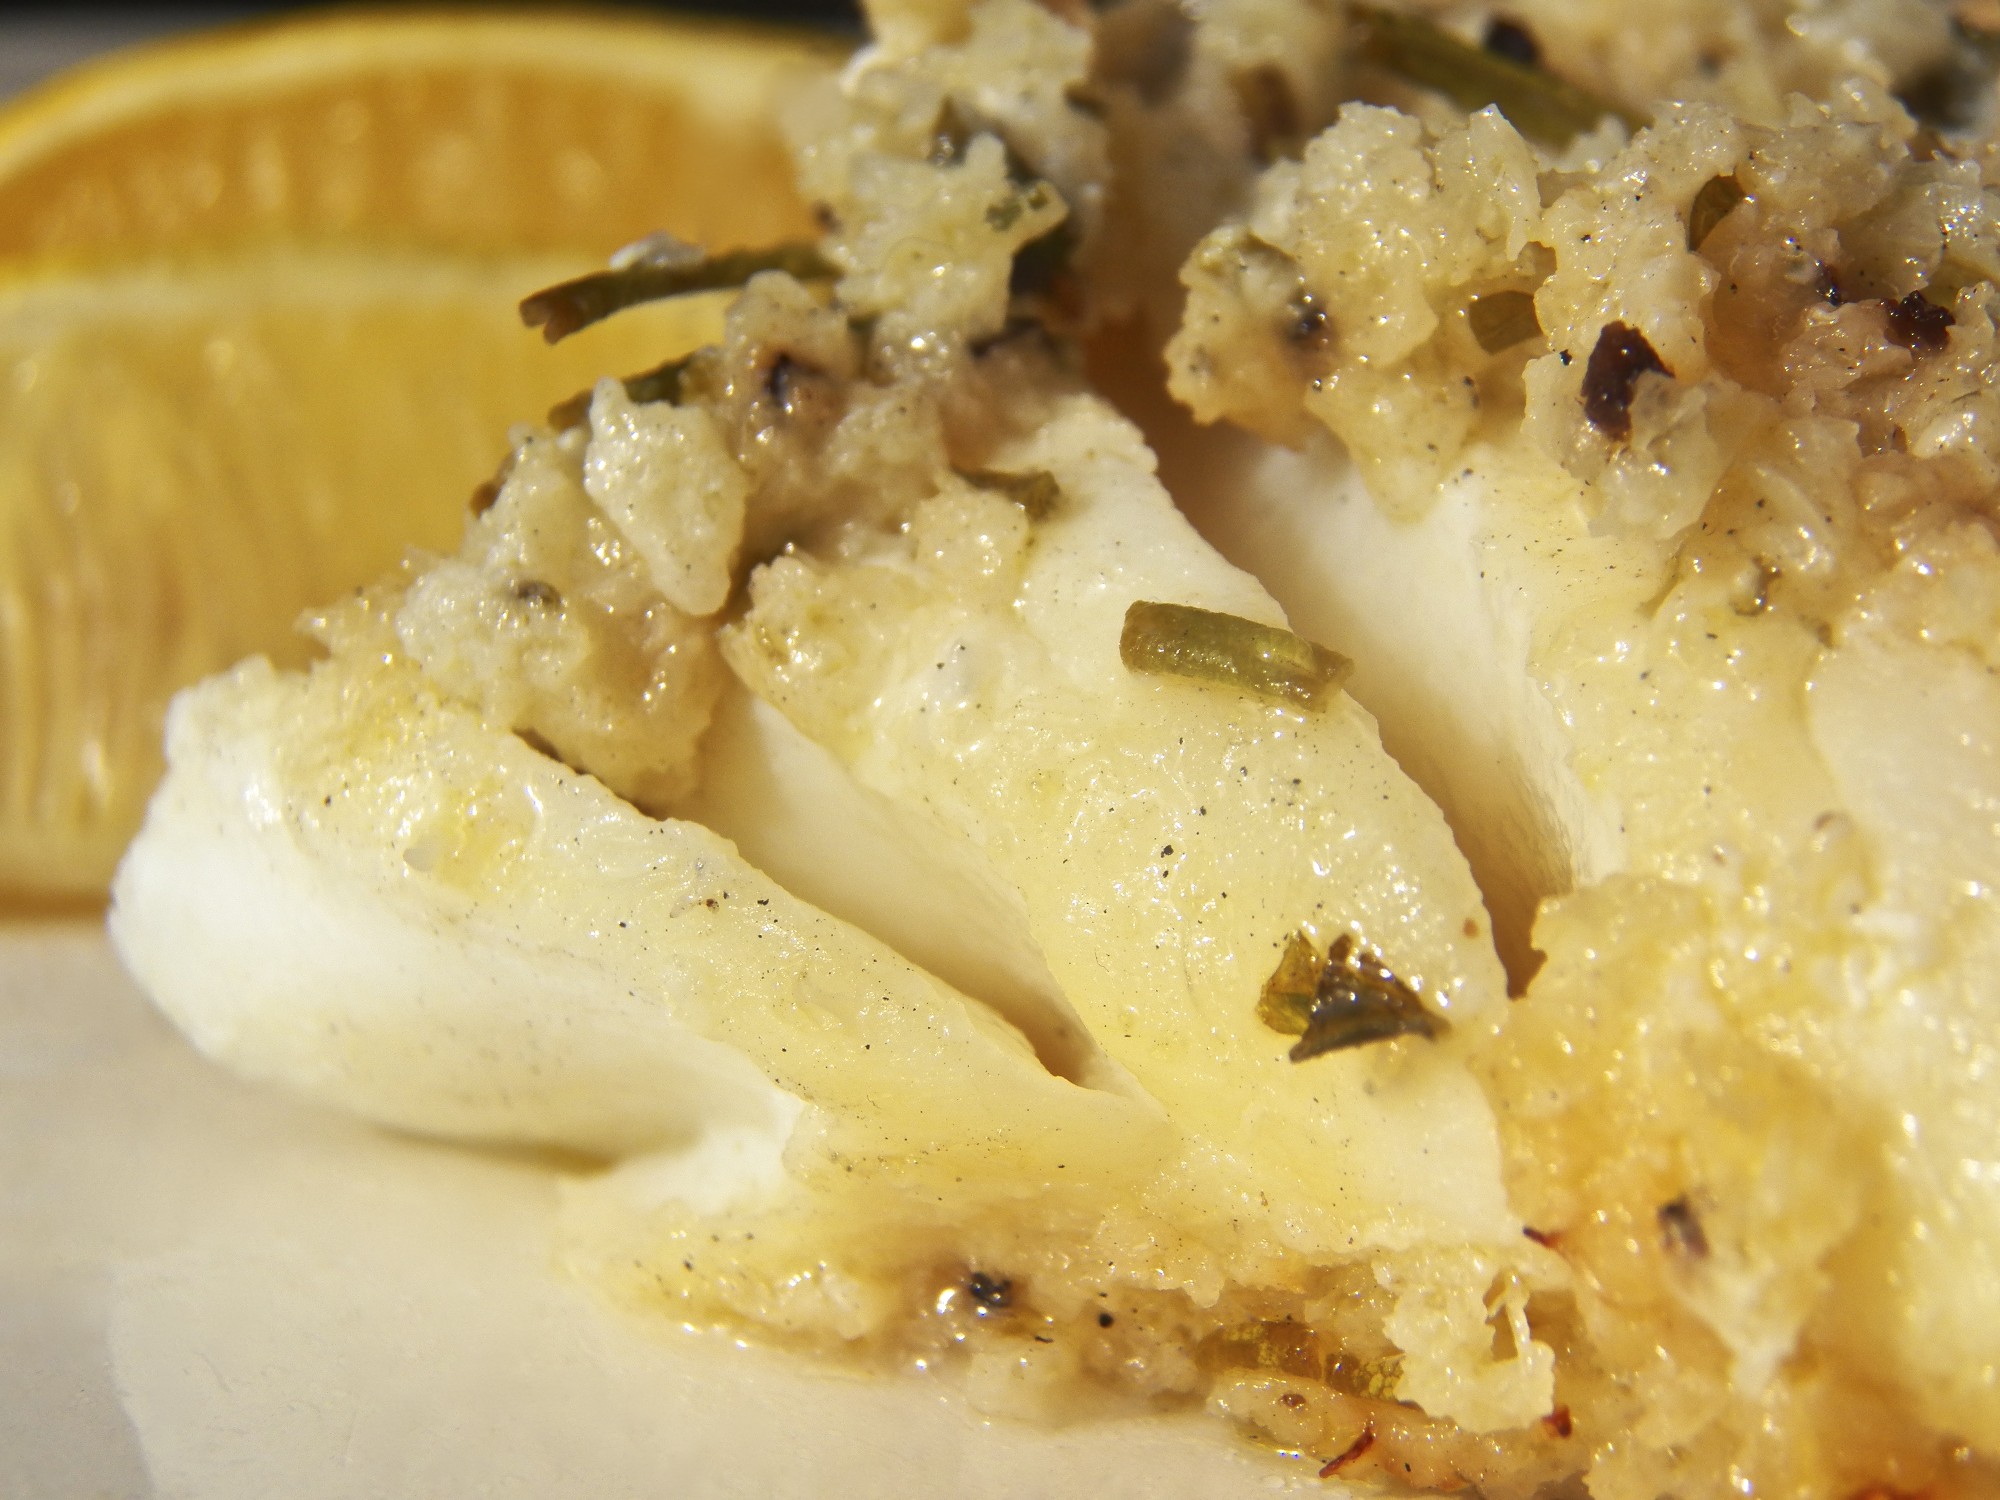
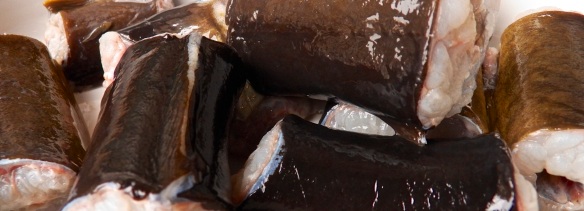
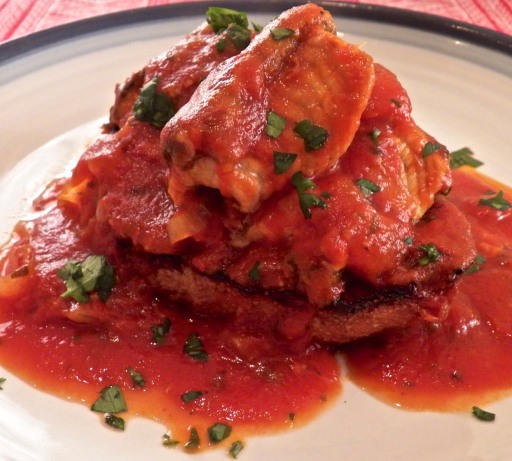
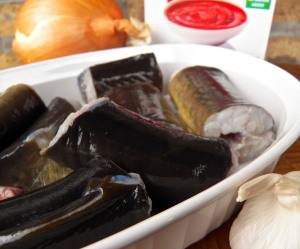
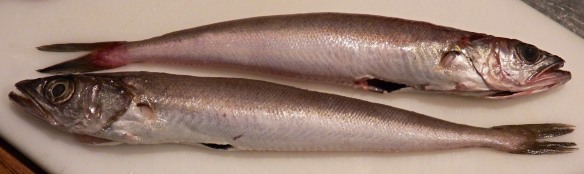
Lastly, I could hardly go home for a visit without bringing something from the fish monger. This visit I brought whiting, merluzzo, with me.

*     *     *

*     *     *

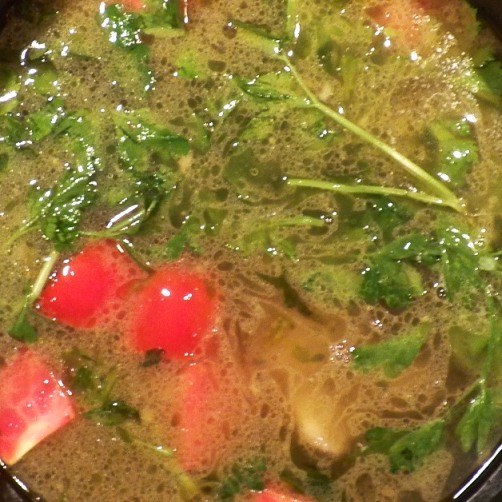
Rather than risk ruining them on a grill with which I’ve had little experience, these little fishies were prepared with the Bartolini breading mixture and baked, with excess breading mixture placed on the baking sheet, roasted, and used to garnish a platter of hand-cut linguine aglio e olio with baby artichokes, spinach, and ramps. The merluzzo recipe was already shared HERE

*     *     *

*     *     *

To make the pasta dish, place 1/3 cup olive oil in a hot pan over med-high heat. Add red pepper flakes, to taste, along with chopped ramps. Sauté till ramps are soft, add 2 to 4 bulbs of diced Spring or new garlic, and continue cooking for another minute. Add the trimmed and quartered fresh artichokes, a half cup of white wine, bring to a boil, and reduce to a soft simmer. Allow the artichokes to braise until soft and the sauce has reduced, about 15 minutes. Meanwhile, cook pasta until two minutes shy of package directions or, if using fresh, until the pasta is a bit firmer to the bite than your prefer. Reserve a cup of the pasta water, drain the pasta, and add to the frying pan along with  a handful or two of fresh spinach. Toss to coat the pasta and continue to sauté the pan’s contents until the pasta is cooked to your liking, adding pasta water as needed to maintain the sauce. To serve, garnish with breading mixture that remains on the baking sheet that was used to roast the merluzzo. Of course, if merluzzo isn’t on that night’s menu, your pasta may be garnished with grated cheese or bread crumbs toasted in a bit of olive oil.

*     *     *

So, there you have it. We cooked, we chatted, we worked out the kinks in a recipe or two, and we spent a very nice time together. And, best of all, there are recipes to share for anyone that’s interested. Would that I could end this post here and now but, alas, there’s a bit more to tell.

Late on the night of my arrival in Michigan, I received a telephone call telling me of some storm damage at my home. Thankfully no one was hurt and there wasn’t any structural damage. Since a picture is worth a thousand words and our friend Celi has challenged us all to post a view from our back porches, here’s mine.

*     *     *

"This is as close to indoor plumbing as I'm ever going to get!"

With the exception of a potted palm that died under the most suspicious of circumstances in the living room, this is about as close to indoor plumbing as Max will ever get.

*     *     *

That green thing is not some prop from a 50’s sci-fi thriller. It’s a trumpet vine that the wind knocked down, blocking the path to the garage and alley, not to mention landing atop a few roses. (Hopefully the dog run’s fence took the brunt of the force from the falling vine.) Here’s the view from the porch landing above.

*     *     *

Believe it or not, buried within that tangled mess are the remnants of a wooden trellis.

*     *     *

As you can see, mine is a typical city yard here in Chicago, made even smaller because of the 2 car garage and dog run … um … and the now-fallen vine. As of this writing, I’m waiting to hear from a few landscapers for bids to remove the vine and haul it away. On the plus side, once it’s removed, there’ll be space for a clematis vine and another rose.

The Kitchens are open again, with a new recipe, Baked Haddock, coming this Wednesday.

*     *     *

You Say Frittatas and I Say Frittate

For a time, I was Mom’s Chief Cook & Bottle Washer. Living just next door, Zia possessed a standing invitation, so, it was 3 for dinner most nights. Now, I may be able to cook a nice dinner, as surely we all can, but what I cannot do is estimate portion size. One of my dinners could just as easily feed 6 as it would 2 or 3. It’s not a problem here at home for I don’t mind eating leftovers at all. If I make enough for 6 servings, I’ll eat all of them over the course of the next few days and not think twice about it. I really couldn’t do that when cooking for Mom and Zia, however, and as a result, after a few days her fridge was brimming with leftovers. And if you think I could waste food in that kitchen, well, as Mom would say, “You’ve got another thing comin’!” Enter the frittata.

*     *     *

*     *     *

A frittata is an egg-based dish, the ingredients of which are only limited by one’s imagination. I assume there are probably thousands of recipes for frittate on the web, though I’ve yet to search for one. When I was a boy, Mom often used her leftover caponata to make me a frittata for lunch on Fridays. Once I was on my own, I continued to make them for I found them easier to make than a fancy folded-over omelet but still better looking than a mish-mash of eggs scrambled with a bunch of ingredients. 

So, with a fridge full of leftovers, deciding to make a frittata back then was a no-brainer. In recent weeks, I found myself in the same predicament, having roasted a ham for Easter and then, unfortunately, having to prepare pasta with burrata a few times due to camera difficulties. (That’s my story and I’m sticking to it.) As much as I enjoy ham sandwiches and as frequently as I reheat pasta, I needed a change and again I turned to frittate.

There are a few things common to any frittata that I’ve ever made. There are eggs, of course, and there’s always some form of starch, be that either pasta or potatoes. Onions, mushrooms, tomatoes, and virtually any other vegetable, both raw and previously cooked, could find their way into the skillet. I almost always add grated cheese of some sort and meat is often included, as well. Once everything is in the skillet and the eggs begin to set, the pan and its contents are placed in a pre-heated oven where the frittata bakes until ready. It’s removed from the oven, flipped onto a serving platter, garnished, and served with a piece of bread and soup or salad.

For the frittate presented here, I used an 8 inch cast iron skillet. For a pan this size, I probably should have used 9 eggs, rather than 6, and the dish would have raised a bit more. Cooking for myself, though, I felt 6 eggs to be enough. As I mentioned, I normally add fresh tomatoes but, this time of year, flavorful fresh tomatoes are almost impossible to find. I skipped them but, in the past, I’ve used sun-dried tomatoes instead. Lastly, very often frittate are finished off under the broiler. Although I’ve prepared them that way, I’ve also forgotten about them in there and pulled out something that had more in common with a roasted marshmallow than a frittata. For me, the oven is a safer bet but the broiler is still an option for you folks with any kind of short-term memory. Just cook the frittata atop the stove a few minutes longer and — here’s the tricky part — check on it frequently once it has been under the broiler for 5 minutes.

*     *     *

You say potatoes and I say patate.

*     *     *

Frittata with Pasta, Broccolini, and Smoked Mozzarella Recipe

Pre-heat your oven to 375˚ F (190˚ C). Into a hot skillet over med-high heat, place a few tablespoons of the cooking fat of your choice. I used bacon fat. Once hot, add some chopped onion, sliced mushroom, and chopped raw broccolini stems. Season lightly with salt and pepper and sauté until the onions are translucent, the mushrooms have a little color, and the broccolini stems are soft. Add the broccolini florets and continue to sauté for another 3 or 4 minutes. Add the pasta, mix well, and sauté until heated through. Add a bit more oil if needed. Meanwhile, crack the eggs in a large bowl, and whisk. Add a few ounces of grated cheese — I used smoked mozzarella — and mix well. Once the pasta is heated, pour the egg and cheese mixture into the pan and, working quickly, use a flat spoon to make sure it’s evenly distributed. Lower the heat to medium and cook until eggs just begin to set. Remove from the stove top and place in the middle of the pre-heated oven. Frittata is ready when all traces of raw egg are gone from the now-coloring surface — usually about 20 minutes but begin checking at 15. Remove from oven, cover with a platter larger than the pan’s circumference, and quickly turn the skillet’s contents onto the platter. Garnish with more grated cheese and serve.

*     *     *

Serve immediately
*     *     *

Frittatas, frittate … 

*     *     *

Frittata with Ham, Potatoes, Asparagus, and Swiss Cheese Recipe

Pre-heat your oven to 375˚ F (190˚ C). Into a hot skillet over med-high heat, place a few tablespoons of the cooking fat of your choice. I used bacon fat but you can use vegetable oil, olive oil, or butter, if you like. Once hot, add some chopped onion and sauté briefly before adding 1 raw potato cut into a 1/2 inch (1.3 cm) dice. Season lightly with salt and pepper. Once the potato is just about fully cooked, add the cubed, cooked ham. Once heated through, add the chopped asparagus spears. Meanwhile, add the eggs into a large bowl and whisk. To that bowl, add a few ounces of grated cheese — I used Swiss — and mix well. When the asparagus is cooked al dente, add the egg and cheese into the pan and, working quickly, use a flat spoon to evenly distribute the mixture across the pan. Lower the heat to medium and cook until eggs just begin to set. Remove from the stove top and place in the middle of the pre-heated oven. Frittata is ready when all traces of raw egg are gone from the now-coloring surface — usually about 20 minutes but begin checking at 15. Remove from oven, cover with a platter larger than the pan’s circumference, and quickly turn the skillet’s contents onto the platter. Garnish with more grated cheese and serve.

*     *     *

*     *     *

Serve immediately

*     *     *

Potatoes, patate.

*     *     *

Variations   

As I mentioned, everything about a frittata is subject to change, so, the variations are unlimited. In that case, the only variation worthy of mention is whether of not to flip your frittata onto a serving platter. Now, if you’re leery, you can increase the odds of a good outcome by running a knife along the frittata’s edge, separating it from the pan, before the flip. After that, you’re on your own. Honestly? Both frittate photographed here flipped flawlessly. Had there been my friends or family seated at the table, I can guarantee that a good portion of the frittata would have remained in the pan as if held by Super Glue — but that’s why they’re seated at the table. Whether the bruschette are aflame, Max couldn’t wait for leftovers, or the frittate won’t flip, we’re still going to have an enjoyable evening.

*     *     *

Notes

Always add firm, raw vegetables to the skillet first. Once partially cooked, add the more fragile raw and/or pre-cooked/leftover vegetables. If using leftover pasta, it should be the last thing added before the egg and cheese mixture hits the skillet.

Season lightly with salt & pepper, keeping in mind that some of the ingredients may be (heavily) salted already. Beware of salty cheeses.

*     *     *

 It’s déjà vu all over again … 

The signs of Spring’ are all around us. There are Spring lambs in the fields, crocuses have given way to daffodils in many gardens, and local-grown asparagus are beginning to flood the markets. For the Bartolini, Spring also means it’s dandelion season and Dad, even though not a Bartolini, enjoyed them every bit as much. Now, I could go on but that might spoil the story.  Click HERE to learn a bit about Dad and his love of dandelion salad.

*     *     *

Coming soon to a monitor near you …

Split Pea Soup

*     *     *

Let’s call the whole thing off.

*     *     *

Grandpa’s Tuna Salad gets a Makeover

Due Insalate di Tonno 

Ah, Spring! Who can forget the sights and aromas of a glorious Spring morning? Well, try as we might, none of us who called the two-flat home will ever forget a few not so glorious Spring days — and I imagine our neighbors would say the same.

As I’ve mentioned in prior posts, Grandpa’s retirement years revolved around his garden, although he always had various maintenance jobs to perform around the building, too. As a young boy, and later teen, one learned to make oneself scarce early in the morning or become part of the work crew. This was especially true in early Spring.

Grandpa sowed his seeds after consulting the lunar calendar and the Old Farmers Almanac. He needed no help with this and the process remains shrouded in mystery to this very day. No, Grandpa only called upon one or more of us boys when he needed muscle. In the Fall, we helped him clear all the old tomato plants and their support stakes before we turned over the soil. The only parts of the garden to escape this tilling were the lettuce and parsley patches. Those he covered in straw and it wasn’t unusual for us to have a bit of both with our Thanksgiving dinner.

Come the following year and the Spring Thaw, Grandpa would find one of us and, again, we tilled the garden, though this time no patch was left unturned. That was the easy part. You see, Grandpa was a firm believer in the power of manure to grow gigantic tomato plants.  (To his credit, there may be some truth to this. How many gardeners do you know that use old hockey sticks to support their tomatoes?) About the time of the tilling, he would ask if you wanted to go out to the farm with him. Grandpa had a farmer friend and how we kids loved going there.  After all, this was the same farm that had adopted our dogs, though they were always out running in the fields when we came to visit. Well, by the time we were old enough to till the garden, the jig was up as far as the dog tales were concerned.  We were, also, fully aware of why we were roped into offered the chance to accompany Grandpa on this particular trip to the farm.

*     *     *

*     *     *

The fact was that the garden needed manure and not just any manure. Grandpa’s tomato crop depended upon this farm’s sheep manure. So, once each Spring, we drove out to the farm and, after a few pleasantries, we drove off with a large metallic tub of sheep manure in the trunk, making us very popular at traffic lights if the wind shifted just the right way. Once home, we hauled the tub to the yard but it didn’t end there. Oh, if only it ended there!

As it turns out, sheep manure, in its natural state, is too strong for young tomato plants and, even if it wasn’t, there was no way we could haul enough manure in a car’s trunk to cover Grandpa’s ever-expanding garden. Grandpa had a solution, all right, and it’s lucky that he was so loved by our neighbors.  Using a very large metallic bucket and a hose, Grandpa made “soup” — his label not mine — which was then spread over the tilled earth. A couple of days later, one of us would be called upon to till the garden again. Don’t think we didn’t try to avoid that call to action but we were on our own. Our parents had their eyes on the prize: a wealth of tomatoes come August. Any inkling that we didn’t want to help Grandpa was met with a  reminder that “work never hurt anyone” and suddenly we found ourselves asking Grandpa if he needed help.

All facts considered, it was one bad afternoon, leaving 364 pretty good ones. Thankfully, it was early enough in the year that the Spring rains helped to quite literally clear the air, much to everyone’s relief. Most fortunately, since the boys’ bedrooms were closest to the garden, rain and cold temperatures prevented anyone from even considering opening a window “to let in some fresh air.”  And the tomatoes? Grandpa’s plants were huge and the crop large enough for 2 families. Sheep manure soup. Who knew?

*     *     *

At noon on any given Friday, save those that fell in Winter or manure week, you could find Grandpa in his patio enjoying his lunch. It was usually a simple dish and, being Catholic, it was, also, meat-free. A favorite of Grandpa, and later my own, was this simple tuna salad. Believe me, it could not get any more simple and no further introduction is required. 

*     *     *

*     *     *

Grandpa’s Tuna Salad Recipe

Ingredients

  • 1 can (5 oz; 142 g) tuna, packed in olive oil, drained 
  • a bit of red onion, sliced or chopped
  • 2 whole anchovy fillets, more if desired
  • olive oil 
  • red wine vinegar
  • salt & pepper, to taste

Directions

  1. Place the tuna on a serving plate. it can be flaked or left in a ring shape.
  2. Top with onion and anchovies.
  3. Sprinkle with olive oil and red wine vinegar.
  4. Season with salt, & pepper, to taste
  5. Serve with crusty bread and a glass of homemade white wine.

*     *     *

That’s it. Quick and easy but surprisingly satisfying. I enjoyed this dish as a boy and continue to enjoy it today. Even so, nothing remains the same forever. As much as I enjoy Grandpa’s tuna salad, I wanted to try something a little different and, so, I gave Grandpa’s version a makeover. Enter tuna salad number 2.

Whereas Grandpa’s tuna rested on a plate, the foot of my salad rests on a bed of mixed salad greens. Rather plainly dressed, Grandpa’s tuna was clothed with just onion, salt, pepper, and oil & vinegar. My new tuna salad is adorned with capers, onion, salt, pepper, olive oil, and freshly squeezed lemon juice. Most importantly, Grandpa’s tuna came to him by way of a can. My tuna skipped the middleman, taking a more direct route to my plate via a grill pan.

Now, to many, it isn’t really a makeover if there is no reveal. Not wanting to disappoint, here’s mine. On the right, you’ll see Grandpa’s original tuna salad and, on the left, may I present the new and “refreshed” tuna salad.

*     *     *

*     *     *

It wouldn’t benefit anyone if I didn’t explain how this transformation took place. Here, then, is how the makeover specialists of the Bartolini Kitchens performed this miracle.

*     *     *

Grandpa’s New & Improved Tuna Salad Recipe

Ingredients

  • 1 tuna steak per serving
  • mixed salad greens
  • 1 tsp capers per serving, more if desired
  • red onion, thinly sliced
  • olive oil
  • lemon juice
  • salt & pepper, to taste
  • lemon wedges for serving
  • whole anchovy fillets (optional)

*     *     *

*     *     *

Directions

  1. Place salad greens in a large bowl. Add onion & capers, dress with olive oil and fresh lemon juice, season with salt & pepper, and toss to combine. Set aside.
  2. Heat the grill pan over med-high heat. Lightly coat the tuna steak with olive oil and season with salt and pepper on both sides.
  3. When the grill is hot, moisten a (paper) towel with vegetable oil and use it to lightly coat the grill surface.
  4. Add the tuna steak to the grill pan. After 90 seconds, use a fish turner to give the steak a quarter turn.
  5. Cook for 60 to 120 seconds and then flip the steak over.
  6. After cooking for 60 seconds, give the steak a quarter turn. Continue cooking the steak for 60 to 90 seconds and remove from heat.
  7. Move tuna steak to a cutting board. Cutting with the grain, carve slices no less than 1/4 inch (2/3 cm) thick.
  8. Place salad on the serving plate and arrange tuna slices atop the salad. Garnish plate with lemon wedges and optional anchovy fillets.
  9. Serve with crusty bread and a white wine of your choosing.

*     *     *

Variations

Although my tuna steak rested atop a bed of baby salad greens, you may choose whatever greens you prefer — baby spinach, baby kale, and rocket come to mind.

I chose to dress my tuna salad with a simple dressing of lemon juice and olive oil, reserving a little juice for the tuna, as well. You may wish to use another dressing, such as the lemon-caper sauce I shared within my grilled sturgeon recipe post.

*     *     *

Notes

I used a grill pan here but you could just as easily use your barbecue, broiler, or skillet to cook your tuna steak. Just resist the urge to move the steak until it’s time to turn it.

Cooking times, as you’ve probably noted, are anything but precise. The pan, the heat, and/or the tuna steak’s thickness all play a role. Remember, too, that the steak will continue to cook once it has been removed from the fire, as well as while you fiddle with a camera, trying to take photos for a blog entry. (#%*@^#&$!)

100_3954Whether you call it tinned or canned, whether it’s packed in oil or water, and whether it’s chunk or whole, please make sure that the tuna you’re about to purchase was harvested in ways that will not harm dolphin populations. The symbol located to the right, or something similar, should be found on the can. If it’s not there, please do not purchase that tuna.

*     *     *

It’s déjà vu all over again

freshly-made

Freshly made mascarpone

A little over a year ago, I was in the middle of my cheese-making series when I shared the recipe for making mascarpone. Though widely known as the star ingredient in tiramisu, mascarpone is so much more than that, Whipped and flavored, this creamy cheese makes a wonderful dessert topping, while adding it to pasta gives new meaning to the words “cream sauce.” Best of all, mascarpone is a snap to make with results far better than you can imagine. But don’t take my word for it. You can see how it’s done by clicking HERE.

*     *     *

 Coming soon to a monitor near you … 

Frittata

*     *     *

Another of the Bartolini Crown Jewels: Cannelloni

Cannelloni dei Bartolini Serve Cannelloni

With St. Joseph’s Feast Day fast approaching, I’m going to take a break in our fish recipe series and share yet another of the Bartolini Crown Jewels, Cannelloni. St. Joe, after all, deserves no less.

Cannelloni are another of Italy’s stuffed pastas, though these are more in the style of manicotti (see Notes) rather than ravioli or agnolotti. As much as we all loved them — we kids called them “cigars” — cannelloni weren’t served for dinner very often. Unlike ravioli or cappelletti, which were “assigned” holidays, cannelloni were served when Mom or Zia found the time to make them. Remember. There were no freezers so a cannelloni dinner meant that they would have been up at dawn, rolling out pasta dough. As a result, though it wasn’t a holiday, a cannelloni dinner was a special occasion, to be sure.

Now, when you look at the recipe, something may seem a bit familiar. Déjà vu, perhaps? No, that’s not until the end of this post. It’s the filling. We use the same filling here that we used when we made cappelletti a few weeks ago. It is not unusual for Italian households to use the same fillings, condiments, marinades, etc., in a number of dishes. Our breading mixture is the perfect example of this. There are other examples but I’ll save those for another day. No sense spoiling the surprise.

Although the filling recipe is rather straight-forward, preparing the dough needs some explaining. As many of you know, I use either a hand-cranked pasta machine or a roller attachment for my stand mixer to roll my pasta dough. The result is a long sheets of pasta, about 2 to 3 feet long and about 6 inches wide Before doing anything else, you Cannelloni Sheetsneed to determine how wide each of the cannelloni will be. Ours are usually about 4 inches long, allowing 2 rows to be placed down the full length of the baking dish. Some prefer larger cannelloni. No matter which size you like, measure the inside width of your baking dish’s bottom. To allow the pasta to expand during cooking (see image for comparison), subtract at least half an inch from the measurement. If you want large cannelloni, this is the width of the dough sheet you’ll need. For smaller cannelloni, divide the measurement by 2. Keep this measurement in mind. (For example. My baking dish is 8 inches square, though, at the bottom, it is 7.5 inches. I wanted to place 2 rows of cannelloni into the dish so I cut my dough sheets at 3 inches.)

Once you’ve made the dough and allowed it to rest, roll it into long sheets. If your machine or rollers are at their widest when set to no. 1, roll and re-roll the dough up to and including no. 5. If your machine or rollers are at their widest at no. 10, then roll and re-roll the dough up to and including no. 6. Once the dough sheet is rolled to the specified thickness, lay it flat on a lightly floured surface. Using a straightedge, move down the full length of the dough sheet, marking it according to the measurement gained above. Use a pastry cutter or sharp knife to cut the sheet into smaller sections. (My sheets were all 3 X 6 inches.) Lay the newly cut sheets separately. Do not stack.

This is where things get interesting. It has been quite sometime since either Zia or I made cannelloni. So, when I asked if we par-boiled the pasta before filling it, she drew a blank. Obviously, so had I or I wouldn’t have asked the question. After some discussion, she leaned toward the side of no par-boiling was required, while I thought it was. I was left with little choice, so, off to the test kitchens I went. That afternoon I made side-by-side dishes of cannelloni, one with noodles that had been boiled and the other with noodles that were raw. Once finished baking, a taste test ensued. After all that, the difference was minimal. Yes, I could tell the difference, tasting them one right after the other. I’m not so sure, however, that I could identify one if eaten alone — although I’d have a 50-50 chance if I guessed. Even so, there was a difference,  no matter how slight, and I preferred the cannelloni prepared with par-boiled dough sheets. I guess I’ll be doing that from now on.

*     *     *

Cannelloni Bite

*     *     *

So, if you chose to par-boil your noodles, place them, in batches, into rapidly boiling salted water. Remove after 60 to 90 seconds, and place in an ice bath. Treat carefully because the noodles are delicate and may tear while being moved or handled. Continue with batch after batch until done. When you’re ready to fill them, you may find it easier if you pat dry each sheet before attempting to fill and roll them.

If you choose to use raw noodles, you must work quickly lest the dough sheets dry. This will cause them to crack when you attempt to roll them. To avoid this problem, once you’ve measured and cut the individual sheets, fill them all and put them aside before starting another piece of dough through the rollers. Follow this method and you’ll have no problems with cracking dough sheets.

Be sure to read the Notes section below for freezing suggestions.

*     *     *

Bartolini Cannelloni Recipe

Ingredients

for the filling

  • 1 1/2 lbs. ground pork
  • 1 1/2 lbs. ground veal (chicken or turkey may be substituted)
  • 2 – 3 tbsp butter
  • 1 pkg (10 oz, 283 g) frozen chopped spinach (cooked and well-drained)
  • 1 pkg (8 oz, 227 g) cream cheese
  • 1 cup grated Pecorino Romano — Parmigiano may be substituted
  • 2 or 3 eggs slightly beaten — depending on size
  • ¼ tsp ground nutmeg
  • zest of 1 lemon, more if you like

for the cheese sauce

  • 2 – 3 oz (57 to 85 g) cream cheese, softened 
  • 2 – 3 oz (59 to 89 ml) milk

for the cannelloni

  • Mom’s pasta dough
  • 1 quart tomato sauce, with meat or without (See Notes)
  • cheese sauce
  • an 8 oz ball of fresh mozzarella
  • 1/2 cup grated Pecorino Romano cheese

*     *     *

*     *     *

Directions

for the filling

  1. Sauté meat in butter. Season lightly with salt.
  2. Use meat grinder to process the meats. Add all the ingredients into a mixing bowl and mix until well-combined.
  3. Cover the filling and refrigerate for a few hours or overnight.
  4. Once the filling has rested, you can begin making your cannelloni.

for the cheese sauce

  1. Combine equal amounts of cream cheese with milk.
  2. Whisk and set aside. 

to make the cannelloni

  1. Shape 2 to 3 tbsp of filling into a small log, about as thick as your index finger. More or less filling may be required depending upon the size of your cannelloni. Do not over-stuff. Filling should leave a 1/4 inch (.6 cm) border on either side of the dough sheet.
  2. Place the filling on the edge of the dough sheet and roll as one would if making a cigar.
  3. Set aside, seam-side down.
  4. Repeat Steps 1 through 3 until all the filling or dough sheets have been used.

assemble the dish and bake

  1. Pre-heat oven to 350˚ F ( 177˚ C).
  2. Liberally butter a baking dish.
  3. Coat the bottom of the dish with 1 to 2 cups (237 to 473 ml) of tomato sauce
  4. Place cannelloni, seam side down, in 2 rows, until dish is filled. Do not over-crowd.
  5. Spoon cheese sauce over all the cannelloni.
  6. Add enough of the remaining tomato sauce to completely cover the dish’s contents.
  7. Sprinkle the top with the grated mozzarella and Pecorino Romano cheeses.
  8. Spray one side of a sheet of aluminum foil with cooking spray and use it to cover the baking dish, sprayed side down.
  9. Bake in pre-heated 350˚ oven for 20 minutes. Remove foil and continue baking until cheese topping is cooked to your satisfaction. Over-cooking may result in dry cannelloni.
  10. Allow to rest 10 minutes before serving.

*     *     *

Cannelloni 7

*     *     *

Variations

If you have a favorite ravioli filling, you can easily use it here. In fact, I’ve used our ravioli filling to make cannelloni several times. The truth is, you may find it easier to make cannelloni than it is to make ravioli, at least initially, so, why wait? Go ahead and use these instructions to make cannelloni with whatever filling you prefer. There’s sure to be a great dinner in store for you, if you do.

Although never served in my family, there is a version of cannelloni that uses crespelle (crêpes) rather than pasta dough sheets. One day I’ll give them a try — once I learn how to make crespelle, that is.

Notes

If you choose not to par-boil the dough sheets, add about a 1/3 cup (80 ml) of water to the tomato sauce before using and stir well. The extra water will be needed by the raw sheets as the cannelloni bake.

I recently made a half-batch of filling with a whole batch of Mom’s pasta dough. Combining the 2, I made 32 cannelloni, enough for several dinners. Your results may vary, however, depending upon how large you make your cannelloni. If you make an entire batch of filling, you could use half to make cannelloni on Day 1, as I did, and use the rest of the filling on Day 2 to make cappelletti. On Day 3, open your freezer and smile, secure in the knowledge that there are some very good dinners in your future.

Cannelloni can be frozen easily.  

  1. Once fully assembled, cover the baking dish with foil and freeze. To heat, leave covered with foil and bake in a pre-heated, 350˚ F (177˚C), oven for 45 minutes. Remove foil and continue baking until cheese is to your liking.
  2. I find it easier and more convenient to freeze the cannelloni individually on a baking Cannelloni for the Freezersheet covered with foil or parchment paper. Once frozen, place them into a hard-sided container and store in your freezer. When it’s time to serve them, you can use as many as needed to assemble your dish, rather than cook a dish you prepared the week before. Follow the same instructions for baking as in the preceding step.
  3. Even if you follow my cooking instructions for frozen cannelloni, you’ll need to test for doneness before removing them from the oven. To do this, place the tip of a metal skewer or sharp knife into one of the cannelloni in the center of the dish. Hold it there for 5 to 10 seconds. Remove and use it to touch the inside of your wrist or just beneath your lower lip. Continue baking until tip is hot to the touch.

If you can, try to use fresh mozzarella to top off this dish, for it tastes so much better. I prefer not to use slices here, though. Since the slices take longer to melt and brown, you run the risk of drying out the cannelloni while it bakes. Fresh mozzarella will melt faster but it can be a mess to grate at home. To make it a bit easier, open its packaging and place it all in your freezer for about 30 minutes before needed. You’ll find the cheese to be firmer and, therefore, easier to grate. If it is too firm, just leave on the counter for a few minutes.

I’m not certain if these definitions are “official”, but in our family, cannelloni were meat-filled and manicotti were filled with a ricotta cheese mixture. You now have our cannelloni recipe. Soon you’ll have our manicotti recipe, too.

It’s déjà vu all over again … 

tricolor-risottoFor today’s Blast from the Past, we’re going to continue to celebrate St. Joseph’s Feast Day with risotto, a dish that’s Italian, through and though.  This is no ordinary dish of risotto, however, as you can see on the right, for its colors are those of the Italian flag. You can learn how to prepare this dish by clicking HERE.

*     *     *

Coming soon to a monitor near you …

Spaghetti with White Anchovies and Capers

Spaghetti with White Anchovies and Capers

 *     *     *

Grilled Salted Cod

Baccalà alla Griglia

Grilled Salted Cod

Today’s post is the 3rd straight recipe involving seafood of some sort — and we’ve 4 more to go. For today’s dish, we return to the grill but this time, after some discussion, a grill basket is used.   You see, fresh from my success with the grilled sturgeon, I wanted to try grilling salted cod, baccalà, directly on the grill plates. What could go wrong? Well, when I spoke with Zia about my plan, not only did she mention what could go wrong but she also pointed out that we Bartolini always grilled baccalà lightly breaded and in a basket.  How could I fight that kind of logic? This is, after all, a place for documenting our family’s recipes. So, moments later, she was explaining how baccalà was grilled in the Old Days and I was wondering where I’d put my grill basket. You needn’t worry, however, if you’re a fan of grill marks on you fish. We’ll return to the grill next week, when swordfish is on the menu.

With the grilling method out-of-the-way, let’s briefly recap baccalà and its preparation. For centuries, cod was caught, cleaned, and dried primarily in Scandinavia before distribution across Europe. If the cod is salted and then air-dried, it’s called salted cod, baccalà in Italy. If the cod is hung and air-dried, it is called stock fish, stoccafisso in Italy. (In Italy, all stoccafisso is cod but that’s not necessarily the case elsewhere.) Before either form of cod can be prepared, each must be re-hydrated and, if necessary, rinsed free of salt. To do so, place the cod in a flat baking dish, deep enough to hold enough water to completely submerge the entire fish. Keep the cod in the water for at least 12 hours but no more than 2 days. Replace the water 3 times daily. You can speed up the process a bit by letting a slow, steady stream of water flow into the dish but not on to the cod or you might damage the fillet. You’ll know the fish is ready by the way it looks, feels, and smells.

Once the cod is ready, remove it from the water and place it on (paper) towels while you make the marinade. You do not want to allow the cod to completely dry out but do remove the surface moisture. In a small mixing bowl, add about 1/3 cup Panko bread crumbs; 3 tbsp chopped fresh parsley; 1 tbsp chopped fresh rosemary; 1 or 2 cloves of garlic (grated or diced); 1/2 cup extra virgin olive oil; and pepper to taste. (Salt should not be needed and ingredient amounts may vary depending upon the size of the fillet.) Return the cod to the now-dry baking dish and cover with the marinade, coating it evenly on all sides. This is not a “true” breading, so, there’s no need to completely cover the fish. Use plastic wrap to cover the dish and set aside for a couple of hours. It may be necessary to refrigerate the cod, depending upon your kitchen’s temperature.

Pre-heat the grill when you’re ready to cook your cod. Clean the grilling basket and oil it liberally just prior to placing the cod in its center. Once secured, lay the basket on the grill and sprinkle a bit of olive oil over the fillet’s top side and close the grill’s lid. Lower the heat to med-high. Depending upon your grill’s temperature, how the basket rests on the grill plates, and the thickness of the fillet(s), baccalà will take from 8 to 11 minutes per side. Be sure to check it midway through the cooking of each side and be prepared to adjust cooking times, as required. Once you’ve flipped the basket over, sprinkle the fish’s “new” top side with the juice of a half-lemon. Continue grilling until done.

When cooked properly, cod will easily flake. Keep this is mind as you carefully remove the cod from the grilling basket.  Place on a serving platter and serve immediately with lemon wedges.

*     *     *

*     *     *

Notes

As mentioned earlier, the marinade is not meant to be a breading that completely covers the fillet. Though it contains bread crumbs, there is no way that all of it will remain on the fish as it is grilled. Once the marinade has done its job, the bread crumbs will offer some protection for the fish, helping it to remain moist as it’s grilled.

Depending upon where you live, you may be able to purchase a piece of baccalà that is just about equal in size to the fillet I used in this recipe.  I have no such luck and must purchase a large piece of baccalà, probably around 18 inches (46 cm) long, that is the entire side of the fish, from the gill opening to its tail. On Christmas Eve, the entire piece can be cut up and cooked, as I showed you HERE. Any other time of the year, that piece of cod is far too big for me and I divvy it up for 3 different dishes. First of all, do not re-hydrate the cod until you’re ready to use that particular piece of fish. Even though dried, you’ll notice one side, the fillet section, that is thicker than any other part of the fish (shown in RED on the right). Use a sharp knife or kitchen shears to remove that piece. This is the piece I used in today’s recipe. On the other side of the fish, is another, equally sized portion, though not as thick (GREEN). Remove that section and return it to the packaging. This piece will be used to make a salad and I’ll show you how in a future post. The remaining section BLUE), about a 10 inch (25 cm) “tail”, should be returned to the packaging and, once re-hydrated, can be baked or broiled. I’ll be showing you how to do that, too, at a later date. Properly sealed and kept dry, these 2 remaining pieces will keep for months although, if you enjoy baccalà like we do, you needn’t worry about it being around for weeks, much less months.

And for those of you keeping track, this is pretty much the same bread crumb mixture that was used in last week’s recipe, as well as a number of other Bartolini recipes. Guaranteed, it will be making at least one more appearance in the weeks ahead.

*     *     *

In my rush to get last week’s entry posted, I failed to include anything about my visitors. For those not in the know, that previous Friday, Miss C and The Matriarch, of The Kitchen’s Garden fame, rode into town on a brisk, but sunny, Friday morning and left the very next morning, heavily laden with packages of every kind. It was a whirlwind tour of some of my favorite food haunts, topped off with a late lunch at a favorite Thai restaurant. They were, without a doubt, perfect guests, as we ran from store to store, aisle to aisle, letting me prattle on as if I was personally responsible for the contents of each. By any measure, it was a very good day, one that I hope we can repeat, weather and Farmy permitting.

*     *     *

It’s déjà vu all over again … 

Easter is still several weeks away but it’s never too late to plan. Besides, if you like this bread as much as all who’ve baked it, you’ll need time to bake another loaf for the Holiday. Crescia al Formaggio is baked in the Bartolini homeland, Le Marche, every year at Easter. With over a cup of grated cheese in its dough, this bread not only tastes good but it fills your kitchen with a fantastic aroma while it’s in the oven. Believe me. This is one bread that is sure to please everyone seated at your dinner table. You can read my post by clicking HERE.

*     *     *

Coming soon to a monitor near you …

Grilled Swordfish with Salsa Verde

 *     *     *

Cappelletti in Brodo, The Super Bowl of the Bartolini

When I shared the recipe for Mom’s Brodo several weeks ago, it was with today’s post in mind. While it may be true that her broth was used in a number of recipes, from chicken cacciatore to risotto, for many of us, it was at its best when served with Cappelletti, yet another jewel in the Bartolini Crown of Recipes. Traditionally served at Christmastime, cappelletti are a type of stuffed pasta said to resemble small hats. Search the internet and you’ll see them made much like the making of tortellini. I’ve watched cooking shows touring Bologna and have been mesmerized at the sight of women quickly fashioning cappelletti by hand. As the camera moves back offering a wider shot, it is really quite impressive to see all the freshly made little hats prepared that morning. That is not what you’re going to see here today.

*     *     *

*     *     *

Forming those little hats is a most time-consuming practice unless you’ve enough experience to become proficient. The women I’ve watched will make more cappelletti in one day than a Bartolini would have made all year — and then some. There is just no way Mom or Zia could devote the time to make enough little hats to serve their families later that day. You read that right, later that day.

When I was a boy, few families, if any, owned freezers other than the small compartment atop their refrigerator. As a result, there simply was no place to store freshly made ravioli or cappelletti. This meant that Mom and Zia got to work making pasta at 5:00 AM on every holiday. As such, either ravioli or cappelletti were made on any given holiday and never both. So, in our home, Mom served ravioli for our Christmas Day dinner, while cappelletti was served for lunch on New Year’s Day. There were days, however, when the cappelletti lunch was nixed in favor ravioli that night. It wasn’t until a large freezer was bought and placed in the basement that it became possible for ravioli and cappelletti to be made ahead of the actual holiday — allowing Mom and Zia to get some much-needed rest on those holiday mornings. Not only that, but it, also, became possible to have cappelletti for lunch AND ravioli for dinner on the same holiday. What joy!

Yet, even though they could now prepare their pasta in advance, there was still no way that either Sister could afford the time to make little hats. Initially, they made cappelletti as they did ravioli, rolling out large sheets of dough, covering half will little balls of filling, and then covering them with the “free” half of the dough sheet. Using a spoon handle, the mound in the dough were sealed and then cut using a pastry wheel. Remember that cappelletti are served in soup and shouldn’t need to be cut before being eaten. Each must be small enough to fit comfortably on a soup spoon, making this a time-consuming process in its own right. There was — and is — no need for hats. Speaking of which and just to be clear, although we call our pasta cappelletti, they actually are small ravioli, raviolini.

Everything changed again when Mom started using dies (moulds) to make her ravioli and cappelletti. Her cappelletti became miniaturized, smaller than any she’d made before. I have that die and, unfortunately, I’ve yet to be able to master it. The compartments for the filling are far too small for my hands to fill. I never saw Mom use the die and I must be missing some secret trick to its use. Now, Mom’s die made 40 cappelletti, each ¾ inch (1.9 cm) square, while my die will make 48 cappelletti, each 1 inch (2.5 cm) square. That ¼ inch may not seem like a lot but it’s enough to separate success from failure on my pasta board. Even so, I know that I’m not done trying to learn how to use that die if for no other reason than self-satisfaction.

This post will not be as detailed as previous posts when depicting the use of a ravioli die. You can find more complete instructions in my Ravioli dei Bartolini post. No matter the size of the die or the resulting pasta, the steps required are the same. Cover the die with a sheet of dough; place a small amount of filling in each indentation; lightly moisten another dough sheet before placing it atop the first; use a rolling-pin to seal the 2 sheets; remove the now-joined sheets from the die; and, separate the individual raviolo. Sometimes, a pastry wheel will be required to cut and separate them.

When using any die, the most important thing to remember is not to overstuff each compartment. Look again at the 2 dies in the photo above. One has compartments that are open while the other’s compartments have a back and are closed. When using a die that is open, the dough sheet will stretch a little to compensate if you’ve used too much filling. Even so, use too much filling and the dough sheet will stretch to the point of tearing, a very disheartening sight. If you place too much filling on to a die that is closed, that has a back, the excess filling has nowhere to go other than out that compartment’s sides, possibly affecting the seal of not just that one raviolo but all of its neighbors, as well. All is not lost, though, for some of these poorly sealed ravioli.

Ravioli are first boiled in water before being drained and dressed with your favorite sauce. Poorly sealed ravioli will dump their contents during the boiling or draining stage. Little can be done to save them and their tasty filling. Cappelletti, though, are a different matter altogether. As you’ll soon see, these are cooked in brodo and should any split during cooking, the contents aren’t lost but will serve to flavor the soup. It may not be pretty but it will be one tasty bowl of soup.

The recipe for the cappelletti filling is easy to follow and lacks exotic ingredients, a hallmark of Bartolini recipes. It can be made as much as 2 days in advance so long as it is kept covered and refrigerated. Longer than that, it may be frozen and used within a few weeks. In preparation for this post, I made about 500 cappelletti with one batch of filling — and still had enough filling left over to use in another recipe. That dish will be shared sometime in the weeks ahead.

*     *     *

*     *     *

Filling Recipe for Bartolini Cappelletti

Yield: Enough filling to be used with 8 eggs of pasta dough. Recipe found here.

Ingredients

  • 1 1/2 lbs. ground pork
  • 1 1/2 lbs. ground veal (chicken or turkey may be substituted)
  • 2 – 3 tbsp butter
  • 1 pkg (8 oz) cream cheese
  • 1 cup grated Pecorino Romano — Parmigiano may be substituted
  • 2 or 3 eggs slightly beaten — depending on size
  • ¼ tsp ground nutmeg
  • zest of 1 lemon, more if you like

Directions

  1. Sauté meat in butter. Season lightly with salt.
  2. Use meat grinder to process the meats. Add all the ingredients into a mixing bowl and mix until well-combined.
  3. Cover the filling and refrigerate for a few hours or overnight.
  4. Once the filling has rested, you can begin making your cappelletti.

*     *     *

Variations

Our cappelletti are served alone in brodo. Adding other ingredients, aside from a garnish of grated cheese, might serve to overpower the hint of nutmeg or touch of lemon zest flavors within the cappelletti.  My blogging buddy, Stefan, serves his tasty Tortellini in Brodo the same way. Ours is not the only way, however.

Recipes abound that feature tortellini served in brodo with a variety of ingredients. Last October, my friend Linda, of Savoring Every Bite, shared her tasty recipe for one such preparation, a hearty Tortellini Soup. And, not to be outdone, my friend Tanya, over at Chica Andaluza, just last week posted her delicious recipe featuring Tortellini with Leeks and Bacon Broth.  You certainly cannot go wrong with any of these recipes.

*     *     *

*     *     *

Notes

As mentioned earlier, cappelletti are cooked in the broth in which they are served. Bring your broth to the boil over med-high heat before adding the cappelletti. Once the boil returns, reduce the heat to a soft simmer. Too hard a boil may damage the cappelletti. Actual cooking times will vary, depending upon the cappelletti’s size and whether they’re freshly made or frozen. Once the cappelletti begin to float in the broth, they are usually just about ready for serving. I’ll wait another 1 or 2 minutes before tasting one for doneness. Serve immediately with plenty of grated cheese at the table.

Not everyone has the time to make homemade brodo and most of us will turn to store-bought stock occasionally.  Whether you use your own broth or buy one at your local market, make sure it is low sodium. The cheeses within the cappelletti both contain salt and, if you’re not careful when preparing/selecting your brodo, your bowl of cappelletti may be too salty to enjoy. You can always add salt, should the soup need it, just prior to serving.

*     *     *

It’s déjà vu all over again … 

I shared the recipe for Steak Pizzaiola about 2 years ago and, since that time, it has become one of the most popular recipes on my site. Easy to prepare, this is one dish sure to please all members of your family — well, except for the vegetarians. Not to worry. We’ll be sharing recipes for our non-carnivore friends in the weeks to come. In the meantime, you can check out the recipe for steak pizzaiola by clicking HERE.

*     *     *

Coming soon to a monitor near you …

Grilled Sturgeon with Lemon-Caper Sauce

*     *     *

Bartolini Sausage Ravioli

Ravioli della Salsiccia dei Bartolini

Christmas Day, New Year’s Day, Easter Sunday, and Thanksgiving all featured one dish, each and every year, and that was a platter of ravioli. Oh, to be sure, there was the obligatory roast of beef, or pork, or lamb, or turkey cooked to perfection on the table, too, along with all the customary fixin’s. None of it made any difference to me, for my eyes were fixated on the platter of pasta pillows. Everything else was a distraction to which “The Others”, my ravioli-eating competition, would, hopefully, fall prey. “Have some more turkey.” “Want some potatoes with that?” “Save room for dessert.” All music to my ears. As they sampled — and re-sampled — each and every one of Mom’s lovingly prepared dishes, only I remained true to the cause. It was ravioli all the way!

Back then we only had two filling recipes for our ravioli. The meat filling recipe I shared HERE and another, not yet shared, that’s used in soup ravioli (cappelletti) which is traditionally served for lunch on Christmas Day, as well as on other special occasions throughout the year. Well, that was until a few years ago. I had finally mastered the family sausage recipe when a friend asked if I’d ever made his favorite, sausage ravioli. I hadn’t and a subsequent phone call to Zia confirmed that no other Bartolini had either. Well, that just wouldn’t do.

*     *     *

*     *     *

It wasn’t long before I had made a half-recipe of ricotta and followed that with a couple of pounds of sausage, setting aside a pound of the seasoned meat. After cooking some chopped spinach and gathering some grated Pecorino Romano cheese, I was ready to go. I didn’t pay too much attention to amounts. This was just a test to see if these flavors would blend successfully — and they did. My next trip home, Zia and I made a batch of the filling, paying close attention to the ingredients’ amounts. The ravioli not only passed her taste tests, we devoted an entire Ravioli Day to the making of the new Bartolini Sausage Ravioli. If that isn’t acceptance, I don’t know what is. Today’s recipe is the result our collaboration.

Please note. When making sausage ravioli, there is but one commandment to follow: Know Thy Sausage. Compared to most store-bought or strongly seasoned homemade sausage, Bartolini sausage is rather mild — no fennel seed, for example — so I use a little less ricotta than specified in the recipe. That allows the sausage’s flavors to be more predominant. Most sausage meat tends to run on the salty side, as does Pecorino Romano cheese. Because of this, no salt is added to the ravioli filling. Before making your filling, be sure to fry a little of the sausage meat for a taste, adjusting the filling’s seasoning and, if necessary, ingredient amounts, accordingly.

*     *     *

Bartolini Sausage Ravioli Filling Recipe

Yield: See Notes below. 

Ingredients

  • pasta dough — recipe found HERE.
  • 1 lb. sausage meat, cooked and well-drained — recipe found HERE.
  • 1 pkg (10 oz) frozen chopped spinach, cooked and well-drained
  • 1 cup ricotta — recipe found HERE.
  • 1 cup grated Pecorino Romano cheese
  • 1 egg, slightly beaten

Directions

  1. Sauté meat over med-high heat until browned.
  2. Use meat grinder to finely process the meat. (See Notes.) Add all the ingredients into a mixing bowl and mix until well-combined.
  3. Cover the filling and refrigerate for a few hours or overnight.
  4. Once the filling has rested, you can begin making your ravioli.

*     *     *

Ravioli Recap

To see a more complete set of instructions for making ravioli with dies, click HERE.

*     *     *

Notes

When I recently made these ravioli, I made 1 batch of this filling and 2 batches (8 eggs) of Mom’s pasta dough. I came away with 22 doz ravioli and 10 oz (284 g) of excess pasta dough, with which I made hand-cut linguine.  Now, I probably could have gotten away with using 6 eggs to make the pasta but that would have cut it close. I’d rather have too much pasta dough than find out I’ve not enough and have to make more. Besides, the linguine were delicious!

You do not need a meat grinder to make sausage; a food processor may be used instead. Place some meat into the bowl and pulse the blades until a coarse grind is achieved. Do not just turn it on and let it process. You’re not making pâté. When using sausage meat for ravioli, after it’s cooked, place it in the bowl and pulse it a few times until a smaller grind is achieved.

*     *     *

Pasta Equipment

I’ve been asked by a few people to talk about the pasta making equipment that I own. Since this is a ravioli post, I’ll start there.

I’ve two ravioli making attachments. One is for my stand mixer and the other attaches to my hand-cranked pasta machine. I’m not all that impressed with either of them. Both have a hopper, situated in the center, for the filling. Dough sheets are fed on either sides of the hopper, passing over a die as the filling drops. The ravioli are formed by the pressure exerted by rollers. My problem with both is that the dough sheets are thicker than what I am accustomed to using. The resultant ravioli have more dough than those of my youth. (Yes, I’m spoilt, but in the best possible way.) You, however, may very well find these ravioli to be acceptable — and that’s just fine. Be forewarned, though, that if the dough sheets are not thick enough, the filling will “run” between the ravioli, making one big mess.

Here is an instructional video to show you how the stand mixer attachment works. The hand-cranked pasta machine attachment works in very much the same way.

*     *     *

*     *     *

Anyone who has seen my ravioli posts will know that I prefer to use ravioli dies to make my filled pastas. Each will result in a ravioli of a unique size. Starting top-left in the photo below, this die will create 12 ravioli that are 2 inches (5 cm) square. (Bear in mind that, no matter the die used, each raviolo will expand a bit when cooked.) It’s interesting to note that this was the original size of the ravioli that Mom and Zia made by hand until we bambini came into the picture. These were too large for us to handle on our own and our parents had to cut them for us to eat. To help our ravioli dinners go more smoothly, Mom and Zia began making ravioli that were small enough for us little ones to handle on our own.

Which brings us to the die top-right of the picture. This will create 24 ravioli that are 1.25 inches (3.2 cm) square and this most closely resembles the size Mom & Zia made, and Zia continues to make, to this day.

Moving to the bottom-left of the photo, this die will create 40 raviolini that are 3/4 inch (2 cm) square.  Mom used these raviolini, calling them cappelletti, in soup. Try as I might, I’ve never gotten the hang of this die. The filling bowl is mighty small, the dough must be mighty pliable, and I end up mighty frustrated, which brings us to …

… the die located bottom-right of the photo. I use this die to make my cappelletti. Each cappelletti is 1 inch (2.5 cm) square and the die will make 48 of the pasta pillows. They may not be as petite as Mom’s but I can make these.

In the center of the photo is a round cappelletti stamp. This is the traditional shape for cappelletti. There was just no way Mom would ever have found the time to individually stamp enough cappelletti for a family of five. Frankly, I don’t know how she did it with the smallest of these dies but she did, repeatedly.

*     *     *

Lastly, in a recent post, I mentioned that Santa gave me a stand mixer attachment that makes a number of pastas — spaghetti, macaroni of 2 sizes, bucatini, fusilli, and rigatoni. I mentioned that the spaghetti was perfectly made but that some of the other pastas were thicker than what one would purchase at a grocery. This is not a problem for me for the superior taste of homemade pasta far outweighs any concerns about its thickness. Thinking that the eggs in my pasta dough may have been the cause for the difference, I said I’m make some dough using water and semolina flour to see if thinner pasta would result. Well, last week I made the dough and the pasta was no different from that which was made with the “egg dough.” Although I’ve no photos of rigatoni made with a pasta dough made with eggs, I did take pictures of rigatoni made with “eggless” pasta dough and compared it to a manufactured brand.

*     *     *

*     *     *

In the photo on the top, the raw, store-bought rigatoni is on the left and a freshly made specimen is on the right. Beneath that photo is another, similarly arranged picture, and both pastas are cooked. You can see that the homemade rigatoni are thicker than store-bought. The same holds true for the homemade bucatini, both macaroni, and fusilli. It is yours to decide whether that difference in thickness is a deal breaker.

*     *     *

It’s déjà vu all over again …

I know. It’s still Christmas in your home and the last thing you want to consider right now is dinner on New Year’s Day. Well, if you want to make that dinner truly special, you’ll need plenty of time so that you can find a picnic ham, skin-on, to make a Bartolini family favorite on the first day of the New Year. Pork Roast with Fennel, Porchetta con Finnocchio, is a spectacular dish, one sure to impress you dinner guests as you start 2013 off on the right foot. You can find the recipe by clicking HERE.

*     *     *

The Bartolini Clan hopes that Yours was a Wonderful Christmas

and

May Peace Reign in 2013.

Happy New Year!

*     *     *

Eel in the Style of Le Marche — Anguille alla Marchigiana

Our ship came in! This morning, I made what has become a daily call to the Italian market and learned that eels had been delivered late yesterday afternoon. I called a friend and within an hour, we were standing in front of the fish counter, watching the fishmonger net today’s entrée. Not but a few hours later, here I sit blogging about the dinner. Not too shabby, well, unless you happen to be an eel.

*     *     *

*     *     *

Throughout much of Italy, eel is a dish served traditionally around the holidays but is most commonly prepared in the southern portions of the country, with Naples famous for its eel. Very often one of the fishes served during Christmas Eve’s Feast of the 7 Fishes, eel is considered to be good luck for those who eat it. This is a very old custom dating back to the days when people believed snakes to be evil because of their role in the story of Adam & Eve. Because it so closely resembles a serpent, by eating eel one was symbolically triumphing over the devil and good fortune was sure to follow. I don’t know if that’s true but I’m buying a few lottery tickets, just in case.

In the old two-flat, I can’t say that eating eel was a tradition at all. In fact, I only remember seeing it one time back then. I must have been no more than 5 years old because I could barely see over the edge of the sink. Even though “barely,” I did manage to get a glimpse of a sink full of the slimy devils. Needless to say, it was a sight that left a lasting impression. Speaking with Zia, that is probably the last time eel was prepared there. So, today’s post wasn’t just a recipe. It was yet another memory test for my long-suffering Zia. I must say, though, having just finished a delicious dinner, Zia came through again. The eel flesh not only remained intact, it’s flavor wasn’t overcome by the tomatoes and, in fact, the sauce had a mild seafood taste throughout. Now I just have to figure out a way to get some eel over to Michigan so she, too, can enjoy the fruits of her memory.

*     *     *

*     *     *

As she suggested, I prepared the anguille like we do much of our seafood, in a simple tomato sauce. In fact, this marinara is almost bland for there are no strong herbs or flavors present. Eel has a mild fish flavor and using something like organo or marjoram would definitely overpower it, leaving a tomato sauce devoid of any taste of seafood. We agreed that the eel might disintegrate if allowed to cook entirely in the sauce, so it was briefly pan-fried before being added it to the tomatoes.  Beyond that, the only change I brought to the recipe was with the basil. My family always tore by hand or chopped fresh basil before adding it to a sauce. Not long ago, I watched as Lidia added an entire stem of basil to her sauce and fished it out before serving. Well, if it’s good enough for Lidia, it is certainly good enough for me. If you, however,  don’t feel like adding a stem of fresh basil, then tear or chop away.

Oh! I should warn tell you one more thing about today’s protein. These eel are alive when purchased. You can bring them home and “take care of them” yourself or you can let your fishmonger do it for you. Um. No question. Let your fishmonger kill, gut, trim, and even chop the eel to your specifications. If you’re considering taking on any of the duties I’ve just mentioned, let me tell you that the term “slippery as an eel” is far more fact than fiction. I chose to chop the eel myself and it was a mistake, one that I’ll never repeat.

*     *     *

Anguille alla Marchigiana Recipe

Ingredients

  • 3 lbs. eel, cleaned with head & tail removed, chopped in 2 – 3 inch pieces.
  • 4 tbsp extra virgin olive oil, divided
  • 1 large sweet onion, sliced thin
  • 1 clove garlic, minced or grated
  • 4 tbsp fresh parsley, chopped, divided
  • 1 large can (28.5 oz) tomatoes
  • 1 stem fresh basil
  • 1 cup white wine
  • salt & pepper
  • thickly sliced, toasted Italian bread, for serving.

Directions

  1. In a large sauce pan, heat 2 tbsp of olive oil over med-high heat. Add onion and sauté for about 3 minutes before adding 3 tbsp of the chopped parsley. Continue to sauté until the onion is translucent, about 5 more minutes.
  2. Add garlic and sauté for a minute.
  3. Add tomatoes, basil, season lightly with salt & pepper, and bring pan’s contents to the boil before reducing to a simmer.
  4. After sauce has simmered for 15 minutes, heat the remaining oil in a large frying pan over med-high heat.
  5. Once the oil is hot, add the pieces of eel and sauté for about 7 minutes, being careful to insure that the pieces are evenly cooked.
  6. Carefully remove the eel and place it in the tomato sauce. Season lightly with salt & pepper.
  7. Use the white wine to deglaze the frying pan. Continue to cook the wine until it is reduced by half. Add the wine reduction to the tomato sauce and carefully stir the pan’s contents.
  8. Increase the heat to high, bring the sauce to the boil, then reduce the heat and simmer for another 15 minutes.
  9. Taste and adjust seasoning, if needed, one last time.
  10. To serve, set a piece of toasted bread on each plate and place eel pieces on top, followed by a generous amount of sauce. Garnish each serving with some of the remaining chopped parsley.

*     *     *

It’s déjà vu all over again …

Calamari SaladA little over a year ago, I gave an account of how the Feast of the 7 Fishes came about. It was part of the post in which I shared Mom’s recipe for a Calamari Salad. Follow this recipe’s guidelines and you’ll have perfectly prepared calamari, not rubber bands. That post also included a round-up of 11 additional seafood recipes for anyone needing help with gathering 7 seafood dishes for the Feast. You can see it all by simply clicking HERE.

*     *     *

What’s this? You’re still a fish short?

Here’s a round-up of this past year’s seafood posts.

So, combining both posts, you now have 18 recipes from which to choose dishes for your Feast of 7 Fishes. Still having trouble? Try this: start your meal with Mom’s Calamari Salad. Next serve a bowl brimming with Brodetto. See? You’ve got 6 Fishes out-of-the-way already. Now, finish your meal with a bang: Branzino al Cartoccio. That’s 7 Fishes and you haven’t even broken a sweat.

*     *     *

Coming soon to a monitor near you …

Mom’s Brodo

*     *     *

Baked Whiting

Merluzzo al Forno

Today’s recipe comes from a half-century ago, a time when television shows were only broadcast in black and white; when a trip to the airport was something eagerly anticipated; when all (US) phones had a dial and many of those phones, being owned by Ma Bell, were rented; when music was purchased on large, black vinyl discs; and when Catholics were forbidden to eat meat on Fridays lest they face the fires of eternal damnation. Yes, that long ago.

*     *     *

*     *     *

When I think back to those days, I’m amazed at the variety of fish that found its way to our dinner table. Aside from the usual guests — i.e., baccalà (salted cod), stoccafisso (dried cod), tuna, vongole (clams), smelt, calamari (squid), perch, sepia, lumache (snails) — there were infrequent visitors but I was far too young to remember their names. Zia, my very own Encyclopedia Italiana, can’t remember their names either. So, you can well imagine my surprise when the fishmonger at the Italian market identified a type of fish in his display case as “merluzzo.” Merluzzo! I’d not heard or seen that fish in almost 50 years. I bought a couple, rushed home, and phoned my Aunt immediately.

Zia was every bit as surprised as I was. I really enjoy these phone calls and they’re why I spend so much time investigating a market’s pasta aisle, the cheese counter, the produce department, and interrogating the fishmonger. It makes my day when I uncover some treasure from long ago and then phone her with the news. To be sure, no matter the discovery, there’ll be some in a bag, a box, or a cooler the next time I come for a visit. And that dinner will be full of memories, some of which I’ll then share with you.

*     *     *

*     *     *

Now then, before discussing the recipe, I can no longer ignore l’elefante nella stanza. Our friends from across The Pond refer to merluzzo as “hake”, whereas here merluzzo is called “whiting.” (My sources on this “side” being my fishmongers and Fabio Trabocchi’s cookbook Cucina of Le Marche.) Although I am by no means an expert, I’ve learned that although the two fish aren’t exactly the same, the names “whiting” and “hake” are used interchangeably.  For the sake of argument, henceforth I’ll call today’s fish “merluzzo”. You, then, can translate it to mean whatever you like,  be that “whiting” or “hake”.  ChgoJohn, Peace Maker.

I’m going to dispense with my normal recipe format, for this dish doesn’t need it. Merluzz’ are small fish. Scaled and gutted, the 2 pictured were about 9 inches (23 cm) long and together weighed about 8 ounces (227 g). To stuff them, you’ll need about 1/3 of a cup of the breading mixture per fish and you may wish to make more, depending upon how you’ll cook or serve your fish.

This stuffing mixture is used in a number of the Bartolini family recipes. Grandma’s Stuffed Vegetables and Grandpa’s Barbecued Shrimp are 2 that I’ve shared so far. We, also, use it to stuff calamari and again with other baked fish, the recipes for which are forthcoming.  The only difference in its composition from one dish to the next is that, with seafood, lemon juice might be added.  It’s easy enough to make. Just combine (Panko) breadcrumbs, chopped fresh parsley, a little grated or minced garlic, salt & pepper, and olive oil. If you like, squeeze a little fresh lemon juice into the mix. Learning how much olive oil to use gave me fits. I pestered Mom with questions and was forever touching Zia’s mixture to get “the feel” of it.  You do not want a breading that is sopping wet with olive oil but neither do you want it barely moist. Too wet and you’ll have a greasy dish; not wet enough and it will dry out, and possibly burn, before the dish has finished cooking. Practice makes perfect.

Once the breading is made, salt & pepper the fish, inside and out, use the breading mixture to stuff it, and add a light drizzle of olive oil. Back in The Day, Grandpa would then secure the merluzzo in a hinged grill basket and place them on his barbecue, turning them after a few minutes. When finished, they would be removed to a serving platter and brought to the table. As you can see, that’s not what I’ve done.

To bake, place the stuffed fish on a lightly oiled baking sheet. Place any excess breading on top of the fish before drizzling with oil, and then place in a pre-heated oven of 375˚F (190˚C). Bake for about 20 minutes or until the breadcrumbs are golden brown. Times may vary depending upon the oven and size of the merluzzo. Remove to a serving platter and serve immediately. That’s still not as is pictured but this is how my family baked and served merluzzo.

*     *     *

*     *     *

One way I like to prepare them is to roast cherry/grape tomatoes with the fish. I make extra breading and use it to cover the fish. Once roasted, the resulting flavors of roasted tomato and breading are reminiscent of Grandma’s Stuffed Vegetables.

A third way to serve them is to prepare even more breading mixture and use it to as a bed and coating for the roasting fish. Once roasted, place the breading and fish atop cooked pasta that has been lightly dressed with olive oil and chopped parsley. Roasted cherry tomatoes would work here, too.

*     *     *

Notes

Don’t let a fear of fish bones prevent you from trying merluzzo. The bones are all attached to the spine and the “top-side” fillet readily lifts off of the fish with your fork. Once exposed, the entire spine is then easily removed, making the “bottom-side” fillet accessible. Just be careful with the meat taken from around the gills and you shouldn’t encounter any bones while eating.

*     *     *

It’s déjà vu all over again …

*     *     *

As I’ve said, seafood is the protein of choice in Italian households on the night before Christmas. My Brodetto, or fisherman’s stew, uses a variety of seafood in a lightly seasoned tomato broth to create a very special dish which, coincidentally, is perfect for Christmas Eve. Click HERE to learn how to make this stew.

*     *     *

Coming soon to a monitor near you …

Next week’s recipe is a mystery dish, my memories of which predate even merluzzo. As such, I’ve no teaser photos for you. I can’t even guarantee that I’ll find it before next Wednesday. If I don’t, I may delay next week’s post a day or two, hoping that something turns up. Don’t you worry. I’ve another seafood recipe, all set to post, if I’m not successful. Stay tuned …

*     *     *

What do a Zia, a Pope, and an Elf have to do with Today’s Pasta? (Part 2)

*     *     *

Ché bella Zia!

*     *     *

As was mentioned yesterday, today is the 90th anniversary of my Zia’s birth! Last Saturday, some 2 dozen Bartolini gathered at the home of one of her Grandsons for a surprise party in her honor. (Very heavy emphasis on the “surprise.”) The food was delish; the champagne chilled and plentiful (just how I like it); and the highlight of the evening was her Son’s slide show of family photographs. It was a wonderful night for this very special Lady and Matriarch of the Bartolini Clan. She deserves no less!

Now, back to our story …

*     *     *

2 Pieces of the Puzzle

*     *     *

Yesterday, I recounted my favorite story involving my Zia as a means of celebrating her birthday. What’s this? You missed it? Well, click HERE to view yesterday’s post. Once there, you’ll see how Zia and Pope John Paul II are connected. Don’t worry, we’ll wait for your return.

For the rest of you, I don’t expect you to sit idly by while the others catch up. Heavens no! Here’s a musical interlude to occupy your attention while we wait. (Thanks, Cris!)

*     *     *

(Remember this aria, Zia?)

*     *     *

Everybody here? Then let’s continue …

When we left our story, Zia and I had just experienced a close encounter of the Papal Kind and were in a taxi being ferried back to our hotel. When we arrived at the hotel, we skipped lunch, preferring to retire to our rooms. We had anticipated a memorable day and this was so much more than that, a truly once-in-a-lifetime experience. A rest was definitely in order — if for no other reason than to allow Zia to re-hydrate. Later that afternoon, as was our custom, room service delivered our caffè to Zia’s room. Normally, this is when we would have planned our dinner and evening. That night, however, we decided to “stay close to home” and made an early reservation at a restaurant just down the street from where we were staying.

Not that much later, we were seated at the restaurant, our appetites still nowhere to be found. Now, one thing you should know about my Cara Zia is that she loves pasta every bit as much as I do. When we dined, we always enjoyed a primo piatto of pasta of some sort before ordering our secondi and contorni. So, absent an appetite, we did what came naturally: we ordered pasta.  Not so coincidentally, that pasta just happens to be today’s recipe, Spaghetti alla Carbonara.

*     *     *

Spaghetti alla Carbonara

*     *     *

Mom first prepared this dish for me when I was in my teens. She told me a legend that its name was derived from the coal miners that worked in the mines that surround Rome. As they ate their lunch, which often consisted of a plate of pasta, coal dust fell from their clothes and on to their plates. The dish’s ample use of black pepper is an homage, of sorts, to those miners and their lunches.

The version Mom served me usually contained bacon, although prosciutto was sometimes substituted, albeit rarely. Pancetta just wasn’t something that Mom and Zia used in their cooking. Remember, many of the Bartolini dishes began with a battuto of onion, garlic, parsley, and salt pork. There was no need for pancetta, too. As my experience as a cook grew, however, I began to use pancetta more frequently when I prepared this pasta.

Back in Rome, Zia and I noticed that this pasta was made with guanciale, something that was an unknown to me. Our waiter explained that guanciale comes from the pig’s jowls and, like pancetta, it’s cured but not smoked. Although now used throughout Italy, our waiter went on to explain that it is still most commonly used in Rome and its surrounding district of Lazio. Well, we needed no further urging. Zia and I ordered the Spaghetti alla Carbonara and so began my love affair with this cured meat. Unfortunately, it would take me 10 years to find a source for guanciale in my hometown but that’s a story for another day. Even so, in my mind, Spaghetti alla Carbonara will be forever linked to Zia and Pope John-Paul II.

OK. So far I’ve explained the connection between Zia and the Pope and how, on the day of their meeting, we dined on today’s pasta, Spaghetti alla Carbonara. Get ready, kids. Here comes Santa Claus!

*     *     *

No, that reindog isn’t Max.

*     *     *

In the years following that momentous day in St Peter’s Square, I’ve prepared Spaghetti alla Carbonara countless times. It is one of the few dishes I prepare using spaghetti because it’s just not my favorite form of pasta. You see, lacking the means to create this thin, round-shaped pasta, I had to rely on manufactured spaghetti. As you know, I prefer homemade pasta over pretty much all manufactured types. Still, when it came to this tasty dish, I gladly bought spaghetti and never thought twice about it. This all changed 3 years ago, almost to the day.

One afternoon, Martha Stewart was promoting a new attachment for a well-known stand mixer. This piece of equipment worked much like an extruder, forcing dough through interchangeable plates, creating macaroni, fusilli, rigatoni, bucatini, and, you guessed it, spaghetti. Later that day, I spoke with a good Friend (aka my Traveling Companion) and mentioned this pasta-making wonder of modern technology. A year later he would become a member in high standing of my blog’s tasting crew and, at this time, he had already been the beneficiary of many of my dishes and, well, experiments. He understood full-well the ramifications of this piece of equipment. Our conversation ended and that was the end of that, as far as I was concerned — or so I thought. About a week later, much to my surprise, UPS delivered the pasta maker. In its packaging was a card from Santa, wishing me a Merry Christmas. I called to thank my Friend but he denied having anything to do with it — a denial he maintains to this very day. Now, I’ve no reason to doubt my Friend or his word. If he maintains that Santa did, indeed, send me a gift, who am I to disagree? I would just like to point out, however, that he is the Elf holding the reindog in the picture above. Just sayin’…

There you have it. This is how my Zia, a Pope, and an Elf all helped to bring you today’s Spaghetti alla Carbonara. All that’s left to do, aside from presenting the recipe, is to say,

“Buon Compleanno, Cara Zia!”

*     *     *

*     *     *

Spaghetti alla Carbonara Recipe 

Ingredients

  • 1 lb spaghetti
  • 2 tbsp extra virgin olive oil
  • 4 oz. guanciale, ¼ inch dice (pancetta, prosciutto, bacon, or ham may be substituted)
  • 1 or 2 cloves of garlic, sliced
  • 3 eggs, beaten
  • 1 cup grated Pecorino Romano cheese – separated
  • ½ to 1 tsp freshly cracked black pepper
  • reserved pasta water
  • Parmesan or Romano cheese for garnish/serving

Directions

  1. Warm a large pasta serving bowl.
  2. Bring a large pot of heavily salted water to boil. Add the spaghetti and stir.
  3. Check the spaghetti package’s cooking instructions. You’ll want it to be 2 minutes shy of al dente when the rest of the ingredients are ready.
  4. Add half of the cheese to the 3 eggs and beat well to be rid of any lumps.
  5. In a large, deep frying pan, heat the oil over medium heat. Add the pancetta and brown, rendering all the fat. Do not over cook.
  6. Add the garlic and sauté for about a minute.
  7. While the garlic cooks, reserve a cup of pasta water, drain the pasta, and add the pasta to the frying pan.
  8. Continue cooking the pasta in the oil for 2 minutes, heating it thoroughly.
  9. Pour the frying pan’s contents into the warmed serving bowl. Add the egg and cheese mixture in a slow, steady stream, stirring constantly to prevent the eggs from scrambling. Once fully coated, add more cheese, the pepper, and as much pasta water as necessary to create a creamy sauce.
  10. Serve immediately with plenty of grated cheese and cracked black pepper available at the table.

*     *     *

Notes

For so few ingredients, this is a relative tricky dish to prepare. If not done properly, the pasta will not be hot enough to cook the eggs, raising the possibility of salmonella. To eliminate that risk, I only use pasteurized eggs when making this dish. On the other end of the spectrum, it is very easy to “scramble” the eggs rather than create a sauce. You can limit this risk by mixing the pasta and egg mixture off the heat, in a warmed bowl, and/or by adding a little of the hot pasta water to the egg mixture before it’s added to the pasta. This will, in effect, temper the eggs a bit. No matter how you do it, remember to keep the pasta hot and to work fast.

*     *     *

It’s déjà vu all over again …

It was just about a year ago when I shared the Bartolini recipe for making sausage. Mild compared to most spicy sausages, ours depend upon garlic, white wine, and salt & pepper for flavoring. Consider them a platform on which to build your own sausage. Paprika, red pepper flakes and fennel seeds will change them up a bit, as will marjoram, mint, and oregano. Though these days we tend to form patties more often than sausages, the post is nonetheless chock full of sausage making information. Feel free to ask any questions that may arise. You can view the post by clicking HERE.

*     *     *

Coming soon to a monitor near you … 

Merluzz’ al Forno

*     *     *