Eggs in Purgatory

Uova in PurgatorioEggs in Purgatory 1Hello? Is anybody there?

Hmmm. Let me see. Let me see. When last I left you, it was at the height of the holiday season, with Christmas but a day away. And then … well … we’ll get there in a few. Promise.

Today’s dish and recipe have certainly made the rounds. In fact, I’ve seen it so many times that I believed that I must have posted it, as well. That was the case when I read Nell’s delicious recipe last November. Hers is a North African (Tunisian) version called Shakshuka, and you can read all about it HERE.

Not long after, I was in Michigan for my last visit of the year with Zia. I offered to make us an early lunch because her son, the Max Whisperer, planned on leaving at noon. I prepared Eggs in Purgatory for us and served it over toast, as seen in the photo below. At the time, I mentioned that if he would like to make the dish for his wife, he could find the recipe on this blog. Later, I went looking for the recipe and discovered I’d never posted one. It was soon scheduled for the New Year’s post, since many consider this dish a hang-over cure.

As luck would have it, shortly after that another version of the dish was posted on My Arab Life, a blog I’ve begun following relatively recently. Although A.K.’s post didn’t include the recipe for his Shakshuka, he does mention that he included garbanzos, making it a much heartier dish.

Well, things were going rather swimmingly until a few days after Christmas. What started as a mild sore throat soon blossomed into a full-blown case of the flu, proving that this year’s flu vaccine wasn’t worth the sore arm. By any standard of measurement, I was knocked on my arse. And like the most obnoxious of guests, it flat-out refused to leave. Each and every time I thought I’d turned the corner, it was waiting for me and came roaring back with a vengeance.

*     *     *

Eggs in Purgatory 2

Don’t answer the doorbell when taking photos or your Eggs in Purgatory will look like Hell.

*     *     *

I set up camp in my living room, which offers a view of much of my home. One doesn’t want to let Max out of your sight for too long, regardless of the circumstances. As it turned out, Max was quite the nursemaid. Granted, he’s no Boo Nanny but he did step it up. Each morning, with a reliability that would shame most alarm clocks, Max woke me at 7:00 AM. It’s his breakfast time, you see, and he saw no reason for it to be late. After that, every few hours, he would come check on me to see if all was well. Sometimes he brought me a toy — remnants of an old sock he had liberated from the laundry basket some time ago — and if I was lucky, it was almost dry. At end-of-day, upon re-entering my home after a final trip to the backyard for “last call,” Max would “go left” to my bedroom and I “right” to the sofa. Soon we were both sound asleep. Well one of us was, anyway, for it wasn’t long before the still of the night was broken by the not so melodic rumble of Max snoring in my bed.

At long last, the bug finally departed for points unknown, leaving me exhausted. It took me a while to get back to normal, such at it is, where I have happily remained ever since. Unfortunately, while I was “out”, I did absolutely nothing with this blog until Monday, when I finally started to clear the backlog of just under 6000 notifications. Sad to say, my other email accounts aren’t in much better shape. All in good time …

Thank you for your emails and messages of concern. I hope that I’ve answered them all but fear I may have missed a couple. Thanks, too, for your understanding and patience. I guess all that’s left is to announce that the Kitchens are now open!

We’ll talk about a planned hiatus at another time.

*     *     *

Eggs in Purgatory is a ridiculously easy dish to make and serve. It can be prepared in under a half-hour and served for breakfast, lunch, or dinner. You can make it as spicy as you like, though when used as a hang-over cure, most like the heat factor raised a notch or two. Here, I’ve written the recipe using 2 eggs. You can easily double or triple the ingredients depending upon the number of people seated at the table. (See Notes)

 *     *     *

Eggs in Purgatory 4

*     *     *

Eggs in Purgatory Recipe

Ingredients

  • 2 tbsp olive oil
  • 1 small onion, chopped
  • 1 small clove garlic, minced or grated
  • red pepper flakes, to taste
  • 1 can (14.5 oz, 411 g) diced tomatoes (See Notes)
  •  marjoram to taste
  • 2 large eggs
  • salt and pepper
  • grated Pecorino Romano cheese for garnish

Directions

  1. In a small fry pan with a lid, heat the olive oil over med-high heat.
  2. Add the onions, season with salt and pepper, and sauté until translucent, about 6 minutes.
  3. Add the garlic and red pepper flakes, continue to sauté for about another minute.
  4. Add the tomatoes and marjoram, stir, and bring to a boil before reducing to a soft simmer.
  5. Simmer until the sauce is cooked to your satisfaction. Additional water may be added if the sauce is too dry. Taste to check for seasoning.
  6. Use the back of a ladle or spoon to make a small indentation in the sauce. Fill each with a freshly cracked egg.
  7. Lightly season the eggs with a bit of salt and pepper, cover, and cook until the eggs are done with the yolks still runny. Alternately, you can place the pan, uncovered, in a pre-heated 375˚ F (190˚ C) oven until the eggs are cooked, about 10 minutes.
  8. Serve immediately as-is or atop a slice of Italian bread, garnished with some grated cheese and anything else you may like. (See Notes)

*     *     *

Eggs in Purgatory on Toast3

*     *     *

Notes

As you can see, the dish uses a simple tomato sauce to cook the eggs. There is certainly no need to follow my sauce recipe and you can add whatever else you like, according to your own tastes. In fact, you may have a store-bought sauce that you enjoy and it can easily be used here.

If you like things really hot, you may wish to downgrade your dish from Purgatory to Hell. A little harissa added to the tomato sauce is sure to do the trick.

As a rule of thumb, I use one small can of diced tomatoes (14.5 oz, 411 g) for every 2 eggs being prepared. This will ensure that each egg is served on a nice bed of tomato sauce.

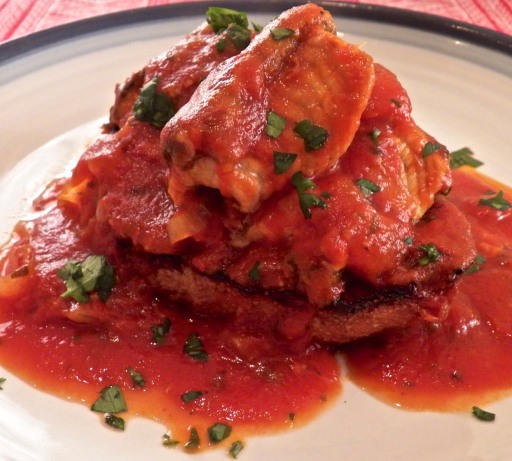
In the past, I always served my eggs as-is or atop sliced Italian bread, sometimes toasted. Nell, however, mentioned serving her eggs atop pasta. Oh, happy day! This is a wonderful variation which soon led to my serving them with polenta, as pictured at the top of this post. If gluten is an issue, however, choose your “platform” wisely.

Although I forgot to do so for the photos, I usually garnish the dish with a bit of grated cheese, though chopped parsley and/or scallions may also be used.

*     *     *

It’s déjà vu all over again …

Strozzapreti A

This time of year, when it’s far too cold to leave the house for just about any reason, I tend to stay put and go through my arsenal of home-made pasta recipes, looking for one that will occupy my afternoon. Strozzapreti is certainly worth considering. Start up a pot of tomato sauce, make some pasta dough, and get to work making these “priest chokers.” Soon you’ll be enjoying a dish of pure Italian comfort food, completely oblivious to the frigid temperatures just outside your door. You can learn how to make this pasta, and the tale behind its name, simply by clicking HERE.

 *     *     *

Coming soon to a monitor near you …

Agnolotti Preview

 Agnolotti Redux

*     *     *

Eel in the Style of Le Marche — Anguille alla Marchigiana

Our ship came in! This morning, I made what has become a daily call to the Italian market and learned that eels had been delivered late yesterday afternoon. I called a friend and within an hour, we were standing in front of the fish counter, watching the fishmonger net today’s entrée. Not but a few hours later, here I sit blogging about the dinner. Not too shabby, well, unless you happen to be an eel.

*     *     *

*     *     *

Throughout much of Italy, eel is a dish served traditionally around the holidays but is most commonly prepared in the southern portions of the country, with Naples famous for its eel. Very often one of the fishes served during Christmas Eve’s Feast of the 7 Fishes, eel is considered to be good luck for those who eat it. This is a very old custom dating back to the days when people believed snakes to be evil because of their role in the story of Adam & Eve. Because it so closely resembles a serpent, by eating eel one was symbolically triumphing over the devil and good fortune was sure to follow. I don’t know if that’s true but I’m buying a few lottery tickets, just in case.

In the old two-flat, I can’t say that eating eel was a tradition at all. In fact, I only remember seeing it one time back then. I must have been no more than 5 years old because I could barely see over the edge of the sink. Even though “barely,” I did manage to get a glimpse of a sink full of the slimy devils. Needless to say, it was a sight that left a lasting impression. Speaking with Zia, that is probably the last time eel was prepared there. So, today’s post wasn’t just a recipe. It was yet another memory test for my long-suffering Zia. I must say, though, having just finished a delicious dinner, Zia came through again. The eel flesh not only remained intact, it’s flavor wasn’t overcome by the tomatoes and, in fact, the sauce had a mild seafood taste throughout. Now I just have to figure out a way to get some eel over to Michigan so she, too, can enjoy the fruits of her memory.

*     *     *

*     *     *

As she suggested, I prepared the anguille like we do much of our seafood, in a simple tomato sauce. In fact, this marinara is almost bland for there are no strong herbs or flavors present. Eel has a mild fish flavor and using something like organo or marjoram would definitely overpower it, leaving a tomato sauce devoid of any taste of seafood. We agreed that the eel might disintegrate if allowed to cook entirely in the sauce, so it was briefly pan-fried before being added it to the tomatoes.  Beyond that, the only change I brought to the recipe was with the basil. My family always tore by hand or chopped fresh basil before adding it to a sauce. Not long ago, I watched as Lidia added an entire stem of basil to her sauce and fished it out before serving. Well, if it’s good enough for Lidia, it is certainly good enough for me. If you, however,  don’t feel like adding a stem of fresh basil, then tear or chop away.

Oh! I should warn tell you one more thing about today’s protein. These eel are alive when purchased. You can bring them home and “take care of them” yourself or you can let your fishmonger do it for you. Um. No question. Let your fishmonger kill, gut, trim, and even chop the eel to your specifications. If you’re considering taking on any of the duties I’ve just mentioned, let me tell you that the term “slippery as an eel” is far more fact than fiction. I chose to chop the eel myself and it was a mistake, one that I’ll never repeat.

*     *     *

Anguille alla Marchigiana Recipe

Ingredients

  • 3 lbs. eel, cleaned with head & tail removed, chopped in 2 – 3 inch pieces.
  • 4 tbsp extra virgin olive oil, divided
  • 1 large sweet onion, sliced thin
  • 1 clove garlic, minced or grated
  • 4 tbsp fresh parsley, chopped, divided
  • 1 large can (28.5 oz) tomatoes
  • 1 stem fresh basil
  • 1 cup white wine
  • salt & pepper
  • thickly sliced, toasted Italian bread, for serving.

Directions

  1. In a large sauce pan, heat 2 tbsp of olive oil over med-high heat. Add onion and sauté for about 3 minutes before adding 3 tbsp of the chopped parsley. Continue to sauté until the onion is translucent, about 5 more minutes.
  2. Add garlic and sauté for a minute.
  3. Add tomatoes, basil, season lightly with salt & pepper, and bring pan’s contents to the boil before reducing to a simmer.
  4. After sauce has simmered for 15 minutes, heat the remaining oil in a large frying pan over med-high heat.
  5. Once the oil is hot, add the pieces of eel and sauté for about 7 minutes, being careful to insure that the pieces are evenly cooked.
  6. Carefully remove the eel and place it in the tomato sauce. Season lightly with salt & pepper.
  7. Use the white wine to deglaze the frying pan. Continue to cook the wine until it is reduced by half. Add the wine reduction to the tomato sauce and carefully stir the pan’s contents.
  8. Increase the heat to high, bring the sauce to the boil, then reduce the heat and simmer for another 15 minutes.
  9. Taste and adjust seasoning, if needed, one last time.
  10. To serve, set a piece of toasted bread on each plate and place eel pieces on top, followed by a generous amount of sauce. Garnish each serving with some of the remaining chopped parsley.

*     *     *

It’s déjà vu all over again …

Calamari SaladA little over a year ago, I gave an account of how the Feast of the 7 Fishes came about. It was part of the post in which I shared Mom’s recipe for a Calamari Salad. Follow this recipe’s guidelines and you’ll have perfectly prepared calamari, not rubber bands. That post also included a round-up of 11 additional seafood recipes for anyone needing help with gathering 7 seafood dishes for the Feast. You can see it all by simply clicking HERE.

*     *     *

What’s this? You’re still a fish short?

Here’s a round-up of this past year’s seafood posts.

So, combining both posts, you now have 18 recipes from which to choose dishes for your Feast of 7 Fishes. Still having trouble? Try this: start your meal with Mom’s Calamari Salad. Next serve a bowl brimming with Brodetto. See? You’ve got 6 Fishes out-of-the-way already. Now, finish your meal with a bang: Branzino al Cartoccio. That’s 7 Fishes and you haven’t even broken a sweat.

*     *     *

Coming soon to a monitor near you …

Mom’s Brodo

*     *     *

Pasta alla Norma

The Italians love eggplant and no place is it better celebrated than in Sicily. For proof of that, one need look no further than today’s recipe, Pasta alla Norma. Named in honor of Bellini’s masterwork “Norma,” eggplant takes center stage in this recipe and the resulting dish, like its operatic inspiration, is sublime.

*     *     *

Campanelle alla Norma

*     *     *

Eggplant was no stranger to our table growing up. Mom often served them halved, topped with bread crumbs, and baked. Sometimes she cut them into discs before breading and frying them. Still other times, she cut them lengthwise to make planks, layering them with cheese and sauce to make a lasagna-like dish. Of course, like most Italian households, she also used eggplant to make her caponata. Comparing the two, caponata is actually more complicated than Pasta alla Norma. Whereas caponata consists of chopped eggplant and a variety of vegetables, Pasta alla Norma’s sauce is a product of just eggplant and marinara sauce. It’s hardly a difficult recipe to follow but it sure is a delicious way to dress a dish of pasta. And with our vegetable stands and markets just beginning to  display this season’s bounty, there’s no better time to try this little taste o’ Sicily.

The recipe calls for 1 to 1 1/2 lbs. of eggplant. Rather than buy one large eggplant, I’ll buy 2 or 3 medium-sized ones. The larger the eggplant, the more seeds it will have and the more bitter it will be. The recipe, also, states that the eggplant should be cut into 1/2 cubes before being salted. You may find it easier to cut the eggplants into 1/2 inch slices and, after salting and rinsing, cut the slices into cubes. If you use small or “baby” eggplants, you needn’t cut them into cubes at all, but leave the slices as-is. The choice is yours.

*     *     *

Pasta alla Norma Recipe

Ingredients

Norma's Notes

  • 2 tbsp olive oil, more as needed
  • 2 – 3 small/medium eggplants (1 – 1 1/2 lb total), cut into 1/2 inch cubes
  • 2 – 3 tsp kosher salt
  • 1/4 to 1/2 tsp red pepper flakes, more to taste (optional)
  • 1 medium onion, chopped
  • 3 cloves garlic, minced
  • 2 – 3 tbsp tomato paste
  • 1 large (28 oz.) can tomatoes, whole or diced
  • 2 tbsp fresh parsley, chopped.
  • 2 – 3 tsp Italian seasoning
  • 2 tbsp fresh basil, chopped
  • salt & pepper, to taste
  • 1 lb pasta, i.e., rigatoni, penne, campanelle
  • reserved pasta water
  • 1/2 cup grated ricotta salata, reserving 2 – 3 tbsp

Directions

  1. Cut each eggplant into 1/2 inch cubes. Place 1/3 of the cubes in a colander and sprinkle with 1/3 of the salt. Add another third of the eggplant and sprinkle with another third of salt. Place the remaining 1/3 of the eggplant cubes in the colander and sprinkle with the last of the salt before carefully mixing the colander’s contents. Allow excess water to drain for 15 – 30 minutes. Give the colander & eggplant a quick rinse of tap water. Dump the rinsed eggplant onto a paper towel-lined baking sheet and use more paper towels to pat dry.
  2. Heat oil in a large, deep skillet over med-high heat.
  3. Begin sautéing the eggplant cubes. Do not overcrowd and work in batches, if necessary. Continue cooking until all cubes are lightly colored, adding more olive oil as needed. Remove cooked cubes and reserve for later.

    Grate Cheese

  4. If needed, add 2 tbsp olive oil and heat. If using the pepper flakes, add them now and cook for one minute.
  5. Add onion and sauté until soft, about 5 minutes.
  6. Season lightly with salt & pepper, add the garlic, and continue sautéing for another minute.
  7. Add tomato paste, stir well, and continue cooking for a minute or so.
  8. Add tomatoes. If using whole tomatoes, tear them into pieces before adding to the pan.
  9. Add the Italian seasoning & parsley, return the eggplant to the pan, and stir to combine everything. Once the sauce begins to boil, reduce the reduce heat to a simmer.
  10. The sauce will cook for 30 minutes. Check the pasta’s package directions and time its cooking so that the pasta is about 2 minutes shy of being al dente when the sauce is ready.
  11. Reserve some of the pasta water before adding the basil and the not quite al dente pasta to the frying pan. Mix well and continue cooking until the pasta is done to your liking. Add some of the reserved pasta water to the pan if the pasta becomes dry during this last step of the cooking process.
  12. Just before serving, add most of the ricotta salata and mix well. Check for seasoning and add salt & pepper, if needed.
  13. Serve immediately, garnished with the reserved 2 – 3 tbsp ricotta salata.

Variations

Like I said, it’s is a simple dish with relatively few ingredients and, as such, there’s little room for variations other than the pasta selection and the cheese. For the pasta, I prefer to serve this sauce with pastas like penne, rigatoni, or campanelle (little bells) and not any of the ribbon-like pastas. As for the cheese, if I have ricotta salata, that’s great. If I don’t have any,  I’ll substitute some crumbled feta or, if all else fails, some grated parmesan cheese. I’ve even used some grated fresh mozzarella, so, I wouldn’t let the absence of ricotta salata prevent you from enjoying this dish.

*     *     *

Pasta with Clams (“Red Sauce”)

Blessed to be living on a peninsula or neighboring island, Italians enjoy a ready supply of seafood of all kinds — and their diet is all the better for it. A favorite dish of mine, whether I’m visiting Italy or at home, is pasta prepared with clams. Here in Chicago, the selection of fresh clams can be limited to cherry stones, with little necks and manila clams available sporadically. Cherry stones and little necks are actually same species of clam. The only difference is their size, with cherry stones being the larger of the two. I find little necks do taste sweeter, however, and I’ll use them whenever I can. If, however, only cherry stones are available, I’ll remove them from their opened shells during the cooking process, give them a quick chop, and then return the chopped clams and any juices to the pot. When all else fails, I have used, with some success, frozen clams and cockles purchased from a few of the area’s Asian markets. These same stores, by the way, can be a relatively cheap source for flash-frozen, vacuum-packed calamari, in any size you could possibly want.

As you can tell by this posting’s title, today’s recipe features clams cooked in a tomato sauce. In this recipe, I find that the sweet, delicate tasting clams can be overpowered by the tomatoes. So, in order to bolster the clam flavoring — and unlike the “white” version of the recipe — I’ll add a can of whole or minced clams to the sauce. It’s listed as “optional” within the recipe’s ingredients and the choice is yours to make. By the same token, whether you add any canned clams, be sure to use herbs and spices sparingly. They, too, can overwhelm the clams. It’s a tricky balance you’re trying to achieve but one definitely worth the effort.

*     *     *

Pasta with Clams (“Red Sauce”) Recipe

total time: under 2 hours (includes time to prep clams)

Ingredients

  • at least 2 doz. little neck or manila clams
  • 1 can (7 oz) whole or minced clams (optional)
  • 3 tbsp olive oil
  • 1/8 to 1/4 tsp red pepper flakes (optional)
  • 1 medium sweet onion, chopped
  • 2 cloves garlic, minced
  • 3 tbsp fresh parsley, chopped
  • 2 tbsp tomato paste
  • 1/3 cup dry white wine
  • 1 large can (28 oz) diced tomatoes
  • salt & pepper, to taste
  • 3 tbsp fresh basil, chopped
  • 1 lb cooked pasta (tagliatelle pictured above)
  • 1 cup reserved cooked pasta water
  • chopped parsley for garnish

Directions

  1. At least an hour before dinner, use a brush to individually scrub each clam before  rinsing and placing it in a large bowl of cold freshwater. Rinse them a second time just before proceeding with the recipe.
  2. Heat oil over med-high heat in a large frying pan with a lid. (If using red pepper flakes, add them now and sauté for 1 minute before proceeding.) Add onion, season lightly with salt & pepper, and sauté until translucent, about 5 minutes. Add garlic and parsley and sauté for another minute.
  3. Add tomato paste, sauté for one minute, add the wine, and then add the tomatoes. Season with salt & pepper, bring to a boil before reducing heat and  simmering for 30 minutes.
  4. Meanwhile, your pasta should be cooking, with an eye toward being drained just as the clams are opening.
  5. Increase heat to medium high, add the basil, and stir. (Add the canned clams now, if you choose to use them.)
  6. Add the clams and cover tightly.
  7. In about 5 to 8 minutes, the clams should be open & steamed. Discard any unopened clams. Replace cover and remove from heat.
  8. Combine the clams & tomato sauce with the drained pasta. If too dry, add some of the reserved pasta water.
  9. Serve immediately, garnished with chopped parsley.

Variations

Tired of tomatoes? Try the “white sauce” version of this recipe.

*     *     *

Chicken Parmesan

As is the case within most families, birthdays were special events in our household and Mom would fix whatever dish the birthday child desired. For me, that choice was always veal parmesan. Mom served it with home-made pasta and I was one happy boy. Nowadays, I tend to avoid veal but I can’t avoid this dish nor the memories it evokes. So, instead of  veal, I use chicken. It may not be the same but it’s close enough — and certainly good enough — for me.

*     *     *

*     *     *

To begin, I start with boneless, skinless chicken thighs, which are fried after being floured and breaded. They are then placed into a baking dish, smothered in marinara sauce, and topped with sliced mozzarella & grated parmesan cheese before being baked in the oven. Yes, this recipe can make a mess of your kitchen but the pay-off is well worth the effort. The only advice in this area that I might offer is to clean as you go. When the marinara sauce is simmering, clean the work area and utensils. The same goes with the breading station as the chicken is being fried. When the final dish is in the oven, put the rest of the mess into the dishwasher (I hope you have a dishwasher) and start it running. Take it from one who’s been there, your kitchen will resemble a disaster area if you put off the cleaning until after you’ve eaten dinner.

*     *     *

Chicken Parmesan Recipe

Ingredients

  • 1 quart Marinara Sauce
  • 1 pkg boneless, skinless chicken thighs (5 or 6 thighs)
  • 1/2 cup all-purpose flour
  • 1 – 1 1/2 cups bread crumbs
  • 3 tbsp fresh parsley, chopped
  • 1/2 tsp garlic powder
  • 1/2 tsp onion powder
  • 2 eggs
  • 2 tbsp milk
  • 3 tbsp olive oil, more as needed for frying
  • 1 large ball of fresh mozzarella, sliced thinly to provide a slice for each thigh
  • 1/2 cup freshly grated parmesan cheese
  • salt & pepper

Directions

  1. Set up a breading station. Place the flour in one dish; combine the eggs & milk and place into the center dish; and in the third dish mix the bread crumbs, garlic powder, onion powder and parsley. Season each thigh with salt & pepper. Use the standard breading technique and begin by coating each thigh with the flour, one at a time. Shake off the excess flour before coating the thigh with the egg mixture. Allow the excess to drain a bit and dredge the thigh in the bread crumbs.  Set the breaded thigh aside and repeat with the remaining chicken pieces.
  2. Place oil in a large frying pan and heat over med-high heat. Working in batches, fry the breaded thighs until each side is golden brown, about 5 minutes per side. If necessary, replenish the oil between batches.
  3. Pre-heat oven to 375*.
  4. Liberally butter or use a cooking spray to coat a 9 x 13″ baking dish.
  5. Coat the bottom of the dish with a few ladles of the marinara sauce.
  6. Place the fried chicken pieces into the dish and use the rest of the tomato sauce to cover them all.
  7. Evenly sprinkle the dish with the parmesan cheese and then position one slice of mozzarella on top of each chicken piece.
  8. Cover with aluminum foil and bake in a pre-heated oven for 20 minutes. Remove the foil and continue baking for another 20 minutes.
  9. Remove from oven and allow to rest 10 minutes before serving.

Variations

Originally, Mom shallow-fried the veal in about 1/4 inch of vegetable oil. Initially, I did the same with the chicken pieces but, over the years, eventually cut out most of the oil in favor of a few tbsp of olive oil. Use whichever method you prefer, so long as the breaded pieces are golden brown when you’re done.

Mom never baked her veal parmesan and you needn’t bake this dish either. In a large, deep frying pan with a lid, add enough sauce to generously coat the pan’s surface, add the coated, fried chicken pieces, and cover with more sauce before sprinkling with grated parmesan cheese and topping with mozzarella slices. Cover the pan and cook over medium heat until the chicken is fully cooked, about 30 minutes. Use an instant read thermometer when in doubt.

I use chicken thighs but chicken breasts, tenders, or whatever chicken parts you prefer can be substituted. You may find, however, that boneless pieces work best. No matter what part(s) of the chicken you use, just be aware that the cooking times may vary, so, again, use an instant read thermometer to ensure the meat is thoroughly cooked.

Notes

The dish, as shown, was prepared “family style” and I wouldn’t necessarily serve it this way for guests.  Here, the chicken pieces are pretty much blanketed by a coating of cheese. If I were serving guests, I would be more careful with the cheese placement, using less cheese and restricting it to the individual chicken pieces. For “family,” however, I’ll go with the cheese blanket and I haven’t had any complaints yet.

*     *     *

Tomato Sauce with Tuna

Having been raised a Catholic, the arrival of Lent reminds me of the countless meatless Fridays of my youth. Even when “the rules” changed in the 60’s, our house continued the practice of fish on Fridays, for the most part, and that was due largely because we all liked fish — and the Bartolini Sisters knew how to cook them. I hope to get to some of those recipes later but, for now, I’m going to start with a pasta dish. (Big surprise!)

Next to a marinara, this is about as simple a sauce as one can make. With tuna as its protein, this sauce is not as strongly flavored as, say, a puttanesca. As a result, one needs to be careful not to overpower the tuna with a lot of strong herbs and spices. The recipe, as presented, is exactly as my family made on many a Friday, with the exception of the capers and mushrooms. I happen to love both with my pasta. As for you, if it isn’t a tomato sauce unless you taste oregano or some other herb, spice, or ingredient, then by all means add it. Just be careful not to overwhelm the tuna and, please, just say no to cheese.

*     *     *

*     *     *

Tomato Sauce with Tuna Recipe

total time: approx.  1 hour

Ingredients

  • 3 tbsp olive oil
  • 1 medium onion, chopped
  • 3 tbsp fresh parsley, chopped
  • 3 cloves garlic, minced
  • 2 tbsp tomato paste
  • 1 can (28 oz) tomatoes (use crushed, diced, or whole that you mash during cooking)
  • 4 – 6 button or crimini mushrooms, sliced — optional
  • 1 can (5 oz) of whole chunk tuna, water-packed, well-drained
  • 2 tbsp + 1 tsp fresh basil, chopped
  • 3 tbsp capers, drained — optional
  • salt & pepper, to taste
  • 1 lb pasta

Directions

  1. Add oil to a medium sauce pan and heat over a medium-high heat. Add onion, garlic, and parsley and sauté until onions are translucent, about 5 minutes.
  2. If using mushrooms, add them now and continue sautéing another 3 or 4 minutes.
  3. Add tomato paste and sauté for about 2 more minutes.
  4. Add tomatoes, stir to thoroughly combine, bring to boil, and reduce to a simmer. Bring a large pot of salted water to boil.
  5. After 30 minutes, carefully add tuna so that the chunks do not fall apart. Add pasta of your choice into the boiling water.
  6. When the pasta is cooked al dente, remove from heat and drain.
  7. Add 2 tbsp basil (and capers, if used) to the sauce and stir carefully.
  8. Combine cooked, drained pasta with the sauce, stir until well-coated, garnish with remaining basil, and serve immediately.

Notes

This is another quick sauce. If you cook it for too long after the tuna has been added, the chunks of tuna will disintegrate.

*     *     *

Puttanesca Sauce

I was a boy when I first heard one of the legends behind pasta puttanesca. Dom DeLuise was the guest host on the Mike Douglas Show and he told the tale while he prepared the dish. It has to do with the “ladies of the evening” of Naples and the strength of their perfume.  I don’t know whether it was the pasta or the tale but I remember both to this day. A variation of the story is that these same ladies used the sauce’s aroma to lure gentlemen callers into their parlors. I’m sure that there are other legends about this sauce’s origins and I’m equally sure that they all involve its strong aroma. Once you’ve prepared a puttanesca sauce, you’ll know exactly what I mean.

Virtually all puttanesca sauces rely principally upon 5 basic ingredients: tomatoes, anchovies, red pepper flakes, garlic, and olives. I prefer a sauce with some texture so I’ll use crushed, diced, or whole tomatoes that I’ve mashed with my spoon. This recipe may call for 6 anchovies but I’ll very often use the entire tin, unless there’s a Caesar salad in my immediate future. Although most recipes call for pitted, black olives, I’ve found that the addition of a couple large, green olives adds another flavor into the mix. The purchase of a small container of mixed olives at my grocery’s deli counter works perfectly.  Speaking of olives, they, along with the anchovies and capers, can be pretty salty. Be sure to taste the sauce before seasoning with salt and do so at the very end of cooking. Now, whether you find yourself in Italy or in an Italian restaurant here in the States, it is frowned upon to use grated cheese of any kind on a pasta dish made with seafood. As such, there are many who will say that a puttanesca sauce starts with anchovies and, therefore, cheese must not be used. Others are willing to bend the rules since the anchovies are not the “star” of the dish as, say, clams might be in a different recipe. To cheese or not to cheese? The answer to that question will be left entirely up to you. I know a minefield when I see one.

*     *     *

Puttanesca Sauce Recipe

total time: approx.  1 hour

Ingredients

The Basics

  • 3 tbsp olive oil
  • 1/8 to 1/4 tsp red pepper flakes
  • 6 anchovy fillets
  • 1 medium onion, chopped
  • 3 cloves garlic, minced
  • 1 – 28 oz can tomatoes
  • 3 tbsp tomato paste
  • 12 – 15 large Kalamata olives, coarsely chopped  (I’ll sometimes add a couple large, green Spanish olives.)
  • 3 tbsp fresh parsley, chopped
  • 2 tbsp + 1 tsp fresh basil, chopped
  • 2 tbsp capers, drained
  • salt & pepper, to taste
  • 1 lb pasta, cooked about 2 minutes shy of al dente — refer to package instructions


Directions

  1. Add oil to a large, deep fry pan and heat over a medium-high heat. Add pepper flakes & anchovies and cook for 2 minutes. Use the back of a wooden spoon to stir & mash the anchovies until they disintegrate into the oil.
  2. Add onion and sauté until onions are translucent, 8 to 10 minutes.
  3. Add garlic & parsley and sauté for 1 minute.
  4. Add tomato paste and continue sautéing for about 2 minutes.
  5. Add tomatoes, stir to thoroughly combine, bring to boil, and reduce to a simmer.
  6. After 30 minutes, add olives and continue simmering.
  7. After 10 minutes, add capers and 2 tbsp basil, stir to combine. Taste before seasoning with salt and pepper.
  8. Add drained pasta to the pan, stir to coat with the sauce, and continue cooking until pasta is al dente, 1 to 2 minutes. Serve immediately, garnished with remaining tsp basil.

Variations

This sauce is cooked relatively quickly and features bold flavors. To add another dimension, try using fresh tomatoes that have been picked in the height of the season. I usually use 10 to 12 ripe plum tomatoes that I’ve peeled after blanching them in boiling water for about a minute. Once peeled, chop and, if you like, seed the tomatoes before adding to the pan. The fresh tomatoes, anchovies, and olives combine to make one spectacular dish!

Notes

Like many of my tomato-based sauces, this one calls for a large can of tomatoes. Truth be told, I rarely use canned tomatoes. Mid-August, I start buying half-bushels of plum tomatoes at my area’s farmers’ markets. After washing, some are blanched, peeled, chopped, and then frozen in quart containers. The rest are run through my Roma strainer before being frozen. I try to freeze at least 45 quarts and that will ensure that I’ll have enough tomatoes to easily last through Spring. When the time comes to use them, depending upon the sauce I’m preparing, I can choose between the chopped or strained quarts, or, I can combine them. Best of all, there are no more trips to the grocery store for a can of tomatoes, only to return with 2 bags full of impulse buys.

*     *     *

Steak Pizzaiola

This is not one of my family’s recipes and I only started cooking it a relatively short time ago. Sure, I’d heard of steak pizzaiola but, for some reason, I always assumed that it was too complicated for me to attempt. Then, one night I saw a rerun of an “Everybody Loves Raymond” episode in which the recipe was a point of contention between Debra & Marie. After the show, I searched the web for the recipe and was surprised to learn just how easy the dish is to prepare. Basically, it’s a steak and marinara sauce served over pasta. Well, I decided to give it a try and I’ve continued to make steak pizzaiola ever since. It is one of those recipes where a minimum of effort results in a great dinner — and it’s a bargain to prepare, as well.

Exhibit A

Searching the web, I soon learned that, as easy as it is, there’s no one way to make steak pizzaiola. It’s as if there’s a different recipe for every cut of meat, especially since the better the cut, the less time needed to cook it. As a result, some recipes feature a steak that’s braised slowly in the sauce while, in others, the steak and sauce are cooked separately, to be combined just prior to serving. Although there’s something to be said for the “fast approach,” I very much prefer a slow and steady method of cooking for this dish. So, I look for a cheaper cut of meat, preferably “bone-in” for added flavor, and let it braise for a couple of hours in the oven. The sauce itself is uncomplicated and there’s no need for a lot of herbs and spices. The braising will do the work for you and infuse the sauce with a rich beef flavor. Now, my family uses very little oregano in its dishes but so many of the web recipes call for it that I’ve listed it here, among the ingredients. Use it instead of, or in combination with, the Italian seasoning, if you like. In fact, if oregano is a favorite of yours, you may want to increase the amount listed in the recipe below. As for the type of pasta to use, I prefer serving it with rigatoni, penne, or cavatappi but feel free to use whatever works for you and your family.

Exhibit B

*     *     *

Steak Pizzaiola Recipe

total time: about 2 1/2 hours.

yield: about 8 servings.

Ingredients

  • 2 – 3 pounds chuck steak, bone-in
  • 3 tbsp olive oil
  • 1/8 – 1/4 tsp red pepper flakes, depending upon taste
  • 1  medium yellow onion, chopped
  • 3 cloves of garlic, chopped fine
  • 2 – 3 tbsp tomato paste
  • 1 large can (28 oz.) tomatoes (I prefer diced or crushed)
  • 1 tbsp Italian seasoning or dried oregano or any combination of the two
  • 3 tbsp chopped fresh parsley
  • 2 tbsp chopped fresh basil
  • salt & pepper
  • 1 lb pasta, cooked al dente per package instructions, reserve 1 cup of pasta water
  • grated Pecorino Romano cheese

Exhibit C

Directions

  1. Pre-heat oven to 325*
  2. Heat oil in large, oven-proof, frying pan with a tight-fitting lid, over med-high heat.
  3. Season meat liberally with salt & pepper and sear in frying pan, about 4 minutes each side.
  4. Remove meat to a platter and add red pepper flakes to the pan. Cook for about  2 minutes.
  5. Add onions to the pan, season with salt & pepper, and sauté until translucent, about 6 – 8 minutes
  6. Add garlic and continue cooking for 2 minutes.
  7. Add tomato paste and continue cooking for 1 – 2 minutes.
  8. Add tomatoes, parsley, Italian seasoning and/or optional oregano, and stir to combine with pan’s contents. Season with salt and pepper.
  9. Return meat to the pan, cover the meat with sauce, cover tightly with lid, and place in center of oven.
  10. Braise meat for 2 hours, checking it every 30 minutes or so. Either flip the meat over or spoon more sauce over it.
  11. After 2 hours, begin heating water for the pasta and remove the lid from the pan in the oven. This will allow the sauce to thicken while the pasta cooks. When the pasta is al dente, reserve a cup of pasta water, drain the pasta, and check your sauce. If your sauce is too dry, use the pasta water to compensate.
  12. Place drained pasta in a large bowl. Take sauce out of the oven, remove any loose bones, and combine with cooked pasta. Garnish with basil and grated Pecorino Roman cheese.
  13. Serve immediately.

Exhibit D

Variations

As was mentioned earlier, some recipes call for using better cuts of meat than a chuck steak. Normally, those recipes do not need a long braise like the one that I’ve shared; the cut of meat is far more tender already. I very much prefer the long braise method, however, for it not only renders the meat fork-tender but the sauce’s flavors are more developed.

Notes

At one time or another, we all have some left-over pasta sitting in our fridge. Re-heating it can be a problem, unless you use Mom & Zia’s method. Rather than use the microwave, place about a tablespoon of butter and about 1/4 cup of water into a frying pan over med-high heat. Add the left-over pasta and sauté until heated through. Add a little more water if the pasta is too dry. Serve immediately, garnished with Pecorino Roman cheese. Understand that the pasta cannot possibly be al dente — that ship sailed the minute you put the left-overs into the fridge. This will, however, re-invigorate the sauce in ways that a microwave never could. As they say, “Try it. You’ll like it.”

*     *     *

Marinara Sauce

Spaghetti Squash Marinara

It seems that there are as many marinara sauces as there are cooks on TV. Everyone has a version and all that I’ve tried are equally good. Today I’d like to share a recipe that I learned from a PBS cooking show some 20 years ago.  I’ve long-since forgotten the show/chef’s name but I learned this marinara to serve with a very special lasagna. (You can find the lasagna recipe HERE.) Like any good marinara, this sauce can be used in any number of dishes.

*     *     *

Marinara Sauce Recipe

total time: approx.  1:45

Ingredients

  • 1 – 28 oz can crushed tomatoes
  • 1 – 15 oz can tomato sauce
  • 3 cloves garlic, minced
  • 2 tbsp extra virgin olive oil
  • 1/4 tsp red pepper flakes
  • 3 carrots, diced or grated
  • 1 celery stalk, chopped
  • 1 medium onion, chopped
  • 2 tsp dried marjoram
  • 1 tbsp fresh basil, chopped
  • 1 tbsp fresh parsley, chopped
  • 1/2 tsp salt
  • 1/2 tsp pepper
  • 1 cup dry red wine

Directions

  1. Add oil to a medium sauce pan and heat over a medium-high heat. Add pepper flakes and cook for 2 minutes.
  2. Place carrots, celery, and onion into a food processor and run until well-chopped. (This will prevent large chunks of carrot, celery, or onion in your sauce.)
  3. Add chopped carrots, onion, & celery to the pan and sauté until the mixture just begin to caramelize, about 8 to 10 minutes. (If you like, add sliced mushrooms midway through.)
  4. Add garlic, season with salt, pepper, & parsley and sauté for 2 minutes.
  5. Add crushed tomatoes, sauce, marjoram and wine. Stir to thoroughly combine.
  6. Bring to boil, reduce to a soft simmer, and cover.
  7. After 45 minutes, remove cover and continue to simmer for another 45 minutes.
  8. Add basil just prior to serving.

Variations

This sauce originally accompanied a lasagna recipe that included mushrooms. That’s why mushrooms aren’t among its ingredients. If you intend to use this recipe for something other than that particular lasagna recipe, feel free to add mushrooms –sliced or otherwise — about 5 minutes after the carrot, onion, & celery have been added. Continue sautéing as indicated above.

*     *     *

Cherry Tomato Sauce

Grape Tomatoes

After years of renting, buying my home meant that I could finally grow tomatoes and, for the first few Summers, I grew only Roma (plum) tomatoes. Come August, I’d start making pasta sauce using my very own crop. I never had enough of them to make a big pot of Bolognese, but that didn’t mean I couldn’t make a sauce. Several years later, I started growing cherry tomatoes along with the Romas. I soon learned that these little tomatoes made a very good sauce and I’ve been hooked ever since.

Before getting to the recipe, let’s talk about some of the ingredients. The recipe starts off with the rendering of either bacon or pancetta. I keep both in my freezer door. If I wish to use bacon for this recipe, I unwrap one end of the bacon package and, with a sharp knife, cut three or four 1/3 inch strips off of the end. When cooked, these will separate into smaller pieces, similar to lardons. When I buy pancetta, I ask for two or three slices about 1/3 of an inch thick, but what I actually receive are slices anywhere from 1/4 to 1/2 inch thick. For this recipe, I use 1 or 2 pancetta slices, depending upon their thickness. Speaking of bacon, it is a source of salt for this recipe, as is the pasta water added in the end. This is why I do not salt the dish until the very end. Similarly, the red pepper flakes bring heat and I wait before using any pepper in the dish.  As for the tomatoes, I’ve used a variety of types with this recipe. The advantage of using cherry or grape tomatoes, however, is that they are relatively good tasting all year-round, unlike their normal-sized cousins. As for the rest of the ingredients, use as much or as little as you like. In other words, make the recipe your own. Vegetarians, for example, would omit the bacon/pancetta but may need to add another tbsp of olive oil. And lastly, as always, the wine is optional.

*     *     *

Cherry/Grape Tomato Pasta Sauce Recipe

total time: approx.  30 – 45 minutes

Ingredients

Grape Tomato Sauce

  • 2 tbsp extra virgin olive oil
  • 1/8 tsp red pepper flakes, or more to taste
  • 2 – 3 slices of bacon, or, 1 or 2 slices of pancetta, diced large – omit if vegetarian
  • 1 medium onion, sliced
  • 3 – 4 cloves garlic, diced or grated
  • 3 oz. (approx) red wine
  • 6 or 7 button or crimini mushrooms, sliced, or more to taste
  • 2 – 3 tbsp tomato paste
  • 2 – 3 cups cherry tomatoes (approx 3/4 lbs), grape tomatoes may be substituted
  • 3 tbsp fresh basil, chopped
  • 3 tbsp fresh parsley, chopped – more for garnish
  • grated parmesan cheese
  • salt & pepper, to taste
  • 1 lb pasta

Simmering Sauce

Directions

  1. Fill a large pot (at least 4 quarts) with water and place over high heat. Once boiling, add salt and cook your pasta, timing it to be ready when the sauce is cooked to your liking. The pasta should be slightly undercooked and will finish cooking when it is mixed with the sauce. Reserve 1 cup of the water in which the pasta was cooked.
  2. Place olive oil in a frying pan and heat over medium-high heat.
  3. Add pepper flakes to frying pan and cook for 2 minutes. Add the bacon/pancetta and cook until fully rendered, about 6 minutes — less if not frozen.
  4. Add onions and cook until translucent, about 5 – 7 minutes.
  5. Add garlic and continue cooking for no more than 1 minute. Do not burn the garlic.
  6. Add the wine and reduce until most has evaporated.
  7. Add mushrooms and sauté for about 5 more minutes.
  8. Add tomato paste and sauté until the air is scented with the smell of roasted tomatoes, about 2 – 3 minutes.
  9. Add the tomatoes, cover, and reduce heat to medium-low.
  10. Check the pan after about 5 minutes to see if the tomatoes have started to burst. When about 1/3 of them have burst, use a potato masher or broad wooden spoon to carefully smash all the tomatoes. The tomato juices are very hot and will burn if allowed to squirt on you.

    Pasta Fresca

  11. The sauce is now ready when you are. Its taste will vary depending upon how long you allow the tomatoes to cook.
  12. Add the basil and parsley and stir. If necessary, add some of the reserved pasta water so that your sauce has the consistency that you prefer.
  13. Season with salt & pepper, to taste.
  14. Add the cooked pasta to the frying pan, mix to coat, and cook until pasta is al dente, about 1 – 2 minutes.
  15. Serve immediately, garnished with parsley and parmesan cheese.

Variations

I’ve seen variations of this recipe prepared by a few of TV’s chefs. Rachael Ray added a twist that I first saw a few years ago. She roasted the tomatoes before adding them to the other ingredients. Although I do not remember her specifics, I pre-heat my oven to 425*, place the cherry tomatoes on a baking sheet, sprinkle them with a little olive oil, and mix them by hand to help coat them all with the oil. The tray is placed in the oven and the tomatoes roasted for about 20 minutes or until they burst. I then remove the tray from the oven and add its contents to the frying pan instead of the raw tomatoes. This is an alternative definitely worth trying.

*     *     *