Ravioli dei Bartolini

Happy Columbus Day everyone! And what better way to celebrate the Holiday than to share one of the Bartolini Clan’s favorite holiday recipes. Say the word “ravioli” to any of the old 2-flat’s former residents and you’re sure to conjure up memories of holidays past, specifically Christmas, New Year’s, and Easter. No matter which of the 2 dinner tables you visited on those evenings, there would be a large platter of ravioli taking center stage. (It was present on Thanksgiving, too, but The Bird was the star of that show.) As a kid, my attention was pretty much focused on that platter of pasta pillows — and dessert, of course — and I think the same would have been said by everyone at the tables, save Mom and Zia. Their perspectives would have been entirely different.

One must remember that in those days, the only freezer available to most households was a small compartment above the fridge. Consequently, if you wanted to serve your family ravioli, you made it the same day it was served. Well, there was absolutely no way that Mom and Zia were going to start making ravioli on a holiday afternoon. That meant that most holiday mornings, they were up at 5:00 am making ravioli for that evening’s holiday dinner. And then there was Christmas. We were allowed to get up during the night to discover what Santa had brought us and to play with our toys. It wasn’t until years later that we learned how our parents no sooner got the gifts wrapped and under the tree when we came charging out of our bedrooms. Mom and Zia were lucky to get a couple of hours of sleep before they started making ravioli. And they weren’t making just a few ravioli. They made enough for everyone at each of the two holiday tables, which often included guests as well as each family. For Mom, that meant ravioli for as many as 12 people. To this day, I don’t know how they did it.

It really is a shame that there are no pictures of these women making pasta and ravioli, for it really was something to see. Mom would make the filling the night before and store it in the fridge. (Woe be the child caught snatching filling from the fridge!) The next day, she would make 8 eggs worth of pasta dough using the “mound” method. (Mound the flour on a large pasta board, make a crater in the center, pour the eggs into the center, and use a fork to slowly bring the flour into the egg mass, being careful not to break the flour wall and allow the eggs to spill out.) Once the dough was made, kneaded, and rested, Mom used her 3+ foot long “rolling-pin” to create thin, circular pasta sheets, 3 – 4 feet in diameter. They were laid to dry by hanging them off the edge of the dining room table, the backs of chairs, even on sheets covering a bed, if one was “open.” Once dry enough, the sheet would be hung off the pasta board’s edge, half on the board and half off. The filling balls were then laid out on the pasta half-sheet in a grid, each equidistant from its neighbors. When they were all positioned, maximizing the surface area, the bottom half of the sheet was  brought up and over, enclosing the filling-covered top half. The long handle of a spoon or spatula was used to seal the pillows. The ravioli were then cut using a pastry cutter, moved to trays, and the next pasta wheel was moved into place. This continued until all the filling was used. The remaining dough, if any, would be hand-cut to form linguine or quadretti. (More about the latter in another post.) Just about the time she was finished cutting the last of the pasta, we kids would come bounding into the kitchen. “Merry Christmas, Mom! What’s for breakfast?”

The purchase of a pasta machine changed all that. Unable to make the large pasta wheels, Mom turned to ravioli dies to make her ravioli. Pictured just below is my collection.  The 2 dies on top are used for ravioli. The one on the top-left makes ravioli that are 2 inches square. That’s just about the size The Sisters were taught to make by hand. The ravioli form on the top-right makes ravioli that are 1.25 inches square. That’s about the size The Sisters made by hand once we kids came into the picture. (Kid-friendly ravioli. Who knew?)  The remaining 3 are used for soup ravioli, which Mom called cappelletti, “little hats.” Though normally rounded, some look similar to tortellini,  the die Mom used (lower left) was .75 inches square. As a result, the word “cappelletti” in our house wasn’t used to describe the pasta’s shape but its use — and that was in soup. Mom gave me her cappelletti die years ago but it’s too small for me to use in any way. (I’ve tried several times but, being ham-fisted, I cannot make the filling “balls” small enough to fit the die.) So, I bought the die on the lower-right. It makes raviolini that are 1 inch square and I use it to make my cappelletti. In the center is a press that makes traditional-looking cappelletti, each 1.25 inches in diameter. I, also, have 2 more ravioli makers, both not shown, but they don’t work very well. One attaches to my pasta machine and the other to my stand mixer. In both cases, they require that the dough sheets be about twice as thick as I am accustomed to using. The result is ravioli that is a bit more chewy than I prefer. What can I say? Mom spoiled us. 

*     *     *

Tools of the Trade

*     *     *

When it come to the pasta dough’s final thickness, let your own palate lead the way. Our pasta machines are calibrated from 1 through 10, with 1 being the thickest setting. Zia prefers to roll her dough up to and including the number 6 setting. I will use the same setting for large ravioli but for the smaller ravioli and cappelletti, I’ll roll the dough one more time, using the number 7 setting.

Once you’ve made the filling and pasta dough, creating the ravioli is easy enough, though time-consuming. Here’s Mom’s Pasta Dough recipe and, on Wednesday, I’ll share the recipe for their ravioli filling. (Future posts will share the filling recipes for sausage ravioli and cappelletti, as well as a few others we’ve tried along the way.) The pictures that follow will guide you through the ravioli making process far better than I ever could describe. Of course, it helps that they feature that world-renowned still photo model, “Zia,” in a sequence of never seen before shots taken where she lives, along the fabulous Michigan Riviera.  Ah, the life of the octogenarian super-model!

*     *     *

How to Make Ravioli

Step One: Cut dough strips into die-sized sheets

*     *     *

Step Two: Cover the die with a dough sheet

*     *     *

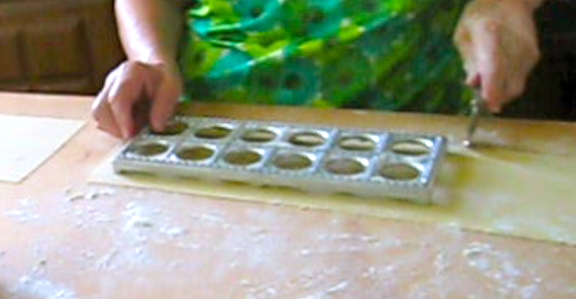
Step Three: Place filling across the die

*     *     *

Step Four: Use dampened fingers to moisten ravioli “walls.”

*     *     *

Step Five: Cover filled die with another dough sheet

*     *     *

Step Six: Use a rolling-pin to seal the ravioli

*     *     *

Step Seven: Trim the excess dough

*     *     *

Step Eight: Flip the filled die

*     *     *

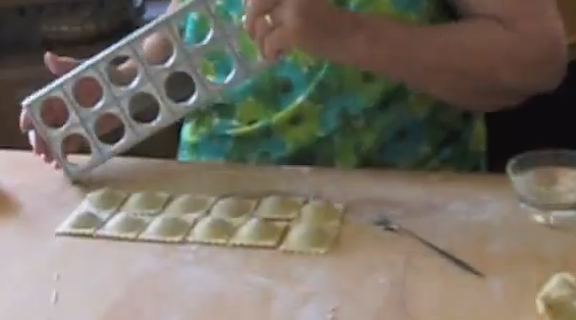
Step Nine: Unmold the ravioli

*     *     *

Step Ten: Lightly puncture the ravioli, meat-filled only

*     *     *

To Cook

  1. Bring a large pot of salted water to a rolling boil.
  2. Add the ravioli, return to boil, then reduce and simmer gently. (If boiled too hard, the ravioli may burst.)
  3. Ravioli normally take 5 – 8 minutes to cook, a couple of minutes more if frozen. Cooking times may vary depending upon the thickness of your dough, the filling, the size of the pot, etc. Taste one to insure they are done to your liking.
  4. Once the ravioli are cooked, carefully drain using a colander or sieve. You can use a Bolognese-style sauce or go meatless.

*     *     *

Variations

The method I’ve described is by no means the only way to make ravioli at home. Check out the Rufus’ Food and Spirit Guide to see Greg make ravioli completely by hand, similar to the method Mom employed but on a smaller scale. You can also see a slightly more modern approach by going to Sweet Caroline’s Cooking. With Thanksgiving just around the corner, her recipe for butternut squash ravioli couldn’t be better timed. Lastly, in an upcoming post, I’ll show you yet another method for making stuffed pasta.

Notes

You’ll note that Step Ten instructs that only meat-filled ravioli should be lightly punctured. This should be done if you intend to freeze the pasta. Doing so will allow any air sealed within each raviolo to escape during the cooking process. Too much trapped air will cause the raviolo to, in effect, balloon and it may burst before the filling can thaw and cook. We use the tines of a cocktail fork to do this but we don’t puncture cheese-filled ravioli. The cheese filling will often leak through the puncture holes. Try to fill each pillow with as much cheese filling, and as little air, as possible. This “balloon effect” should not be a problem if the ravioli are fresh (not frozen) when cooked.

Although not especially difficult, this is a time-consuming process. I’d recommend that you make enough for a couple of dinners and that you freeze what you won’t be using immediately that day. It’s easy enough. Place your freshly made ravioli in a single layer on lined baking sheets and into your freezer. 2 to 3 hours later, place the now frozen ravioli into bags or containers and return to the freezer. When needed, do not thaw before placing into boiling water, reduce to soft simmer, and cook till done to your liking, normally a few minutes longer than if freshly made.

And for heaven’s sake, keep an eye on Max at all times!

*     *     *

The Apple Thingamajig

I’d planned to start this post by extolling the apple and its many uses but it’s hard to sing a fruit’s praises when there’s a thingamajig dangling atop your blog, metaphorically speaking, of course.  So, I might as well explain the name of this dish and get it over with — in a minute or two.

I’ve been busy elsewhere the past few days, so, these acknowledgements are a tad late. Last Friday, Kristy, of Eat, Play, Love was kind enough to pass me the Versatile Blogger Award, as did Eva of Kitchen Inspirations the very next day. Kristy’s blog is a family affair, featuring 2 gourmands-in-the-making, Mr. N and Miss A. Her recipes come from around the World and the blog’s stars are adorable. 4 spoons all the way! Eva’s blog is a treat, as well. Visit her blog and you may find yourself having brunch in a Montreal café or sharing a Moroccan feast that she researched and prepared herself. And every post is beautifully photographed. If you haven’t already done so, do yourself a favor and visit these 2 wonderful blogs. And as for the award itself, I am very thankful for the honor but, having just received this award a week ago, I won’t be passing it along. (As I mentioned to Kristy, I fear putting us all into some sort of infinite loop.) I will, however, refer you to my post of a week ago. Now, about that thingamajig …

Several years ago, at about this time of the year, my cooking shows were all featuring apple pies. Now, I love apple pie but had shied away from making them because my pie crusts were terrible and the poor apples turned to mush. That Fall, I decided to teach myself how to bake a pie and, every week to 10 days, I baked an apple pie. Well, with parents who were children of the Great Depression, we learned very early on that one  never wastes food. Period. So, if I made a pie, I ate a pie. True, eventually my pies got better and I was confident enough to share them with friends — but I ate a whole lotta pie before then. Still, even though I eventually settled on recipes for both crust and filling, one pie is a lot if you live alone, as Zia and I often commiserated. As a result, neither of us baked apple pie because we didn’t want to be greeted by the same pie every time we entered our kitchens for the next week or so. That was until 2 years ago. It was about that time that we both saw cooks on television prepare apples in a form that was part pie and part tart. They called them “open-faced” pies or tarts but, to our minds, they’re neither. So, we started calling them apple “thingamajigs” and the confusion ended, at least between the two of us. Best of all, an apple thingamajig is half the size of a pie and, therefore, better suited to our swinging single lifestyles.

Now, there are plenty of recipes around for thingamajigs and mine is based upon my apple pie recipe, with one notable exception. I include cheddar cheese in my apple pie crust but not here. Being a thingamajig has only one crust, the cheddar cheese flavor is too mild to be noticed and adding more cheese to the recipe only serves to make the crust unmanageable. So, the cheddar is reserved for double-crusted pies and it’s probably just as well. (My apple pie recipe with a cheddar crust is forthcoming.) A thingamajig, being open-faced, is less “runny” than a normal pie due to evaporation during baking. (See Notes.) As you’ll see and much to my liking, the apple slices remain firm and more apple flavor retained. As for the apples themselves, I always use tart apples, preferably Granny Smith, but I also add a sweet one — Fuji or Honeycrisp — to the filling, usually in a 3 tart to 1 sweet apple ratio. That way, you get an occasional taste of sweet among the sour. Raisins or currants will do the same. To that end, I don’t use a lot of sugar nor a number of spices in my apple filling. Why use tart apples if you’re going to add a ton of sugar and spice to the filling? For me, when it comes to apple filling, less is more.

*     *     *

The Apple Thingamajig Recipe

Ingredients

  • For Pie Crust
    • 1 1/2 cups AP flour
    • 1/4 tsp salt
    • 5 tbsp vegetable shortening, cut into cubes and well-chilled
    • 4 tbsp unsalted butter, cut into cubes and well-chilled
    • 3 tbsp ice water
    • 1 tbsp cider vinegar

  • For Apple Filling
    • 3 Granny Smiths (or similar, tart apples) peeled, cored, and sliced evenly
    • 1 Fuji (or similar, sweet apple) peeled, cored, and sliced evenly
    • 2 tbsp lemon juice
    • 1/4 cup sugar
    • 2 tbsp dark brown sugar
    • 2 tbsp AP flour
    • 1/2 tsp cinnamon
    • 1/8 tsp nutmeg
    • 1/4 tsp salt
    • 1 egg, beaten
    • sugar
    • butter

Directions

  • For Pie Crust
    1. Add flour and salt to the processor. Pulse it a few times to mix the 2 ingredients.
    2. Add the very cold butter & shortening cubes.
    3. Pulse the machine 3 times, with each pulse lasting a 3-count. Your ingredients will now be lightly mixed. If need be, pulse again.
    4. With the machine running, add the vinegar and then slowly add the ice water. Do not add so much that a ball of dough forms. Remove the lid and, with your hands, test the dough to see if a ball of dough can be formed.
      1. If so, turn the dough until a very lightly floured service, form a ball, wrap it in plastic wrap, and refrigerate for 30 minutes.
      2. If a dough ball will not form, add a little more water, pulse the machine a couple of times, and test it again. When you can form a ball of dough, follow step A above.
    5. While the dough rests in the fridge, prepare the filling.

  • For Apple Filling
    1. In a large mixing bowl, combine the apple slices and lemon juice. Stir to coat the apples.
    2. In a small bowl, mix together the sugar, brown sugar, flour, cinnamon, nutmeg, and salt.
    3. Add the spice mixture to the apples and gently stir until the apples are coated evenly.
    4. Set aside until the pie crust is ready.


  • Assembly
    1. Roll the dough as if making a bottom crust for a 9 inch pie.
    2. Place the apples in the center of the dough circle, leaving a 2 inch border around the filling. Creative types may wish to carefully place the apples in a circular design. (That is soo not me.)
    3. Carefully lift the border, working your way around the filling, crimping as needed. You are creating the crust for your open-faced thingamajig.
    4. Dot the top of the apple filling with small bits of butter.
    5. With a pastry brush, lightly coat the exposed crust with the beaten egg. Sprinkle the sugar.
    6. Place in a pre-heated 375* oven and bake for 40 to 45 minutes or until golden brown.
    7. Should not be served piping hot but may be served warm.

*     *     *

Variations

Just like its cousins the tart and pie, you can add ingredients to the filling to suit your own tastes. In the past, I’ve added raisins, currants, and chopped walnuts to the filling and enjoyed each. And, of course, you can change this dessert completely by selecting different apples. I like tart; you may prefer sweet. Lucky for us, there are plenty of apples to choose from.

*     *     *

Notes

Because there are fewer pie juices to contain, this pie crust can be rolled thinner than you would for a pie and, as a result, you can easily make 2 thingamajigs — as I often do and did today. I keep one for myself and give the other to a friend.  I believe it was Confucius who said, “It is easier to give someone a thingamajig than it is to give half a pie.”

*     *     *

Spaghetti Aglio e Olio

Of all the pasta dishes one might make, spaghetti aglio e olio (spaghetti with garlic & oil) is, by far, the easiest to prepare. Ready in minutes, at its most basic, there are but 3 ingredients to this dish: pasta, garlic, and olive oil. That’s it. Now, understandably, there are many variations to the dish, the most common involve adding grated cheese (romano or parmesan)  and/or chopped red pepperoncini or pepper flakes. I am firmly planted on the side of those who love their pasta aglio e olio served with a few red pepper flakes and a good dusting of grated cheese. Still, even after adding these 2 ingredients, you can see that this is a most uncomplicated dish.

As a young adult still living at the old two-flat, I’d come home after a night out with the boys and, while they were in a drive-thru waiting for their sack o’ sliders, I was already fixing myself a plate of aglio e olio. One of those nights, as I was eating, Zia’s husband, “Uncle,” came down the back stairs to see what I was cooking. After a brief chat, he went back upstairs. A week or two later, the same thing happened but, this time, he mentioned how quickly I had prepared the dish. Realizing the implication, I was ready for him the next time. A couple of weeks later, after a night spent carousing with friends, I set about to make my late night dinner, only this time I slowed things down a bit. Sure enough, Uncle appeared but this time I was just about to add the pasta to the boiling water (butta giù in our house’s parlance). I added enough spaghetti for two and within minutes we were enjoying a late night snack together. We “dined together” several times after that and I always knew that if he didn’t appear by the time I was ready to butta giù, I would be dining alone. To this day, I cannot have a dish of pasta aglio e olio without thinking of those late night dinners together.

Throughout the years, this simple dish has continued to serve me well. After a 10 hour day at the office, I would arrive home and prepare a plate of aglio e olio within minutes. On those days/nights that I tended bar, a dish of this pasta officially marked the end of my day. Even now, if I don’t feel like cooking, I can whip up a batch of spaghetti aglio e olio in a fraction of the time it would take to have a dinner delivered. And I still find it every bit as satisfying as I did those many years ago, although, admittedly, Max is hardly the conversationalist that Uncle was.

*     *     *

Spaghetti Aglio e Olio Recipe 

Ingredients

  • 1 lb spaghetti (cappellini, spaghettini, linguine, or trenette may be used)
  • 1/2 cup extra virgin olive oil
  • 3 – 6 cloves of garlic, diced
  • 1/2 to 1 tsp red pepper flakes or 1 red peperoncino, diced (optional)
  • 1/2 cup grated cheese, separated – romano or parmesan may be used (optional)
  • reserved pasta water
  • chopped parsley, for garnish (optional)
  • grated cheese for serving (optional)

*     *     *

*     *     *

Directions

  1. Bring a large pot of heavily salted water to boil. Add the spaghetti and stir.
  2. Check the spaghetti package’s cooking instructions. About 3 minutes before the spaghetti is supposed to be cooked al dente, begin heating the oil in a deep frying pan. Add the pepper flakes (or peperoncino) & garlic and sauté until the edges of the garlic just begin to turn brown, no more than 2 minutes. Do not allow the garlic to brown completely or, worse yet, to burn. Your pasta should be ready about now.
  3. Reserve 1 cup of the pasta water, strain the pasta, add it to the frying pan, and stir to combine and to coat the pasta.
  4. Add a few ounces of the reserved pasta water to the pan with the pasta, more as needed. Allow the pasta to finish cooking, to your liking.
  5. Before serving, take the pan off of the heat, add all but 2 tbsp of the cheese,  and mix until well coated. Garnish with parsley & the remaining cheese. Serve immediately.

*     *     *

Variations

Since the recipe just presented already modified the original dish to include grated cheese and red pepper flakes, why stop there? About a year ago, I realized that I hadn’t any cheese — Gasp! — after I had already added my pasta to the pot of boiling water. Remembering what I’d seen on a number of cooking shows, I quickly tossed some bread crumbs into a frying pan, added the parsley that was to have been a garnish, and toasted the combination. When my pasta was ready to be served, I topped it off with the toasted bread crumbs — and I’ve done it many times since, sometimes with cheese, sometimes without. As it turns out, using bread crumbs in place of cheese is a Sicilian custom, as Ambrosiana recently verified. (Speaking of Ambrosiana, be sure to check out her blog, Tales of Ambrosia. Not only will you find great recipes & dishes, beautifully photographed, but you’ll be treated to scenes of an Italy that the tour books have yet to discover.)

*     *     *

Let’s have another cup o’ coffee and let’s have another … award?!?!

Aside

Maybe I should start my day with tea or juice or something other than coffee. With the WP problems still around, every day I awake to a fresh batch of posts to view, some as much as a day old. This morning, coffee in hand, I learned that Sawsan of Chef in Disguise had passed to me the Versatile Blogger Award. This was every bit as unexpected as was yesterday’s Liebster Award — and certainly no less appreciated. So, thank you Sawsan for this honor and, for the rest of you, if you’ve not checked out Chef in Disguise, this is your opportunity to do so. Beautifully photographed, Sawsan takes even the most complicated recipes and breaks them down into easy to follow, step-by-step instructions that even a novice like myself can follow. Now that’s something!

As for the Award, I believe I’m expected to share 7 little known facts about myself. So, here goes, in no apparent order:

1. I am an I Love Lucy fan and member of the We Love Lucy Fan club. Honestly, what’s not to love?

2. I’ve mentioned Max a few times and Lucy once. Here are their pics. Max-A-Million is a boxer mix, Lucy a female Eclectus Parrot. Max got his name because it was a million to one shot that he’d end up with me. Lucy, well, look at her pic and read No. 1 above. And, yes, Max’s left eye is partly blue.

3. I’m allergic to penicillin, having found out the “hard way.” Luckily, the doctor who administered the shot insisted I wait 20 minutes before leaving for home. He saved my life.

4. Zia and I once led a procession of the faithful to meet John-Paul II after one of his Wednesday public audiences.

5. A life-long smoker, I quit 2 years ago — and this time it’s for good.

6. If you’re lucky enough to wait on my table in a restaurant, don’t bother reciting the dessert options and you can keep the dessert menu. Just bring me cheesecake and I will be one very happy diner.

7. During high school, I worked at a family owned, Italian foods processing plant.

Well, that’s 7 and it’s too bad I’m limited to only 7. I guess I’ll have to wait until next time before I can talk about my years in the French Foreign Legion, my volunteer work on the island of hangnail sufferers, my prison record, and my contributions to nuclear fusion research.

Now comes the hard part, nominating 15 others for this award. I know a few of the bloggers I follow have recently received this award and, so, I’ll try not to double nominate anyone. And, even though I may have nominated a few of you yesterday for the Liebster Award, that doesn’t mean I don’t want to learn more about you. I hope you don’t mind my mentioning you again. And if I’ve missed anyone, please forgive me.

Um … that’s not 15?

8. I can’t count.

And, thank you again, Sawsan.

*     *     *

Note: I don’t know why there’s no title and cannot get the font back to normal After about a dozen attempts at correcting this — none of which shows up in the drafts — I give up.

No. 9  I’m a quitter!

*     *     *

A cup of coffee and a surprise

I’ve no idea what has been going on with some of my WordPress features. Just this morning my “stats” page seems to have moved residences without leaving so much as a forwarding address. I know it’s here somewhere and I’ll find it sometime during my second cup of coffee. I wish that were the extent of the problems, but NOOOO! For about a week, I didn’t receive any notifications that any of the blogs I followed had posted anything. I had to rely upon emails for the notifications — and then they started to go missing. After that, while checking my admin pages, I noticed that I was no longer subscribed to some of you and so I re-subscribed. And repeated the process the next day with a new batch of blogs to which I, for whatever reason, was no longer subscribed. Over the past 2 weeks , or so, things have gotten better — not fully corrected, but better. Notifications of blog posts arrive in groups, usually a few hours after their authors have posted them, And, I guess it’s just for being patient, I now get 2 identical posts every time! So, this morning, with coffee in hand, I wasn’t quite sure what to expect when I opened my WordPress reader. And there it was, something I would never have expected — and twice!

My blogging friend, Cecelia, of thekitchensgarden nominated me for an award, the Leibster Blog Award. If you’ve not been to her blog, you are missing out on a real treat. Tales from her youth in New Zealand and her life today on a farm here in Illinois are woven together, using recipes as a common thread. Simply wonderful!

Now, back to the Leibster Award. What I love about this Award is that it doesn’t come with any strings attached, meaning no need to examine yourself, your blog, or anything else, for that matter. All I need do is pass the award onto 5 bloggers whose work I read and admire. Well, there’s the rub. I’m certain that I failed to mention some wonderful blogs when I was lucky enough to be given the 7 Links Challenge. It will likely happen again since I can only nominate 5  bloggers here. So, please do not feel slighted if I fail to mention your blog. Ours is a surprisingly small community. If I fail to mention you today, within a week someone else will see to it.

So, with gratitude to Cecilia, I’m going to name these 5 blogs for the Award. All of these are a part of my morning routine. They’re good for a chuckle, a recipe, a bit of knowledge, and, most unfortunately, some first hand accounts of the Summer’s worst weather. I hope anyone who reads this will take a few minutes to check out each of these 5, as well as Cecilia’s. You certainly won’t regret it.

*     *     *

A Zucchini for Your Penne

For the last 10 weeks, or so, my weekends have begun with an early Saturday morning trip to the Evanston Farmers Market. (Sunday mornings are reserved for the Skokie Market.) Granted, my purchases have changed now that Summer is ending but one vegetable I rarely go home without is fresh zucchini. Whether I serve it within Mom’s caponata, stuffed like Grandma’s eggplant, sautéed with onion in olive oil, or served with pasta, a week doesn’t go by without zucchini making at least one appearance at my dinner table. So, when I recently watched Jamie Oliver prep zucchini and yellow squash for a penne dish, I sat up and took notice.

Normally when I prepare these 2 vegetables for my pasta dish, I either cut them into quarter-inch disks or shred them with my food processor. Jamie took them and, with a few simple cuts, fashioned them into penne look-alikes, and then prepared them carbonara-style. You can see his recipe here. I, however, prefer my carbonara cooked the more traditional way, so, I’ve chosen to cook these aglio e olio, with garlic and oil. (Coming soon: the recipe for spaghetti aglio e olio.) You may have a favorite way of fixing zucchini with pasta and I see no reason for you to change now. This post isn’t so much about how to cook the zucchini as it is how to prepare it. Even so, I’ve included general guidelines that I followed when I cooked the dish.

To begin, I selected 2 zucchini and 2 summer squash, each about 6 inches long, to be cooked with 1/2 pound of penne. You can easily see how you can increase or decrease the ratio of vegetables to pasta according to you own preference. Once that was decided, I started preparing the veggies as pictured below. Briefly stated, cut them into quarters; trim away the seed-filled center; and cut, diagonally, into penne-sized strips.

Clever, no? Anyway, to cook, add penne pasta to a pot of salted, boiling water. The package instructions for the penne I used stated the penne would be ready in 13 minutes. As a result, I planned to drain the pasta after cooking for about 10 minutes. So, once the penne is in the water and it has returned to the boil, start the clock. At the 5 minute mark, add about 3 tbsp extra virgin olive oil into a deep frying pan over medium-high heat. Once hot, add 1 or 2 minced cloves of garlic and sauté for about 30 seconds. Add the zucchini and yellow squash, season with salt & pepper, and continue to sauté until the 10 minute mark. Reserve some of the pasta water, drain the pasta, and add the pasta to the pan with the vegetables. Continue to sauté until the pasta is cooked to your liking. Add some of the reserved pasta water, if needed. When cooked al dente, remove from heat and mix in 1/4 cup grated parmesan cheese. Serve immediately, garnished with more cheese and chopped fresh parsley.

As I’ve mentioned, the point here is the preparation of the zucchini and summer squash. If aglio e olio isn’t for you, this dish could just as easily be prepared with a cream or marinara sauce, instead. For the latter, I would sauté the zucchini and summer squash in a little butter, timing them so that they’d be cooked to my liking when the penne is cooked al dente.  Mix the vegetables with the cooked penne and dress both with the marinara. Garnish with a little grated cheese and some chopped parsley before serving immediately.

*     *     *

Don’t sit under that apple tree. Make apple sauce!

I love this time of the year. Here in Chicago, Winter’s relentless, Spring’s nonexistent, Summer’s hot & humid, but Fall, beautiful, wonderful Fall is our reward for putting up with the rest of the year’s weather. The days are warm, the nights cool, the lakefront a thing of beauty and the Park, which borders the Lake for pretty much the full breadth of the City, gradually transforms from lush green to a multi-colored patchwork. As nice as that all sounds and is, truthfully, there’s but one thing missing and, surprisingly, it has little to do with my adoptive home but everything to do with the time of year. It’s apples. I love apples. Cook ’em, bake ’em, turn ’em into sauce. Give me a pie, a tart, a crisp, a cobbler. How about a muffin? A piece of cake? A slice of  bread? A stack of flapjacks? Or, if all else fails, just give one to me raw. Believe me, you cannot go wrong offering me apples in any way, shape, or form.

So, for years, when Fall rolled around, I set about making pies and cobblers, with an occasional loaf of bread or a baked apple thrown in for good measure. This all changed 2 Summers ago when I bought my Roma Sauce Maker. (Do you hear a harp? I always hear a harp when I mention that strainer.) I bought it to process my tomatoes before freezing but I quickly learned that it was good for making apple sauce. Well, that was a game changer around this place.

In prior posts, I’ve mentioned the two boys that live above me with their Mom. The oldest, like most kids, loves sweets of any kind. The youngest is his polar opposite and doesn’t like sweets. Period. This poses a problem for me. I’d love to bring them ice cream, cookies, or whatever it is I’m making in the kitchen but I shy away from it because I don’t want the little guy to feel left out. That, however, was before my Roma Sauce Maker came home. (C’mon! You had to have heard that!) The Li’l Guy, you see, loves apple sauce. So, this time of year, he gets all the apple sauce he wants. That was, until very recently. Now, I CAN, which means the apple sauce I make today can, and will, be given to him next May when I give his brother some cookies, or, in July when I make ice cream for the house. And, best of all, he can still have plenty of apple sauce now, too! There really is an upside to this canning business. Who knew!

Now, as for the sauce, I am by no means an expert but I have had some pretty good luck with it. To begin, I never use anything but apples, a few ounces of organic apple juice, and a pinch of salt. That’s it, no sugar whatsoever and, for that matter, no cinnamon either. I use about 4 kinds of apples, all sweet, for every batch of sauce. This week, as shown, I used Molly Delicious, McIntosh, Honey Crisp, and Regal Gala. Because they’re so small, I selected 7 Galas and 6 of each of the other varieties; their total weight being 10 and a half pounds (4.8 kg). Although there’s no need to core or peel the apples when you use a strainer or food mill,  you still need to cut up the apples. So, I used my corer/slicer and, in about 10 minutes, had all of these in the pot and ready to go. Since I don’t add sugar or cinnamon to my apple sauce, there really isn’t a recipe to share. Instead, I’ll give you the steps that I follow and, as you’ll soon find out, making apple sauce isn’t at all difficult.

First off, select apples known for their sweetness — i.e., Gala, Honey Crisp, McIntosh, Pink Lady, Fuji, Delicious, Macoun, and Golden Delicious, to name a few. Begin by washing all the fruit and, if you have a strainer or food mill, cut the apples into equal-sized slices or chunks. If no strainer, peel and core the apples before chopping the apples. Place the apple pieces into a heavy bottomed sauce pan over medium heat. Add 4 to 6 oz apple juice and simmer, stirring frequently. You want the apple slices to be soft when finished. This could take anywhere from 30 to 60 minutes, depending upon your stove, the pot, the amount of apples, and whether you’ve offended the gods that morning. Once soft, pass the apples through your food strainer or food mill, separating the peel, core, and seeds from the pulp. If you haven’t a strainer or food mill, once the apples are soft enough, you can mash them with a potato masher or force the pulp through a sieve. No matter which method you use, place the resultant pulp into a sauce pan. This is when I season it with a pinch of salt. You may wish to add sugar or cinnamon, to taste. If you’ve chosen your apples carefully, however, I think you’ll be surprised to learn just how sweet it is — and how totally unnecessary the sugar is. At this point, you can place it in your fridge where it will last about a week; cool it and freeze it; or can it.

If you chose to can it, according to the Pick Your Own website, you will need to re-heat the sauce; use clean, sterile jars that are still hot; use sterile tops and lids; and process in a boiling water bath for 15 minutes if using pint containers or 20 minutes if using quarts. Once removed from the boiling bath, place on a towel-covered baking sheet and place in a spot away from drafts where they will remain undisturbed for 12 to 24 hours.

My 10 and a half pounds of apples resulted in 6 pints of apple sauce. I canned 3 pints and froze the remainder in 6 single cup-sized containers. He doesn’t know it yet but there’s going to be one happy little boy living above me.

*     *     *

OK. One last time. Roma Sauce Maker! All right, this time I agree with you. I couldn’t hear the harp because the fanfare was blaring. You did hear the fanfare, right? Right?

*     *     *

Zia’s Corn Relish

Zia's Relish

Growing up, this would have been the time of year when Mom and Zia canned tomatoes. I vaguely remember the canning process itself but I do remember, vividly, being sent down to the cantina, “cellar”, to retrieve a quart or 2 of tomatoes when Mom was making sauce. Being arachnophobic, it took me forever to select jars with the least chance of having a spider lurking behind them. I never did come across a spider but, if I had, Mom surely would have heard the crash of jars smashing on the basement floor. Anyway, as their nests emptied — Mom & Zia’s nests, not the spiders’ — the need for tomatoes shrunk accordingly and eventually they stopped canning them altogether. But they didn’t stop canning. One of the things Zia canned was corn relish. Another condiment, this relish may be used to top any sandwich, sausage, or hamburger. Although not really a side dish, its acidity makes a spoonful or two a good accompaniment for meat or fish and, as was the case with the giardiniera recipe, I’m sure others will be offering serving suggestions as time goes by.

I didn’t set out to make corn relish this Summer and certainly didn’t plan on canning it. Speaking with Zia, I was surprised to learn that she hadn’t made the relish since 2006! Here I thought it had been about 2 years. After our call ended, I searched the web for recipes and none looked all that complicated. I spoke with her again late Friday, knowing that I would be going to the farmers’ market early Saturday morning. After a discussion, I decided to try my hand at it, she gave me the recipe, and I bought all the fresh ingredients at the market the following morning. By noon Saturday, I was canning corn relish and soon there were 4 pints cooling on towels.

*     *     *

*     *     *

The recipe I’m sharing is Zia’s recipe, with the exception of the optional jalapeño. It makes about 7 pints of corn relish and that is too much for me. So, I halved the recipe, using a little more than 5 cups of corn instead of the 10 cups required for her relish. Zia’s recipe calls for 2 cups of white vinegar. I found that most recipes on the web used at least twice that amount and used either white or apple cider vinegar. I happen to love vinegar’s acidity so I used 2 cups of vinegar in my relish, 1 cup of which was white and the other cup cider. Lastly, I prefer a little spice so I added a whole jalapeño, diced, to the mix. The resulting heat was just enough for my palate without being the least bit unbearable.

*     *     *

Zia’s Corn Relish Recipe

Ingredients

  • 10 cups corn kernels (about 16 – 20 ears)
  • 4 cups celery
  • 2 cups green bell pepper, diced
  • 2 cups red bell pepper, diced
  • 1 cup onion, diced
  • 1 whole jalapeño, diced (optional)
  • 1 3/4 cups sugar
  • 2 cups vinegar
  • 2 1/2 tbsp canning or pickling salt
  • 2 tsp celery seed
  • 1/4 cup AP flour mixed with a couple tbsp water
  • 2 tbsp dry mustard
  • 1 tsp turmeric

Directions

  • To prepare the relish
    1. This recipe requires that fresh corn be blanched for 5 minutes before being removed from the cob. Simply place the ears in boiling water for 5 minutes and remove to an ice bath. Once cooled, use a sharp knife to remove the kernels.
    2. In a large, heavy bottomed pot over med-high heat, combine the celery, bell peppers, onion, sugar, vinegar, salt, celery seed, and jalapeño, if using. Bring to a boil, stir occasionally, reduce and simmer for 5 minutes.
    3. Add the turmeric, mustard, corn, and the flour with water to the relish. Simmer for an additional 5 minutes and begin canning process.
  • To can the relish
    • The only canning instructions I received from Zia was to process the jars for 15 minutes in a boiling water bath. Now, that would have meant absolutely nothing to me but a few short weeks ago. Instead, today, I knew exactly what she meant. Nevertheless, I wanted — OK, needed — some sort of official validation that I was going to can this relish correctly, Once again, I turned to the Pick Your Own website where, lo and behold, there was a section about making and canning homemade corn relish. Their recipe is very similar to Zia’s and their canning instructions are laid out, step-by-step.

*     *     *

And so ends — and, believe me, I do mean “ends” — my brief and thoroughly unexpected visit to Cannery Row for 2011.

*     *     *

Italian Lemonade and Godmothers

If you’ve come to this blog entry hoping to find quaint stories about my Italian Godmother sipping lemonade, you’re going to be disappointed. You see, today’s entry will introduce 2 cocktails, a godmother and Italian lemonade, and although Zia, my Godmother, might enjoy them, she really has little to do with either.  No, these cocktails came to me by way of my Trusty Traveling Companion, a man who at one time was a rather celebrated bartender in these parts. And with this being an Italian recipe blog, you couldn’t find a better place to present 2 amaretto cocktails. Not only that, since it was he who introduced me to these cocktails, I asked that he supply the images that accompany this post, thereby introducing them to you.

He introduced me to the first cocktail, a godmother, during our first trip together, in Italy. Even if a bit “potent,” it quickly became a favorite and we spent many a cocktail hour sipping godmothers as we penned postcards to friends and family back home. Heaven knows how many actually made it to their destinations but we sure did have a good time writing them. He introduced me to the second cocktail, Italian lemonade, earlier this Summer. Think of it as a godmother-light and, being a bit diluted by the lemonade, it will make a great drink for a Labor Day barbecue or picnic.

Oh! For those of you who googled “Italian godmother lemonade” and, disappointed, found yourselves at this blog but continued to read to this point anyway, I’ve a treat for you. “Justin Bieber,” “Lady Gaga,”  “Casey Anthony,” and “nude pictures of   “.  See? Now you have plenty of misdirected company, each of whom probably far more disappointed than you.

*     *     *

Godmother Recipe

Ingredients

  • Amaretto di Saronno
  • Stolichnaya Vanilla Vodka
  • lemon slices and/or mint sprigs for garnish (optional)

Directions

  1. Combine equal amounts of amaretto and vodka into a cocktail shaker, mix well, and pour into ice-filled “rock” glasses. Add garnish, if desired.

*     *     *

Italian Lemonade Recipe

Ingredients

  • Amaretto di Saronno
  • Premium Vodka
  • Lemonade (pink optional)
  • Fresh berries, lemon slice, or mint for garnish (optional)

Directions

  1. These are best made by the pitcher, or a similarly large amount, following a 7:2:1 ratio. That’s 7 parts lemonade and 2 parts vodka for every 1 part amaretto. Mix thoroughly, pour over ice into tall glasses, and add the garnish of your choice.

*     *     *

Notes

Pictured, the Italian Lemonades have been served in tall glasses, the rims of which have been dipped in colored sugar. This sugar can be found among the cake decorating supplies of your local grocery or made at home. Just combine 1/3 cup of granulated sugar with a few drops of food coloring. Once you have the sugar, place it in a bowl just wide enough to fit the top of the glass. Start with a clean, dry cocktail glass. Use a lemon slice to moisten its rim and then invert and dip the glass momentarily into the sugar. Remove the glass from the sugar, set upright, and fill with ice and the cocktail, being careful not to over-pour or in any way disturb the sugar-coating.

*     *     *

Chicken gizzards? No way!

Admittedly, dishes featuring chicken gizzards are a hard sell and some of you will go no further than the picture above (Just click HERE, Cynthia.) and that’s fine.  Believe me, the majority of my family will be going with you. Since this blog was conceived as a means of recording and sharing my family’s recipes, however, I’d be remiss if I failed to mention these two. Who knows? Some future Bartolini Clan member may wish to know how to cook chicken gizzards and they won’t need to look any further than right here.

Mom and Zia were little girls when the Great Depression struck and our family, like so many others, was hit hard. By all accounts, these were lean times and our Grandparents struggled to put food on the table and keep a roof over their heads. Both Bartolini Girls marvel(ed) at how Grandma could make a single chicken last a full week, feeding a family of four in the process. Well, that’s when she could get a chicken. Both of today’s recipes come from that time. Mom often served us the first, a side dish of peas with gizzards, when I was growing up. No need to explain why it wasn’t an especially popular dish with my siblings. The second is a pasta dish that I “created” on my own. I remember telling Mom about it and, somewhat surprised, she recalled that Grandma used to make the same dish. Zia has mentioned that, as well. Since neither had ever mentioned or served me this pasta, I think it’s a sign that Grandma wants this dish prepared and, by sharing it here, I’m just doing my part to see that her wish is carried out.

I can’t speak of packaging during the Depression but, in today’s markets, one can usually find chicken gizzards and hearts sold together in 1 pound containers. Once cleaned and trimmed, I’ll divide them, with a quarter being reserved for the peas dish and the rest for pasta. One of the 2 portions will be set aside, even frozen, for later use. Cooking these meats can be a little tricky. To brown them like one would, say, beef chunks for stew, will render them nearly inedible. That shouldn’t be a problem if you follow the steps outlined in the recipes that follow.

*     *     *

Peas alla Nonna Recipe (aka Chicken Gizzards with Peas)

Ingredients

  • 5 or 6 oz chicken gizzards & hearts, cleaned and trimmed
  • 1/2 small onion, divided in halves
  • water
  • 1 tbsp olive oil
  • 2 tbsp butter
  • 1 plum tomato, chopped
  • 2 cups frozen or fresh peas
  • pinch of cloves
  • salt and pepper, to taste

Directions

  1. Place gizzards, half of the onion, and enough lightly salted water to cover into a medium saucepan, Cover, bring to a boil over med-high heat, and reduce to a soft simmer. Cook for 1 hour, checking periodically to ensure enough water remains. At the end of an hour, pour the pan’s contents through a strainer, discarding the onion and stewing liquid.
  2. Slice the remaining onion portion and roughly chop the stewed meat.
  3. In the same pan, heat oil and butter over medium high heat. Return gizzards to the pan, along with the sliced onion, and sauté until the onion is soft and translucent.
  4. Add tomato and sauté for a minute before adding peas, cloves, and a few tbsp of water to the pan. Season with salt and pepper, cover, and cook about 5 minutes or until peas are done to you liking.
  5. Serve immediately.

*     *     *

Pasta with Chicken Gizzards Recipe

Ingredients

  • 12 – 16 oz chicken gizzards & hearts, cleaned & trimmed
  • 2 tbsp extra virgin olive oil
  • 1/2 onion, chopped
  • 3 cloves garlic, minced
  • 1/2 cup dry white wine
  • 2 to 3 tbsp tomato paste
  • 1 large (28 oz) can tomatoes, whole or diced
  • 3 tbsp fresh parsley, chopped
  • 1 lb pasta, cooked to not quite al dente
  • grated parmesan cheese
  • salt and pepper, to taste

Directions

  1. Heat oil in a deep skillet over medium heat. Add gizzards and cook for 5 minutes. Do not allow to burn.
  2. Add onion, season with salt and pepper, and cook until translucent.
  3. Add garlic and sauté for 1 minute before adding the wine. Cook until almost all the wine has evaporated.
  4. Add the tomato paste and sauté for 1 to 2 minutes. Add parsley and tomatoes. If using whole tomatoes, tear them apart before adding to the pan. Season with salt and pepper.
  5. Bring to a boil, cover partially, and reduce to a soft simmer.
  6. The sauce should cook for 45 minutes. Check the pasta’s package directions and time its cooking so that the pasta is about 2 minutes shy of being al dente when the sauce is ready.
  7. Reserve some of the pasta water before adding the pasta to the frying pan. Mix well and continue cooking until the pasta is done to your liking. Add some of the reserved pasta water to the pan if the pasta becomes dry during this last step of the cooking process.
  8. Serve immediately, garnished with the grated parmesan cheese.

*     *     *

Notes

And so ends our treatment of chicken gizzards and hearts. Oh, don’t you worry. We’ll be coming back to these ingredients when the Bartolini Family Risotto recipe is shared. That won’t be for a while, however, so, all you chickens out there can rest easy. Your giblets are safe — for now.

*     *     *