The Apple Thingamajig

I’d planned to start this post by extolling the apple and its many uses but it’s hard to sing a fruit’s praises when there’s a thingamajig dangling atop your blog, metaphorically speaking, of course.  So, I might as well explain the name of this dish and get it over with — in a minute or two.

I’ve been busy elsewhere the past few days, so, these acknowledgements are a tad late. Last Friday, Kristy, of Eat, Play, Love was kind enough to pass me the Versatile Blogger Award, as did Eva of Kitchen Inspirations the very next day. Kristy’s blog is a family affair, featuring 2 gourmands-in-the-making, Mr. N and Miss A. Her recipes come from around the World and the blog’s stars are adorable. 4 spoons all the way! Eva’s blog is a treat, as well. Visit her blog and you may find yourself having brunch in a Montreal café or sharing a Moroccan feast that she researched and prepared herself. And every post is beautifully photographed. If you haven’t already done so, do yourself a favor and visit these 2 wonderful blogs. And as for the award itself, I am very thankful for the honor but, having just received this award a week ago, I won’t be passing it along. (As I mentioned to Kristy, I fear putting us all into some sort of infinite loop.) I will, however, refer you to my post of a week ago. Now, about that thingamajig …

Several years ago, at about this time of the year, my cooking shows were all featuring apple pies. Now, I love apple pie but had shied away from making them because my pie crusts were terrible and the poor apples turned to mush. That Fall, I decided to teach myself how to bake a pie and, every week to 10 days, I baked an apple pie. Well, with parents who were children of the Great Depression, we learned very early on that one  never wastes food. Period. So, if I made a pie, I ate a pie. True, eventually my pies got better and I was confident enough to share them with friends — but I ate a whole lotta pie before then. Still, even though I eventually settled on recipes for both crust and filling, one pie is a lot if you live alone, as Zia and I often commiserated. As a result, neither of us baked apple pie because we didn’t want to be greeted by the same pie every time we entered our kitchens for the next week or so. That was until 2 years ago. It was about that time that we both saw cooks on television prepare apples in a form that was part pie and part tart. They called them “open-faced” pies or tarts but, to our minds, they’re neither. So, we started calling them apple “thingamajigs” and the confusion ended, at least between the two of us. Best of all, an apple thingamajig is half the size of a pie and, therefore, better suited to our swinging single lifestyles.

Now, there are plenty of recipes around for thingamajigs and mine is based upon my apple pie recipe, with one notable exception. I include cheddar cheese in my apple pie crust but not here. Being a thingamajig has only one crust, the cheddar cheese flavor is too mild to be noticed and adding more cheese to the recipe only serves to make the crust unmanageable. So, the cheddar is reserved for double-crusted pies and it’s probably just as well. (My apple pie recipe with a cheddar crust is forthcoming.) A thingamajig, being open-faced, is less “runny” than a normal pie due to evaporation during baking. (See Notes.) As you’ll see and much to my liking, the apple slices remain firm and more apple flavor retained. As for the apples themselves, I always use tart apples, preferably Granny Smith, but I also add a sweet one — Fuji or Honeycrisp — to the filling, usually in a 3 tart to 1 sweet apple ratio. That way, you get an occasional taste of sweet among the sour. Raisins or currants will do the same. To that end, I don’t use a lot of sugar nor a number of spices in my apple filling. Why use tart apples if you’re going to add a ton of sugar and spice to the filling? For me, when it comes to apple filling, less is more.

*     *     *

The Apple Thingamajig Recipe

Ingredients

  • For Pie Crust
    • 1 1/2 cups AP flour
    • 1/4 tsp salt
    • 5 tbsp vegetable shortening, cut into cubes and well-chilled
    • 4 tbsp unsalted butter, cut into cubes and well-chilled
    • 3 tbsp ice water
    • 1 tbsp cider vinegar

  • For Apple Filling
    • 3 Granny Smiths (or similar, tart apples) peeled, cored, and sliced evenly
    • 1 Fuji (or similar, sweet apple) peeled, cored, and sliced evenly
    • 2 tbsp lemon juice
    • 1/4 cup sugar
    • 2 tbsp dark brown sugar
    • 2 tbsp AP flour
    • 1/2 tsp cinnamon
    • 1/8 tsp nutmeg
    • 1/4 tsp salt
    • 1 egg, beaten
    • sugar
    • butter

Directions

  • For Pie Crust
    1. Add flour and salt to the processor. Pulse it a few times to mix the 2 ingredients.
    2. Add the very cold butter & shortening cubes.
    3. Pulse the machine 3 times, with each pulse lasting a 3-count. Your ingredients will now be lightly mixed. If need be, pulse again.
    4. With the machine running, add the vinegar and then slowly add the ice water. Do not add so much that a ball of dough forms. Remove the lid and, with your hands, test the dough to see if a ball of dough can be formed.
      1. If so, turn the dough until a very lightly floured service, form a ball, wrap it in plastic wrap, and refrigerate for 30 minutes.
      2. If a dough ball will not form, add a little more water, pulse the machine a couple of times, and test it again. When you can form a ball of dough, follow step A above.
    5. While the dough rests in the fridge, prepare the filling.

  • For Apple Filling
    1. In a large mixing bowl, combine the apple slices and lemon juice. Stir to coat the apples.
    2. In a small bowl, mix together the sugar, brown sugar, flour, cinnamon, nutmeg, and salt.
    3. Add the spice mixture to the apples and gently stir until the apples are coated evenly.
    4. Set aside until the pie crust is ready.


  • Assembly
    1. Roll the dough as if making a bottom crust for a 9 inch pie.
    2. Place the apples in the center of the dough circle, leaving a 2 inch border around the filling. Creative types may wish to carefully place the apples in a circular design. (That is soo not me.)
    3. Carefully lift the border, working your way around the filling, crimping as needed. You are creating the crust for your open-faced thingamajig.
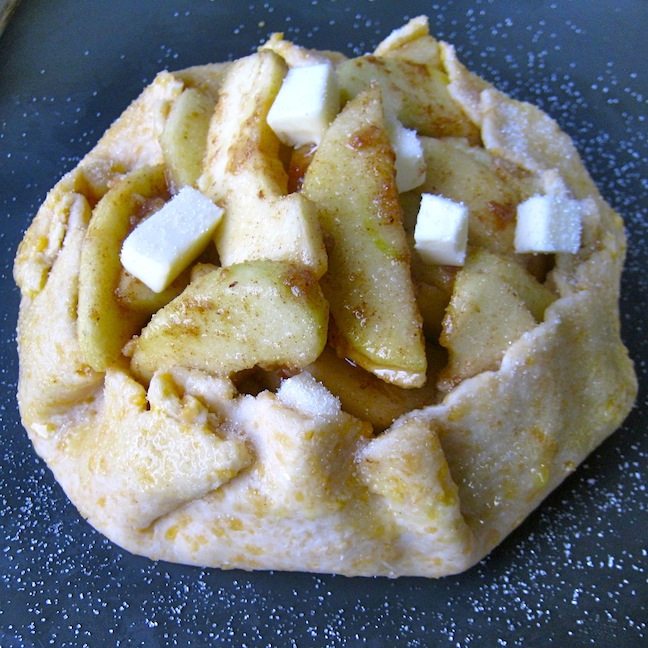
    4. Dot the top of the apple filling with small bits of butter.
    5. With a pastry brush, lightly coat the exposed crust with the beaten egg. Sprinkle the sugar.
    6. Place in a pre-heated 375* oven and bake for 40 to 45 minutes or until golden brown.
    7. Should not be served piping hot but may be served warm.

*     *     *

Variations

Just like its cousins the tart and pie, you can add ingredients to the filling to suit your own tastes. In the past, I’ve added raisins, currants, and chopped walnuts to the filling and enjoyed each. And, of course, you can change this dessert completely by selecting different apples. I like tart; you may prefer sweet. Lucky for us, there are plenty of apples to choose from.

*     *     *

Notes

Because there are fewer pie juices to contain, this pie crust can be rolled thinner than you would for a pie and, as a result, you can easily make 2 thingamajigs — as I often do and did today. I keep one for myself and give the other to a friend.  I believe it was Confucius who said, “It is easier to give someone a thingamajig than it is to give half a pie.”

*     *     *

Spaghetti Aglio e Olio

Of all the pasta dishes one might make, spaghetti aglio e olio (spaghetti with garlic & oil) is, by far, the easiest to prepare. Ready in minutes, at its most basic, there are but 3 ingredients to this dish: pasta, garlic, and olive oil. That’s it. Now, understandably, there are many variations to the dish, the most common involve adding grated cheese (romano or parmesan)  and/or chopped red pepperoncini or pepper flakes. I am firmly planted on the side of those who love their pasta aglio e olio served with a few red pepper flakes and a good dusting of grated cheese. Still, even after adding these 2 ingredients, you can see that this is a most uncomplicated dish.

As a young adult still living at the old two-flat, I’d come home after a night out with the boys and, while they were in a drive-thru waiting for their sack o’ sliders, I was already fixing myself a plate of aglio e olio. One of those nights, as I was eating, Zia’s husband, “Uncle,” came down the back stairs to see what I was cooking. After a brief chat, he went back upstairs. A week or two later, the same thing happened but, this time, he mentioned how quickly I had prepared the dish. Realizing the implication, I was ready for him the next time. A couple of weeks later, after a night spent carousing with friends, I set about to make my late night dinner, only this time I slowed things down a bit. Sure enough, Uncle appeared but this time I was just about to add the pasta to the boiling water (butta giù in our house’s parlance). I added enough spaghetti for two and within minutes we were enjoying a late night snack together. We “dined together” several times after that and I always knew that if he didn’t appear by the time I was ready to butta giù, I would be dining alone. To this day, I cannot have a dish of pasta aglio e olio without thinking of those late night dinners together.

Throughout the years, this simple dish has continued to serve me well. After a 10 hour day at the office, I would arrive home and prepare a plate of aglio e olio within minutes. On those days/nights that I tended bar, a dish of this pasta officially marked the end of my day. Even now, if I don’t feel like cooking, I can whip up a batch of spaghetti aglio e olio in a fraction of the time it would take to have a dinner delivered. And I still find it every bit as satisfying as I did those many years ago, although, admittedly, Max is hardly the conversationalist that Uncle was.

*     *     *

Spaghetti Aglio e Olio Recipe 

Ingredients

  • 1 lb spaghetti (cappellini, spaghettini, linguine, or trenette may be used)
  • 1/2 cup extra virgin olive oil
  • 3 – 6 cloves of garlic, diced
  • 1/2 to 1 tsp red pepper flakes or 1 red peperoncino, diced (optional)
  • 1/2 cup grated cheese, separated – romano or parmesan may be used (optional)
  • reserved pasta water
  • chopped parsley, for garnish (optional)
  • grated cheese for serving (optional)

*     *     *

*     *     *

Directions

  1. Bring a large pot of heavily salted water to boil. Add the spaghetti and stir.
  2. Check the spaghetti package’s cooking instructions. About 3 minutes before the spaghetti is supposed to be cooked al dente, begin heating the oil in a deep frying pan. Add the pepper flakes (or peperoncino) & garlic and sauté until the edges of the garlic just begin to turn brown, no more than 2 minutes. Do not allow the garlic to brown completely or, worse yet, to burn. Your pasta should be ready about now.
  3. Reserve 1 cup of the pasta water, strain the pasta, add it to the frying pan, and stir to combine and to coat the pasta.
  4. Add a few ounces of the reserved pasta water to the pan with the pasta, more as needed. Allow the pasta to finish cooking, to your liking.
  5. Before serving, take the pan off of the heat, add all but 2 tbsp of the cheese,  and mix until well coated. Garnish with parsley & the remaining cheese. Serve immediately.

*     *     *

Variations

Since the recipe just presented already modified the original dish to include grated cheese and red pepper flakes, why stop there? About a year ago, I realized that I hadn’t any cheese — Gasp! — after I had already added my pasta to the pot of boiling water. Remembering what I’d seen on a number of cooking shows, I quickly tossed some bread crumbs into a frying pan, added the parsley that was to have been a garnish, and toasted the combination. When my pasta was ready to be served, I topped it off with the toasted bread crumbs — and I’ve done it many times since, sometimes with cheese, sometimes without. As it turns out, using bread crumbs in place of cheese is a Sicilian custom, as Ambrosiana recently verified. (Speaking of Ambrosiana, be sure to check out her blog, Tales of Ambrosia. Not only will you find great recipes & dishes, beautifully photographed, but you’ll be treated to scenes of an Italy that the tour books have yet to discover.)

*     *     *

A Zucchini for Your Penne

For the last 10 weeks, or so, my weekends have begun with an early Saturday morning trip to the Evanston Farmers Market. (Sunday mornings are reserved for the Skokie Market.) Granted, my purchases have changed now that Summer is ending but one vegetable I rarely go home without is fresh zucchini. Whether I serve it within Mom’s caponata, stuffed like Grandma’s eggplant, sautéed with onion in olive oil, or served with pasta, a week doesn’t go by without zucchini making at least one appearance at my dinner table. So, when I recently watched Jamie Oliver prep zucchini and yellow squash for a penne dish, I sat up and took notice.

Normally when I prepare these 2 vegetables for my pasta dish, I either cut them into quarter-inch disks or shred them with my food processor. Jamie took them and, with a few simple cuts, fashioned them into penne look-alikes, and then prepared them carbonara-style. You can see his recipe here. I, however, prefer my carbonara cooked the more traditional way, so, I’ve chosen to cook these aglio e olio, with garlic and oil. (Coming soon: the recipe for spaghetti aglio e olio.) You may have a favorite way of fixing zucchini with pasta and I see no reason for you to change now. This post isn’t so much about how to cook the zucchini as it is how to prepare it. Even so, I’ve included general guidelines that I followed when I cooked the dish.

To begin, I selected 2 zucchini and 2 summer squash, each about 6 inches long, to be cooked with 1/2 pound of penne. You can easily see how you can increase or decrease the ratio of vegetables to pasta according to you own preference. Once that was decided, I started preparing the veggies as pictured below. Briefly stated, cut them into quarters; trim away the seed-filled center; and cut, diagonally, into penne-sized strips.

Clever, no? Anyway, to cook, add penne pasta to a pot of salted, boiling water. The package instructions for the penne I used stated the penne would be ready in 13 minutes. As a result, I planned to drain the pasta after cooking for about 10 minutes. So, once the penne is in the water and it has returned to the boil, start the clock. At the 5 minute mark, add about 3 tbsp extra virgin olive oil into a deep frying pan over medium-high heat. Once hot, add 1 or 2 minced cloves of garlic and sauté for about 30 seconds. Add the zucchini and yellow squash, season with salt & pepper, and continue to sauté until the 10 minute mark. Reserve some of the pasta water, drain the pasta, and add the pasta to the pan with the vegetables. Continue to sauté until the pasta is cooked to your liking. Add some of the reserved pasta water, if needed. When cooked al dente, remove from heat and mix in 1/4 cup grated parmesan cheese. Serve immediately, garnished with more cheese and chopped fresh parsley.

As I’ve mentioned, the point here is the preparation of the zucchini and summer squash. If aglio e olio isn’t for you, this dish could just as easily be prepared with a cream or marinara sauce, instead. For the latter, I would sauté the zucchini and summer squash in a little butter, timing them so that they’d be cooked to my liking when the penne is cooked al dente.  Mix the vegetables with the cooked penne and dress both with the marinara. Garnish with a little grated cheese and some chopped parsley before serving immediately.

*     *     *

Don’t sit under that apple tree. Make apple sauce!

I love this time of the year. Here in Chicago, Winter’s relentless, Spring’s nonexistent, Summer’s hot & humid, but Fall, beautiful, wonderful Fall is our reward for putting up with the rest of the year’s weather. The days are warm, the nights cool, the lakefront a thing of beauty and the Park, which borders the Lake for pretty much the full breadth of the City, gradually transforms from lush green to a multi-colored patchwork. As nice as that all sounds and is, truthfully, there’s but one thing missing and, surprisingly, it has little to do with my adoptive home but everything to do with the time of year. It’s apples. I love apples. Cook ’em, bake ’em, turn ’em into sauce. Give me a pie, a tart, a crisp, a cobbler. How about a muffin? A piece of cake? A slice of  bread? A stack of flapjacks? Or, if all else fails, just give one to me raw. Believe me, you cannot go wrong offering me apples in any way, shape, or form.

So, for years, when Fall rolled around, I set about making pies and cobblers, with an occasional loaf of bread or a baked apple thrown in for good measure. This all changed 2 Summers ago when I bought my Roma Sauce Maker. (Do you hear a harp? I always hear a harp when I mention that strainer.) I bought it to process my tomatoes before freezing but I quickly learned that it was good for making apple sauce. Well, that was a game changer around this place.

In prior posts, I’ve mentioned the two boys that live above me with their Mom. The oldest, like most kids, loves sweets of any kind. The youngest is his polar opposite and doesn’t like sweets. Period. This poses a problem for me. I’d love to bring them ice cream, cookies, or whatever it is I’m making in the kitchen but I shy away from it because I don’t want the little guy to feel left out. That, however, was before my Roma Sauce Maker came home. (C’mon! You had to have heard that!) The Li’l Guy, you see, loves apple sauce. So, this time of year, he gets all the apple sauce he wants. That was, until very recently. Now, I CAN, which means the apple sauce I make today can, and will, be given to him next May when I give his brother some cookies, or, in July when I make ice cream for the house. And, best of all, he can still have plenty of apple sauce now, too! There really is an upside to this canning business. Who knew!

Now, as for the sauce, I am by no means an expert but I have had some pretty good luck with it. To begin, I never use anything but apples, a few ounces of organic apple juice, and a pinch of salt. That’s it, no sugar whatsoever and, for that matter, no cinnamon either. I use about 4 kinds of apples, all sweet, for every batch of sauce. This week, as shown, I used Molly Delicious, McIntosh, Honey Crisp, and Regal Gala. Because they’re so small, I selected 7 Galas and 6 of each of the other varieties; their total weight being 10 and a half pounds (4.8 kg). Although there’s no need to core or peel the apples when you use a strainer or food mill,  you still need to cut up the apples. So, I used my corer/slicer and, in about 10 minutes, had all of these in the pot and ready to go. Since I don’t add sugar or cinnamon to my apple sauce, there really isn’t a recipe to share. Instead, I’ll give you the steps that I follow and, as you’ll soon find out, making apple sauce isn’t at all difficult.

First off, select apples known for their sweetness — i.e., Gala, Honey Crisp, McIntosh, Pink Lady, Fuji, Delicious, Macoun, and Golden Delicious, to name a few. Begin by washing all the fruit and, if you have a strainer or food mill, cut the apples into equal-sized slices or chunks. If no strainer, peel and core the apples before chopping the apples. Place the apple pieces into a heavy bottomed sauce pan over medium heat. Add 4 to 6 oz apple juice and simmer, stirring frequently. You want the apple slices to be soft when finished. This could take anywhere from 30 to 60 minutes, depending upon your stove, the pot, the amount of apples, and whether you’ve offended the gods that morning. Once soft, pass the apples through your food strainer or food mill, separating the peel, core, and seeds from the pulp. If you haven’t a strainer or food mill, once the apples are soft enough, you can mash them with a potato masher or force the pulp through a sieve. No matter which method you use, place the resultant pulp into a sauce pan. This is when I season it with a pinch of salt. You may wish to add sugar or cinnamon, to taste. If you’ve chosen your apples carefully, however, I think you’ll be surprised to learn just how sweet it is — and how totally unnecessary the sugar is. At this point, you can place it in your fridge where it will last about a week; cool it and freeze it; or can it.

If you chose to can it, according to the Pick Your Own website, you will need to re-heat the sauce; use clean, sterile jars that are still hot; use sterile tops and lids; and process in a boiling water bath for 15 minutes if using pint containers or 20 minutes if using quarts. Once removed from the boiling bath, place on a towel-covered baking sheet and place in a spot away from drafts where they will remain undisturbed for 12 to 24 hours.

My 10 and a half pounds of apples resulted in 6 pints of apple sauce. I canned 3 pints and froze the remainder in 6 single cup-sized containers. He doesn’t know it yet but there’s going to be one happy little boy living above me.

*     *     *

OK. One last time. Roma Sauce Maker! All right, this time I agree with you. I couldn’t hear the harp because the fanfare was blaring. You did hear the fanfare, right? Right?

*     *     *

Zia’s Corn Relish

Zia's Relish

Growing up, this would have been the time of year when Mom and Zia canned tomatoes. I vaguely remember the canning process itself but I do remember, vividly, being sent down to the cantina, “cellar”, to retrieve a quart or 2 of tomatoes when Mom was making sauce. Being arachnophobic, it took me forever to select jars with the least chance of having a spider lurking behind them. I never did come across a spider but, if I had, Mom surely would have heard the crash of jars smashing on the basement floor. Anyway, as their nests emptied — Mom & Zia’s nests, not the spiders’ — the need for tomatoes shrunk accordingly and eventually they stopped canning them altogether. But they didn’t stop canning. One of the things Zia canned was corn relish. Another condiment, this relish may be used to top any sandwich, sausage, or hamburger. Although not really a side dish, its acidity makes a spoonful or two a good accompaniment for meat or fish and, as was the case with the giardiniera recipe, I’m sure others will be offering serving suggestions as time goes by.

I didn’t set out to make corn relish this Summer and certainly didn’t plan on canning it. Speaking with Zia, I was surprised to learn that she hadn’t made the relish since 2006! Here I thought it had been about 2 years. After our call ended, I searched the web for recipes and none looked all that complicated. I spoke with her again late Friday, knowing that I would be going to the farmers’ market early Saturday morning. After a discussion, I decided to try my hand at it, she gave me the recipe, and I bought all the fresh ingredients at the market the following morning. By noon Saturday, I was canning corn relish and soon there were 4 pints cooling on towels.

*     *     *

*     *     *

The recipe I’m sharing is Zia’s recipe, with the exception of the optional jalapeño. It makes about 7 pints of corn relish and that is too much for me. So, I halved the recipe, using a little more than 5 cups of corn instead of the 10 cups required for her relish. Zia’s recipe calls for 2 cups of white vinegar. I found that most recipes on the web used at least twice that amount and used either white or apple cider vinegar. I happen to love vinegar’s acidity so I used 2 cups of vinegar in my relish, 1 cup of which was white and the other cup cider. Lastly, I prefer a little spice so I added a whole jalapeño, diced, to the mix. The resulting heat was just enough for my palate without being the least bit unbearable.

*     *     *

Zia’s Corn Relish Recipe

Ingredients

  • 10 cups corn kernels (about 16 – 20 ears)
  • 4 cups celery
  • 2 cups green bell pepper, diced
  • 2 cups red bell pepper, diced
  • 1 cup onion, diced
  • 1 whole jalapeño, diced (optional)
  • 1 3/4 cups sugar
  • 2 cups vinegar
  • 2 1/2 tbsp canning or pickling salt
  • 2 tsp celery seed
  • 1/4 cup AP flour mixed with a couple tbsp water
  • 2 tbsp dry mustard
  • 1 tsp turmeric

Directions

  • To prepare the relish
    1. This recipe requires that fresh corn be blanched for 5 minutes before being removed from the cob. Simply place the ears in boiling water for 5 minutes and remove to an ice bath. Once cooled, use a sharp knife to remove the kernels.
    2. In a large, heavy bottomed pot over med-high heat, combine the celery, bell peppers, onion, sugar, vinegar, salt, celery seed, and jalapeño, if using. Bring to a boil, stir occasionally, reduce and simmer for 5 minutes.
    3. Add the turmeric, mustard, corn, and the flour with water to the relish. Simmer for an additional 5 minutes and begin canning process.
  • To can the relish
    • The only canning instructions I received from Zia was to process the jars for 15 minutes in a boiling water bath. Now, that would have meant absolutely nothing to me but a few short weeks ago. Instead, today, I knew exactly what she meant. Nevertheless, I wanted — OK, needed — some sort of official validation that I was going to can this relish correctly, Once again, I turned to the Pick Your Own website where, lo and behold, there was a section about making and canning homemade corn relish. Their recipe is very similar to Zia’s and their canning instructions are laid out, step-by-step.

*     *     *

And so ends — and, believe me, I do mean “ends” — my brief and thoroughly unexpected visit to Cannery Row for 2011.

*     *     *

Italian Lemonade and Godmothers

If you’ve come to this blog entry hoping to find quaint stories about my Italian Godmother sipping lemonade, you’re going to be disappointed. You see, today’s entry will introduce 2 cocktails, a godmother and Italian lemonade, and although Zia, my Godmother, might enjoy them, she really has little to do with either.  No, these cocktails came to me by way of my Trusty Traveling Companion, a man who at one time was a rather celebrated bartender in these parts. And with this being an Italian recipe blog, you couldn’t find a better place to present 2 amaretto cocktails. Not only that, since it was he who introduced me to these cocktails, I asked that he supply the images that accompany this post, thereby introducing them to you.

He introduced me to the first cocktail, a godmother, during our first trip together, in Italy. Even if a bit “potent,” it quickly became a favorite and we spent many a cocktail hour sipping godmothers as we penned postcards to friends and family back home. Heaven knows how many actually made it to their destinations but we sure did have a good time writing them. He introduced me to the second cocktail, Italian lemonade, earlier this Summer. Think of it as a godmother-light and, being a bit diluted by the lemonade, it will make a great drink for a Labor Day barbecue or picnic.

Oh! For those of you who googled “Italian godmother lemonade” and, disappointed, found yourselves at this blog but continued to read to this point anyway, I’ve a treat for you. “Justin Bieber,” “Lady Gaga,”  “Casey Anthony,” and “nude pictures of   “.  See? Now you have plenty of misdirected company, each of whom probably far more disappointed than you.

*     *     *

Godmother Recipe

Ingredients

  • Amaretto di Saronno
  • Stolichnaya Vanilla Vodka
  • lemon slices and/or mint sprigs for garnish (optional)

Directions

  1. Combine equal amounts of amaretto and vodka into a cocktail shaker, mix well, and pour into ice-filled “rock” glasses. Add garnish, if desired.

*     *     *

Italian Lemonade Recipe

Ingredients

  • Amaretto di Saronno
  • Premium Vodka
  • Lemonade (pink optional)
  • Fresh berries, lemon slice, or mint for garnish (optional)

Directions

  1. These are best made by the pitcher, or a similarly large amount, following a 7:2:1 ratio. That’s 7 parts lemonade and 2 parts vodka for every 1 part amaretto. Mix thoroughly, pour over ice into tall glasses, and add the garnish of your choice.

*     *     *

Notes

Pictured, the Italian Lemonades have been served in tall glasses, the rims of which have been dipped in colored sugar. This sugar can be found among the cake decorating supplies of your local grocery or made at home. Just combine 1/3 cup of granulated sugar with a few drops of food coloring. Once you have the sugar, place it in a bowl just wide enough to fit the top of the glass. Start with a clean, dry cocktail glass. Use a lemon slice to moisten its rim and then invert and dip the glass momentarily into the sugar. Remove the glass from the sugar, set upright, and fill with ice and the cocktail, being careful not to over-pour or in any way disturb the sugar-coating.

*     *     *

Chicken gizzards? No way!

Admittedly, dishes featuring chicken gizzards are a hard sell and some of you will go no further than the picture above (Just click HERE, Cynthia.) and that’s fine.  Believe me, the majority of my family will be going with you. Since this blog was conceived as a means of recording and sharing my family’s recipes, however, I’d be remiss if I failed to mention these two. Who knows? Some future Bartolini Clan member may wish to know how to cook chicken gizzards and they won’t need to look any further than right here.

Mom and Zia were little girls when the Great Depression struck and our family, like so many others, was hit hard. By all accounts, these were lean times and our Grandparents struggled to put food on the table and keep a roof over their heads. Both Bartolini Girls marvel(ed) at how Grandma could make a single chicken last a full week, feeding a family of four in the process. Well, that’s when she could get a chicken. Both of today’s recipes come from that time. Mom often served us the first, a side dish of peas with gizzards, when I was growing up. No need to explain why it wasn’t an especially popular dish with my siblings. The second is a pasta dish that I “created” on my own. I remember telling Mom about it and, somewhat surprised, she recalled that Grandma used to make the same dish. Zia has mentioned that, as well. Since neither had ever mentioned or served me this pasta, I think it’s a sign that Grandma wants this dish prepared and, by sharing it here, I’m just doing my part to see that her wish is carried out.

I can’t speak of packaging during the Depression but, in today’s markets, one can usually find chicken gizzards and hearts sold together in 1 pound containers. Once cleaned and trimmed, I’ll divide them, with a quarter being reserved for the peas dish and the rest for pasta. One of the 2 portions will be set aside, even frozen, for later use. Cooking these meats can be a little tricky. To brown them like one would, say, beef chunks for stew, will render them nearly inedible. That shouldn’t be a problem if you follow the steps outlined in the recipes that follow.

*     *     *

Peas alla Nonna Recipe (aka Chicken Gizzards with Peas)

Ingredients

  • 5 or 6 oz chicken gizzards & hearts, cleaned and trimmed
  • 1/2 small onion, divided in halves
  • water
  • 1 tbsp olive oil
  • 2 tbsp butter
  • 1 plum tomato, chopped
  • 2 cups frozen or fresh peas
  • pinch of cloves
  • salt and pepper, to taste

Directions

  1. Place gizzards, half of the onion, and enough lightly salted water to cover into a medium saucepan, Cover, bring to a boil over med-high heat, and reduce to a soft simmer. Cook for 1 hour, checking periodically to ensure enough water remains. At the end of an hour, pour the pan’s contents through a strainer, discarding the onion and stewing liquid.
  2. Slice the remaining onion portion and roughly chop the stewed meat.
  3. In the same pan, heat oil and butter over medium high heat. Return gizzards to the pan, along with the sliced onion, and sauté until the onion is soft and translucent.
  4. Add tomato and sauté for a minute before adding peas, cloves, and a few tbsp of water to the pan. Season with salt and pepper, cover, and cook about 5 minutes or until peas are done to you liking.
  5. Serve immediately.

*     *     *

Pasta with Chicken Gizzards Recipe

Ingredients

  • 12 – 16 oz chicken gizzards & hearts, cleaned & trimmed
  • 2 tbsp extra virgin olive oil
  • 1/2 onion, chopped
  • 3 cloves garlic, minced
  • 1/2 cup dry white wine
  • 2 to 3 tbsp tomato paste
  • 1 large (28 oz) can tomatoes, whole or diced
  • 3 tbsp fresh parsley, chopped
  • 1 lb pasta, cooked to not quite al dente
  • grated parmesan cheese
  • salt and pepper, to taste

Directions

  1. Heat oil in a deep skillet over medium heat. Add gizzards and cook for 5 minutes. Do not allow to burn.
  2. Add onion, season with salt and pepper, and cook until translucent.
  3. Add garlic and sauté for 1 minute before adding the wine. Cook until almost all the wine has evaporated.
  4. Add the tomato paste and sauté for 1 to 2 minutes. Add parsley and tomatoes. If using whole tomatoes, tear them apart before adding to the pan. Season with salt and pepper.
  5. Bring to a boil, cover partially, and reduce to a soft simmer.
  6. The sauce should cook for 45 minutes. Check the pasta’s package directions and time its cooking so that the pasta is about 2 minutes shy of being al dente when the sauce is ready.
  7. Reserve some of the pasta water before adding the pasta to the frying pan. Mix well and continue cooking until the pasta is done to your liking. Add some of the reserved pasta water to the pan if the pasta becomes dry during this last step of the cooking process.
  8. Serve immediately, garnished with the grated parmesan cheese.

*     *     *

Notes

And so ends our treatment of chicken gizzards and hearts. Oh, don’t you worry. We’ll be coming back to these ingredients when the Bartolini Family Risotto recipe is shared. That won’t be for a while, however, so, all you chickens out there can rest easy. Your giblets are safe — for now.

*     *     *

Spumoni Ice Cream (It’s da Bomba!)

As you already know, a number of people in my life have birthdays in August. Mom, Grandma, Uncle, my Friend the kitchens’ Taste Tester, my Friend the Entertainer, my Grand-Nephew, and the Oldest of the Boys Upstairs were all born in August. Well, in their honor, and since this is the last day of their collective birthday month, why not go out with a bang? Today’s recipe is the Spumoni Bomba.

These past few Fridays, I shared recipes for pistachio, chocolate, and cherry ice cream. Not so coincidentally, these are the 3 flavors used to create spumoni ice cream, Mom’s favorite. Dad often brought home boxes of spumoni from the restaurant, with each individual serving conveniently wrapped in paper. Klondike bars? Who needed ice cream sandwiches when we had boxes of spumoni in the freezer? Anyway, if we’re going to celebrate the end of Mom’s birthday month, spumoni is the only way to go.

Before offering instructions for creating the Bomba, as well as the traditional “loaf,” a few things should be mentioned. First off, I knew all along that I would be making spumoni ice cream and that’s why I chose to use the same base for all 3 flavors. I wanted all 3 ice cream layers to have the same creamy texture on the palate. Using a custard-based chocolate layer with a yogurt-based cherry layer and Mom’s pistachio layer, for example, just wouldn’t work. Secondly, “authentic” spumoni recipes call for a variety of candied fruit pieces to be added to the cherry layer. For me, these chunks do not freeze well and consequently ruin the texture of the ice cream. So, I dropped ’em! Moving beyond the rejected candied fruit, this recipe will use 3 batches of home-made ice cream, with each batch equaling 1 1/2 quarts. Of course, the amount of ice cream required will depend upon the size of the bowls you use to create the bomba. If you don’t wish to make home-made ice cream, store-bought can be substituted. You’ll need to let the ice cream soften a bit before you add any fruits or nuts, if desired, and before you use it to make either the loaf or bomba. Lastly, unless you have 3 canisters for your ice cream maker, this is going to take more than 1 day to create.

*     *     *

Magic happens when you slice into a bomba!

*     *     *

Spumoni Bomba Recipe

Special equipment: a set of 3 nested mixing bowls, each decreasing in size. Mine were approx. 10″, 8″, and 6″ in diameter, and/or 1 bread loaf pan.

Ingredients

Directions

  1. While the chocolate-chocolate hazelnut ice cream is being made, cover the exterior of the middle-sized bowl with plastic wrap, place it in the largest bowl, and place both in the freezer until needed.
  2. When the ice cream has been made, reserve 1 cup of it and pour the rest into the largest bowl. Place the plastic-covered middle bowl into the first and press down, causing the ice cream to flow upwards between the 2 bowls. Stop applying pressure when the ice cream reaches the top of the outer bowl. Place both bowls back into the freezer for a few hours.
  3. Remove the middle bowl and plastic wrap. With an offset spatula, use the reserved ice cream to fill any cracks that the plastic wrap may have created in the surface of the chocolate layer. Cover the ice cream-covered bowl with plastic wrap and return it to the freezer.
  4. As soon as the ice cream maker’s canister is ready, begin making the pistachio ice cream.
  5. Cover the exterior of the smaller bowl with plastic wrap and place in the freezer.
  6. Once the pistachio ice cream has been made, reserve 1 cup and pour the rest into the chocolate ice cream-covered bowl. Place the smallest bowl into the semi-frozen pistachio and press down, causing the ice cream to flow upwards between the 2 bowls. Stop applying pressure when the ice cream reaches the top of the chocolate-covered bowl. Place both bowls back into the freezer for a few hours..
  7. Remove the small bowl and plastic wrap. With an offset spatula, use the reserved ice cream to fill any cracks that the plastic wrap may have created in the surface of the pistachio layer. Cover with plastic wrap and return it to the freezer.
  8. As soon as the ice cream maker’s canister is ready, begin making the Maraschino cherry ice cream.
  9. When completed, use the cherry ice cream to fill the remaining cavity. Cover with plastic wrap and place in the freezer until fully frozen.
  10. To serve, place the bowl in a hot water bath briefly while running an offset spatula or knife along the outer edge of the molded ice cream.
  11. Quickly invert the ice cream bomba onto a chilled serving plate, sprinkle with the chopped nuts, top off with cherries, and serve. (See Notes below.)

*     *     *

*     *     *

Variations

If you wish to go the more traditional route and create a spumoni loaf, use a bread pan as your ice cream mold. Fill to 1/3 with chocolate ice cream and place in freezer until firm. Next, fill another 1/3 with pistachio ice cream and return to freezer until firm. Lastly, use cherry ice cream to fill the rest of the bread pan, cover with plastic wrap, and return to freezer until firm. When ready to serve, follow the same instructions for unmolding the bomba.

*     *     *

*     *     *

Notes

Looking at the pictures, you may have noticed that the bomba’s cherry ice cream center is larger (thicker) than the other 2 layers. If you want your layers to be more consistent, you can either use a set of smaller bowls or make/buy more chocolate ice cream to form the outer layer. As it was, I used the entire quart-and-a-half batch made by my ice cream maker.

As you also may have noticed, serving a bomba in a heat wave does have its risks and unless you’ll be dining in a walk-in freezer, you can expect some melting to occur. If possible, unmold the bomba onto an ice-cold serving platter and place it back in the freezer for a short while before serving.

Pictured was a “surprise birthday bomba, ” the recipient of which, my Friend the Entertainer, didn’t mind “the thaw” one bit and even waited patiently for the pictures to be taken.

*     *     *

Maraschino Cherry Ice Cream

This is the third ice cream recipe in the series celebrating the birthdays of Mom, Grandma, Uncle, my Friend the kitchens’ Taste Tester, and my Friend the Entertainer, not to mention those of my Grand-Nephew and the Oldest of the Boys Upstairs. Just like its chocolate predecessor, today’s recipe uses the same cream base as was found in Mom’s pistachio nut ice cream recipe. Simple to make, I like its creamy texture and saw no reason to look elsewhere when developing this recipe. So, although today’s recipe was not in the recipe book she gave me, I still consider it to be her recipe and I think you’ll find that it’s pretty good.

When you look over today’s recipe, you’ll note that I strain the chopped cherries, press out as much of the liquid as possible, and then soak them in half & half. That’s an attempt to replace as much of the watery syrup with the thicker half & half, in the hope that the fruit pieces will not form ice shards when frozen. You see, probably my least favorite “features” of home-made ice cream are the ice shards that can result from using fruit in a recipe. I believe the water in the fruit is the culprit and if I can eliminate the water, the problem is solved.  My method may not be 100% effective but there are far fewer shards when the fruit is handled this way. If you are aware of a better way, by all means let me know. And, again, although the recipe calls for a raw egg, I always use eggs with pasteurized shells to eliminate any risk of contamination.

*     *     *

*     *     *

Maraschino Cherry Ice Cream Recipe

yield: 1.5 quarts

Ingredients

  • 2 doz Maraschino cherries, drained, coarsely chopped
  • 1/3 cup Maraschino cherry syrup
  • 1 egg
  • 1 cup half & half
  • 3/4 cups sugar
  • 2 cups whipping cream
  • 1 tsp vanilla extract
  • 1/8 tsp Kirsch liqueur (optional)
  • whipping cream, for garnish (optional)
  • 1 cherry per serving, for garnish

Directions

  1. Coarsely chop cherries, place in sieve, and use a spoon to press as much liquid out of the cherries as possible. Save liquid for later use.
  2. Soak cherries in half & half for at least an hour before proceeding.
  3. Once again strain the cherries and place the strained half & half into the blender along with the egg. “Stir” for a few seconds. Moisten the cherries with a tbsp or so of cream and refrigerate until later use.
  4. Add the reserved cherry juice, sugar, whipping cream, vanilla extract, and Kirsch, if using, to the blender and “Stir” until fully blended.
  5. Refrigerate for at least a few hours or overnight.
  6. Pour both the cream mixture and the chopped cherries in cream into the ice cream maker and process according to manufacturer’s instructions.
  7. When completed, remove the ice cream from the canister to be either served or transferred to a sealable container to be frozen to your liking.
*     *     *

Variations

Although there are many ice creams recipes made with cherries, I chose to make one with Maraschino cherries because it’s about as far removed from tart cherries as possible. Besides, as pink as it is, it’s sure to be a big hit among some members of the Barbie Set.

Notes

This being the last of August’s Fridays, one would think that it would mean an end to the ice cream recipes. Well, it’s not a “birthday 3 and a half weeks” but it is a “birthday month.” So, with this month ending on Wednesday the 31st, I’ve little choice but to offer one last recipe for an ice cream confection. See you next Wednesday.

*     *     *

Giardiniera – the Chicago Way

With farmers’ markets fully stocked and bustling, this is the time to start preserving fruits and vegetables. One such method is canning and that’s about all I have to say about it. There’s freezing and, within the next few weeks, my basement freezer will be packed with quarts of diced, peeled plum tomatoes. And then there’s pickling, a common preservation method that I’m using more and more. In Italy, pickling is sometimes called sotto acetti, under vinegar, and pickled vegetables often take the form of giardiniera. Mild by Chicago standards, theirs usually gets its heat, if at all, from the peppers and pepper flakes for which CalabriaBasilicata are well-known. The Italians will often serve giardiniera as one of many antipasti or among the insalati. The recipe is pretty much the same in the States, except we tend to use “local” chilis to bring heat to the mix. A few jalapeños or serranos will often do the trick. Here in Chicago, we up the ante, adding more chilis and skipping a few of the ingredients. The result is more condiment than antipasto and it’s a staple of most “reputable” sandwich shops. In fact, in some circles, it’s almost sacrilege to order an Italian beef sandwich without a healthy scoop of giardiniera to top it off — but that’s not all. Good giardiniera makes a great topping for any sandwich, as well as for burgers, hot dogs, and brats, while a healthy sprinkling of it can elevate even the most lackluster of pizzas.

Today’s recipe is based upon one that I found in an area newspaper some years ago. Unfortunately, I destroyed the clipping, along with many others, when I transferred my recipes to a Mac-based recipe file three years ago. (Writing a blog wasn’t even a remote possibility at the time.) Nevertheless, it’s a great recipe that anyone, Chicagoan or not, will enjoy. There’s a freshness about it that you just won’t find bottled on a supermarket shelf. The recipe itself is pretty straight-forward and, if you’ve ever pickled anything, you probably already have all of the spices required and, this time of the year, you can get the rest of the ingredients with one trip to a farmers’ market. I’ve seen versions that include mushrooms, broccoli, olives, etc., but they are more salad-like than condiment, in this Chicagoan’s opinion.  Many recipes, too, rely solely upon olive oil and white vinegar for the pickling. I prefer to lighten the solution by replacing half of the olive oil with vegetable oil and to sweeten it by replacing half of the white vinegar with apple cider vinegar. As always, the choice is yours.

*     *     *

*     *     *

In reality, the hardest part of this recipe is to determine an acceptable level of heat. After all, one person’s idea of mildly spicy is another’s 5 alarm fire. The original recipe, like I’ve posted below, calls for 8 whole jalapeños. That’s the Chicago Way and it’s too hot for me. I’ve learned through experimentation that 4 whole jalapeños, along with 4 that have been seeded and “de-ribbed,” deliver just the right amount of heat for my palate. You, however, may prefer it hotter, so, follow the recipe and use 8 whole jalapeños. If that still doesn’t do it for you, switch out some or all of the jalapeños for serranos. On the other side of the coin, some may want their giardiniera mild, with very little heat, if any. By removing the jalapeños’ ribs and seeds, you’ll get a mild giardiniera that includes the flavor of jalapeños but none of the heat. And if that’s not mild enough, drop the red pepper flakes. The point is, you can make the giardiniera as hot, or mild, as you like. With a little experimentation, I’m sure you’ll find the right combination of chilis and pepper flakes to create the perfect giardiniera.

*     *     *

Chicago Giardiniera Recipe

Ingredients

  • 8 jalapeños, chopped (for more heat, serranos may be substituted)
  • 1/2 large cauliflower, cut into florets
  • 2 carrots, diced
  • 2 celery stalks, diced
  • 1 green bell pepper, diced
  • 1 red bell pepper, diced
  • 2 sweet banana peppers, diced
  • 1 sweet onion, diced
  • 1/2 cup kosher salt
  • 3 cloves garlic, minced
  • 2 1/2 tsp dried oregano
  • 1 tsp red pepper flakes
  • 1/2 tsp celery seeds
  • black pepper, to taste
  • 1/2 cup cider vinegar
  • 1/2 cup white vinegar
  • 1/2 cup extra virgin olive oil
  • 1/2 cup vegetable/canola oil

Directions

  1. Combine vegetables and salt. Add enough water to cover, stir, cover, and refrigerate for at least 12 hours.
  2. Strain vegetables from brine, rinse well, and set aside.
  3. In a large glass bowl, add garlic and remaining seasonings.
  4. To that bowl, add the vinegars and stir until well-mixed. Whisk the solution while adding the oils.
  5. Add the reserved, brined vegetables into the bowl and gently mix until well-coated.
  6. At this point, the giardiniera may be left, covered, in the bowl or transferred to clean jars. Either way, it must be refrigerated for 48 hours before serving.
  7. Because this giardiniera isn’t canned, it must be stored in the refrigerator, where it will keep for a few weeks.

*     *     *

Giardiniera-topped Mount Burger

*     *     *

Variations

I’ve already listed a number of variations and I’m sure you can dream up more. I’ve found that some vegetables, however, do not respond particularly well to the brining and pickling processes. Broccoli is one such under-performer, in my opinion.

Notes

Be aware that there is a range of heat for each kind of chili. A very hot jalapeño, for example, can equal a weak serrano. There is no way to insure that the heat of the batch of giardiniera you make today will equal the one you made 3 weeks ago. You can limit your risk, however, by always purchasing your peppers from the same grocer, vegetable stand, or farmers’ market vendor. Hopefully, that will offer some consistency. Still, as I learned this morning, peppers can be mislabeled. Those “sweet banana peppers” may turn out to be hot Hungarian yellow wax peppers. Two completely different peppers – and I’ve a burning eye to prove it.

Not everyone lives here in Chicago nor can they buy airfare every time they want an Italian beef sandwich. Well, you shouldn’t have to go without just because of distance. Thanks to a great food & sports blog, sports-glutton.com, you can make your own Italian beef to go along with this giardiniera. It’s a little bit o’ Chi-town wherever you happen to be.

Speaking of pickling, be sure to check out my recipe for Refrigerator Bread and Butter Pickles.

*     *     *