Mom’s Caponata

The origins of caponata may be found in Sicily but today it is served throughout Italy, in one form or another. Yet, as varied as the final dishes might be, 5 ingredients form the basis of virtually all renditions: eggplant, tomato, onion, garlic, and olive oil, with eggplant being the star of the dish. Beyond these 5, the additional components depend as much upon the individual cook as it does the region of Italy. There’s no better example of this than Mom’s recipe and the one that Zia, her sister, follows. Both included some bell pepper and mushrooms but Mom, also, added zucchini; Zia rarely, if ever, does. The difference here is minimal but, then again, their kitchens were only separated by less than 20 vertical feet. Imagine the differences when there’s hundreds of miles separating the kitchens. In fact, I’ve seen caponata recipes that include, among other things, olives, pine nuts (pignoli), fennel, capers, currants, celery, and even seafood. Seafood seems a bit much to me and I pretty much follow Mom’s recipe. Still, more important than which recipe to follow is finding the right ingredients. Like Mom & Zia, I’ll choose only those vegetables that are fresh and “in season,” for best results. And if you end up with caponata that looks suspiciously like ratatouille, well, I won’t tell anyone.

Whatever vegetables you choose to include, try to chop them evenly, creating pieces that are roughly the same size by type. I cut the “firm” vegetables — onions, peppers, etc. — into strips. The “soft” vegetables — tomatoes, zucchini, eggplant, etc. — are chopped into 3/4 to 1 inch cubes. By cutting the ingredients into strips and cubes, you’ll be adding visual interest to the final dish. When sautéing, begin with the most firm vegetables and proceed until you’ve added the softest. The end-result should be a dish of vegetables that are fully cooked and not at all al dente. Caponata may be served hot, warm or at room temperature. It can be served as a side dish or as an appetizer, where it can be used as a spread or to make bruschetta. Like Mom before me, very often I’ll use it to dress pasta, resulting in a delicious vegetarian dish. Best of all, to my tastes, left-over caponata can be used to make a delicious frittata the next morning. In fact, when I was a boy, Mom always reserved a portion for my breakfast the following day. Today, if I go to a farmers’ market in the morning, it’s almost guaranteed that I’ll be having some form of caponata that evening. You can guess what I’ll be having for breakfast the next morning.

*     *     *

Caponata Recipe

Ingredients

  • 3 tbsp olive oil
  • 1 medium onion, halved and sliced
  • 2 bell pepper, sliced into strips – gypsy, cubanelle, or Italian peppers may be substituted
  • 2 cloves garlic, minced
  • 3 tbsp freshly chopped parsley
  • 1 doz. button or crimini mushrooms, quartered
  • 2 medium eggplants, cubed (peeling optional)
  • 1 – 2 zucchini, cubed
  • 2 plum tomatoes, cubed
  • salt & pepper, to taste

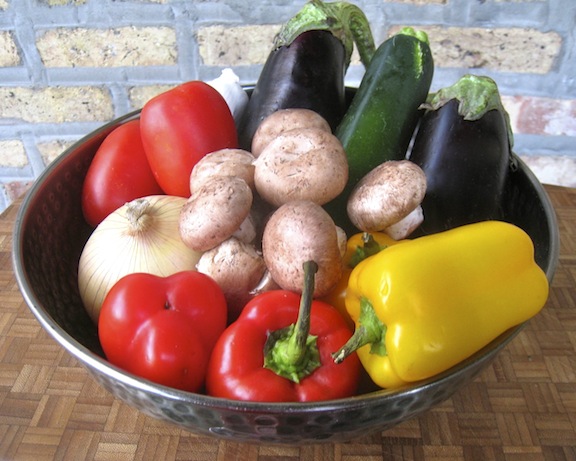
A Good Day at the Market

Directions

  1. Add oil to a large fry pan and heat over a medium-high heat. Add onion and bell pepper, season with salt & pepper, and sauté until barely soft, about 5 minutes.
  2. Add garlic & parsley and sauté for 1 minute.
  3. Add mushrooms and continue sautéing for about 5 minutes.
  4. Add eggplant, zucchini, and tomatoes, stir to combine, season with salt & pepper, and sauté until done to your liking, at least 8 minutes more.
  5. The dish is now done and may be served hot, warm, or at room temperature.

Variations

As mentioned above, this basic recipe can be modified in any number of ways. Thinly sliced fennel, cubed summer squash, currants, pine nuts, celery, you name it, all may be added. Once you’ve assembled and prepared the ingredients, it’s just a matter of adding them to the pan in an order that assures each will be done to your liking. If the order that I’ve listed above doesn’t do that for you, change it to suit your palate.

Notes

Left-over caponata can be served with pasta or used to make a tasty frittata. I’ll devote a later posting to our frittata recipe but, for now, I’ll share the “easy” method. For this, pre-heat your oven to 375*. In a fry pan over med-high heat, re-heat the caponata. Meanwhile, lightly scramble enough eggs to insure ample coverage of the re-heated caponata. Pour the eggs into the fry pan and, like you would with scrambled eggs, use a slotted turner or spatula to gently pull back the edge to let the eggs run behind it. After a few minutes, place the pan in the pre-heated oven and bake for about 10 minutes or until the top of the frittata is set.  Top with grated cheese, if desired, and serve immediately.

Coincidentally, while this recipe was waiting to be published, our local PBS station aired a re-broadcast of an episode of Jacques Pepin’s “More Fast Food My Way” during which he prepared ratatouille. Not only did he mention how similar ratatouille was to caponata, he used it to dress some penne pasta. How about that? You can add “French chef” to the list of Mom & Zia’s many titles and accomplishments!

*     *     *

Pasta with Clams (“Red Sauce”)

Blessed to be living on a peninsula or neighboring island, Italians enjoy a ready supply of seafood of all kinds — and their diet is all the better for it. A favorite dish of mine, whether I’m visiting Italy or at home, is pasta prepared with clams. Here in Chicago, the selection of fresh clams can be limited to cherry stones, with little necks and manila clams available sporadically. Cherry stones and little necks are actually same species of clam. The only difference is their size, with cherry stones being the larger of the two. I find little necks do taste sweeter, however, and I’ll use them whenever I can. If, however, only cherry stones are available, I’ll remove them from their opened shells during the cooking process, give them a quick chop, and then return the chopped clams and any juices to the pot. When all else fails, I have used, with some success, frozen clams and cockles purchased from a few of the area’s Asian markets. These same stores, by the way, can be a relatively cheap source for flash-frozen, vacuum-packed calamari, in any size you could possibly want.

As you can tell by this posting’s title, today’s recipe features clams cooked in a tomato sauce. In this recipe, I find that the sweet, delicate tasting clams can be overpowered by the tomatoes. So, in order to bolster the clam flavoring — and unlike the “white” version of the recipe — I’ll add a can of whole or minced clams to the sauce. It’s listed as “optional” within the recipe’s ingredients and the choice is yours to make. By the same token, whether you add any canned clams, be sure to use herbs and spices sparingly. They, too, can overwhelm the clams. It’s a tricky balance you’re trying to achieve but one definitely worth the effort.

*     *     *

Pasta with Clams (“Red Sauce”) Recipe

total time: under 2 hours (includes time to prep clams)

Ingredients

  • at least 2 doz. little neck or manila clams
  • 1 can (7 oz) whole or minced clams (optional)
  • 3 tbsp olive oil
  • 1/8 to 1/4 tsp red pepper flakes (optional)
  • 1 medium sweet onion, chopped
  • 2 cloves garlic, minced
  • 3 tbsp fresh parsley, chopped
  • 2 tbsp tomato paste
  • 1/3 cup dry white wine
  • 1 large can (28 oz) diced tomatoes
  • salt & pepper, to taste
  • 3 tbsp fresh basil, chopped
  • 1 lb cooked pasta (tagliatelle pictured above)
  • 1 cup reserved cooked pasta water
  • chopped parsley for garnish

Directions

  1. At least an hour before dinner, use a brush to individually scrub each clam before  rinsing and placing it in a large bowl of cold freshwater. Rinse them a second time just before proceeding with the recipe.
  2. Heat oil over med-high heat in a large frying pan with a lid. (If using red pepper flakes, add them now and sauté for 1 minute before proceeding.) Add onion, season lightly with salt & pepper, and sauté until translucent, about 5 minutes. Add garlic and parsley and sauté for another minute.
  3. Add tomato paste, sauté for one minute, add the wine, and then add the tomatoes. Season with salt & pepper, bring to a boil before reducing heat and  simmering for 30 minutes.
  4. Meanwhile, your pasta should be cooking, with an eye toward being drained just as the clams are opening.
  5. Increase heat to medium high, add the basil, and stir. (Add the canned clams now, if you choose to use them.)
  6. Add the clams and cover tightly.
  7. In about 5 to 8 minutes, the clams should be open & steamed. Discard any unopened clams. Replace cover and remove from heat.
  8. Combine the clams & tomato sauce with the drained pasta. If too dry, add some of the reserved pasta water.
  9. Serve immediately, garnished with chopped parsley.

Variations

Tired of tomatoes? Try the “white sauce” version of this recipe.

*     *     *

Grandpa’s Barbecued Shrimp

I’ve just returned from a week-long visit with Zia in Michigan, where Spring has finally sprung — even if it is much wetter and colder than most would like. The arrival of Spring in Michigan’s Thumb means that Summer is just about here for the rest of the country. And with Summer comes barbecue season, but hold onto your skewers. First, a little history …

The old two-flat had a great barbecue in the backyard that Grandpa built during the Summer of 1959. Pictured on the right is the construction site and below, to the left, the finished monolith. Grandpa was a master at masonry and he created the arch over the grilling area. (It wasn’t until I was much older that I appreciated the skill involved in doing that.) The grilling area had 3 sections: the top was the grill surface; the middle was where the fire burned; and the lowest section was where the ashes collected. The doors of the lower 2 sections had vents with which you could limit and direct the airflow to the fire, and thereby control the grill’s heat. The flue system practically guaranteed that there would be no smoke to bother the eyes of the barbecue’s many users. To the left of the grilling area was a large, flat surface that served as a work station and, under that, an area for storing wood. He’d thought of everything.

Once it was finished, that barbecue was often a center of activity for both households, regardless of the weather. In Winter, our yard was turned into an ice skating rink and the grill helped to warm us as it heated our hot chocolate. In warmer weather, I clearly remember seeing Dad, the High Priest of Grilling, standing in front of his altar, umbrella in his left hand & struggling with the wind, as his right hand tended to the sacrificed beast that would become our meal. Once Summer came, there were many Sundays when both families feasted together on some main course that was char-broiled to perfection. As for Grandpa, he could often be found “out back” on Fridays grilling shrimp, his specialty and today’s recipe. Somehow, I always found myself at his side as he grilled and, lo and behold, he would give me 1 or 2 shrimp just for “keeping company.” I think I got the better part of that deal. Not only did I get a couple of shrimp back then but now, years later, whenever I lay skewers of shrimp on a grill, my thoughts inevitably turn to the times spent standing next to my Grandpa in front of his master work — and I smile.

Back now, to the Present. Many stores today offer shrimp that have been cleaned but with the shells still on. These shrimp are definitely preferable to those that have been peeled simply because the shells offer some protection during grilling and so the shrimp are less likely to burn. Not only that but the opening left from the de-veining process makes a perfect home for stuffing. When buying shrimp destined for the grill, I’ve found that bigger is better. Large shrimp aren’t so quick to burn and they make a more memorable presentation. As for the stuffing, the amount of olive oil you need will vary depending upon the bread crumbs you use — i.e., fresh, store-bought, or panko. The goal is a stuffing that’s rather wet, though not “soupy.” You want it wet enough to survive the heat of the grill without drying out completely and yet dry enough so that  you do not see stuffing and oil pooling on your serving platter. For the grilling, you can use a webbed grill basket, the kind with 2 sides that can be opened and that will hold the shrimp in place while grilling. This type of basket will allow you to turn over all the shrimp with ease. Lacking a grilling basket, thin bamboo skewers can be used after they’ve been soaked to prevent being burned on the grill. I use 2 skewers per set of shrimp and this, too, makes turning them over much easier.

*     *     *

Grandpa’s Barbecued Shrimp Recipe

Ingredients

  • 1 lb extra-large shrimp (no smaller than 21 – 25-ct), de-veined but not peeled
  • 1/3 – 1/2 cup bread crumbs
  • 1 clove garlic, minced
  • 2 tbsp fresh parsley, chopped
  • 1/3 – 1/2 cup olive oil
  • salt & pepper, to taste
  • thin bamboo skewers, soaked in water for at least 1 hour before grilling
  • lemon wedges for serving

*     *     *

*     *     *

Directions

  1. In a mixing bowl, combine the bread crumbs, garlic, parsley, salt & pepper and mix well.
  2. Add enough olive oil to the mixture to produce a wet, but not soupy, stuffing. Mix well.
  3. Place the shrimp into the bowl with the bread crumbs and mix well. Cover the bowl and refrigerate for at least 30 minutes.
  4. In the meantime, arrange the coals, if used, to enable the “indirect cooking method.” Start the grill or fire up the coals so that the fire is ready when the shrimp are.
  5. Use 2 skewers to hold the shrimp. Place one skewer near the shrimp’s tail and the other skewer near its opposite end. Grab a second shrimp and do the same, using the same 2 skewers so that this shrimp is on top of the first one that you skewered. Be sure to include a little stuffing between the shrimp. Repeat the process until the skewers are full, keeping in mind the size or your grilling area. You may only be able to skewer 3 jumbo shrimp or 5 – 6 large shrimp per set of 2 skewers.
  6. Repeat step 5 until all the shrimp are skewered.
  7. With the grill very hot, clean the grates and use a wad of paper towels dipped in vegetable oil to coat the grilling surface. (No need to coat the grates if using a grilling basket.)
  8. If using the indirect method, the shrimp should take no more than a total of 5 minutes to cook both sides, depending upon the size and temperature of the grill. The time will be less if the shrimp are peeled and even less if they are grilled directly above the flames. Stay near the grill and watch them closely.
  9. Once cooked, the shrimp may be served as-is, on the skewers, or off of the skewers and arranged on a platter.
  10. Serve immediately with lemon wedges on the side.

Notes

With minor changes, you will see this bread crumb mixture, the Bartolini breading mixture, used again and again throughout this blog. The Bartolini Girls used it to stuff a number of vegetables, from artichokes to zucchini, not to mention seafood preparations from stuffed calamari to baked tilapia. Learn to make it, and to adjust the moisture level to suit the dish being prepared, and you will be amazed at how many uses you’ll find for it. Just please don’t forget to come back here and tell us about it.

*     *     *

Chicken Parmesan

As is the case within most families, birthdays were special events in our household and Mom would fix whatever dish the birthday child desired. For me, that choice was always veal parmesan. Mom served it with home-made pasta and I was one happy boy. Nowadays, I tend to avoid veal but I can’t avoid this dish nor the memories it evokes. So, instead of  veal, I use chicken. It may not be the same but it’s close enough — and certainly good enough — for me.

*     *     *

*     *     *

To begin, I start with boneless, skinless chicken thighs, which are fried after being floured and breaded. They are then placed into a baking dish, smothered in marinara sauce, and topped with sliced mozzarella & grated parmesan cheese before being baked in the oven. Yes, this recipe can make a mess of your kitchen but the pay-off is well worth the effort. The only advice in this area that I might offer is to clean as you go. When the marinara sauce is simmering, clean the work area and utensils. The same goes with the breading station as the chicken is being fried. When the final dish is in the oven, put the rest of the mess into the dishwasher (I hope you have a dishwasher) and start it running. Take it from one who’s been there, your kitchen will resemble a disaster area if you put off the cleaning until after you’ve eaten dinner.

*     *     *

Chicken Parmesan Recipe

Ingredients

  • 1 quart Marinara Sauce
  • 1 pkg boneless, skinless chicken thighs (5 or 6 thighs)
  • 1/2 cup all-purpose flour
  • 1 – 1 1/2 cups bread crumbs
  • 3 tbsp fresh parsley, chopped
  • 1/2 tsp garlic powder
  • 1/2 tsp onion powder
  • 2 eggs
  • 2 tbsp milk
  • 3 tbsp olive oil, more as needed for frying
  • 1 large ball of fresh mozzarella, sliced thinly to provide a slice for each thigh
  • 1/2 cup freshly grated parmesan cheese
  • salt & pepper

Directions

  1. Set up a breading station. Place the flour in one dish; combine the eggs & milk and place into the center dish; and in the third dish mix the bread crumbs, garlic powder, onion powder and parsley. Season each thigh with salt & pepper. Use the standard breading technique and begin by coating each thigh with the flour, one at a time. Shake off the excess flour before coating the thigh with the egg mixture. Allow the excess to drain a bit and dredge the thigh in the bread crumbs.  Set the breaded thigh aside and repeat with the remaining chicken pieces.
  2. Place oil in a large frying pan and heat over med-high heat. Working in batches, fry the breaded thighs until each side is golden brown, about 5 minutes per side. If necessary, replenish the oil between batches.
  3. Pre-heat oven to 375*.
  4. Liberally butter or use a cooking spray to coat a 9 x 13″ baking dish.
  5. Coat the bottom of the dish with a few ladles of the marinara sauce.
  6. Place the fried chicken pieces into the dish and use the rest of the tomato sauce to cover them all.
  7. Evenly sprinkle the dish with the parmesan cheese and then position one slice of mozzarella on top of each chicken piece.
  8. Cover with aluminum foil and bake in a pre-heated oven for 20 minutes. Remove the foil and continue baking for another 20 minutes.
  9. Remove from oven and allow to rest 10 minutes before serving.

Variations

Originally, Mom shallow-fried the veal in about 1/4 inch of vegetable oil. Initially, I did the same with the chicken pieces but, over the years, eventually cut out most of the oil in favor of a few tbsp of olive oil. Use whichever method you prefer, so long as the breaded pieces are golden brown when you’re done.

Mom never baked her veal parmesan and you needn’t bake this dish either. In a large, deep frying pan with a lid, add enough sauce to generously coat the pan’s surface, add the coated, fried chicken pieces, and cover with more sauce before sprinkling with grated parmesan cheese and topping with mozzarella slices. Cover the pan and cook over medium heat until the chicken is fully cooked, about 30 minutes. Use an instant read thermometer when in doubt.

I use chicken thighs but chicken breasts, tenders, or whatever chicken parts you prefer can be substituted. You may find, however, that boneless pieces work best. No matter what part(s) of the chicken you use, just be aware that the cooking times may vary, so, again, use an instant read thermometer to ensure the meat is thoroughly cooked.

Notes

The dish, as shown, was prepared “family style” and I wouldn’t necessarily serve it this way for guests.  Here, the chicken pieces are pretty much blanketed by a coating of cheese. If I were serving guests, I would be more careful with the cheese placement, using less cheese and restricting it to the individual chicken pieces. For “family,” however, I’ll go with the cheese blanket and I haven’t had any complaints yet.

*     *     *

Pasta with Clams (“White Sauce”)

Pasta con VongoleWhenever I’m lucky enough to visit Italy, I make a point of ordering pasta with clams at least once while I’m there. Using varieties of clams I’ve never seen stateside, my pasta is served chock full of tiny, incredibly sweet bivalves no bigger than my thumbnail. What a treat! Back here at home, when I’m in an adventurous mood, I’ll make a run to the Asian markets to try some of the varieties of clams that they have on hand. More often than not, however, I’ll just head to one of the better groceries and pick up some littleneck or manila clams. When I do, I know that night’s dinner will be something special.

With no tomato sauce to simmer, this is an amazingly simple recipe that results in a very flavorful dish. Just toss a few ingredients into a frying pan while your pasta cooks and, in about 10 minutes, you’ll be sitting down to dinner. It really is as simple to make as it is delicious to eat.

*     *     *

Pasta with Clams (“White Sauce”) Recipe

total time: approx.  90 minutes (75 minutes for prep, 15 minutes cooking)

Ingredients

  • at least 2 doz. little neck or manila clams
  • 3 tbsp olive oil
  • 1 to 2 cloves of garlic, minced
  • 3 tbsp fresh parsley, chopped
  • 1/4 cup white wine or water
  • salt & pepper, to taste
  • 1 lb pasta
  • chopped parsley for garnish

Linguine with Clams

Directions

  1. At least an hour before dinner, use a brush to individually scrub each clam before  rinsing and placing it in a large bowl of cold freshwater. Rinse them a second time just before proceeding with the recipe.
  2. Bring a 6 quart pot of salted water to boil.
  3. Add oil to a large frying pan with a lid. Add the garlic, parsley and the wine or water.
  4. Add the pasta to the pot of salted boiling water. The pasta, if dried, should take 9 or 10 minutes to cook. If fresh, less time will be needed. Time it so that its completion coincides with that of the clams.
  5. Just when the frying pan’s liquid begins to show signs of boiling, add the clams and cover tightly,
  6. In about 5 to 8 minutes, the clams should be open & steamed. Discard any unopened clams. Replace cover and remove from heat.
  7. Reserve 1 cup of the pasta water, drain the pasta, and combine the clams & pan juices with the drained pasta. If too dry, add some of the reserved pasta water.
  8. Serve immediately, garnished with chopped parsley.

Variations

This dish is totally reliant upon timing. If you’re off, the pasta will not be piping hot or, worse yet, the clams will be over-cooked and chewy. Just heed the pasta package’s instructions and keep in mind that the clams will open about 5 minutes after they hit the hot pan. Very often, if my clams are ready and my pasta still needs another minute or two, I’ll use the time to remove some of the clam meat from the shells. I won’t remove all of the meat from the shells because I prefer to see a few shells in each serving. It’s all about the presentation.

Notes

When in Italy, one is far more likely to see this dish than you would pasta with clams in a tomato (“red”) sauce. The latter dish, however, is more popular here in the States.  Truth be told, I usually prepare today’s recipe and only “go red” about 25% of the time. The choice is yours to make and here’s my recipe for Pasta with Clams – (Red Sauce) for those who prefer their clams in a tomato sauce.

*     *     *

Cherry Cheesecake Pizza

Since Easter is only a few days away, I thought it the perfect time for something sweet. Mom got this recipe from one of our two-flat’s neighbors, Johnnie, a wonderful woman whose daughter and my sister remain very close friends to this day. Easy to make, this is a perfect dessert for any party, potluck, or family dinner. If you wish, you can use canned pie filling and ready-made pie crusts — I told you it was easy. On the other hand, if you’ve got the time, you can make your own pastry dough and/or topping from fresh or frozen fruit. Either way, you’ll end up with a great little dessert.

*     *     *

Cherry Cheesecake Pizza Recipe

Ingredients

  • 2 pie crusts, ready-made or equivalent amount of pastry dough — not puff pastry
  • two 8 oz packages of cream cheese, at room temperature
  • 1/2 cup sugar
  • 2 eggs
  • 1/3 cup walnuts, rough chopped
  • 1 tsp salt
  • two 14.5 oz cans of pie filling (or use 2 cans/bottles of tart cherries and follow the maker’s recipe on the container to make a filling)
  • Whipped cream for serving – optional

Directions

  1. Pre-heat oven to 350*.
  2. Roll pastry dough until large enough to cover the pan, as well as to create a ridge along the edge of the pan. Transfer to pan, prick with fork several times, and bake on center rack of oven for 15 minutes. Remove from oven and cool completely.
  3. Using a hand or stand mixer, beat together cream cheese and sugar.
  4. Add eggs, one at a time, and beat until well-blended. Add vanilla and mix well.
  5. Add the walnuts and mix using a spoon or spatula.
  6. Once the crust is thoroughly cooled, pour the cream cheese mixture over the crust and use an offset spatula to make it smooth.
  7. Bake in pre-heated 350* oven until set, about 15 to 20 minutes. Remove from oven and cool completely before proceeding.
  8. Carefully pour and spread fruit topping to cover the cheesecake. Refrigerate until well-chilled, at least 2 hours.
  9. Serve with whipped cream, if desired.

*     *     *

*     *     *

Variations

The original recipe called for one ready-made pie crust and one 8 oz package of cream cheese. Mom always doubled the amount of cream cheese and used both pie crusts, as well. This cheesecake was originally made on a 14″ or 16″ round pizza pan but, lacking one, I use a 12″ x 9″ sheet pan instead. Lastly, the original recipe used cherries for the topping. You can easily substitute blueberries, strawberries, or whatever fruit you prefer.

*     *     *

Stracciatella Soup

Stracciatella is an Italian egg drop soup that is common to San Marino and Le Marche, as well as Rome and Emilia-Romagna. The name is derived from the Italian word that means “torn apart” or “rags” and that’s an apt description for the dish. The eggs look like tiny torn rags in the broth. A tasty soup, this easy-to-prepare dish makes a perfect lunch or first course.

The foundation of any good bowl of soup is the broth. Sunday mornings, from late Fall through early Spring, it was fairly common to find a large stock pot, simmering atop Mom’s stove, filled with vegetables, chicken, and a piece of beef.  The resultant broth, brodo, formed the basis of that week’s soup and the occasional batch of risotto. Stracciatella, being so relatively plain, needs that kind of rich, full-bodied broth. I highly recommend making your own stock — be it vegetable or meat-based — for this soup but I, also, realize that not everyone has the time to do so. As a result, if you do use store-bought stock, be sure it’s low-sodium. Once you’ve added the egg and cheese mixture to the broth, you can taste the soup and add salt, if need be.

*     *     *

Stracciatella Soup Recipe

total time: approx.  15 minutes

Ingredients

  • 8 cups (2 quarts) chicken stock (vegetable stock may be substituted for a vegetarian diet)
  • 3 large eggs
  • 1/4 cup grated parmesan cheese
  • 1 tbsp fresh parsley, chopped
  • a pinch of freshly ground nutmeg
  • salt & pepper, to taste
  • grated parmesan cheese for serving

Directions

  1. Combine eggs, cheese, parsley, and nutmeg in a bowl or container with a pouring spout and mix well.
  2. Place stock into a sauce pan and heat over a med-high heat.
  3. When it begins to boil, reduce heat to medium-low, use one hand to gently stir the stock in a circular motion and, with the other hand, slowly pour the egg mixture into the pan.
  4. When all the egg mixture has been added, stop stirring and continue simmering for another minute or so.
  5. Taste the soup and season with salt & pepper, if needed.
  6. Serve immediately with additional grated parmesan cheese.

Variations

I’ve seen stracciatella prepared with spinach several times by television cooks and, in fact, I’ve prepared it this way, too. Strictly speaking, it is not a “true” stracciatella but it is a tasty alternative and just about as easy to make as the original. Take either frozen chopped spinach or fresh spinach that’s been chopped and add it to the simmering stock. Let the stock cook the spinach for a few minutes before stirring and adding the egg mixture. Whether or not you include spinach, with so few ingredients, a delicious bowl of stracciatella is only minutes away.

*     *     *
Stracciatella (soup)

*     *     *

Tomato Sauce with Tuna

Having been raised a Catholic, the arrival of Lent reminds me of the countless meatless Fridays of my youth. Even when “the rules” changed in the 60’s, our house continued the practice of fish on Fridays, for the most part, and that was due largely because we all liked fish — and the Bartolini Sisters knew how to cook them. I hope to get to some of those recipes later but, for now, I’m going to start with a pasta dish. (Big surprise!)

Next to a marinara, this is about as simple a sauce as one can make. With tuna as its protein, this sauce is not as strongly flavored as, say, a puttanesca. As a result, one needs to be careful not to overpower the tuna with a lot of strong herbs and spices. The recipe, as presented, is exactly as my family made on many a Friday, with the exception of the capers and mushrooms. I happen to love both with my pasta. As for you, if it isn’t a tomato sauce unless you taste oregano or some other herb, spice, or ingredient, then by all means add it. Just be careful not to overwhelm the tuna and, please, just say no to cheese.

*     *     *

*     *     *

Tomato Sauce with Tuna Recipe

total time: approx.  1 hour

Ingredients

  • 3 tbsp olive oil
  • 1 medium onion, chopped
  • 3 tbsp fresh parsley, chopped
  • 3 cloves garlic, minced
  • 2 tbsp tomato paste
  • 1 can (28 oz) tomatoes (use crushed, diced, or whole that you mash during cooking)
  • 4 – 6 button or crimini mushrooms, sliced — optional
  • 1 can (5 oz) of whole chunk tuna, water-packed, well-drained
  • 2 tbsp + 1 tsp fresh basil, chopped
  • 3 tbsp capers, drained — optional
  • salt & pepper, to taste
  • 1 lb pasta

Directions

  1. Add oil to a medium sauce pan and heat over a medium-high heat. Add onion, garlic, and parsley and sauté until onions are translucent, about 5 minutes.
  2. If using mushrooms, add them now and continue sautéing another 3 or 4 minutes.
  3. Add tomato paste and sauté for about 2 more minutes.
  4. Add tomatoes, stir to thoroughly combine, bring to boil, and reduce to a simmer. Bring a large pot of salted water to boil.
  5. After 30 minutes, carefully add tuna so that the chunks do not fall apart. Add pasta of your choice into the boiling water.
  6. When the pasta is cooked al dente, remove from heat and drain.
  7. Add 2 tbsp basil (and capers, if used) to the sauce and stir carefully.
  8. Combine cooked, drained pasta with the sauce, stir until well-coated, garnish with remaining basil, and serve immediately.

Notes

This is another quick sauce. If you cook it for too long after the tuna has been added, the chunks of tuna will disintegrate.

*     *     *

Spianata

When I was a boy, Mom occasionally treated us all to home-made pizza. She’d make standard pepperoni or sausage pizzas for us kids but Dad’s was a special order. His pizza was called spianata and, unlike our kiddie versions, his was topped with only garlic, onion, rosemary, salt and pepper, resembling a rather plain focaccia. Yet, for so few ingredients, it made a very tasty pizza back then, while Zia and I use it today as a perfect accompaniment for any number of dishes.

*     *     *

*     *     *

The recipe I’m about to share starts with what is called a “sponge.” Fairly common to many Italian/European breads, it’s a mixture of water, yeast, and flour that’s allowed to rise overnight. The mixture, in a sense, ferments and the resultant bread is more flavorful, almost sourdough-like. (In fact, I often add some of my sourdough starter to the sponge instead of yeast.) Of course, you needn’t start with a sponge but the spianata is so much more flavorful if you do. Once the sponge has “spent the night,” the rest of the recipe is pretty straight-forward and you should have no trouble following it.

*     *     *

Spianata Recipe

Ingredients

For the sponge

A Sponge Worthy of Spianata

  • 1 cup flour
  • 1 cup warm water
  • 1 tsp active yeast

For the spianata

  • 1/2 cup olive oil, divided
  • 1 tsp salt
  • 2 cups flour

For the topping

  • 1/2 of a small onion, sliced thin
  • 1 clove garlic, sliced thin or grated
  • 3 tbsp fresh rosemary, coarsely chopped
  • olive oil
  • coarse salt & pepper

Directions

  1. Proof the yeast in warm water, add to the flour to make the sponge, mix well, cover, and set aside. The sponge should be allowed to rise for at least 8 hours but no more than 20. 12 to 16 hours is usually best, in my experience. When you are ready to proceed, the sponge’s surface should be mottled with bubbles and it should have a strong yeast scent.
  2. To the sponge, add the flour, 1/4 cup olive oil, and salt. Knead dough for 5 minutes. Dough should not be sticky. If it is, sprinkle with flour and continue kneading until absorbed.
  3. Place dough in an oiled bowl, cover, and let rise until doubled — from 1 to 2 hours. (If using only sourdough starter, it could take longer.)
  4. Punch the dough down, turn it onto a floured work surface, cover with a towel, and let rest for 15 minutes. Meanwhile, coat a 9″ x 12″ sheet pan with the remaining 1/4 cup of olive oil.
  5. After resting 15 minutes, place dough onto the pan and use your fingers to begin stretching it to fit the pan. When it covers about 2/3 of the pan, flip the dough over and continue stretching the dough until the entire pan is covered and there’s enough dough to create a ridge around the pan’s edge. Cover with a towel and let rise until doubled again, about 1 hour.
  6. Pre-heat oven to 425*. Place garlic and onion into a small bowl and moisten lightly with olive oil.
  7. Once doubled, remove towel and, with your fingers, poke the surface of the dough repeatedly. Sprinkle surface with garlic, onion, rosemary, coarse salt & pepper.
  8. Bake on oven’s center rack for about 25 minutes. The spianata should be lightly browned.
  9. Allow to cool slightly before cutting and serving.

Notes

Like most breads, spianata can be frozen easily. Once it is fully cooled, wrap it tightly in aluminum foil and place in your freezer. When you are ready to serve it, place it, still wrapped in foil, in a pre-heated 350* oven for about 25 minutes. Enjoy!

*     *     *

Cacioni

Half-Moon Pie?

Cacioni are small, half-moon shaped pies which, in San Marino, are filled with greens, very often a combination of Swiss chard and spinach (cacioni con bietole e spinaci). In other parts of Italy, however, cacioni are filled with a variety of cheeses and, in one case, even beans are used. And then there’s Liguria where they make a torta pasqualina at Easter which is filled with greens — but the torte are much larger than cacioni and the filling also includes ricotta and grated cheese. Of all the recipes I’ve come across, however, only the Bartolini cacioni are deep-fried. In fact, Zia went to lunch with some Sammarinese friends a few years ago and one of the ladies brought baked cacioni for everyone. The idea of baking cacioni is a game changer for Zia and me. Up until now, we rarely made them because there was no way to store them. You fried and ate what you made and that was that. As such, it just wasn’t practical to make them if you lived alone. Now that baking is an option, however, we can make a dozen, reserve 2 for dinner, and freeze the rest. Suddenly, cacioni are back in our diets, but, what does this mean for you?

Well, I’m going to give you both options for preparing cacioni. The first will be deep-fried; the second will be baked using pastry dough. To that end, in a recent episode of Mad Hungry, Lucinda Scala Quinn prepared a pie crust that she used with her pocket pies. (If you’re not familiar with her blog, you should be.) Her recipe is perfect for cacioni and it really is fool-proof. No matter which cooking option you may choose, the filling will remain the same and we’ll start there.

*     *     *

Cacioni Recipe

(Swiss Chard & Spinach Filling)

Ingredients

  • 3 tbsp olive oil
  • 2 cloves garlic, crushed
  • 1 small yellow onion, chopped
  • 1 bunch  fresh Swiss chard, trimmed, leaves chopped after removal from stalks, stalks chopped and reserved
  • 1/2 pkg frozen chopped spinach, thawed  — use more or less, if you like
  • salt & pepper to taste

Directions

  1. Heat oil and garlic in a frying pan over medium heat until garlic begins to brown, about 5 minutes. Do not allow garlic to burn.
  2. Remove garlic, increase heat to med-high, add onion and as much of the chopped chard stalks as you prefer. Season with salt & pepper and sauté until translucent, about 8 to 10 minutes.
  3. Add chopped spinach to pan and continue sautéing until heated through, about 4 minutes.
  4. Add chard leaves, season with salt & pepper, and sauté until leaves are wilted and cooked to your preference.
  5. Place cooked greens in a colander or strainer, place a dish on top of the cooked vegetables, and place a heavy can or similar weight on top of the dish. This will help to drain as much liquid from the greens as possible before filling the cacioni.

*     *     *

Fried Cacioni

Swiss Chard & Spinach Cacioni

yield: 12 – 15 pies.

Ingredients

  • Swiss chard with spinach, sautéed and well-drained (recipe above)
  • 1/2 batch Mom’s pasta dough, rested for 30 minutes after preparation
  • Oil for frying — NOT olive oil

Directions

  1. Separate dough into quarters and wrap 3 quarters in plastic wrap.
  2. Using the remaining dough quarter, run it repeatedly through the pasta machine rollers until thin. If no. 1 is the widest setting, continue rolling the dough up to, and including, the no. 6 position.
  3. Spread the dough sheet on a flat surface. Using a bowl, saucer, or wide-mouthed mug/jar as a template, cut circles as large as you can on the dough sheet. Trim and reserve the excess dough for later use.
  4. Depending upon the size of the dough circle, place 2 to 4 tbsp of the chard filling in a line across the center of each one. Using a pastry brush or your finger tips, moisten the edge of each circle with water. Fold the pastry in half upon itself, creating a half-moon. Use a fork to press and seal the edges of the dough. Use the fork to prick each pie to let steam to escape during frying. Set aside.
  5. Continue until all the filling has been used. The left-over dough may be used to make the pasta of your choosing.
  6. Using a large frying pan, add enough vegetable/peanut oil to create a depth of 1 to 1 1/2 inches. To avoid boiling over, do not fill the pan over halfway full. (This is more a “shallow-fry” than deep-fry. Of course, if you prefer deep-frying, go for it.)
  7. Bring oil to 350*. Depending upon the pan size, fry 2, 3, or 4 cacioni at a time. Do not overcrowd. Fry until golden brown before turning each one over.
  8. Place a wire rack atop a baking sheet and place both into a warm oven. When each batch of cacioni are finished frying, place them on the rack in the oven to keep warm. Sprinkle with coarse kosher or sea salt.
  9. Repeat the process until all are fried. Serve immediately.

*     *     *

Baked Cacioni

Cacioni con Bietole e Spinaci

Note: This will require enough pastry dough as would be used to make a double-crusted, 9 inch pie. Use your own pastry dough recipe, try Lucinda’s cream cheese pastry dough, or buy it ready-made at your grocery store. Puff pastry, however, is not recommended.

yield: 10 – 12 pies.

Ingredients

  • Swiss chard with spinach, sautéed and very well-drained (recipe above)
  • pastry dough (see note above)
  • 1 egg yolk mixed with a tbsp of water to make a wash

Directions

  1. Separate dough into halves, wrap one half with plastic wrap and place in the fridge. Roll the remaining half as you would for a pie crust.
  2. Using a bowl, saucer, or wide-mouthed mug/jar as a template, cut circles as large as you can on the dough sheet. Trim and reserve the excess dough for later use.
  3. Depending upon the size of the dough circle, place 2 to 4 tbsp of the chard filling in a line across the center of each one. Using a pastry brush or your finger tips, moisten the edge of each circle with water. Fold the pastry in half upon itself, creating a half-moon. Use a fork to press and seal the edges of the dough. Use the fork to prick each pie to let steam to escape during baking. Set aside on a baking sheet lined with parchment paper.
  4. Continue until no more dough remains and then place the baking sheet into the fridge while you work with the second half of the pastry dough. Repeat the process until there is no more filling or dough.
  • TO COOK IMMEDIATELY
  1. Pre-heat oven to 375*
  2. Meanwhile, chill the cacioni for a few minutes before proceeding.
  3. Using a pastry brush, carefully coat the exposed surface of each pie with the egg wash. Sprinkle with salt.
  4. Place baking sheet into pre-heated oven and bake until golden brown, about 20 minutes.
  5. Serve immediately.
  • TO FREEZE & COOK
  1. Place newly prepared cacioni on a lined baking sheet and then into the freezer.
  2. After a couple of hours, place the cacioni into more permanent freezer containers.
  3. When ready to cook, DO NOT THAW. Pre-heat oven to 350*.
  4. Remove the cacioni from the freezer, place on a parchment-lined baking sheet, and, using a pastry brush, coat the exposed surface of each pie with egg wash. Sprinkle with coarse kosher or sea salt.
  5. Place the baking sheet into a pre-heated oven and bake until golden brown, about 30 minutes.
  6. Serve immediately.

Variations

Although my family has only used a combination of chard and spinach to fill our cacioni, there’s no reason other vegetables can’t be used. In fact, Zia and I are considering rapini (broccoli raab) as filling for some future cacioni — if I can ever remember to buy some and bring it with me when I visit.

Notes

Working on this recipe resulted in my making a couple dozen cacioni, both fried and baked. At one point, I had some left-overs that had been baked and were made with Lucinda’s pastry dough. Rather than refrigerate them, I placed them with some raw cacioni on one of the baking sheets in my freezer. Lucinda freezes her cooked pocket pies and re-heats them in the microwave, so, why not do the same with cacioni? Well, I’m happy to report that those frozen, fully baked cacioni were successfully re-heated in the microwave. They tasted great and I’ll definitely be doing this again. Special thanks to Lucinda and her Mad Hungry Blog. She’s the best!

So, there’s no longer a reason for us single folk not to enjoy cacioni on a regular basis. You can make a batch, bake what you need, and freeze the rest for future baking, or, if you prefer, you can bake them all, freeze the left-overs, and re-heat them in the microwave at some later date. Either way, you won’t be disappointed.

*     *     *