Grilled Clams

I do enjoy going to the fishmonger. I may go in with something in mind but I always leave with something else entirely. One of my last visits is a case in point.

This particular Tuesday I went shopping for chicken. My fishmonger is the only place in town that I know of where you can buy fresh, never frozen, organic chicken. I left with a chicken — and a little more than a pound of “Vancouver blue clams”. I just couldn’t resist them.

*     *     *

Preview Clams

*     *     *

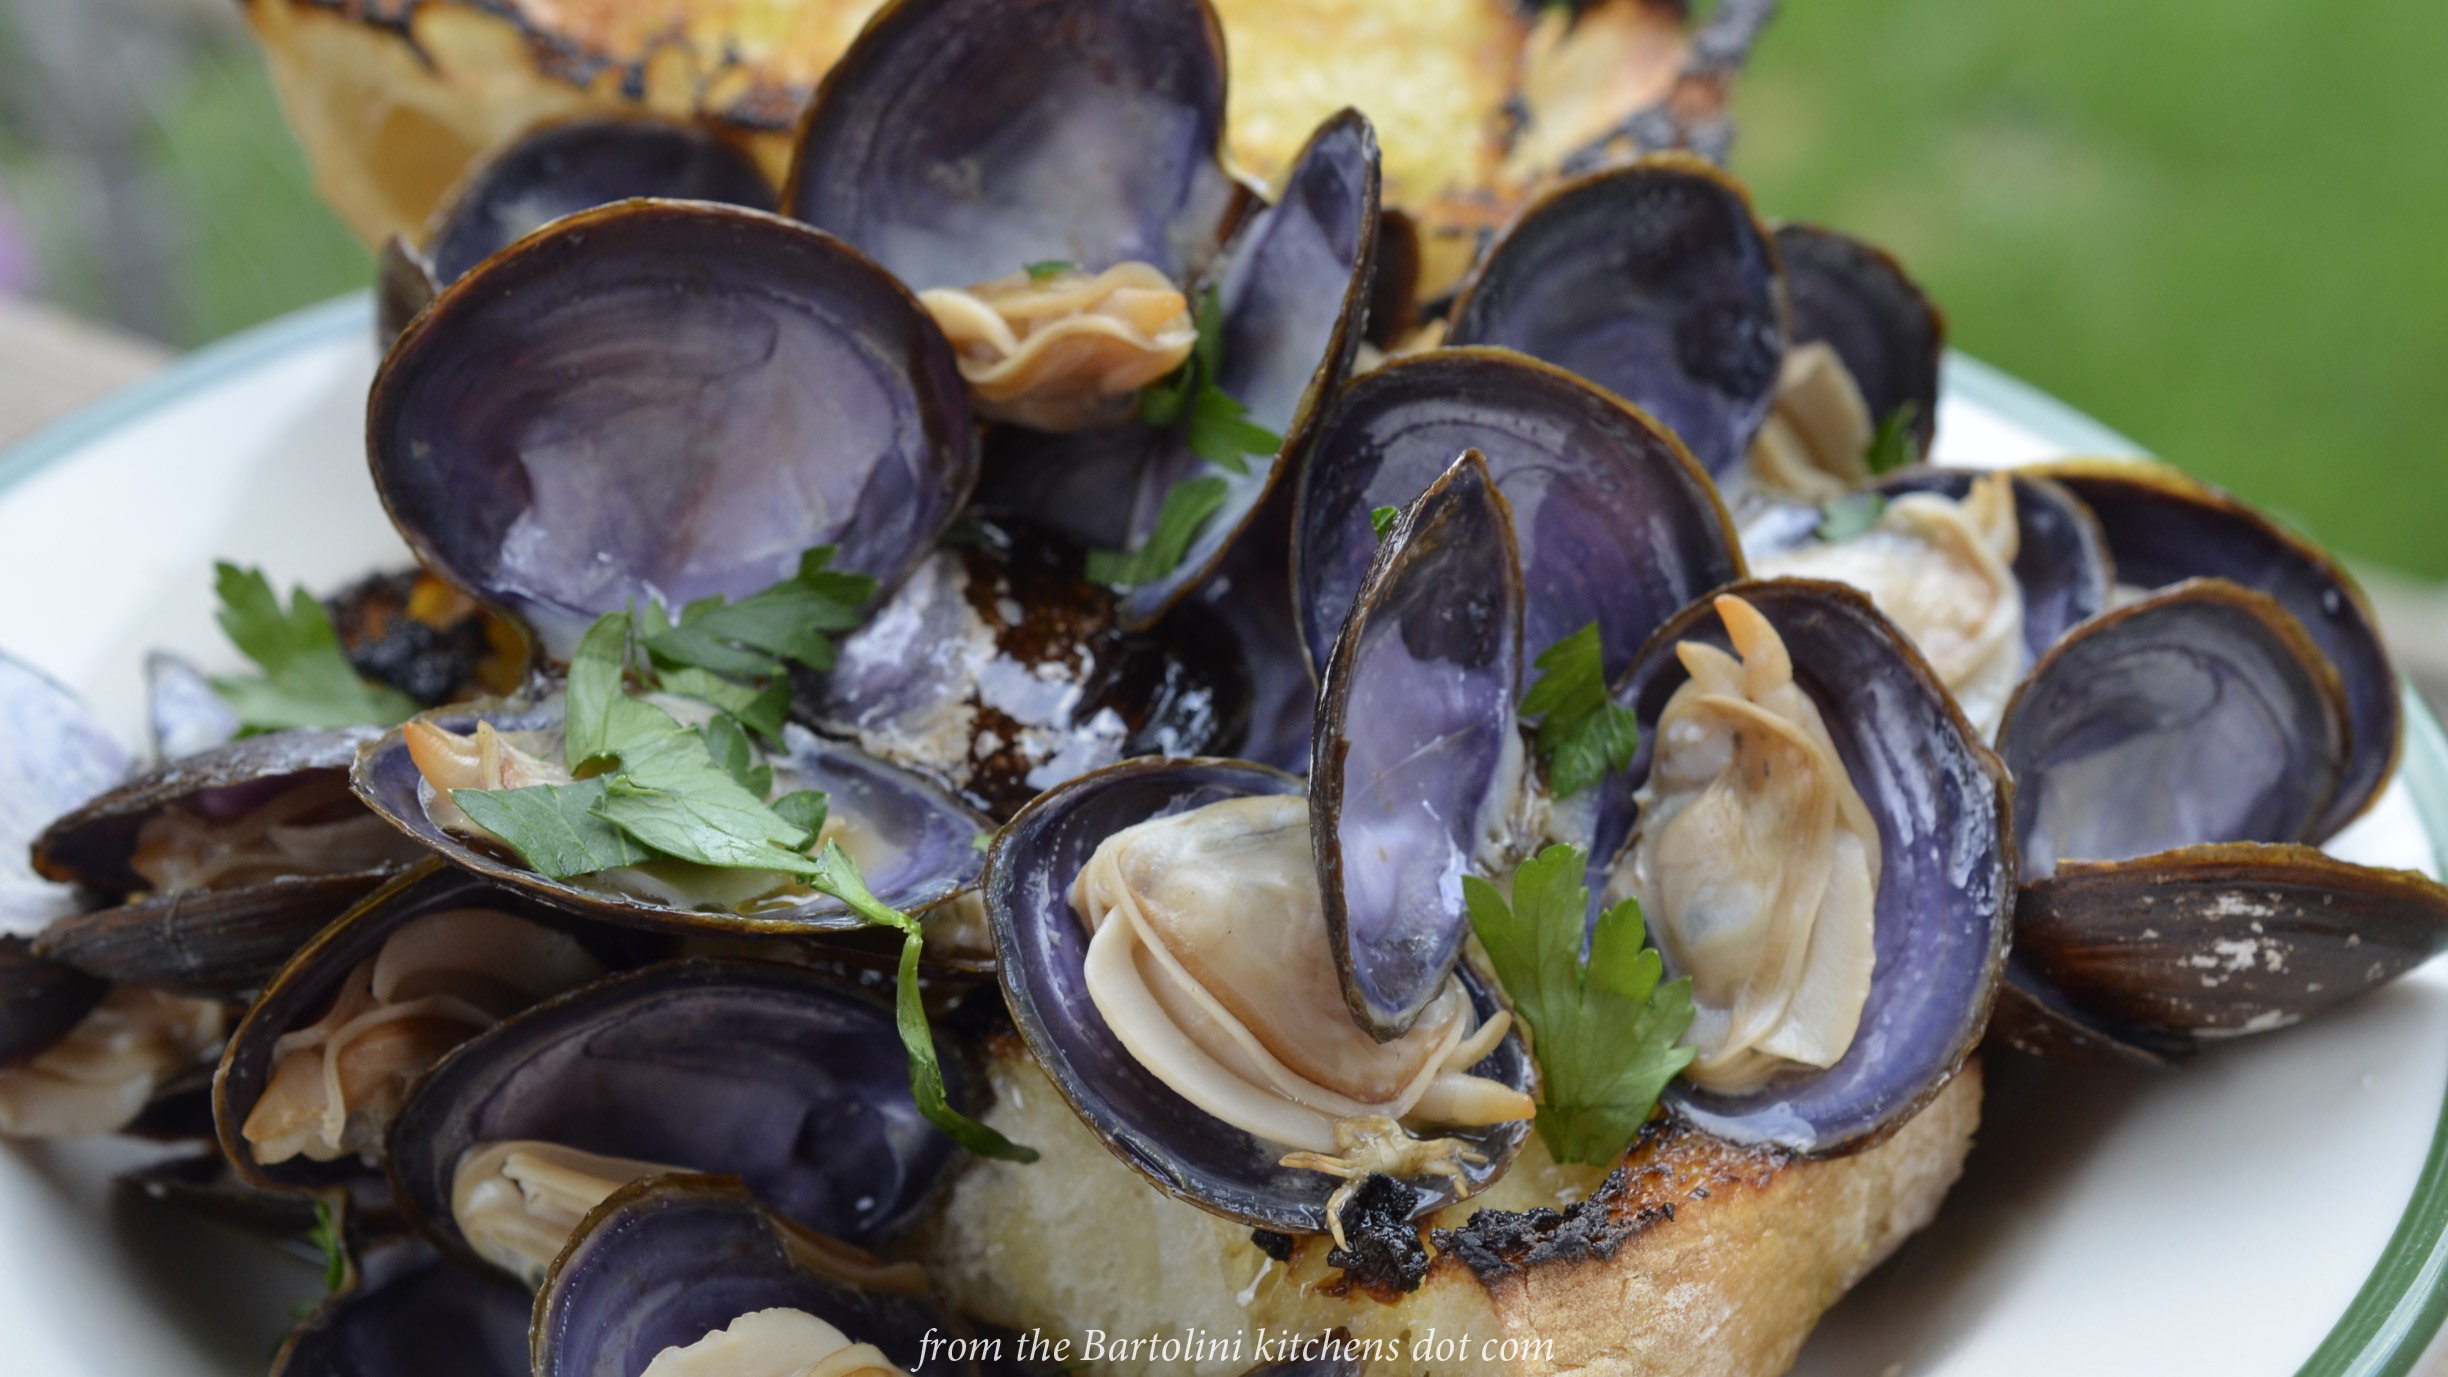
These clams were small — about the size of manila clams — and there were 36 of the beauties in my purchase. Best of all, they’re mighty tasty. In fact, I’m already thinking of going back for more.

Once home, I decided to try something different. Believe me. Deciding not to cook them with linguine was one of the toughest culinary decisions I’ve made in a very long time. Even so, having watched a number of chefs grill clams, I thought I’d give it a try myself. The chefs placed the clams directly upon the grill grates, let them open, and then carefully removed them to a serving platter. That wouldn’t work for me.

Being so small, I envisioned watching them open and spilling their delicious juices on to the flames. They’re simply not large enough to comfortably ride the grates. Worse, any liquids to have survived the opening would surely be dumped as I clumsily tried to move the clams to a platter. A cast iron skillet was the answer. First, though, the clams had to be cleaned.

Using my food brush, the clams’ shells were scrubbed clean. After that, they were placed in a bowl of cold, fresh water and left to soak for almost an hour. Midway through, the water was dumped and the bowl refilled. That gave the clams plenty of time to expel any sand. Clams that refused to close were discarded.

*     *     *

Blue Clams 1

*     *     *

The grill was lit and the flames set to high. Meanwhile, a lemon-butter sauce was prepared using 4 tbsp butter, the juice of 1/2 lemon, and 1 clove of garlic, smashed. The butter and garlic were gently heated in a small saucepan. When the butter just started to simmer, the lemon juice was added and the heat was shut off. The garlic was allowed to steep in the lemon-butter for a few minutes.

Next, a 10 inch cast iron skillet was placed on the grill directly over the flames. While it heated, some fresh parsley was chopped and a chunk of ciabatta bread was sliced in half. The cut side of both pieces was lightly coated with olive oil and the bread was set aside.

The clams were drained and returned to the bowl, along with a couple of ounces of both white wine and water. By now, the pan was screaming hot. The clams with the wine mixture were poured into the pan and the bread was placed on the grill to toast a bit. The grill lid was then closed.

Back in the kitchen, the garlic was removed from the lemon-butter sauce and the pan was returned to a low heat.

It took barely 2 minutes for the bread to toast, I removed both pieces and the clams were already opening. Within 5 minutes, all the clams were open and were quickly removed to a serving bowl. The pan liquids were added, as well. (Note: be sure to discard any clams that remain unopened after cooking.)

*     *     *

Grilled Clams 1

*     *     *

To serve, the bottom piece of bread was placed in a bowl and topped with some clams and a bit of the pan juices. The lemon-butter sauce was poured over the dish and fresh parsley was used to garnish. The top side of the toasted ciabatta bread was served on the side.

Yeah. I’m going back for more clams, but it’s anyone’s guess what else I’ll bring home.

*     *     *

It’s déjà vu all over again …

LingClams_Lrg300

Nothing but a Pasta with Clams recipe would be appropriate here. It is one of my favorite dishes and one I’m sure you’ll enjoy. You can see how the dish is prepared simply by clicking HERE.

*     *     *

Coming soon to a monitor near you …

Sepia e Calamari in Umido Preview

Stewed Cuttlefish and Squid

*     *     *

Advertisement

Salmon en Papillote — on the grill

Summer is here in full-force and I’ve moved most of my “oven-required” dinners to the slow cooker, the grill, or off the menu till Fall. It’s warm enough without my cranking up the oven to fix dinner. That’s just fine for most entrées but it does present a problem for fish. Sure, I could sauté the fillets and create a quick sauce in the pan, but every time I serve it? For me, poor grill master that I am, grilling a fish steak means 5 minutes of fighting to get the poor thing unstuck from the grilling surface, no matter what that surface happens to be. And that’s where today’s recipe comes into play. Cooking en papillote is a method of cooking something, frequently seafood, while enclosed in a pouch of parchment paper. Usually baked in an oven, I use aluminum foil and cook the fish on my grill. No muss, no fuss, and dinner is served.

Dill Butter with Lemon atop Asparagus

As for the recipe, there really isn’t one and this is more a set of guidelines. As such, I’ll list elements of the 3 components, describe how to wrap the fish, and it is for you to decide which ingredients will work best for you. Although, if left to me, I’d vote for a salmon steak thinly coated with pesto and topped with diced tomato and scallion. Yum!

Salmon en Papillote 

Ingredients

  • One 6 – 8 oz salmon fillet or steak, per person. Bass or trout are good alternatives.
  • Chopped fresh herbs. Tarragon, basil, thyme, dill, oregano, parsley, and/or cilantro are suggested. Pesto may be used, as well.
  • Optional minced garlic.
  • Butter
  • Optional fresh vegetables, evenly chopped in a large or small dice or thinly sliced. Choices would include asparagus, onion, tomato, carrot, zucchini, fennel, spinach, summer squash, bell pepper, scallion, etc.
  • Optional splash of white wine per serving.
  • Olive oil, to taste.
  • Lemon zest
  • Salt & pepper
  • Thinly sliced lemon
  • Chopped parsley

Tomato & Scallion with Pesto

  1. Combine chopped herbs and garlic with about 1 tbsp of butter per piece of fish to create a compound butter. This may be done well in advance.
  2. Pre-heat grill to a medium heat, about 350*. Prepare it for “indirect” grilling.
  3. Finely chop or thinly slice the vegetables, if any, dress with a little extra virgin olive oil, and season with salt and pepper.
  4. Prepare the sheet(s) of aluminum foil. Take one long piece of extra-strength foil — about 3 times the length of the fish. Divide it in half to create 2 rectangles. One rectangle will be the pouch’s bottom upon which your ingredients will be placed and layered. The other, the “top,” will eventually be folded over and used to seal the pouch. Now, to layer the ingredients that you’ve chosen to use:
    1. If using a bed of vegetables: in the center of the bottom rectangle, form a vegetable layer, add the fish (skin-side down), season with salt and pepper, dot with the compound butter or pesto, top with lemon slice(s) & zest, and sprinkle with chopped parsley.
    2. If not using a vegetable bed: place the fish in the center of the rectangle (skin-side down), season with salt & pepper, dot with compound butter or pesto. At this point you can either: a) top with lemon slices & zest, garnish with chopped parsley, and add a splash of white wine: or, b) place the vegetables atop the fish, add lemon slice(s) & zest, and garnish with chopped parsley.
  5. Fold the other half of the foil so that it fully covers the bottom rectangle containing the ingredients. Beginning on one side, start crimping and sealing the edges of the foil’s top and bottom. You will need to do this to 3 sides of the pouch. (The 4th side is the fold and, as such, is already sealed.) Be sure the pouch is well-sealed for you don’t want any steam to escape during cooking.
  6. Use the indirect grilling method to determine the placement of each foil pouch.
  7. Fish should be cooked in 15 – 20 minutes, though times will vary depending upon the size and temperature of the grill, the types and cut of the vegetables, and the thickness and kind of fish used.

Butter & Lemon with White WIne

Variations

I’ve already listed pretty much all the variations I can think of, save one. Not everyone has a grill but all that means is that you have to “move the party indoors.” That is to say, prepare the fish as indicated above, using foil or parchment paper to create the pouch. Place the pouch on a baking sheet and bake for 15 – 20 minutes in the center of a pre-heated, 400* oven. Again, cooking times may vary.

Grandpa’s Barbecued Shrimp

I’ve just returned from a week-long visit with Zia in Michigan, where Spring has finally sprung — even if it is much wetter and colder than most would like. The arrival of Spring in Michigan’s Thumb means that Summer is just about here for the rest of the country. And with Summer comes barbecue season, but hold onto your skewers. First, a little history …

The old two-flat had a great barbecue in the backyard that Grandpa built during the Summer of 1959. Pictured on the right is the construction site and below, to the left, the finished monolith. Grandpa was a master at masonry and he created the arch over the grilling area. (It wasn’t until I was much older that I appreciated the skill involved in doing that.) The grilling area had 3 sections: the top was the grill surface; the middle was where the fire burned; and the lowest section was where the ashes collected. The doors of the lower 2 sections had vents with which you could limit and direct the airflow to the fire, and thereby control the grill’s heat. The flue system practically guaranteed that there would be no smoke to bother the eyes of the barbecue’s many users. To the left of the grilling area was a large, flat surface that served as a work station and, under that, an area for storing wood. He’d thought of everything.

Once it was finished, that barbecue was often a center of activity for both households, regardless of the weather. In Winter, our yard was turned into an ice skating rink and the grill helped to warm us as it heated our hot chocolate. In warmer weather, I clearly remember seeing Dad, the High Priest of Grilling, standing in front of his altar, umbrella in his left hand & struggling with the wind, as his right hand tended to the sacrificed beast that would become our meal. Once Summer came, there were many Sundays when both families feasted together on some main course that was char-broiled to perfection. As for Grandpa, he could often be found “out back” on Fridays grilling shrimp, his specialty and today’s recipe. Somehow, I always found myself at his side as he grilled and, lo and behold, he would give me 1 or 2 shrimp just for “keeping company.” I think I got the better part of that deal. Not only did I get a couple of shrimp back then but now, years later, whenever I lay skewers of shrimp on a grill, my thoughts inevitably turn to the times spent standing next to my Grandpa in front of his master work — and I smile.

Back now, to the Present. Many stores today offer shrimp that have been cleaned but with the shells still on. These shrimp are definitely preferable to those that have been peeled simply because the shells offer some protection during grilling and so the shrimp are less likely to burn. Not only that but the opening left from the de-veining process makes a perfect home for stuffing. When buying shrimp destined for the grill, I’ve found that bigger is better. Large shrimp aren’t so quick to burn and they make a more memorable presentation. As for the stuffing, the amount of olive oil you need will vary depending upon the bread crumbs you use — i.e., fresh, store-bought, or panko. The goal is a stuffing that’s rather wet, though not “soupy.” You want it wet enough to survive the heat of the grill without drying out completely and yet dry enough so that  you do not see stuffing and oil pooling on your serving platter. For the grilling, you can use a webbed grill basket, the kind with 2 sides that can be opened and that will hold the shrimp in place while grilling. This type of basket will allow you to turn over all the shrimp with ease. Lacking a grilling basket, thin bamboo skewers can be used after they’ve been soaked to prevent being burned on the grill. I use 2 skewers per set of shrimp and this, too, makes turning them over much easier.

*     *     *

Grandpa’s Barbecued Shrimp Recipe

Ingredients

  • 1 lb extra-large shrimp (no smaller than 21 – 25-ct), de-veined but not peeled
  • 1/3 – 1/2 cup bread crumbs
  • 1 clove garlic, minced
  • 2 tbsp fresh parsley, chopped
  • 1/3 – 1/2 cup olive oil
  • salt & pepper, to taste
  • thin bamboo skewers, soaked in water for at least 1 hour before grilling
  • lemon wedges for serving

*     *     *

*     *     *

Directions

  1. In a mixing bowl, combine the bread crumbs, garlic, parsley, salt & pepper and mix well.
  2. Add enough olive oil to the mixture to produce a wet, but not soupy, stuffing. Mix well.
  3. Place the shrimp into the bowl with the bread crumbs and mix well. Cover the bowl and refrigerate for at least 30 minutes.
  4. In the meantime, arrange the coals, if used, to enable the “indirect cooking method.” Start the grill or fire up the coals so that the fire is ready when the shrimp are.
  5. Use 2 skewers to hold the shrimp. Place one skewer near the shrimp’s tail and the other skewer near its opposite end. Grab a second shrimp and do the same, using the same 2 skewers so that this shrimp is on top of the first one that you skewered. Be sure to include a little stuffing between the shrimp. Repeat the process until the skewers are full, keeping in mind the size or your grilling area. You may only be able to skewer 3 jumbo shrimp or 5 – 6 large shrimp per set of 2 skewers.
  6. Repeat step 5 until all the shrimp are skewered.
  7. With the grill very hot, clean the grates and use a wad of paper towels dipped in vegetable oil to coat the grilling surface. (No need to coat the grates if using a grilling basket.)
  8. If using the indirect method, the shrimp should take no more than a total of 5 minutes to cook both sides, depending upon the size and temperature of the grill. The time will be less if the shrimp are peeled and even less if they are grilled directly above the flames. Stay near the grill and watch them closely.
  9. Once cooked, the shrimp may be served as-is, on the skewers, or off of the skewers and arranged on a platter.
  10. Serve immediately with lemon wedges on the side.

Notes

With minor changes, you will see this bread crumb mixture, the Bartolini breading mixture, used again and again throughout this blog. The Bartolini Girls used it to stuff a number of vegetables, from artichokes to zucchini, not to mention seafood preparations from stuffed calamari to baked tilapia. Learn to make it, and to adjust the moisture level to suit the dish being prepared, and you will be amazed at how many uses you’ll find for it. Just please don’t forget to come back here and tell us about it.

*     *     *