The Spiralizer Chronicles, Chapter 2: Butternut Squash “Noodles” with Pancetta, Clams and Shrimp

Squash with Seafood 1

Although I may not be posting many recipes that rely upon my new love, the spiralizer, I continue to us it frequently. In fact — hold on to your hats — I use it more often than I do my pasta machine. I know! I never would have thought such a thing possible. Yet, here I am with about 3/4 lb of homemade pasta in my pasta basket, where’s its been for just about 3 weeks now. 3 weeks!!! This would have been unthinkable just last summer and I have butternut squash to credit — or is it blame?

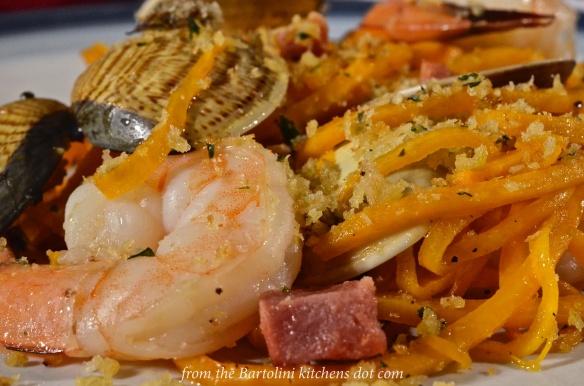
As much as I enjoy zucchini noodles, “zoodles”, their texture often leaves much to be desired, They can go from al dente to unappealingly soft in the blink of an eye. To avoid this, I often serve them raw, making more of a pasta salad than a dish of freshly cooked pasta. Not so with butternut squash. Roasting doesn’t affect these noodles’ “bite” but it does add flavor to the final dish. Best of all, these noodles can be served hot, making a number of dishes possible. Today’s recipe is one such dish.

As is the case with most seafood pasta dishes, this one is easy to prepare and you’ll find that roasted butternut squash compliments seafood quite well. Truth be told, I’ve a squash just waiting for me to return home from the fishmonger with more seafood. It won’t be long now.

*     *     *

Squash with Seafood 2

*     *     *

Butternut Squash Noodles with Seafood Recipe

Ingredients

  • 1 small butternut squash
  • 2 tbsp olive oil, divided
  • 2 oz (56 g) pancetta, chopped
  • about 12 small clams — manila, littleneck, or cockles will do (See Notes)
  • 1 clove garlic, minced or grated
  • about 12 shrimp — no smaller than 41 to 50 ct/lb
  • 2 tbsp breadcrumbs – omit if GF (See Notes)
  • 2 tsp parsley per serving, chopped
  • olive oil
  • salt and pepper to taste

Directions

  1. Preheat oven to 400˚ F (195˚ C).
  2. Separate neck of squash from the bulb end that contains the seeds. Reserve the bulb for another use.
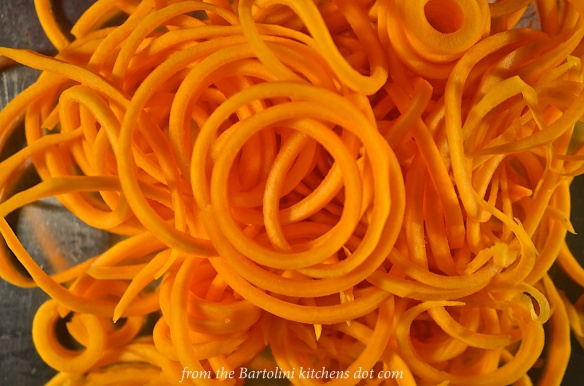
  3. Peel the squash before using a spiralizer to create spaghetti-like noodles.
  4. Place noodles on a baking sheet, season with salt and pepper, and sprinkle with 1 tablespoon olive oil. Place in oven and roast for 15 minutes.
  5. Combine breadcrumbs, parsley, and a bit of olive oil. Mix thoroughly. Place mixture in a small fry pan over medium heat. Cook until mixture is golden brown. Set aside.
  6. Begin heating remaining olive oil in a large frypan with a lid. Add the pancetta and begin to render its fat. Do not allow the pancetta to burn. It should be fully rendered about the time that the noodles have 5 minutes to go.
  7. Place the garlic and clams in the pan with the pancetta and cover. Sauté for 5 minutes before adding the shrimp to the pan. Cover the pan.
  8. After a minute or so, stir the frying pan’s contents and cover.
  9. Remove noodles from the oven and dump them into the pan with the seafood and pancetta. Stir to evenly coat everything with the pan juices.
  10. Continue to sauté until the clams and shrimp are fully cooked — no more than 2 minutes more.
  11. DISCARD ANY CLAMS THAT REMAIN UNOPENED.
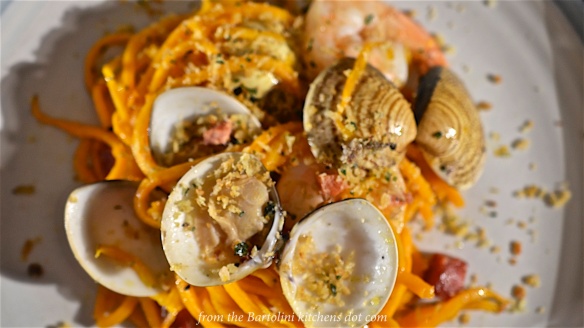
  12. Remove to a serving platter and garnish with the toasted breadcrumbs created in Step 5.
  13. Serve immediately.

*     *     *

Squash with Seafood 3

*     *     *

Notes

Use a brush reserved for food-prep to scrub all clams before cooking. Any that remain open after a thorough scrubbing should be discarded. Opinions vary as to whether to soak fresh clams in salt or fresh water to cause the clams to expel grit. Some feel that commercially harvested and shipped clams do not need such purging. If, however, your clams are bought directly from the fishermen or harvested yourself, they must be soaked for at least 30 minutes before scrubbing, changing the water midway through.

In Italian cooking, it is definitely not recommended to use grated Parmigiano or Pecorino cheese on a dish with most varieties of seafood. Very often, toasted breadcrumbs are substituted, just as I did above. Do you remember the stuffed calamari recipe I shared back in March? At the time, I suggested freezing the extra cooked breading mixture. They would make the perfect garnish for this dish, as well as a number of other pasta with seafood dishes. Being roasted already, all you need do is to warm them in a small frying pan. Use them as you would grated cheese, as a garnish just before serving.

I’ve seen recipes where squash noodles are boiled first, much like pasta, rather than roasted. I’ve yet to prepare them that way. If it ain’t broke …

My spiralizer is an attachment for a stand mixer. As such, it makes quick work of the “neck” of a butternut squash. Some may find this squash is too firm for their hand-cranked spiralizer. I’ve no experience with any of them and look forward to hearing from you in the Comments.

Of course, for a gluten-free version do not include the toasted breadcrumbs unless they’re GF. Garnish with chopped parsley instead.

*     *     *

It’s déjà vu all over again …

Tart Cherry Frozen Yogurt with Chocolate Sauce

With September almost here, there’s no time like the present for frozen treats. If you’re like me and took advantage of the sour cherry season, stashing some of the red beauties in your freezer, well, now’s the time to set some of them free! Follow this LINK to learn how to use them to prepare frozen yogurt, as well as a tasty chocolate sauce to smother it. All that’s missing is the cherry on top!

*     *     *

Coming soon to a monitor near you …

General Tso's - Preview

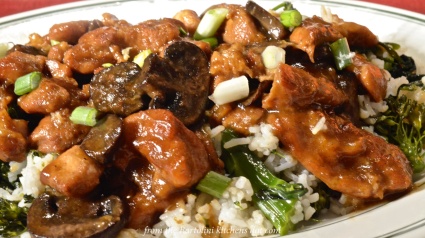
General Tso’s Chicken

*     *     *

Advertisement

Pasta with Shrimp

Having just returned from a visit with Zia, I decided I had better jot down this recipe while it was still fresh in my mind. This is one of those dishes that I never really think about while I’m preparing it. It just kinda happens. Besides, this wasn’t even the dinner I had planned.

I had intended all along to make  Trenette al Salmone for Zia during my visit. I should have brought smoked salmon with me but I was sure that I could get some in her area’s stores. Well, guess again. I went to her local groceries — “local” meaning 15 and 25 miles away, respectively, in opposite directions — and neither had smoked salmon. One of the stores happened to be running a special on large shrimp (25 – 30-ct), so I bought some and, under her watchful eye, I prepared dinner for us that night.

Like the smoked salmon dish, this is an easy meal to prepare. I prefer to use large, raw shrimp that are peeled, cleaned, and with tails removed. I cut them in half because they are otherwise too large to be eaten with pasta in a single bite, not to mention the larger the shrimp, the fewer to clean and prep. Where this dish differs from that of the smoked salmon, however, is that shrimp have a strong enough flavor that they won’t be overpowered by diced onion and garlic in the sauce. But for the onion and garlic, the same basic cream sauce is used in both dishes and neither uses cheese, as well. Remember, Italian recipes rarely, if ever, use cheese when seafood is a primary ingredient.

*     *     *

Pasta with Shrimp Recipe

Ingredients

  • 1/4 cup (1/2 stick) butter
  • 1 medium onion, chopped fine
  • 2 cloves garlic, minced
  • 1 cup heavy cream
  • 1 lb large (25 – 30 ct) shrimp, cleaned, peeled, tails removed, cut in half
  • 1 lb cooked thin spaghetti
  • 3 tbsp fresh parsley, chopped, separated
  • salt & ground white pepper, to taste
  • reserved pasta water

*     *     *

*     *     *

Directions

  1. Melt butter in a large, deep frying pan over med-high heat.
  2. Add onion and sauté until soft, about 3 minutes.
  3. Add garlic and continue sautéing for another minute.
  4. Add shrimp and sautéing for about 2 minutes. Shrimp should not be thoroughly cooked at this point.
  5. Add the cream and allow shrimp to finish cooking as the cream reduces slightly, about 2 – 3 minutes.
  6. Season with 2 tbsp of the parsley before adding the cooked spaghetti to the pan. Mix until the pasta is well-coated. If necessary, add a little of the reserved pasta water. Taste the dish and season with salt & pepper.
  7. Garnish with remaining tbsp of parsley and serve immediately.

Variations

You will find that different pastas, be they fresh or dried, absorb sauces at different rates. Reserving some of the starchy pasta water will help you deal with a “thirsty” batch of noodles or a sauce that was simmered too strongly and is a little dry. Not only that but the water, being starchy, can be used as somewhat of a thickening agent. Just bear in mind that the water is heavily salted, so, go easy on the salt until after you’ve added the pasta water.

*     *     *

Grandpa’s Barbecued Shrimp

I’ve just returned from a week-long visit with Zia in Michigan, where Spring has finally sprung — even if it is much wetter and colder than most would like. The arrival of Spring in Michigan’s Thumb means that Summer is just about here for the rest of the country. And with Summer comes barbecue season, but hold onto your skewers. First, a little history …

The old two-flat had a great barbecue in the backyard that Grandpa built during the Summer of 1959. Pictured on the right is the construction site and below, to the left, the finished monolith. Grandpa was a master at masonry and he created the arch over the grilling area. (It wasn’t until I was much older that I appreciated the skill involved in doing that.) The grilling area had 3 sections: the top was the grill surface; the middle was where the fire burned; and the lowest section was where the ashes collected. The doors of the lower 2 sections had vents with which you could limit and direct the airflow to the fire, and thereby control the grill’s heat. The flue system practically guaranteed that there would be no smoke to bother the eyes of the barbecue’s many users. To the left of the grilling area was a large, flat surface that served as a work station and, under that, an area for storing wood. He’d thought of everything.

Once it was finished, that barbecue was often a center of activity for both households, regardless of the weather. In Winter, our yard was turned into an ice skating rink and the grill helped to warm us as it heated our hot chocolate. In warmer weather, I clearly remember seeing Dad, the High Priest of Grilling, standing in front of his altar, umbrella in his left hand & struggling with the wind, as his right hand tended to the sacrificed beast that would become our meal. Once Summer came, there were many Sundays when both families feasted together on some main course that was char-broiled to perfection. As for Grandpa, he could often be found “out back” on Fridays grilling shrimp, his specialty and today’s recipe. Somehow, I always found myself at his side as he grilled and, lo and behold, he would give me 1 or 2 shrimp just for “keeping company.” I think I got the better part of that deal. Not only did I get a couple of shrimp back then but now, years later, whenever I lay skewers of shrimp on a grill, my thoughts inevitably turn to the times spent standing next to my Grandpa in front of his master work — and I smile.

Back now, to the Present. Many stores today offer shrimp that have been cleaned but with the shells still on. These shrimp are definitely preferable to those that have been peeled simply because the shells offer some protection during grilling and so the shrimp are less likely to burn. Not only that but the opening left from the de-veining process makes a perfect home for stuffing. When buying shrimp destined for the grill, I’ve found that bigger is better. Large shrimp aren’t so quick to burn and they make a more memorable presentation. As for the stuffing, the amount of olive oil you need will vary depending upon the bread crumbs you use — i.e., fresh, store-bought, or panko. The goal is a stuffing that’s rather wet, though not “soupy.” You want it wet enough to survive the heat of the grill without drying out completely and yet dry enough so that  you do not see stuffing and oil pooling on your serving platter. For the grilling, you can use a webbed grill basket, the kind with 2 sides that can be opened and that will hold the shrimp in place while grilling. This type of basket will allow you to turn over all the shrimp with ease. Lacking a grilling basket, thin bamboo skewers can be used after they’ve been soaked to prevent being burned on the grill. I use 2 skewers per set of shrimp and this, too, makes turning them over much easier.

*     *     *

Grandpa’s Barbecued Shrimp Recipe

Ingredients

  • 1 lb extra-large shrimp (no smaller than 21 – 25-ct), de-veined but not peeled
  • 1/3 – 1/2 cup bread crumbs
  • 1 clove garlic, minced
  • 2 tbsp fresh parsley, chopped
  • 1/3 – 1/2 cup olive oil
  • salt & pepper, to taste
  • thin bamboo skewers, soaked in water for at least 1 hour before grilling
  • lemon wedges for serving

*     *     *

*     *     *

Directions

  1. In a mixing bowl, combine the bread crumbs, garlic, parsley, salt & pepper and mix well.
  2. Add enough olive oil to the mixture to produce a wet, but not soupy, stuffing. Mix well.
  3. Place the shrimp into the bowl with the bread crumbs and mix well. Cover the bowl and refrigerate for at least 30 minutes.
  4. In the meantime, arrange the coals, if used, to enable the “indirect cooking method.” Start the grill or fire up the coals so that the fire is ready when the shrimp are.
  5. Use 2 skewers to hold the shrimp. Place one skewer near the shrimp’s tail and the other skewer near its opposite end. Grab a second shrimp and do the same, using the same 2 skewers so that this shrimp is on top of the first one that you skewered. Be sure to include a little stuffing between the shrimp. Repeat the process until the skewers are full, keeping in mind the size or your grilling area. You may only be able to skewer 3 jumbo shrimp or 5 – 6 large shrimp per set of 2 skewers.
  6. Repeat step 5 until all the shrimp are skewered.
  7. With the grill very hot, clean the grates and use a wad of paper towels dipped in vegetable oil to coat the grilling surface. (No need to coat the grates if using a grilling basket.)
  8. If using the indirect method, the shrimp should take no more than a total of 5 minutes to cook both sides, depending upon the size and temperature of the grill. The time will be less if the shrimp are peeled and even less if they are grilled directly above the flames. Stay near the grill and watch them closely.
  9. Once cooked, the shrimp may be served as-is, on the skewers, or off of the skewers and arranged on a platter.
  10. Serve immediately with lemon wedges on the side.

Notes

With minor changes, you will see this bread crumb mixture, the Bartolini breading mixture, used again and again throughout this blog. The Bartolini Girls used it to stuff a number of vegetables, from artichokes to zucchini, not to mention seafood preparations from stuffed calamari to baked tilapia. Learn to make it, and to adjust the moisture level to suit the dish being prepared, and you will be amazed at how many uses you’ll find for it. Just please don’t forget to come back here and tell us about it.

*     *     *