My Cherry Amour, The Return (This time it’s personal)

OK! I admit it. I have a problem. At first it was interesting, even quaint. Then it became mildly neurotic, with close friends beginning to question my actions. Now, I’m afraid, it’s a full-blown obsession and I’ve been urged to seek help — until the concerned individual learns that s/he will be receiving the fruits of my addiction. How quickly concern becomes encouragement. Enablers all! To think, I was happily satisfied with my frozen stash of muffins and cherries. Thrilled that my cherry pie had been well-received and was good to the very last bite. All in all, there was certainly no need for me to seek out more cherries — until I noticed a “Jam” category at Tanya’s wonderful ChicaAndaluza blog.  Lo and behold! Just a few short weeks ago, she made cherry jam. My heart raced as I read her post. Ah! She canned her jam and I don’t can. (I suffer from botulismaphobia.) My heart beat returned to normal — but wait. She canned them without a water bath. How could this be? I used her post’s comment section to ask if it were possible to can something without a hot water bath, knowing full-well that it would be days before her answer was received, long after yesterday morning’s trip to the farmers’ market and, presumably, after this season’s tart cherries were gone. I was in the clear and the few remaining tart cherries within the tri-state area breathed a sigh of relief. And then the unthinkable happened. Tanya answered my question within 2 hours. TWO  HOURS!! I knew instantly that I was doomed.

*     *     *

*     *     *

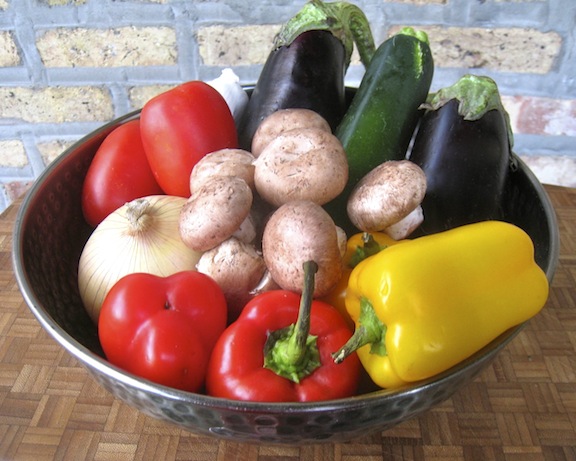
Yesterday morning, Saturday, in the middle of a driving rain storm, Max & I headed to the farmers’ market. I promised myself that we would turn around and come home if the rain didn’t let up. In fact, it got worse as we drove north toward Evanston. Confidently, I drove onward. And then, about 1/2 mile from the market, it was as if Moses himself had waved his staff. The clouds parted and the rain stopped completely. Again, my heart began to race. Upon parking the car, I went immediately to both fruit stands that had, unwittingly, fed my addiction in prior weeks. There were no sour cherries to be found at either location. Relieved, I went about buying an assortment of vegetables — I’ve giardiniera to make. Within minutes, my shopping bags were full and I was headed back to the car, where Max and the traffic coördinator had been keeping company. That’s when I saw them. 8 quarts of tart cherries where, just minutes before, there had been none. The young woman apologized. Something about the rain. Arriving late. Being short-handed. I don’t really remember what else, if anything, was said; my head was reeling. I pointed to 2 quarts, paid her in silence, walked backed to my car, and drove home, managing to avoid looking Max in the eye the entire trip. Forget about whatever had been planned, the day had become cherry jam day.

*     *     *

*     *     *

Never having canned anything before, I referenced 3 sources. Tanya’s Summer Cherry Jam recipe, of course; David Lebovitz’s No-Recipe Cherry Jam; and the pectin envelope’s instructions. I pitted the 2 quarts of cherries and they yielded 3 lbs of cherries and juice. I reserved 8 oz, put the remaining portion into a food processor, and pulsed until the cherries were coarsely chopped. I then returned the whole cherries to the mix, per Lebovitz’s suggestion to keep a few cherries unchopped. The jars, all new, were washed in my dish washer, using the “sanitize” cycle. The lids were washed in warm soapy water, rinsed, and then placed in a deep bowl. While the cherries were being cooked, boiling water was poured over the lids and they remained in the water until needed. With everything now prepared, I followed Tanya’s recipe and made just about 7 cups of cherry jam. Thanks to Tanya, my first foray into canning wasn’t nearly as painful as I had feared. Even so, I think I’ll limit my future canning exploits to the making of jam. No need to press my luck.

*     *     *

Notes

We will NOT be going to the Skokie Farmers’ Market today — I think.

*     *     *


My Cherry Amour, Reprise (Bigger, better, badder!)

Having professed my love of tart cherries last week, I’m sure you can understand my remorse now that cherry season has come to an end. Rather than mourn their passing, however, I’ve decided to celebrate their sour little lives by baking one last cherry pie. (Put another way, I’ve got a freezer full of cherry muffins and there’s still another quart of pitted cherries in the fridge.)

I’ve used both of these recipes for several years now. The first, for pastry dough, uses a food processor to mix the dough. That alone makes it a winner in my book. The recipe, however, makes only enough pastry dough for one 9 inch pie crust. I’ve found that I get better results if I make 2 batches of dough, rather than doubling the recipe for a double-crusted pie. Don’t ask me why but that’s just the way it works. The recipe for the pie filling is about as simple as can be. Flour, not cornstarch or tapioca, is the thickening agent and there’s no need to pre-cook the fruit filling mixture before placing it into the pie shell. So, if you’re good working with pastry dough, you can have a pie in the oven pretty quickly. Me? It’s an afternoon project, often including wailing, the gnashing of teeth, and the rending of garments.

There is one last thing to consider, especially if you, like me, tend to throw common sense out the window when you see all the pretty quarts of tart cherries lined up in the market or at some farmer’s stand. I mean, how can you not buy a few quarts? It all makes perfect sense until you arrive home and realize that you have to pit them all before you can do anything else with them. Well, there is hope for us. I’ve found a website that should be called “How to deal with the fruit and stuff that result from ChgoJohn going to a farmers’ market.com?” It has been called, instead, Kraft Foods something or other and it explains how to freeze a variety of baked goods. You can reach it by clicking here and I recommend that you bookmark the site. It’s one of those web pages that you probably won’t need today, you may not need tomorrow, but you are going to need it some day.

*     *     *

Food Processor Pie Crust Recipe

Yield: One 9 inch pie crust

For best results:

  • Do not over-process the dough.
  • Use only enough water to create a crumbly texture.
  • Do not run the processor long enough to form a dough ball. Use your hands to do that.

Ingredients

  • 1 1/2 cups flour
  • 4 tbsp unsalted butter, chilled/frozen, cubed
  • 5 tbsp shortening, chilled/frozen, cubed
  • 1/2 tsp salt
  • 3 tbsp ice water

Directions

  1. Add flour and salt to the processor. Pulse it a few times to mix the 2 ingredients.
  2. Add the very cold butter and shortening cubes.
  3. Pulse the machine 3 times, with each pulse lasting a 3-count. Your ingredients will now be lightly mixed.
  4. With the machine running, slowly add the ice water. Do not add so much that a ball of dough forms. Remove the lid and, with your hands, test the dough to see if a ball of dough can be formed.
    1. If so, turn the dough until a very lightly floured service, form a ball, wrap it in plastic wrap, and refrigerate for 30 minutes.
    2. If a dough ball will not form, add a little more water, pulse the machine a couple of times, and test it again. When you can form a ball of dough, follow step A above.
  5. After 30 minutes, remove the dough from the fridge and roll it until large enough to completely cover the bottom of a 9 inch pie pan. Place the dough into the pan, trim any access, and return the crust and pan to the fridge until needed further.
  6. I usually postpone handling the 2nd pie crust, the “top,” until just before it is needed. The colder the dough going into the oven, the flakier the crust coming out.

*     *     *

Pie Eyed

*     *     *

Cherry Pie Recipe 

Ingredients

  • Pastry for 1 double-crust 9 inch pie.
  • 4 cups fresh, tart cherries, pitted
  • 1 1/3 cups sugar
  • 1/3 cup ap flour
  • 1/4 tsp salt
  • 1/4 tsp almond extract
  • 2 tbsp butter, cut into small cubes
  • 3 tbsp milk
  • sugar

Directions

  1. Pre-heat oven to 425*.
  2. Use half of the pastry dough to line the pie plate. Place it in the refrigerator to chill until needed.
  3. Gently combine the cherries, sugar, flour, salt, and almond extract.
  4. Roll out the other half of the pastry and prepare for use. If covering the entire pie, leave as is. If creating a lattice, cut the strips. If, as I did, you’re creating leaves, use a stamp to form them all, place on a baking sheet lined with parchment paper, and refrigerate until needed.
  5. Pour the cherry mixture into the chilled pie shell and dot the pie with the cubes of butter.
    1. If covering the entire pie, spread the top portion of the pastry dough, seal its edge with the bottom’s dough, crimp the edge, and create slits in the top to allow steam to vent.
    2. For a lattice cover, retrieve the strips and, starting at one end of the pie, weave a lattice across the pie’s top. (See Notes below.)
    3. For a leaf top, place the dough leaves across the top,  being careful to leave enough openings for steam to vent.
  6. Use a pastry brush to coat the upper crust with milk. Sprinkle the top with a light dusting of sugar.
  7. Bake on a baking sheet — in case of overflow — in a pre-heated 425* oven for 35 to 40 minutes until golden.
  8. Allow to cool before serving so that the filling sets properly.

*     *     *

"... And let's have another piece of pie."

*     *     *

Notes

The reason one sees so many lattice-topped cherry pies is because a woven top allows the pie’s juices to evaporate somewhat during the baking process, making for a better pie. Cook’s Illustrated Magazine’s book, Baking Illustrated (p. 148), suggests creating the lattice on parchment paper and not atop the pie. Once woven, place both the lattice and parchment paper in the freezer. When the lattice is firm, gently transfer it from the paper to the pie’s top and carefully connect it to the bottom crust. Brush it with milk, sprinkle with sugar, and bake as directed above.

And so ends this year’s journey down Cherry Lane, where pitting is such tart sorrow.

*     *     *


Mom’s Caponata

The origins of caponata may be found in Sicily but today it is served throughout Italy, in one form or another. Yet, as varied as the final dishes might be, 5 ingredients form the basis of virtually all renditions: eggplant, tomato, onion, garlic, and olive oil, with eggplant being the star of the dish. Beyond these 5, the additional components depend as much upon the individual cook as it does the region of Italy. There’s no better example of this than Mom’s recipe and the one that Zia, her sister, follows. Both included some bell pepper and mushrooms but Mom, also, added zucchini; Zia rarely, if ever, does. The difference here is minimal but, then again, their kitchens were only separated by less than 20 vertical feet. Imagine the differences when there’s hundreds of miles separating the kitchens. In fact, I’ve seen caponata recipes that include, among other things, olives, pine nuts (pignoli), fennel, capers, currants, celery, and even seafood. Seafood seems a bit much to me and I pretty much follow Mom’s recipe. Still, more important than which recipe to follow is finding the right ingredients. Like Mom & Zia, I’ll choose only those vegetables that are fresh and “in season,” for best results. And if you end up with caponata that looks suspiciously like ratatouille, well, I won’t tell anyone.

Whatever vegetables you choose to include, try to chop them evenly, creating pieces that are roughly the same size by type. I cut the “firm” vegetables — onions, peppers, etc. — into strips. The “soft” vegetables — tomatoes, zucchini, eggplant, etc. — are chopped into 3/4 to 1 inch cubes. By cutting the ingredients into strips and cubes, you’ll be adding visual interest to the final dish. When sautéing, begin with the most firm vegetables and proceed until you’ve added the softest. The end-result should be a dish of vegetables that are fully cooked and not at all al dente. Caponata may be served hot, warm or at room temperature. It can be served as a side dish or as an appetizer, where it can be used as a spread or to make bruschetta. Like Mom before me, very often I’ll use it to dress pasta, resulting in a delicious vegetarian dish. Best of all, to my tastes, left-over caponata can be used to make a delicious frittata the next morning. In fact, when I was a boy, Mom always reserved a portion for my breakfast the following day. Today, if I go to a farmers’ market in the morning, it’s almost guaranteed that I’ll be having some form of caponata that evening. You can guess what I’ll be having for breakfast the next morning.

*     *     *

Caponata Recipe

Ingredients

  • 3 tbsp olive oil
  • 1 medium onion, halved and sliced
  • 2 bell pepper, sliced into strips – gypsy, cubanelle, or Italian peppers may be substituted
  • 2 cloves garlic, minced
  • 3 tbsp freshly chopped parsley
  • 1 doz. button or crimini mushrooms, quartered
  • 2 medium eggplants, cubed (peeling optional)
  • 1 – 2 zucchini, cubed
  • 2 plum tomatoes, cubed
  • salt & pepper, to taste

A Good Day at the Market

Directions

  1. Add oil to a large fry pan and heat over a medium-high heat. Add onion and bell pepper, season with salt & pepper, and sauté until barely soft, about 5 minutes.
  2. Add garlic & parsley and sauté for 1 minute.
  3. Add mushrooms and continue sautéing for about 5 minutes.
  4. Add eggplant, zucchini, and tomatoes, stir to combine, season with salt & pepper, and sauté until done to your liking, at least 8 minutes more.
  5. The dish is now done and may be served hot, warm, or at room temperature.

Variations

As mentioned above, this basic recipe can be modified in any number of ways. Thinly sliced fennel, cubed summer squash, currants, pine nuts, celery, you name it, all may be added. Once you’ve assembled and prepared the ingredients, it’s just a matter of adding them to the pan in an order that assures each will be done to your liking. If the order that I’ve listed above doesn’t do that for you, change it to suit your palate.

Notes

Left-over caponata can be served with pasta or used to make a tasty frittata. I’ll devote a later posting to our frittata recipe but, for now, I’ll share the “easy” method. For this, pre-heat your oven to 375*. In a fry pan over med-high heat, re-heat the caponata. Meanwhile, lightly scramble enough eggs to insure ample coverage of the re-heated caponata. Pour the eggs into the fry pan and, like you would with scrambled eggs, use a slotted turner or spatula to gently pull back the edge to let the eggs run behind it. After a few minutes, place the pan in the pre-heated oven and bake for about 10 minutes or until the top of the frittata is set.  Top with grated cheese, if desired, and serve immediately.

Coincidentally, while this recipe was waiting to be published, our local PBS station aired a re-broadcast of an episode of Jacques Pepin’s “More Fast Food My Way” during which he prepared ratatouille. Not only did he mention how similar ratatouille was to caponata, he used it to dress some penne pasta. How about that? You can add “French chef” to the list of Mom & Zia’s many titles and accomplishments!

*     *     *

My Cherry Amour

point of pride for the Great Lake State, Michigan’s west coast is an incredible fruit belt. It’s hard to believe that those Winter storms blowing in from Lake Michigan help to create a climate that’s perfect for growing a variety of fruit. Of all the fruit grown, however, the one that I most anticipate is the tart cherry. Depending upon the weather each Spring, these cherries come into season sometime during the latter half of June and last but a few weeks. Now that doesn’t leave me much time to get my share. In years past, I’ve detoured while traveling to, or from, a visit home; I’ve made “cherry runs,” driving 2 1/2 hours each way to get to just the right farm; or the Fates have smiled upon me and I’ve come across some at one of our farmers’ markets — like this year. As thrilled as I am to be able to buy some without a long drive, I must say, buying directly from the farm does have its advantages. Not only are they less than half the price, but many farms sell them pitted and frozen, as well as whole. In one trip, I can get enough cherries for a couple of pies and a few batches of muffins, with nary a pit to be found.

This recipe was in a book of recipes Mom assembled for me after I moved to Chicago. She and her Sister, Zia, both gave me recipe books and I often refer to them. In fact, quite a few of the recipes already in this blog, and many more to come, are from those 2 books. The thing is, this recipe was not a part of the book; it was on an index card stuck within its pages. As a result, I have no idea where it actually came from or who gave it to me. As far as muffin recipes go, it’s pretty basic. It does, however, include an optional topping made of flour, butter, and sugar. Though not necessary, it does add a nice element to each muffin top. All facts considered, the only real problem I have with this recipe is that a dozen muffins, even if small, are a few too many for me, being I live alone. So, I’ll drop a few off with friends and freeze the rest. These freeze well and nothing starts the day off better than doing so with a home-made muffin. But what if cherry muffins do nothing for you? Then I suggest you check out this recipe for Blackberry Jam Muffins over at Katherine & Greg’s blog, Rufus’ Food and Spirits Guide. Not only is it a good recipe but theirs is a great blog to follow.

*     *     *

*     *     *

Cherry Muffin Recipe

Ingredients

  • 2 cups all-purpose flour
  • 3 tsp baking powder
  • 1/2 tsp salt
  • 1/2 cup sugar
  • 1/2 tsp cinnamon
  • 1/2 tsp almond extract
  • 1 egg, lightly beaten
  • 1/4 cup vegetable oil
  • 1 cup milk — buttermilk may be substituted
  • 2 cups cherries, pitted & roughly chopped by hand
  • OPTIONAL TOPPING
    • 3 tbsp cold, unsalted butter, cut into bits
    • 1/2 cup flour
    • 3 1/2 tbsp sugar

Directions

  1. Pre-heat oven to 375*. Either spray muffin tin with cooking spray or place one liner in each cup.
  2. In a large mixing bowl, whisk together flour, baking powder, salt, cinnamon, and sugar.
  3. In a separate bowl, combine egg, almond extract, vegetable oil, and milk.
  4. Add wet ingredients to dry and barely mix before adding the cherries. Mix entire batter until just combined. Batter should be lumpy. Muffins will be too dense if batter is over-mixed.
  5. Use an ice cream scoop or large spoon to fill each of 12 muffin cups equally.
  6. If topping is desired: Using a fork, combine the flour, butter, and sugar to create a crumble topping. Sprinkle an equal amount on top of each of the filled muffin cups.
  7. Bake until golden or the muffins pass the clean toothpick test, about 20 – 25 minutes.
  8. Allow to cool at least 5 minutes before removing from pan to cool further on a rack.

*     *     *

Good Morning!

*     *     *

Notes

As you can see, this recipe doesn’t rely upon a lot of sugar. I don’t want sugar to take away from the tartness of the cherries. Since I didn’t create the topping for this batch, I did, however,  give each muffin a very light sprinkle of sugar. While it won’t detract from the cherries, a light dusting of sugar will help to crisp the muffin top. And when you’re preparing the cherries, chop them by hand and not in a food processor. I’ve found that no matter how hard I try, a food processor over-chops the fruit. By using a large knife to roughly chop the cherries, you’ll end up with flavorful muffins containing large pieces of fruit.

*     *     *


No-Cook Couscous Salad

As I write this, much of our country has spent the last few days sweltering in a record-setting heat wave. As a result, my stove is officially off-limits and the barbecue has been all but abandoned. To further complicate matters, for every degree the temperature goes above 95, my appetite seems to decrease exponentially. So, today, with yet another heat index forecast to be well over 100*, I’m looking for something light, fresh, and easy to prepare for dinner. For me, that often means a pasta salad. (OK. It also means ordering a meal for home delivery but what kind of recipe post would that make?) We all have our favorite pasta salads and recipes abound for tabbouleh-like salads that use couscous in place of bulgur. Today’s recipe, a favorite of mine, is from David Rocco’s Dolce Vita and is perfect whenever it’s a hot time in the city.

*     *     *

*     *     *

Resembling a grain, couscous is actually a small bead of pasta. In fact, I’ve seen Lidia Bastianich actually make it on her show, Lidia’s Italy. It’s a simple process: flour — I believe it was semolina — is spread on a tabletop and water is sprinkled over its surface. A few minutes later, the resulting small pasta beads are carefully collected and sorted using sieves with holes of varying sizes. It was an interesting process to watch, although I doubt that I’ll ever attempt it, especially for today’s recipe. That’s because the main advantage to this pasta salad over all others is in its ease of preparation: there is no cooking. Instead, raw couscous is allowed to marinate in a rather generous amount of dressing and, as it hydrates, the couscous absorbs the dressing’s flavors. The result is a light, tasty salad and a kitchen that’s as cool as it was when you started. Believe me, on days such as these, my kitchen needs all the help it can get.

*     *     *

No-Cook Couscous Salad Recipe

Ingredients

  • 2 cups couscous
  • 1/2 cup extra virgin olive oil
  • 1 sweet onion, chopped
  • 2 bell peppers of differing colors, chopped
  • 1 celery stalk, diced
  • 1 carrot, diced
  • 1 doz cherry tomatoes, halved
  • 1 large can (28 oz) diced tomatoes plus liquid
  • 1/4 cup fresh lemon juice
  • basil leaves, torn, to taste
  • salt and pepper, to taste
  • splash of red wine vinegar (optional)

Directions

  1. Place olive oil, lemon juice, and canned tomatoes (juices included) into a large bowl and mix well. Add couscous and stir to combine.
  2. Add the bell peppers, onion, celery, carrot, and cherry tomatoes to the bowl and mix well. Cover with plastic wrap and refrigerate for a few hours. Give the salad an additional mix, or two, while it is being refrigerated.
  3. Just before serving, tear the basil leaves, add them to the salad, and mix well. If desired, add a light sprinkling of vinegar over the top of the salad.

Variations

Anyone who reads this recipe will probably think of additional ingredients to add to the mix. In fact, I added the celery, carrot, and splash of vinegar to David’s original dish. The interesting thing about the recipe is not so much the list of ingredients as the fact that no cooking is required. Still, if you’re looking for suggestions, you can try adding chick peas, sliced radishes, lettuce, walnuts, apple, you name it. And don’t forget herbs. Mint, for example, will add a completely new dimension to your salad’s flavor profile. Lastly, if you’re looking for something a bit more substantial, try topping off your salad with some flaked tuna that’s been dressed lightly with olive oil & wine vinegar. 

*     *     *

Brodetto

doubt there’s a European fishing community that doesn’t have its own version of fishermen’s stew. The Italians call it brodetto, the French bouillabaisse, and the Portuguese refer to it as caldeirada. Even in the this country, San Francisco is well-known for its cioppino — the real “San Fransisco treat,” in my book. Although some of the ingredients may vary by country and region within each country, the dish’s origins are often the same. The village fishermen would gather together at the end of a very long day and into a large pot they would add whatever fish that hadn’t been sold, a few vegetables, some spices, and a little wine. A short while later, with some crusty bread in hand, each would sit back and enjoy a feast among friends, no doubt filling the night air with tales of the ones that got away.

Living in Chicago, we have a wide assortment of seafood available, some of which is fresh while the rest has been flash frozen for shipment here. Although I prefer fresh, I will buy frozen and usually have shrimp and a variety of fish fillets in my freezer. If I see a sale somewhere for fresh mollusks, be they little neck or manila clams, mussels, or cockles, I’ll buy some, along with some scallops, and that night’s dinner will be brodetto. The recipe I’ll follow then is the one that I’m going to share with you now. And just like the stew the old fishermen threw together, the amount and types of seafood in my brodetto may vary but the basics remain the same. Fish, mollusks, and shrimp are added to a simple tomato broth flavored with a few herbs, garlic, and wine. Serve it in a bowl with some crusty bread, like ciabatta, and you’ll have a spectacular dinner, as well as a new-found respect for those fishermen of old.

*     *     *

Brodetto Recipe

Yield: 6 generous servings

Ingredients

  • 3 tbsp olive oil
  • 1/4 to 1/2 tsp red pepper flakes
  • 1 medium onion, chopped
  • 3 cloves garlic, minced
  • 3 tbsp fresh parsley, chopped
  • 1 cup stock (fish, clam, vegetable, or chicken)
  • 1 cup dry white wine
  • 1  large can (28 oz) whole or large dice tomatoes. (or 8 to 10 fresh plum tomatoes, peeled, seeded, and chopped into large pieces)
  • 3 or 4 stems of fresh thyme
  • 1/2 tsp Italian seasoning
  • 18 little neck or 24 manila clams or cockles
  • 1 doz mussels
  • 3/4 lb large shrimp
  • 1 doz scallops
  • 1 – 1 1/2 lbs fish fillets, cut into large, equal sized pieces (cod, haddock, halibut, striped bass, pollock, red snapper, or any combination may be used)
  • salt and pepper
  • 2 tbsp fresh basil, chopped, for garnish
  • extra virgin olive oil, for garnish

Directions

  1. At least an hour before you start cooking, scrub all the mollusks with a brush and soak the clams and cockles in cold water. Change the water at least once in the next hour. If using mussels, before scrubbing, grab hold of the “beard” and pull to remove. Keep cold until ready to cook.
  2. Once the mollusks have been sufficiently soaked and cleaned, heat olive oil in a large saucepan over med-high heat. Add red pepper flakes and cook for 1 minute.
  3. Add onion and sauté until translucent, about 5 minutes. Season lightly with salt and pepper.
  4. Add garlic and parsley and continue sautéing for another minute or so.
  5. Add stock and wine, using the liquids to deglaze the pan.
  6. Add the tomatoes. If using canned whole tomatoes, use your hands to tear the tomatoes before placing the chunks into the pan. This is a stew, not a sauce. Large chunks are preferable.
  7. Add thyme and Italian seasoning. Season lightly with salt & pepper.
  8. Bring pot to the boil, reduce heat to med-low, and simmer for 30 to 40 minutes. If stew becomes too dry, add water or stock.
  9. Increase heat to med-high, add clams and/or cockles and cover the pan.
  10. After about 3 minutes, add the mussels and cover.
  11. About 3 minutes later, place the shrimp atop the mollusks and return the cover to the pan.
  12. 2 minutes later, add the scallops and cover the pan.
  13. About a minute later, add the fish to the top of the stew, cover the pan, and cook until all is done, about 3 or 4 minutes.
  14. Serve immediately in large bowls, garnished with a sprinkling of good quality extra virgin olive oil and freshly chopped basil. Be sure to have plenty of good, crusty bread available.

Notes

The recipe I’ve just shared is by no means set in stone. I imagine that the fishermen of long ago weren’t too strict about their ingredients. I think their only concerns were that the seafood was fresh and the wine plentiful. The rest took care of itself. Today, recipes abound and it’s not just the seafood that varies from one recipe to the next. Oftentimes vegetables will be added to the stew, with bell peppers, fennel, and potatoes frequently mentioned. Some cooks will start the recipe by creating and sautéing a soffritto of chopped onion, celery, and carrot. What does all this mean for you? Well, do you have a preference for, say, crab claws? Then add them to the mix. Don’t like mussels? Don’t use them. Want more of a vegetable base for your stew? Then start with a soffritto and add whatever veggies you like. In short, indulge your palate and make the recipe your own.

*     *     *

Affogati

So, dreaming of Sunday mornings spent sipping cappuccino and weekday afternoon espresso pick-me-ups, you purchased a beautiful espresso machine and gave it a place of prominence atop your counter. Now, two years later, you spend more time dusting it than you do making caffeine drinks of any kind, let alone espresso.  We’ve all done it and I’ve no magic words to prevent it from happening again. What I can do is offer a recipe that just might encourage you to use your espresso machine again. Today’s recipe is affogato, a relatively light dessert that I use to end many a summertime meal.

Actually, the full name of today’s recipe is affogato al caffè, which when translated means “drowned in coffee”. At its most basic, this is a combination of ice cream, espresso, and whipped cream — but who likes basic? I’ve included a couple of variations that may pique your interest and entice you to break out that espresso machine. Oh! And what if you don’t own an espresso machine? Not to worry. You can substitute some strong, black coffee for the espresso.

*     *     *

Affogati Recipes

a) Affogato al Caffè

Ingredients

  • 4 large scoops premium or home-made vanilla ice cream
  • 4 shots espresso or very strong black coffee
  • freshly whipped cream
  • chocolate shavings (optional)

Directions

  1. Place one scoop of ice cream into each of 4 dessert bowls or large coffee mugs.
  2. Pour a freshly brewed shot of espresso or coffee over each scoop.
  3. Top off with a dollop of whipped cream.
  4. Sprinkle with shaved chocolate, if desired.
  5. Serve immediately.

*     *     *

b)  Affogato with Almonds (Mandorle)

Ingredients

  • 4 large scoops premium or home-made vanilla ice cream
  • 4 shots espresso or very strong black coffee
  • 2 shots Amaretto Liqueur
  • freshly whipped cream
  • toasted slivered or sliced almonds (optional)
  • chocolate shavings (optional)

Directions

  1. Place one scoop of ice cream into each of 4 dessert bowls or large coffee mugs.
  2. Pour a freshly brewed shot of espresso or coffee over each scoop.
  3. Pour 1/2 shot of Amaretto over each serving.
  4. Top off with a dollop of whipped cream.
  5. Sprinkle with almonds and/or shaved chocolate, if desired.
  6. Serve immediately.

*     *     *

c) Affogato with Hazelnuts (Nocciola)

Ingredients

  • 4 large scoops premium or home-made vanilla ice cream
  • 4 shots espresso or very strong black coffee
  • 2 shots Frangelico Liqueur
  • freshly whipped cream
  • crushed toasted hazelnuts (optional)
  • chocolate shavings (optional)

Directions

  1. Place one scoop of ice cream into each of 4 dessert bowls or large coffee mugs.
  2. Pour a freshly brewed shot of espresso or coffee over each scoop.
  3. Pour 1/2 shot of Frangelico over each serving.
  4. Top off with a dollop of whipped cream.
  5. Sprinkle with crushed hazelnuts and/or shaved chocolate, if desired.
  6. Serve immediately.

*     *     *

d) Chocolate Affogato (Cioccolato)

Ingredients

  • 4 large scoops premium or home-made chocolate ice cream
  • 4 shots espresso or very strong black coffee
  • 2 shots Kahlua Liqueur
  • freshly whipped cream
  • 4 tbsp chocolate shavings, + 1 tbsp for garnish

Directions

  1. Place one scoop of ice cream into each of 4 dessert bowls or large coffee mugs.
  2. Pour a freshly brewed shot of espresso or coffee over each scoop.
  3. Sprinkle 1 tbsp of chocolate over each serving.
  4. Pour 1/2 shot of Kahlua over each serving.
  5. Top off with a dollop of whipped cream.
  6. Divide and sprinkle remaining tbsp of shaved chocolate over all 4 servings
  7. Serve immediately.

*     *     *

Variations

Of course, the liqueur may be omitted from the variations listed-above. On the other hand, you may wish to use Framboise or Chambord liqueurs in addition to, or in place of, the Kahlua in the chocolate affogato recipe. And although fine if served as-is, you may wish to include almond cookies (amaretti) when serving affogato with almonds, or, perhaps some complimentary biscotti, — i.e., hazelnut, chocolate, etc. — with the appropriate variation. And if those aren’t enough choices, you can try adding a sprinkling of cinnamon or nutmeg to the whipping cream.

*     *     *

Salmon en Papillote — on the grill

Summer is here in full-force and I’ve moved most of my “oven-required” dinners to the slow cooker, the grill, or off the menu till Fall. It’s warm enough without my cranking up the oven to fix dinner. That’s just fine for most entrées but it does present a problem for fish. Sure, I could sauté the fillets and create a quick sauce in the pan, but every time I serve it? For me, poor grill master that I am, grilling a fish steak means 5 minutes of fighting to get the poor thing unstuck from the grilling surface, no matter what that surface happens to be. And that’s where today’s recipe comes into play. Cooking en papillote is a method of cooking something, frequently seafood, while enclosed in a pouch of parchment paper. Usually baked in an oven, I use aluminum foil and cook the fish on my grill. No muss, no fuss, and dinner is served.

Dill Butter with Lemon atop Asparagus

As for the recipe, there really isn’t one and this is more a set of guidelines. As such, I’ll list elements of the 3 components, describe how to wrap the fish, and it is for you to decide which ingredients will work best for you. Although, if left to me, I’d vote for a salmon steak thinly coated with pesto and topped with diced tomato and scallion. Yum!

Salmon en Papillote 

Ingredients

  • One 6 – 8 oz salmon fillet or steak, per person. Bass or trout are good alternatives.
  • Chopped fresh herbs. Tarragon, basil, thyme, dill, oregano, parsley, and/or cilantro are suggested. Pesto may be used, as well.
  • Optional minced garlic.
  • Butter
  • Optional fresh vegetables, evenly chopped in a large or small dice or thinly sliced. Choices would include asparagus, onion, tomato, carrot, zucchini, fennel, spinach, summer squash, bell pepper, scallion, etc.
  • Optional splash of white wine per serving.
  • Olive oil, to taste.
  • Lemon zest
  • Salt & pepper
  • Thinly sliced lemon
  • Chopped parsley

Tomato & Scallion with Pesto

  1. Combine chopped herbs and garlic with about 1 tbsp of butter per piece of fish to create a compound butter. This may be done well in advance.
  2. Pre-heat grill to a medium heat, about 350*. Prepare it for “indirect” grilling.
  3. Finely chop or thinly slice the vegetables, if any, dress with a little extra virgin olive oil, and season with salt and pepper.
  4. Prepare the sheet(s) of aluminum foil. Take one long piece of extra-strength foil — about 3 times the length of the fish. Divide it in half to create 2 rectangles. One rectangle will be the pouch’s bottom upon which your ingredients will be placed and layered. The other, the “top,” will eventually be folded over and used to seal the pouch. Now, to layer the ingredients that you’ve chosen to use:
    1. If using a bed of vegetables: in the center of the bottom rectangle, form a vegetable layer, add the fish (skin-side down), season with salt and pepper, dot with the compound butter or pesto, top with lemon slice(s) & zest, and sprinkle with chopped parsley.
    2. If not using a vegetable bed: place the fish in the center of the rectangle (skin-side down), season with salt & pepper, dot with compound butter or pesto. At this point you can either: a) top with lemon slices & zest, garnish with chopped parsley, and add a splash of white wine: or, b) place the vegetables atop the fish, add lemon slice(s) & zest, and garnish with chopped parsley.
  5. Fold the other half of the foil so that it fully covers the bottom rectangle containing the ingredients. Beginning on one side, start crimping and sealing the edges of the foil’s top and bottom. You will need to do this to 3 sides of the pouch. (The 4th side is the fold and, as such, is already sealed.) Be sure the pouch is well-sealed for you don’t want any steam to escape during cooking.
  6. Use the indirect grilling method to determine the placement of each foil pouch.
  7. Fish should be cooked in 15 – 20 minutes, though times will vary depending upon the size and temperature of the grill, the types and cut of the vegetables, and the thickness and kind of fish used.

Butter & Lemon with White WIne

Variations

I’ve already listed pretty much all the variations I can think of, save one. Not everyone has a grill but all that means is that you have to “move the party indoors.” That is to say, prepare the fish as indicated above, using foil or parchment paper to create the pouch. Place the pouch on a baking sheet and bake for 15 – 20 minutes in the center of a pre-heated, 400* oven. Again, cooking times may vary.

No-Knead Bread and Buns

This being the 4th of July weekend, I’m sure that there’ll be barbecues blazing from sea to shining sea. I’m equally sure that more than a few of them will be grilling up burgers and dogs for at least one meal during the long weekend. I know mine will. To that end, I’ve got a “no-knead” recipe that may come in handy, courtesy of the King Arthur Flour Co. website. Originally intended to make hamburger buns, I’ve found that it can be used for hot dog buns just as easily and with equally good results. Mix up a double batch of dough and make both kinds of buns; they’re well worth the effort.

Since we’re on the subject of bread, I thought I’d share a second recipe similar to one that I found last year. It’s another recipe for no-knead bread, only this dough is used to make loaves and not buns. More importantly, you make enough dough for 3 to 4 loaves, baking one loaf at a time, as needed. The remaining dough is kept in the refrigerator where the longer it sits, the better it tastes. Unfortunately, I copied the recipe, pictures and all, but not the name of the website that supplied it. Within the portion I copied, however, the website’s author did make mention of his/her source, the book “Artisan Bread in Five Minutes” by Jeff Hertzberg and Zoë François. As luck would have it, there’s a recipe for no-knead bread on the King Arthur website and it, too, credits the Hertzberg/François book. So, since I cannot properly credit my source, I’ll send you to King Arthur for their version. I’ve used both recipes with equally good results.

*     *     *

No Knead Hamburger Buns Recipe

Coming soon: the giardiniera pictured above!

This recipe will yield 6 hamburger buns or, with a little shaping, you can get 6 brat or 8 hot dog buns. Although they’ll keep for a couple of days in a sealed bag, they are best when used the day they’re baked.

King Arthur’s No-Knead Cheese Burger Buns


*     *     *

No-Knead Bread Loaves Recipe

This recipe will yield 3 – 4 loaves, depending upon their size. You mix up a batch of dough and, after its first rise, store it in the fridge. Later, when you want to bake some bread, you literally grab a handful of dough, shape it, let it rise for an hour, and bake it. Make a batch of dough on the weekend and you can have freshly baked bread throughout the following week. It really is that simple.

King Arthur’s No-Knead Crispy White Bread

*     *     *

Notes

  • Before anyone questions my sanity for baking bread in the middle of Summer, I sometimes have sleepless nights due to insomnia. If that’s the case, like now, I take some of the refrigerated dough out, let it rise for an hour, and bake it. I’ll have a fresh loaf of bread cooling and it won’t even be 7:00 am.
  • If you’re interested, the Hertzberg/François book may be purchased here. If you wish to visit its companion blog, click here.

*     *     *

Pasta alla Norma

The Italians love eggplant and no place is it better celebrated than in Sicily. For proof of that, one need look no further than today’s recipe, Pasta alla Norma. Named in honor of Bellini’s masterwork “Norma,” eggplant takes center stage in this recipe and the resulting dish, like its operatic inspiration, is sublime.

*     *     *

Campanelle alla Norma

*     *     *

Eggplant was no stranger to our table growing up. Mom often served them halved, topped with bread crumbs, and baked. Sometimes she cut them into discs before breading and frying them. Still other times, she cut them lengthwise to make planks, layering them with cheese and sauce to make a lasagna-like dish. Of course, like most Italian households, she also used eggplant to make her caponata. Comparing the two, caponata is actually more complicated than Pasta alla Norma. Whereas caponata consists of chopped eggplant and a variety of vegetables, Pasta alla Norma’s sauce is a product of just eggplant and marinara sauce. It’s hardly a difficult recipe to follow but it sure is a delicious way to dress a dish of pasta. And with our vegetable stands and markets just beginning to  display this season’s bounty, there’s no better time to try this little taste o’ Sicily.

The recipe calls for 1 to 1 1/2 lbs. of eggplant. Rather than buy one large eggplant, I’ll buy 2 or 3 medium-sized ones. The larger the eggplant, the more seeds it will have and the more bitter it will be. The recipe, also, states that the eggplant should be cut into 1/2 cubes before being salted. You may find it easier to cut the eggplants into 1/2 inch slices and, after salting and rinsing, cut the slices into cubes. If you use small or “baby” eggplants, you needn’t cut them into cubes at all, but leave the slices as-is. The choice is yours.

*     *     *

Pasta alla Norma Recipe

Ingredients

Norma's Notes

  • 2 tbsp olive oil, more as needed
  • 2 – 3 small/medium eggplants (1 – 1 1/2 lb total), cut into 1/2 inch cubes
  • 2 – 3 tsp kosher salt
  • 1/4 to 1/2 tsp red pepper flakes, more to taste (optional)
  • 1 medium onion, chopped
  • 3 cloves garlic, minced
  • 2 – 3 tbsp tomato paste
  • 1 large (28 oz.) can tomatoes, whole or diced
  • 2 tbsp fresh parsley, chopped.
  • 2 – 3 tsp Italian seasoning
  • 2 tbsp fresh basil, chopped
  • salt & pepper, to taste
  • 1 lb pasta, i.e., rigatoni, penne, campanelle
  • reserved pasta water
  • 1/2 cup grated ricotta salata, reserving 2 – 3 tbsp

Directions

  1. Cut each eggplant into 1/2 inch cubes. Place 1/3 of the cubes in a colander and sprinkle with 1/3 of the salt. Add another third of the eggplant and sprinkle with another third of salt. Place the remaining 1/3 of the eggplant cubes in the colander and sprinkle with the last of the salt before carefully mixing the colander’s contents. Allow excess water to drain for 15 – 30 minutes. Give the colander & eggplant a quick rinse of tap water. Dump the rinsed eggplant onto a paper towel-lined baking sheet and use more paper towels to pat dry.
  2. Heat oil in a large, deep skillet over med-high heat.
  3. Begin sautéing the eggplant cubes. Do not overcrowd and work in batches, if necessary. Continue cooking until all cubes are lightly colored, adding more olive oil as needed. Remove cooked cubes and reserve for later.

    Grate Cheese

  4. If needed, add 2 tbsp olive oil and heat. If using the pepper flakes, add them now and cook for one minute.
  5. Add onion and sauté until soft, about 5 minutes.
  6. Season lightly with salt & pepper, add the garlic, and continue sautéing for another minute.
  7. Add tomato paste, stir well, and continue cooking for a minute or so.
  8. Add tomatoes. If using whole tomatoes, tear them into pieces before adding to the pan.
  9. Add the Italian seasoning & parsley, return the eggplant to the pan, and stir to combine everything. Once the sauce begins to boil, reduce the reduce heat to a simmer.
  10. The sauce will cook for 30 minutes. Check the pasta’s package directions and time its cooking so that the pasta is about 2 minutes shy of being al dente when the sauce is ready.
  11. Reserve some of the pasta water before adding the basil and the not quite al dente pasta to the frying pan. Mix well and continue cooking until the pasta is done to your liking. Add some of the reserved pasta water to the pan if the pasta becomes dry during this last step of the cooking process.
  12. Just before serving, add most of the ricotta salata and mix well. Check for seasoning and add salt & pepper, if needed.
  13. Serve immediately, garnished with the reserved 2 – 3 tbsp ricotta salata.

Variations

Like I said, it’s is a simple dish with relatively few ingredients and, as such, there’s little room for variations other than the pasta selection and the cheese. For the pasta, I prefer to serve this sauce with pastas like penne, rigatoni, or campanelle (little bells) and not any of the ribbon-like pastas. As for the cheese, if I have ricotta salata, that’s great. If I don’t have any,  I’ll substitute some crumbled feta or, if all else fails, some grated parmesan cheese. I’ve even used some grated fresh mozzarella, so, I wouldn’t let the absence of ricotta salata prevent you from enjoying this dish.

*     *     *