No baloney, it’s Mascarpone!

Hard to believe that this is already the 4th cheese of the series. We’re in the home stretch now but there’ll be no sprint to the finish line. No, I’ll continue to go slow so that any who want to jump on this cheesy bandwagon will have plenty of time to do so. If you’re thinking of giving it a go, I’ll repeat what I’ve said in the comments following each cheese post: start with the ricotta cheese recipe. It’s the easiest, there’s less chance for error, and the ricotta is the best you’ve ever tasted. Not only that, but working with ricotta gets you experience with handling curds, a must when making cheese. So, get yourself a couple quarts of whole milk, some white vinegar, and make a batch of ricotta. Once you do, you’ll realize that none of the cheeses I’ve covered thus far are at all difficult to prepare.

Those who have followed this series may notice the similarities between today’s recipe and that of my ricotta. The main difference between the 2 recipes is the amount of milk fat in the dairy products used. In the case of ricotta, warmed whole milk separates into ricotta & whey with the addition of white vinegar. To make mascarpone, combine equal amounts of heavy cream with half-and-half, warm, and use lemon juice to separate the mascarpone from the whey. In both instances, the curds are strained and the resulting cheeses are ready for use in your favorite recipes. Yes, it is that simple and those of you have made the ricotta know exactly what I mean. Best of all, it is far cheaper to make mascarpone at home than it is to purchase it from your grocer. For example, the dairy products I used cost about $4.50 and resulted in 16 oz. of cheese. An 8 oz. container of mascarpone costs about $7.00 at the same store. Needless to say, since coming across this recipe on the Fankenhauser Cheese Page, I’ve not bought a bit of mascarpone from any store.

So, what can you do with all of that homemade mascarpone in your refrigerator? Well, add a little confectioner’s sugar and heavy cream, whip it, and the result may be served with berries in a variety of ways or used as a luscious topping for your favorite dessert. Use mascarpone as the creamy base for a number of delicious pasta dishes, perfect as primi or secondi piatti. Combine it with your favorite cheeses (cheddar, Monterey Jack, Asiago, etc.) and use the mixture to stuff jalapeños to make poppers.  And of course, use it to prepare tiramisu, the quintessential Italian dessert. Given mascarpone’s creamy texture and relatively mild flavor, the only limit to its uses is your own imagination.

*     *     *

Hand-Cut Pappardelle with Spinach, Pecorino Romano, and Mascarpone

*     *     *

Before beginning, please refer to my Cheesy Stuff page. Chock full of cheesy details, it provides information about ingredients, cleaning/sterilizing equipment, spices & seasonings, a few tips, and sources for supplies and information.

*     *     *

Home-Made Mascarpone Cheese Recipe

yield: slightly more than 1 lb. (485g)

Ingredients

  • 1 pint heavy whipping cream
  • 1 pint half-and-half
  • 2 tbsp fresh lemon juice

Directions

  1. Place the cream and half-and-half into a clean, sterile pot with a lid and heat over low to med-low heat until it reaches 185˚. Stir frequently to prevent cream from scorching on the pot’s bottom. A double-boiler works fine, too.
  2. Add lemon juice and stir until thoroughly combined.
  3. Cover and maintain 185˚ temperature for 5 minutes, stirring occasionally. Mixture should show signs of thickening.
  4. Remove from heat and place covered pot into the refrigerator overnight.
  5. The next morning, the mixture should have thickened more and you should see traces of the whey beginning to separate from the curds. .
  6. Cover a large strainer with a clean, sterile handkerchief.
  7. Gently pour the curds into the handkerchief.
  8. Grab the handkerchief’s 4 corners, tie them, and use them to hang like a sack over the sink or a large pot. If your kitchen is exceptionally warm or if it has drained a few hours and still not to your liking, place everything into the fridge to drain.
  9. Drain until the mascarpone is the consistency you prefer. To hurry the process, carefully twist the “sack” to force the whey out of the cheese.
  10. Place cheese into container(s) and refrigerate. The mascarpone will remain fresh for about 1 week but is best when used immediately.

*     *     *

Notes

Unlike some of the other cheeses, you can use ultra-pasteurized dairy products to make mascarpone — but I would avoid them if possible. You’ll get the best tasting cheese if you use raw dairy but it is illegal to sell raw milk in many States, including Illinois. With raw dairy products off of the table, you’re left with pasteurized and ultra-pasteurized products. Although both processes negatively affect the mascarpone’s taste, it’s worse with ultra-pasteurization. So, I only use ultra-pasteurized products when I’ve no choice.

Some sites and cheese recipes call for using tartaric acid instead of lemon juice to separate the curds from the whey when making mascarpone. This additive can be bought online and is available at a couple of the resources I’ve listed on my Cheesy Stuff page. I have never used it and am perfectly happy with the mascarpone that results from using lemon juice.

Coming Attractions

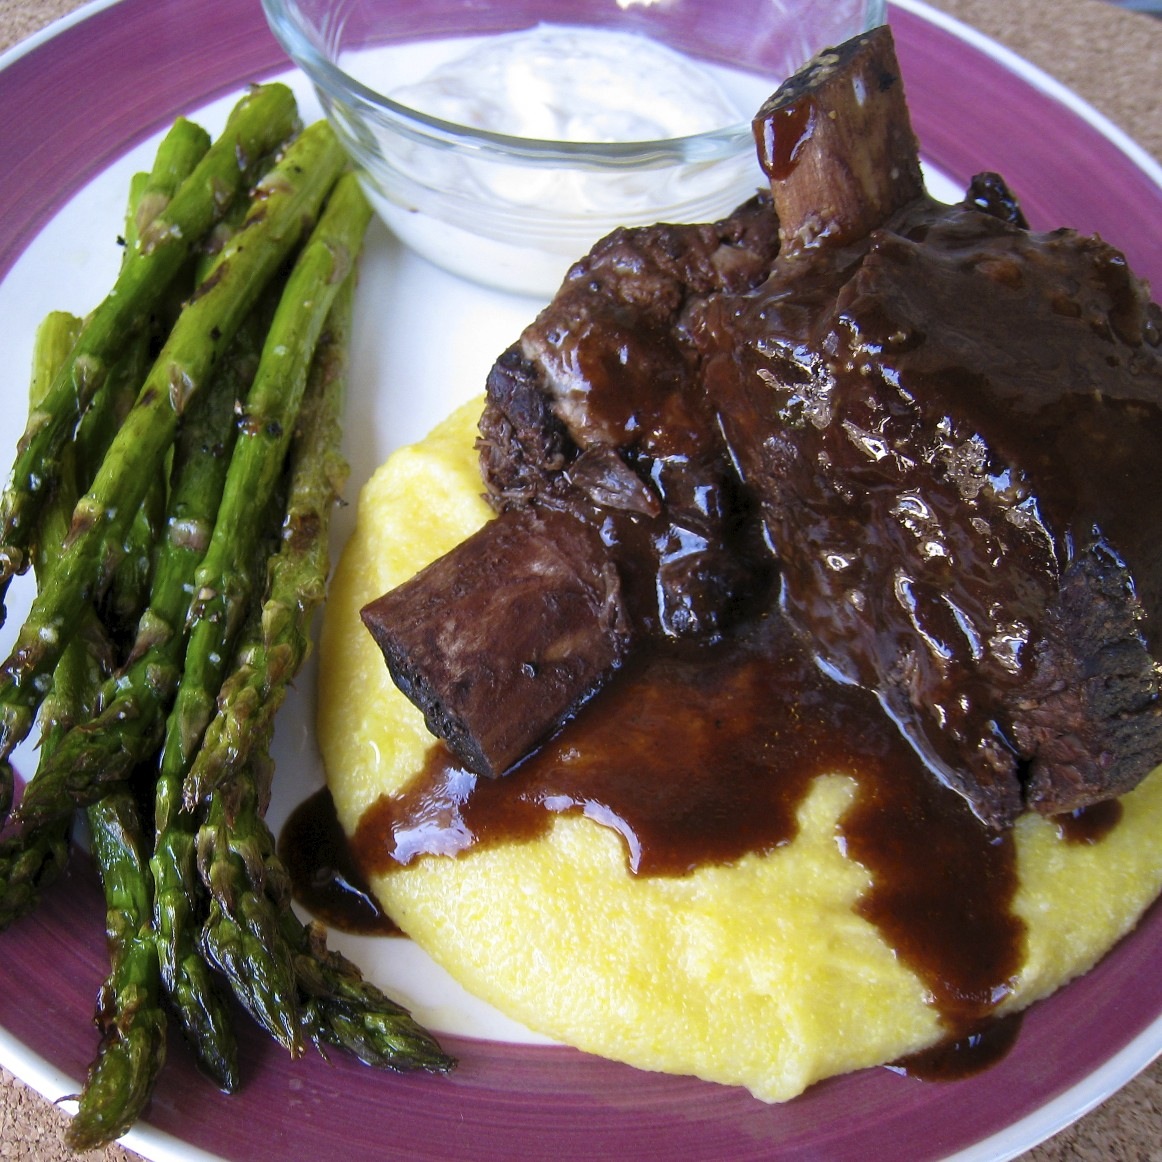
Here is the recipe for the Pappardelle with Spinach, Mascarpone and Pecorino Romano Cheeses dish pictured above. Recipes for the remaining pictured dishes, as well as Aunt Lil’s tiramisu, are forthcoming.

Feta cheese is next in this cheesy series.

*     *     *

Inspired by the Fankhauser Making Mascarpone At Home webpage.

*     *     *

Beef Short Ribs

Short ribs weren’t on the menu when I was growing up. No, I had to wait until I was well past my youth, living here in Chicago, to discover them and even then it was purely coincidental. I had just moved into an apartment on The Lake and was checking out the neighborhood one Saturday when I “discovered” a Hungarian restaurant. Having looked at the menu, I was ready to order the paprikash when my waitress announced that the day’s luncheon special was short ribs. I opted for the special and that split-second decision became a life-altering event. For well over a year afterward, I dined there frequently and never sampled the paprikash, but I did order the short ribs every time. I introduced friends to my “discovery” and urged each to try the short ribs. You see, I was in heaven and was happy to share my good fortune with everyone — until  that  day.

*     *     *

Beef short ribs served over polenta, with grilled asparagus & horseradish sauce

*     *     *

I was having lunch with a good friend and we were marveling about — you guessed it — the short ribs when the check came. My friend was surprised to see how little our lunch cost and I mouthed the words that I would soon come to regret, “I don’t know how they do it?” During my very next visit to this little gem of a restaurant, we overheard a patron at a neighboring table question the waitress about the restaurant’s future. She replied, assuring them that the restaurant wasn’t going anywhere. At the end of our meal, one of my lunch party, a friend who had come to love the place as much as I, asked the waitress whether the place was closing. Again she said, “No way!”

The following Saturday the place was closed, never to re-open.

In the years since, more than a few of my favorite restaurants have closed, each after I uttered the fateful incantation. Once I realized the power of those words, I did my very best to avoid mouthing them but if you’re going to serve potent margaritas or top-shelf sake at below market prices, well, I can hardly be held responsible. Anyway, through the years, I’ve seen my favorite Chinese, Mexican, and Sushi restaurants all close, not to mention great little diners and hamburger joints. Perhaps the most painful closing of them all was my neighborhood Thai restaurant, which served the best Pad Thai on the planet. I was known as “Mr. John.” Since its closing 8 years ago, I’ve never repeated those powerful words in reference to any restaurant that I’ve liked. (Interesting to note that I have tried to use the magic on restaurants that should be closed as a service to my fellow diners. The fact that these businesses have continued, uninterrupted, mocks me to this very day.) So, aside from ruining the businesses —  and dreams — of a number of immigrant families, just what does any of this have to with short ribs?

Well, once my Hungarian restaurant closed, I took it upon myself to learn how to prepare beef short ribs. Mom, my first resource in such matters, suggested making them like a beef stew. So, my first attempts were cooked in a slow cooker and pretty much looked like a stew. Looking back, my experiences preparing short ribs pretty much mirrors my growth as a cook, such as it was. Over the years, I learned to brown the meat first, make a roux and a sauce, use the vegetables for the braise only, added wine, moved the braise from the slow cooker to a Dutch oven, and, finally, added some balsamic vinegar to the pot. The spices, also,  changed and, somewhere along the way, I began making horseradish sauce. The recipes I share today are the last of a long series.

*     *     *

Beef Short Ribs Recipe

Ingredients

  • 3 – 4 lbs (approx. 1.8kgs) beef short ribs — 6 to 8 rib pieces
  • 2 tbsp olive oil
  • 1 large onion, roughly chopped
  • 2 carrots, roughly chopped
  • 2 celery stalks, roughly chopped
  • 3 cloves garlic, smashed
  • 3 tbsp all-purpose flour
  • 1½ cups red wine
  • 1½ cups low-sodium beef broth
  • ¾ cup balsamic vinegar
  • 3 tbsp tomato paste
  • 3 or 4 fresh thyme stems
  • 2 fresh rosemary stems
  • 1 bay leaf
  • salt & pepper, to taste

Horseradish Sauce – recipe follows

Directions

  1. Pre-heat oven to 325˚F (160˚C).
  2. Heat oil in a Dutch oven or heavy-bottomed pot with a lid over med-high heat.
  3. Meanwhile, use paper towels to pat dry the short ribs, season liberally with salt & pepper, and place into the now hot oil. DO NOT CROWD. You will probably need to brown them in 2 batches. Once the meat has been placed into the pot, do not disturb for about 3 minutes. Check one to see if it has browned. If so, turn each piece to brown another side, If not, continue cooking for another 2 minutes before checking again.
  4. Brown all sides of each rib before removing them to a platter and repeating the process with the rest of the ribs.
  5. Pour off excess grease, leaving 3 tbsp in the pot. Add the celery, carrots, and onion to the pot and begin sautéing. Season with salt & pepper.
  6. When the onion is translucent and the vegetables have softened, add the garlic and continue sautéing for about a minute.
  7. Add the flour to the pot, stir, and cook for two minutes.
  8. Use the red wine to deglaze the pot. Once finished, add the balsamic, beef stock and tomato paste. Season with salt and pepper and stir well.
  9. Add the thyme, rosemary, and bay leaves. Return the ribs to the pot, bring to a boil, cover, and place in pre-heated oven.
  10. Continue to cook for 2½ to 3 hours or until meat is fork tender and falling off of the bones. Carefully remove the ribs to a platter and cover with foil to keep warm.
  11. Pour the braising liquid through a strainer and place resultant liquid into a grease separator.  Wait a few minutes to allow the grease to rise and then pour off the sauce.
  12. Depending upon your preference, you can
    1. Serve the sauce as is.
    2. Place the sauce into a small pan so that it can be further reduced and thickened.
    3. Add more wine or beef broth and then reduce.
  13. No matter the choice, be sure to taste the sauce to see if additional seasoning is needed.
  14. The sauce may be used to cover the ribs before serving or left on the side.
  15. Serve immediately with mashed potatoes, buttered broad noodles, or polenta, as pictured.

*      *     *

Horseradish Sauce

Combine equal amounts of plain yogurt (Greek pref.) and sour cream. Add horseradish to taste, some brown, whole grain or Dijon mustard, a dash or two of Worcestershire Sauce, and salt & pepper to taste. Mix well and refrigerate until needed. Be sure to make extra for the cole slaw.

*      *     *

Pulled rib sammich with horseradish slaw & corn relish

*     *     *

Notes

I always try to make extra ribs, gravy, and horseradish sauce. Not only are the ribs even tastier the next day, the meat can be pulled apart, similar to what is done with pork, and used with the extra gravy to make sandwiches. The extra horseradish sauce can be used as a dressing for cole slaw to top off the sandwich, as pictured, or as a condiment. If used to dress slaw, you may wish to add more yogurt, sour cream, or a little mayonnaise, to suit your tastes.

Be sure to come back next Wednesday when, as promised, I’ll show you how to make mascarpone.

*     *     *

There’s something about Mary …


Happy St. Joseph’s Feast Day!

Eggplant Parmesan

Order the cannoli! Put the biscotti in the oven! Chill the prosecco! St. Joseph’s Feast Day is just around the corner! Across Italy and certainly throughout Sicily, as well as in many Italian-American households and communities around our own country, next Monday, St. Joseph’s Feast Day, will be marked by special religious services, street fairs, parades, and celebratory dinners. There’s even a special pastry (zeppola) and dish (fava beans) to be served in this Saint’s honor. So, why all the hoopla?

To start, and to eliminate any possible confusion with the many other St. Josephs, I’m speaking about Joseph, the carpenter who, along with Mary, raised the Christ Child, according to Christian beliefs. Perhaps because of its close proximity and relationship with the Vatican for so many centuries, the Church has exercised considerable control over Italy. Each town, village, city, district, in fact every community of any size, has at least one patron saint. And Saint Joseph is one very popular patron saint. Today, he is the Patron Saint of Sicily and that is the reason for the celebrations on Monday — but it wasn’t always that way.

The Holy Family - Michelangelo

According to legend, sometime during the Middles Ages, Sicily was struck by drought. As the earth dried and crops withered, famine became a very real possibility. Fava beans alone are all that kept the people from starvation. They prayed to St. Joseph, beseeching him to intercede on their behalf and to ask his “Son” to end the drought. In return, the people promised to hold a feast every year in his honor. The rains came, the drought ended, and mass starvation was averted. The grateful Sicilians proclaimed Saint Joseph their Patron Saint and his Feast Day is marked by celebrations to this very day.

Now, lacking both fava beans and the skills of a pasty chef, I decided to take a different path to honor this Saint. Since eggplant is used so often in Sicilian cuisine, I thought an eggplant dish would be appropriate. So, today’s recipe is eggplant parmesan, parmigiana di melanzane.

In recent years, the 3 most common parmigiana dishes — veal, chicken, and eggplant — have come under fire somewhat. Let’s face it, they aren’t exactly low-cal, by any measure. And, to be honest, it is only in the past few years that I’ve attempted to make them a bit lighter. In this case, where I used to fry the breaded slices of eggplant, I now bake them. In place of a meat sauce, I now use a marinara. Granted, you still won’t see this dish listed on any menu as the “Dieter’s Special”, but you will enjoy a lighter dish that is every bit as enjoyable as the more traditional preparations.

One further note deserves mention. During a recent post in which I shared instructions for making goat cheese, I asked if anyone knew of a nearby buffalo herd, implying that I’d use their milk to make mozzarella. Bufala mozzarella, by the way, is the most prized of all mozzarella cheeses. Judy@Savoring Today left a comment stating that bufala mozzarella, made in Italy, was available at, get this, Costco, of all places! Within days, I was at Costco and the parmigiana di melanzane pictured in today’s post is the result. Thank you, Judy!

 *     *     *

Eggplant Parmesan Recipe

Ingredients

  • 6 – 8 cups marinara sauce (recipe below)
  • 2 eggplant, about 2 1/2 lbs. total
  • 3/4 cup all-purpose flour
  • 4 – 5 cups bread crumbs, more may be required
  • 3 tbsp fresh parsley, chopped
  • 1 tbsp Italian seasoning
  • 1 tsp garlic powder
  • 3 eggs
  • 2 tbsp milk
  • 1 lb. fresh mozzarella, thinly sliced or shredded
  • 1 cup freshly grated parmesan cheese, pecorino romano may be substituted
  • salt & pepper

Directions

To prepare the eggplant

  1. Create a breading station.  In a large dish or flat-bottomed container, add the flour. Add the eggs and mild to a second such container and mix until well-combined.  Add to the 3rd container the bread crumbs, parsley, Italian seasoning, and garlic powder. Mix to thoroughly combine.
  2. Pre-heat oven to 400˚.
  3. Slice the eggplant, lengthwise, into 1/2 inch slices.
  4. Coat each eggplant slice with flour, shake off excess, and dip into egg wash. Allow excess to drip off before dipping into the bread crumb mixture to completely coat each slice. Place on a cooking rack that has been sprayed with cooking spray. Continue until all slices are breaded. You will need to use 2 racks or to bake 2 batches.
  5. Place eggplant-filled cooling rack on top of a large baking sheet and bake in pre-heated, 400˚ oven for 15 minutes or until very lightly browned.

Assembly & cooking instructions – family style

  1. Use a few ladles of sauce to coat the bottom of a large baking dish.
  2. Add eggplant slices to form a layer in the baking dish. Place a few ladles of sauce evenly across the breaded slices. Apply 1/3 of the mozzarella in an even layer across the eggplant. Finish the layer by sprinkling 1/3 of the parmesan cheese on top.
  3. Repeat step 2 twice, creating 3 layers in all and alternating the direction of each layer’s slices.
  4. Bake in 400˚ oven for 30 to 40 minutes, until the dish is bubbly and the cheese has cooked/browned to your liking.

*     *     *

*     *     *

Variations

If prepared as indicated — and pictured — above, the result is more suitable for a “family style” dinner and resembles a tray of lasagna. If you like, you can easily “build” individual servings using 3 slices of eggplant and covering each layer with the sauce and cheese as above but keeping each serving separate from the others. Similarly, you can slice the eggplant into 1/2 inch disks, rather than lengthwise, and create smaller sized portions, perfect for use as primi piatti.

*     *     *

Marinara Sauce

This marinara isn’t meant to be simmered for hours. The resulting, fresh-tasting sauce adds another flavor element to this vegetarian dish.

  • 3 tbsp olive oil
  • 1/2 – 1 tsp red pepper flakes (optional)
  • 1 large onion, coarsely chopped
  • 2 carrots, coarsely chopped
  • 2 celery stalks, coarsely chopped
  • 6 garlic cloves, smashed
  • 2 – 3 tbsp tomato paste
  • 1 can (28 oz) diced tomatoes
  • 1 can (28 oz) crushed tomatoes
  • 1/2 cup dry red wine (optional)
  • 3 tbsp fresh parsley, chopped fine
  • 1 tbsp dried marjoram
  • salt & pepper

Directions

  1. Place onion, carrots, celery, and garlic into a food processor and process until finely chopped. Alternately, finely chop the vegetables and garlic by hand.
  2. Heat oil in a sauce pan over med-high heat. Add the optional red pepper flakes and sauté for about a minute.
  3. Add the finely chopped ingredients, season with salt & pepper, and cook until liquid has evaporated and they start to caramelize.
  4. Add the tomato paste and continue to cook for about 2 more minutes.
  5. Add the tomatoes, wine, parsley, marjoram, and stir to combine. Season with salt & pepper, bring to a boil, and reduce to a simmer.
  6. Continue to simmer until sauce has thickened and deepened in color,  about 60 minutes, on average. Check for seasoning and reserve for use in your recipe.

*     *     *

Mom’s Boiled Dinner

Though Italian, through and through, the Bartolini Sisters’ recipe repertoire was anything but restricted to Italian fare. Both Sisters cooked a range of dishes representing many cuisines, and as Mom loved to recall, I was about 6 when I told her that eating at our  house was “an adventure!” You see, it was about that time that Mom had gone to lunch with a few friends, I believe, at what was at the time Detroit’s premier Chinese restaurant. She ordered sweet & sour something-or-other (I don’t remember what), thoroughly enjoyed it, and asked the waiter if she could have the recipe. He agreed and returned a few minutes later with the recipe, which no doubt pleased Mom no end. Later, when the check arrived, Mom was surprised to see a $25.00 fee for the recipe included in the total! (Understand that this was a time when $25.00 was considered a nice sum to win on game shows like “What’s My Line?”. )  Mom, rightly, refused to pay the $25.00, indignantly gave them back the recipe, and vowed to duplicate that meal. And thus began our “adventure.” Starting with the Chun King section of the grocery store, Mom set out to make the ultimate sweet and sour dish. Time after time, she served us the latest version which, to be fair, we kids often thought was OK. Having tasted the original, however, Mom felt otherwise. I remember one specific dinner when her latest attempt fell short of expectations. After one bite, disgusted, she pushed her plate aside and watched as we kids gobbled it down.  The thing I most remember and, frankly, am most proud of, is she never gave up. Laughably, we did eat a couple pretty bad sweet & sour concoctions but she was determined to prove that the restaurant’s food wasn’t all that special and certainly not worth $25.00 per recipe. Truthfully, I don’t think she ever hit pay dirt, at least not while I was living at home, but she did teach me a valuable lesson by her example. So, when I describe the number of tests I’ve run to, say, come up with a cheddar cheese pie crust, or, to find the right level of “heat” in my giardiniera, don’t credit me. Credit Mom.

But I digress …

*     *     *

*     *     *

Among the many cuisines the Bartolini Girls drew upon, American was first and foremost. Meatloaf, stews, casseroles, and fried foods, among others, were very often served — with a platter of pasta on the side, of course. Mom, in particular, loved a New England boiled dinner and she was sure to serve it a couple of times each year. Today, although I may have added a couple of vegetables to the pot, I keep her tradition alive and prepare a boiled dinner at least twice every year, once in the Spring and again in the Fall.

The recipe that I’m about to share uses quite a few vegetables to form a bed for the corned beef. Even with my 6 quart crock pot, only a couple of cabbage wedges will fit into the cooker and, as a result, I have to make other arrangements for the rest of the cabbage. When there’s about an hour to go before dinner is ready, I place as much sliced cabbage as will fit comfortably into the slow cooker and replace the lid. The rest of the cabbage goes into a covered frying pan, a cup of broth from the slow cooker is added, and then everything is seasoned with salt & pepper, to be cooked over a medium heat. Cooking times will vary, depending upon the amount of cabbage and size of the pan. Try to time it so that this cabbage is finished when the slow cooker’s contests are ready. When ready, combine the two preparations for serving and storing. Of course, the alternative to doing this is to use fewer vegetables but, frankly, that just ain’t gonna happen around here.

*     *     *

Mom’s Boiled Dinner Recipe

total time: approx.  8.5 hours

Ingredients

  • 1 prepared corned beef, 4 lbs. Do not discard the packing liquid, unless directed to do so by the package directions.
    • enclosed spice packet
    •                     or
    • 12 green peppercorns and 1 tbsp pickling spice.
  • 1 small bag of baby Yukon gold potatoes
  • 1 large onion, cut into about 8 wedges
  • 1 rutabaga, cut into large chunks
  • 1 turnip, cut into large chunks
  • 4 carrots, cut into 2 inch chunks
  • 4 parsnips, cut into 2 inch chunks
  • 2 garlic cloves, diced
  • 1 cabbage, outer leaves discarded, cut into about 10 wedges
  • salt and pepper, to taste
  • water

Directions

  1. About an hour before you begin, remove the corned beef from the fridge and set it on a counter so that it warms slightly.
  2. Place the potatoes, onion, rutabaga, turnip, carrots, and parsnips into the slow cooker.
  3. Sprinkle the garlic over the vegetables and do the same with the spice packet, if any, that came with the corned beef. (If no spice packet, add the pickling spice and green peppercorns.) Season with salt and pepper.
  4. Place the corned beef atop the vegetables and empty the packing liquids over everything. Add water until the slow cooker is about 2/3 full.
  5. Set crock pot to “high” and cook for one hour, turn the meat over, set to “low” and cook for 6 more hours, turning the meat over every 2 hours. Periodically skim the surface to remove any off-color foam, as necessary.
  6. After 7 hours, turn over the corned beef one last time, place the cabbage wedges into the slow cooker, replace the cover, and cook for an additional hour. If you have too much cabbage for your slow cooker, place the surplus into a frying pan, season with salt & pepper, and baste with a cup of broth from the crock pot. Cover and cook over medium heat until ready to be served — 15 to 20 minutes.
  7. After a total of 8 hours, remove the corned beef to a cutting board, slice it thinly, and place it on a platter with the cooked vegetables and cabbage. Serve immediately. Alternately, some people, myself included, prefer that their vegetables be served in a bowl with some of the broth.
  8. When preparing the leftovers for storage, be sure to combine all the cabbage and its cooking liquid with the rest of the vegetables.

Variations

Aside from making one’s own corned beef from beef brisket — something beyond my scope — the only variations of which I’m aware involve the vegetables. Basically, this recipe was Mom’s but I’ve added the turnip, rutabaga, and parsnips. Make the recipe your own and drop or add any vegetables to suit your tastes

*     *     *

*     *     *

Note

The leftovers from this dinner store well and you can easily use them to repeat the meal, if that’s your wish. As I’ve mentioned, however, I prefer the vegetables served with the broth as a soup. That means that I can use the corned beef for panini, also personal favorites. Pictured above is one such sandwich made with corned beef, Swiss cheese, a little cabbage, and some mustard. It doesn’t get much better than this.

*     *     *

Don’t tell Philadelphia that we’re making Cream Cheese

This is my 3rd, cheese-related post of the series. Unlike its predecessors, unlike almost all of my prior blog entries, there is no side story, no anecdote, to tell. Yes, Mom sometimes served us cream cheese but don’t all Moms do the same? Although it’s true I’ve made this cream cheese for Zia, it’s hard to build a story around her saying, “I like it.” Looking beyond the 2 Bartolini Girls, there just aren’t any cream cheese yarns to report coming from the old two-flat. Moving more to the Present, in all of my sleepless nights, cream cheese never played even the smallest of bit parts. To be honest, I don’t even recall a single instance where I snacked on cream cheese in the wee hours of the morning. Most shockingly — and, for once, disappointingly — Max has never done anything to disrupt or despoil my cream cheese operation nor its end-product. And Lucy doesn’t speak cheese, so, she is of no help whatsoever. As a result, I’ve got nothing. Nada. Butkis. So, then, how did I come to make cream cheese? One day about 2 year ago, while looking at the Fankenhauser Cheese Page, I clicked on the words Cream Cheese. Within days, the Bartolini kitchens were making cream cheese. Hardly the quaint tale of a bygone time that you’ve come to expect, now is it?

So, with no story to tell, I’ll get right to the business at hand. The ingredient list mentions that salt is optional but strongly recommended. I would definitely add salt should you decide to make this cheese. Not only will it prolong the cheese’s shelf-life, but it tastes so much better. Believe me, a salt-free cream cheese is one, extremely bland cheese. Beyond the salt issue, there’s but one thing more worthy of mentioning. While I was away, guest hosting for Jed at sports-glutton.com, I happened upon his post dedicated to the fine art of making NYC-style bagels. Thanks to Jed and that post, the Bartolini kitchens actually baked all the bagels pictured within this post.

By the way, home-made mascarpone is next on the cheesy schedule and, like today, I’ve got nothing.

Before attempting to make this cheese or any within my recipe collection, please refer to my Cheesy Stuff page. Chock full of cheesy details, it provides information about ingredients, cleaning/sterilizing equipment, spices & seasonings, a few tips, and sources for supplies and information.

*     *     *

Home-Made Cream Cheese Recipe

yield: 2 pounds

Ingredients

  • 1 quart whole milk – never ultra-pasteurized
  • 1 quart whipping cream – never ultra-pasteurized
  • 1/4 cup cultured buttermilk – no substitutes
  • 1/2 tablet Rennet dissolved in 1/4 cup distilled water
  • 1 to 2 tsp table salt, more or less to taste – optional but strongly recommended

Directions

  1. Place the milk and cream into a clean, sterile pot with a lid and heat over low to med-low heat until it reaches 70˚ . Stir frequently.
  2. Add buttermilk, mix thoroughly, cover, and set aside for 15 minutes.
  3. Add rennet, stir, set aside for at least 8 hours, or overnight, at a room temperature from 70 to 75˚.
  4. If properly prepared, the mixture should have gelled after waiting the specified time. Sprinkle the salt over the top of the gelled mixture. Briefly use a whisk to gently stir the mixture, creating pea-sized curds.
  5. Cover a large strainer with a clean, sterile handkerchief.
  6. Gently pour the curds into the handkerchief and let drain for 30 minutes.
  7. Grab the handkerchief’s 4 corners, tie them, and use them to hang like a sack over the sink or a large pot. If your kitchen is exceptionally warm, place everything into the fridge to drain.
  8. Drain until the cream cheese is the consistency you prefer. To hurry the process, carefully twist the “sack” to force the whey out of the cheese.
  9. Place cheese into container(s) and refrigerate. The cream cheese will remain fresh for about 1 week, less if unsalted.

*     *     *

Notes

Because of its relatively short shelf-life, I rarely mix other ingredients into my cream cheese unless it will be used up entirely within a day. To do otherwise, I feel, opens the door to contaminating the cheese because of a slightly over-ripe berry or piece of fruit.

I’ve tried cooking with this cream cheese and it “broke,” liquified, both times. I have used it successfully, however, in a variety of refrigerated cheesecakes and spreads.

*     *     *

Adapted from Emeril’s Homemade Creole Cream Cheese

and

     the Fankhauser Making Cream Cheese webpage.

*     *     *

My Uncle’s Pasta (aka Cacio e Pepe … whatever!)

Being today is George Washington’s birthday, I’ve decided to come clean. Understand that there is no easy way for me to say this, so, I’m just going to blurt it out. I lied to you. Well-intentioned though I was, I nevertheless gave you false information. And, what’s worse, I did it not once but twice. Now, before you grab torches, gather en masse, and storm Chicago looking for me — by the way, if you do, be sure to take the Dan Ryan (hehehe) — let me explain …

*     *     *

  *     *     *

Back in October, 2010, my first real post was the recipe for Pasta in Bianco and, at the time, I said it was about the easiest pasta dish to make. And it is … sorta. Then, a year later, I shared the recipe for Spaghetti Aglio e Olio which I described as being “by far, the easiest (pasta dish) to prepare.” Well, it is … kinda. The truth is that there is a 3rd dish, an even easier dish to prepare, a dish that for decades I’ve prepared for myself and enjoyed as my own personal creation and that reminded me of Uncle. That is, until a few weeks ago when I found an authentic recipe that is identical to “my” recipe for Uncle’s Pasta. I could ignore it or, worse yet, try to convince everyone that my recipe is the original but, c’mon.  I’ve just confessed to 2 lies, committing a 3rd lie — especially one so obvious — would serve no purpose other than to further grease my path into Hades. So, I’ll take the high road and explain how I came upon this dish and, in an effort to make amends, I’ll throw in a little info on yet another obscure pasta, to boot.

Living in the old two-flat, there were many dinners where the families ate together and very often some form of pasta was served. My Uncle, like most, enjoyed grated cheese atop his pasta but, what set his plate apart from everyone else’s, was his love of black pepper. To my eye, he used more pepper than anyone seated at the table. Well, for this youngster, the aroma of grated Pecorino Romano mingling with the scent of freshly cracked pepper was intoxicating, made even more so because I was considered too young to have access to the pepper shaker. (As an unexpected benefit, however, when the nuns spoke of the Garden of Eden, I understood all too well Eve’s desire for the Forbidden Seasoning Fruit.) Well, I eventually grew up, as most young boys tend to do, and was finally able to add as much pepper to my pasta as I wanted — and I did. But wait, there’s more to this story because, up until now, I could have been talking about any pasta dish. I need to narrow the field a bit.

Once I moved away, I lived with a number of roommates until I could finally afford a place of my own. Back then, having a well-stocked pantry was not exactly high on my priority list. Let’s be honest, if not for “tissue”, coffee, and cat litter, I probably wouldn’t have seen the inside of a grocery for months at a time. Now, I’ve already blogged about my love for, and reliance upon, Spaghetti Aglio e Olio, pasta made with garlic and olive oil, but there were times when I didn’t have any olive oil. What to do? Well, I made my pasta without it, adding a bit more cheese, a couple more sprinkles of pepper, and some pasta water in its place. Moments later, I’d be seated at the dinner table where, with a single whiff, I was 6 years old again watching Uncle shower his pasta with pepper. So, for some 30 years, I’ve made this pasta, not just when out of olive oil but whenever I needed a pasta fix and the nostalgia bug hit me.  Over time, this pasta came to be called Uncle’s Pasta in my mind because its aroma reminded me of his plate during those family dinners of long ago.

*     *     *

I’ll re-visit this picture when WordPress becomes scratch & sniff-enabled.

*     *     *

With that in mind, you can well imagine my surprise when, a few short weeks ago whilst I was looking at pasta cutters, I learned that the people of Rome, and its district of Lazio, make a pasta called Cacio e Pepe, Cheese and Pepper, that is exactly like my Uncle’s Pasta! Now, rather than become bitter, I’ve decided to rise to the occasion and to turn this into a teaching opportunity. You see, the night that I became aware that the Romans had plundered my childhood memories and stolen my pasta recipe,  I was looking at a pasta maker called the chitarra. Italian for “guitar”, a chitarra is shirt box-sized with many wires or cords stretched, lengthwise, from one end to the other. A freshly made pasta sheet is laid on top of the “strings” and a rolling-pin is used to forcefully push the dough sheet through them to create pasta noodles. Although the width between the strings may vary from chitarra to chitarra, when they are set close enough together so that the distance is the same as the width of the pasta sheet, the result is a square-shaped pasta called tonnarelli. Often as thick as spaghetti, tonnarelli, not so coincidentally, are often used to make Cacio e Pepe. Never seen ’em? Guess again.  One very common “fresh” pasta’s cappellini is, in fact, tonnarelli. If you own a pasta machine, chances are it makes 2 types of pasta. The packaging will name the smaller of the 2 as being either cappellini or spaghetti. Um … no. One very popular stand mixer’s pasta cutter is advertised as making angel hair pasta. Again … no! These cutters are incapable of making a round pasta noodle and both cappellini and spaghetti are, in fact, round. If it’s a thin, square-shaped pasta, it’s tonnarelli. Now, if the pasta from your smallest cutter isn’t quite square, that’s probably because the pasta sheet wasn’t the same thickness as the cutter’s width. If you’re so inclined, vary the pasta sheet’s width and you’ll get your square tonnarelli.

My point isn’t to make sure everyone that sits at my dinner table, or that reads this, can identify the pasta set before them. No, not at all. It is to illustrate just how seriously the Italians take their pasta. For many, Emilia–Romagna is the home of Italy’s best pasta makers, with Bologna as its capital. True pasta aficionados from that region will claim that they can tell whether the pasta dough is rolled by hand or machine, with a wooden versus a steel rolling-pin, on a wooden board versus a stainless steel or marble counter top, etc., etc., etc. My father, when he saw Mom preparing to make pasta that day, would remind her to roll it out by hand as he left for work. Mom always assured him she would — and then got out the pasta machine before his car had made it to the end of the block. When dinner was served, could Dad tell the difference? Who knows but, like any loving husband, he knew when to keep quiet.

Wow! Such a long post for so simple a dish to prepare. I won’t be giving this recipe the full treatment because, frankly, it would be a waste of time. All you need is some pasta, freshly made is preferred but boxed spaghetti will do nicely; hot pasta water; some grated cheese, Pecorino Romano if possible; and freshly cracked/ground pepper.  I won’t be giving ingredient amounts because they will all depend upon the number of servings to be prepared and your own taste. You may not be as enamored with pepper as am I, after all.

While your pasta is cooking, warm the serving bowl. This can be done by pouring hot water from a tea kettle or via the tap. Once the pasta is cooked to your liking, reserve a  cup of the boiling pasta water before draining the pasta. No need to drain it fully. In fact, it’s better if you don’t. Work quickly now. Place the cooked pasta into the now-warmed serving bowl and season it very generously with the grated Pecorino Romano cheese. (Parmesan may be substituted.) Mix the pasta, adding more pasta water, a little at a time, so that it combines with the cheese to create a sauce-like dressing for the pasta. If it’s too dry, add more water; too wet, add more cheese. Once the pasta is evenly coated, add some pepper and stir. Remember, the dish is called Cacio e Pepe for a reason.

*     *     *

*     *     *

With your pasta now appropriately dressed, serve it on warmed dinnerware.  Garnish each serving with a generous sprinkling of grated Pecorino Romano and another dusting of pepper. Now, before you sample this testament to simplicity, take a moment to savor the fragrances of freshly grated cheese and newly cracked pepper wafting up from your plate. Nothing more need be said.

*     *     *

Pasta Cacio e Pepe

*     *     *

Sis’s Soup with Little Meatballs (Minestra con Polpettine)

You might recall that last December, I demonstrated how to make quadretti, a small, square-shaped pasta. At some point, I mentioned Mom using this pasta in soup to nurse me back to health but that my Sister remembered differently. She recalled Mom serving broth filled with Acini di Pepe, “sick soup”, whenever she was ill. Well, since Monday was Sis’s birthday, why not share the recipe for her sick soup?

Soup made with Acini di Pepe is not a Bartolini tradition. Oh, sure, it was served plenty of times at the old two-flat but it wasn’t made from a recipe that had been handed down from one generation to the next. It came to us, oddly enough, from the Mother of my 5th grade teacher. Mr. D was from Upstate New York and my class was his first in Detroit. In fact, he arrived in my hometown barely 1 week before school started that September. Mr. D wanted to introduce himself to the parish and to our parents so, once classes started, he visited the home of each of his students. He chose the families alphabetically, making mine the second home he entered. And as was so often the case with newcomers who entered the two-flat, he hung around for a number of years — make that decades — afterwards. (There was a similar phenomenon in our backyard that involved Grandpa, our neighbors, and the Parish priests but I’ll save that for another post.) Eventually, Mr. D migrated upstairs, becoming good friends of Zia and Uncle.  At some point, and I do not recall how much time had transpired, his Mother and Aunt came to Detroit for a visit. It wasn’t long before they, too, became ensnared in the two-flat’s web of conviviality. Well, as luck would have it, both women were good cooks and during subsequent visits, recipes were traded. One of the very few recipes to survive is today’s minestra, Acini di Pepe with meatballs. (It took a while but I got us here.)

Acini di Pepe is a small, bead-like pasta that expands during the cooking process, much like couscous. Mom served it to Sis when her tummy was upset, just as she served me quadretti. As was her way, Doctor Mom started with broth only and gradually added increasing amounts of Acini di Pepe to the broth as Sis’s condition improved. The meatballs, polpettine, were never used for medicinal purposes. No, they were served when everyone was well and seated at the dinner table. And did we ever enjoy them. The lemon zest in the polpettine, when mixed with a hint of nutmeg, take this simple soup to an entirely different level. Now, if Acini di Pepe isn’t “your thing,” I strongly suggest you make the polpettine and use them with whatever pastina you prefer. Trust me. You won’t be disappointed.

Oh, yeah. Happy Birthday, Sis!

*     *     *

Acini di Pepe with Meatballs Recipe

Ingredients

For the polpettine

  • 1/2 lb ground veal
  • 1/4 cup grated cheese, pecorino romano preferred
  • 1/2 cup plain bread crumbs
  • 1 large egg, slightly beaten
  • 1/8 tsp nutmeg
  • zest from 1/2 lemon
  • 2 tbsp fresh parsley, chopped
  • salt & pepper, to taste

For the minestra

  • 2 quarts homemade chicken stock (low-sodium store-bought may be substituted)
  • 1 cup Acini di Pepe, uncooked
  • additional grated pecorino romano

*     *     *

*     *     *

Directions

To make polpettine

yield : approx. 100 polpettine, divided, half to be frozen for later use

  1. Place all the ingredients into a bowl and mix until combined. Do not over-work.
  2. Use a melon baller or small scoop to fashion small meatballs. (See Notes below.)
  3. Divide all the polpettine into 2 halves and place each on separate baking sheets.
  4. Place one baking sheet into the freezer and, once frozen, place the polpettine in a container, return to the freezer for use on a later date.
  5. Use the other half as indicated below.

To make the minestra

  1. Bring the stock to a rapid boil.
  2. Add the Acini di Pepe, stir, and then add the remaining half of the polpettine.
  3. When stock returns to the boil, reduce to a medium simmer and cook for about 10 minutes. Stir often but gently so that the polpettine remain intact.
  4. At the end of 10 minutes, taste the minestra to see if the pasta is cooked to your liking and to adjust seasoning, if necessary.
  5. Serve immediately. Have plenty of grated pecorino romano cheese available at the table.

*     *     *

Notes

Polpettine are meant to be relatively small. One polpettino should easily fit upon a soup spoon with plenty of room left for pasta and broth. Although this recipe yields about 100 meatballs, I prefer to use only about half that amount in a 2 quart pot of soup. Of course, you may use more or less depending upon your own preference.

*     *     *

And Now for the Awards Portion of  Today’s Presentation

Over the past few weeks, I’ve been lucky enough to have received a few awards from members within our blogging community. And lest anyone think that I do not appreciate these wonderful gifts, I wanted to make sure that each was acknowledged.

*     *     *

So, to Marie, of My Little Corner of Rhode Island, I say thank you for generously nominating me for the Kreative Blogger Award.

*

*

*     *     *

To Kathryn, of kiwsparks, and Eva, of Kitchen Inspirations, I say thanks for your thoughtfulness in granting me The (Red) Educational Shoe Award. (And to Greg: You’ll just have to wait before you get to see me in stilettos, be they red or some other color.)

*

*     *     *

Finally, to Roger, of Food, Photography, & France, mere words cannot express the depth of emotion that I experienced upon learning you had nominated me for the Sunshine Award.

*

*

*

*     *     *

OK, I know that I’m supposed to answer a variety of questions or volunteer some facts about myself and I must admit to enjoying reading others’ replies. The truth of the matter is, however, that I’m not all that interesting. I am no onion with many layers to be pulled back revealing inner truths. There is no art in this choke. What you see is what you get — and what you get is pretty boring, at that. Besides, what little there is to tell is fodder for my future posts. If I tell you everything about myself now, whatever will I write about next time or the time after that?  And so, to those who truly wish to learn more about me, I say “Stay tuned … “

The next part of any award acceptance is to pass the award along to deserving individuals. Well, there are 3 awards to pass along and I don’t even know how many bloggers, in total, I am to name. I do know, however, that no matter how many good people I nominate, I will surely forget one person and, in all probability, quite a few more. I have been treated kindly by everyone I’ve met here and encouraged in more ways than I could ever enumerate.  I’d sooner quit blogging than hurt or offend any of those who have treated me so graciously. So, rather than nominate many, I shall only nominate one.

A relative newcomer, this blogging friend has taught me a great deal. By her example, I’ve learned that less is more. That silence is truly golden. That to just be yourself and the World will be yours to conquer. And so it is that I nominate, for the Kreative Blogger, The (Red) Educational Shoe, and Sunshine awards, none other than …

*

*

*

*

*

*

*

*

*

*

*

*

*

*

FLAT RUTHIE !!!!!

As soon as word of the awards became known, her friends carried her off to an impromptu party at Chicago’s Fondue Stube. Pictured above, Flat Ruthie is seen with one of her dearest of friends, Thing, as they await the arrival of the fondue pots. Oh, what a night!

So, congratulations Flat Ruthie! I for one, cannot wait to read your acceptance speech. (No fair helping her, 3D Ruth.)

And to Marie, Kathryn, Eva, and Roger, all joking aside, I am both honored and grateful for the awards you’ve sent my way. Mille grazie!

*     *     *

The Bartolini Have Left The Building!

Yes, it’s true. The Bartolini kitchens have moved — for today only.

Recently, a blogger buddy, Jed, asked if I wouldn’t mind stopping by his place, sports-glutton.com, while he was away covering the AT&T Pro Am at Pebble Beach. Well, if there’s one thing you should know about this Bartolini, besides his undying love for pasta and intense hatred for spiders, is his fondness for travel. So, when Jed asked me to come for a visit, I couldn’t say “Yes!” fast enough. And I must say I love being here.

First and foremost, Jed’s is a blog about sports and sporting events. If something is happening within the World of Sports, Jed will take us there, not only reporting the event but explaining its significance in “the big picture.” This would be more than enough to keep most sports bloggers busy but not our Jed. In addition to these reports, Jed shares delicious recipes guaranteed to appeal to the glutton in all of us. Now, Jed understands that there’s more to life besides sports and eating.  So, he offers his critiques and ratings of select beers and wines in his Thirsty Thursday series of posts. And, finally, to help us all start our week off on the right foot, Jed serves up a little Monday Morning Humor each and every week.

Sporting news, tasty recipes, expert advice on beverage selection, and a bit of humor, sports-glutton.com has it all. So, please take this link to see my Pastistio Recipe and then take some time to look around and check out sports-glutton.com. You will not be disappointed.

Thanks, Jed, for giving me this opportunity to fill-in for you, even if only for a day. Oh! I almost forgot. It looks like someone broke into your wine cellar last night and stole a few bottles. They must have been real professionals because Max didn’t move all night long. Gotta run.

*     *     *

You Milk The Goat, I Make The Cheese

I came to making my own cheeses by a rather indirect path. Almost 4 years ago, on some cooking show, I watched as labneh was made by straining plain yogurt using coffee filters. I tried it, liked the result and then, following their lead, seasoned it with some herbs. I was so pleased with the end-result that I served it that Thanksgiving and it was well-received. Shortly thereafter, on another sleepless night, I was searching the web looking for more things to do with labneh when I stumbled upon one of the many cheese making websites. Soon I was jumping from site to site, surprised to learn how relatively simple cheese is to create depending, of course, upon the type you’re making — and I’ve been making a few select cheeses ever since.

With the right equipment, supplies, and environment, you can make almost any cheese. Living in the city, however, I cannot get many of the dairy products needed to make some cheeses. Neither do I have, nor am I going to build, a temperature-controlled room to age the hard cheeses that require it. So, right off the bat, I’ve eliminated most types of cheese — and that’s just fine. I’m very satisfied making just goat cheese, cream cheese, ricotta, mascarpone, and mozzarella. Besides, no matter how good the home-made parmesan, I don’t use nearly enough to make it worth my while to make some. (The Bartolini kitchens prefer Pecorino Romano, anyway, but try to find lactating sheep in Chicago.)

*     *     *

Goat Cheese Prepared with Herbes des Provence

*     *     *

Recently, when I decided to share my cheese making experiences, I mapped out a game plan starting with the easiest cheese to make. In my opinion, ricotta is that cheese, especially since my recipe is non-traditional, meaning not made from the whey created when mozzarella is made.  (Having made ricotta both ways, I’ll stick with the recipe I posted for reasons of both taste and ease of preparation.) Somewhere along the way I had planned to talk about making butter at home but Celi did such a good job with it that I’ll just send you to her kitchen’s garden for a look-see. So, having already shared the ricotta recipe and with the butter instructions out-of-the-way, that brings us to the next cheese in the schedule: goat cheese.

To make goat cheese, you begin by adding a little rennet to a combination of goat’s milk and cultured buttermilk. That mixture is gently warmed and then set aside to allow the formation of curds. Once formed, the curds are separated from the whey and the resulting goat cheese is ready for use in your favorite recipe, or, once salted and possibly herbed, can be used as a tasty spread. It really is that easy, as you’ll soon see.

Before attempting to make this cheese or any within my recipe collection, please refer to my Cheesy Stuff page. Chock full of cheesy details, it provides information about ingredients, cleaning/sterilizing equipment, spices & seasonings, a few tips, and sources for supplies and information.

*     *     *

Home-Made Goat Cheese Recipe

yield: about 20 oz. of cheese

Ingredients

  • 1/2 gallon goat’s milk (never ultra-pasteurized)
  • 1 pint (2 cups) cultured buttermilk (no substitutions)
  • 1/2 tablet rennet, dissolved in 1/4 cup distilled water
  • salt (optional, though strongly recommended)
  • herbs (optional)
  • olive oil (optional)

Directions

  1. Place the goat’s milk, buttermilk, and rennet into a large, non-reactive pot. Over med-low heat, slowly raise the mixture’s temperature to 180˚, stirring occasionally to prevent its scorching on the pot’s bottom.
  2. Once it has reached 180˚, remove the mixture from the heat, pour it into a large glass bowl, cover it, and set it aside, undisturbed, for about 12 hours. If the curds have not yet formed, leave it undisturbed until they do. It could take as long as another 12 hours (although it has never taken that long for me).
  3. Take some sterilized cheesecloth or a handkerchief and use it to cover the inside of a strainer. Slowly pour the mixture into the cloth-lined strainer. Once most, if not all the liquid (whey) has passed through the strainer, gather the corners of the cloth and tie them together, forming a sack, of sorts, with the curds inside. Hang this sack over a bowl and refrigerate at least overnight.
  4. Remove the goat cheese from the cloth and season with salt, to taste, and whatever herbs and olive oil you prefer.

*     *     *

Goat Cheese Stuffed Shells

*     *     *

Variations

You can do many things with goat cheese and much depends upon how well it is drained. If you intend to use it as a spread, do not drain it fully and leave it a little on the moist side or, if you like, add a little olive oil. Season it with your favorite herbs and spices and you’ll have a delicious spread for crostini and crudités, or you may crumble it and use it in salads. Drain it more thoroughly and although you can still season it and use it as was already mentioned, you’ll find that you can, also, use it as you would ricotta in lasagna, cheesecake, or stuffed shells, or on top of pizza or bruschette.

Notes

There are any number of places where you can purchase molds used to press various cheeses into recognizable shapes. If I were to make more kinds of cheese, I would probably buy a few of them. Since I really don’t make enough cheese to warrant purchasing molds, I made do. Using a large can that had been used for pineapple rings, I removed the can’s top & bottom, saving one of the lids, and filled it with goat cheese. I placed a cooling rack on top of a baking sheet and covered it with a piece of waxed paper in which I’d punctured some holes in an area a little larger than the size of the can. I placed the cheese-filled can over the holes, replaced the lid, and placed a heavy can on top of the lid, thus applying pressure to force more whey out of the cheese. Everything was refrigerated overnight and the cheese was used later that day to make the stuffed shells pictured above.

*     *     *

Coming Soon

In the weeks ahead, look for my posts detailing the making of cream cheese, mascarpone, and mozzarella. Speaking of mozzarella, please let me know if you are aware of a nearby water buffalo herd.

*     *     *

Inspired by Fankhauser’s How to Make Farmer’s Cheese web page.

*     *     *

Here’s Flat Ruthie Now …

Flat Ruthie visited Chicago and stayed long enough to take part in my 2 day birthday celebration. Click on Day One to join us as we get the party started and to learn the story behind the picture below. The celebration continues on Day Two with a mini-tour of Chi-town and concludes that evening with my birthday dinner.

*     *     *