Trenette with Soft Shell Crabs and Morel Mushrooms

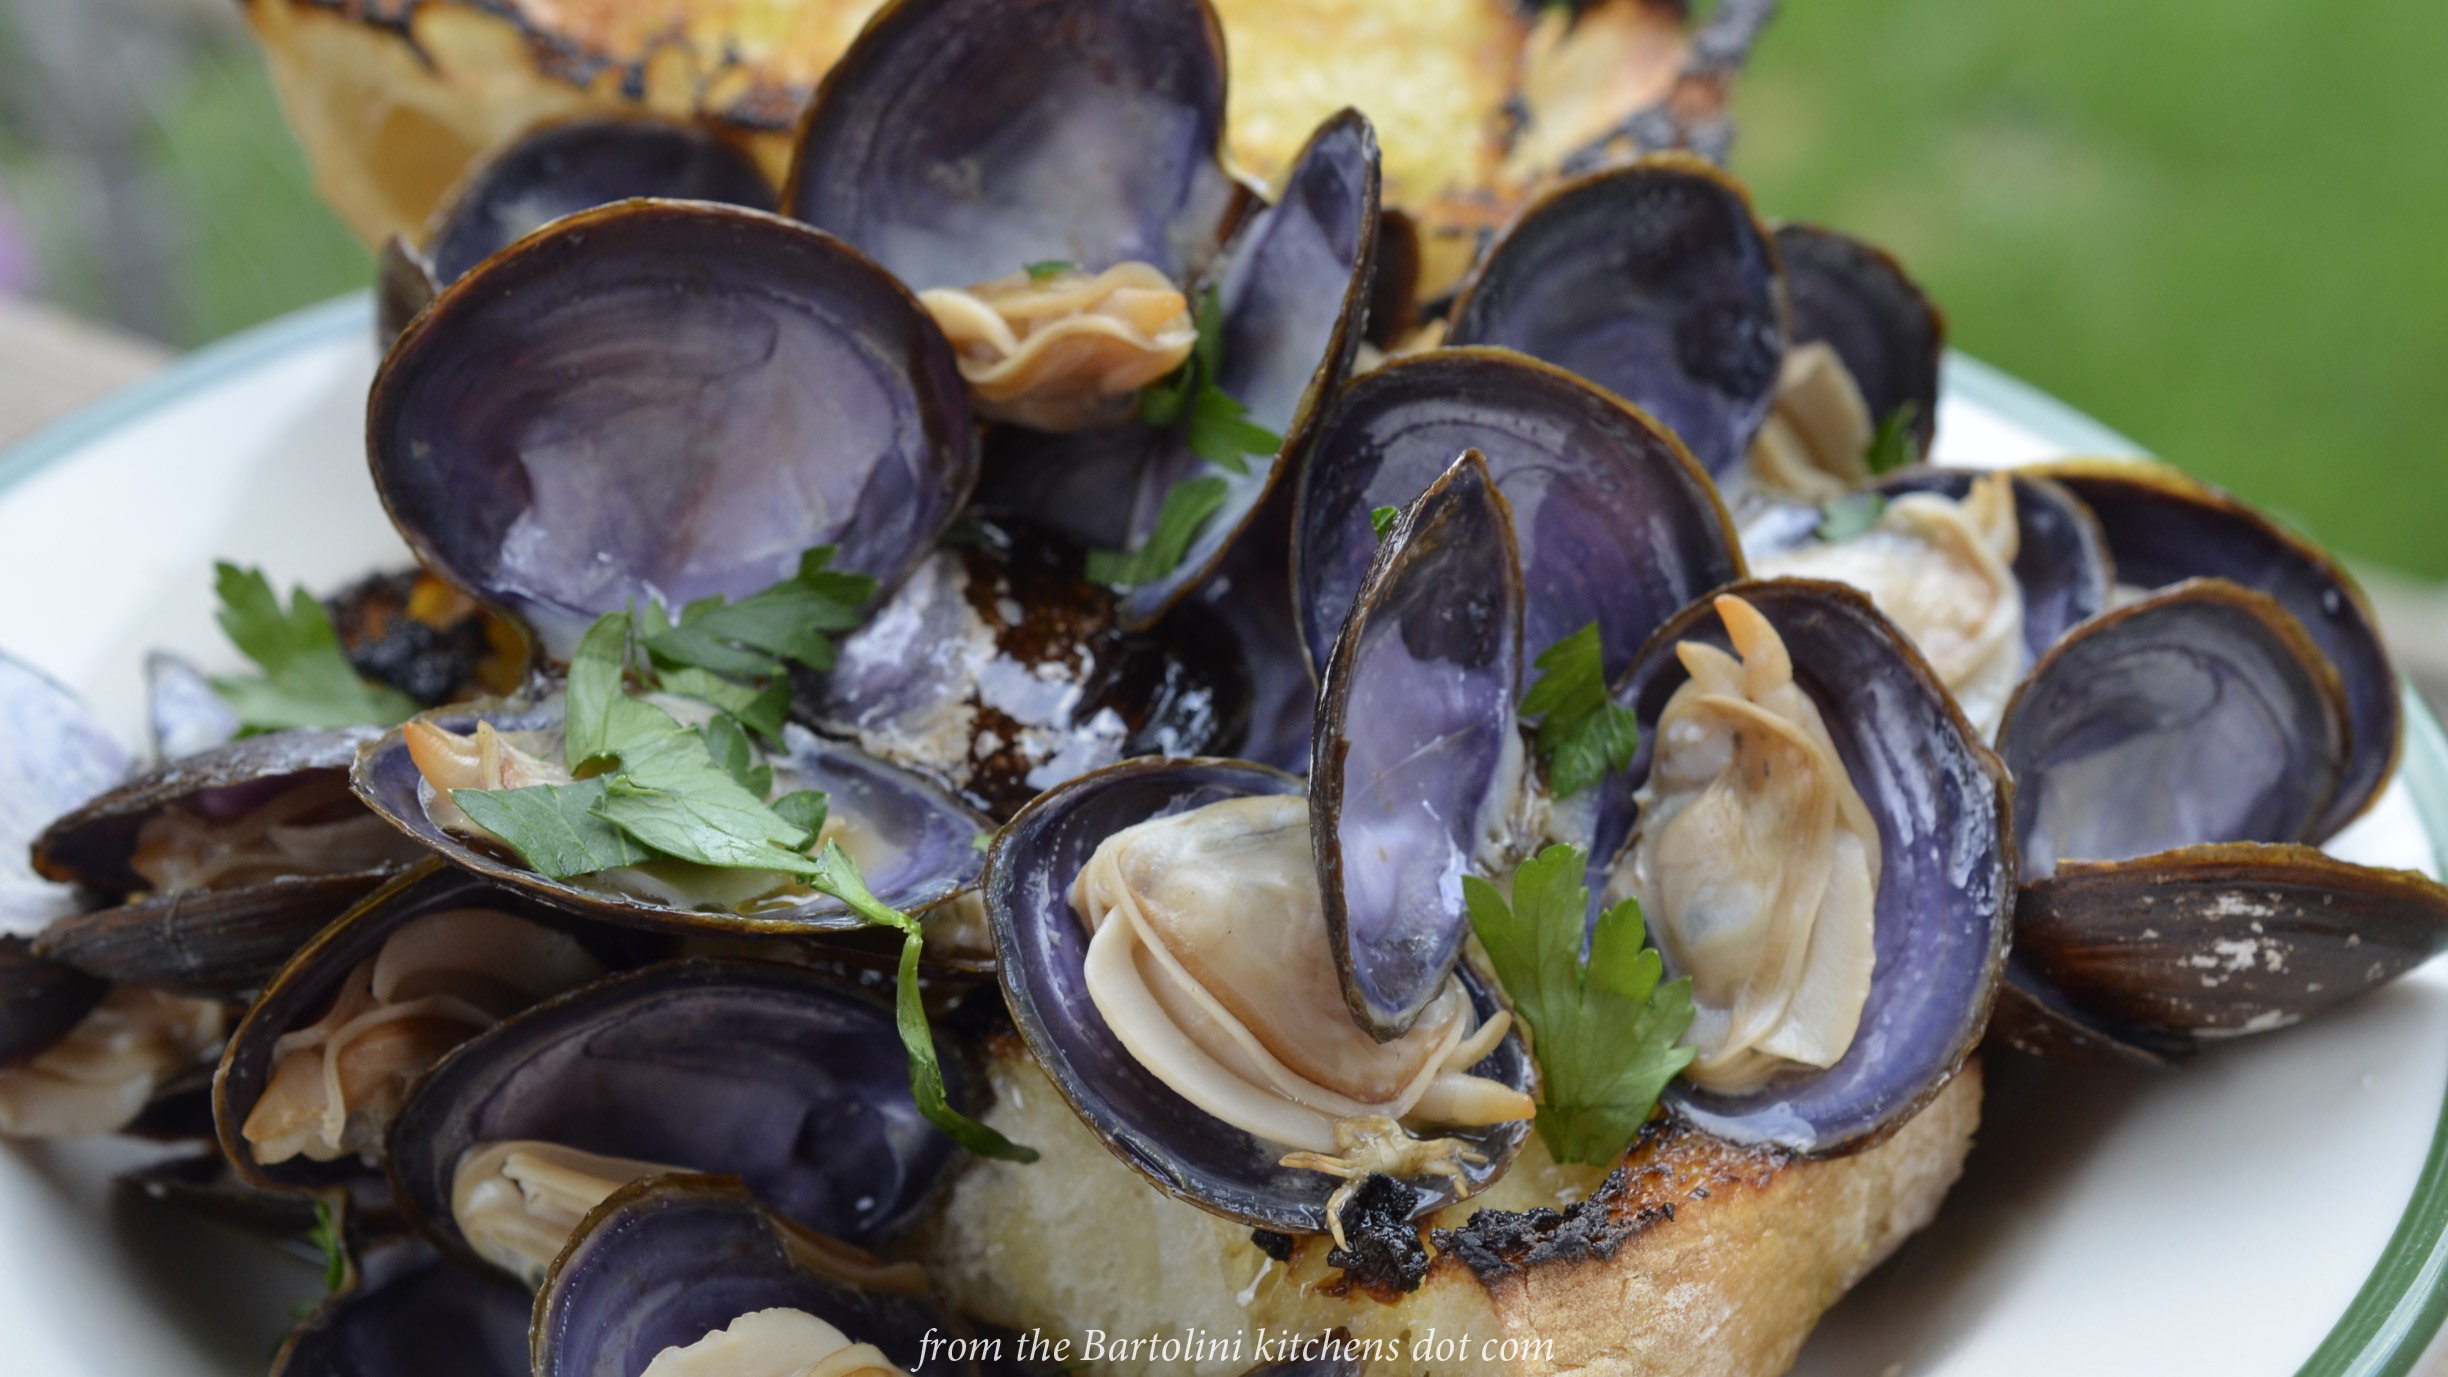
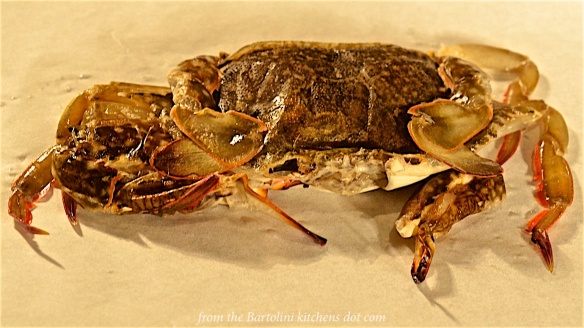
Present conditions notwithstanding, spring’s arrival is certainly welcomed in these parts, for it means the return of flowers and green to our drab landscape. It also means that fresh produce and vegetables begin to make their return to our markets, starting with asparagus and a variety of mushrooms. One yearly event that may escape your notice is the arrival of soft shell crabs. A crab’s shell does not grow, so, every year the crabs shed their old shells in favor of this year’s newer, more spacious models. The new shell is relatively soft for a few weeks, setting off a rush to harvest as many crabs as possible before they toughen up for another 11 months.

Lucky for me, I’ve a great fishmonger that provides many of the fruits of spring. Located not far from my home in Chicago, The Fishguy Market & Wellfleet is my go-to place for seafood and, in the spring, for items like morel mushrooms, asparagus, and ramps. Today’s post may have been written last spring and held until now but its morels and soft shell crabs, as well as the duck eggs used to make the trenette pasta, all came from the Fishguy. They offer much more than I could possibly mention here and my advice for those living in Chicagoland would be to join the mailing list. You may find it worth your while to stop there some day but be forewarned. If you’re going for a sale on clams or soft shell crabs, get there early. They are the favorites of some selfish blogger who, by his own admission, cannot resist buying them.

*     *     *

Linguine with Soft Shell Crabs and Morels 1

*     *     *

I first enjoyed soft shell crabs some 20+ years ago while working in The Loop. A few of us went to lunch at a nearby hotel and soft shell crabs were on the menu. I decided to give them a try and it was love at first bite. Lightly floured and deep-fried, the crabs were served open-face on a long roll reminiscent of New Orleans’ oyster poor boy sandwiches.  Since that fateful day, I order or prepare them whenever I see them. (By the way, a recipe for soft shell crab po’ boys is in the works, as well as a yellow curry.)

It is best to purchase the crabs at their peak of freshness, meaning they should be alive if possible. It also means that you’ll have to kill and clean them before using them in your dish. Well, I love the crabs but let my fishmonger handle the dirty work. As for the morels, a simple brushing should remove any dirt. If need be, you can give them a quick rinse — do not soak — but be sure to pat them dry before using. (See Notes.)

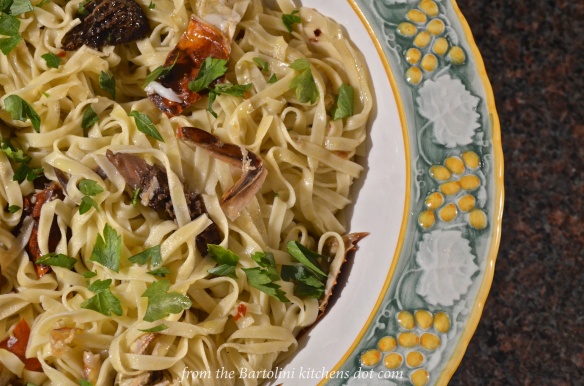
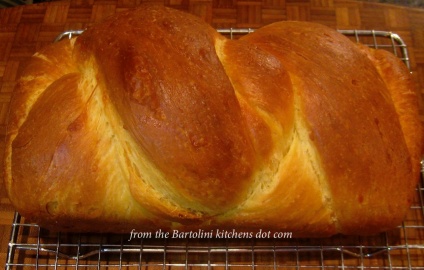
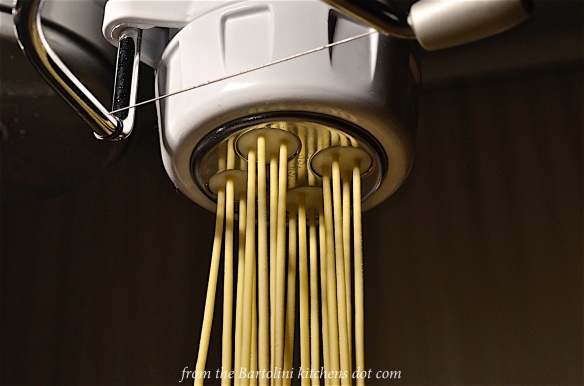
Last week, a number of you inquired about the trenette used in these recipes. Cut a little thinner than linguine, trenette most closely resembles that which Mom cut by hand when I was a boy. Luckily, I found an attachment for my pasta machine that recreates this nostalgia-packed pasta. If you go looking for the pasta, be sure to buy “TRENETTE” and not “TRENNETTE“.  The first is Mom’s pasta. The latter is another pasta that is much like penne, though a little more narrow.  Regardless, don’t be alarmed if you cannot find trenette. Look for a dried pasta called linguine fini. It will make a fine substitute.

*     *     *

Scheduling Note 

This is it, my last post for the next few weeks. My nephew and I will be traveling to Italy to visit Dad’s family in The Republic of San Marino and then it’s off to see Rome. Later, while he boards a plane to return home, I’ll board a train to Corinaldo, the wellspring of the Bartolini Clan. See you on the other side.

*     *     *

Trenette with Soft Shell Crabs and Morels 4

*     *     *

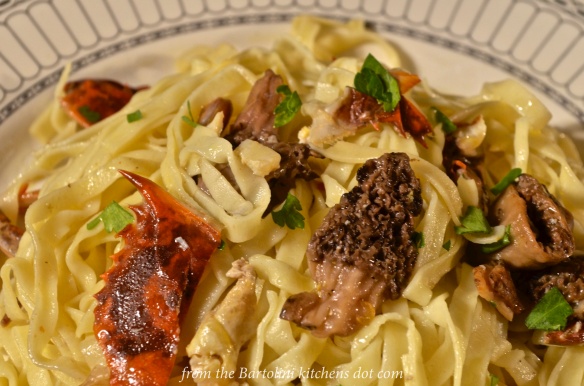
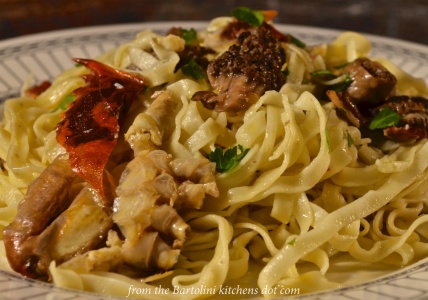
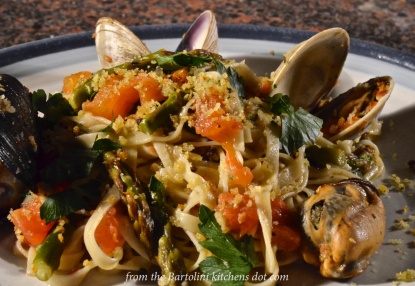
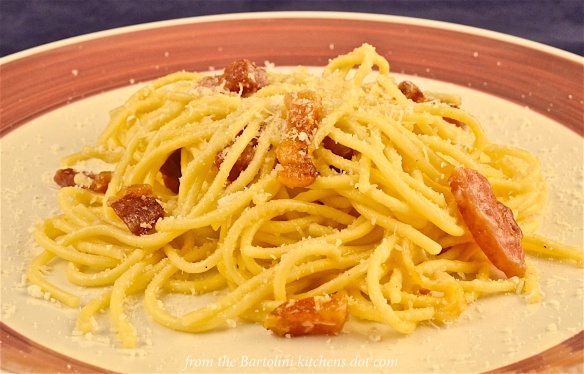
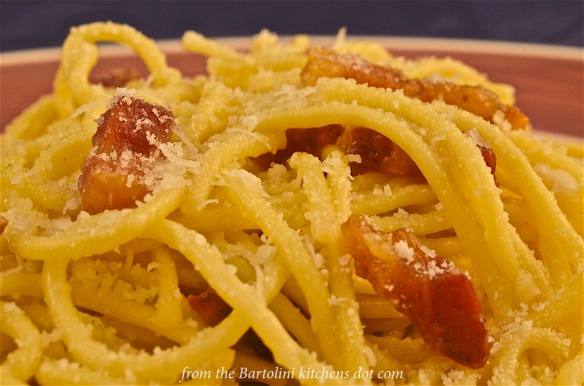
Trenette with Soft Shell Crabs and Morel Mushrooms Recipe

Ingredients

  • 1 lb (450 g) trenette – linguine may be substituted
  • 3 or 4 soft shell crabs, cleaned
  • 2 tbsp buter
  • 2 tbs olive oil
  • 3 cloves garlic, smashed
  • red pepper flakes, to taste
  • 2 to 4 oz (56 to 112 g) morel mushrooms (see Notes)
  • salt and pepper to taste
  • reserved pasta water
  • fresh parsley, for garnish

Directions

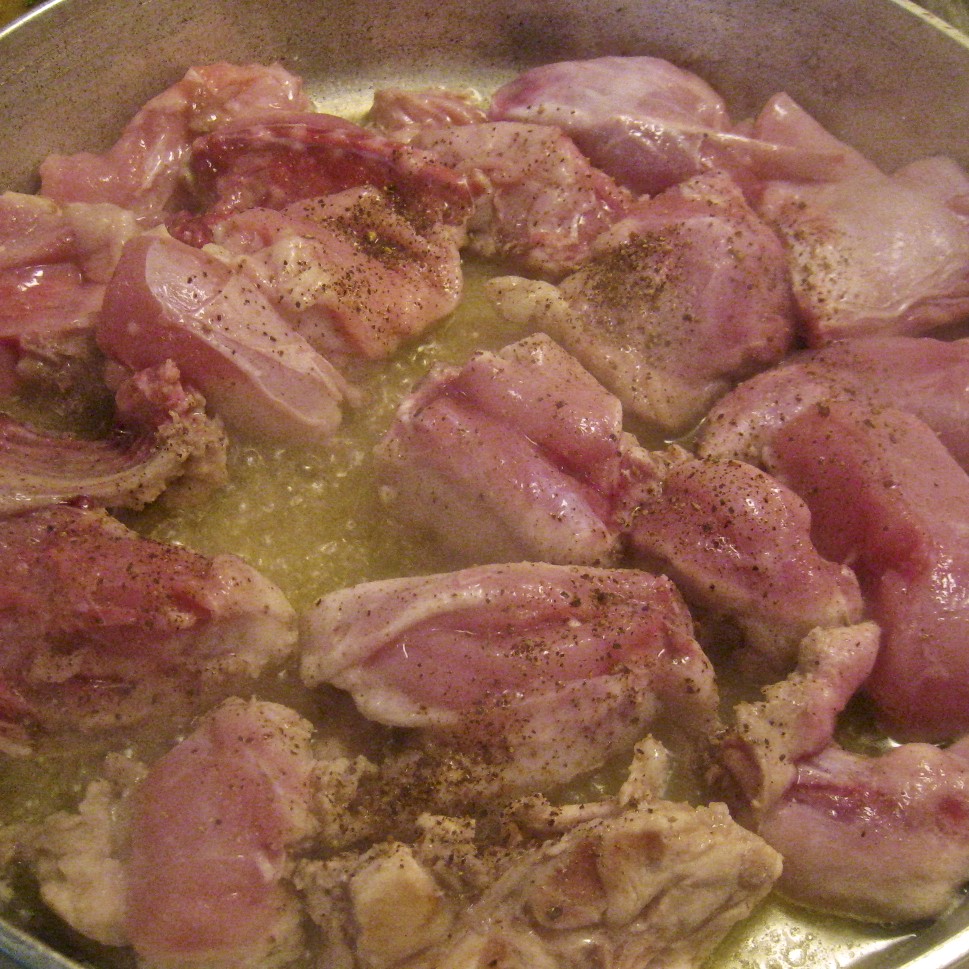
  1. Heat oil and butter in a large frypan with a lid over medium heat. Add the garlic and sauté until browned but not burnt. Remove and discard the garlic, leaving the now-flavored oil in the pan.
  2. Add the red pepper flakes and crabs to the pan, lower the heat to med-low, and cover the pan.
  3. Continue to gently sauté the crabs for about 15 minutes, turning them over mid-way through. The crabs will turn crimson when cooked.
  4. Meanwhile, bring to the boil a large pot of salted water. Add the trenette and cook until it is about 2 minutes shy of being al dente. (If using packaged pasta, refer to the package instructions.) Time the components so that the crabs and pasta are ready at the same time. Now is the time to reserve a cup of the pasta water.
  5. Turn the heat to med-high before placing the morels into the pan with the crabs.
  6. Drain the trenette and dump the pasta into the pan. Stir/toss to combine. If too dry, add some of the reserved pasta water.
  7. Continue to sauté until the pasta is cooked to your satisfaction.
  8. Remove to a serving platter and garnish with freshly chopped parsley before bringing to the table.

*     *     *

Linguine with Soft Shell Crabs and Morels 2

*     *     *

Notes

As this blog’s good friend (and honorary Bartolini) Stefan proved, mushrooms do not absorb enough water to affect taste when cleaned by rinsing with water. Morels have a pitted surface to which water may cling. If you do rinse them, take extra time to dry them as much as possible. Failure to do so may result in the morels being steamed in the frypan instead of being sautéed.

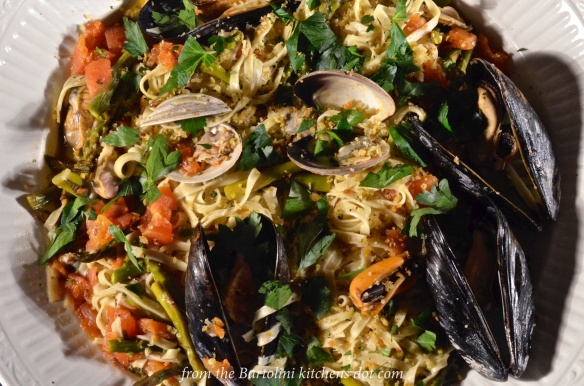
Timing is important with this dish but not as critical as it was in last week’s mollusks dish. Still, you don’t want the pasta or crabs to sit waiting for the other component to complete. Fresh pasta will cook in about 3 minutes, so, drain and add it to the pan after it has cooked for about 2 minutes. Follow the package instructions for dried pasta, draining it about 2 minutes before the stated time for al dente.

Whenever you’re cooking pasta, always reserve some of the pasta water, removing it just before you drain the pasta. Should the finished dish be too dry, a little of this water will work wonders. Not only will it moisten the dish but its starch content will help to thicken whatever sauce is being used to dress the pasta.

If you cannot source fresh morels, dried may be substituted. Soak them in hot, NOT boiling, water for at least 30 minutes or overnight. Once hydrated, strain the mushrooms and use in today’s recipe but reserve the soaking liquid. Filter the liquid to remove any grit and freeze, to be used to flavor your next mushroom risotto.

*     *     *

My comments regarding the Fishguy Market were my own. I requested and was granted permission to mention the market with no compensation trading hands for my doing so.

*     *     *

It’s déjà vu all over again …

Ramps Ravioli with Morel Mushrooms

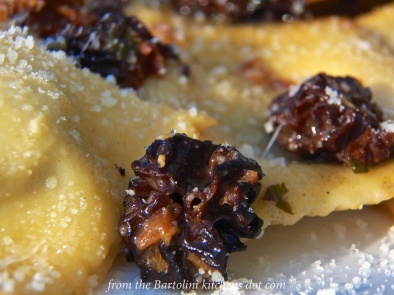
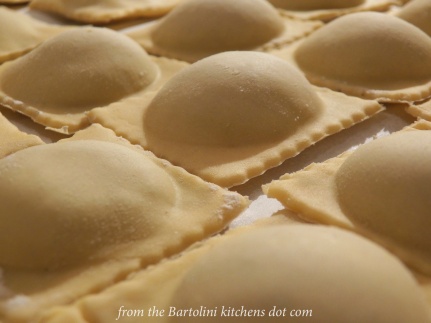
Since we’re talking about utilizing spring’s harvest, why not continue the theme with today’s look back? Hard to believe it was 3 years ago that I posted a recipe for ramps ravioli dressed with a morel mushroom sauce. WIth its ingredients soon coming into season, now’s the time to consider preparing the recipe. You can see how it’s prepared by clicking HERE.

*     *     *

Coming soon to a monitor near you …

Corzetti Pasta Preview

A Surprise!

*     *     *

Advertisement

Trenette with Mussels and Clams

Trenette con Cozze e Vongole

Trenette with Clams and Mussels 3

Just when you think you’ve got all bases covered, The Fates take note and decide to have a little fun. I have been busily at work getting recipes and posts together for the next several weeks. With my trip fast approaching, I don’t want any loose ends to complicate matters. Having posts written and scheduled means that my attention, such as it is,  can be diverted elsewhere with minimal affect to the blog. That was the plan and, with everything in place, I went to the fishmonger.

How was I to know that there would be a sale on clams and mussels? More to the point, how was I supposed to ignore the sale on clams and mussels? The truth is, I couldn’t. I left the shop with a bag full of mollusks and a head full of pasta ideas. On the way home, I stopped at a grocery and bought everything I needed to make today’s dish. Afterwards, I wrote this post and inserted it here, shifting the other posts to accommodate it.

So why the schedule change? Asparagus. It’s coming into season and the green stalks are every bit the star of today’s dish as are its shelled companions. You may not find clams or mussels on sale but you’re sure to see plenty of asparagus. It makes a wonderful addition to just about any pasta that you might prepare in the weeks ahead.

At this point, you would think that all’s well with my schedule and I can rest easy. Oh, how little you know of The Fates. Having finished adjusting the posts to accommodate the new entry, I searched for my soft shell crab pasta recipe to use as the déjà vu photo for today’s post. It was nowhere to be found. I soon discovered that although it had been included in the cookbook, the recipe never made it to the blog. Curses! With soft shell crabs currently in season, that recipe needs to be posted and the recipe has been inserted into the schedule for next time. Once again, all subsequent posts have been shifted to make room for the new guy. One step forward, two steps back.

*     *     *

Trenette with Clams and Mussels 1

*     *     *

Trenette with Mussels and Clams Recipe

Ingredients

  • 1 lb (450 g) trenette pasta – spaghetti or linguine may be substituted
  • 3 tbs olive oil
  • 1 clove garlic, minced or diced
  • red pepper flakes, to taste
  • 3 plum tomatoes, peeled, seeded, and chopped
  • about 1/2 cup dry white wine
  • 1 lb littleneck clams, soaked to remove grit and scrubbed (See Notes)
  • 1 lb mussels, scrubbed with beards removed
  • 1/2 lb of fresh asparagus, chopped into 2 inch (5 cm) pieces
  • 2 tbs fresh basil chopped
  • salt and pepper to taste
  • roasted bread crumbs for garnish – optional  (See Notes)
  • fresh parsley for garnish

*     *     *

Trenette with Clams and Mussels 4

*     *     *

Directions

  1. Begin heating a large pot of salted water to be used to cook the pasta.
  2. Heat the olive oil in a large frying pan with a lid over medium heat.
  3. Add garlic and red pepper flakes. Cook for 2 minutes.
  4. Add tomatoes and wine. Stir well to combine.
  5. Continue cooking until most of the wine has reduced and the tomatoes have broken down — about 20 to 25 minutes.
  6. Add the asparagus and basil, stir, and then add the clams. Cover the frying pan.
  7. Add the pasta to the boiling water. (See Notes).
  8. About 2 minutes later, add the mussels to the frying pan and cover again.
  9. The mussels and clams should be opening at just about the time the pasta is nearing al dente – about 4 to 5 minutes.
  10. Drain the pasta and add it to the frying pan. Toss to combine. Continue cooking until the pasta is cooked to your satisfaction.
  11. Place the frying pan’s contents into the serving bowl. Be sure to remove and discard any unopened clams and mussels. When in doubt, toss it out!
  12. Garnish the dish with toasted bread crumbs and parsley before serving. Please, no cheese for this seafood dish.

*     *     *

Empty Molluscs

*     *     *

Notes

Unlike years ago, most clams bought today from retail outlets have already been purged of sand, or so I’ve heard. That’s not the case, however, if you harvest your own or buy them along the shore. Even so, I still soak my clams to give them a chance to eliminate any sand. To do this, place the clams in a bowl of cold, fresh water and allow them to soak for a half hour or more, changing the water mid-way through. This is not the only way, however, and some advise that salt water is better at getting clams to discharge their sand. In both camps, there are some who believe that a bit of cornmeal will speed the process.

Do you remember last week’s baked calamari post? At the time, I advised making extra breading and reserving all of it left in the roasting pan once the calamari were removed and served. Well, this is one of the reasons why I suggested saving it. Rather than toast some breadcrumbs to garnish your pasta, grab some of these reserved breadcrumbs instead. They’re already cooked so either let them come to room temperature or nuke ’em for about 30 seconds before using. They are a great source of seafood flavor for your pasta.

This recipe is based on cooking dried pasta with an al dente cooking time of about 6 minutes. When I made the dish pictured, I used fresh trenette pasta that I had made just about an hour before cooking. Freshly made pasta cooks in 2 to 3 minutes. As a result, I waited an additional 2 minutes before adding it to the boiling water.

*     *     *

It’s déjà vu all over again …

Asparagus Ravioli Deja vu

WIth this post’s mention of asparagus, it would be a missed opportunity should I not point you to another asparagus-related post. Made with asparagus, crimini mushrooms, and freshly made ricotta, these ravioli are a great springtime dish, whether served as a starter or main course. You can learn how to make the ravioli HERE.

*     *     *

Coming soon to a monitor near you …

Trenette with Soft Shell Crabs and Morels Preview

Trenette with Soft Shell Crabs and Morel Mushrooms

*     *     *

Zia’s Baked Calamari

Calamari Cotti della Zia

St. Joseph’s Feast Day is just around the corner (March 19th) and what better way to celebrate than to share one of the few remaining Bartolini recipes, Zia’s Baked Calamari.

*     *     *

Baked Calamari 6

.*     *     *

The 12 of us living together in the two-flat were treated to some exceptional cooking, courtesy of Mom, Zia, and Nonna. We all had our favorites, to be sure, and I’ve made no attempt to hide my never-ending love of Bartolini ravioli. Even so, Zia’s baked calamari is the one dish that reigns supreme in several of our hearts,. You can be sure that when that platter is set on the table, photos will be snapped and dispatched to those not present. The caption is guaranteed to read something like, “Look what we had for dinner.” When not included, the “Nyeah, nyeah!” is implied.

Now that I know how they’re prepared, it all seems so easy. Getting here, though, was tortuous, leaving a trail of barely edible cephalopods in my wake. From over-stuffing the tubes with breading that was far too oily to roasting them at too high a temperature and for too long, if there was a mistake to be made, I found and made it — sometimes more than once. Finally I made it a point to stay in her kitchen and watch Zia perform every step of the process, even grabbing a bit of breading to get a feel for the amount of oil needed. And then it happened. I got it right. I’ve not been so happy with a dish since I made my first batch of our family ravioli. I am very happy to say that calamari is now a frequent guest of honor at my dinner table.

Since that momentous dinner, I have made a couple modest changes to the original recipe, adding a garlic clove to the stuffing and some lemon juice to the baking dish just before placing it in the oven. You can easily skip both if you like. Otherwise, you’ll find that the stuffing is very similar to the breading used in several of my family’s recipes. Zia adds a bit of lemon juice and the chopped tentacles to the mixture. No need to include the latter if you don’t want them.

Now, as I so painfully learned, here are the problems to avoid. Do not over saturate the filling with olive oil. It should be moist to the touch, not sopping wet. Fill, do not stuff, the tubes. Calamari shrink while being baked and, If too heavily stuffed, much of the excess will spill out. When properly filled, the tubes will shrink around the filling without any being lost. Lastly, raising the oven temperature will result in over-cooked calamari with under-cooked filling. (Been there, there, and, yes, even there.)

*     *     *

Happy St. Joseph’s Feast Day, everyone!

*     *     *

Baked Calamari Filling

*     *     *

Baked Calamari Recipe

Ingredients

  • 3 lbs calamari, fresh or frozen, cleaned (tentacles optional)
  • 2 cups plain bread crumbs – Panko may be substituted
  • half cup chopped parsley
  • 2 tbsp fresh lemon juice
  • 1 garlic clove, minced or grated (optional)
  • enough olive oil to moisten the bread crumbs – should not be sopping wet
  • salt and pepper to taste
  • fresh lemon juice (optional)

Directions

  1. Clean the calamari, if necessary. Make sure to remove the beak located in the center of the tentacles. (See Notes)
  2. Chop the tentacles, if using.
  3. Combine all the ingredients, except for the calamari tubes, and mix well.
  4. Use the breading mixture to fill the calamari tubes. Do not overfill. The tubes will shrink while cooking.
  5. Place filled calamari in a baking dish that has been lightly oiled or sprayed with cooking spray.
  6. Sprinkle excess breading mixture on top of the calamari. (See Notes)
  7. Sprinkle lightly with olive oil and, if you like, a little lemon juice.
  8. Place in a pre-heated 350˚ F (175˚C) for 35 to 40 minutes. (See Notes)
  9. Serve immediately.

*     *     *

Baked Calamari 5

*     *     *

Notes

I was unable to capture the process but you can watch a chef clean whole squid right HERE.

In the past, I’ve mentioned that rubbery calamari will result when not cooked quickly or for at least 45 minutes. Here, because they’re baked, a few minutes have been shaved off the cooking time. The calamari will be slightly crisp instead of being chewy.

In the highly unlikely event that there are leftovers, I like to slice them into rings and use them when I prepare pasta aglio e olio. Just follow the pasta recipe and add the calamari to the pan of seasoned oil when you add the pasta. When the pasta is ready, the calamari will be heated through.

The breading remnants in the baking dish are worth their weight in gold. Gather and place them in a sealable plastic bag to be stored in the freezer. Use them to garnish a future seafood pasta dish in place of cheese. They will add plenty of flavor to your pasta and all you need do is reach into the freezer to retrieve a bag.

*     *     *

It’s déjà vu all over again …

Easter Bread Deja Vu

WIth Easter fast approaching, why not take a look at a bread that’s traditionally prepared in Marchigiani homes for the holy day? The recipe comes from King Arthur Flour’s website but it is very reminiscent of a loaf that my Nonna made for her two young daughters, Mom and my Zia. You can learn all about it just by clicking HERE.

*     *     *

Coming soon to a monitor near you …

Trenette with Clams and Mussels Preview

Trenette with Mussels and Clams

*     *     *

Smothered Pork Chops

Smothered Pork Chops 2

Those of you who have been with me for the past few weeks are aware that my eating habits are in a state of flux. Once it entered my life, the spiralizer set about changing me, as new loves often attempt. It was successful to an extent. Though I’ve not increased the number of my meatless days, I have enjoyed a greater number of meatless suppers. Even so, there are limits to my meat-free ways. When the temperature gets and stays well below freezing, I crave comfort food which, for this carnivore, means a meat dish of some sort. Enter today’s recipe, smothered pork chops.

I’ve watched countless chefs prepare this dish, each adding their own special touch. I shied away from preparing it because I have a history of being gravy-challenged, unless you prefer a gloppy, lump-filled mess. Lucky for me, and anyone seated around my table, that’s no longer the case. Who says you can’t reach an old dog new tricks? So, with my new-found gravy-making skills, it was time to smother some pork chops — and I haven’t looked back.

The recipe itself is surprisingly simple and there are plenty of opportunities to make it your own. For this recipe, I make a gravy using mushrooms, onions, and garlic with chicken stock and a little milk. You may wish to add jalapeños or perhaps make more of a milk gravy. Buttermilk is a good substitution, as well. Don’t have milk? Don’t worry about it. Replace it with some white wine and you’ll still have a tasty gravy. In short, so long as you’ve got the chops, you can make this for dinner tonight.

One word of caution. Although the chops will be pulled off the heat when not quite finished cooking, the time needed to get to that point will vary greatly depending on the thickness of the chops. Steer clear of really thick chops. They’ll require a longer cooking time, at lower heat, or they’ll brown but remain raw on the inside. That could be a problem later in the process, when you return the chops to the pan with the gravy.  Rather than cook them together for 10 minutes or so, they’ll need to stay in the pan for quite a bit longer. For me, that causes the gravy to thicken far too much. (Gravy-challenged, remember?)

*     *     *

Smothered Pork Chops 3

*     *     *

Smothered Pork Chops Recipe 

Ingredients

  • 2 tbsp olive oil to start, possibly more later in the process
  • pork chops, medium thickness, 1 per serving
  • 1 small to medium onion, sliced
  • 6 mushrooms sliced
  • 2 garlic cloves, finely diced or grated
  • ¼ cup flour
  • 1½ cups chicken stock – vegetable or pork stock may be substituted
  • ¼ cup milk – buttermilk or cream may be substituted
  • salt and pepper, to taste

Directions

  1. Heat olive oil in a large fry pan over medium heat.
  2. Once oil is hot, place pork chop(s) into the pan and cook until browned on each side — about 5 minutes per side. Remove to a plate.
  3. Place onion into the pan and sauté for a couple of minutes before adding the mushrooms. Continue to sauté until onions are translucent and mushroom cooked to your liking.
  4. Add garlic and continue to sauté for about a minute.
  5. Remove all but 4 tbsp of oil from the pan. If need be, add enough oil to the pan so that the amount of fat/oil in the pan equals the amount of flour added in the next step.
  6. Add the flour to the pan, stir, and make a roux. No need to make a dark roux but it should be cooked for a couple of minutes.
  7. Add the chicken stock to the pan in thirds, mixing well between additions to eliminate lumps.
  8. Reduce heat to med-low, add the milk, and stir to combine.
  9. Season with salt and pepper to taste.
  10. Return the pork chops to the pan, spoon gravy over them, and heat until cooked to your satisfaction, usually 5 to 10 minutes, Turn the chops mid-way through.
  11. Serve immediately with plenty of gravy for smothering.

*     *     *

Smothered Pork Chops 1

*     *     *

Notes

You may need to adjust the gravy ingredient amounts to suit the number of chops to be served. In the photos, that is one big chop and there’s more than enough gravy to smother it.

Milk gravy is a southern tradition. If that’s your preference, you can easily make it here. Just reverse the quantities of the chicken stock and the milk. Be sure to test for seasoning before serving.

*     *     *

It’s déjà vu all over again …

Strawberry-Balsamic-Mascarpone Parfait

I recently prepared a pasta with mascarpone  for dinner and thought it was about time we revisited making the creamy cheese. (Hard to believe it’s been 4 years since I first shared that recipe.) Mascarpone is far easier to make than you might think and certainly cheaper than any that you can buy. Once made, why not use some in a strawberry-balsamic parfait just like the one pictured? You can learn all about it when you click HERE.

*     *     *

Coming soon to a monitor near you …

Baked Calamari Preview

Zia’s Baked Calamari

*     *     *

There’s a storm-a-comin’! Grab the … lentils?

Lenticchie

A couple of weeks ago, those of us living in this area were treated to a number of weather forecasts warning of an impending snowstorm. Depending on the day and the forecaster, the predicted snowfall ranged from as little as an inch or two to as much as ten inches of the white stuff. When the results vary this greatly, I rarely go out and stock up on supplies to carry me through a blizzard. So long as I’ve got eggs, flour, and cheese, I can make enough pasta to last days — and that doesn’t take into account the food in my freezers. To quote a great American philosopher, “What, me worry?”

*     *     *Stormy Lentils 1

*     *     *

This time around, I found myself in a grocery on Thursday, two days before the first great snow of the year was to hit. I bought my regular items without giving the forecasts a second thought. At one point, I was in the bulk food area looking for seeds for Lucy, my parrot, when I stumbled upon French green lentils. (These aren’t Puy lentils but I’ll take what I can get.) I bought some thinking that one day I’d use them to prepare and blog about my family’s method of cooking lentils. That was the plan.

Come Saturday morning, the storm was hitting the southern part of Illinois and headed for Chicago. Forecasts were now saying we’d get 5 or 6 inches before the storm passed on. This usually means that I would be spending an hour or so clearing snow from my walk, as well as those of my neighbors. (They’re all retirees and I hate to see them out there, shovel in hand, clearing their walks.) I remembered how nice it is to come into my kitchen, having just finished my snow removal duties, and smelling a pot of soup on the stove. That’s it. I’d make a pot of soup.

Well, apparently, I had used the last of the chicken stock the week before when I made risotto. Worse, I’d used the last of the chicken bones, along with my vegetable clippings, to make that stock. I was just about to give up the idea of making soup when I saw the lentils on my countertop. This will work. The ingredients for today’s recipe were all in supply in my kitchen, except for the thyme. I thought of that when I went into the yard to make sure everything was stored before the big storm arrived.

As luck would have it, the vegetable stock was ready and although there was rain, there was no snow. I waited a couple of hours and still no snow. I went ahead and cooked the lentils — still no snow. I ate my dinner and eventually about an inch of snow fell, none of which “stuck” to the walks.

All told, it was a pretty good day: my home carried the aroma of stock simmering on the stove; I enjoyed a comforting lentil dinner; and, I didn’t need to go out and deal with any snow whatsoever. May our weather men’s predictions for snow always fall short, just as they did that Saturday afternoon.

*     *     *

Stormy Lentils 2

*     *     *

Stormy Lentils Recipe

Ingredients

  • 1 cup (190 g) French green lentils
  • 6 cups (1420 ml) vegetable stock, separated, more or less to taste (see Notes)
  • 2 tbsp olive oil plus more if needed
  • 2 Bartolini sausage patties (about 8 oz; 225 g) — link sausages may be substituted, skin removed
  • 1 celery stalk, chopped small
  • 1 small onion, chopped small
  • 1 carrot, chopped small
  • 2 garlic cloves, minced or grated
  • red pepper flakes, to taste – optional
  • 1 small can (14.5 oz; 411 g) diced tomatoes
  • thyme to taste
  • salt and pepper to taste

Directions

  1. Pick through the lentils removing any small pebbles or grit that you may find. Rinse them under cold running water. Drain.
  2. Place the lentils in a medium sauce pan and cover with 1 quart (950 ml) of vegetable stock. Bring to a boil over med-high heat before lowing to a soft simmer.
  3. Meanwhile, place the sausage meat into a frying pan over med-high heat. As it cooks, use a wooden spoon to break up the meat into small pieces.
  4. After about 5 minutes, add the onion, carrot, and celery. You may need to add a bit more oil to moisten the pan. Continue to sauté until the vegetables are cooked but still al dente – about 7 to 10 minutes.
  5. Add the garlic and optional red pepper flakes. Continue cooking for another minute.
  6. Add the tomatoes, 1 cup of vegetable stock, and the thyme, if using. Stir to combine. Bring to a boil and then reduce to a simmer.
  7. As the lentils cook, use a large spoon to remove any foam that may surface in the liquid.
  8. After simmering for 30 minutes, clear the remaining foam from the surface and pour the lentils and liquid into the pot with the tomato sauce. Bring to a boil before covering and reducing to a simmer.
  9. After 15 minutes, check the lentils. If too dry, add more vegetable stock. If too soupy, keep uncovered and allow some of the excess liquid to boil off. The dish is ready when the lentils are cooked and the consistency you prefer.
  10. Serve immediately and if I’m seated at the table, have some grated Pecorino Romano nearby.

*     *     *

Stormy Lentils 3

*     *     *

Notes

No need to run to a store to buy vegetable stock. Into a medium size sauce pan, place one quartered onion, 2 roughly chopped celery stalks, 2 roughly chopped carrots, a few parsley stems, 2 smashed garlic cloves, and a quartered tomato or 1 – 2 tbsp tomato paste. Fill with water, bring to a boil, and then lower to a soft simmer. Continue to cook for 90 minutes to 2 hours. Season lightly with salt and pepper before straining the vegetables. You will easily have enough stock for this recipe. Refrigerate whatever stock is left over.

Before bringing to the table, add as much stock as you prefer. This can be served relatively dry or with enough stock to resemble a soup.

You may notice that leftover lentils will absorb whatever stock is left in the bowl. Use the refrigerated stock to moisten the lentils when you reheat them.

*     *     *

What’s this? More bad weather on the way?

While this recipe sat innocently in the queue waiting to be posted, an arctic blast Ham Hocks 1descended upon sweet home Chicago. As luck would have it, I had just bought ham hocks at the grocery the day before. So, as the temperatures dropped, there was a pot of vegetable stock simmering on the stove, to be replaced by a pot of lentils later in the day. This time, however, with its use of ham hocks, the recipe is the same as the one prepared by my family years ago. Comfort and nostalgia served in one bowl.

*     *     *

It’s déjà vu all over again …

Brodo flashback

As was implied above, our current weather means it’s time for soup. With that in mind, I’m sending you back to Mom’s broth recipe, her brodo. That one pot of stock would be used to make noodle soup, risotto, gravies, and, of course, to soothe our upset tummies. You can learn all about this wonder broth by clicking HERE.

*     *     *

Coming soon to a monitor near you …

Smothered Pork Chops

Smothered Pork Chops

*     *     *

Two Dishes Cooked alla Gricia

I first enjoyed Spaghetti alla Gricia 2 years ago. It was my last night and supper in Rome after what had been, by any measurement, a very filling vacation. I wanted some lighter fare and the simplicity and flavors of this dish appealed to me. I’m currently in the planning stages of another trip to San Marino and Rome and that dinner and pasta came to mind.

*     *     *

Spaghetti alla Gricia 1

*     *     *

Spaghetti alla Gricia is an old recipe that originated in Lazio, the district in which Rome is located. It is from the time before tomatoes were brought to Europe in the sixteenth century. There are 2 legends surrounding tomatoes’ arrival in Europe and Italy. The first, and most probable, is that they crossed the Atlantic when one of the conquistadors (Pizarro?) returned to Spain. The other says that 2 Italian priests brought tomatoes with them when they returned from Mexico. Regardless of how they got to the continent, the first mention of tomatoes in Italy appeared in a Tuscan document in 1548. Pre-dating that document means that Spaghetti alla Gricia is one, old dish!

You can trace 2 delicious pasta dishes to Spaghetti alla Gricia, Spaghetti alla Carbonara and Spaghetti all’Amatriciana. Much like the alla Gricia pasta, a carbonara is tomato-free, though it does include eggs, something its predecessor lacks. Amatriciana dishes don’t include eggs but they do include tomatoes. Frankly, you cannot go wrong if you decide to make any one of the three dishes.

I had originally intended to share a recipe for butternut squash noodles cooked alla Gricia. While writing that post, I searched this blog for my Spaghetti alla Gricia recipe and was surprised that it was never shared. So, I’ll share the spaghetti version now and the butternut squash version in a few minutes.

With only 4 ingredients, this is about as simple a pasta dish as you can prepare. The longest part of the process is the time it takes to boil the water. As is the case with all easy pasta dishes, timing is critical. The spaghetti should be cooked just shy of al dente so that it finishes cooking in the pan with the pork. The only other issue that may arise is the type of pork product to use. The dish is normally made with guanciale, a non-smoked bacon made from the jowls of a hog. Here I substituted pancetta. You could also use ham or bacon, although I would caution against using a smoked product. WIth so few ingredients, the smoke would become the predominant flavor and this dish is all about balance. You’ll want to taste the pork and cheese equally and not smoke.

*     *     *

Spaghetti alla Gricia 2

*     *     *

Spaghetti alla Gricia Recipe

Ingredients

  • 1 lb (450 g) spaghetti
  • 2 tbsp olive oil
  • 4 to 6 oz (112 to 168 g) guanciale cut into strips (lardons) or ⅓ inch dice – pancetta, ham, or non-smoked bacon may be substituted
  • ¼ cup Pecorino Romano cheese, grated
  • reserved pasta water
  • additional grated Pecorino Romano for serving

Directions

  1. Bring a large pot of heavily salted water to the boil. Add the spaghetti and cook following package directions until about 2 minutes short of al dente. Reserve some of the pasta water for possible use later. (Step 5)
  2. Meanwhile, place olive oil in a hot frying pan over medium heat. Add pancetta and sauté to render the fat.
  3. Once the fat has been rendered and the pancetta browned, not burnt, add the cooked spaghetti and toss to evenly coat the pasta.
  4. Sauté until the pasta is cooked to your preference.
  5. Remove from heat, add the Pecorino Romano cheese, and toss to combine. If too dry, add some of the reserved pasta water.
  6. Serve immediately, garnished with additional Pecorino Romano.

*     *     *

Spaghetti alla Gricia 3

*     *     *

What did I tell you? This really is an easy recipe to prepare and a very flavorful one, at that. I think you’ll find butternut squash alla Gricia to be no more complicated.

*     *     *

The Spiralizer Chronicles, Chapter 2: Butternut Squash alla Gricia

*     *     *

Butternut alla Gricia 3

*     *     *

Although quite simple to prepare, working with spiralized vegetables does create a few issues. Some spiralized vegetables, like zucchini, will sweat water over time. If boiled, you may need to drain and, unlike pasta, pat them dry before proceeding with the recipe. Roasting may help to lessen the problem but, whether boiled or roasted, these “noodles” will not absorb sauce like pasta does. Remember that when dressing these dishes. If there’s a pool of sauce/dressing at the bottom of the serving bowl, you’ve likely used too much.

With those issues in mind, and knowing that butternut squash doesn’t sweat nearly as much as other vegetables, choosing to prepare it alla Gricia was a no-brainer, especially for an inexperienced spiralizer user like myself. I mean, there are only 4 ingredients and one of those are the noodles! You don’t need much experience to get this recipe right.

As simple as this dish is to prepare, if you choose to cook the noodles as I have, there are 2 ways to go about it. I chose to roast the butternut noodles prior dressing them with the sauce. If you prefer, you can cook the noodles in the same pan as was used to prepare the sauce (see Notes). There is, in fact, a third option. Depending upon the vegetable you use to make your noodles, you may choose not to cook them at all. Once spiralized, place the noodles in a serving bowl, dress them with the browned guanciale and rendered fat. Add the cheese, toss to combine, and serve.

*     *     *

Butternut alla Gricia 2

*     *     *

Butternut Squash “Noodles” alla Gricia Recipe

Ingredients

  • the neck of ! small butternut squash (9 oz; 270 g – trimmed) (See Notes)
  • 2 tbsp olive oil
  • 4 oz guanciale cut into 1 inch strips or ⅓ inch dice – pancetta, ham, or non-smoked bacon may be substituted
  • ¼ cup Pecorino Romano cheese, grated
  • hot water or chicken stock
  • additional Pecorino Romano for serving

Directions

  1. Preheat oven to 400˚ F (205˚ C)
  2. Use a spiralizer to create the thinnest possible noodles
  3. Place noodles evenly on a baking sheet. Season with salt and pepper and sprinkle LIGHTLY with olive oil. Mix to evenly coat the squash.
  4. Place the squash into the preheated oven and roast for 10 to 15 minutes or until cooked to your preference.
  5. While the squash roasts, Place the oil in a large hot frying pan. Once heated, add the guanciale and cook over a medium heat. This will render the fat without burning the guanciale,
  6. Cook until the guanciale is browned, not burnt, and the fat has rendered.
  7. Add the now-cooked noodles to the pan and toss to coat.
  8. Remove from the heat, add the cheese, and toss until the noodles are well-coated.
  9. If too dry, add a little hot water or chicken stock. Mix well.
  10. Serve immediately garnished with additional grated Pecorino Romano.

*     *     *

Butternut alla Gricia 1

*     *     *

Notes

As is the case with all vegetables to be spiralized, choose butternut squash that are as straight as possible. Spiralizers do not work as well with curved vegetables.

Butternut squash have a long neck connected to a bulb-like section which contains the seeds. This bulb cannot be spiralized. Cut the squash where the 2 sections meet and reserve the bulb for another use.

Unlike many other vegetables, butternut squash must be peeled before being spiralized.

If you choose not to bake your noodles beforehand, spiralize the squash and set the noodles aside. Heat the oil and guanciale in a large frying pan. Once the guanciale has browned — not burned! — and the fat rendered, remove the guanciale to a paper towel. You may need to drain some of the fat in the pan depending upon the amount of noodles you’ll be using. Add the noodles to the pan and toss until evenly coated with the fat. Cook the noodles until they reach the right amount of doneness to suit your taste. Once cooked to your liking, add the guanciale back into the pan, toss. When heated through, take off the heat, add the cheese, and toss to combine. If too dry, add some hot water or chicken stock, toss, and serve garnished with grated cheese.

No matter how you cook the noodles, the longer you cook them, the softer they will become. The noodles should retain a bit of crispness straight from the oven. Taste the noodles as they sauté until they reach your desired doneness. Once there, immediately take them off the heat before continuing with the recipe.

For either alla Gricia recipes, be careful not to add so much olive oil when rendering the pork fat that you will need to pour some of it off before adding the spaghetti or squash noodles. That fat is loaded with flavor. Better that you add just a little olive oil in the beginning and more, as needed, later on.

*     *     *

It’s déjà vu all over again …

Pasta alla Chitarra 1

Since it was mentioned earlier as a “descendent” of today’s recipe, I though I’d send you back to take a look at the Spaghetti all’Amatriciana recipe. Not only will you see the dish prepared but you’ll learn how to use a chitarra to make the pasta. Interested? Just click HERE.

*     *     *

Coming soon to a monitor near you …

Stormy Lentils Preview

Stormy Lentils

*     *     *

Stovetop Braised Rabbit

Rabbit ServedI’ve mentioned in the past that Dad was a hunter. When I was very young, he and a few friends would spend a weekend deer hunting in autumn. I don’t recall him ever being successful, though we sometimes received venison from one his friends. Whether the friend was a member of the hunting party or just generous, I do not recall.

Dad was far more successful hunting pheasants. He’d leave early in the morning and return that night, usually with at least one ring-necked pheasant. Very often, he and I dressed the birds. Because the seasons overlapped, he sometimes brought home a rabbit, as well. He skinned the animal and I remember cleaning them but not very often. I think Mom objected far more to my participation than I did. I couldn’t/wouldn’t do it today.

Rabbit Sous Chef

Flat Ruthie comes out of retirement

We enjoyed rabbit many more times than Dad’s rifle ever supplied. Grandpa sometimes brought them home from the farmers market already dressed. Dad also brought them home but I do not recall his source. Though not a regular part of our diet, it wasn’t a surprise to see rabbit served when Dad was home for dinner.

Today, I’ve a number of groceries that sell rabbit. With the exception of one butcher shop, all are frozen. If I’m going to buy a frozen rabbit, I’ll buy one that carries the date on the label and from a store I trust. As I’ve said in the past, developing relationships with your butchers and grocers can prove beneficial in a number of ways.

I rarely buy rabbit to cook for myself. I will buy one, however, and bring it to Zia. Served relatively rarely, these days rabbit is more of a treat than it ever was. With only two of us seated at the table, one rabbit is more than enough to satisfy us both. No matter which of us is cook that night, we always cook our rabbit the same way and that’s the recipe I’ll be sharing. Do take a look at the Notes section, however, for an alternative way to prepare it.

One thing to keep in mind when preparing rabbit is that it is a very lean meat. With so little fat, the meat can be tough and dry if not prepared correctly. I know because I once served my Traveling Companion probably the worst rabbit dinner ever prepared. WIth lean meats, low and slow is the way to go. Keep the heat low and take your time braising it. You’ll be rewarded with a moist, tender rabbit to serve your guests.

*     *     *

Rabbit Braise Start*     *     *

Stovetop Braised Rabbit Recipe

Ingredients

  • 1 dressed rabbit, about 3 lbs 
  • olive oil
  • 2 cloves garlic, chopped
  • 1 tomato, chopped – 2 TBS tomato paste may be substituted – (optional)
  • 2 sprigs of fresh rosemary
  • white wine
  • salt and pepper

Directions

  1. Cut the rabbit into manageable pieces. This can be from 8 to 12 pieces, depending upon your preference and plans for serving.
  2. Season the rabbit with salt and pepper. 
  3. Heat a few TBS of olive oil over med-high in a deep frypan with a lid. 
  4. Place the garlic and rabbit pieces into the pan and brown the rabbit before flipping them over to brown the other side — about 5 – 8 minutes per side.
  5. Add the tomato (optional), rosemary, and about ¾ cups of white wine to start, and bring the pan to the boil. 
  6. Reduce the heat to a soft simmer, cover, and braise the rabbit for well over an hour — more like an hour-and-a-half. 
  7. During the braise, turn the pieces over occasionally and add more wine, as needed, should the pan begin too dry. You may substitute water or chicken stock for some of the wine. 
  8. When fully cooked, remove and discard the rosemary sprigs, place the rabbit on a platter, and serve.

*     *     *

Rabbit Braising

*     *     *

Notes

This recipe is the Bartolini method of braising rabbit. (Actually, it was Mom’s idea to add a little tomato, “Just for color.”) If, like me, you have a difficult time getting the braise right, you may want to try cooking the rabbit in the hunter’s style, alla cacciatore. Mom’s cacciatore is also a stove top braise but it includes bell peppers, onions, and mushrooms. They’ll keep the rabbit moist, just as they do chicken. There’s no need to go looking for the recipe. Mom’s Chicken Cacciatore is today’s “Deja Vu” dish.

*     *     *

It’s déjà vu all over again …

Cacciatore with Polenta

Whether you decide to cook rabbit in this style, you really should give Mom’s cacciatore a try. The peppers, onions, mushrooms, and rosemary combine with the wine to make a very appetizing main course. Best of all, the aroma will fill your kitchen like only the best comfort foods can. You can see how it’s prepared by clicking HERE.

 *     *     *

Coming soon to a monitor near you …

Strawberry Pie Preview

Mom’s Strawberry-Banana Pie

 *     *     *

Stewed Cuttlefish and Squid

Sepia e Calamari in Umido

It’s that time of year when some will surf the net looking for seafood recipes. In many Italian households, you see, Christmas Eve will be celebrated with a Feast of the 7 Fishes … or 11 Fishes … or 12 Fishes … or 13 Fishes. The number itself is dependent upon: a) the number of Christian Sacraments (7); b) the number of Apostles minus Judas (11); c) the number of original Apostles (12); or, d) the number of original Apostles plus Jesus (13). No matter how or why you count them — and there are more versions than those I’ve listed — that’s a lot of fish dishes.

*     *     *

Sepia e Calamari in Umido

*     *     *

Although my family never celebrated with a Feast of however many Fishes, we did have a variety of seafood dishes to enjoy on Christmas Eve. I’ve shared those recipes, along with a meatless dish or two, in previous years. To make it easier for you to access them, I’ve created a “Christmas Eve” category that you can access at the end of this post or on the right side of the blog’s Home Page. If you need more suggestions, you may want to check out my Seafood (Frutti di Mare) category. There you’ll find every seafood dish I’ve shared over the past 5 years. (5 years!! Do you believe it?)

I doubt that today’s recipe was ever served at either home of the two-flat. The fact is, either cuttlefish (sepia) or squid (calamari) would have been served but never both in the same pot. Believe me. Initially I had no intention of doing it either. The fact is that the fishmonger was out of fresh cuttlefish and the box contained fewer than were needed to make today’s dish. As luck would have it, that was the only box that he had. It had been decades since either Zia or myself had even seen cuttlefish and I wanted to surprise her with them during the last Visitation. So, I bought some fresh squid and decided to sail into uncharted culinary waters.

Before getting into the recipe, lets talk seafood. Cuttlefish, squid, and octopus are all members of the cephalopod family. As you can see in the photo below, a cuttlefish has the shorter, more round body with tentacles that are also shorter and thicker than its squid cousin. If you own a parakeet/budgie, you may have purchased a cuttlebone for it to use to maintain its beak. That “bone” comes from cuttlefish. In squid, that bone is a smaller, clear, and flexible piece of cartilage. It’s known as the “pen”. The flesh of cuttlefish is thicker than that of squid and most believe it to be more tender. When cooked in umido, like today’s dish, the difference is too minimal to be noticed — at least to my palate. Lastly, because of the differences in body type, I sliced the cuttlefish lengthwise into strips. The squid’s body was cut into rings. The tentacles of both were cut in half but if you find them unappealing, just discard them. (See NOTES for help with cleaning squid.)

*     *     *

Cuttlefish & Squid

*     *     *

Stewed Cuttlefish and Squid Recipe

Ingredients

  • 2 to 3 tbs olive oil
  • 2 or 3 anchovies
  • 4 cloves garlic, chopped or grated
  • red pepper flakes to taste
  • 1 lb raw cuttlefish, skinned, cleaned and cut into strips. If using tentacles, cut in half.
  • 1 lb raw squid, skinned, cleaned, and cut into rings. If fusing tentacles, cut in half.
  • 1 cup dry white wine
  • 1 large can (28 oz, 800 g) whole tomatoes
  • 1 small can (14 oz, 400 g ) diced tomatoes
  • 2 tbs fresh parsley, chopped
  • 2 tbs fresh basil, chopped
  • salt and pepper, to taste
  • 1 whole clove garlic, minced or grated
  • sliced, thick crusted bread for serving

Directions

  1. Heat oil over med-high heat in a medium, heavy bottomed sauce pan.
  2. Add the anchovies, garlic, and red pepper flakes before reducing heat to med-low. Cook for about 2 minutes. Do not allow garlic to burn.
  3. Add cuttlefish and squid and continue to cook until flesh whitens – about 5 minutes.
  4. Add wine and increase heat to med-high. Continue to cook until wine is reduced by half – about 7 to 10 minutes.
  5. Add both cans of tomatoes, tearing the tomatoes by hand as you add them to the pot.
  6. Combine the parsley and basil and use 3/4 to season the pot. Reserve the rest. Stir to fully combine.
  7. Reduce the heat to medium and allow the pot to simmer for at least 20 minutes. It is ready to be served when the stew has thickened and grown deeper in color.
  8. Bring to the table garnished with the remaining chopped basil and parsley.

To Serve

While the stew simmers, toast some crusty bread, one slice per serving. While still warm. rub the remaining garlic clove across the bread. Place one slice of the now garlicky bread

into the bottom of each serving bowl. When it has finished simmering, ladle the stew over the bread in each bowl. Buon appetito!

*     *     *

Notes

When cooking cuttlefish or squid, either cook them for less than a minute or more than 45 minutes. Anything in between will result in seafood with the texture of rubber. Because this is a stewed dish, if in doubt, taste a piece. If it’s chewy, continue to cook until tender.

As you know, I work alone in the kitchen, taking all the photos as I go. Normally, there isn’t a problem that a time delay and remote shutter cannot handle. Cleaning squid, however, is a different matter completely. Being the ham-fisted person that I am, there really was no way for me to capture the cleaning without in some way impacting my camera. Is squid juice corrosive? I didn’t want to find out, so, I’ve found a video that will teach you what you need to know about cleaning squid — all in under 3 minutes. Enjoy!  How to clean squid.

This is another seafood dish in which the flavors are relatively mild. Using grated cheese would pretty much obliterate them. Save that cheese for some other dish on the night’s menu.

*     *     *

Leftovers?

Squid and Sepia Leftovers

Was there any doubt?

*     *     *

It’s déjà vu all over again …

Frutti di Mare, Deja vu

Whether you choose to serve this dish individually, with each dinner guest receiving a packet, or en masse, with a large packet placed in the table’s center, few dishes will delight your table mates like Linguine with Seafood in Parchment. After all, who doesn’t like receiving gifts this time of year and this one comes with a fantastic aroma that’s released upon opening. It doesn’t get much better than this and you can learn all about it HERE.

 *     *     *

Coming soon to a monitor near you …

Braised Rabbit PreviewStovetop Braised Rabbit

(You may want to skip this one, Eva.)

 *     *     *

Grilled Clams

I do enjoy going to the fishmonger. I may go in with something in mind but I always leave with something else entirely. One of my last visits is a case in point.

This particular Tuesday I went shopping for chicken. My fishmonger is the only place in town that I know of where you can buy fresh, never frozen, organic chicken. I left with a chicken — and a little more than a pound of “Vancouver blue clams”. I just couldn’t resist them.

*     *     *

Preview Clams

*     *     *

These clams were small — about the size of manila clams — and there were 36 of the beauties in my purchase. Best of all, they’re mighty tasty. In fact, I’m already thinking of going back for more.

Once home, I decided to try something different. Believe me. Deciding not to cook them with linguine was one of the toughest culinary decisions I’ve made in a very long time. Even so, having watched a number of chefs grill clams, I thought I’d give it a try myself. The chefs placed the clams directly upon the grill grates, let them open, and then carefully removed them to a serving platter. That wouldn’t work for me.

Being so small, I envisioned watching them open and spilling their delicious juices on to the flames. They’re simply not large enough to comfortably ride the grates. Worse, any liquids to have survived the opening would surely be dumped as I clumsily tried to move the clams to a platter. A cast iron skillet was the answer. First, though, the clams had to be cleaned.

Using my food brush, the clams’ shells were scrubbed clean. After that, they were placed in a bowl of cold, fresh water and left to soak for almost an hour. Midway through, the water was dumped and the bowl refilled. That gave the clams plenty of time to expel any sand. Clams that refused to close were discarded.

*     *     *

Blue Clams 1

*     *     *

The grill was lit and the flames set to high. Meanwhile, a lemon-butter sauce was prepared using 4 tbsp butter, the juice of 1/2 lemon, and 1 clove of garlic, smashed. The butter and garlic were gently heated in a small saucepan. When the butter just started to simmer, the lemon juice was added and the heat was shut off. The garlic was allowed to steep in the lemon-butter for a few minutes.

Next, a 10 inch cast iron skillet was placed on the grill directly over the flames. While it heated, some fresh parsley was chopped and a chunk of ciabatta bread was sliced in half. The cut side of both pieces was lightly coated with olive oil and the bread was set aside.

The clams were drained and returned to the bowl, along with a couple of ounces of both white wine and water. By now, the pan was screaming hot. The clams with the wine mixture were poured into the pan and the bread was placed on the grill to toast a bit. The grill lid was then closed.

Back in the kitchen, the garlic was removed from the lemon-butter sauce and the pan was returned to a low heat.

It took barely 2 minutes for the bread to toast, I removed both pieces and the clams were already opening. Within 5 minutes, all the clams were open and were quickly removed to a serving bowl. The pan liquids were added, as well. (Note: be sure to discard any clams that remain unopened after cooking.)

*     *     *

Grilled Clams 1

*     *     *

To serve, the bottom piece of bread was placed in a bowl and topped with some clams and a bit of the pan juices. The lemon-butter sauce was poured over the dish and fresh parsley was used to garnish. The top side of the toasted ciabatta bread was served on the side.

Yeah. I’m going back for more clams, but it’s anyone’s guess what else I’ll bring home.

*     *     *

It’s déjà vu all over again …

LingClams_Lrg300

Nothing but a Pasta with Clams recipe would be appropriate here. It is one of my favorite dishes and one I’m sure you’ll enjoy. You can see how the dish is prepared simply by clicking HERE.

*     *     *

Coming soon to a monitor near you …

Sepia e Calamari in Umido Preview

Stewed Cuttlefish and Squid

*     *     *

Ground Cherry Jam

Ground Cherries

This is the recipe I referenced when I shared the recipe for  Ground Cherry Salsa … AKA Cape Gooseberry Salsa … AKA Husk Cherry Salsa … AKA Peruvian Cherry Salsa … AKA Salsa di Alkekengi … AKA Those-Little-Orange-Thingies-in-the-Paper-Lanterns Salsa. Whatever you call them, the fruit have a unique blend of pineapple and tomato flavors and makes a tasty jam that couldn’t be easier to prepare.

The cherries are husked, rinsed, and placed in a pot with sugar, along with whatever pectin you prefer. I added a little lemon and rosemary just to see how it would taste. In the end, 3 quarts of ground cherries produced 6 small jelly jars (3 half-pints). At $5.00 a quart, this isn’t the cheapest jam to make. Remember, too, that husked ground cherries are considerably less in volume than those still wearing husks. I wish these were the only problems.

I chose to use pectin because it yields more jam than if I relied on the fruit’s natural gelling properties. It can also be made in 1 day whereas jamming without pectin is a 2 day affair. Using pectin, however, resulted in a jam that was a bit too thick for my tastes. This is why I hate discovering a new item at the end of our growing season. I’ll have to wait until next year before I can make more of this jam. Whether I use pectin, I’ll use at least 4 quarts of ground cherries. Either way, I’ll have a tasty jam that’s hopefully easier to spread. While I’m at it, I’d also like to bake a pie with this fruit. (Thanks, Gretchen. Do take a few minutes to check out her fantastic blog, where every recipe is critiqued by 3 very discerning foodies.)

Hmm … Maybe I can get some sort of discount if I buy ground cherries by the crate.

*     *     *

Ground Cherry Jam 3

*     *     *

Ground Cherry Jam Recipe

Ingredients

  • 3 1/2 cups ground cherries, husked & rinsed
  • 1/4 cup lemon juice
  • 1/2 cup water
  • 1 box pectin
  • 2 rosemary sprigs
  • 3 cups sugar
  • pinch of salt

Directions

  1. Place the ground cherries, lemon juice, water, pectin, and rosemary into a heavy bottomed pot over med-high heat. (See Notes)
  2. After they’ve softened a bit, use a potato masher or wooden spoon to mash the cherries to the consistency you prefer.
  3. Bring the mixture to a rolling boil (see Notes).  Add salt and sugar. Stir well.
  4. When the jam returns to a rolling boil, continue heating for 1 minute and then take off the heat. Remove the rosemary sprigs.
  5. Place hot jam immediately into clean, sterile jars, cap, and place in a boiling water bath for 10 minutes.
  6. Remove from bath, set on a clean kitchen towel away from drafts, and do not disturb for 24 hours to allow the tops to properly seal.
  7. Once sealed, store in a cool, dark place. (See Notes)

*     *     *

Ground Cherry Jam 2

*     *     *

Notes

Directions may vary slightly depending upon the pectin being used. Be sure to follow the directions on your pectin’s packaging,

A rolling boil is one which continues even while the pot’s contents are stirred.

In the event that a jar does not seal properly, the jam is still good but must be refrigerated and used within a couple of weeks, You can also place the jar in the freezer. I’ve enjoyed jam that has been frozen for several months.

*     *     *

A scheduling change

It’s no secret that we’re coming to the end of the Bartolini recipe file. I do have a few more recipes, along with a few from Dad’s family, to share but certainly not enough to continue publishing a weekly recipe. So, although I’ll continue to post on Wednesdays, it just won’t be every Wednesday.

Did you hear that? It was a sigh of relief from Zia who just now learned that, after 5 years, I won’t be asking if she has another recipe for me or if she remembers the time when …

(Psst. I’ll still post, just not as often.)

*     *     *

It’s déjà vu all over again …

Figs 1

Since today’s post featured a rather unusual jam, I thought we’d continue down that road and take you back to my Fig Jam with Balsamic and Black Pepper recipe. This is a delicious jam and it pairs very well with pork roasts.  You can read all about it HERE.

 *     *     *

Coming soon to a monitor near you …

Grilled clams 2

Grilled Clams

 *     *     *