Salmon en Papillote — on the grill

Summer is here in full-force and I’ve moved most of my “oven-required” dinners to the slow cooker, the grill, or off the menu till Fall. It’s warm enough without my cranking up the oven to fix dinner. That’s just fine for most entrées but it does present a problem for fish. Sure, I could sauté the fillets and create a quick sauce in the pan, but every time I serve it? For me, poor grill master that I am, grilling a fish steak means 5 minutes of fighting to get the poor thing unstuck from the grilling surface, no matter what that surface happens to be. And that’s where today’s recipe comes into play. Cooking en papillote is a method of cooking something, frequently seafood, while enclosed in a pouch of parchment paper. Usually baked in an oven, I use aluminum foil and cook the fish on my grill. No muss, no fuss, and dinner is served.

Dill Butter with Lemon atop Asparagus

As for the recipe, there really isn’t one and this is more a set of guidelines. As such, I’ll list elements of the 3 components, describe how to wrap the fish, and it is for you to decide which ingredients will work best for you. Although, if left to me, I’d vote for a salmon steak thinly coated with pesto and topped with diced tomato and scallion. Yum!

Salmon en Papillote 

Ingredients

  • One 6 – 8 oz salmon fillet or steak, per person. Bass or trout are good alternatives.
  • Chopped fresh herbs. Tarragon, basil, thyme, dill, oregano, parsley, and/or cilantro are suggested. Pesto may be used, as well.
  • Optional minced garlic.
  • Butter
  • Optional fresh vegetables, evenly chopped in a large or small dice or thinly sliced. Choices would include asparagus, onion, tomato, carrot, zucchini, fennel, spinach, summer squash, bell pepper, scallion, etc.
  • Optional splash of white wine per serving.
  • Olive oil, to taste.
  • Lemon zest
  • Salt & pepper
  • Thinly sliced lemon
  • Chopped parsley

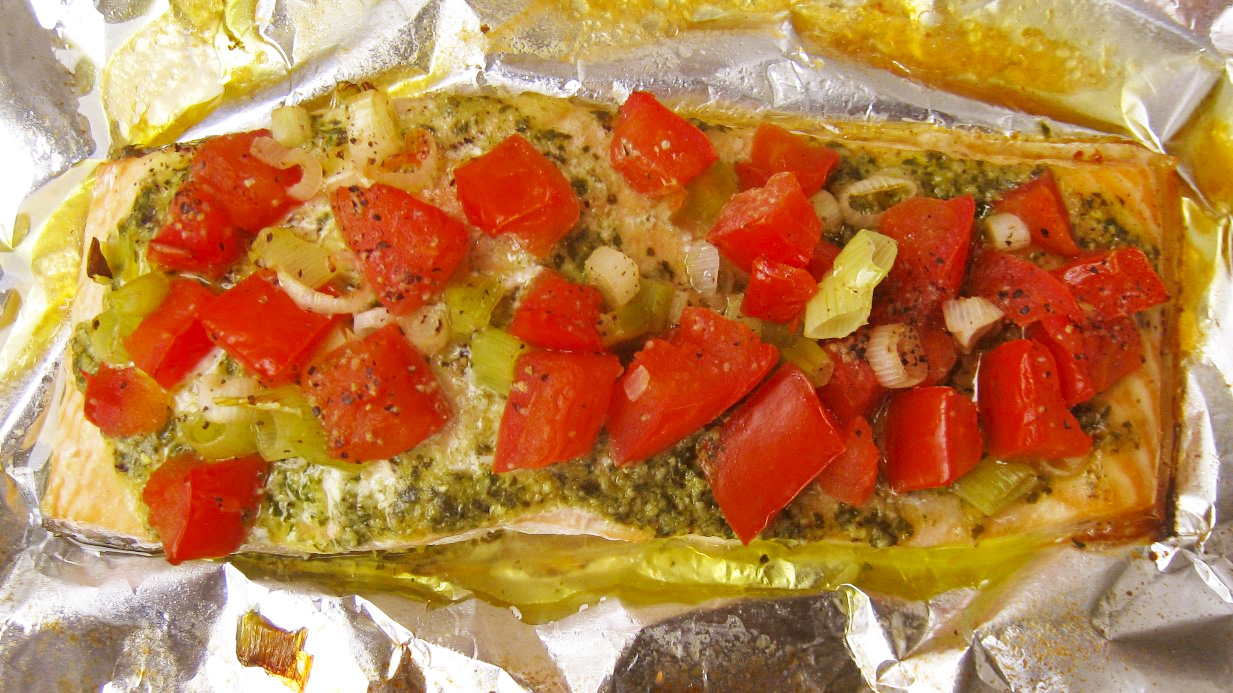
Tomato & Scallion with Pesto

  1. Combine chopped herbs and garlic with about 1 tbsp of butter per piece of fish to create a compound butter. This may be done well in advance.
  2. Pre-heat grill to a medium heat, about 350*. Prepare it for “indirect” grilling.
  3. Finely chop or thinly slice the vegetables, if any, dress with a little extra virgin olive oil, and season with salt and pepper.
  4. Prepare the sheet(s) of aluminum foil. Take one long piece of extra-strength foil — about 3 times the length of the fish. Divide it in half to create 2 rectangles. One rectangle will be the pouch’s bottom upon which your ingredients will be placed and layered. The other, the “top,” will eventually be folded over and used to seal the pouch. Now, to layer the ingredients that you’ve chosen to use:
    1. If using a bed of vegetables: in the center of the bottom rectangle, form a vegetable layer, add the fish (skin-side down), season with salt and pepper, dot with the compound butter or pesto, top with lemon slice(s) & zest, and sprinkle with chopped parsley.
    2. If not using a vegetable bed: place the fish in the center of the rectangle (skin-side down), season with salt & pepper, dot with compound butter or pesto. At this point you can either: a) top with lemon slices & zest, garnish with chopped parsley, and add a splash of white wine: or, b) place the vegetables atop the fish, add lemon slice(s) & zest, and garnish with chopped parsley.
  5. Fold the other half of the foil so that it fully covers the bottom rectangle containing the ingredients. Beginning on one side, start crimping and sealing the edges of the foil’s top and bottom. You will need to do this to 3 sides of the pouch. (The 4th side is the fold and, as such, is already sealed.) Be sure the pouch is well-sealed for you don’t want any steam to escape during cooking.
  6. Use the indirect grilling method to determine the placement of each foil pouch.
  7. Fish should be cooked in 15 – 20 minutes, though times will vary depending upon the size and temperature of the grill, the types and cut of the vegetables, and the thickness and kind of fish used.

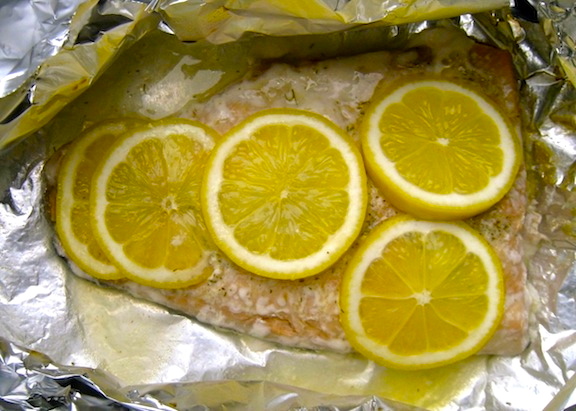
Butter & Lemon with White WIne

Variations

I’ve already listed pretty much all the variations I can think of, save one. Not everyone has a grill but all that means is that you have to “move the party indoors.” That is to say, prepare the fish as indicated above, using foil or parchment paper to create the pouch. Place the pouch on a baking sheet and bake for 15 – 20 minutes in the center of a pre-heated, 400* oven. Again, cooking times may vary.

Pasta with Clams (“Red Sauce”)

Blessed to be living on a peninsula or neighboring island, Italians enjoy a ready supply of seafood of all kinds — and their diet is all the better for it. A favorite dish of mine, whether I’m visiting Italy or at home, is pasta prepared with clams. Here in Chicago, the selection of fresh clams can be limited to cherry stones, with little necks and manila clams available sporadically. Cherry stones and little necks are actually same species of clam. The only difference is their size, with cherry stones being the larger of the two. I find little necks do taste sweeter, however, and I’ll use them whenever I can. If, however, only cherry stones are available, I’ll remove them from their opened shells during the cooking process, give them a quick chop, and then return the chopped clams and any juices to the pot. When all else fails, I have used, with some success, frozen clams and cockles purchased from a few of the area’s Asian markets. These same stores, by the way, can be a relatively cheap source for flash-frozen, vacuum-packed calamari, in any size you could possibly want.

As you can tell by this posting’s title, today’s recipe features clams cooked in a tomato sauce. In this recipe, I find that the sweet, delicate tasting clams can be overpowered by the tomatoes. So, in order to bolster the clam flavoring — and unlike the “white” version of the recipe — I’ll add a can of whole or minced clams to the sauce. It’s listed as “optional” within the recipe’s ingredients and the choice is yours to make. By the same token, whether you add any canned clams, be sure to use herbs and spices sparingly. They, too, can overwhelm the clams. It’s a tricky balance you’re trying to achieve but one definitely worth the effort.

*     *     *

Pasta with Clams (“Red Sauce”) Recipe

total time: under 2 hours (includes time to prep clams)

Ingredients

  • at least 2 doz. little neck or manila clams
  • 1 can (7 oz) whole or minced clams (optional)
  • 3 tbsp olive oil
  • 1/8 to 1/4 tsp red pepper flakes (optional)
  • 1 medium sweet onion, chopped
  • 2 cloves garlic, minced
  • 3 tbsp fresh parsley, chopped
  • 2 tbsp tomato paste
  • 1/3 cup dry white wine
  • 1 large can (28 oz) diced tomatoes
  • salt & pepper, to taste
  • 3 tbsp fresh basil, chopped
  • 1 lb cooked pasta (tagliatelle pictured above)
  • 1 cup reserved cooked pasta water
  • chopped parsley for garnish

Directions

  1. At least an hour before dinner, use a brush to individually scrub each clam before  rinsing and placing it in a large bowl of cold freshwater. Rinse them a second time just before proceeding with the recipe.
  2. Heat oil over med-high heat in a large frying pan with a lid. (If using red pepper flakes, add them now and sauté for 1 minute before proceeding.) Add onion, season lightly with salt & pepper, and sauté until translucent, about 5 minutes. Add garlic and parsley and sauté for another minute.
  3. Add tomato paste, sauté for one minute, add the wine, and then add the tomatoes. Season with salt & pepper, bring to a boil before reducing heat and  simmering for 30 minutes.
  4. Meanwhile, your pasta should be cooking, with an eye toward being drained just as the clams are opening.
  5. Increase heat to medium high, add the basil, and stir. (Add the canned clams now, if you choose to use them.)
  6. Add the clams and cover tightly.
  7. In about 5 to 8 minutes, the clams should be open & steamed. Discard any unopened clams. Replace cover and remove from heat.
  8. Combine the clams & tomato sauce with the drained pasta. If too dry, add some of the reserved pasta water.
  9. Serve immediately, garnished with chopped parsley.

Variations

Tired of tomatoes? Try the “white sauce” version of this recipe.

*     *     *

Grandpa’s Barbecued Shrimp

I’ve just returned from a week-long visit with Zia in Michigan, where Spring has finally sprung — even if it is much wetter and colder than most would like. The arrival of Spring in Michigan’s Thumb means that Summer is just about here for the rest of the country. And with Summer comes barbecue season, but hold onto your skewers. First, a little history …

The old two-flat had a great barbecue in the backyard that Grandpa built during the Summer of 1959. Pictured on the right is the construction site and below, to the left, the finished monolith. Grandpa was a master at masonry and he created the arch over the grilling area. (It wasn’t until I was much older that I appreciated the skill involved in doing that.) The grilling area had 3 sections: the top was the grill surface; the middle was where the fire burned; and the lowest section was where the ashes collected. The doors of the lower 2 sections had vents with which you could limit and direct the airflow to the fire, and thereby control the grill’s heat. The flue system practically guaranteed that there would be no smoke to bother the eyes of the barbecue’s many users. To the left of the grilling area was a large, flat surface that served as a work station and, under that, an area for storing wood. He’d thought of everything.

Once it was finished, that barbecue was often a center of activity for both households, regardless of the weather. In Winter, our yard was turned into an ice skating rink and the grill helped to warm us as it heated our hot chocolate. In warmer weather, I clearly remember seeing Dad, the High Priest of Grilling, standing in front of his altar, umbrella in his left hand & struggling with the wind, as his right hand tended to the sacrificed beast that would become our meal. Once Summer came, there were many Sundays when both families feasted together on some main course that was char-broiled to perfection. As for Grandpa, he could often be found “out back” on Fridays grilling shrimp, his specialty and today’s recipe. Somehow, I always found myself at his side as he grilled and, lo and behold, he would give me 1 or 2 shrimp just for “keeping company.” I think I got the better part of that deal. Not only did I get a couple of shrimp back then but now, years later, whenever I lay skewers of shrimp on a grill, my thoughts inevitably turn to the times spent standing next to my Grandpa in front of his master work — and I smile.

Back now, to the Present. Many stores today offer shrimp that have been cleaned but with the shells still on. These shrimp are definitely preferable to those that have been peeled simply because the shells offer some protection during grilling and so the shrimp are less likely to burn. Not only that but the opening left from the de-veining process makes a perfect home for stuffing. When buying shrimp destined for the grill, I’ve found that bigger is better. Large shrimp aren’t so quick to burn and they make a more memorable presentation. As for the stuffing, the amount of olive oil you need will vary depending upon the bread crumbs you use — i.e., fresh, store-bought, or panko. The goal is a stuffing that’s rather wet, though not “soupy.” You want it wet enough to survive the heat of the grill without drying out completely and yet dry enough so that  you do not see stuffing and oil pooling on your serving platter. For the grilling, you can use a webbed grill basket, the kind with 2 sides that can be opened and that will hold the shrimp in place while grilling. This type of basket will allow you to turn over all the shrimp with ease. Lacking a grilling basket, thin bamboo skewers can be used after they’ve been soaked to prevent being burned on the grill. I use 2 skewers per set of shrimp and this, too, makes turning them over much easier.

*     *     *

Grandpa’s Barbecued Shrimp Recipe

Ingredients

  • 1 lb extra-large shrimp (no smaller than 21 – 25-ct), de-veined but not peeled
  • 1/3 – 1/2 cup bread crumbs
  • 1 clove garlic, minced
  • 2 tbsp fresh parsley, chopped
  • 1/3 – 1/2 cup olive oil
  • salt & pepper, to taste
  • thin bamboo skewers, soaked in water for at least 1 hour before grilling
  • lemon wedges for serving

*     *     *

*     *     *

Directions

  1. In a mixing bowl, combine the bread crumbs, garlic, parsley, salt & pepper and mix well.
  2. Add enough olive oil to the mixture to produce a wet, but not soupy, stuffing. Mix well.
  3. Place the shrimp into the bowl with the bread crumbs and mix well. Cover the bowl and refrigerate for at least 30 minutes.
  4. In the meantime, arrange the coals, if used, to enable the “indirect cooking method.” Start the grill or fire up the coals so that the fire is ready when the shrimp are.
  5. Use 2 skewers to hold the shrimp. Place one skewer near the shrimp’s tail and the other skewer near its opposite end. Grab a second shrimp and do the same, using the same 2 skewers so that this shrimp is on top of the first one that you skewered. Be sure to include a little stuffing between the shrimp. Repeat the process until the skewers are full, keeping in mind the size or your grilling area. You may only be able to skewer 3 jumbo shrimp or 5 – 6 large shrimp per set of 2 skewers.
  6. Repeat step 5 until all the shrimp are skewered.
  7. With the grill very hot, clean the grates and use a wad of paper towels dipped in vegetable oil to coat the grilling surface. (No need to coat the grates if using a grilling basket.)
  8. If using the indirect method, the shrimp should take no more than a total of 5 minutes to cook both sides, depending upon the size and temperature of the grill. The time will be less if the shrimp are peeled and even less if they are grilled directly above the flames. Stay near the grill and watch them closely.
  9. Once cooked, the shrimp may be served as-is, on the skewers, or off of the skewers and arranged on a platter.
  10. Serve immediately with lemon wedges on the side.

Notes

With minor changes, you will see this bread crumb mixture, the Bartolini breading mixture, used again and again throughout this blog. The Bartolini Girls used it to stuff a number of vegetables, from artichokes to zucchini, not to mention seafood preparations from stuffed calamari to baked tilapia. Learn to make it, and to adjust the moisture level to suit the dish being prepared, and you will be amazed at how many uses you’ll find for it. Just please don’t forget to come back here and tell us about it.

*     *     *

Pasta al Salmone

My introduction to pasta with salmon was some 20 years ago in Rome, during my first visit to Italy. To say that it left a lasting impression would be a gross understatement. In the years to follow, I made it my life’s quest to duplicate that recipe and it was far more difficult than one might imagine. Back then I didn’t own a PC, there was no Food Network nor Cooking Channel, and the few cooking shows that were available were mainly broadcast on PBS. (We were simple folk back then.) Duplicating a recipe meant that I had to keep trying until I got it right. Well, I’m certainly not a trained chef, by any stretch of the imagination, and it’s not as if I attempted to make this dish every week, or even every month, for that matter. Eventually, my interest waned and my “testing” stretched out over several years. Sadly, I never did get it quite right, although things may have gone differently had I remembered to record the ingredients and their amounts from one test to the next. Anyway, the sauce would inevitably be too runny or too thick and the flavor either too bland, too strong, or just plain wrong. Then, one day in my favorite Greek market, I noticed a small container of salmon pieces packed in oil. Evidently, a processing plant in Florida packaged and sold the trimmings left when smoked salmon is prepared. I bought a container, substituted its oil for some of my recipe’s butter, and chopped a portion of the salmon for use in the dish. Eureka! The result was perfection and I served it to all of my friends, to great acclaim — for all of 6 months. That’s about when the market stopped carrying the small containers of salmon. After a suitable period of mourning — during which I contacted the company and asked, unsuccessfully, if their product was sold anywhere else, not just in Illinois but in Wisconsin, Indiana, or Michigan, too — I went back into the test kitchen and my quest began anew. Today’s recipe is the result of those very tests.

I can see now that my early renditions were doomed to failure. I used too much cream, not enough salmon, and the technique was all wrong. Even my use of garlic proved to be too much for the dish. In the end, however, I did wind up with a tasty cream sauce similar to the recipe that I’ve already shared for fettuccine alfredo. Being fish-based, however, no cheese is used during its preparation, nor when it is served, and shallots are used in place of the ill-fated garlic. All was well until a few months ago when I watched a YouTube video of a woman making a pasta with salmon dish. She only spoke Italian and her video was often interrupted by advertisements for some sort of thick, cream-like, vegetable-based product. Being that my knowledge of the language is so limited, I was about to turn off the video when she added some vodka to the sauce. (I may not know many foreign words but, inexplicably, “vodka,” much like “jagermeister,” is one that I recognize in many tongues.) As a result of that video, I added an ounce of vodka to my recipe and liked the result, for it really does add a nice depth to the dish. One thing I’ve learned, though, is that when you use vodka in a recipe, be sure to use a higher quality brand. I’m not suggesting that you spend $40.00 for a bottle of vodka — I surely don’t — but do try to avoid the really cheap stuff; there is a definite difference in taste. Lastly, as far as the vodka is concerned, if you’re going to use some, be sure to remove the hot pan from the heat source before you add the liquor. This is true whenever you add alcohol to a pan. If poured near a flame, the fumes alone may ignite and you could have a nasty situation to deal with. Just remove the pan from the heat, add the liquor, give it a quick stir, and return the pan to the stove top — and keep a pan lid nearby to smother any unexpected flames. Safety first, always.

This sauce should take about 7 or 8 minutes to prepare. Keep that in mind as you cook the trenette, or whatever pasta you intend to use. In a perfect world, the pasta will be draining just as the sauce finishes. Your odds will improve if you remember that fresh pasta cooks relatively quickly, in a few minutes, and that dried pasta can take twice as long to reach al dente. Read the package instructions and plan accordingly. And be sure to reserve some of the water used to cook your pasta just in case the sauce needs a little more liquid.

*     *     *

Trenette al Salmone Recipe

Ingredients

  • 1/2 stick (1/4 cup) butter
  • 1 shallot, chopped fine
  • 1 cup heavy cream
  • 1/2 lb (8 oz) smoked salmon, cut into 1 1/2 to 2 inch strips
  • 1 oz vodka (optional)
  • 1 lb cooked trenette
  • 2 tbsp fresh parsley, chopped, separated
  • salt & ground white pepper, to taste
  • reserved pasta water

*     *     *

*     *     *

Directions

  1. Melt butter in a large, deep frying pan over med-high heat.
  2. Add shallots and sauté until soft, about 2 minutes.
  3. Add salmon and continue sautéing for another 2 minutes.
  4. Remove pan from heat, add vodka, give the pan’s contents a quick stir, and return to heat.
  5. After a minute, add the cream and continue cooking until sauce thickens slightly, about 2 – 3 minutes.
  6. Season with 1 tbsp of the parsley and salt & pepper to taste before adding the cooked trenette to the pan. Mix until the pasta is well-coated. If necessary, add a little of the reserved pasta water.
  7. Garnish with remaining tbsp of parsley and serve immediately.

Variations

The use of vodka in the recipe is certainly not required and is completely your choice. If you opt to use garlic in place of, or along with, the shallots, be careful not to be too heavy-handed. The star of this dish is the smoky flavor of the salmon and too much garlic will interfere with that.

And I’m begging you: Please, no cheese!

Notes

Traditionally served with pesto, trenette are thin, ribbon-like pasta that are just a bit more narrow than linguine. I prefer trenette over all other pasta simply because their width mirrors that of the pasta Mom and Zia cut by hand during my youth. In fact, when I demonstrated the pasta cutter for Zia, she agreed with my memory and I bought her a trenette cutter shortly thereafter.

*     *     *

Pasta with Clams (“White Sauce”)

Pasta con VongoleWhenever I’m lucky enough to visit Italy, I make a point of ordering pasta with clams at least once while I’m there. Using varieties of clams I’ve never seen stateside, my pasta is served chock full of tiny, incredibly sweet bivalves no bigger than my thumbnail. What a treat! Back here at home, when I’m in an adventurous mood, I’ll make a run to the Asian markets to try some of the varieties of clams that they have on hand. More often than not, however, I’ll just head to one of the better groceries and pick up some littleneck or manila clams. When I do, I know that night’s dinner will be something special.

With no tomato sauce to simmer, this is an amazingly simple recipe that results in a very flavorful dish. Just toss a few ingredients into a frying pan while your pasta cooks and, in about 10 minutes, you’ll be sitting down to dinner. It really is as simple to make as it is delicious to eat.

*     *     *

Pasta with Clams (“White Sauce”) Recipe

total time: approx.  90 minutes (75 minutes for prep, 15 minutes cooking)

Ingredients

  • at least 2 doz. little neck or manila clams
  • 3 tbsp olive oil
  • 1 to 2 cloves of garlic, minced
  • 3 tbsp fresh parsley, chopped
  • 1/4 cup white wine or water
  • salt & pepper, to taste
  • 1 lb pasta
  • chopped parsley for garnish

Linguine with Clams

Directions

  1. At least an hour before dinner, use a brush to individually scrub each clam before  rinsing and placing it in a large bowl of cold freshwater. Rinse them a second time just before proceeding with the recipe.
  2. Bring a 6 quart pot of salted water to boil.
  3. Add oil to a large frying pan with a lid. Add the garlic, parsley and the wine or water.
  4. Add the pasta to the pot of salted boiling water. The pasta, if dried, should take 9 or 10 minutes to cook. If fresh, less time will be needed. Time it so that its completion coincides with that of the clams.
  5. Just when the frying pan’s liquid begins to show signs of boiling, add the clams and cover tightly,
  6. In about 5 to 8 minutes, the clams should be open & steamed. Discard any unopened clams. Replace cover and remove from heat.
  7. Reserve 1 cup of the pasta water, drain the pasta, and combine the clams & pan juices with the drained pasta. If too dry, add some of the reserved pasta water.
  8. Serve immediately, garnished with chopped parsley.

Variations

This dish is totally reliant upon timing. If you’re off, the pasta will not be piping hot or, worse yet, the clams will be over-cooked and chewy. Just heed the pasta package’s instructions and keep in mind that the clams will open about 5 minutes after they hit the hot pan. Very often, if my clams are ready and my pasta still needs another minute or two, I’ll use the time to remove some of the clam meat from the shells. I won’t remove all of the meat from the shells because I prefer to see a few shells in each serving. It’s all about the presentation.

Notes

When in Italy, one is far more likely to see this dish than you would pasta with clams in a tomato (“red”) sauce. The latter dish, however, is more popular here in the States.  Truth be told, I usually prepare today’s recipe and only “go red” about 25% of the time. The choice is yours to make and here’s my recipe for Pasta with Clams – (Red Sauce) for those who prefer their clams in a tomato sauce.

*     *     *

Fried Calamari

One of the most ubiquitous of appetizers, fried calamari can be found on most of America’s restaurant menus and, as one would expect, recipes abound for creating the dish. Some of these recipes marinate the squid first, while others only flour them before frying. Still others rely on a batter to coat the squid, and those batters may use any one of a number of liquids, from water to milk to beer. Absent a family recipe, what’s a blogger to do?

Well, this blogger ran some tests. Armed with frozen squid, vegetable oil, and a dream, I set out to learn which recipe resulted in the best fried calamari. I took 2 calamari and did nothing but flour them before frying. Six other calamari were given a buttermilk soak for over an hour. Of those, 2 were floured and fried, 2 were dipped in a beer batter before frying, and the last 2 were coated with a water-based batter before frying. My objective was to determine which frying method was the best, so, I only used salt & pepper for seasoning. I didn’t want the results clouded by too many variables.

So, then, how did they do? Well, all 4 preparations fried easily and the results were crisp, although some more so than others. Perhaps my least favorite was the beer batter-fried (lower – left). Although I’d like to try that batter again with chicken, shrimp, or onion rings, it was just too thick for the calamari. These tentacles were the worst of the bunch, a sorry mass of fried batter. Next would have to be the calamari that were fried after only being dipped in flour (l – r). Although they were crispy and the tentacles were the best of all four, they were the least flavorful. As is the case with chicken, soaking the squid in buttermilk made a difference. Next were the calamari that were dipped in a water-based batter (top – left). They were good but not good enough to overtake my favorite, the calamari that were soaked in buttermilk before being floured and fried (t-r). They benefited from the buttermilk and got extra points for ease of preparation and of frying — there was no messy batter to deal with. This, then, is the recipe I’ll be sharing today.

*     *     *

The Winner!

*     *     *

Fried Calamari Recipe

yield: 2 servings

Ingredients

  • 1 lb. squid (about 16 medium-sized), cleaned & cut into 1/2 inch rings (Frozen, raw rings may be substituted. Thaw before using.)
  • 2 cups buttermilk
  • 1 cup all-purpose flour
  • 1 tbsp garlic powder
  • 1/2 tsp coarse kosher or sea salt
  • 1 tsp cayenne pepper – more or less to taste
  • 1/4 tsp pepper
  • Oil for frying — NOT olive oil

Directions

  1. Place buttermilk, calamari rings, and tentacles into a bowl and set aside for one hour. If longer, refrigerate until you’re ready.
  2. Heat oil in a large sauce pan or dutch oven over med-high heat.
  3. Place dry ingredients into a bowl and whisk to combine.
  4. Line a sheet pan with paper towels and pre-heat oven to 200*.
  5. When oil reaches 360*, remove some pieces of calamari from the buttermilk and allow excess liquid to run off before dredging them in the flour mixture. Place pieces, one at a time, into the hot oil. Work in batches. Do not overcrowd.
  6. Remove calamari when golden brown, about 90 seconds to 2 minutes, and place on paper-lined sheet pan. Sprinkle with salt and place in warmed oven.
  7. Repeat steps 5 and 6 until all calamari are fried.
  8. Serve immediately with lemon wedges and your favorite dipping sauce.

Variations

The ingredient amounts listed-above are not set in stone. They are what I use and, as you can see, they bring a little heat to the dish. You can just as easily use more of one spice and less of another or, for that matter, skip one altogether in favor of some other. The point is no matter what spices you use, be sure to soak the calamari in buttermilk for optimum flavor. Do that and you won’t be disappointed.

What if, after all of this, you decide you’d rather not fry your calamari? You can always try my Mom’s Calamari Salad recipe. Follow her directions and  you’ll be rewarded with calamari rings that are tender but never rubbery and a salad that looks as fresh as it tastes.

Note

When I ran these tests, I put some thought into the testing but completely forgot about serving the calamari. I was mid-way through the frying when I realized I didn’t have any sauce for an accompaniment. I made a quick dipping sauce using 2 parts mayo, 1 part sour cream, the juice of a half-lemon, 1 grated garlic clove, and a little salt & pepper. It worked just fine although, if you have a low tolerance for garlic, you may wish to use 1/2 clove or none at all.

*     *     *

Tomato Sauce with Tuna

Having been raised a Catholic, the arrival of Lent reminds me of the countless meatless Fridays of my youth. Even when “the rules” changed in the 60’s, our house continued the practice of fish on Fridays, for the most part, and that was due largely because we all liked fish — and the Bartolini Sisters knew how to cook them. I hope to get to some of those recipes later but, for now, I’m going to start with a pasta dish. (Big surprise!)

Next to a marinara, this is about as simple a sauce as one can make. With tuna as its protein, this sauce is not as strongly flavored as, say, a puttanesca. As a result, one needs to be careful not to overpower the tuna with a lot of strong herbs and spices. The recipe, as presented, is exactly as my family made on many a Friday, with the exception of the capers and mushrooms. I happen to love both with my pasta. As for you, if it isn’t a tomato sauce unless you taste oregano or some other herb, spice, or ingredient, then by all means add it. Just be careful not to overwhelm the tuna and, please, just say no to cheese.

*     *     *

*     *     *

Tomato Sauce with Tuna Recipe

total time: approx.  1 hour

Ingredients

  • 3 tbsp olive oil
  • 1 medium onion, chopped
  • 3 tbsp fresh parsley, chopped
  • 3 cloves garlic, minced
  • 2 tbsp tomato paste
  • 1 can (28 oz) tomatoes (use crushed, diced, or whole that you mash during cooking)
  • 4 – 6 button or crimini mushrooms, sliced — optional
  • 1 can (5 oz) of whole chunk tuna, water-packed, well-drained
  • 2 tbsp + 1 tsp fresh basil, chopped
  • 3 tbsp capers, drained — optional
  • salt & pepper, to taste
  • 1 lb pasta

Directions

  1. Add oil to a medium sauce pan and heat over a medium-high heat. Add onion, garlic, and parsley and sauté until onions are translucent, about 5 minutes.
  2. If using mushrooms, add them now and continue sautéing another 3 or 4 minutes.
  3. Add tomato paste and sauté for about 2 more minutes.
  4. Add tomatoes, stir to thoroughly combine, bring to boil, and reduce to a simmer. Bring a large pot of salted water to boil.
  5. After 30 minutes, carefully add tuna so that the chunks do not fall apart. Add pasta of your choice into the boiling water.
  6. When the pasta is cooked al dente, remove from heat and drain.
  7. Add 2 tbsp basil (and capers, if used) to the sauce and stir carefully.
  8. Combine cooked, drained pasta with the sauce, stir until well-coated, garnish with remaining basil, and serve immediately.

Notes

This is another quick sauce. If you cook it for too long after the tuna has been added, the chunks of tuna will disintegrate.

*     *     *