Quadretti Pasta

Most of us have warm and fuzzy memories of being nursed back to health by a loving caregiver, usually Mom, who served us a cup or bowl of soup. And you parents reading this are sure to have equally warm memories — some pretty recent — but from the other side of the covers. I’d be willing to bet that most of us were served soup made with a chicken-based stock or broth. What went into that broth, however, varied widely from house to house. In ours, Mom used either of 2 pastas, one of which is today’s recipe, quadretti.

Generally speaking, Mom relied upon 3 dishes to get me up-and-about. Breakfast would be a 3-minute egg, with or without buttered toast depending upon my stomach’s attitude.  My meals would be pasta in bianco. Aside from it being a traditional cure served to bambini with stomach ailments, Mom knew that I could’ve been at Death’s door and I would have agreed to at least try a little pasta in bianco. Between meals, though, there was a constant supply of broth which, as the recovery progressed, contained more and more pastina. Ask my Sister what Mom served her when ill and she’ll mention, without hesitation, Acini de Pepe, a tiny bead-like pasta. As for my Brother and me, it was quadretti all the way.

“Feeling better?”

Quadretti are square-shaped pastina that, as you’ll soon see, are quite easy to make. Whenever Mom made pasta of any kind, she would roll out the left-over dough and use it to make quadretti. (In true Italian tradition, absolutely nothing was wasted.) This she stored in a container, adding to it with each new batch of home-made pasta. Because she was always adding to her stash, she rarely had to devote a batch of pasta dough to making quadretti. When combined with the quart or 2 of chicken stock she was sure to have on-hand for risotto,  Mom was always prepared when one of us was feeling under the weather.

One more thing before getting to the directions and this is for soup novices. You will get better results if you only make enough soup with quadretti for as many bowls as will be served in 1 meal. If you make a large batch of soup with quadretti and store it in the fridge, when you bring it out of the fridge, you may be surprised to find that the noodles have absorbed a great deal of the broth. Not only that but, depending upon how much quadretti you put into the soup, you my have very little broth left at all. So, before you add the quadretti to your soup, take into consideration that the noodles will swell a bit during cooking and later in storage. Better to make just enough soup for one meal and store the raw quadretti separately from the broth/stock.

Don’t let any of this deter you from making this pasta. Just as you cannot compare a dish of home-made linguine with store-bought, you will not find a mass-produced pasta that comes close to the taste of home-made quadretti. It just ain’t gonna happen!

*     *     *

How To Make Quadretti

A half batch of Mom’s Pasta Dough will give you about 2/3 to 3/4 lb of fresh pasta dough. That should be more than enough for most soup recipes. Once the dough has rested, you must roll it out, either manually or by machine. If doing it by hand, roll it until it is as thin as you would when making ravioli. If using a machine that, like mine is at its widest when the setting is number “1,” then pass the dough through the rollers, repeatedly, advancing the setting with each pass, up-to-and-including the number “6” setting. If your rollers, like Zia’s, work the opposite of mine and their widest setting is number “10,” then pass the dough repeatedly through the rollers, decreasing the setting with each pass, down-to-and-including the number “5” setting. Once you’ve attained the proper thickness, cut the dough strip into sheets 2 to 3 feet long, and follow the steps outlined in the images below. Be sure to allow the dough sheets to dry sufficiently. If the sheets are too moist, the quadretti will stick together when you cut them. If too dry, the dough sheet will crack and break as you try to fold it to create the sfoglia.

*     *     *

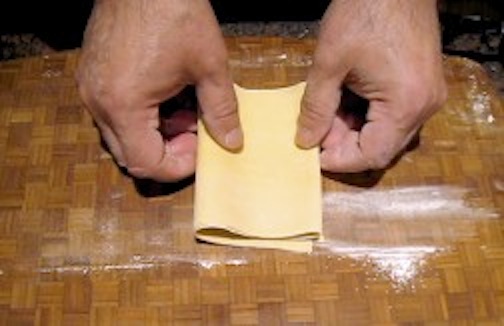
Fold dough sheet in half,

*     *     *

Continue to fold in half repeatedly until a sfoglia of about 2 to 4 inches wide is created.

*     *     *

Starting at one end, begin cutting sfoglia into strips, no thicker than the width of linguine.

*     *     *

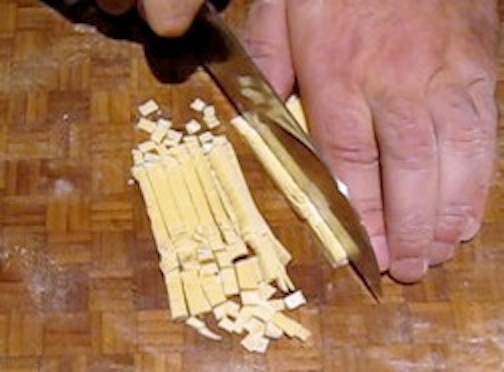
Carefully turn a number of the noodles 90* and begin cutting, again as if cutting linguine.

*     *     *

Gently separate the freshly cut quadretti.

*     *     *

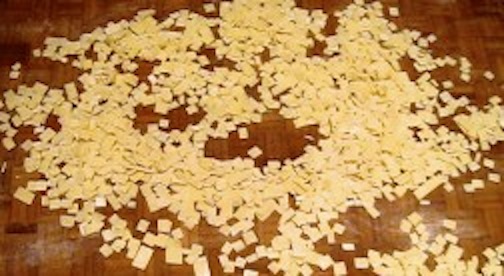
Spread out to dry before freezing or refrigerating in an airtight container until use.

*     *     *

See? A pasta cannot be easier to make by hand and, if you’ve never enjoyed home-made pasta in your broth, you’re in for a real treat. Keep a container of quadretti in the back of your freezer and if, heaven forbid, you’re feeling under the weather, a mug of your home-made broth with a sprinkling of quadretti is just what my “Doctor Mom” would have ordered.

*     *     *

Bartolini Sausage

Laws are like sausages,” wrote Bismarck. “It’s better not to see them being made.” Well, I know little of the backroom dealings that are integral to our legislative process but today I intend to pull back the veil on sausage making, at least my family’s sausage making, that is. And why today? Because Zia taught me how to make sausage and today is her 89th birthday!!!

Allora, buon compleanno, Cara Zia! Cent’ anni e tanti baci!

*     *     *

You'll have no beef with this burger!

*     *     *

For as long as I can remember, the Bartolini Girls made sausage and served them at any meal. They’d cut up a few, add some beaten eggs, and we had a frittata for breakfast. As kids, many is the time we had sausages instead of hot dogs for lunch while, for supper, the sausages were either served alone, roasted with veggies & potatoes, or cooked in a tomato sauce and served with pasta instead of meatballs. Truth be told, we were much more likely to have sausage than we were to have meat balls.  Even after I moved away, Mom always made sure I had at least one container of frozen sausage patties to enjoy once I got home. And to this very day, whenever I make sausage, that first whiff of the seasoned ground pork is a trip on the Wayback Machine to my youth, watching Mom at work. Sure, there are many kinds of sausage available at the local groceries and butchers, not to mention the ethnic markets, but not a one reminds me of home. That’s reason enough for me to keep making these.

Now, for you sausage novices, there is at least 1 reason for Bismarck’s comment. You see, pork sausage requires a certain amount of fat, with some recipes calling for as much as 25% fat content. This recipe doesn’t come near that percentage but fat content is an issue. If you buy a cut of meat that’s too lean, like the pork loin I purchased early in my sausage making career, you will be very disappointed with the result. Look for a good, not too lean, pork butt roast when you make sausage. Even then, you may find that you need to add pork fat to the ground meat, although it wasn’t always this way. Years ago, pork  products had a much higher fat content and one rarely, if ever, needed to add more fat to the mix. Then, without warning to our fellow sausage makers, hog breeders began to develop a leaner, healthier product and the “Other White Meat” campaign was born. Unfortunately, getting rid of the fat got rid of a good deal of flavor, so much so that Mom and Zia quit making sausage altogether! I eventually convinced Zia to try making it again so that I could learn the recipe and, at first, I bought some extra pork belly fat to compensate for today’s leaner pork. It worked, I learned the recipe, and all was well — or should have been. One fateful day, I attempted to make sausage on my own and over-compensated with the fat. What a greasy mess! After that, I quit using additional fat and switched to pancetta. For a 4 lb. pork butt, I use about a half-pound of pancetta. Not only does it add some much-needed fat without going overboard, it brings a nice flavor to our sausage, as well. Most importantly, Zia approved the addition. In fact, the picture to the left was taken at her home and that’s pancetta on top of the pork. (See Notes below for a tip on grinding the meat.)

When you look over our recipe, you’ll quickly notice that there is a surprising lack of spices used but, because it’s so simple, it can easily be modified to suit your tastes. Mom didn’t like fennel seed in her sausage but I don’t think she’d mind if you added some to yours. She, also, didn’t like her sausage spicy but I’m sure she’d look the other way if you wanted to add some red pepper flakes or a couple shakes of cayenne pepper. And I bet Zia would find it interesting if you were to, say, add a little ground sage or marjoram to the ground meat. As for me, I’m a garlic lover and have been known to add a couple of cloves of minced garlic, in addition to the garlic-flavored wine. And if none of those suggestions hit their mark, check out Greg’s recipe at the Rufus Guide. Just remember that no matter what spices you use and how much, be sure to start with less than you think necessary and cook a small amount of pork for a taste test. You can always add more if need be.

Now, one more thing probably should be mentioned. Some may be wondering where the sausages are, being this is a posting about sausage making. Well, you can blame me for that.  As I mentioned, Mom always sent me home with a container of sausage patties after I visited and I grew to prefer them. Cooked on the grill, they are a great alternative to hamburgers. Not only that, but a patty or 2 can be easily crumbled for addition to a tomato sauce, meatloaf, pizza, or some other dish. Well, during one of our Sausage Days, I convinced Zia to just make patties that afternoon and we haven’t made a sausage since. If you’re a sausage person, however, feel free to stuff those casings!

*     *     *

Bartolini Sausage Recipe

Ingredients

  • 4 lbs pork butt, coarsely ground
  • 1/2 lbs. pancetta, coarsely ground
  • 6 oz dry white wine
  • 3 cloves garlic, smashed
  • 1 1/2 tbsp salt, more or less to taste
  • 2 tsp ground black pepper, more or less to taste

Directions

  1. At least 2 hours before beginning, place garlic and wine into a glass and set aside.
  2. Once garlic and wine have “married,” combine ground meats and spread in an even layer, about 2 inches thick, on a work surface.
  3. Season the meat with salt and pepper. Use your fingertips to create dimples in the meat’s surface.
  4. Strain the garlic from the wine and discard. Sprinkle the now flavored wine evenly across the meat. Begin mixing the meat until the seasoning and wine are evenly distributed. Recreate the meat layer and let rest for at least 30 minutes so that the flavors meld. (Caution should be taken if you are doing this on a hot Summer’s day or in a very warm room.)
  5. Once rested, make a mini-patty and cook it in a small frying pan. After tasting, you may need to adjust your seasoning. If you do add seasoning, let it rest 15 minutes before tasting again.
  6. Once the sausage meat has passed your taste tests, begin making patties. Place them in single layers on baking sheets and into the freezer. Once frozen, you can bag them or place them into containers until needed.

*     *     *

Notes

Our preference is to grind the pork using the plate with the largest holes. This will create a coarse grind. When grinding meat for ravioli or cappelletti, use a smaller holed plate for a finer grind. No matter what size the end-result, you’ll find that your grinder, whether machine run or hand-cranked, will perform better and produce a more consistent result if the meat is cut into strips and partly frozen before you begin. Cut the pork butt into strips, layer them on baking sheets, and place them into the freezer for 30 to 45 minutes. Do not let them freeze solid or you will have to thaw them somewhat before grinding.

In a way, this recipe represents a milestone in the long and storied history of Bartolini sausage making. Never before were the wine, salt, and pepper measured so that they could be recorded in a recipe. It was always, “Grab some salt. Grab a little pepper. Put some wine in a glass. No, that’s too much. … ” To write this recipe, Zia worked her magic using wine and seasoning that I had pre-measured and placed in containers on her counter. When a mini-sausage patty passed her palate’s inspection, I simply measured the salt, pepper, and wine that remained. Still, as I cautioned earlier, start out with less spice than you think you’ll need. Be especially careful with the salt if you add pancetta to the ground pork, for its salt content can vary.

Just One Thing More

You didn’t think I would end this post without at least 1 picture of sausages, did you? This one is from the Bartolini Sausage Archives.

*     *     *

*     *     *

Filling for Ravioli dei Bartolini

The Bartolini Girls made 2 versions of filling for their pasta. One, used in cappelletti, was served in soup while the other was for ravioli and dressed in sauce. A couple of years ago, I decided to try my hand at making sausage ravioli, using our family sausage recipe. The results were good enough to serve Zia, gain her approval, and now the Bartolini Clan has 3 ravioli fillings made with meat. Today I’m going to share the “saucy” filling; we’ll get to the “soupy” and sausage fillings in later posts.

I have 2 versions of Mom’s recipe. The original, which is little more than a few notes, and the one that’s part of a recipe book she gave to me after I moved to Chicago. Both are pictured below and, for obvious reasons, I follow the more complete version of the two. This is the same recipe that Zia follows when we have Ravioli Day. Similar to Sausage Day, once or twice a year we’ll devote a day to making ravioli so that she’ll have plenty for her family when they visit. We work well together as a team and that night’s dinner is always a good one. Never one to wait for dinner, however, Max has been known to steal a few errant ravioli that may have wandered too close to the pasta board’s edge. On one memorable Ravioli Day, he managed to inhale 35 of the pasta pillows. That was about 10% of that afternoon’s production and, not so coincidentally, the last ravioli that Max has enjoyed, to date.

*     *     *

*     *     *

When you look at the recipe, you’ll note that in the original version, Mom used nutmeg but cloves is used in the version she gave me. I’ve no idea why or when she modified the recipe, only that she gave me the book in the early ’80’s.  As is the case with any of our ravioli fillings, the meat is cooked before being ground in a meat grinder. I once tried using a food processor but did not like the results at all. The filling became a thick purée without any real texture, and I definitely prefer some texture. The recipe, also, calls for ground pork and veal but if Mom couldn’t find veal, she often substituted chicken or turkey. Living here, I’ve no problem finding any of the ingredients but it’s good to know that there are alternatives should you run into problems or be averse to using veal. The rest of the recipe is easy enough. The “fun” part will come when we make the ravioli and you can see how we do that HERE.

*     *     *

Filling Recipe for Ravioli dei Bartolini

Yield: Enough filling to be used with 8 eggs of pasta dough. Recipe found here.

Ingredients

  • 1 1/2 lbs. ground pork
  • 1 1/2 lbs. ground veal (chicken or turkey may be substituted)
  • 2 – 3 tbsp butter
  • 1 pkg (10 oz) chopped spinach (cooked and well-drained)
  • 1 pkg (8 oz) cream cheese
  • 1 cup grated romano or parmesan cheese – your choice
  • 2 or 3 eggs slightly beaten
  • dash of cloves (optional)

Directions

  1. Sauté meat in butter. Season lightly with salt.
  2. Use meat grinder to process the meats. Add all the ingredients into a mixing bowl and mix until well-combined.
  3. Cover the filling and refrigerate for a few hours or overnight.
  4. Once the filling has rested, you can begin making your ravioli.

*     *     *

*     *     *

Notes

Pictured above  is ravioli filling pre-formed into “balls.” Sometimes, while the pasta dough rests, Zia & I will use the time to create some, giving us a jump on the day’s production.

Mom and Zia used this filling exclusively for ravioli. I’ve used it in a few other dishes – i.e., stuffed shells, cannelloni, and, on occasion, a rotello. We’ll get to these recipes, too.

*     *     *

Ravioli dei Bartolini

Happy Columbus Day everyone! And what better way to celebrate the Holiday than to share one of the Bartolini Clan’s favorite holiday recipes. Say the word “ravioli” to any of the old 2-flat’s former residents and you’re sure to conjure up memories of holidays past, specifically Christmas, New Year’s, and Easter. No matter which of the 2 dinner tables you visited on those evenings, there would be a large platter of ravioli taking center stage. (It was present on Thanksgiving, too, but The Bird was the star of that show.) As a kid, my attention was pretty much focused on that platter of pasta pillows — and dessert, of course — and I think the same would have been said by everyone at the tables, save Mom and Zia. Their perspectives would have been entirely different.

One must remember that in those days, the only freezer available to most households was a small compartment above the fridge. Consequently, if you wanted to serve your family ravioli, you made it the same day it was served. Well, there was absolutely no way that Mom and Zia were going to start making ravioli on a holiday afternoon. That meant that most holiday mornings, they were up at 5:00 am making ravioli for that evening’s holiday dinner. And then there was Christmas. We were allowed to get up during the night to discover what Santa had brought us and to play with our toys. It wasn’t until years later that we learned how our parents no sooner got the gifts wrapped and under the tree when we came charging out of our bedrooms. Mom and Zia were lucky to get a couple of hours of sleep before they started making ravioli. And they weren’t making just a few ravioli. They made enough for everyone at each of the two holiday tables, which often included guests as well as each family. For Mom, that meant ravioli for as many as 12 people. To this day, I don’t know how they did it.

It really is a shame that there are no pictures of these women making pasta and ravioli, for it really was something to see. Mom would make the filling the night before and store it in the fridge. (Woe be the child caught snatching filling from the fridge!) The next day, she would make 8 eggs worth of pasta dough using the “mound” method. (Mound the flour on a large pasta board, make a crater in the center, pour the eggs into the center, and use a fork to slowly bring the flour into the egg mass, being careful not to break the flour wall and allow the eggs to spill out.) Once the dough was made, kneaded, and rested, Mom used her 3+ foot long “rolling-pin” to create thin, circular pasta sheets, 3 – 4 feet in diameter. They were laid to dry by hanging them off the edge of the dining room table, the backs of chairs, even on sheets covering a bed, if one was “open.” Once dry enough, the sheet would be hung off the pasta board’s edge, half on the board and half off. The filling balls were then laid out on the pasta half-sheet in a grid, each equidistant from its neighbors. When they were all positioned, maximizing the surface area, the bottom half of the sheet was  brought up and over, enclosing the filling-covered top half. The long handle of a spoon or spatula was used to seal the pillows. The ravioli were then cut using a pastry cutter, moved to trays, and the next pasta wheel was moved into place. This continued until all the filling was used. The remaining dough, if any, would be hand-cut to form linguine or quadretti. (More about the latter in another post.) Just about the time she was finished cutting the last of the pasta, we kids would come bounding into the kitchen. “Merry Christmas, Mom! What’s for breakfast?”

The purchase of a pasta machine changed all that. Unable to make the large pasta wheels, Mom turned to ravioli dies to make her ravioli. Pictured just below is my collection.  The 2 dies on top are used for ravioli. The one on the top-left makes ravioli that are 2 inches square. That’s just about the size The Sisters were taught to make by hand. The ravioli form on the top-right makes ravioli that are 1.25 inches square. That’s about the size The Sisters made by hand once we kids came into the picture. (Kid-friendly ravioli. Who knew?)  The remaining 3 are used for soup ravioli, which Mom called cappelletti, “little hats.” Though normally rounded, some look similar to tortellini,  the die Mom used (lower left) was .75 inches square. As a result, the word “cappelletti” in our house wasn’t used to describe the pasta’s shape but its use — and that was in soup. Mom gave me her cappelletti die years ago but it’s too small for me to use in any way. (I’ve tried several times but, being ham-fisted, I cannot make the filling “balls” small enough to fit the die.) So, I bought the die on the lower-right. It makes raviolini that are 1 inch square and I use it to make my cappelletti. In the center is a press that makes traditional-looking cappelletti, each 1.25 inches in diameter. I, also, have 2 more ravioli makers, both not shown, but they don’t work very well. One attaches to my pasta machine and the other to my stand mixer. In both cases, they require that the dough sheets be about twice as thick as I am accustomed to using. The result is ravioli that is a bit more chewy than I prefer. What can I say? Mom spoiled us. 

*     *     *

Tools of the Trade

*     *     *

When it come to the pasta dough’s final thickness, let your own palate lead the way. Our pasta machines are calibrated from 1 through 10, with 1 being the thickest setting. Zia prefers to roll her dough up to and including the number 6 setting. I will use the same setting for large ravioli but for the smaller ravioli and cappelletti, I’ll roll the dough one more time, using the number 7 setting.

Once you’ve made the filling and pasta dough, creating the ravioli is easy enough, though time-consuming. Here’s Mom’s Pasta Dough recipe and, on Wednesday, I’ll share the recipe for their ravioli filling. (Future posts will share the filling recipes for sausage ravioli and cappelletti, as well as a few others we’ve tried along the way.) The pictures that follow will guide you through the ravioli making process far better than I ever could describe. Of course, it helps that they feature that world-renowned still photo model, “Zia,” in a sequence of never seen before shots taken where she lives, along the fabulous Michigan Riviera.  Ah, the life of the octogenarian super-model!

*     *     *

How to Make Ravioli

Step One: Cut dough strips into die-sized sheets

*     *     *

Step Two: Cover the die with a dough sheet

*     *     *

Step Three: Place filling across the die

*     *     *

Step Four: Use dampened fingers to moisten ravioli “walls.”

*     *     *

Step Five: Cover filled die with another dough sheet

*     *     *

Step Six: Use a rolling-pin to seal the ravioli

*     *     *

Step Seven: Trim the excess dough

*     *     *

Step Eight: Flip the filled die

*     *     *

Step Nine: Unmold the ravioli

*     *     *

Step Ten: Lightly puncture the ravioli, meat-filled only

*     *     *

To Cook

  1. Bring a large pot of salted water to a rolling boil.
  2. Add the ravioli, return to boil, then reduce and simmer gently. (If boiled too hard, the ravioli may burst.)
  3. Ravioli normally take 5 – 8 minutes to cook, a couple of minutes more if frozen. Cooking times may vary depending upon the thickness of your dough, the filling, the size of the pot, etc. Taste one to insure they are done to your liking.
  4. Once the ravioli are cooked, carefully drain using a colander or sieve. You can use a Bolognese-style sauce or go meatless.

*     *     *

Variations

The method I’ve described is by no means the only way to make ravioli at home. Check out the Rufus’ Food and Spirit Guide to see Greg make ravioli completely by hand, similar to the method Mom employed but on a smaller scale. You can also see a slightly more modern approach by going to Sweet Caroline’s Cooking. With Thanksgiving just around the corner, her recipe for butternut squash ravioli couldn’t be better timed. Lastly, in an upcoming post, I’ll show you yet another method for making stuffed pasta.

Notes

You’ll note that Step Ten instructs that only meat-filled ravioli should be lightly punctured. This should be done if you intend to freeze the pasta. Doing so will allow any air sealed within each raviolo to escape during the cooking process. Too much trapped air will cause the raviolo to, in effect, balloon and it may burst before the filling can thaw and cook. We use the tines of a cocktail fork to do this but we don’t puncture cheese-filled ravioli. The cheese filling will often leak through the puncture holes. Try to fill each pillow with as much cheese filling, and as little air, as possible. This “balloon effect” should not be a problem if the ravioli are fresh (not frozen) when cooked.

Although not especially difficult, this is a time-consuming process. I’d recommend that you make enough for a couple of dinners and that you freeze what you won’t be using immediately that day. It’s easy enough. Place your freshly made ravioli in a single layer on lined baking sheets and into your freezer. 2 to 3 hours later, place the now frozen ravioli into bags or containers and return to the freezer. When needed, do not thaw before placing into boiling water, reduce to soft simmer, and cook till done to your liking, normally a few minutes longer than if freshly made.

And for heaven’s sake, keep an eye on Max at all times!

*     *     *

Fazzoletti Pasta

It’s been said that the Inuit have 100 words for “snow.” I’ve no idea whether that’s true but I bet the Italians with their pasta can come close, matching them pasta shape for snow term. You see, as many pasta shapes and sizes that you may find in your local market, they are but a small fraction of the pasta varieties available, particularly if you’re lucky enough to visit Italy. It’s as if every restaurant there features a couple pastas that you’ve never heard of, each of which comes with some story behind it. Fazzoletti, today’s recipe, is one of those pastas. Derived from the Italian word for handkerchiefs, Zia and I were served this pasta for lunch one day in a small restaurant not far from the Coliseum of Rome. Today, I usually make fazzoletti with the dough scraps left when I’ve made some other pasta. Definitely the easiest of pastas to make, they are simply squares that can be anywhere from 3 to 6 inches long, per side. Personally, I tend to make mine around the 3 inch mark but two or three 6 inch fazzoletti, lightly dressed, make a perfect primo piatto. Whether you serve them large or small, you’ll amaze your dinner companions with your knowledge of Italian cuisine’s more obscure pastas. It works every time.

*     *     *

Fazzoletti Pasta Recipe

total time: approx.  45 minutes (includes resting time)

Ingredients

  • 1/2 lb. fresh dough, (about 1/3 of Mom’s Pasta Dough recipe or use dough left over from some other preparation)
  • extra all-purpose flour for dusting the work surface and pasta sheets
  • To serve: your favorite tomato sauce (marinara or meat-based) or your favorite pesto (traditional or Trapanese).

Directions

  1. Steps 2 though 7 are a partial reprint of the directions found here Home-Made Fettucine, Linguine, Capellini
  2. Be sure the dough has been allowed to rest at least 15 minutes before starting to roll it.
  3. Using a knife or dough scraper, separate a ball of dough, roughly the size of a very large egg. With your hands, flatten the dough somewhat, making a square. Set your machine’s rollers to the widest setting and dust the rollers with flour.
  4. Place one edge of the dough between the rollers and turn the crank, causing the dough to grow thinner as it passes through the rollers. Lightly flour the dough, fold it in half upon itself, and pass it through the rollers again. Repeat this, without adjusting the rollers, a few times.
  5. Repeat steps 3 & 4. In fact, work with as many dough “eggs” as you are comfortable handling. Just remember to keep the remaining dough covered while you work with the “eggs.”
  6. Once you have rolled a few “eggs”, adjust the rollers to the next setting and pass each dough sheet through the rollers. If the dough is at all sticky, dust the sheets with flour. When all the sheets have been rolled, fold each in half and send through the rollers again.
  7. Adjust the rollers and repeat Step 6, again and again, until the strips are the desired thinness. You should no longer need to flour the strips between passes through the rollers.
  8. Lay a dough strip on the work surface. Use a pastry cutter to cut the strip into equally sized squares. Remove the fazzoletti and place in a single layer on a floured surface or lined sheet pan.
  9. Cook ASAP. Storing dried fazzoletti is problematic and some breakage is all but assured.
  10. Fresh fazzoletti will take minutes to cook in a pot of salted boiling water. Once cooked al dente, reserve some of the pasta water and either pour the pot’s contents into a colander or use a “spider” skimmer to remove the pasta from the water.
  11. Drain, lightly dress with either sauce or pesto, using some of the reserved pasta water if necessary. Serve immediately. If you prefer large fazzoletti, use tongs to carefully place and fold, in a seemingly careless manner,  the dressed pasta on each serving plate. (Remember: it’s all about presentation. You do not want a large fazzeletto laying flat upon the plate, nor is it desirable to serve several smaller fazzoletti stacked like pancakes.)

*     *     *

*     *     *

Notes

As I’ve mentioned, I normally make fazzoletti out of pasta dough remnants, most often after making  a tray of lasagna for friends. I usually have enough pasta dough and sauce left over that I can quickly make myself a nice dinner of fazzoletti. If, heaven forbid, I don’t have any sauce, I can either serve it in bianco or grab some pesto out of the freezer. No matter how it’s dressed, you can be sure that I’ll be enjoying a dish of freshly made fazzoletti that evening while reminiscing about Italy, as will Zia when she reads this recipe.

*     *     *

Stracciatella Soup

Stracciatella is an Italian egg drop soup that is common to San Marino and Le Marche, as well as Rome and Emilia-Romagna. The name is derived from the Italian word that means “torn apart” or “rags” and that’s an apt description for the dish. The eggs look like tiny torn rags in the broth. A tasty soup, this easy-to-prepare dish makes a perfect lunch or first course.

The foundation of any good bowl of soup is the broth. Sunday mornings, from late Fall through early Spring, it was fairly common to find a large stock pot, simmering atop Mom’s stove, filled with vegetables, chicken, and a piece of beef.  The resultant broth, brodo, formed the basis of that week’s soup and the occasional batch of risotto. Stracciatella, being so relatively plain, needs that kind of rich, full-bodied broth. I highly recommend making your own stock — be it vegetable or meat-based — for this soup but I, also, realize that not everyone has the time to do so. As a result, if you do use store-bought stock, be sure it’s low-sodium. Once you’ve added the egg and cheese mixture to the broth, you can taste the soup and add salt, if need be.

*     *     *

Stracciatella Soup Recipe

total time: approx.  15 minutes

Ingredients

  • 8 cups (2 quarts) chicken stock (vegetable stock may be substituted for a vegetarian diet)
  • 3 large eggs
  • 1/4 cup grated parmesan cheese
  • 1 tbsp fresh parsley, chopped
  • a pinch of freshly ground nutmeg
  • salt & pepper, to taste
  • grated parmesan cheese for serving

Directions

  1. Combine eggs, cheese, parsley, and nutmeg in a bowl or container with a pouring spout and mix well.
  2. Place stock into a sauce pan and heat over a med-high heat.
  3. When it begins to boil, reduce heat to medium-low, use one hand to gently stir the stock in a circular motion and, with the other hand, slowly pour the egg mixture into the pan.
  4. When all the egg mixture has been added, stop stirring and continue simmering for another minute or so.
  5. Taste the soup and season with salt & pepper, if needed.
  6. Serve immediately with additional grated parmesan cheese.

Variations

I’ve seen stracciatella prepared with spinach several times by television cooks and, in fact, I’ve prepared it this way, too. Strictly speaking, it is not a “true” stracciatella but it is a tasty alternative and just about as easy to make as the original. Take either frozen chopped spinach or fresh spinach that’s been chopped and add it to the simmering stock. Let the stock cook the spinach for a few minutes before stirring and adding the egg mixture. Whether or not you include spinach, with so few ingredients, a delicious bowl of stracciatella is only minutes away.

*     *     *
Stracciatella (soup)

*     *     *

Pesto

Pesto Genovese

Since tomorrow is St. Patrick’s Day, we’ll go green for this week’s recipe. Pesto was one of those dishes that I had enjoyed eating but never thought to make myself. Several years ago, before I moved to my present home, a good friend taught me how to make pesto using basil grown in my garden. I haven’t bought another drop since. Sure, we all know that pesto is great when combined with hot pasta but that’s only part of the story. Pesto-dressed pasta can, also, be served at room temperature and, if chilled, the addition of a few ingredients will make a great pasta salad. Moving beyond pasta, I’ll use a couple of tablespoons of pesto to flavor soups, sauces, in sandwiches, and in meat marinades. When roasting a chicken or game hen, a little pesto between the bird’s flesh and skin results in a very flavorful main course. The fact is that pesto isn’t just for pasta anymore.

As easy as pesto is to prepare, there are a few things to remember. First off, be sure to use only fresh ingredients. This is not the time to use dried basil or powdered garlic. Although I use a food processor to make my pesto, a high-speed blender may be used, as well. No matter which appliance you use, do not over-process the basil. If you do, your basil will darken considerably. Lastly, pesto can be stored in the fridge for up to one week and frozen for much longer. If you choose to freeze your pesto, however, do not add any cheese to it because it will not thaw properly. Instead, make your pesto without the cheese, freeze it, and after you thaw it, mix the pesto into your pasta, adding cheese as you do. And if you are going to freeze it, consider putting your pesto into an ice-cube tray. Once frozen, remove the cubes, place them in a bag, and store the bag in the freezer. Doing so will ensure that you’ll defrost only what you need.

*     *     *

Pesto Recipe

total time: approx. 10 minutes

Ingredients

  • 2 cups basil leaves, about 2 oz
  • 1/4 cup pine nuts
  • 2 – 3 cloves garlic, roughly chopped
  • 1/3 cup parmesan cheese
  • 1/2 – 3/4 cup extra virgin olive oil
  • 1/4 tsp salt
  • pepper to taste

Directions

  1. To your food processor or blender, add the pine nuts and garlic. Process about 20 seconds to chop the ingredients.
  2. Add the basil, salt, and pepper and pulse for a few seconds, about 3 or 4 times. This should give the basil a rough chop.
  3. Start the processor and pour the olive oil through the feed tube in a slow, steady stream. Stop the processor about 5 seconds after all the oil has been added.
  4. At this point, the pesto may be frozen for later use (see above).
  5. If you are not going to freeze the pesto, add the grated cheese and process just long enough to combine the ingredients.
  6. Pesto is now ready and may be served over your favorite pasta.

*     *     *

*     *     *

Variations

There are far too many variations to serving pesto for listing here. I mentioned a few in the introduction above and that was by no means a complete list. Pictured here is a dish of farfalle with chopped asparagus spears and marinated artichoke hearts, all of which has been dressed in pesto. I served it warm but I could have easily added some halved cherry tomatoes, a little chopped onion and maybe some chopped olives, stuck it in the fridge to chill, and served it as a pasta salad. As you can see, the possibilities are endless.

Notes

The amount of oil I use in this recipe will vary depending upon how I intend to use the pesto. If I’m going to use the it right away, I’ll use what’s indicated in the recipe above. If I’m going to make a chilled pasta salad, I may add a little more oil to the dish. If I’m going to freeze the pesto, I’ll reduce the amount of oil, as well as skip the cheese, making more of a paste. When I eventually use it, I’ll defrost it and coat my pasta with olive oil before adding the pesto. You, too, may wish to adjust the amount of oil to correspond with your own likes and dislikes.

*     *     *

Spianata

When I was a boy, Mom occasionally treated us all to home-made pizza. She’d make standard pepperoni or sausage pizzas for us kids but Dad’s was a special order. His pizza was called spianata and, unlike our kiddie versions, his was topped with only garlic, onion, rosemary, salt and pepper, resembling a rather plain focaccia. Yet, for so few ingredients, it made a very tasty pizza back then, while Zia and I use it today as a perfect accompaniment for any number of dishes.

*     *     *

*     *     *

The recipe I’m about to share starts with what is called a “sponge.” Fairly common to many Italian/European breads, it’s a mixture of water, yeast, and flour that’s allowed to rise overnight. The mixture, in a sense, ferments and the resultant bread is more flavorful, almost sourdough-like. (In fact, I often add some of my sourdough starter to the sponge instead of yeast.) Of course, you needn’t start with a sponge but the spianata is so much more flavorful if you do. Once the sponge has “spent the night,” the rest of the recipe is pretty straight-forward and you should have no trouble following it.

*     *     *

Spianata Recipe

Ingredients

For the sponge

A Sponge Worthy of Spianata

  • 1 cup flour
  • 1 cup warm water
  • 1 tsp active yeast

For the spianata

  • 1/2 cup olive oil, divided
  • 1 tsp salt
  • 2 cups flour

For the topping

  • 1/2 of a small onion, sliced thin
  • 1 clove garlic, sliced thin or grated
  • 3 tbsp fresh rosemary, coarsely chopped
  • olive oil
  • coarse salt & pepper

Directions

  1. Proof the yeast in warm water, add to the flour to make the sponge, mix well, cover, and set aside. The sponge should be allowed to rise for at least 8 hours but no more than 20. 12 to 16 hours is usually best, in my experience. When you are ready to proceed, the sponge’s surface should be mottled with bubbles and it should have a strong yeast scent.
  2. To the sponge, add the flour, 1/4 cup olive oil, and salt. Knead dough for 5 minutes. Dough should not be sticky. If it is, sprinkle with flour and continue kneading until absorbed.
  3. Place dough in an oiled bowl, cover, and let rise until doubled — from 1 to 2 hours. (If using only sourdough starter, it could take longer.)
  4. Punch the dough down, turn it onto a floured work surface, cover with a towel, and let rest for 15 minutes. Meanwhile, coat a 9″ x 12″ sheet pan with the remaining 1/4 cup of olive oil.
  5. After resting 15 minutes, place dough onto the pan and use your fingers to begin stretching it to fit the pan. When it covers about 2/3 of the pan, flip the dough over and continue stretching the dough until the entire pan is covered and there’s enough dough to create a ridge around the pan’s edge. Cover with a towel and let rise until doubled again, about 1 hour.
  6. Pre-heat oven to 425*. Place garlic and onion into a small bowl and moisten lightly with olive oil.
  7. Once doubled, remove towel and, with your fingers, poke the surface of the dough repeatedly. Sprinkle surface with garlic, onion, rosemary, coarse salt & pepper.
  8. Bake on oven’s center rack for about 25 minutes. The spianata should be lightly browned.
  9. Allow to cool slightly before cutting and serving.

Notes

Like most breads, spianata can be frozen easily. Once it is fully cooled, wrap it tightly in aluminum foil and place in your freezer. When you are ready to serve it, place it, still wrapped in foil, in a pre-heated 350* oven for about 25 minutes. Enjoy!

*     *     *

Cacioni

Half-Moon Pie?

Cacioni are small, half-moon shaped pies which, in San Marino, are filled with greens, very often a combination of Swiss chard and spinach (cacioni con bietole e spinaci). In other parts of Italy, however, cacioni are filled with a variety of cheeses and, in one case, even beans are used. And then there’s Liguria where they make a torta pasqualina at Easter which is filled with greens — but the torte are much larger than cacioni and the filling also includes ricotta and grated cheese. Of all the recipes I’ve come across, however, only the Bartolini cacioni are deep-fried. In fact, Zia went to lunch with some Sammarinese friends a few years ago and one of the ladies brought baked cacioni for everyone. The idea of baking cacioni is a game changer for Zia and me. Up until now, we rarely made them because there was no way to store them. You fried and ate what you made and that was that. As such, it just wasn’t practical to make them if you lived alone. Now that baking is an option, however, we can make a dozen, reserve 2 for dinner, and freeze the rest. Suddenly, cacioni are back in our diets, but, what does this mean for you?

Well, I’m going to give you both options for preparing cacioni. The first will be deep-fried; the second will be baked using pastry dough. To that end, in a recent episode of Mad Hungry, Lucinda Scala Quinn prepared a pie crust that she used with her pocket pies. (If you’re not familiar with her blog, you should be.) Her recipe is perfect for cacioni and it really is fool-proof. No matter which cooking option you may choose, the filling will remain the same and we’ll start there.

*     *     *

Cacioni Recipe

(Swiss Chard & Spinach Filling)

Ingredients

  • 3 tbsp olive oil
  • 2 cloves garlic, crushed
  • 1 small yellow onion, chopped
  • 1 bunch  fresh Swiss chard, trimmed, leaves chopped after removal from stalks, stalks chopped and reserved
  • 1/2 pkg frozen chopped spinach, thawed  — use more or less, if you like
  • salt & pepper to taste

Directions

  1. Heat oil and garlic in a frying pan over medium heat until garlic begins to brown, about 5 minutes. Do not allow garlic to burn.
  2. Remove garlic, increase heat to med-high, add onion and as much of the chopped chard stalks as you prefer. Season with salt & pepper and sauté until translucent, about 8 to 10 minutes.
  3. Add chopped spinach to pan and continue sautéing until heated through, about 4 minutes.
  4. Add chard leaves, season with salt & pepper, and sauté until leaves are wilted and cooked to your preference.
  5. Place cooked greens in a colander or strainer, place a dish on top of the cooked vegetables, and place a heavy can or similar weight on top of the dish. This will help to drain as much liquid from the greens as possible before filling the cacioni.

*     *     *

Fried Cacioni

Swiss Chard & Spinach Cacioni

yield: 12 – 15 pies.

Ingredients

  • Swiss chard with spinach, sautéed and well-drained (recipe above)
  • 1/2 batch Mom’s pasta dough, rested for 30 minutes after preparation
  • Oil for frying — NOT olive oil

Directions

  1. Separate dough into quarters and wrap 3 quarters in plastic wrap.
  2. Using the remaining dough quarter, run it repeatedly through the pasta machine rollers until thin. If no. 1 is the widest setting, continue rolling the dough up to, and including, the no. 6 position.
  3. Spread the dough sheet on a flat surface. Using a bowl, saucer, or wide-mouthed mug/jar as a template, cut circles as large as you can on the dough sheet. Trim and reserve the excess dough for later use.
  4. Depending upon the size of the dough circle, place 2 to 4 tbsp of the chard filling in a line across the center of each one. Using a pastry brush or your finger tips, moisten the edge of each circle with water. Fold the pastry in half upon itself, creating a half-moon. Use a fork to press and seal the edges of the dough. Use the fork to prick each pie to let steam to escape during frying. Set aside.
  5. Continue until all the filling has been used. The left-over dough may be used to make the pasta of your choosing.
  6. Using a large frying pan, add enough vegetable/peanut oil to create a depth of 1 to 1 1/2 inches. To avoid boiling over, do not fill the pan over halfway full. (This is more a “shallow-fry” than deep-fry. Of course, if you prefer deep-frying, go for it.)
  7. Bring oil to 350*. Depending upon the pan size, fry 2, 3, or 4 cacioni at a time. Do not overcrowd. Fry until golden brown before turning each one over.
  8. Place a wire rack atop a baking sheet and place both into a warm oven. When each batch of cacioni are finished frying, place them on the rack in the oven to keep warm. Sprinkle with coarse kosher or sea salt.
  9. Repeat the process until all are fried. Serve immediately.

*     *     *

Baked Cacioni

Cacioni con Bietole e Spinaci

Note: This will require enough pastry dough as would be used to make a double-crusted, 9 inch pie. Use your own pastry dough recipe, try Lucinda’s cream cheese pastry dough, or buy it ready-made at your grocery store. Puff pastry, however, is not recommended.

yield: 10 – 12 pies.

Ingredients

  • Swiss chard with spinach, sautéed and very well-drained (recipe above)
  • pastry dough (see note above)
  • 1 egg yolk mixed with a tbsp of water to make a wash

Directions

  1. Separate dough into halves, wrap one half with plastic wrap and place in the fridge. Roll the remaining half as you would for a pie crust.
  2. Using a bowl, saucer, or wide-mouthed mug/jar as a template, cut circles as large as you can on the dough sheet. Trim and reserve the excess dough for later use.
  3. Depending upon the size of the dough circle, place 2 to 4 tbsp of the chard filling in a line across the center of each one. Using a pastry brush or your finger tips, moisten the edge of each circle with water. Fold the pastry in half upon itself, creating a half-moon. Use a fork to press and seal the edges of the dough. Use the fork to prick each pie to let steam to escape during baking. Set aside on a baking sheet lined with parchment paper.
  4. Continue until no more dough remains and then place the baking sheet into the fridge while you work with the second half of the pastry dough. Repeat the process until there is no more filling or dough.
  • TO COOK IMMEDIATELY
  1. Pre-heat oven to 375*
  2. Meanwhile, chill the cacioni for a few minutes before proceeding.
  3. Using a pastry brush, carefully coat the exposed surface of each pie with the egg wash. Sprinkle with salt.
  4. Place baking sheet into pre-heated oven and bake until golden brown, about 20 minutes.
  5. Serve immediately.
  • TO FREEZE & COOK
  1. Place newly prepared cacioni on a lined baking sheet and then into the freezer.
  2. After a couple of hours, place the cacioni into more permanent freezer containers.
  3. When ready to cook, DO NOT THAW. Pre-heat oven to 350*.
  4. Remove the cacioni from the freezer, place on a parchment-lined baking sheet, and, using a pastry brush, coat the exposed surface of each pie with egg wash. Sprinkle with coarse kosher or sea salt.
  5. Place the baking sheet into a pre-heated oven and bake until golden brown, about 30 minutes.
  6. Serve immediately.

Variations

Although my family has only used a combination of chard and spinach to fill our cacioni, there’s no reason other vegetables can’t be used. In fact, Zia and I are considering rapini (broccoli raab) as filling for some future cacioni — if I can ever remember to buy some and bring it with me when I visit.

Notes

Working on this recipe resulted in my making a couple dozen cacioni, both fried and baked. At one point, I had some left-overs that had been baked and were made with Lucinda’s pastry dough. Rather than refrigerate them, I placed them with some raw cacioni on one of the baking sheets in my freezer. Lucinda freezes her cooked pocket pies and re-heats them in the microwave, so, why not do the same with cacioni? Well, I’m happy to report that those frozen, fully baked cacioni were successfully re-heated in the microwave. They tasted great and I’ll definitely be doing this again. Special thanks to Lucinda and her Mad Hungry Blog. She’s the best!

So, there’s no longer a reason for us single folk not to enjoy cacioni on a regular basis. You can make a batch, bake what you need, and freeze the rest for future baking, or, if you prefer, you can bake them all, freeze the left-overs, and re-heat them in the microwave at some later date. Either way, you won’t be disappointed.

*     *     *

Passatini

Passatini Soup

Let me start this post by stating that, when I was a boy, my Mom was the coolest Mom on the block. After I’d spent a morning hard at play, manufacturing Creepy Crawlers with my Mattel Thingmaker, guess what she served for lunch? Worms. That’s right, WORMS! How cool was that? Granted, we didn’t have actual worms for lunch but we did have passatini, a far more appetizing and tasty alternative. Sometimes called passatelli, passatini are noodles, of a sort, made with bread crumbs & cheese instead of flour and lightly flavored with lemon rind and nutmeg. The noodles themselves are extruded using a special press, a large-holed ricer, or a meat grinder. Once made, they can be added immediately to a pot of boiling stock or placed in single layers on baking sheets to be frozen. After a couple of hours, the now-frozen passatini may be gently placed into a container and stored in an area of the freezer where they won’t be disturbed. As you may have guessed, these noodles are more delicate than most and care needs to be taken when storing them. On the other hand, this recipe can be halved easily, thereby eliminating the need for freezing altogether. Whether freshly made or previously frozen, a steaming bowl of passatini is a meal fit for the coldest of Winter’s days. And if you happen to be serving children of a certain age, you, too, can be as cool as my Mom.

*     *     *

Passatini Recipe

total time: approx.  30 minutes

Ingredients

  • 4 large eggs
  • 2 cups bread crumbs
  • 1 to 1 1/2 cups grated cheese (parmesan or romano)
  • 1/2 tbsp lemon rind
  • 1/2 tsp ground nutmeg
  • chicken stock (vegetable stock may be substituted for a vegetarian diet)
  • grated cheese for serving

Freshly Pressed

Directions

  1. Combine dry ingredients in a large bowl.
  2. Add eggs and mix until a dough is formed. (I use my stand mixer and paddle attachment.)
  3. Form into a ball, cover, and let dough rest for 10 minutes.
  4. Using a large-holed potato ricer or meat grinder, extrude the passatini and place in a single layer on baking sheets, to be used immediately or frozen for later use, as explained in my comments above.
  5. Bring a pot of stock to boil, add the passatini, and reduce to a medium simmer. When the passatini begin to float, cook for 3 to 4 minutes more and serve.
  6. Be sure to have grated cheese available for you and your dinner companions.

Variations

I’ve seen recipes for passatini that include ground meat and even bone marrow, although I’ve never tasted them prepared in that way. I like my worms just the way they are.

*     *     *