Porcini Mushroom, Leek, and Goat Cheese Ravioli Filling

Last week I demonstrated how easy it is to make ravioli, tortelloni, and manicotti using wonton wrappers. Now that you know what to do with the wrappers, today I’ll show you how to make a filling.

Given the stated purpose of these two posts, it wouldn’t make much sense to use a filling that was overly complicated to prepare or that required a dozen ingredients. Using only dried porcini mushrooms, leeks, garlic, and goat cheese, this filling could not be easier to make and yet packs a great deal of flavor into each pasta. With the longest step in the process being the wait for the mushroom-leek mixture to cool after being sautéed, you can easily make enough wonton wrapper ravioli in an afternoon for that evening’s dinner. Yes, you can do this.

Thursday I’ll be leaving for Michigan, where the Dial-Up Modem is King. As a result, the Kitchens must close temporarily and there can be no post next Wednesday. My next entry is scheduled for Wednesday, June 5th.

*     *     *

Porcini Mushroom, Leek, & Goat Cheese Ravioli Filling Recipe

Ingredients

  • 1 tbsp olive oil
  • 1 tbsp butter
  • .7 oz (20 g) dried porcini mushrooms
  • 3 oz (85 g) leeks, chopped fine
  • 1 garlic clove, minced or grated
  • 10.5 oz (298 g) goat cheese
  • 1/2 tsp kosher salt
  • 1/8 tsp white pepper

*     *     *

*     *     *

Directions

  1. Bring 2 cups of water to boil, remove from heat, and add mushrooms. Allow mushrooms to soak for at least 20 minutes. Remove mushrooms to paper towels, being careful not to disturb sediments in liquid. (Reserve mushroom liquid. See Notes.) Use another paper towel to blot the mushrooms dry before chopping them to a small dice. Put aside.
  2. Heat olive oil and butter over med-high heat. Add leeks and mushrooms, lower heat to medium, and sauté until mixture just begins to change color — about 6 or 7 minutes.
  3. Add garlic, salt, and pepper, and continue to sauté until liquids are gone. Do not allow to burn.
  4. Remove from heat and allow to cool fully before proceeding.
  5. Once cooled, combine mushroom-leek mixture with goat cheese and stir to thoroughly combine.
  6. Filling may now be used to fill you favorite pasta.

*     *     *

Variations

This recipe is not set in stone. Don’t have any leeks? Use half the amount listed in sweet onions. Don’t like goat cheese? Use ricotta. No porcini? Use 3 to 4 oz (85 to 113 g) fresh crimini mushrooms. Don’t like this filling at all? Don’t worry. You may prefer to use either of these 2 fillings: the traditional Bartolini ravioli filling or the Bartolini sausage ravioli filling. Still not quite what you’re looking for? In a few weeks I’ll be posting an asparagus-based filling recipe.

*     *     *

Notes

There’s really no way of determining how much pasta you’ll be able to fill with today’s recipe. That will depend upon the type and size of the pasta you wish to make. Because of this, I wouldn’t invite 10 guests to dinner the first time you make a homemade stuffed pasta, whether or not you use wonton wrappers. Better to wait until your 2nd attempt or at least wait to make your guest list until after the pasta is made.

When making this filling, I allowed the goat cheese to warm a bit so that it would be easier to combine with the other ingredients. Depending upon the pasta to be filled, you may find it easier to chill it again before using it to stuff your pasta.

Do not discard the liquid used to rehydrate the porcini mushrooms. Once the sediments have settled, pour off the liquid, leaving those sediments behind. The liquid can then be stored/frozen for later use in soups, sauces, risotto, or pasta dishes, to name a few.

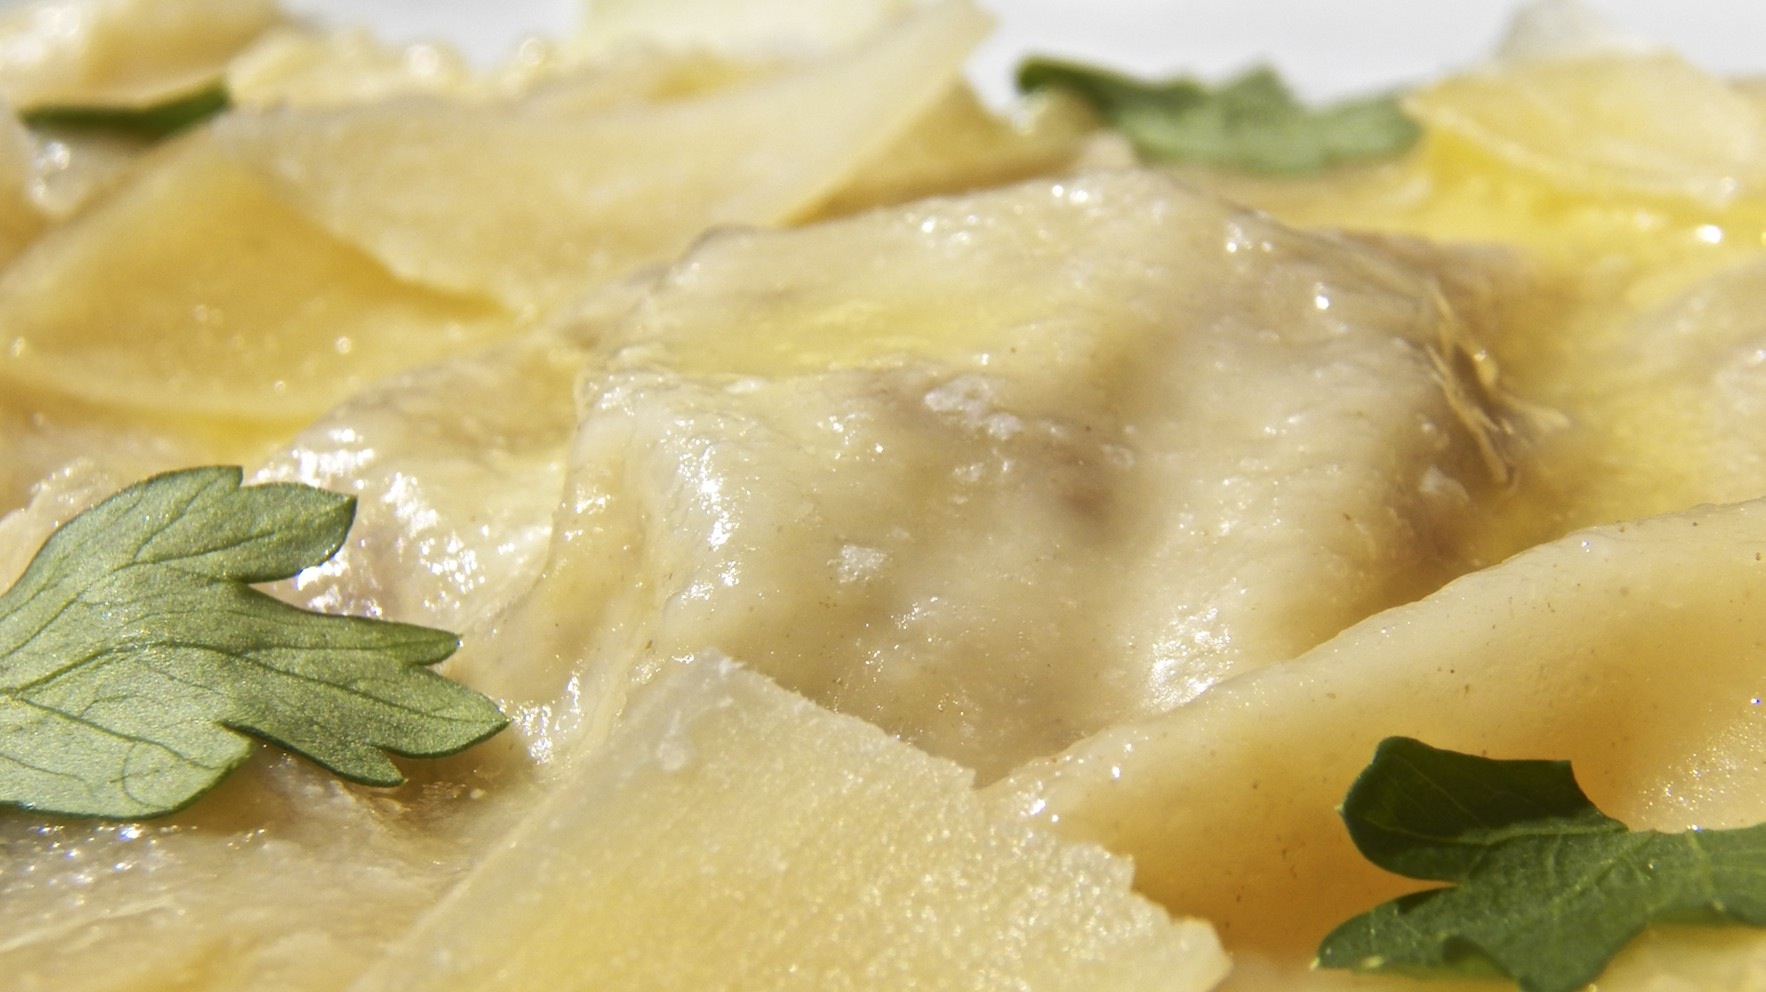
Although you can use any sauce yo wish to dress pasta using this filling, I chose to, again, keep it simple. Once it was cooked and drained, I gently tossed the raviolo in some melted butter and garnished it with flaked Parmesan cheese, as seen in this post’s opening photo.

*     *     *

It’s déjà vu all over again …

BBQ Shrimp

Gamberetti alla Griglia

This weekend is a 3-day weekend and start of the grilling season. I thought it only fitting to feature Grandpa’s Barbecued Shrimp as this week’s blast from the past. Easy to prepare, whether you serve them as a snack, appetizer, or main course, you and your guests will love them. You can learn how Grandpa did it by clicking HERE.

*     *     *

Coming soon to a monitor near you …

Baked Haddock

*     *     *

Where East Meets West: Wonton Wrapper Pastas

Today’s entry is the fulfillment of a promise that I made to Norma in the Comments section of the Bartolini Cannelloni recipe post of last March. (Norma, by the way, is a cookbook author whose wonderful blog, Garden to Wok, is filled with tasty recipes and gardening tips.) She asked if egg roll skins could be used in place of pasta dough to make cannelloni. Well, Norma, it took 2 months and I used wonton wrappers but here’s the promised post.

Back before I started buying ravioli molds but after I learned I was unable to use Mom’s tiny cappelletti mold, I saw someone on a cooking show use wonton wrappers to make ravioli. That’s all I needed to see. Before long I was making ravioli and tortelloni using the wrappers without any problems. In fact, I’d probably still be using wrappers if I hadn’t seen another TV cook use a large ravioli mold one day. Soon I was making ravioli and cappelletti of all sizes and I never bought another wonton wrapper.

When I’ve shared our ravioli recipes, some have mentioned that the process seemed difficult and time-consuming. Using wonton wrappers eliminates one of the more difficult elements, that of making and rolling out the pasta dough. With that out-of-the-way, the rest of the process is a snap and this post will show you just how easy it is to use wonton wrappers to make stuffed pasta. Along the way, we’ll make round ravioli, manicotti, square ravioli, and tortelloni, all of which are pictured in the unfortunate photo above. It’s a long post but the method for preparing each pasta will “stand on its own” so that you need only reference the section(s) that interest you.

*     *     *

How to make Jumbo Ravioli (Ravioloni)

  1. Place one wonton wrapper on a floured work surface.
  2. Place about a tbsp of filling in the center of the wrapper.
  3. Use your fingers or a brush to moisten the 4 edges on the wrapper.
  4. Place another wrapper on top.
  5. Use your fingers to remove as much air as possible while pressing to seal the edges.
  6. Use a pastry wheel or sharp knife to trim uneven edges.
  7. Use a fork’s tines to press and further seal the 2 wrappers.
  8. Reserve on a lined baking sheet for later cooking or freezing.

*     *     *

This slideshow requires JavaScript.

These ravioli are about 3.25 inches (8.9 cm) square, after trimming. Remember that when cooked, they will expand a bit more.

*     *     *

How to make Ravioli

  1. Place one wonton wrapper on a floured work surface.
  2. Use a pastry wheel or sharp knife to cut the wrapper in half.
  3. Place about a tsp of filling in the bottom half of each part.
  4. Use your fingers or a brush to moisten the top half of each part.
  5. Fold the top half and cover the bottom half of each.
  6. Use your fingers to remove as much air as possible while pressing to seal the edges.
  7. Use a fork’s tines to press and further seal the 2 ravioli.
  8. Reserve on a lined baking sheet for later cooking or freezing.

*     *     *

This slideshow requires JavaScript.

These ravioli are about 1.6 inches (4.0 cm) square.

*     *     *

How to make Large Round Ravioli

  1. Place one wonton wrapper on a floured work surface.
  2. Place about 2 tsp of filling in the center of the wrapper.
  3. Use your fingers or a brush to moisten the wrapper area around the filling.
  4. Place another wrapper on top.
  5. Use your fingers to remove as much air as possible while pressing to seal the edges.
  6. Carefully place a large biscuit cutter over the covered filling. Make sure that the cutter surrounds the filling without touching it.
  7. Press down on the biscuit cutter hard enough to sever the wrappers.
  8. Remove excess wrapper from around the cutter.
  9. Remove the raviolo from the cutter and reserve on a lined baking sheet for later cooking or freezing.

*     *     *

This slideshow requires JavaScript.

These ravioli have a diameter of 2.5 inches (6.4 cm).

To make Small Round Ravioli use a smaller biscuit cutter. Mine was 2 inches (5 cm) in diameter.

*     *     *

How to make Tortelloni

  1. Place one wonton wrapper on a floured work surface.
  2. Use your fingers or a brush to moisten 2 adjoining sides of the wrapper.
  3. Place a little more than a tsp in the corner opposite the moistened sides.
  4. Fold the moistened half of the wrapper to cover the other.
  5. Use your fingers to remove as much air as possible while pressing to seal the edges.
  6. Use a fork’s tines to press and further seal the 2 sides.
    1. At this point, you’ve created a triangular-shaped raviolo. You can stop here or continue and make a tortelloni. 
  7. Use you finger to make an indentation in the center of the triangle’s hypotenuse. (And you once thought you’d never use geometry in real life, didn’t you?) 
  8. Bring the two opposing corners together, moisten one, and press together to seal.
  9. Bend backwards the remaining corner.
  10. Reserve on a lined baking sheet for later cooking or freezing.

*     *     *

This slideshow requires JavaScript.

Although it’s not possible to give the exact size of your tortelloni, it’s safe to assume that these would be too large to be used in soup. Any stuffed pasta used in soup should be bite-sized so that the diner needn’t cut them before eating.

*     *     *

How to make Manicotti/Cannelloni

  1. Place one wonton wrapper on a floured work surface.
  2. Place about 1.5 tbsp of filling along the bottom edge of the wrapper.
  3. Use your fingers or a brush to moisten the opposite or top edge of the wrapper.
  4. Carefully and tightly roll the wrapper and filling towards the moistened edge.
  5. Place the finished manicotto/cannellono, sealed-side down, on a lined baking sheet for later baking or freezing.

*     *     *

This slideshow requires JavaScript.

In my family, cannelloni are meat-filled and manicotti are cheese-filled. These manicotti/cannelloni are about 3.5 inches (8.9 cm) wide, perfect for creating a double row in many baking dishes.

*     *     *

Variations

The size and shape of your pasta is limited only by the size of the wonton wrapper. If you haven’t a biscuit cutter in the size you want, try using a glass or jar to cut your pasta. I’ve never used egg roll wrappers but imagine that the processes would be the same, only much larger. Frankly, I’d never use an entire egg roll wrapper to make a single stuffed pasta. Instead, I’d cut it into halves or quarters before using.

*     *     *

*     *     *

Notes

No matter what size or shape of ravioli that you make, be sure that there is no filling along the edge where the dough is to be sealed. It will only interfere with the seal and the pasta will probably open up during cooking. Equally important is to make sure that the pasta edges being sealed are moistened with water. Mom, Zia, Lidia Bastianich, and Mario Batali all agree: egg or egg wash is never used to seal pasta for it can harden during the cooking process, making the edges of your pasta pillows unpalatable.

As you may have noticed in the photos, I used a cheese-based filling when making each stuffed pasta. The recipe for that filling, porcini mushroom, leek, and goat cheese can be found HERE. If you don’t wish to use that filling, you may prefer to use either of these 2 fillings: the traditional Bartolini ravioli filling or the Bartolini sausage ravioli filling.

At the very beginning of this post I stated that my objective was to show how simple it is to make wonton wrapper pasta. As you’ll see next week, the filling I used here is flavorful yet, also, uncomplicated and easy to prepare. The same holds true for dressing the cooked pasta. Although you can certainly use any sauce you wish to dress your ravioli or tortelloni, you needn’t complicate matters. The large ravioli pictured above were dressed with melted butter and garnished with Parmesan flakes and fresh parsley. You could just as easily use olive oil in place of the butter, and, grated cheese in place of the Parmesan flakes. By keeping it simple I hoped I’ve demonstrated just how easy it is to prepare a homemade stuffed pasta dinner using wonton wrappers. In short, yes, you can do this!

*     *     *

 It’s déjà vu all over again … 

Fazzoletti PastaSince today’s post used square wonton wrappers, I thought I’d stick with the theme and send you back to the post where we made fazzoletti, little handkerchiefs, pasta. Nothing more than pasta squares, these are among the easiest of pastas to make at home. You can see how they’re made simply by clicking HERE.

*     *     *

Coming soon to a monitor near you …

Porcini mushroom, leek, and goat cheese ravioli filling.

*     *     *

Split Pea Soup

With Mother’s Day but a few days away, I’ve read a number of posts featuring recipes for a variety of dishes, running the full gamut from savory to sweet. Not to take anything away from these beautiful posts, but I’ve chosen a different path. You see, so far I’ve shared a number of soup-related posts. Each was often described in terms of its use for members of my family. This soup nursed me back to health, that one nursed Sis; this was our New Year’s Day lunch, these took turns as lunch on cold Winter’s days; and, always, Dad was there to enjoy the salad Mom prepared using the boiled meats, similar to a bollito misto. Notice that Mom was never mentioned, other than as cook for these fantastic dishes. Sure, she enjoyed each soup but none were her favorite. No, Mom’s favorite, not so coincidentally, is today’s featured soup, split pea.

*     *     *

*     *     *

As much as she enjoyed split pea soup, Mom rarely prepared it. If my memory is correct — something that becomes less likely with each passing day — Mom and I were the only ones to like this soup. The rest, at best, endured it. Not only that but we rarely had baked ham for dinner. As I’ve mentioned in previous posts, our holiday meals were pretty much decided and ham just didn’t make the cut. Besides, I don’t think that Dad was at all interested in baked ham, for I cannot remember it ever being served on a Sunday or any other night that Dad was home for dinner. So, with ham being served so rarely, there were no ham leftovers and, consequently, no split pea soup. I know my vegan and vegetarian friends will take issue with what I’m about to write but here it is. You must have ham to make good split pea soup. Mom said so.

Though it’s true that we might not have had it often, Mom and I still did enjoy our split pea soup. She usually served it when it was just the two of us for lunch and it became something of a special treat. Later, after I moved away, whenever I told her that I was going to roast a ham — or had just done so — she would ask if I was going to make split pea soup, asking for each and every detail of the recipe. And more than once I brought a frozen ham bone home to Michigan with me, made a pot of split pea soup, and left it for her, safely stored in her freezer. So, this Sunday, while many will honor their Mom with a homemade breakfast in bed or a fantastic brunch at a favorite restaurant, I’ll remember mine with a bowl of split pea soup for lunch.

*     *     *

Like so many of the recipes I post, today’s is a work in progress. Over the years it has evolved into a two-step process. In the first, a stock is prepared that becomes the base for the second step. It’s not at all complicated but it does take a bit more time than the standard way of preparing split pea soup. I think you’ll find, though, that the additional flavor in the soup is well worth the extra time required.

*     *     *

Split Pea Soup Recipe

Ingredients

For the ham stock

  • 1 ham bone, some meat left on
  • 2 partially cooked, smoked ham hocks
  • 2 onions, quartered
  • 4 carrots, quartered
  • 4 celery stalks leaves attached, quartered
  • parsley stems
  • 2 bay leaves
  • 4 quarts (3.8 l) water

For the split pea soup

  • 2 lb (908 g) dried split peas
  • 3 to 4 quarts (2.85 to 3.8 l) ham stock
  • 3 or 4 carrots, diced or sliced, as preferred
  • 8 oz (227 g) roasted ham, cubed — more or less, to taste
  • ham removed from bone, trimmed & chopped
  • meat from ham hocks, trimmed & chopped
  • salt & pepper, to taste
  • croutons for serving (see Notes)

Directions

  1. For the stock
    1. Put all the stock’s ingredients into a large, heavy bottomed pot, bring to a boil, and then reduce to a low simmer.
    2. Continue simmer for 2 hours, skimming surface foam occasionally, as needed.
    3. After 2 hours, remove meat from pot and reserve. Pour stock through a fine mesh sieve to remove remaining vegetables and other bits, resulting in a clean stock. Reserve.
    4. When cool enough to handle, trim the meat from the bones and chop into bite-sized pieces. Cover and reserve.
  2. For the soup:
    1. Add all the soup’s ingredients to a slow cooker. If you did not create enough stock in the previous step, add water to augment.
    2. Set on “low” and cook for 8 hours or set on “high” and cook for 4 hours.
    3. Check for seasoning and serve garnished with croutons. (See Notes.)

*     *     *

*     *     *

Variations

This can just as easily be made on the stove top as it can in a slow cooker. Create the stock as indicated and place all the ingredients into a stock pot rather than a slow cooker. Bring to a boil over a med-high heat and then reduce to a soft simmer. Soup will be ready once the peas are soft and the carrots cooked, about 30 to 45 minutes.

If you want the smokey flavor but not the pork, try using a bit of smoked turkey instead of the ham hocks.

 *     *     *

Notes

From what I’ve seen, split peas are sold in 1 lb. (454 g) packages. When I made today’s soup, I made a “double batch” that resulted in a little over 4 quarts (3.8l) of soup.  I wanted some for my dinner, to be sure, but also some for the freezer. As you may have already gathered, a bowl of split pea soup makes a fantastic lunch. Still, you can easily halve the recipe, if you like.

You’ll note that I do not use salt and pepper until the very end. There’s no way to estimate the amount of salt in the ham or hocks. Wait until the end of the cooking process, give a taste, and then add whatever you feel is needed.

To make croutons:

  • Heat equal amounts of olive oil and butter in a frying pan over medium heat.
  • Add 1 smashed clove of garlic and sauté.
  • Meanwhile, cube a few slices of thickly sliced bread.
  • When oil is hot and garlic fragrant, place bread cubes in the pan and toast, turning frequently.
  • When browned to your satisfaction, remove to paper towels, and reserve.

*     *     *

It’s déjà vu all over again … 

Pasta al Salmone

Pasta al Salmone

When I travel to Italy, there are 2 dishes that I request every time and very often more than once: pasta with clams and pasta with salmon. The first is a dish I’ve made for some time using a family recipe, while a recipe for the latter eluded me for years. You can well imagine my excitement when I finally stumbled upon the secret to this fantastic dish. Click HERE to see this secret revealed.

*     *     *

Coming soon to a monitor near you … 

Wonton wrapper pastas

*     *     *

You Say Frittatas and I Say Frittate

For a time, I was Mom’s Chief Cook & Bottle Washer. Living just next door, Zia possessed a standing invitation, so, it was 3 for dinner most nights. Now, I may be able to cook a nice dinner, as surely we all can, but what I cannot do is estimate portion size. One of my dinners could just as easily feed 6 as it would 2 or 3. It’s not a problem here at home for I don’t mind eating leftovers at all. If I make enough for 6 servings, I’ll eat all of them over the course of the next few days and not think twice about it. I really couldn’t do that when cooking for Mom and Zia, however, and as a result, after a few days her fridge was brimming with leftovers. And if you think I could waste food in that kitchen, well, as Mom would say, “You’ve got another thing comin’!” Enter the frittata.

*     *     *

*     *     *

A frittata is an egg-based dish, the ingredients of which are only limited by one’s imagination. I assume there are probably thousands of recipes for frittate on the web, though I’ve yet to search for one. When I was a boy, Mom often used her leftover caponata to make me a frittata for lunch on Fridays. Once I was on my own, I continued to make them for I found them easier to make than a fancy folded-over omelet but still better looking than a mish-mash of eggs scrambled with a bunch of ingredients. 

So, with a fridge full of leftovers, deciding to make a frittata back then was a no-brainer. In recent weeks, I found myself in the same predicament, having roasted a ham for Easter and then, unfortunately, having to prepare pasta with burrata a few times due to camera difficulties. (That’s my story and I’m sticking to it.) As much as I enjoy ham sandwiches and as frequently as I reheat pasta, I needed a change and again I turned to frittate.

There are a few things common to any frittata that I’ve ever made. There are eggs, of course, and there’s always some form of starch, be that either pasta or potatoes. Onions, mushrooms, tomatoes, and virtually any other vegetable, both raw and previously cooked, could find their way into the skillet. I almost always add grated cheese of some sort and meat is often included, as well. Once everything is in the skillet and the eggs begin to set, the pan and its contents are placed in a pre-heated oven where the frittata bakes until ready. It’s removed from the oven, flipped onto a serving platter, garnished, and served with a piece of bread and soup or salad.

For the frittate presented here, I used an 8 inch cast iron skillet. For a pan this size, I probably should have used 9 eggs, rather than 6, and the dish would have raised a bit more. Cooking for myself, though, I felt 6 eggs to be enough. As I mentioned, I normally add fresh tomatoes but, this time of year, flavorful fresh tomatoes are almost impossible to find. I skipped them but, in the past, I’ve used sun-dried tomatoes instead. Lastly, very often frittate are finished off under the broiler. Although I’ve prepared them that way, I’ve also forgotten about them in there and pulled out something that had more in common with a roasted marshmallow than a frittata. For me, the oven is a safer bet but the broiler is still an option for you folks with any kind of short-term memory. Just cook the frittata atop the stove a few minutes longer and — here’s the tricky part — check on it frequently once it has been under the broiler for 5 minutes.

*     *     *

You say potatoes and I say patate.

*     *     *

Frittata with Pasta, Broccolini, and Smoked Mozzarella Recipe

Pre-heat your oven to 375˚ F (190˚ C). Into a hot skillet over med-high heat, place a few tablespoons of the cooking fat of your choice. I used bacon fat. Once hot, add some chopped onion, sliced mushroom, and chopped raw broccolini stems. Season lightly with salt and pepper and sauté until the onions are translucent, the mushrooms have a little color, and the broccolini stems are soft. Add the broccolini florets and continue to sauté for another 3 or 4 minutes. Add the pasta, mix well, and sauté until heated through. Add a bit more oil if needed. Meanwhile, crack the eggs in a large bowl, and whisk. Add a few ounces of grated cheese — I used smoked mozzarella — and mix well. Once the pasta is heated, pour the egg and cheese mixture into the pan and, working quickly, use a flat spoon to make sure it’s evenly distributed. Lower the heat to medium and cook until eggs just begin to set. Remove from the stove top and place in the middle of the pre-heated oven. Frittata is ready when all traces of raw egg are gone from the now-coloring surface — usually about 20 minutes but begin checking at 15. Remove from oven, cover with a platter larger than the pan’s circumference, and quickly turn the skillet’s contents onto the platter. Garnish with more grated cheese and serve.

*     *     *

Serve immediately
*     *     *

Frittatas, frittate … 

*     *     *

Frittata with Ham, Potatoes, Asparagus, and Swiss Cheese Recipe

Pre-heat your oven to 375˚ F (190˚ C). Into a hot skillet over med-high heat, place a few tablespoons of the cooking fat of your choice. I used bacon fat but you can use vegetable oil, olive oil, or butter, if you like. Once hot, add some chopped onion and sauté briefly before adding 1 raw potato cut into a 1/2 inch (1.3 cm) dice. Season lightly with salt and pepper. Once the potato is just about fully cooked, add the cubed, cooked ham. Once heated through, add the chopped asparagus spears. Meanwhile, add the eggs into a large bowl and whisk. To that bowl, add a few ounces of grated cheese — I used Swiss — and mix well. When the asparagus is cooked al dente, add the egg and cheese into the pan and, working quickly, use a flat spoon to evenly distribute the mixture across the pan. Lower the heat to medium and cook until eggs just begin to set. Remove from the stove top and place in the middle of the pre-heated oven. Frittata is ready when all traces of raw egg are gone from the now-coloring surface — usually about 20 minutes but begin checking at 15. Remove from oven, cover with a platter larger than the pan’s circumference, and quickly turn the skillet’s contents onto the platter. Garnish with more grated cheese and serve.

*     *     *

*     *     *

Serve immediately

*     *     *

Potatoes, patate.

*     *     *

Variations   

As I mentioned, everything about a frittata is subject to change, so, the variations are unlimited. In that case, the only variation worthy of mention is whether of not to flip your frittata onto a serving platter. Now, if you’re leery, you can increase the odds of a good outcome by running a knife along the frittata’s edge, separating it from the pan, before the flip. After that, you’re on your own. Honestly? Both frittate photographed here flipped flawlessly. Had there been my friends or family seated at the table, I can guarantee that a good portion of the frittata would have remained in the pan as if held by Super Glue — but that’s why they’re seated at the table. Whether the bruschette are aflame, Max couldn’t wait for leftovers, or the frittate won’t flip, we’re still going to have an enjoyable evening.

*     *     *

Notes

Always add firm, raw vegetables to the skillet first. Once partially cooked, add the more fragile raw and/or pre-cooked/leftover vegetables. If using leftover pasta, it should be the last thing added before the egg and cheese mixture hits the skillet.

Season lightly with salt & pepper, keeping in mind that some of the ingredients may be (heavily) salted already. Beware of salty cheeses.

*     *     *

 It’s déjà vu all over again … 

The signs of Spring’ are all around us. There are Spring lambs in the fields, crocuses have given way to daffodils in many gardens, and local-grown asparagus are beginning to flood the markets. For the Bartolini, Spring also means it’s dandelion season and Dad, even though not a Bartolini, enjoyed them every bit as much. Now, I could go on but that might spoil the story.  Click HERE to learn a bit about Dad and his love of dandelion salad.

*     *     *

Coming soon to a monitor near you …

Split Pea Soup

*     *     *

Let’s call the whole thing off.

*     *     *