Mom’s Strawberry-Banana Pie

Strawberry Pie 1

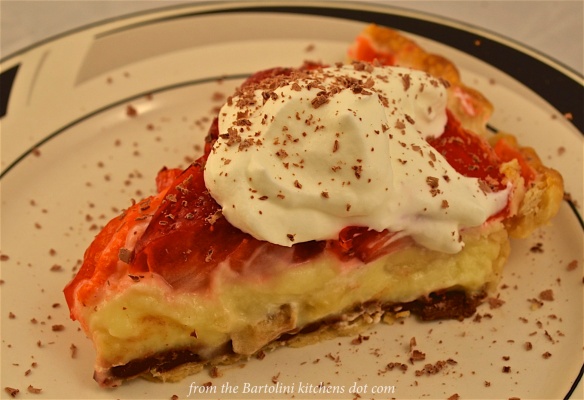
I really cannot explain why this recipe was overlooked for so long. Granted, it wasn’t one that Mom prepared frequently — we were a strawberry shortcake family — but she did make this pie at least once a year. And how I loved it! I was walking around the farmers market, looking at all the fresh strawberries, when I remembered this treat. After buying a quart of strawberries, I rushed home, stopping along the way at a grocery to buy the rest of the ingredients. It wasn’t very much later that I had a strawberry-banana pie chilling in my fridge. A few weeks more and I prepared another while visiting Zia. Now, several months later and with my birthday looming in the near future (it’s Sunday, you know), I thought this the perfect time to share the recipe for Mom’s strawberry banana pie — and my personal favorite. Happy birthday to me!

The recipe I’m sharing is memory-based, for there is nothing written to follow. As you’ll soon see, however, the recipe is easy enough to reconstruct, although I did make a couple of changes. In the first place, I believe Mom used a pudding mix — sometimes vanilla, other times banana — and I do not recall her make pudding from scratch for this pie. The recipe I initially followed was printed in the recipe book that came with my first microwave, bought after I moved to Chicago in 1980. Never throw away a cookbook.

Then again, there are times when maybe you should toss a cookbook. When I prepared its vanilla pudding recipe, it was far too thick and not nearly as creamy as remembered and, therefore, not worthy of Mom’s pie. So, I made a couple of adjustments. I cut the amount of cornstarch, used 3 egg yolks instead of 2 whole eggs, and used less vanilla. The result was a pudding fit for Mom’s pie, just thick enough not to be runny yet creamy enough to wash over your palate. I, like the pudding, was all set.

I could not recall what, if any, glaze Mom used with the strawberry topping. I chose strawberry flavored gelatin, thinking it would both set the berries in place and prolong their shelf life. I did consider making the pie without the strawberry topping, using fresh berries to garnish each piece when served. If you prefer to do that, you should cover the pie with plastic wrap to prevent a film forming on the pudding.

It’s my idea to add a thin coating of chocolate to the pie crust. Living alone, my pie will not “disappear” as quickly as Mom’s did. The chocolate coating will prevent the pie crust from getting soggy as the pie sits. (I can say, with some certainty, that from my earliest days I have never liked a soggy bottom.)

*     *     *

Strawberrhy Banana Pie

Dessert at Zia’s

*     *     *

Strawberry-Banana Pie Recipe

Ingredients

for the pie

  • 1 pastry crust large enough to cover a deep, 9″ (23 cm) pie dish – store-bought may be substituted
  • ⅓ cup semi-sweet chocolate chips
  • 2 tbsp whole milk
  • 1 banana, sliced
  • vanilla pudding, recipe follows
  • 12 oz (340 g) fresh strawberries, cleaned, hulled, and halved or sliced
  • strawberry flavored gelatin, instructions follow
  • whipping cream for serving
  • shaved chocolate for garnish (optional)

for the vanilla pudding

  • ⅔ cup sugar
  • 3 tbsp cornstarch
  • ¼ tsp salt
  • 2 cups whole milk
  • 3 egg yolks, slightly beaten
  • 2 tbsp butter
  • 1 tsp vanilla

*     *     *

This slideshow requires JavaScript.

*     *     *

Directions

to prepare the vanilla pudding

  1. Whisk together the sugar, cornstarch, and salt before adding ½ cup of milk. Continue whisking until fully combined.
  2. Add remaining milk and microwave on high for 5 or 6 minutes, stirring occasionally. Pudding should be smooth and thick.
  3. Temper the eggs by adding a few ounces of the hot liquid to the eggs, stirring all the while. Begin stirring the hot liquid as you add the egg mixture to it.
  4. Microwave on high until the pudding just begins to boil, about 1 minute.
  5. Add the butter and vanilla to the pudding, stir well, cover with plastic wrap (see Notes), and set aside to cool.

to prepare the pie crust

  1. Pre-heat oven to 450˚ F (230˚ C).
  2. Use whatever type of pasty crust that you prefer — homemade or store-bought — and use it to cover a deep, 9 inch (23 cm) pie plate/pan.
  3. Use a fork to puncture the pie crust before baking for 10 to 12 minutes in the pre-heated oven. Crust should be golden brown. Remove to cool.
  4. Once the crust has cooled somewhat, melt the chocolate chips and warm the milk.
  5. Add the milk to the melted chocolate and whisk to create a ganache (see Notes.)
  6. Use a pastry brush to lightly coat the bottom of the pie crust with the melted chocolate.

to prepare the gelatin

  1. Follow the package directions to quickly prepare the gelatin using both boiling water and ice cubes.
  2. Once the gelatin is dissolved and the ice cubes have melted, add the halved/sliced strawberries and gently stir.
  3. Refrigerate for 30 minutes.

to assemble the pie

  1. Once the pie crust has set and the chocolate coating hardened, coat the chocolate with a bit of pudding.
  2. Evenly space the sliced bananas across the pie’s bottom.
  3. Use as much pudding as is necessary to coat the sliced bananas. Be sure to leave room on top of the pudding for the strawberries. Use an offset spatula to even the top of the pudding.
  4. Use a slotted spoon to place the strawberries atop the pudding. Carefully pour the gelatin to cover the pudding and coat the strawberries.
    • Place excess gelatin and strawberries into serving bowls. Once set they may be served to those poor unfortunates who do not like pie.
  5. Refrigerate at least 2 hours to let the pie fully set. The longer the better.
  6. Serve garnished with freshly whipped cream and shaved chocolate (optional).

*     *     *

Strawberry Banana Pie 6

*     *     *

Notes

You can make this pie any number of ways, from the very simple — use store-bought pastry and instant pudding mix — to the more involved — make your own pastry, pudding, and strawberry glaze. No matter how you choose to prepare it, you’ll find this pie makes a fine dessert.

I bet that a few of you gasped and clutched your pearls when you read that I had prepared the pudding in the microwave. Release the pearls! Martha Stewart’s vanilla pudding recipe is a good one and is prepared in a more traditional way.

Whatever type of pudding you prepare, be sure it is on the firm side so that the pie doesn’t collapse as the runny pudding fills the empty place left when you serve a piece of the pie.

Although I like the chocolate coating for the pie’s crust, you’ll create new problems if the chocolate is rock-hard when solid. Remember you’ll have to cut through it to serve the pie. Use enough milk to make a ganache that will stiffen without getting too hard. Either that or make the chocolate coating as thin as possible.

*     *     *

It’s déjà vu all over again …

Blueberry-Lemon Slice copy

Since today’s recipe was a dessert, why not end this post with another? This Blueberry-Lemon Slice is the perfect combination of tart and sweet and not at all difficult to prepare. It’s also a tasty way to use some of those blueberries if, like me, you freeze a couple quarts every summer. You will see the recipe when you click HERE.

*     *     *

Coming soon to a monitor near you …

Zucchini Pesto Pasta Preview

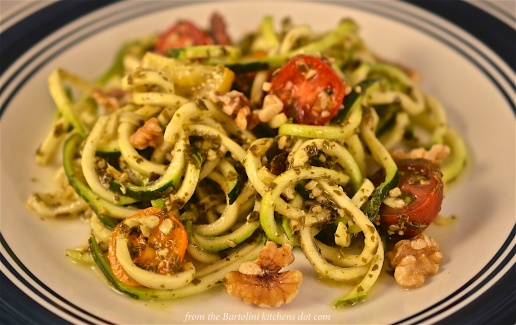
Zucchini “Noodles” with Walnut Pesto

*     *     *

Advertisement

A Blogger’s Relaxing Day Leads To A Jam-Filled One For Me

You may recall, two weeks ago my mascarpone post contained three recipes, one of which paired strawberries with balsamic vinegar. What some of you may not know is that the day before, my blogging buddy, Sarah, whose blog Sarah’s Place, is one worth checking out, had a “relaxing” day that included starting and making a great deal of progress on a knitting project; preparing strawberry balsamic and black pepper jam from a recipe that she found on another worthwhile blog, Sydney’s Kitchen; and baking a rosemary-herbed focaccia studded with cherries. Did you notice the part about the jam? It sure did catch my eye, particularly arriving when it did, just before my own post featuring those same flavors. Suddenly, I was thinking about making jam.

Well, coincidentally, that Friday, a 2nd blogging friend, Michael, whose blog Oishi is another that I enjoy, posted a salad recipe featuring — you guessed it — strawberries with balsamic … and this time bleu cheese, too. It was then that I decided to make jam and, as I wrote to Michael, I would buy enough berries to make his salad, too. The very next morning at the Evanston farmers market, once Max had his much-anticipated rendezvous with Debra, the crossing guard, I found myself standing before 3 long tables covered with quarts of Michigan strawberries, over which hung a giant sign, “Last Chance.” Whatever doubts I may have had were quickly vanquished. I bought 3 quarts and moved on to the Egg Ladies’ stall.

Once home, I began to have second thoughts. No, not about making the jam; that and the salad were “done deals.” It was the timing. The forecast was for another day with a high well into the 90’s, hardly jam-making weather. So, remembering a link I found on Pinterest, I soaked my berries in a 10% vinegar solution for 10 minutes, to prevent mold, and refrigerated the red beauties. One would think that this would be where this tale ends. Yes, one would think …

Crostini of Goat Cheese with Strawberry Balsamic & Black Pepper Jam

You see, the original recipe would make only 1 jar of jam and it wasn’t processed, meaning it had to be refrigerated and used within 3 to 4 weeks. Well, I need to make enough jam to give jars to an entire team of tasters, as well as my Zia, and this recipe just wouldn’t do. So, I went looking for a canning recipe that remained true to the original, while making enough for each of my devoted tasters. Luckily, I found two. The first recipe, from Canadian Living Magazine, gave me canning instructions but the amount of balsamic required was quite a bit less than the amount used in the original. Not being an experienced canner, I didn’t know whether increasing the amount of balsamic would ruin the “set” of my jam. I had no choice, therefore, but to look for another recipe — and I and found one on Epicurious.com. With a balsamic amount proportional to that used in the original, a couple of commenters stated that they canned it without any problem. Eureka! Now armed with this new-found knowledge, I braved the heat and set pots of water to boil, as I cleaned and hulled my strawberries. So, to be fair, I’ll credit Sarah’s Place, Sydney’s Kitchen, Epicurious.com, and Canada for the inspiration for today’s recipe.

 *     *     *

Strawberry Balsamic Vinegar and Black Pepper Jam Recipe 

yield: approx 8 cups

Ingredients

  • 6 cups fresh strawberries, cleaned, hulled, quartered (approx. 2 quarts, whole)
  • 4½ cups sugar – separated
  • 1 envelope (49 g) low-sugar pectin
  • 1 tsp butter (optional)
  • pinch of salt
  • ½ cup + 1 tbsp balsamic vinegar
  • 1 tbsp cracked black pepper

Directions

To Prepare

  1. Sterilize the jars and wash the jar lids and rings in hot, soapy water. Place lids and rings in a deep bowl and pour near-boiling water over them.
  2. Start bringing to boil a large, deep canning kettle of water to be used for the canning process and a second, smaller pot of water to be used to replenish water that may boil away during the canning process.
  3. Mix the pectin with ¼ cup of the sugar. Set aside.
  4. Working in batches, add sliced berries into a large bowl and use a potato masher to smash them. Continue until all are equally smooshed.

To Make the Jam

Thanks, Sarah!

  1. Place the strawberries and the pectin-sugar mixture into a heavy-bottomed pot over a med-high heat. A Dutch oven works nicely. Add butter, if desired, to limit foam.
  2. Stirring frequently, you are heating the berries until a rolling boil is achieved at about 220˚F. A rolling boil is one that will not dissipate when the pot’s contents are stirred.
  3. Add the remaining sugar and stir well. Stir frequently while you wait for the pot to return to a roiling boil.
  4. Once a rolling boil has returned, keep stirring for exactly one minute before removing the pot from the heat.
  5. With a large spoon, carefully skim the surface to remove any foam.
  6. Add balsamic vinegar and pepper. Stir well to thoroughly combine.

To Can

  1. Using a funnel and large ladle, fill each jar to ¼ inch from the rim. Wipe the rim to make sure no jam has spilt, place a lid on each jar, and then the ring, tightening until “finger tight” but not as tight as you can make it. Act quickly, filling and capping all the jars.
  2. Jars placed directly on the kettle’s bottom might burst, so, a rack of some sort must be put into the canning kettle to cover the bottom. Many large pots have one, as do many pressure cookers. (I use a rack from an old pot that has long since been discarded.)
  3. Keep each jar level as you place them, one by one, into the canning kettle filled with now boiling water. The jars should not touch each other, nor should they be allowed to tip over. Depending upon the size of the kettle and number of jars, you may need to work in batches.
  4. Once the jars are in the kettle, make sure that there is at least one inch of water over the top of the tallest jar(s). If not, add boiling water from the smaller pot mentioned in Step 2 of  To Prepare.
  5. Cover the pot and begin timing when the water returns to the boil. The jars must be boiled, “processed”, for 10 minutes.
  6. Meanwhile, place a baking sheet on a level surface and line it with a clean kitchen towel.
  7. Once 10 minutes have passed, carefully remove each jar and place it on to the towel-lined baking sheet. Leave about an inch separating the jars.
  8. Once all the jars have been processed and placed on the baking sheet, remove the baking sheet & jars to a place that is draft-free and where they will remain undisturbed for 24 hours.
  9. After 24 hours have passed, check each jar to insure it’s sealed and then store on a shelf in a cool, dark place, where it will stay fresh for months.

Notes

According to several commenters on the Epicurious website, once canned, it is best to let the jam sit for a week before sampling it. The flavors blend and the pepper becomes more pronounced.

Once opened, the jam should be refrigerated and fully used within a month.

One last thing

I did make Michael’s salad and it was every bit as good as I had hoped.

*     *     *

By any other name … 

“Elizabeth Taylor”

*     *     *

The Kitchens’ Strawberries be Jammin!

I know, I know. I do not can. The threat of giving my friends & loved ones the gift of botulism has pretty much kept me away from this age-old method of food preservation. Not only that, I’ve no room for the canning gear nor for the canned goods.  So, why then am I suddenly canning?

To begin with, last week’s canning experiment with cherry jam went very well. It jelled properly and the jars all sealed without using a water bath. Those who have tasted it liked it, and, most importantly, survived. Family, friends, and a few fellow bloggers were all quite positive, some even encouraging me to continue canning. One friend was particularly enthusiastic, although methinks the promise of freshly made grape jelly may have been the cause. You see, I had confided to him that I wanted to make grape jelly but that Concord grapes weren’t easy to come by. This isn’t exactly Napa Valley. I told him I would be going to the farmers’ market this morning to find grapes and, if all else failed, I might try canning some Michigan strawberries, if they were still available. What he didn’t know was that I had found Mom’s strawberry jam recipe in the recipe book she had given me years ago. All thus time I had ignored it because, as we all know, I do not can. Well, with no grapes to be found anywhere at the market, I bought 3 containers (pints?) of strawberries. I followed Mom’s recipe, with 1 exception. Remembering David Lebovitz’s recommendation of using lemon rind as well as lemon juice, I added the zest of 1 lemon to the fruit and sugar. Beyond that and as Mom had suggested, I used a potato masher to crush the hulled berries, which yielded a little more than 4 cups of smashed fruit. The fact that there was no need for store-bought pectin was a big plus; I didn’t have any. From there, the rest of the recipe is easy enough that I had no problems following it. An experienced canner and jammer should be able to do this in her/his sleep.

*     *     *

*     *     *

Mom’s Strawberry Jam Recipe        

Ingredients

  • 2 pounds fresh strawberries, hulled (4 cups smashed)
  • 4 cups sugar
  • 1/4 cup lemon juice
  • zest of 1 lemon

Directions

  1. In a heavy bottomed saucepan, mix together the strawberries, sugar, lemon and lemon juice & zest. Stir over low heat until the sugar is dissolved. Increase heat to high, and bring the mixture to a full rolling boil.
  2. Boil, stirring often, until the mixture reaches 220 degrees F (105 degrees C).
  3. Transfer to hot sterile jars, leaving 1/4 to 1/2 inch head space, and seal.
  4. Process in a water bath, allow to sit in boiling water for 10 minutes.
  5. After 10 minutes, carefully remove jars from boiling water and place on rack covered with a towel to prevent jars from shattering due to quick temperature change.
  6. Leave, untouched, for 12 to 24 hours to insure proper sealing.
  7. Store in cool, dark place for up to 1 year.
  8. If the jam is going to be eaten right away, don’t bother with processing and just refrigerate.

*     *     *


*     *     *

Notes

If unsure whether the jam will jell properly, you can test it. Just before you start preparing the strawberries, place a plate in your freezer. After your jam has reached 220*, take about 1/4 tsp of the hot jam, place it on the chilled dish, and return both to the freezer. After a couple of minutes, use your finger to “push” through the jam on the plate. If the jam wrinkles before your finger and does not flow to refill the path your finger took, the jam is ready to be placed in jars.

Oh! All evidence to the contrary notwithstanding, I do not can.

*     *     *

Strawberry Risotto

Strawberry risotto. What a concept! I first learned of the dish during a trip through Italy with my trusty Traveling Companion and a mutual friend. The three of us were staying in Rome and used a tour book to select a restaurant, La Maschera (The Mask), near Rome’s Campo de’ Fiori. For her primo piatto, my friend ordered strawberry risotto. She absolutely loved the dish, as did I when offered a taste. Fast forward a few years, Zia and I are in Rome. Eager to give her this tasty treat, we hopped in a cab and went to La Maschera — which was closed and seemingly had been for quite some time. (Let that be a lesson for you: when returning to a vacation spot, open the purse strings and buy a new tour book.) Although we had a lovely dinner nearby, there was no strawberry risotto on the menu and the dish “fell off my radar.” Then, during a sleepless night, I started looking at recipes for strawberry risotto on the web. Pretty much all that I came across shared the same ingredient list as “regular” risotto, save the strawberries, of course. I decided to give it a try and started by making my family’s risotto, substituting strawberries for mushrooms. Next to go were the garlic, cheese, and cream and eventually I settled upon the recipe I’m posting here.

First, before sharing the recipe, I think a few things need to be mentioned. This recipe requires that the rice be soaked before cooking. Anyone who has ever made risotto will tell you that this isn’t exactly normal. When I spoke with Zia about writing this recipe, she mentioned that when she was a girl, a family friend, Ida, taught her how to cook risotto and that she always pre-soaked the rice. So, my use of that technique here is something of a salute to Ida. (She, also, insisted that Zia use only Uncle Ben’s when making risotto but that’s where I draw the line. My salute will go no further than pre-soaked arborio rice.) I then experimented with the strawberries. In the beginning, I just couldn’t seem to get a strong enough strawberry flavor. Putting the berries in early only served to have them almost totally disintegrate during the cooking process. I want strawberry pieces in my risotto. Putting them in late resulted in risotto with strawberries in it, almost like breakfast cereal. I want to taste strawberry in every bite. Zia’s memories of Ida’s soaked rice were an inspiration. By soaking the berries in the wine, the strawberry flavor infuses the wine and, as a result, is more readily dispersed throughout the dish. Success! As for which wine to use, I only use white wine in this dish and avoid the sweet varieties, preferring instead a white that is on the dry side. Use a wine that you’d serve to accompany this risotto and you won’t go wrong. Lastly, do not use either cream or cheese with this dish; both will only mask the strawberry’s flavor and aroma.

*     *     *

*     *     *

Strawberry Risotto Recipe

total time: approx.  1 hour (includes 30 minute “soak”)

yield: approx.  3 cups

Ingredients

  • 3 cups chicken stock, divided, (for a meat-free diet, vegetable stock may be substituted)
  • 2 tbsp butter
  • 1 small onion, finely chopped
  • 2 cups fresh strawberries, hulled and puréed or chopped as finely as you prefer
  • 1 cup arborio rice
  • 1/2 cup white wine
  • salt & pepper, to taste
  • 1 strawberry per plate, sliced, for garnish

Directions

  1. Soak strawberries in white wine and soak rice in 1 cup of stock for 30 minutes before you start cooking.
  2. Heat remaining stock in a sauce pan. Adjust heat to keep it hot but not boiling.
  3. Add butter to a medium sauce pan over medium heat. Add onion, season lightly with salt & pepper, and sauté until translucent, about 5 – 8 minutes.
  4. Add rice, stir, and cook until all the liquid is just about gone. Add another ladle of stock and continue to stir.
  5. Repeat the process, adding stock by the ladle, stirring constantly until the liquid is almost gone, and adding another ladle of stock, for no less than 10 minutes.
  6. Add the strawberries and wine and continue stirring. When the wine has been absorbed, add a ladle of stock.  Continue stirring and adding ladles of stock for another 10 minutes or until rice is cooked to you liking.
  7. Season with salt & pepper, stir well, and serve garnished with sliced strawberries.

*     *     *

Variations

Choosing not to use cream or cheese pretty much limits the possible variations for the dish. You can, however, use champagne in place of the white wine if you’re feeling relatively fancy schmancy that day/evening.

Notes

Even though this risotto begins with the unorthodox step of pre-soaking the rice, the other “risotto rules” still apply. That is to say, cook atop no more than medium heat, keep the stock hot, and stir the rice constantly.

*     *     *