Bartolini Sausage

Laws are like sausages,” wrote Bismarck. “It’s better not to see them being made.” Well, I know little of the backroom dealings that are integral to our legislative process but today I intend to pull back the veil on sausage making, at least my family’s sausage making, that is. And why today? Because Zia taught me how to make sausage and today is her 89th birthday!!!

Allora, buon compleanno, Cara Zia! Cent’ anni e tanti baci!

*     *     *

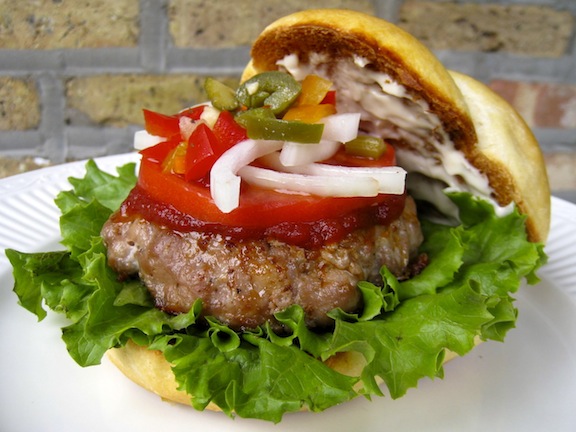
You'll have no beef with this burger!

*     *     *

For as long as I can remember, the Bartolini Girls made sausage and served them at any meal. They’d cut up a few, add some beaten eggs, and we had a frittata for breakfast. As kids, many is the time we had sausages instead of hot dogs for lunch while, for supper, the sausages were either served alone, roasted with veggies & potatoes, or cooked in a tomato sauce and served with pasta instead of meatballs. Truth be told, we were much more likely to have sausage than we were to have meat balls.  Even after I moved away, Mom always made sure I had at least one container of frozen sausage patties to enjoy once I got home. And to this very day, whenever I make sausage, that first whiff of the seasoned ground pork is a trip on the Wayback Machine to my youth, watching Mom at work. Sure, there are many kinds of sausage available at the local groceries and butchers, not to mention the ethnic markets, but not a one reminds me of home. That’s reason enough for me to keep making these.

Now, for you sausage novices, there is at least 1 reason for Bismarck’s comment. You see, pork sausage requires a certain amount of fat, with some recipes calling for as much as 25% fat content. This recipe doesn’t come near that percentage but fat content is an issue. If you buy a cut of meat that’s too lean, like the pork loin I purchased early in my sausage making career, you will be very disappointed with the result. Look for a good, not too lean, pork butt roast when you make sausage. Even then, you may find that you need to add pork fat to the ground meat, although it wasn’t always this way. Years ago, pork  products had a much higher fat content and one rarely, if ever, needed to add more fat to the mix. Then, without warning to our fellow sausage makers, hog breeders began to develop a leaner, healthier product and the “Other White Meat” campaign was born. Unfortunately, getting rid of the fat got rid of a good deal of flavor, so much so that Mom and Zia quit making sausage altogether! I eventually convinced Zia to try making it again so that I could learn the recipe and, at first, I bought some extra pork belly fat to compensate for today’s leaner pork. It worked, I learned the recipe, and all was well — or should have been. One fateful day, I attempted to make sausage on my own and over-compensated with the fat. What a greasy mess! After that, I quit using additional fat and switched to pancetta. For a 4 lb. pork butt, I use about a half-pound of pancetta. Not only does it add some much-needed fat without going overboard, it brings a nice flavor to our sausage, as well. Most importantly, Zia approved the addition. In fact, the picture to the left was taken at her home and that’s pancetta on top of the pork. (See Notes below for a tip on grinding the meat.)

When you look over our recipe, you’ll quickly notice that there is a surprising lack of spices used but, because it’s so simple, it can easily be modified to suit your tastes. Mom didn’t like fennel seed in her sausage but I don’t think she’d mind if you added some to yours. She, also, didn’t like her sausage spicy but I’m sure she’d look the other way if you wanted to add some red pepper flakes or a couple shakes of cayenne pepper. And I bet Zia would find it interesting if you were to, say, add a little ground sage or marjoram to the ground meat. As for me, I’m a garlic lover and have been known to add a couple of cloves of minced garlic, in addition to the garlic-flavored wine. And if none of those suggestions hit their mark, check out Greg’s recipe at the Rufus Guide. Just remember that no matter what spices you use and how much, be sure to start with less than you think necessary and cook a small amount of pork for a taste test. You can always add more if need be.

Now, one more thing probably should be mentioned. Some may be wondering where the sausages are, being this is a posting about sausage making. Well, you can blame me for that.  As I mentioned, Mom always sent me home with a container of sausage patties after I visited and I grew to prefer them. Cooked on the grill, they are a great alternative to hamburgers. Not only that, but a patty or 2 can be easily crumbled for addition to a tomato sauce, meatloaf, pizza, or some other dish. Well, during one of our Sausage Days, I convinced Zia to just make patties that afternoon and we haven’t made a sausage since. If you’re a sausage person, however, feel free to stuff those casings!

*     *     *

Bartolini Sausage Recipe

Ingredients

  • 4 lbs pork butt, coarsely ground
  • 1/2 lbs. pancetta, coarsely ground
  • 6 oz dry white wine
  • 3 cloves garlic, smashed
  • 1 1/2 tbsp salt, more or less to taste
  • 2 tsp ground black pepper, more or less to taste

Directions

  1. At least 2 hours before beginning, place garlic and wine into a glass and set aside.
  2. Once garlic and wine have “married,” combine ground meats and spread in an even layer, about 2 inches thick, on a work surface.
  3. Season the meat with salt and pepper. Use your fingertips to create dimples in the meat’s surface.
  4. Strain the garlic from the wine and discard. Sprinkle the now flavored wine evenly across the meat. Begin mixing the meat until the seasoning and wine are evenly distributed. Recreate the meat layer and let rest for at least 30 minutes so that the flavors meld. (Caution should be taken if you are doing this on a hot Summer’s day or in a very warm room.)
  5. Once rested, make a mini-patty and cook it in a small frying pan. After tasting, you may need to adjust your seasoning. If you do add seasoning, let it rest 15 minutes before tasting again.
  6. Once the sausage meat has passed your taste tests, begin making patties. Place them in single layers on baking sheets and into the freezer. Once frozen, you can bag them or place them into containers until needed.

*     *     *

Notes

Our preference is to grind the pork using the plate with the largest holes. This will create a coarse grind. When grinding meat for ravioli or cappelletti, use a smaller holed plate for a finer grind. No matter what size the end-result, you’ll find that your grinder, whether machine run or hand-cranked, will perform better and produce a more consistent result if the meat is cut into strips and partly frozen before you begin. Cut the pork butt into strips, layer them on baking sheets, and place them into the freezer for 30 to 45 minutes. Do not let them freeze solid or you will have to thaw them somewhat before grinding.

In a way, this recipe represents a milestone in the long and storied history of Bartolini sausage making. Never before were the wine, salt, and pepper measured so that they could be recorded in a recipe. It was always, “Grab some salt. Grab a little pepper. Put some wine in a glass. No, that’s too much. … ” To write this recipe, Zia worked her magic using wine and seasoning that I had pre-measured and placed in containers on her counter. When a mini-sausage patty passed her palate’s inspection, I simply measured the salt, pepper, and wine that remained. Still, as I cautioned earlier, start out with less spice than you think you’ll need. Be especially careful with the salt if you add pancetta to the ground pork, for its salt content can vary.

Just One Thing More

You didn’t think I would end this post without at least 1 picture of sausages, did you? This one is from the Bartolini Sausage Archives.

*     *     *

*     *     *

Advertisement

Garlic Mashed Potatoes

As I’ve mentioned in my last posts, I’m on a campaign to vary Thanksgiving dinners at my place. I do realize, however, that there is only so much leeway to be had. I wouldn’t swap out the turkey for some other fowl, nor would I replace the stuffing with wild rice, and I certainly wouldn’t serve dinner without preparing mashed potatoes — although serving the potatoes has proven to be a bit problematic. Over the years, I’ve tried a number of mashed potato recipes that, although not bad, were just not good enough to be the “go to” recipe for Thanksgiving. Then, about 6 years ago, I watched Alton Brown prepare these potatoes and it was love at first sight. Now this is the only way I make mashed potatoes and my dinner guests are very pleased that I do.

Before detailing the recipe, I feel the need to explain my statement about serving potatoes being problematic. (I apologize to those who may have already read a brief recounting of this story in a previous post’s comments.) The apartment I rented before buying my home was what they called “vintage.” The building itself contained three, 3 bedroom apartments, was Victorian in style, and each contained the original unpainted, woodwork, beamed ceilings, original leather wainscoting in the dining rooms,  and the original built-in china hutch in each dining room. Yes, the living rooms and dining rooms were really quite beautiful but, walk down the hall and you entered a kitchen nightmare. Saying that they wanted to “keep it vintage” — we tenants quickly learned that the landlords were just plain cheap — none of the kitchens had any counter space whatsoever. Each had a sink like the one pictured below and that drain board was the only “counter” to be found. There were only 2 small cupboards, as well, and they were located above the sink. To be fair, there was an adjoining pantry but it was of little use when pulling something out of the oven, unloading groceries or, I dunno, just pouring a cup of coffee in the morning.

I moved into that apartment in August and by the time Thanksgiving rolled around, I’d only found one table that I liked for the kitchen. It was an old kitchen work table with a flour bin drawer and underneath was enough space for my pots & pans. Best of all, it offered a tabletop surface that I so desperately needed. That first Thanksgiving was going swimmingly. My friends had already finished their pasta and were working on their salads. I was in the kitchen getting everything assembled for the final push. While clearing the salad plates, rather uncharacteristically, I actually remembered the rolls were in the oven and, with counter space at a premium, placed the hot baking sheet full of toasty rolls atop the bowl of mashed potatoes. I served the dinner and, by all accounts, it was very well-received. In fact, near the end of the main course, one friend mentioned that he didn’t even mind not having mashed potatoes. Huh? Sure enough, my potatoes were still in the kitchen, on the table with a now empty baking sheet covering them. Laughing, I served them, more to prove that I did make them than for any other reason. To their credit, my guests all did have some, although I wouldn’t say that they were especially thrilled to see mashed potatoes served so late in the game. Cheesecake, yes. Mashed potatoes, no.

That recipe was destined to be forgotten because once I saw today’s recipe prepared, I never made any other kind. It is certainly my kind of dish, easy to make with very little room for error — so long as you don’t lose ’em in the kitchen. All you do is steep some garlic in heavy cream and combine that cream with some boiled potatoes.  Add a little cheese & butter, and the result is a dish of mashed potatoes with a delicious garlic flavor throughout. Just be aware that when you add the last of the cream, it very well may look like there’s been too much added. Never fear. Just give it a good stir and let it rest. Within minutes, the cream is absorbed and you’ll end up with a beautiful dish of creamy, garlic mashed potatoes.

*     *     *

Garlic Mashed Potatoes Recipe

Ingredients

  • 3 1/2 lbs of potatoes (Yukon Gold)
  • 2 cups heavy cream
  • 6 garlic cloves, smashed
  • 1/2 cup grated parmesan cheese
  • 4 tbsp butter
  • 2 tbsp kosher salt

Directions

  1. Peel and evenly chop potatoes, place in a saucepan, cover with cold water, bring to a boil over med-high heat, add the salt, and then lower to a simmer.
  2. Continue to simmer potatoes until fork-tender, about 20 minutes. Remove from heat, strain the potatoes, and return to the now empty saucepan to sit for 5 minutes, allowing them to dry more fully.
  3. Meanwhile, place garlic and cream in a small saucepan and heat over medium heat until simmering. Remove from heat and set aside until needed. Just before use, pour the cream mixture through a sieve to strain out and discard the garlic.
  4. Once the potatoes have been boiled, drained, and rested,  begin mashing them.  Add some of the cream to make them easier to mash. Once mashed to your liking, add the remainder of the cream and mix well before adding the cheese and butter. Mix to combine.
  5. Let the mashed potatoes rest a few minutes on your stove top while the remaining cream and butter is fully absorbed. Mix well and serve.

*     *     *

Notes

Alton likes to leave his garlic in the cream and mash it along with the potatoes. I prefer to strain it out prior to mashing. I feel that I can better control the level of garlic flavor in the final dish and, also, ensure that no one is served a chunk of garlic masquerading as a potato lump. Whether or not you strain the cream, remember that the longer you allow the garlic to steep, the more garlic flavor will be infused into the cream.

If you look at Alton’s recipe, you may notice that he doesn’t add any butter. No butter in mashed potatoes? Perish the thought! I’ve corrected his oversight in my version of the recipe.

*     *     *

This will be my last post before the Holiday, so, I’d like to wish a happy Thanksgiving to you and all whom you hold dear. And for those not celebrating the Holiday, have a great day and an even better weekend.

*     *     *

Stovetop Braised Root Vegetables

Continuing my quest to bring a little variety to my Thanksgiving dinner, the year following the introduction of creamed corn, I served a medley of root vegetables. This dish was selected because it met 2 important criteria required of any dish to be deemed worthy of a spot on my roster of  Thanksgiving side dishes.

First, and most importantly, any new addition must be tasty — and this one was surprisingly delicious. I say surprisingly because I’d never sampled rutabaga prior to my finding this recipe on the web during yet another sleepless night. I added parsnips to the dish after enjoying them for the first time at a dinner prepared by the Neighbor Lady of my Trusty Traveling Companion. While some might find that surprising, in retrospect, it’s totally understandable why rutabaga and parsnip never made an appearance upon our dining table when I was growing up. Considering the cornucopia of vegetables that graced our table, there just wasn’t any room for these 2 on the menu. Add one more vegetable and Mom may have had to cut a pasta dish out of her repertoire. Cut a pasta? I can feel my heart racing!

The second requirement is that the potential dish be easy to prepare — and special consideration is given if the dish can be cooked on the stove top.  When I’m in the final stages of getting the dinner to the table, the last thing I need is to be babysitting a couple of side dishes. I’ve got potatoes to rice/smash, gravy to make, a pasta course to serve, salads to prepare, and rolls to forget and burn in the oven. And we mustn’t forget a bird to carve and dishes to clear. Tending to some needy side dish(es) just won’t do and the time I spend trying to find room in the oven for it could be better spent trying to find the cocktail I left somewhere out among my guests. This dish is perfect in this regard. First off, you can peel and chop the vegetables well before your guests arrive. In fact, I’ll often do the prep work the night before and seal the chopped veggies in a plastic bag to be stored in the fridge. Taking but 20 minutes to cook, if that, once you get everything into the pan, you can pretty much leave it until it’s ready to be served. It doesn’t get much easier than that and you may find that you even have time to lose a 2nd cocktail.

*     *     *

*     *     *

Stovetop Braised Root Vegetables Recipe

Ingredients

  • 2 tablespoons butter
  • 1 clove garlic, minced
  • 1 red onion, chopped
  • 4 carrots, peeled and chopped
  • 4 parsnips, peeled and chopped
  • 1 rutabaga, peeled and chopped
  • salt & pepper, to taste
  • 2 cups low-sodium chicken stock (vegetable stock may be substituted)

Directions

  1. Melt the butter in a skillet with a cover over med-high heat.
  2. Add garlic, onion, carrots, parsnips, and rutabaga. Season with salt & pepper and sauté for 5 minutes, stirring occasionally.
  3. Add stock, bring to a boil, reduce to simmer, and cover.
  4. Cook vegetables until fork tender, about 15 minutes. Season with salt & pepper, to taste.
  5. Remove from heat and serve immediately.

*     *     *

Notes

Besides being tasty and easy to prepare, this dish is perfect for those who color coördinate their Thanksgiving dinner. By offering 4 distinct colors in one recipe (pale yellow, orange, and white, not to mention the red onion), this dish single-handedly provides you with many of the colors of the Thanksgiving palette. And if you’re worried that the parsnips will bring too much white to your table, just replace your mashed russets with a batch of Jed’s purple potatoes and you’ll be fine.

*     *     *

A Taster’s Mom’s Creamed Corn

Anyone who has cooked Thanksgiving dinner a few years in succession will understand my problem. So will anyone that dines at the same Thanksgiving table for several years. The problem is boredom, for lack of a better word. My Thanksgiving dinner’s main course and all the fixins didn’t vary from year to year. Sure, I served a different pasta for the primo piatto, I varied the salad course, desserts came and went, but the turkey & fixins remained pretty much unchanged. So, about 5 years ago, I decided to mix things up a bit. Beginning that year, and every year thereafter, I would switch out a dish for a new one.

A friend — and Bartolini kitchens taste tester — is from the South. I asked if he had a favorite dish that his Mom made at Thanksgiving. He loved her corn and I asked for the recipe. Well, as luck would have it, something came up and my friend couldn’t make it to my place for Thanksgiving dinner but his Mom’s corn sure did. It was such a hit that it has become a mainstay of my Thanksgiving dinners ever since. In fact, at one dinner I casually mentioned that I intended to switch the corn out for something else the following year. My guests politely suggested I leave well enough alone. Ironic isn’t it? I prepare a new dish in an effort to “mix things up a bit” and it is so well-received that now, 5 years later, it has become one of the dishes it was meant to replace. Anyway, even though the corn may have stayed, undaunted I’ve continued to introduce a new dish every year since, a couple of which will be shared in future posts.

*     *     *

Creamed Corn Recipe 

Ingredients

  • 1/2 red bell pepper, diced
  • 1 shalot, diced
  • 1/2 cup (1 stick) butter, halved
  • 4 cups corn kernels (fresh or frozen)
  • 1/3 cup sugar
  • 1 cup half-and-half
  • 1 1/2 tsp salt
  • 1/8 – 1/4 tsp white pepper
  • 1/4 cup all-purpose flour

*     *     *

*     *     *

Directions

  1. In a medium sauce pan or skillet over medium heat, sauté the shallot and bell pepper in half of the butter for 3 minutes.
  2. Add the half-and-half, sugar, corn, salt, and pepper. Mix well and bring to a boil.
  3. Meanwhile make a roux by combining the flour with the remaining butter over medium heat. Stir to combine and continue cooking until the roux is a pale yellow.
  4. Add the roux to the corn mixture and stir constantly until it thickens. Continue cooking and stirring for an additional minute and serve.

*     *     *

Variations

If I prepare this dish in August or September, the height of our corn season here in Illinois/Michigan, I’ll use only a 1/4 cup of sugar because the corn and its juices will be very sweet. For much of  the rest of the year, however, unless I’m certain the corn is really good, I’ll use frozen corn. Unfortunately, frozen corn has no liquids — “liquor,” if you will. To make up for the lack of liquor, I’ll take 1 to 2 cups of the corn and pulse it a few times in my food processor. This will help the final dish to look like the corn has been cut from the cob by hand. To make up for the sweetness lost, I’ll increase the sugar from 1/4 cup to 1/3 cup. The resulting dish looks and tastes like it was made from fresh corn.

Notes

I remove the corn kernels in one of two ways, depending upon the recipe. For Zia’s Corn Relish, I’ll use an electric knife to slice the kernels off of the cob. I find that the kernels remain whole with very little liquor created, just perfect for corn relish.  For this recipe, I’ll use a large chef’s knife to remove the kernels. This method is not nearly as “kind” to the ear of corn, resulting in kernels that are somewhat chopped and a good amount of that sweet corn liquor.

*     *     *

Gorgonzola and Honey Bruschette

This is probably my all-time favorite bruschetta recipe. Not only does it blend salty with sweet, it couldn’t be easier to prepare, a big plus when you’re trying to get a large holiday dinner on the table. Being so simple, I see no need to give it the “full treatment” normally accorded recipes on this blog. You’ll see what I mean soon enough.

I came across this recipe some 13 years ago, just about the time I moved into my current home. That year I prepared my first Thanksgiving dinner here for some friends and these bruschette were to be the sole appetizer. Unfortunately, and in full view of my guests who refused to leave the kitchen, I not only burned them but set them on fire under the broiler. Luckily, I’d bought 2 baguettes and, after a quick but oh, so memorable trip to the trash, I was able to make another batch with nothing harmed but my pride. After what was literally a baptism of fire, I’ve served these many times since, always to rave reviews. Just to be on the safe side, however, I make sure to clear the kitchen of guests when I remove them from the heat.

*     *     *

*     *     *

Not counting flambé, there are 2 ways to prepare these bruschette and first I’ll describe the method least likely to set off a smoke alarm or result in the fire department joining you for dinner.

Take a fresh baguette and slice it, on the diagonal, into 1/2 to 3/4 inch thick slices. Place the slices in a single layer on a baking sheet. Lightly brush each with extra virgin olive oil. and bake in a pre-heated 400˚ oven for 10 to 15 minutes or until golden brown. Remove from the oven and cover each piece with crumbled gorgonzola. Return to the oven and bake for a few minutes more until the cheese melts. Remove from oven, drizzle with honey, and serve.

As simple as that is to do, you may wish to try a different approach. When I first moved here, my stove had a separate broiler area, unlike the one I now own. Prior to my guests’ arrival, I would toast the baguette slices in my toaster, place them on a baking sheet, and cover with plastic wrap. Once my guests began to arrive, I would brush the slices with olive oil, cover with crumbled gorgonzola, and place under the broiler for 2 minutes or until the cheese melted. A drizzle of honey later and these bruschette were ready to be served.

*     *     *

*     *     *

See? Didn’t I tell you? These couldn’t be easier to make and, if you’re at all like me, the combination of salty and sweet flavors can’t be beat. And if you don’t care for gorgonzola, feel free to substitute blue cheese. You may even find that it melts better. No matter which cheese you choose, you can take the safe route and bake them in the oven or throw caution to the wind and pop these babies under the broiler. If you choose the latter, however, just make sure you’re alone in the kitchen with a clear path to a fire pail — and having a spare baguette handy may not be such a bad idea.

*     *     *

2 Brie are a Breeze

With Thanksgiving approaching fast, I thought that I’d share a few of the recipes that I’ve prepared over the years on Turkey Day. Let’s start with 2 baked brie recipes, one sweet and the other savory.

As a child, our holiday dinners always included a platter of pasta, usually ravioli. It’s a tradition that I’ve continued as an adult, always beginning special dinners for family & friends with a primo piatto of pasta. Well, with all that food to be prepared and consumed, something has to give — and it won’t be dessert, that’s for sure. So, I tend to go light with the appetizers. Besides, Max thinks that every bit of food that crosses the threshold into my his home is a potential snack. This means, in practical terms, the more appetizer dishes served, the more likely he is to “sample” one. As the graph to the right clearly shows, if 2 or fewer appetizers are served, Max will “score” a nibble less than only 30% of the time. Serve a 3rd, however, his chances more than double and he’ll snag something over 75% of the time! If 4 or more are served, you might as well put one of the appetizer trays on the floor in a corner. At least he’ll be out of the way as he noshes.

With the above in mind, I’ve found brie to be a good appetizer to serve but, rather than bake one large “wheel,” I make 2 smaller ones, a sweet and a savory. They’re easy enough to prepare, my guests can choose whichever they prefer, and, when combined, they are actually smaller than one large baked brie. That latter point will help to insure that my guests’ appetites will be saved for the actual dinner.  And, best of all, the odds are still in my favor that Max will not be joining us for appetizers. Of course, having been denied an appetizer, he will be even more hungry, as well as determined, when we move to the dining table. The question then becomes whether he will be able to scarf something from a kitchen counter or the stove top — yes, the stove top! — while I’m serving dinner. (Smart money will bet on the dog.)

*     *     *

Baked Brie with Caramelized Onions and Rosemary Recipe

Ingredients

  • an 8 oz wheel of brie
  • 2 onions, chopped
  • 2 tbsp butter
  • 1 tbsp fresh rosemary, chopped
  • olive oil
  • 1 garlic clove, minced
  • 3 oz dry white wine, divided
  • salt & pepper, to taste
  • 1 tsp fresh rosemary, chopped, for garnish (optional)

Directions

  1. Place chopped onion and butter into a saucepan over medium heat. Season with salt and pepper and sauté until translucent, about 8 minutes.
  2. Add 1 tbsp chopped rosemary and continue cooking. The onions will become golden in color by the 30 minute mark. Keep cooking, stirring frequently. Onions need to brown but not burn. Do not rush. Lower the heat if necessary.  Add a little olive oil if pan becomes too dry.
  3. Pre-heat oven to 350˚.
  4. Once deep brown in color, add garlic and sauté for no more than 2 minutes.
  5. Add about 2 ounces of white wine and sauté until completely reduced.
  6. Use remaining wine to deglaze the pan and sauté until reduced completely.
  7. Check to see if salt & pepper are needed. (At this point, caramelized onions can be refrigerated for several days, in an airtight container, until needed.)
  8. With a large knife, carefully remove the rind from the brie’s top and discard.
  9. Place cheese in an oven-proof serving dish, cut-side up. Cover the brie with an even layer of caramelized onions.
  10. Bake in a 350˚ oven until cheese is melted, about 25 to 30 minutes.
  11. Let stand for 5 minutes. Garnish with remaining rosemary and serve.

Serving Suggestions

I prefer to serve this brie with assorted crackers and freshly made crostini — thin slices of baguette that have been lightly brushed with olive oil and toasted before being “wiped” with a cut garlic clove.

*     *     *

Brie en Croute with Raspberry and Almond Recipe

Ingredients

  • an 8 oz wheel of brie
  • 3 – 4 tbsp seedless raspberry jam
  • 1/4 cup sliced almonds, toasted — separated
  • 1 puff pastry sheet
  • 1 egg + 1 tbsp water, combined

Directions

  1. Pre-heat oven to 400˚.
  2. Open & spread 1 sheet of puff pastry dough atop a lightly floured work surface. Use a rolling pin to lightly smooth out any creases that may have been created by the folds.
  3. Carefully slice the brie into 2 half-layers.

    "Do you remember Becky, the little girl who lives next door? Well, she and her Mother dropped in just as I was unwrapping the puff pastry and ... "

  4. Coat the top of the lower half with the raspberry jam. Do not spread jam to the very edge; leave about a quarter-inch border.
  5. Evenly cover the jam with the sliced almonds, reserving 1 tbsp for garnish.
  6. Return top half of brie to the lower half.
  7. Place brie, upside down, onto the center of the pastry sheet. Bring up the edges of the pastry sheet to cover and enclose the brie. Trim away and save the excess.
  8. Place the brie, seam-side down on a parchment lined baking sheet. Use your hands to smooth out the pastry and make it form-fitting.
  9. Brush the exposed surface with egg wash.
  10. If artistic, use excess pastry to decorate the top.
  11. If, like me, you are anything but artistic, do the best you can and tell your guests that you let the neighbors’ 5 year-old help you with the decorating.
  12. Once decorated, brush the decorations’ surface with egg wash.
  13. Place in  400˚ oven and bake until golden brown, about 20 to 25 minutes.
  14. Allow to stand for 20 minutes before moving to a serving tray/platter. Garnish with remaining almond slivers and serve.

Serving Suggestions

I prefer to serve this brie with slices of apple and pear, as well as an assortment of crackers.

*     *     *

Variations

For the savory:

  • Instead of caramelized onion atop your brie, try Mandy’s delicious Onion Marmalade, from her blog The Complete Cookbook.
  • Replace the rosemary with the herb(s) of your choice. Herbs des Provence or thyme come to mind.

For the sweet:

  • The raspberry jam can easily be replaced with cherry or apricot jam. Sautéed apples with walnuts or prepared cranberries with pecans could also be used. The possibilities are endless.

Notes

Hot, melted cheese, long slivers of caramelized onion, and crispy crostini or crackers are a stain waiting to happen. By chopping rather than slicing the onions prior to caramelizing, I hope to lessen the odds of a mishap. Speaking of the onions, they can be caramelized days before being needed in the recipe. Just don’t make them too far in advance as they have a tendency to “disappear” the longer they sit in the fridge.

*     *     *

Lumache alla Bartolini

This is another within the series of posts which, quite frankly, is not for everyone, not even the intrepid tourist to the left. Truth be told, snails weren’t exactly popular among members of my generation at the old two-flat either. (If you wish to exit, you may do so HERE.) I am probably the only one to have eaten lumache back then and certainly am the only one willing to go back to that well again today. Still, if I’m going to record the family’s recipes for Posterity, I’m not about to start filtering them. Besides, the look on Zia’s face when I unveiled the lumache and announced my plans for dinner was priceless. This blog delights in ways I never dreamt possible!

As I recall, lumache, or babbaluci as they are known in Sicily, was not at all a common dish at our dinner table nor, for that matter, at Zia’s. I only remember them being served 2, maybe 3, times. That’s probably because of the amount of work involved in preparing them for the table. They had to be soaked to rouse them from dormancy, scrubbed, boiled, scrubbed again, and either removed from their shells or left intact for further cooking. As you can imagine, this was no 1 day job. Mom would put water, vinegar, and the dormant lumache into her largest pot; place a colander atop the pot, weighted with a heavy book or pan; and, set it aside to let the lumache come out of their shells. As they came to life, they would leave the water and head up into the colander — hence the reason for the weight. Unfortunately, that weight wasn’t heavy enough to prevent me from snatching a pet when I was about 6 years old. It was, however, too heavy for me to replace properly before I returned to bed, my new pet snail in a water glass at my bedside. Mom was just a tad upset when she woke me the next morning. Her kitchen cupboards and counters were covered with lumache on the lam. Even my pet (the little tattle-trail!) was well on its way to my bedroom’s ceiling by that time. Funny thing. I don’t recall ever having a pet snail after that.

*     *     *

*     *     *

I’ve chosen to share this recipe today because of Mario Batali. On a recent rebroadcast of Molto Mario, he mentioned that lumache was one of several dishes that the people of Le Marche (the Marchigiani) prepare on All Souls Day. Well, with the Bartolinis being Marchigiani and today being All Soul’s Day, what choice do I have? So, the recipe I’m going to share is the very recipe the Bartolini Girls cooked those many years ago — with 1 exception. There was no way on Earth that I was going to start with dormant lumache. With Max in the house, that is surely a disaster waiting to happen. I can just see him running around my home, trying to lure me into a game of keep-away with some unlucky snail in his mouth, while I’m on a ladder retrieving the rest off of my kitchen’s walls. No, no, no! So, I did a little googling — and it paid off. On Amazon (of course!), I found canned lumache that were cleaned, shelled, trimmed, and ready for stewing. What was once a multi-day, very messy affair suddenly became as easy as preparing a tomato sauce. I ordered them and, once delivered, I packed them up and brought them to Zia for one most memorable dinner.

*     *     *

Lumache alla Bartolini Recipe 

Ingredients

  • 1 can (15 oz, 48 count) very large size lumache
  • 2 tbsp extra virgin olive oil
  • 1 large onion, chopped
  • 3 garlic cloves, diced
  • 1 can (14 oz) crushed tomatoes
  • 1 can (14 oz) diced tomatoes
  • 4 oz dry white wine
  • 3 tbsp parsley
  • 1 tsp marjoram
  • salt & pepper, to taste
Directions

  1. Heat olive oil in medium-sized sauce pan over med-high heat. Add onions and sauté until translucent, about 5 minutes. Season lightly with salt & pepper.
  2. Add garlic and sauté for another minute before adding the tomatoes, wine, marjoram, and parsley.
  3. Bring to a boil, reduce to a simmer, and continue cooking for about 45 minutes or until the tomatoes are cooked and the sauce has darkened.
  4. Add the lumache with the canning liquid and continue to simmer for about 30 minutes more. The sauce should be dark and thick.
  5. Season with salt & pepper, to taste, and serve.

*     *     *

Serving Suggestions

                                  *                         When she cooked lumache in their shells, Mom served them in deep soup bowls with a chunk of crusty bread on the side. When removed from their shells, lumache may, also, be served as a dressing for pasta or atop polenta.

*     *     *

Notes

Back in the days preceding Vatican Council II, when eating meat was forbidden on Fridays and other “days of abstinence,” Catholics were allowed to eat lumache because they were considered seafood. Well, in classic Italian cuisine, cheese is very rarely used in a dish featuring seafood and if the Church labels something as seafood, who are we to argue? The use of cheese, therefore, in a dish with lumache is frowned upon. On the other hand, what you serve in your own home is your own business. (Was that thunder?)

*     *     *